GM Service Manual Online
For 1990-2009 cars only
Table 1: Metric Prevailing Torque Fastener Minimum Torque Development
Table 2: English Prevailing Torque Fastener Minimum Torque Development

Metric Fasteners

This vehicle provides fastener dimensions using the metric system. Most metric fasteners are approximate in diameter to equivalent English fasteners. Make replacements using fasteners of the same nominal diameter, thread pitch, and strength.

A number marking identifies the OE metric fasteners except cross-recess head screws. The number also indicates the strength of the fastener material. A Posidrive® or Type 1A cross-recess identifies a metric cross-recess screw. For best results, use a Type 1A cross-recess screwdriver, or equivalent, in Posidrive® recess head screws.

GM Engineering Standards and North American Industries have adopted a portion of the ISO-defined standard metric fastener sizes. The purpose was to reduce the number of fastener sizes used while retaining the best thread qualities in each thread size. For example, the metric M6.0 X 1 screw, with nearly the same diameter and 25.4 threads per inch replaced the English 1/4-20 and 1/4-28 screws. The thread pitch is midway between the English coarse and fine thread pitches.
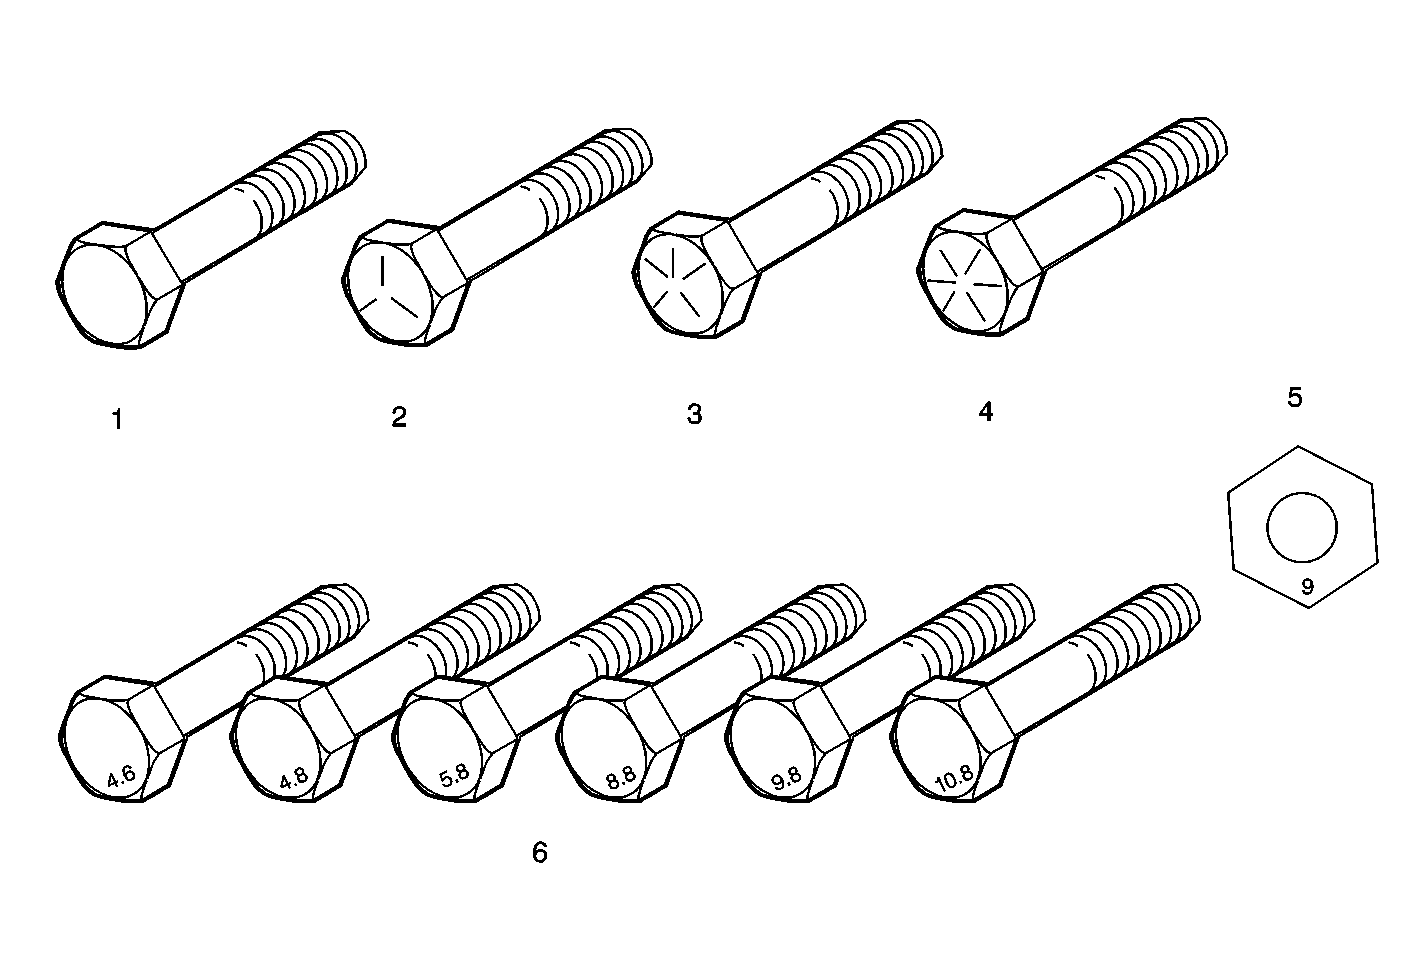
Fastener Strength Identification


Object Number: 171891  Size: MF
(1)English Bolt, Grade 2 (Strength Class)
(2)English Bolt, Grade 5 (Strength Class)
(3)English Bolt, Grade 7 (Strength Class)
(4)English Bolt, Grade 8 (Strength Class)
(5)Metric Nut, Strength Class 9
(6)Metric Bolts, Strength Class Increases as Numbers Increase

The most commonly used metric fastener strength property classes are 9.8 and 10.9. The class identification is embossed on the head of each bolt. The English, inch strength classes range from grade 2 to grade 8. Radial lines are embossed on the head of each bolt in order to identify the strength class. The number of lines on the head of the bolt is 2 lines less than the actual grade. For example, a grade 8 bolt will have 6 radial lines on the bolt head. Some metric nuts are marked with a single digit strength identification number on the nut face.

The correct fasteners are available through GM SPO. Many metric fasteners available in the aftermarket parts channels are designed to metric standards of countries other than the United States, and may exhibit the following:

    • Lower strength
    • No numbered head marking system
    • Wrong thread pitch

The metric fasteners on GM products are designed to new, international standards. The following are the common sizes and pitches, except for special applications:

    • M6.0 X 1
    • M8 X 1.25
    • M10 X 1.5
    • M12 X 1.75
    • M14 X 2.00
    • M16 X 2.00

Prevailing Torque Fasteners

Prevailing torque fasteners create a thread interface between the fastener and the fastener counterpart in order to prevent the fastener from loosening.

All Metal Prevailing Torque Fasteners

These fasteners accomplish the thread interface by a designed distortion or deformation in the fastener.

Nylon Interface Prevailing Torque Fasteners

These fasteners accomplish the thread interface by the presence of a nylon material on the fastener threads.

Adhesive Coated Fasteners

These fasteners accomplish the thread interface by the presence of a thread-locking compound on the fastener threads. Refer to the appropriate repair procedure in order to determine if the fastener may be reused and the applicable thread-locking compound to apply to the fastener.


Object Number: 171892  Size: SH
(1)Prevailing Torque Nut, Center Lock Type
(2)Prevailing Torque Nut, Top Lock Type
(3)Prevailing Torque Nut, Nylon Patch Type
(4)Prevailing Torque Nut, Nylon Washer Insert Type
(5)Prevailing Torque Nut, Nylon Insert Type
(6)Prevailing Torque Bolt, Dry Adhesive Coating Type
(7)Prevailing Torque Bolt, Thread Profile Deformed Type
(8)Prevailing Torque Bolt, Nylon Strip Type
(9)Prevailing Torque Bolt, Out-of-Round Thread Area Type

A prevailing torque fastener may be reused ONLY if:

    • The fastener and the fastener counterpart are clean and not damaged
    • There is no rust on the fastener
    • The fastener develops the specified minimum torque against its counterpart prior to the fastener seating

Metric Prevailing Torque Fastener Minimum Torque Development

Application

Specification

Metric

English

All Metal Prevailing Torque Fasteners

  • 6 mm

0.4 N·m

4 lb in

  • 8 mm

0.8 N·m

7 lb in

  • 10 mm

1.4 N·m

12 lb in

  • 12 mm

2.1 N·m

19 lb in

  • 14 mm

3 N·m

27 lb in

  • 16 mm

4.2 N·m

37 lb in

  • 20 mm

7 N·m

62 lb in

  • 24 mm

10.5 N·m

93 lb in

Nylon Interface Prevailing Torque Fasteners

  • 6 mm

0.3 N·m

3 lb in

  • 8 mm

0.6 N·m

5 lb in

  • 10 mm

1.1 N·m

10 lb in

  • 12 mm

1.5 N·m

13 lb in

  • 14 mm

2.3 N·m

20 lb in

  • 16 mm

3.4 N·m

30 lb in

  • 20 mm

5.5 N·m

49 lb in

  • 24 mm

8.5 N·m

75 lb in


English Prevailing Torque Fastener Minimum Torque Development

Application

Specification

Metric

English

All Metal Prevailing Torque Fasteners

  • 1/4 in

0.5 N·m

4.5 lb in

  • 5/16 in

0.8 N·m

7.5 lb in

  • 3/8 in

1.3 N·m

11.5 lb in

  • 7/16 in

1.8 N·m

16 lb in

  • 1/2 in

2.3 N·m

20 lb in

  • 9/16 in

3.2 N·m

28 lb in

  • 5/8 in

4 N·m

36 lb in

  • 3/4 in

7 N·m

54 lb in

Nylon Interface Prevailing Torque Fasteners

  • 1/4 in

0.3 N·m

3 lb in

  • 5/16 in

0.6 N·m

5 lb in

  • 3/8 in

1 N·m

9 lb in

  • 7/16 in

1.3 N·m

12 lb in

  • 1/2 in

1.8 N·m

16 lb in

  • 9/16 in

2.5 N·m

22 lb in

  • 5/8 in

3.4 N·m

30 lb in

  • 3/4 in

5 N·m

45 lb in

Torque-to-Yield Fasteners

Some fasteners on the 4 cylinder and 6 cylinder engines are "torque-to-yield" fasteners. Torque-to-yield fasteners must be replaced whenever removed and require a torque angle meter in addition to a torque wrench for proper installation. Simply put, a "torque-to-yield" fastener is designed to stretch a certain amount upon correct installation. This is why they cannot be re-used. Once stretched in position, this action cannot be repeated.

One Time Use Fasteners

Some fasteners on the 4 cylinder and 6 cylinder engines are "one time use" fasteners. One time use fasteners have been identified by engineering as fasteners that must be replaced whenever removed.

Torque Angle Description

The process to use a torque angle meter tool is as follows. First, a specific torque is applied using a torque wrench. Next, a special angle of rotation(s) is applied using a torque angle meter tool. For example, the specification of 27 N·m (20 ft-lbs) + 60° + 30° means:

  1. Use a torque wrench to tighten all bolts in sequence to 27 N·m (20 ft-lbs).
  2. Then, use a torque angle meter to turn all bolts in sequence an additional 60°.
  3. Finally, use a torque angle meter again to turn all bolts in sequence another 30°.

Do not short-cut this sequence by tightening to specification, then turning to 90° (60° + 30°) in one step. Tightening is done in steps for proper bolt stretching and clamping to take place.