CD Changer/Player Installation - Retailer Installed Accessory Sedan
Preparation
Important: Before disconnecting the negative battery cable, make sure that the customer's
radio theft deterrent system has been deactivated. If the system is in the SECURE
state, refer to theft deterrent feature, to deactivate this feature.
- Record the preset radio stations.
- Disconnect the negative battery terminal.
Caution: When you are performing service on or near the SIR components or the
SIR wiring, you must disable the SIR system. Refer to Disabling the SIR System.
Failure to follow the correct procedure could cause air bag deployment,
personal injury, or unnecessary SIR system repairs.
- Disable the SIR system. Refer to
Disabling the SIR System
in SIR.
I/P CD Jumper Installation
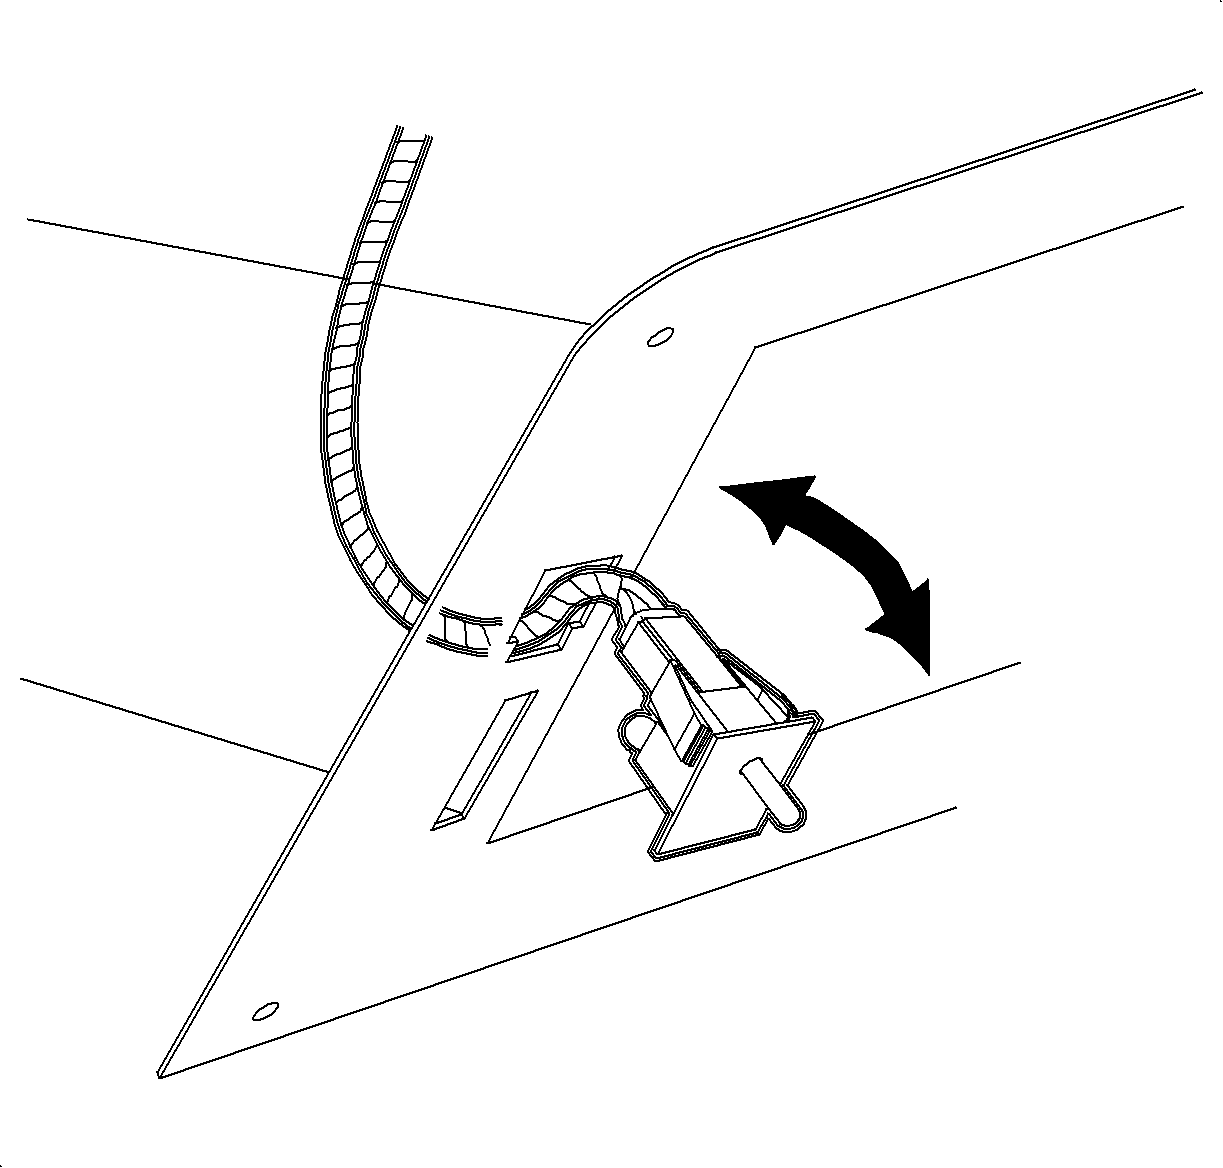
- Open the glove compartment door.
- Remove the glove compartment lamp assembly by pulling on the lamp plunger.
- Disconnect the wiring harness connector from the glove compartment lamp.
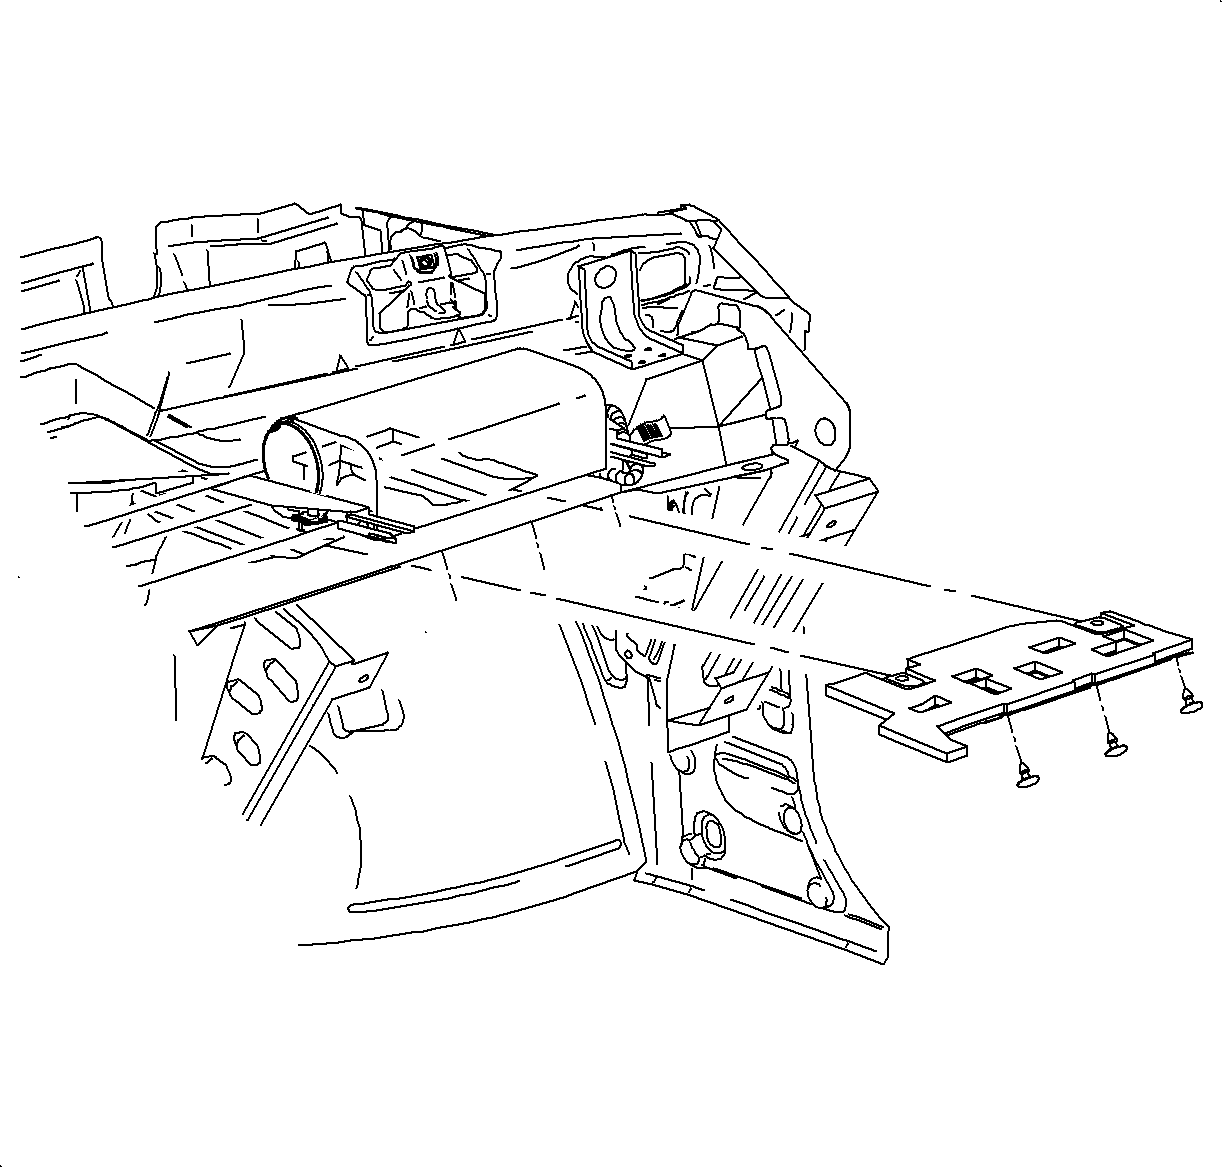
- Remove the right side I/P lower closeout, hush panel, retainers.
- Pull the closeout panel, hush panel, rearward to detach from the forward
retainers.
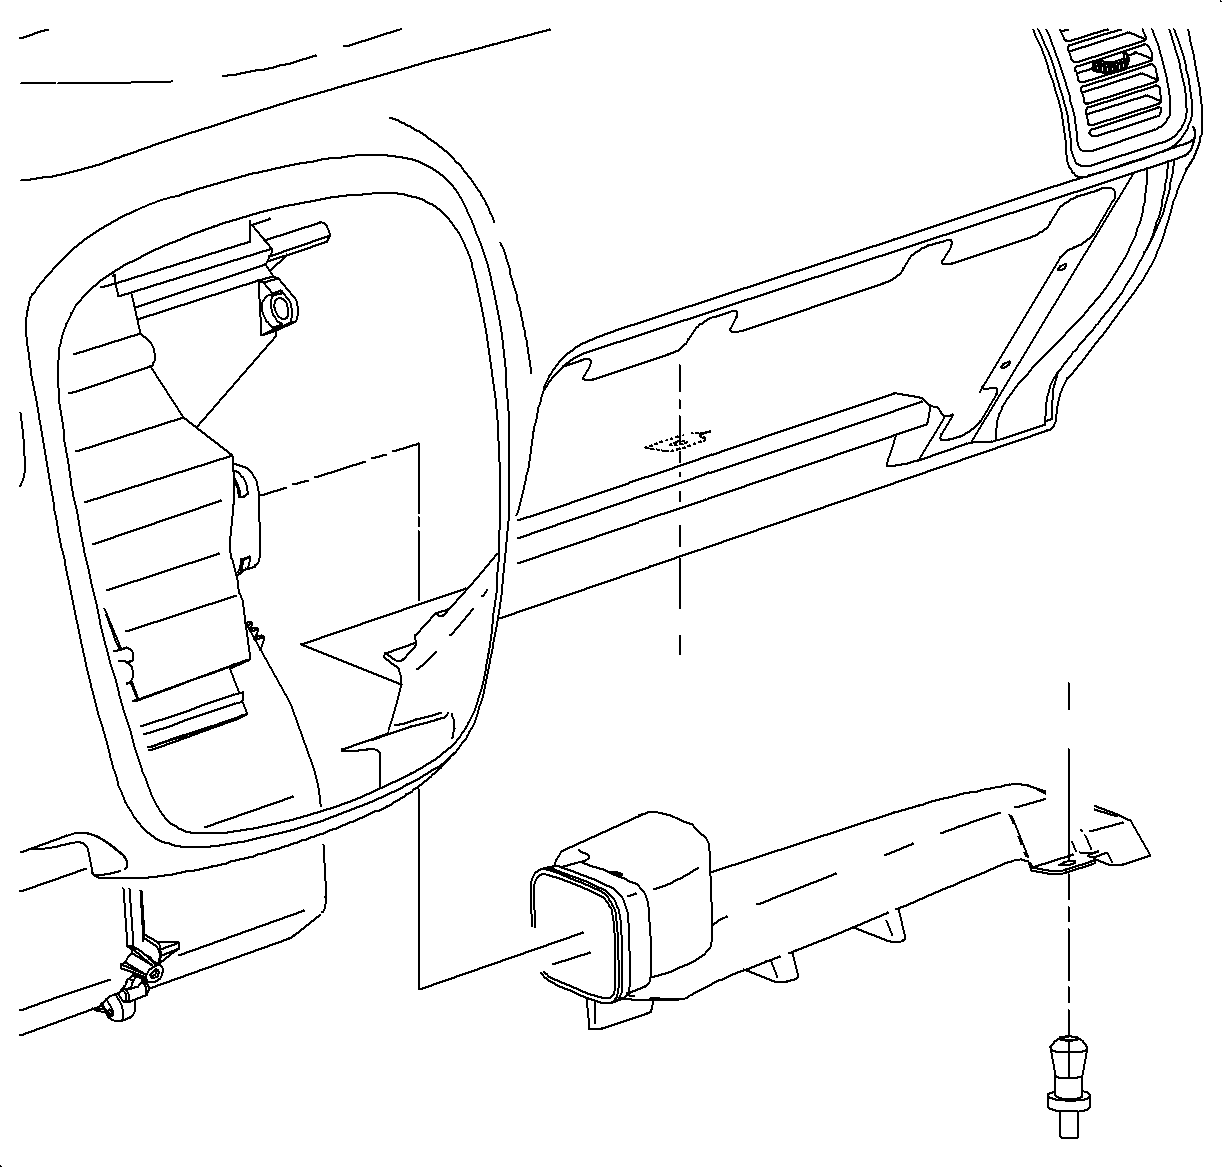
- Remove the right side heater outlet assembly retainer and remove the outlet.
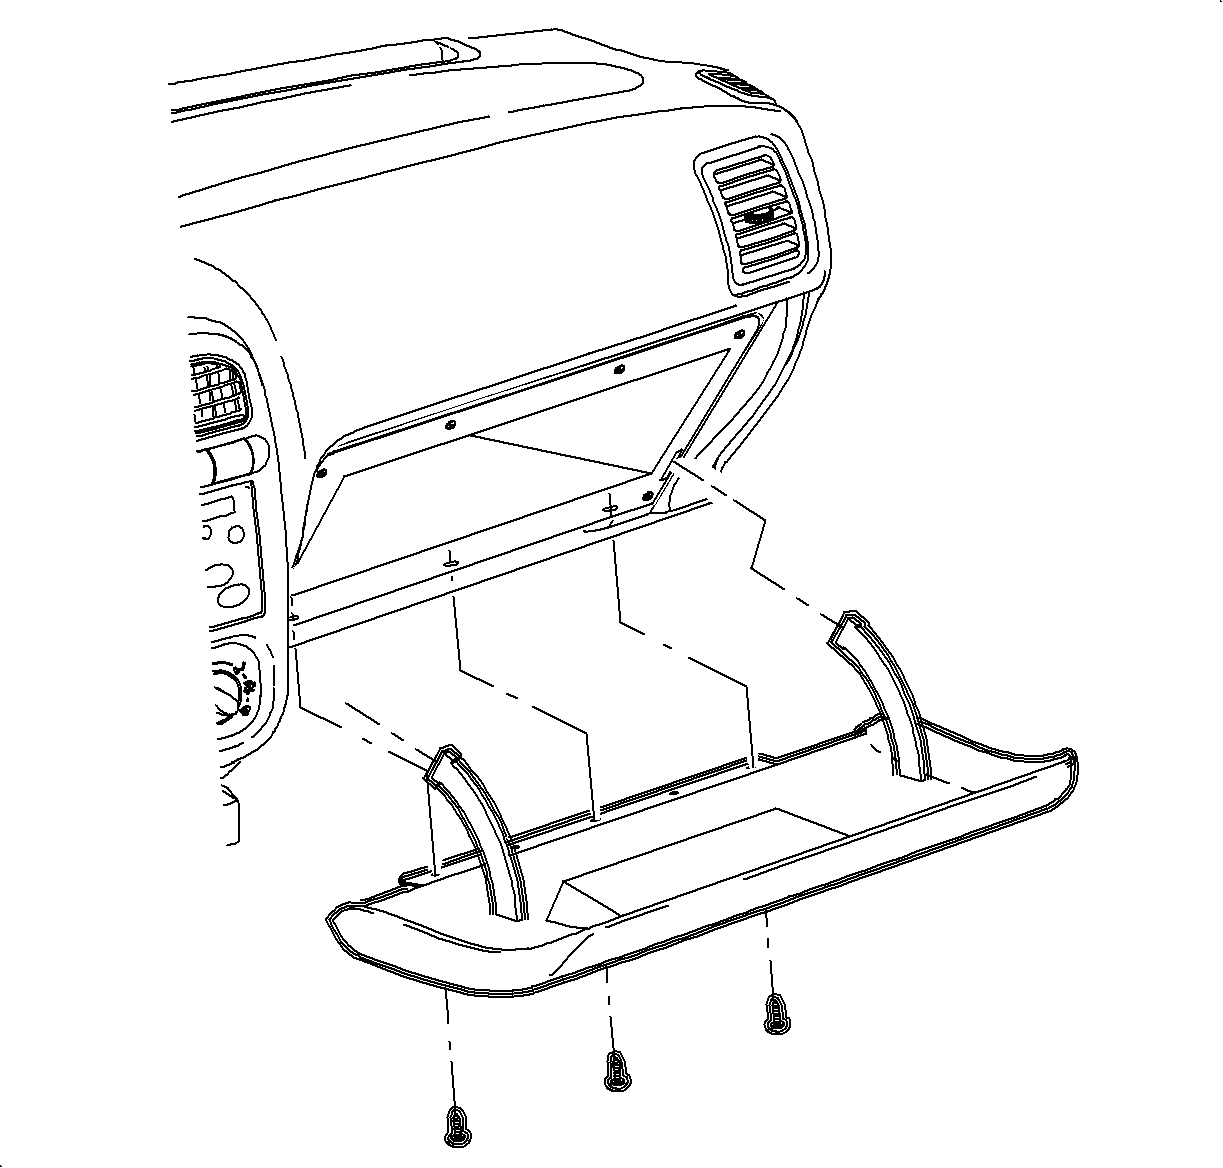
- Remove the glove compartment fasteners and the door.
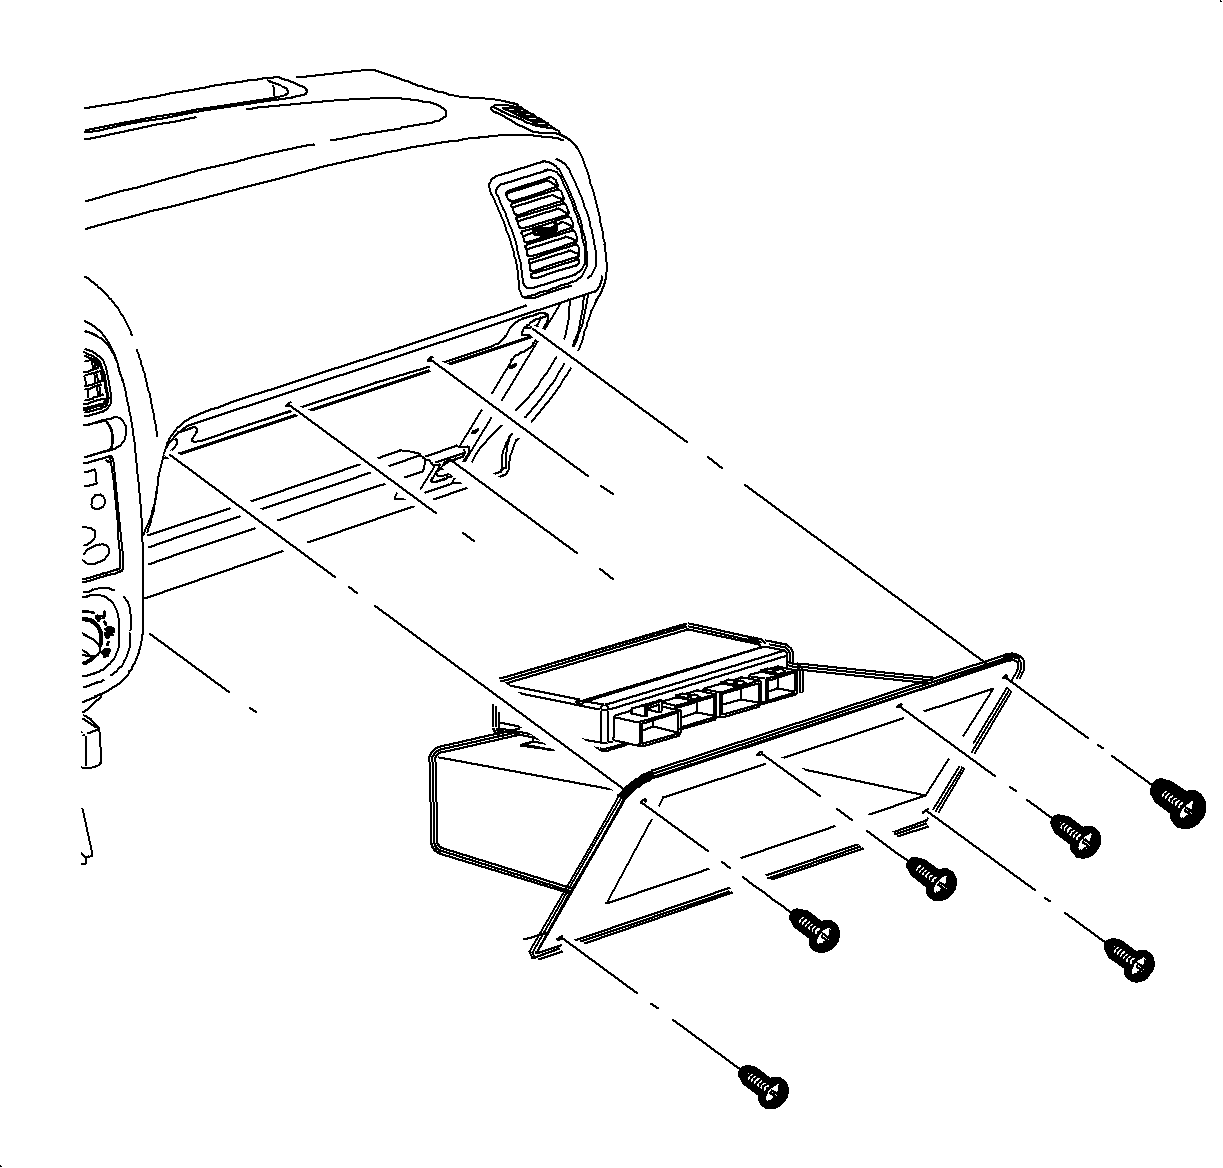
- Remove the glove compartment bin fasteners.
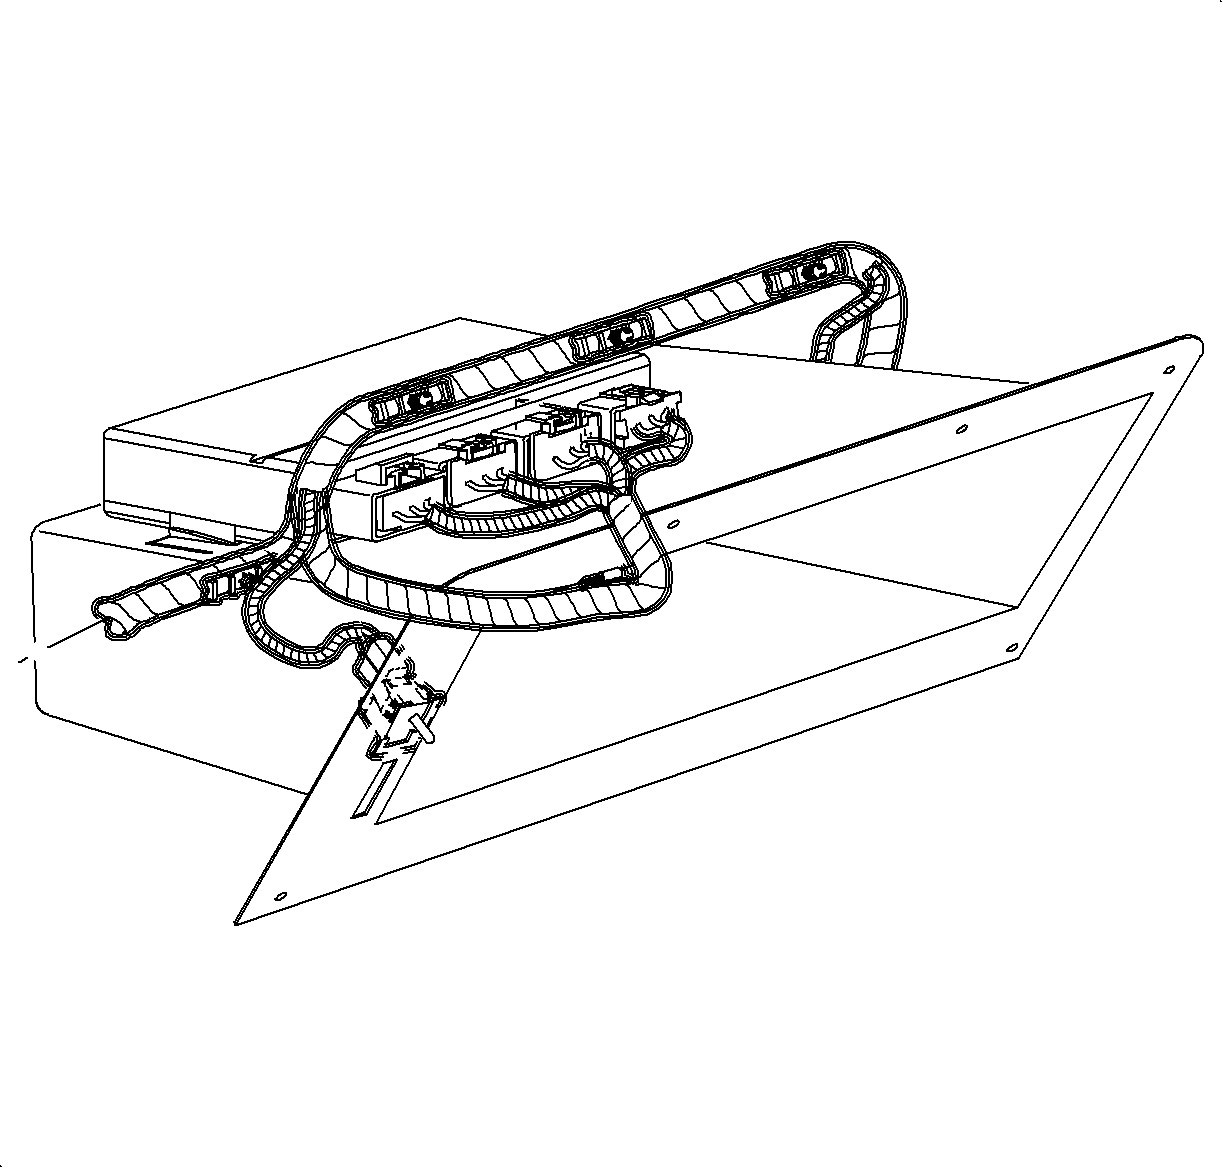
- Slowly remove the glove compartment bin and tilt the bin downward to expose
the BCM residing on top of the glove compartment.
- Remove the BCM from the glove compartment by sliding the module out of
the attaching slots.
- Remove the glove compartment bin.
- Let the BCM hang on the wiring harness.
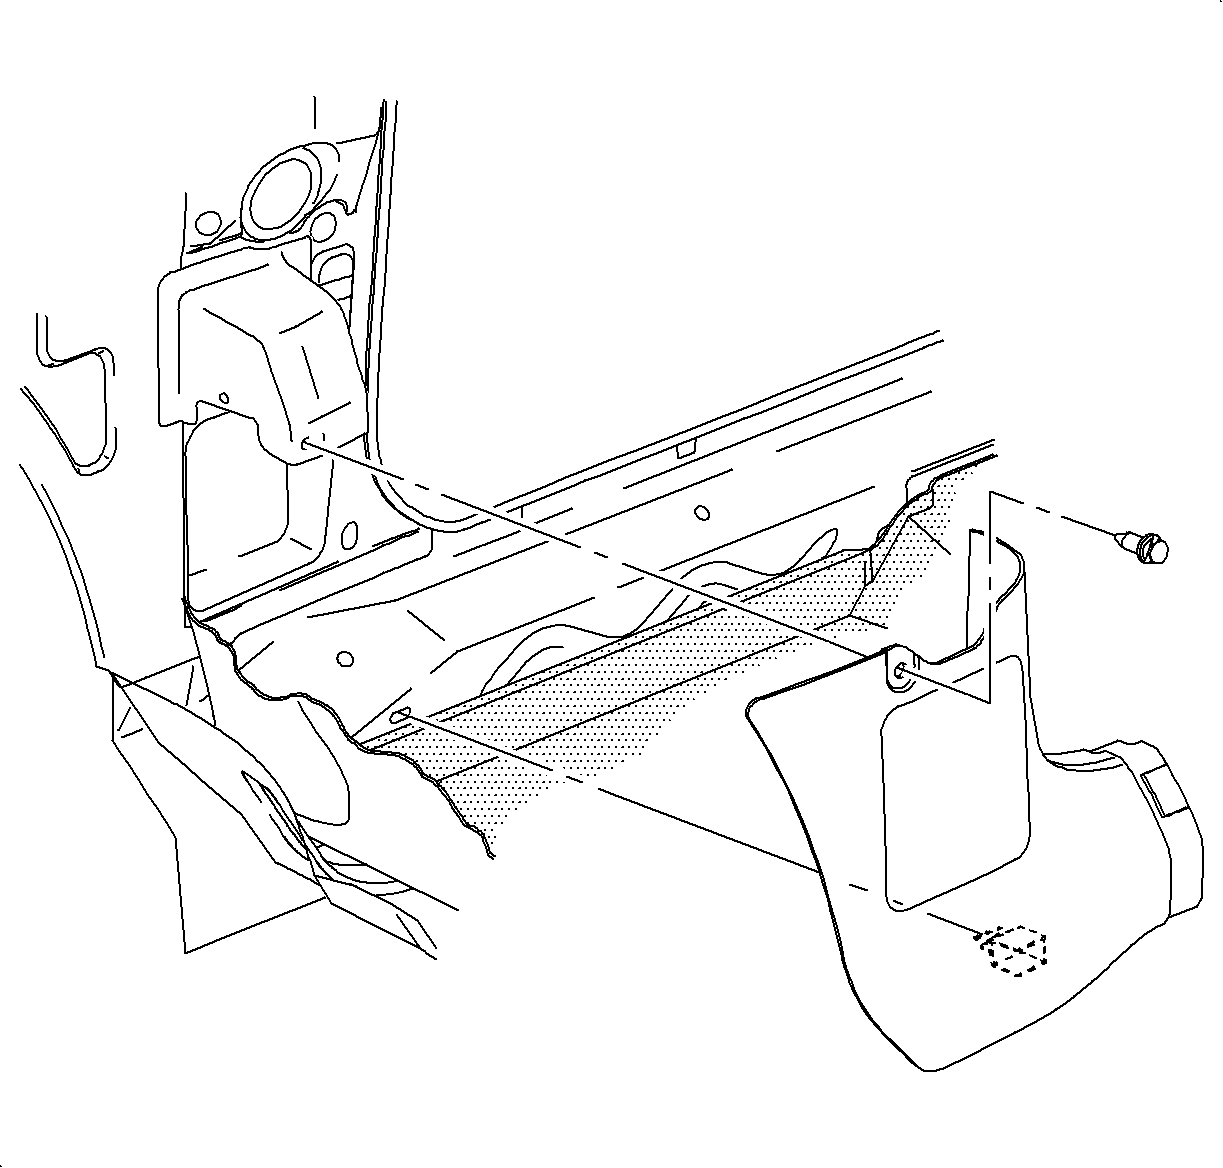
- Remove the right hinge pillar molding, kick panel.
| 13.1. | Remove the upper push pin fastener using a trim panel tool. |
| 13.2. | Remove the fuse box door and pull on the hinge pillar molding at the clip
location to disengage the molding. |
| 13.3. | Slide the hinge pillar molding out from under the carpet retainer and
remove the hinge pillar molding. |
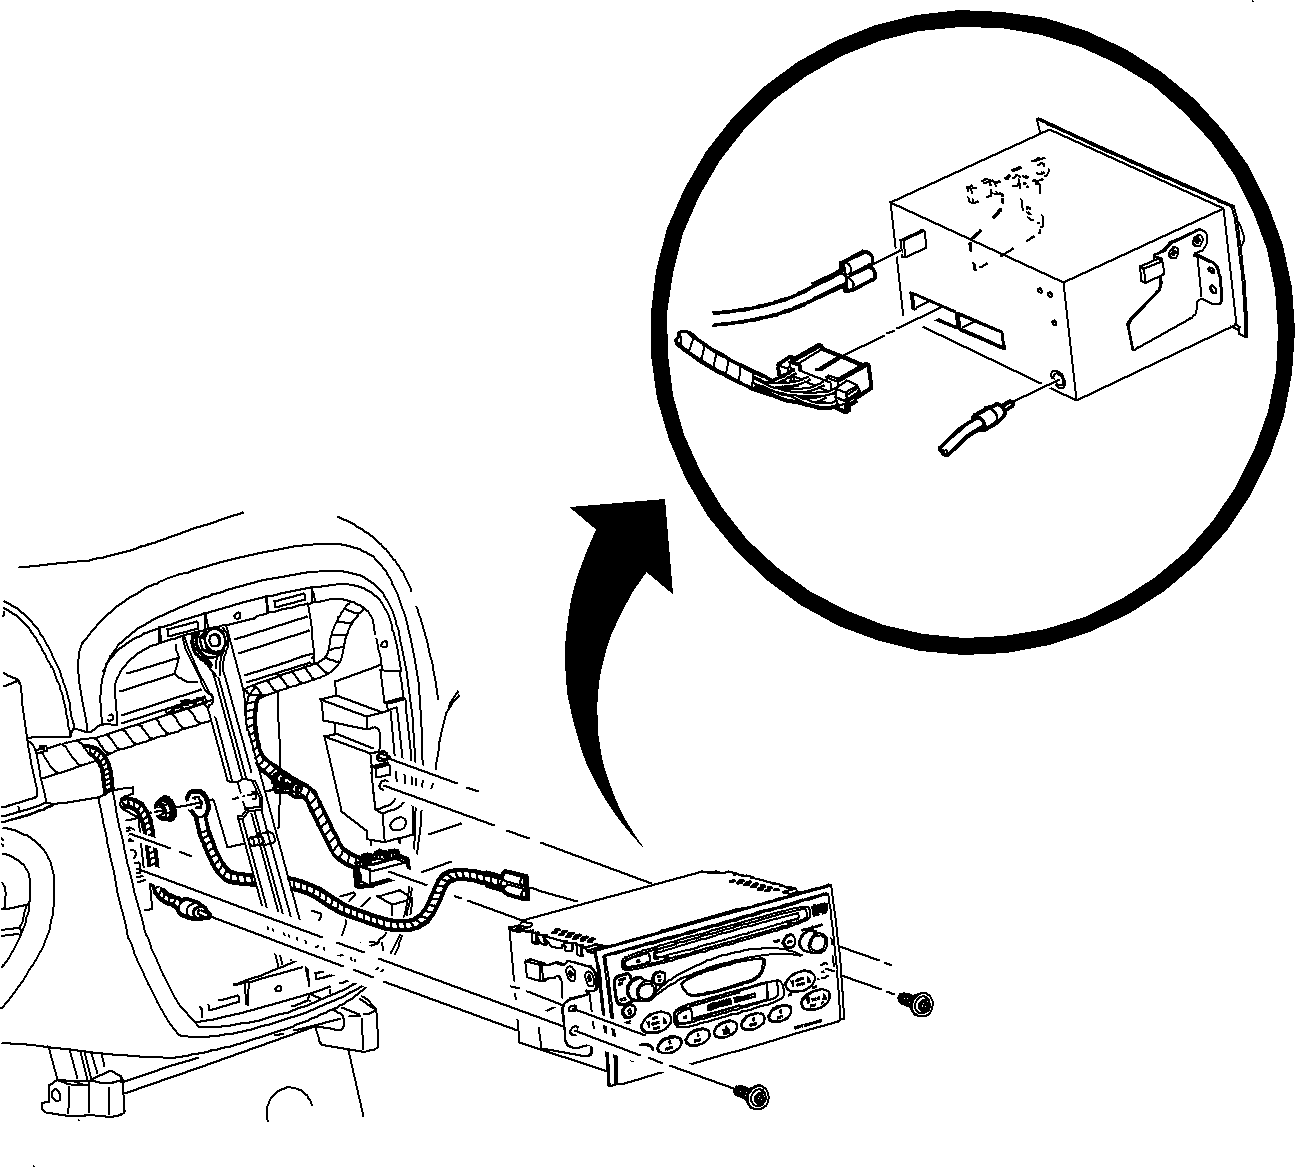
- Gain access to the rear of the radio and connect the CD I/P harness to the radio.
Important: The I/P harness connector, the antenna connector, and the ground strap terminal
do not need to be disconnected, unless the radio needs to be upgraded. Ensure connection.
| 14.2. | Upgrade the radio, if necessary, to AM/FM stereo cassette player and CD
player with equalizer, UP0. |
| 14.3. | Connect the I/P CD jumper connector to the rear of the radio. |
| | Important: Do not secure the radio or trim in place until the CD changer/player is installed
and verified to be functioning correctly.
|
| 14.4. | Set the radio into the radio brace. |
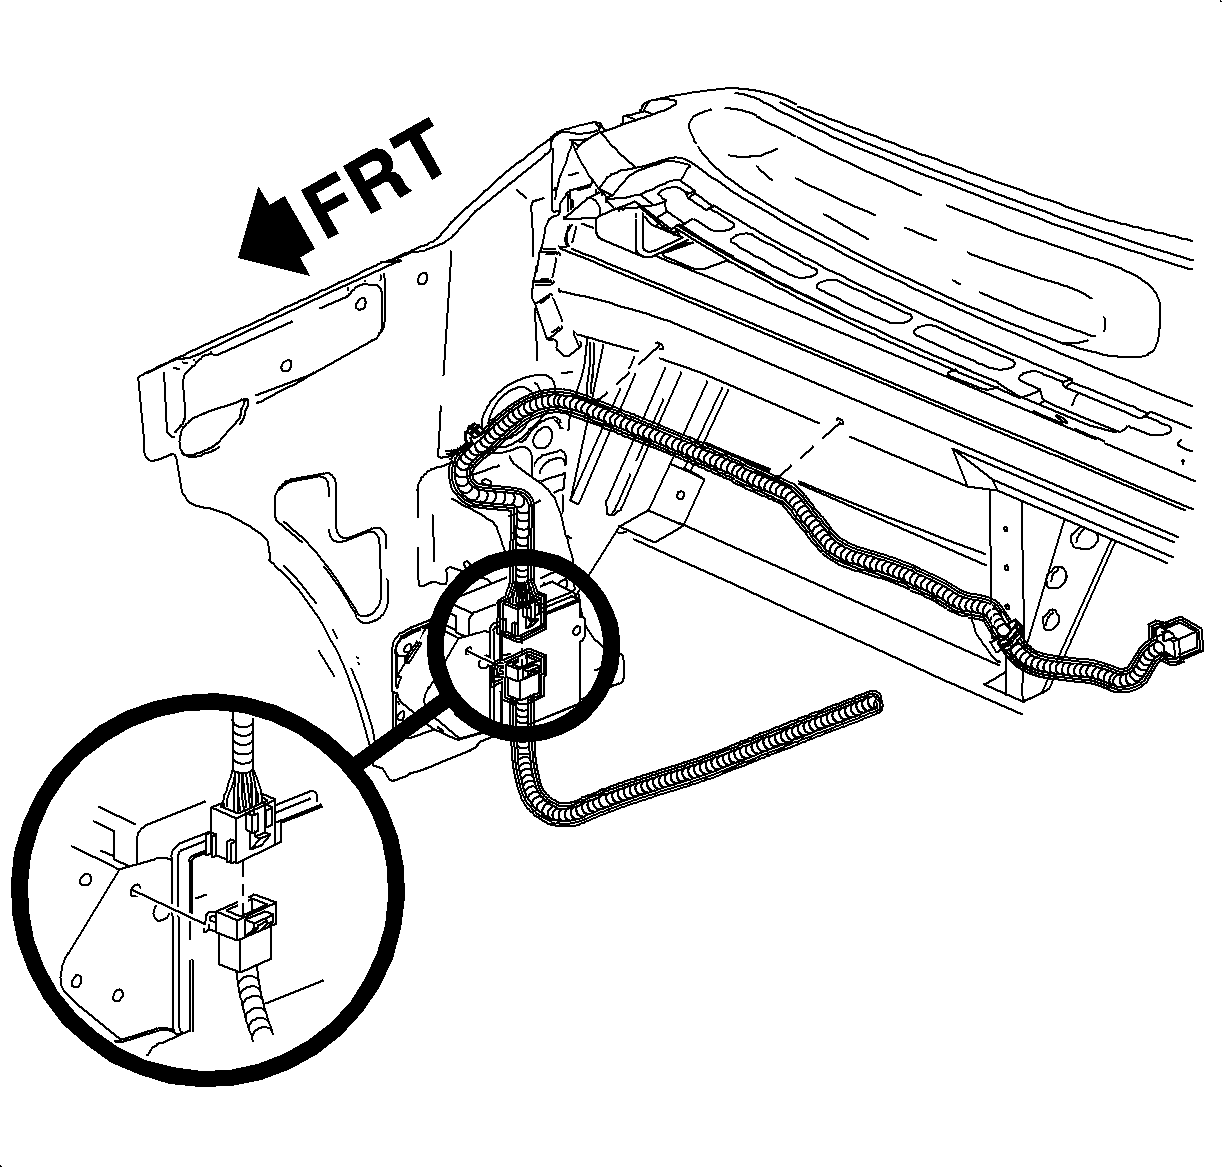
- Route the I/P CD jumper from the rear of the radio to right I/P fuse block.
| 15.1. | Route the I/P CD jumper behind the right side of the radio to the right
of the H-brace, along side of the current routing for the I/P harness. |
| 15.2. | Attach the I/P CD jumper to the I/P lead that connects to the radio using
the buddy clip on the harness to hold the jumper in place. |
| 15.3. | Route the I/P CD jumper along the I/P beam and attach the fir tree clips
to the vertical side of the beam forward in the car. These clips are located just
below the current routing for the I/P harness in the area above the glove compartment
bin. |
| 15.4. | Route the I/P CD jumper the rest of the way to the right I/P fuse block
area. |
Body CD Jumper Installation
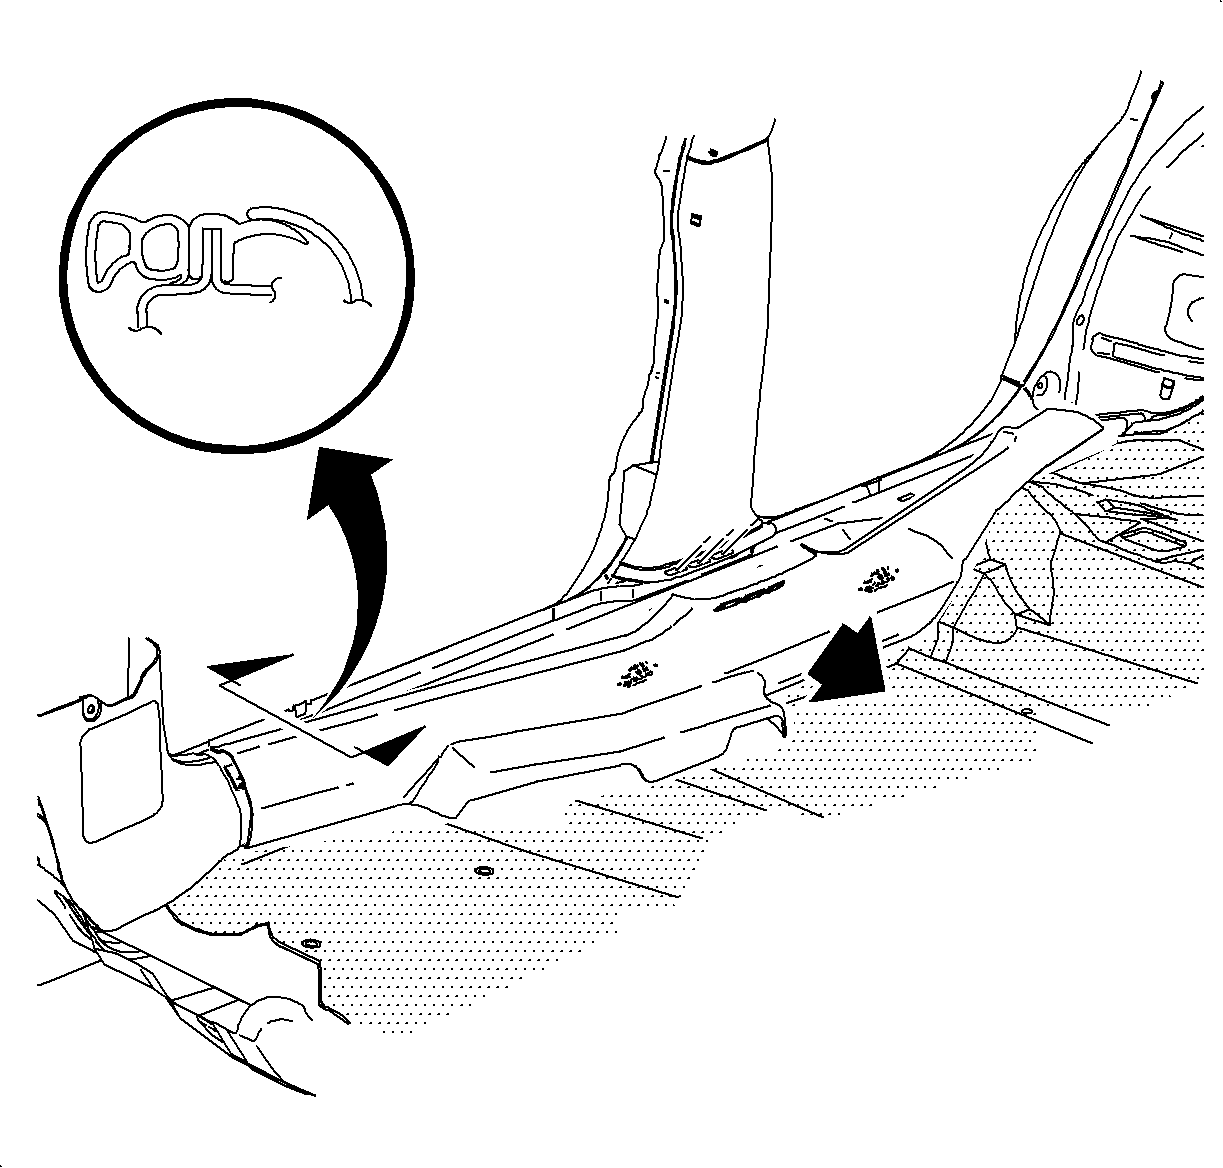
- Remove the right
side of the carpet retainer, sill plate.
| 1.1. | Move the front seat to the forward most position. |
| 1.2. | Starting at the front of the vehicle, remove the carpet retainer by gently
pulling on the retainer at the attaching clip locations. |
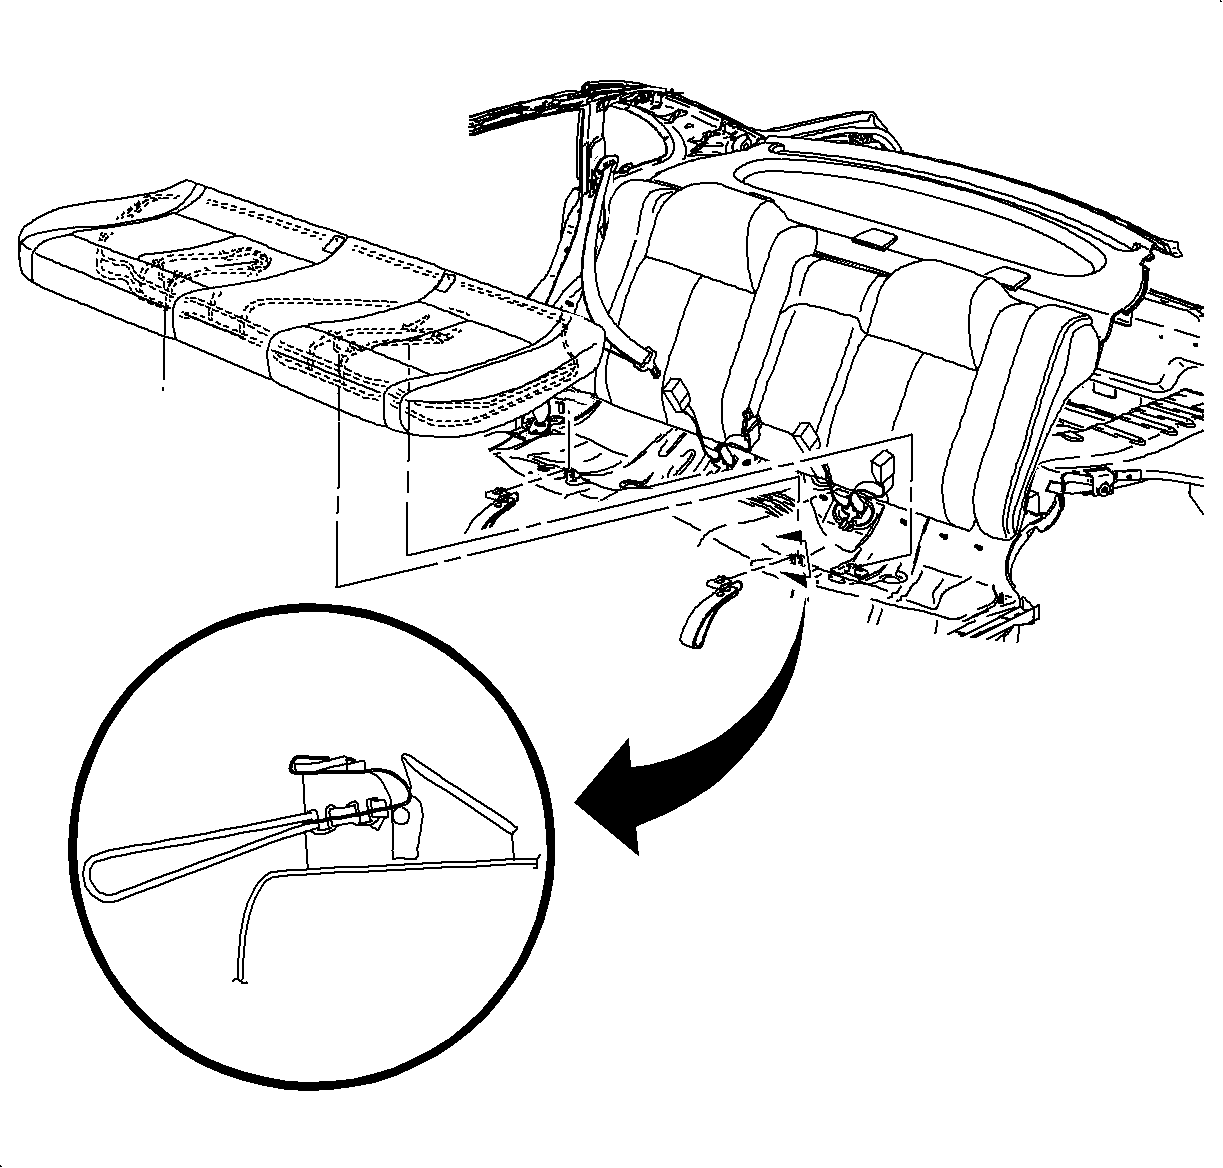
- If there are leather
seats, move the rear seat cushion forward before removing bolster to avoid damage
to the leather.
If the seat is not leather, movement is not necessary.
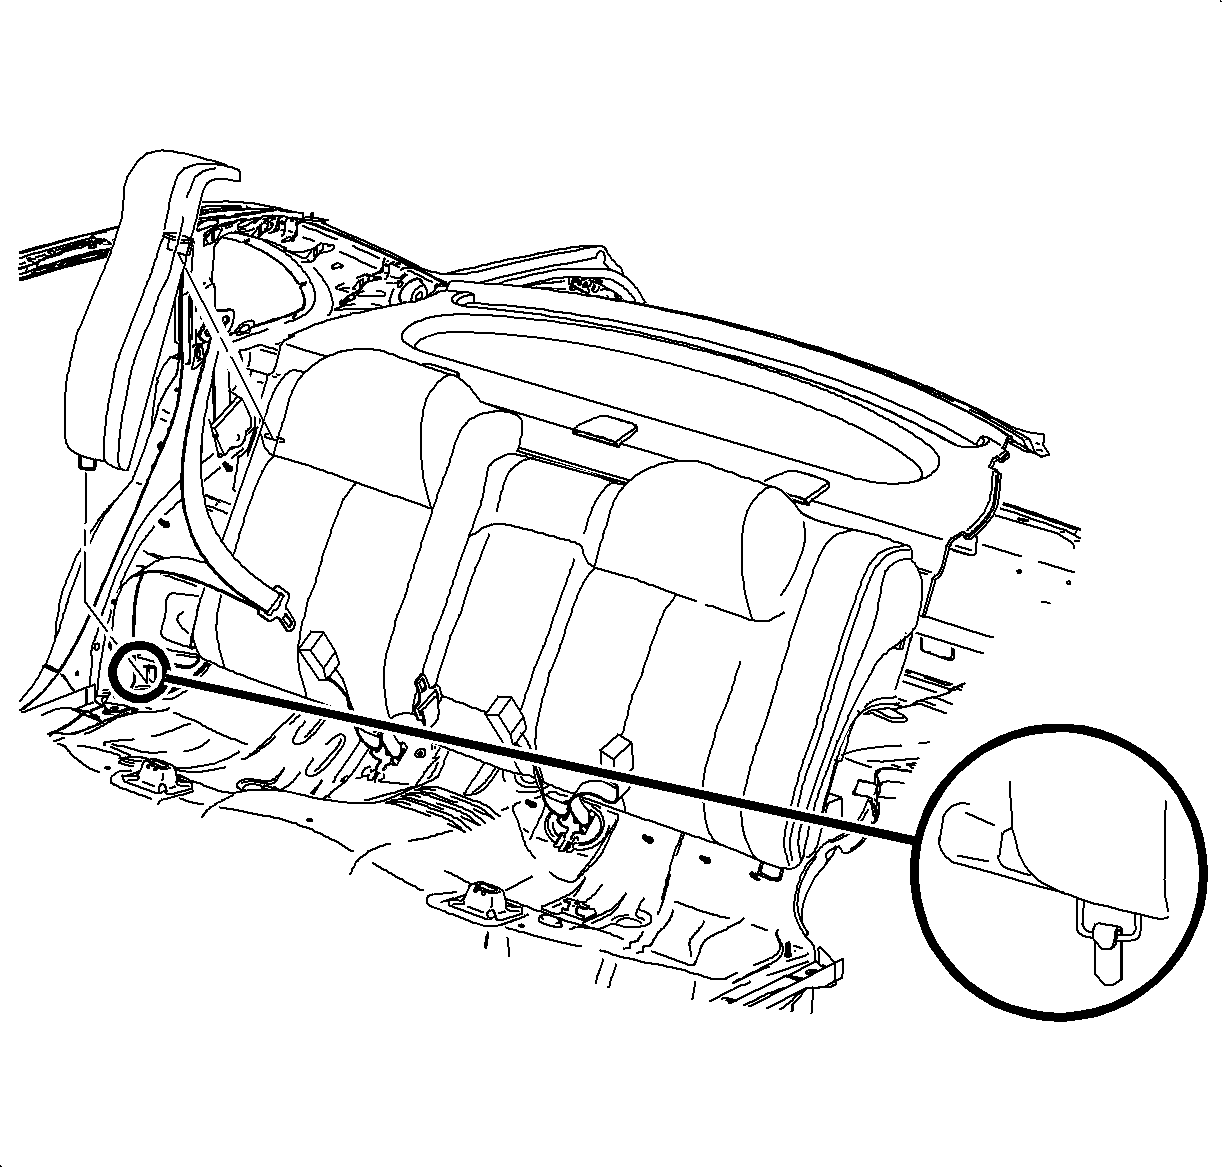
- Remove the right rear seat bolster.
| 3.1. | Reach down into the outer corner of the rear seat cushion to expose the
bolster retainer tab. |
| 3.2. | Bend the tab upward. |
| 3.3. | Starting at the bottom, pull forward to disengage the bolster from the
retainer tab, then pull upward to disengage the upper attachment. |
- Remove the rear compartment side carpet.
| 4.1. | Flip the rear compartment floor carpet away from the right side of the
vehicle. |
| 4.2. | Remove the rear compartment side carpet fastener as shown. |
| 4.3. | Remove the side carpet assembly. |
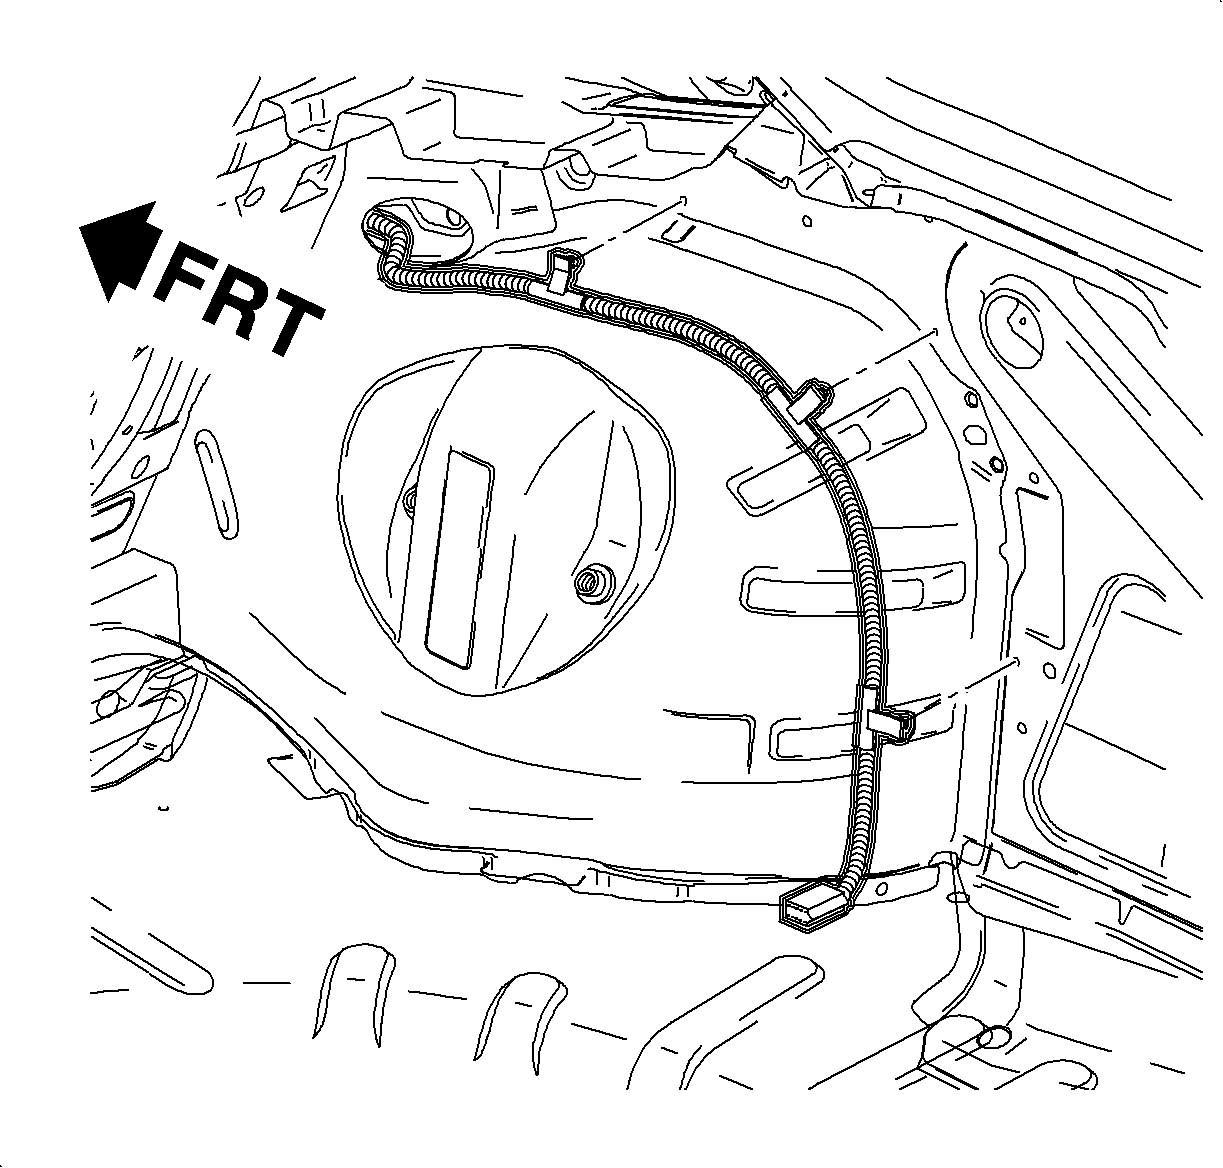
- Route the body CD jumper along the right side of the vehicle starting at the
area between rear seat and rear compartment.
- Route the body CD jumper connector through hole found beneath the right
rear seat bolster and put enough of the harness through to reach the CD changer/player
location.
Notice: Make sure the body CD jumper is lined up correctly with holes before attaching
them. The clips are easily damaged when removed.
- Install the body
CD jumper to the vehicle starting with the jumper clip nearest the CD changer/player
connector. Attach all of the other clips as you route the body CD jumper to the rear
seat area.
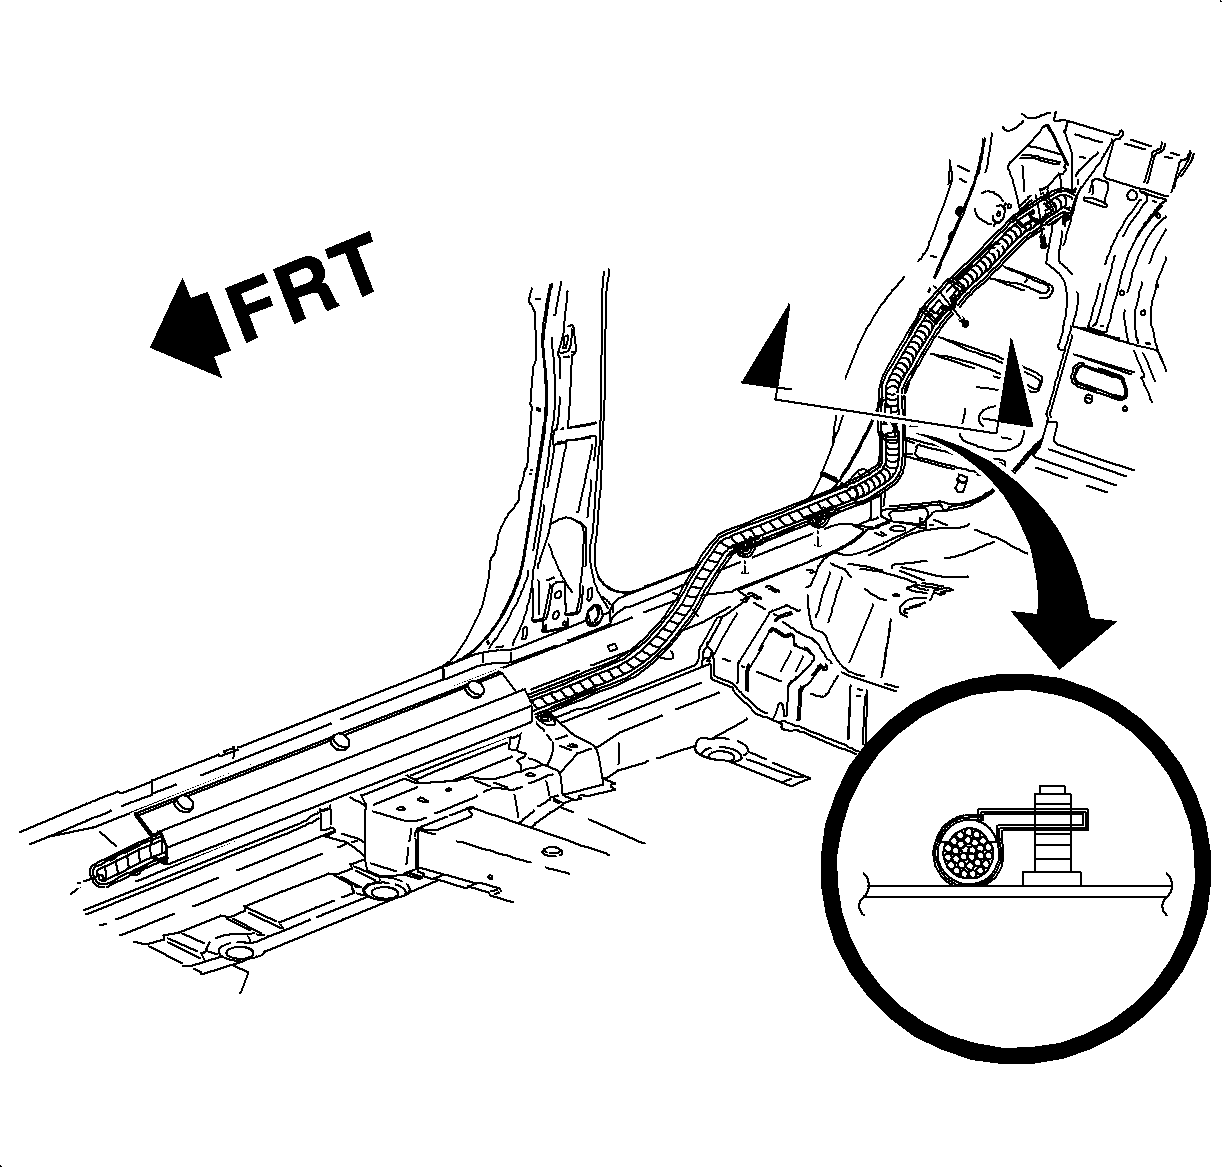
- Route the body CD jumper along the rear seat and install the jumper to the vehicle
using attachment clips.
- Open the harness channel found in the right inner rocker panel area and
install the body CD jumper.
- After installing the harness, close the harness channel.

- Connect the body CD jumper connector to the I/P CD jumper connector which was
routed earlier and is located near the right I/P fuse block (RIPFB) area.
- Connect the body CD jumper connector to the RIPFB using the rosebud clip
on the connector.
CD Changer/Player Installation
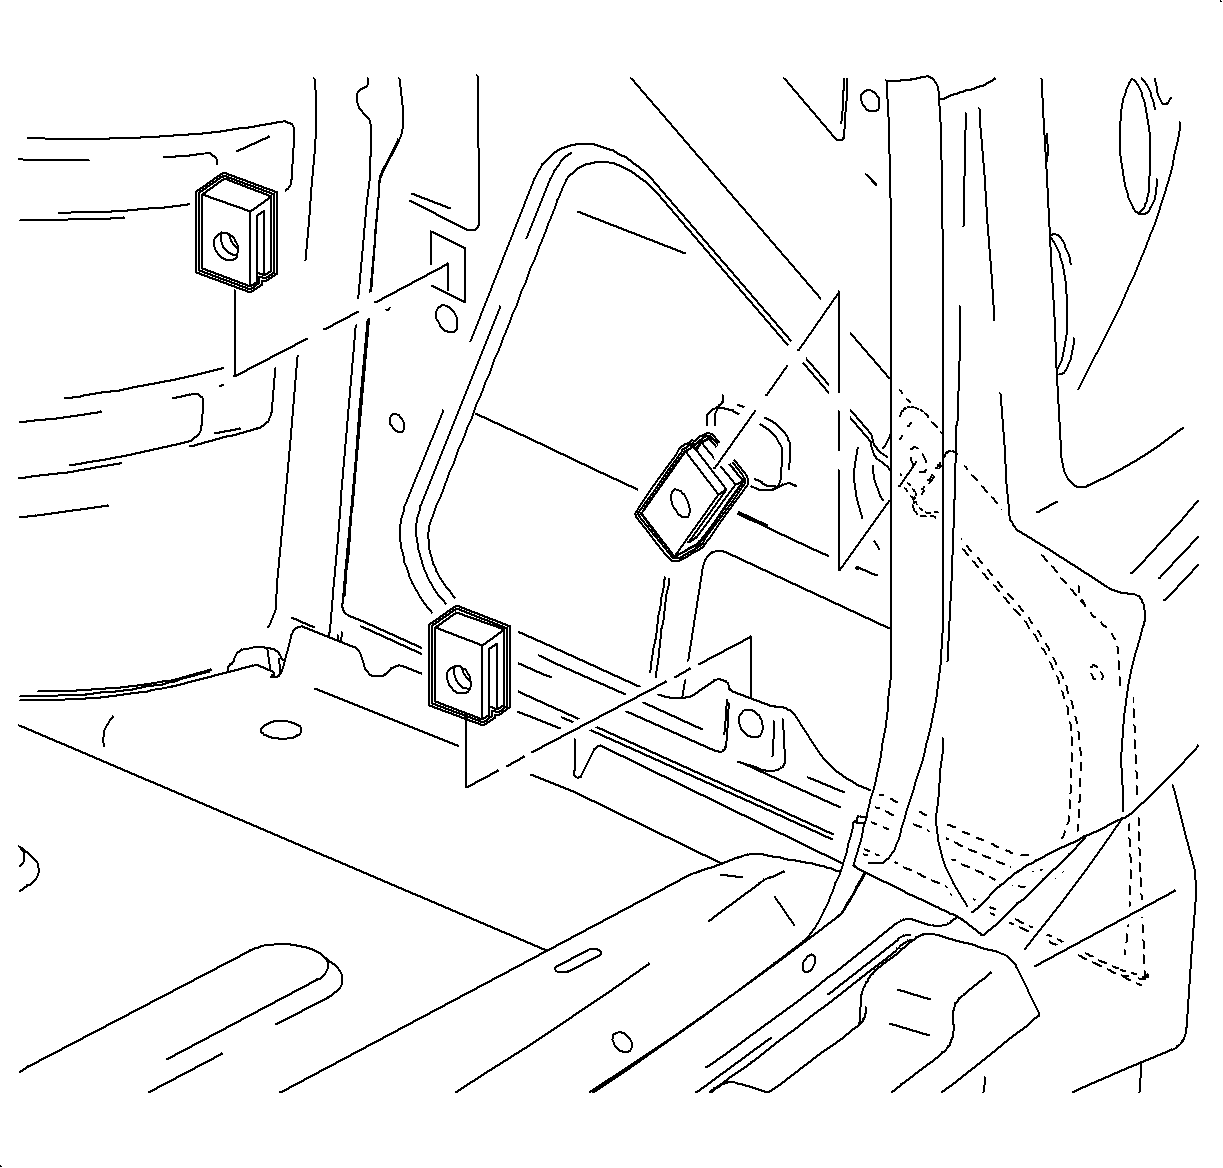
Important: The CD changer/player unit must be installed after the bracket is installed.
Important: If a U-nut is already present at the lower attachment point on the sheet metal,
it will be used later in this procedure to install the convenience net.
- Install the U-nuts to a specified attachment point in the sheet metal.
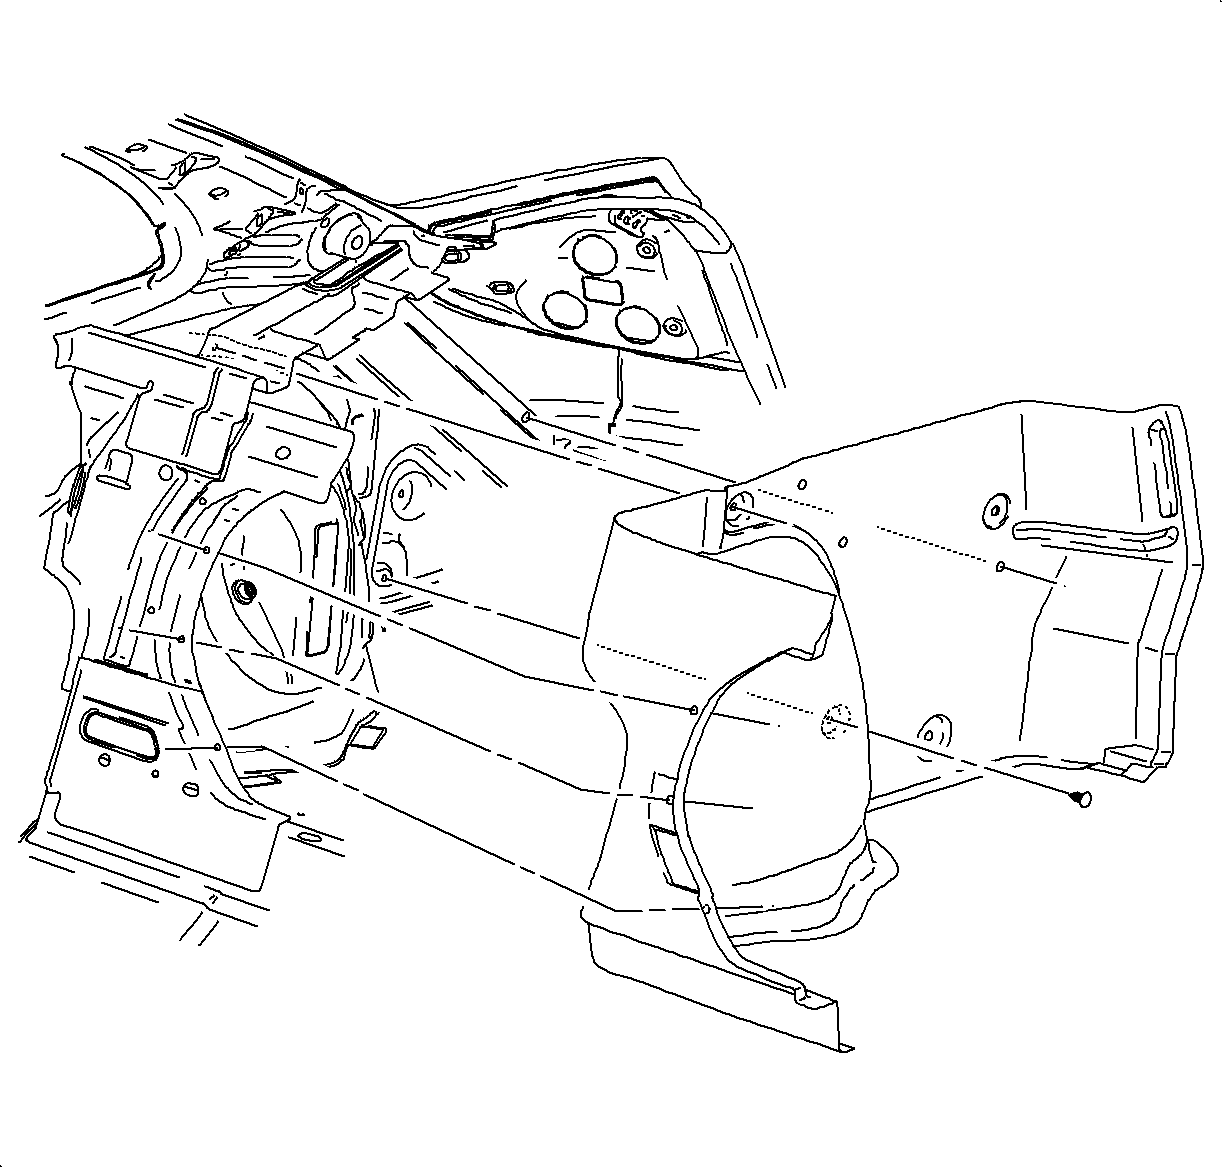
Important: Do not install the fasteners that attach the trunk side carpet to the vehicle.
- Position the rear compartment side carpet to the side of the vehicle.
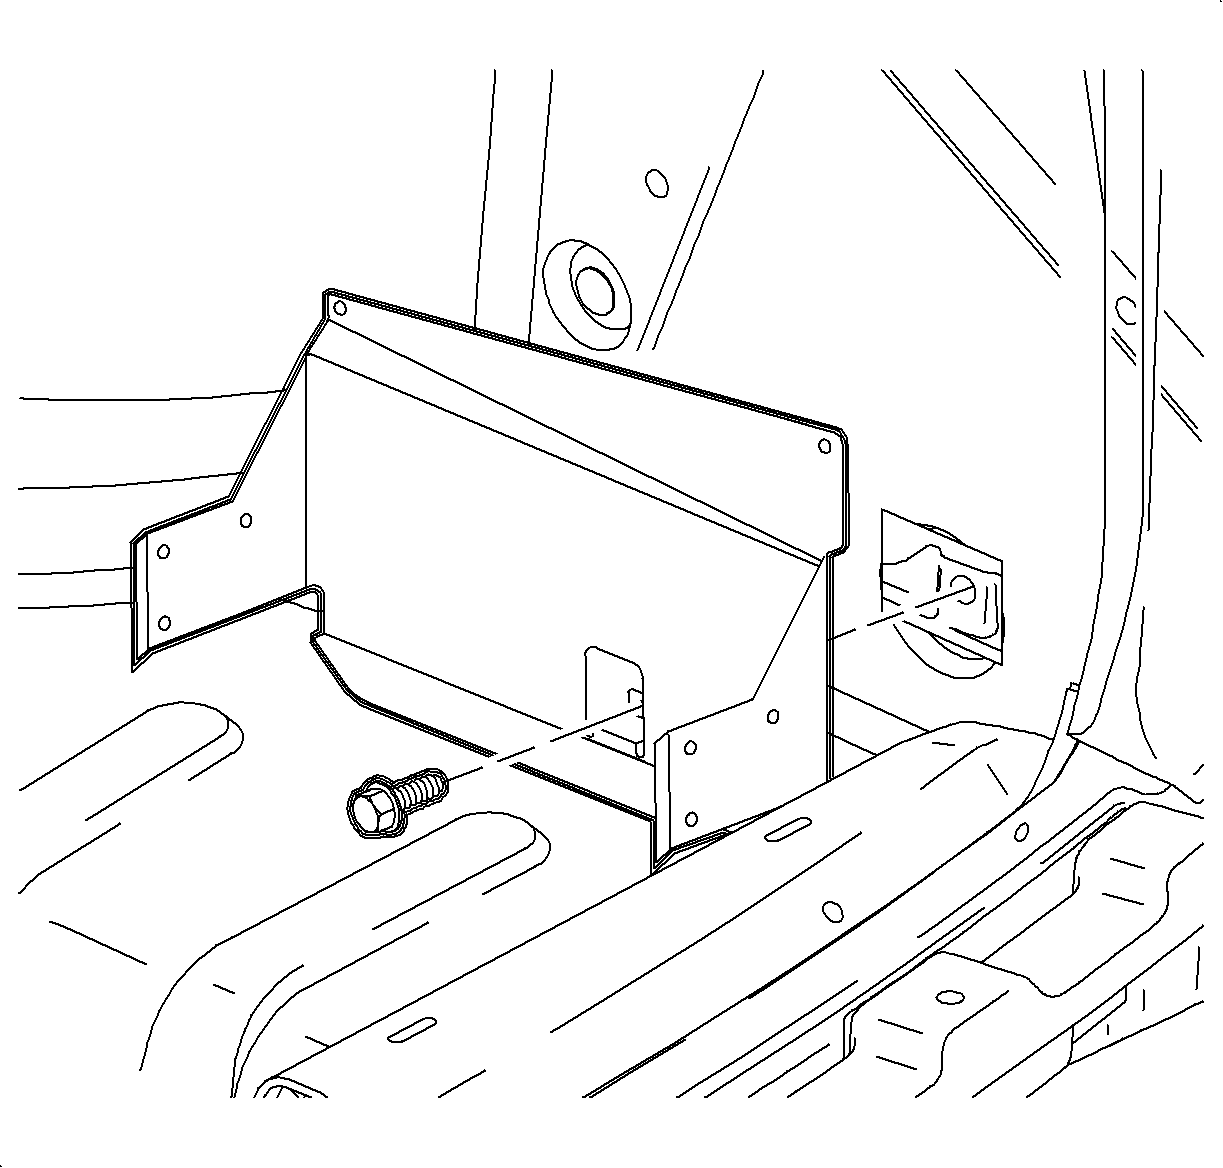
- Using a sharp knife, carefully cut a hole in raised portion of the rear compartment
side carpet at the U-nut location to proved room for the bracket to go through the
carpet and attach to vehicle.
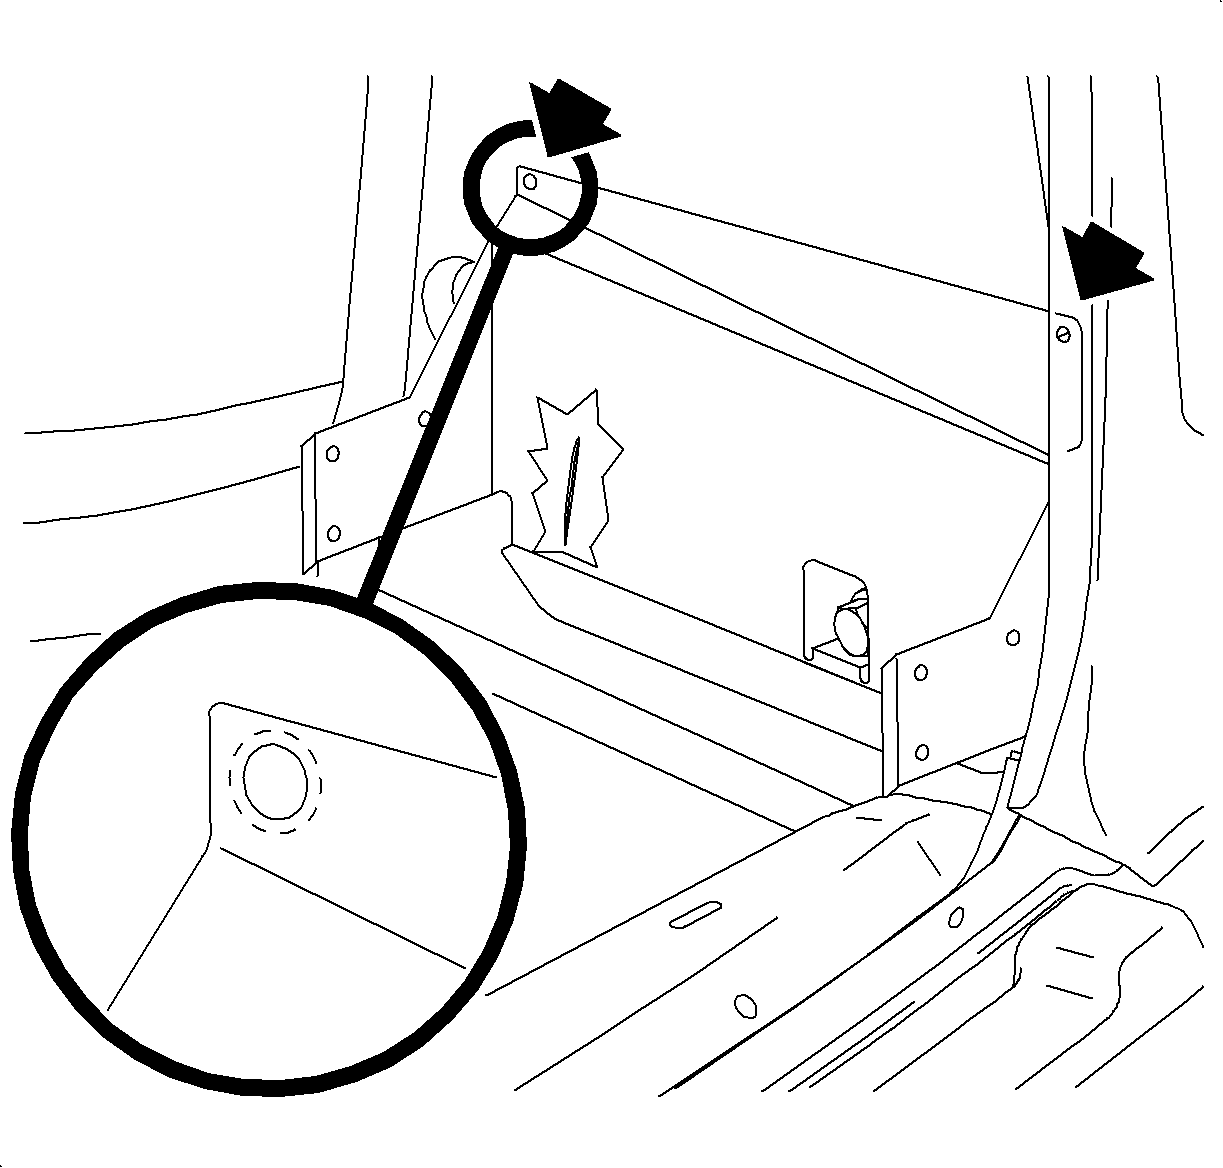
- Align the bracket over the side trim ensuring the bracket is straight.
- Mark with a pen or sharp tool where the Riv-Nut holes are beneath it.
- Mark with a pen or sharp tool where the connector should come through,
near the lower edge of the bracket.
- Pull the bracket away.
- Using a sharp knife, carefully cut holes in the rear compartment side
carpet for fasteners to go through into the Riv-Nuts.
- Pull the body CD jumper through trunk side carpet slit.

- Position the rear compartment side carpet back in place to side of vehicle.
- Install the fasteners that attach the rear compartment side carpet to
vehicle
- Position the decklid weather-strip over the rear compartment side carpet.
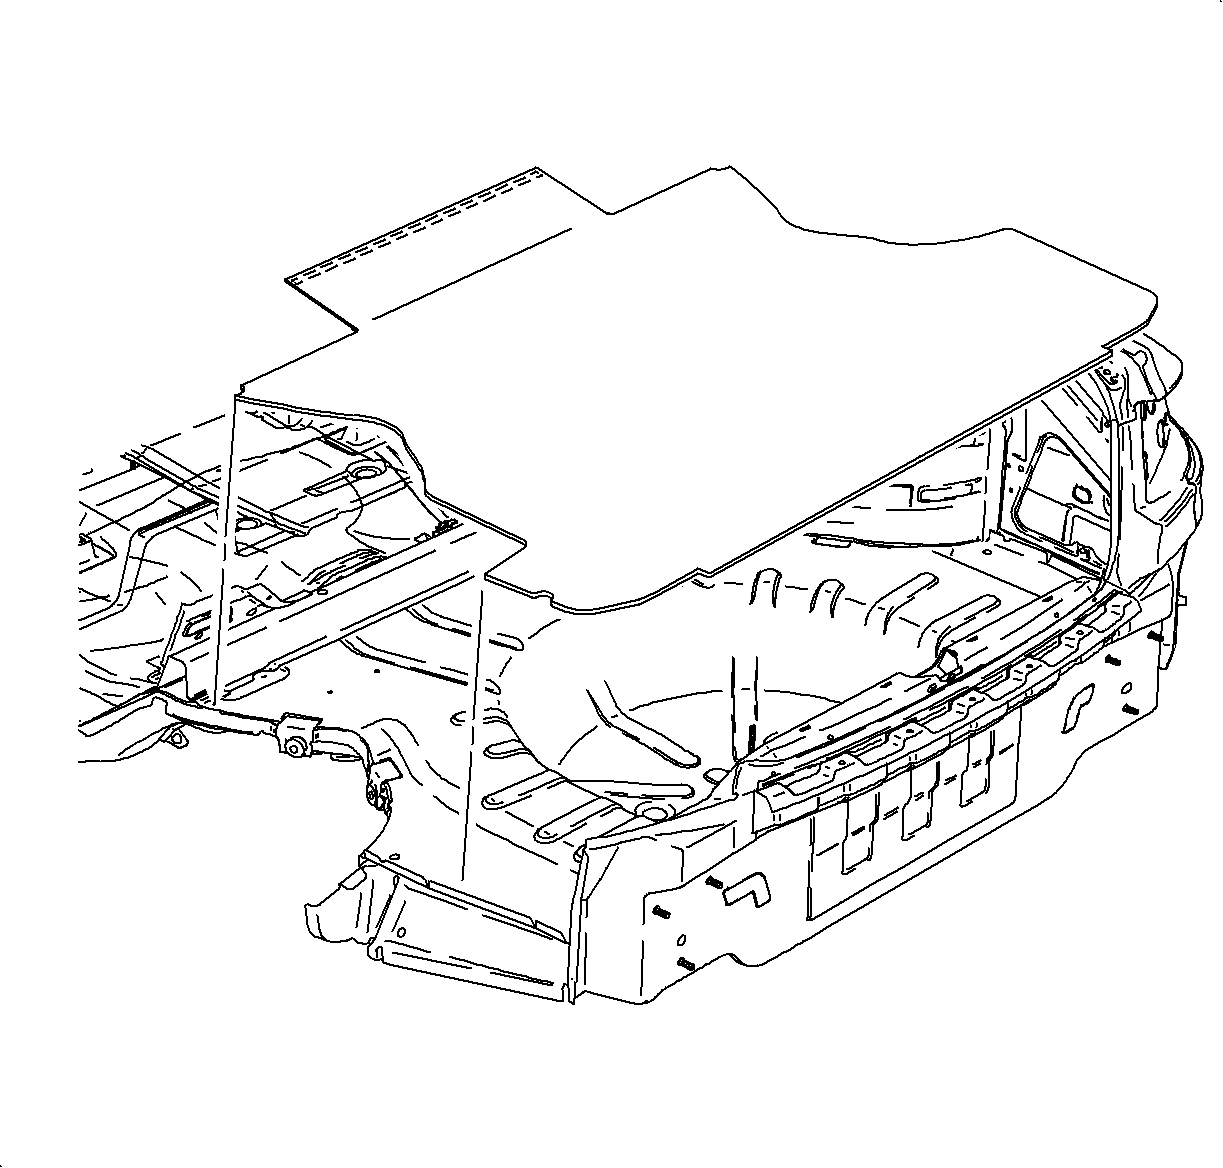
- Position the rear compartment floor carpet into place.
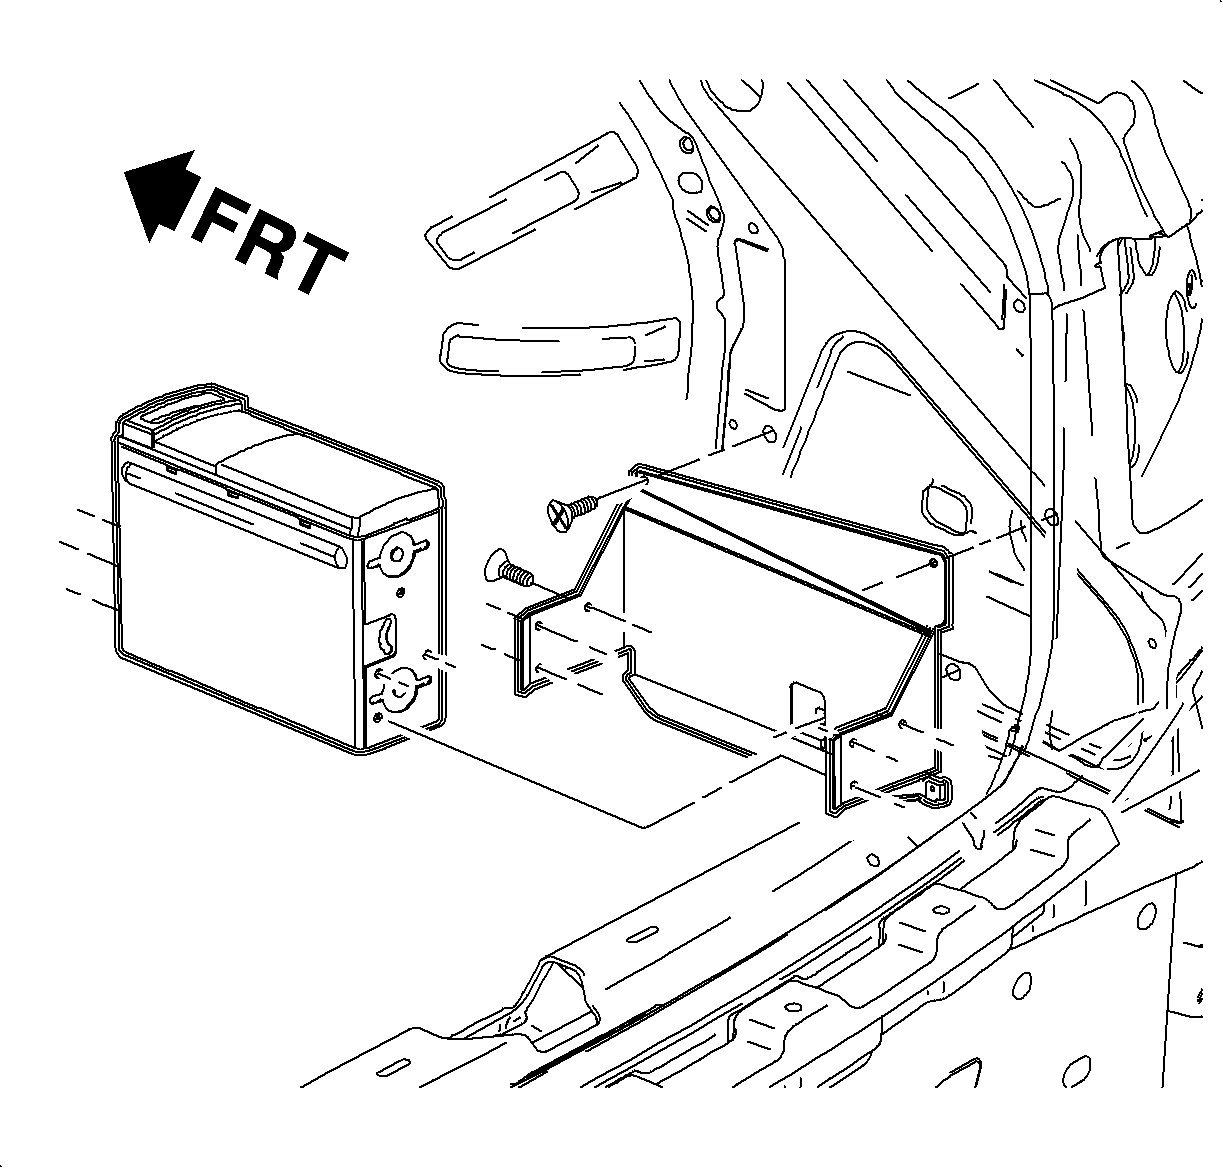
- Hold the bracket in the installation location.
Notice: Refer to Fastener Notice in the Preface section.
- Attach the bracket to the vehicle with the screws.
Tighten
Tighten the CD changer/player bracket-to-vehicle fastener to 8 N·m
(71 lb in).
- Before fastening the CD changer/player to bracket, make the electrical
connection and temporarily connect the negative battery cable. Verify that the CD
changer/player is functioning properly, then disconnect the negative battery cable.
- Install the CD changer/player to bracket.
Tighten
Tighten the CD changer/player-to-CD changer/player bracket fasteners to 4 N·m
(35 lb in).
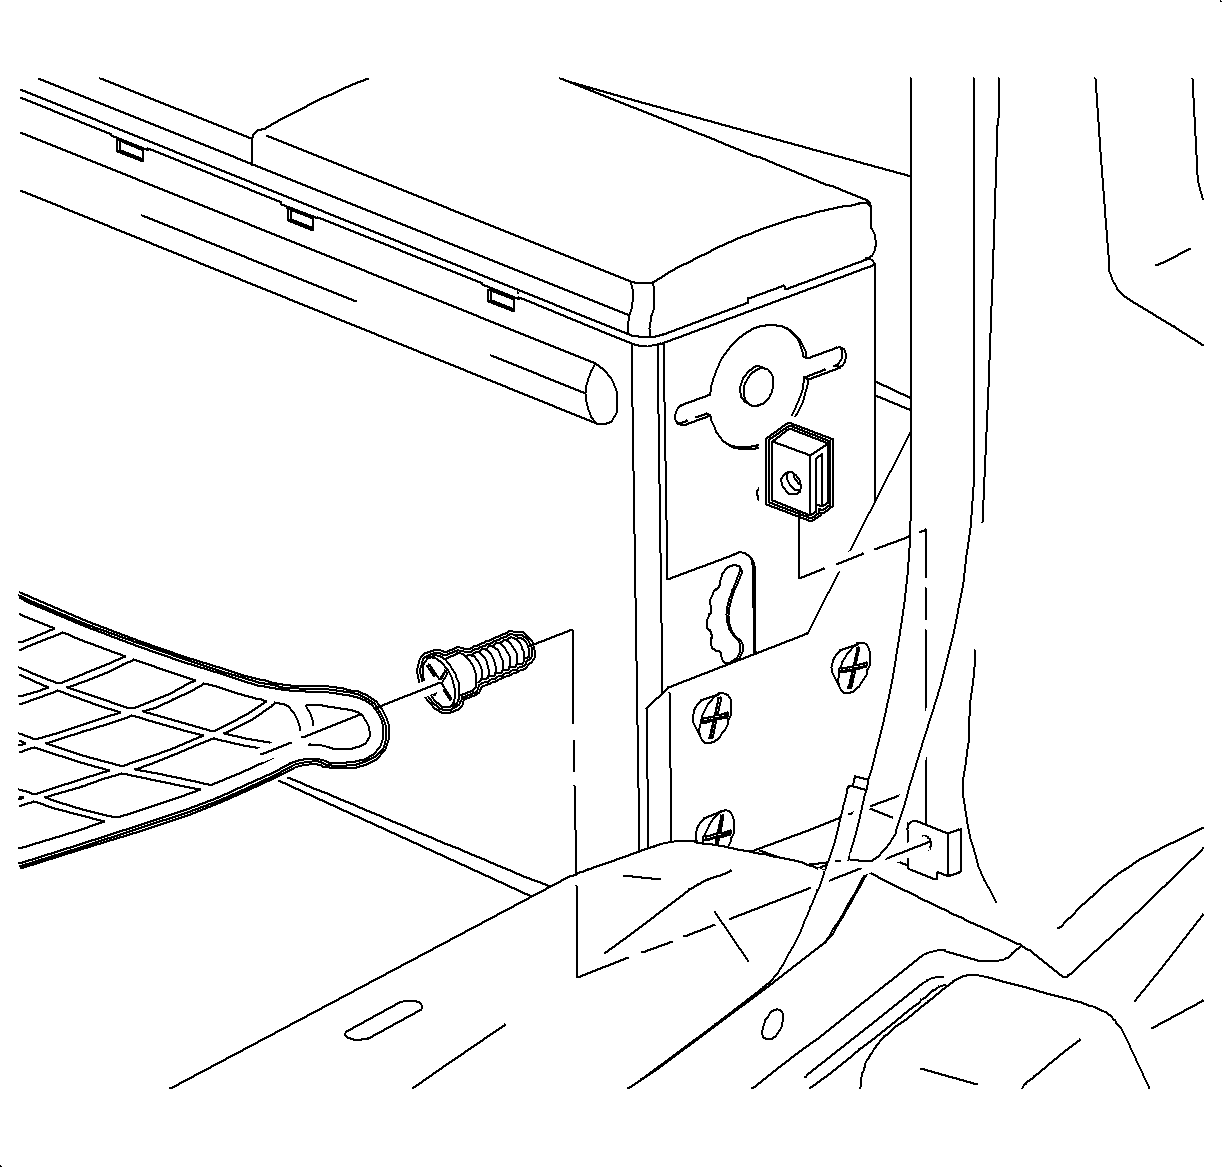
- If equipped with a convenience net, attach the U-Nut to side attachment on the
CD changer/player bracket.
- Attach the convenience net to the CD changer/player bracket.
Removed Parts From the Harness Installation

Important: Ensure that the I/P harness connector, antenna connector, and the ground strap
connector are connected.
- Install the radio. Refer to
Radio Replacement
.

- Install the glove compartment bin partially into the opening.
- Secure the BCM to the glove compartment bin slots.

- Route the glove compartment lamp wiring harness to the lamp opening and connect
the wiring harness to the glove compartment lamp.
- Snap the lamp into the glove compartment bin.
Notice: Refer to Fastener Notice in the Preface section.

- Install the glove compartment bin to the I/P with fasteners.
Tighten
Tighten the glove compartment bin-to-I/P fasteners to 2.5 N·m (22 lb in).

- Install the heater outlet with the retainer to glove compartment bin.

- Install the right lower I/P closeout panel, hush panel, with retainers.

- Install glove compartment door with fasteners.
Tighten
Tighten the glove compartment door fasteners to 2 N·m (18 lb in).
- Operate the glove compartment lamp and glove compartment door to assure
proper operation.

- Install the right hinge pillar molding, kick panel.
| 11.1. | Slide the hinge pillar molding into the carpet retainer. |
| 11.2. | Position the hinge pillar molding to body and install by pushing gently
at the clip location. |
| 11.3. | Install the hinge pillar molding upper push pin fastener. |
| 11.4. | Install the fuse box door. |
| 11.5. | Install the weather-strip over the hinge pillar molding cover using a
flat blade tool. |

- Install the right
side carpet retainer, sill plate.
| 12.1. | Position the carpet retainer into the vehicle. |
| 12.2. | Starting at the rear of the vehicle, slide the carpet retainer under the
rear seat cushion. |
| 12.3. | Position the carpet retainer over the remaining attaching clip locations. |
| 12.4. | Gently push on the attaching clips to install the carpet retainer. |
| 12.5. | Install the weather-strip over the carpet retainer using a flat blade
tool. |

Caution: Make sure the rear seat shoulder belt is not caught behind the bolster when
installing the bolster.
Important: If leather rear seat cushion was removed, install it after installing right
rear seat bolster.
- Install the right rear seat cushion bolster.
| 13.1. | Position the rear seat bolster onto the upper bolster attachment. |
| 13.2. | Push down on the bolster to engage the upper attachment and install the
over retaining tab. |
| 13.3. | Bend the lower retainer tab over the bolster wire frame at the rear seat
cushion location. |

- Install the rear compartment side carpet.
| • | Install the side carpet assembly. |
| • | Install the rear compartment side carpet as shown in illustration. |
| • | Flip the rear compartment floor carpet down toward the right side of the
vehicle. |
Remote CD Changer/Player Installation Finishing Touches
- Enable the SIR System. Refer to
Enabling the SIR System
in SIR.
- Connect the negative battery cable.
- Test the operation of CD Changer/Player. If the CD Changer/Player does
not operate correctly, refer to the troubleshooting portion of the audio section.
- Set earlier recorded radio preset stations and clock time.
- Remind customer that the Theft Deterrent Feature is not activated and
that it needs to be reactivated if continued security is desired.


