Symptom | Procedure | ||||||||||
|---|---|---|---|---|---|---|---|---|---|---|---|
Uplevel audio system display is inoperative, radio controls are inoperative, all speaker sets are inoperative. | Go to Chart 1. | ||||||||||
Uplevel audio system-radio display functions, but no sound from one-to-three speaker sets. |
| ||||||||||
Uplevel audio system-radio display functions, but either all left or all right speakers are inoperative. |
| ||||||||||
Uplevel audio system-radio display functions, no sound from all 4 speaker sets. |
| ||||||||||
Advanced audio system-display is inoperative, radio controls are inoperative, all speaker sets are inoperative. | Go to Chart 1. | ||||||||||
Advanced audio system-radio display functions, no sound from subwoofer or one-to-three door speaker sets. |
Important: The rear doors of the advanced audio system do not contain tweeters. Go to Chart 3. | ||||||||||
Advanced audio system-radio display functions, no sound from all four speaker sets, no sound from the subwoofer. | Go to Chart 4. | ||||||||||
Advanced audio system-radio display functions, no sound from all four speaker sets while subwoofer still functions. |
| ||||||||||
Uplevel or advanced audio system - speaker distortion, poor sound, or low output from one or more speakers. |
| ||||||||||
Uplevel or advanced audio system - no sound from any speakers, radio displays "AUX" |
| ||||||||||
Weak reception | Refer to Antenna charts. | ||||||||||
RFI | Refer to RFI charts and/or ground strap connection. | ||||||||||
Tape player does not operate properly.
| Go to Chart 5. | ||||||||||
Cassette-type portable CD adapter will not play | Some cassette-type portable CD adapters will not play. Saturn stereos are equipped with software that senses cut, broken, or binding tapes. Therefore, the radio will eject some CD adapters because it senses that the tape is cut, broken, or binding. The cassette-type portable CD adapters that will work must contain either a tape loop or a resistance wheel to simulate normal tape drag. An example of this is the Sony CPA-9 type (or equivalent). | ||||||||||
In-dash CD player does not operate properly - skips/mutes, ejects or "Err" is displayed. | Go to Chart 6. | ||||||||||
In-dash CD player will load a known good CD, but will not play the CD. Radio functions correctly in AM/FM mode. | Replace the radio. | ||||||||||
In-dash CD player will not accept the CD. |
| ||||||||||
In-dash CD player will not eject the CD. |
| ||||||||||
The CD changer/player skips or mutes | Go to Chart 7. | ||||||||||
The CD changer/player-Radio displays "Err" while trying to use the CD changer/player. | Go to Chart 8. | ||||||||||
The CD changer/player will not function. The radio functions properly in AM/FM mode. No CD changer/player icon. | Go to Chart 9. | ||||||||||
The CD changer/player-Left, right, or all speakers are inoperative only while using CD changer/player. The speakers work correctly in AM/FM mode. | Go to Chart 10. | ||||||||||
The CD changer/player initializes, loads, and ejects magazine, but will not play CDs. No CD changer/player icon. | Go to Chart 11. | ||||||||||
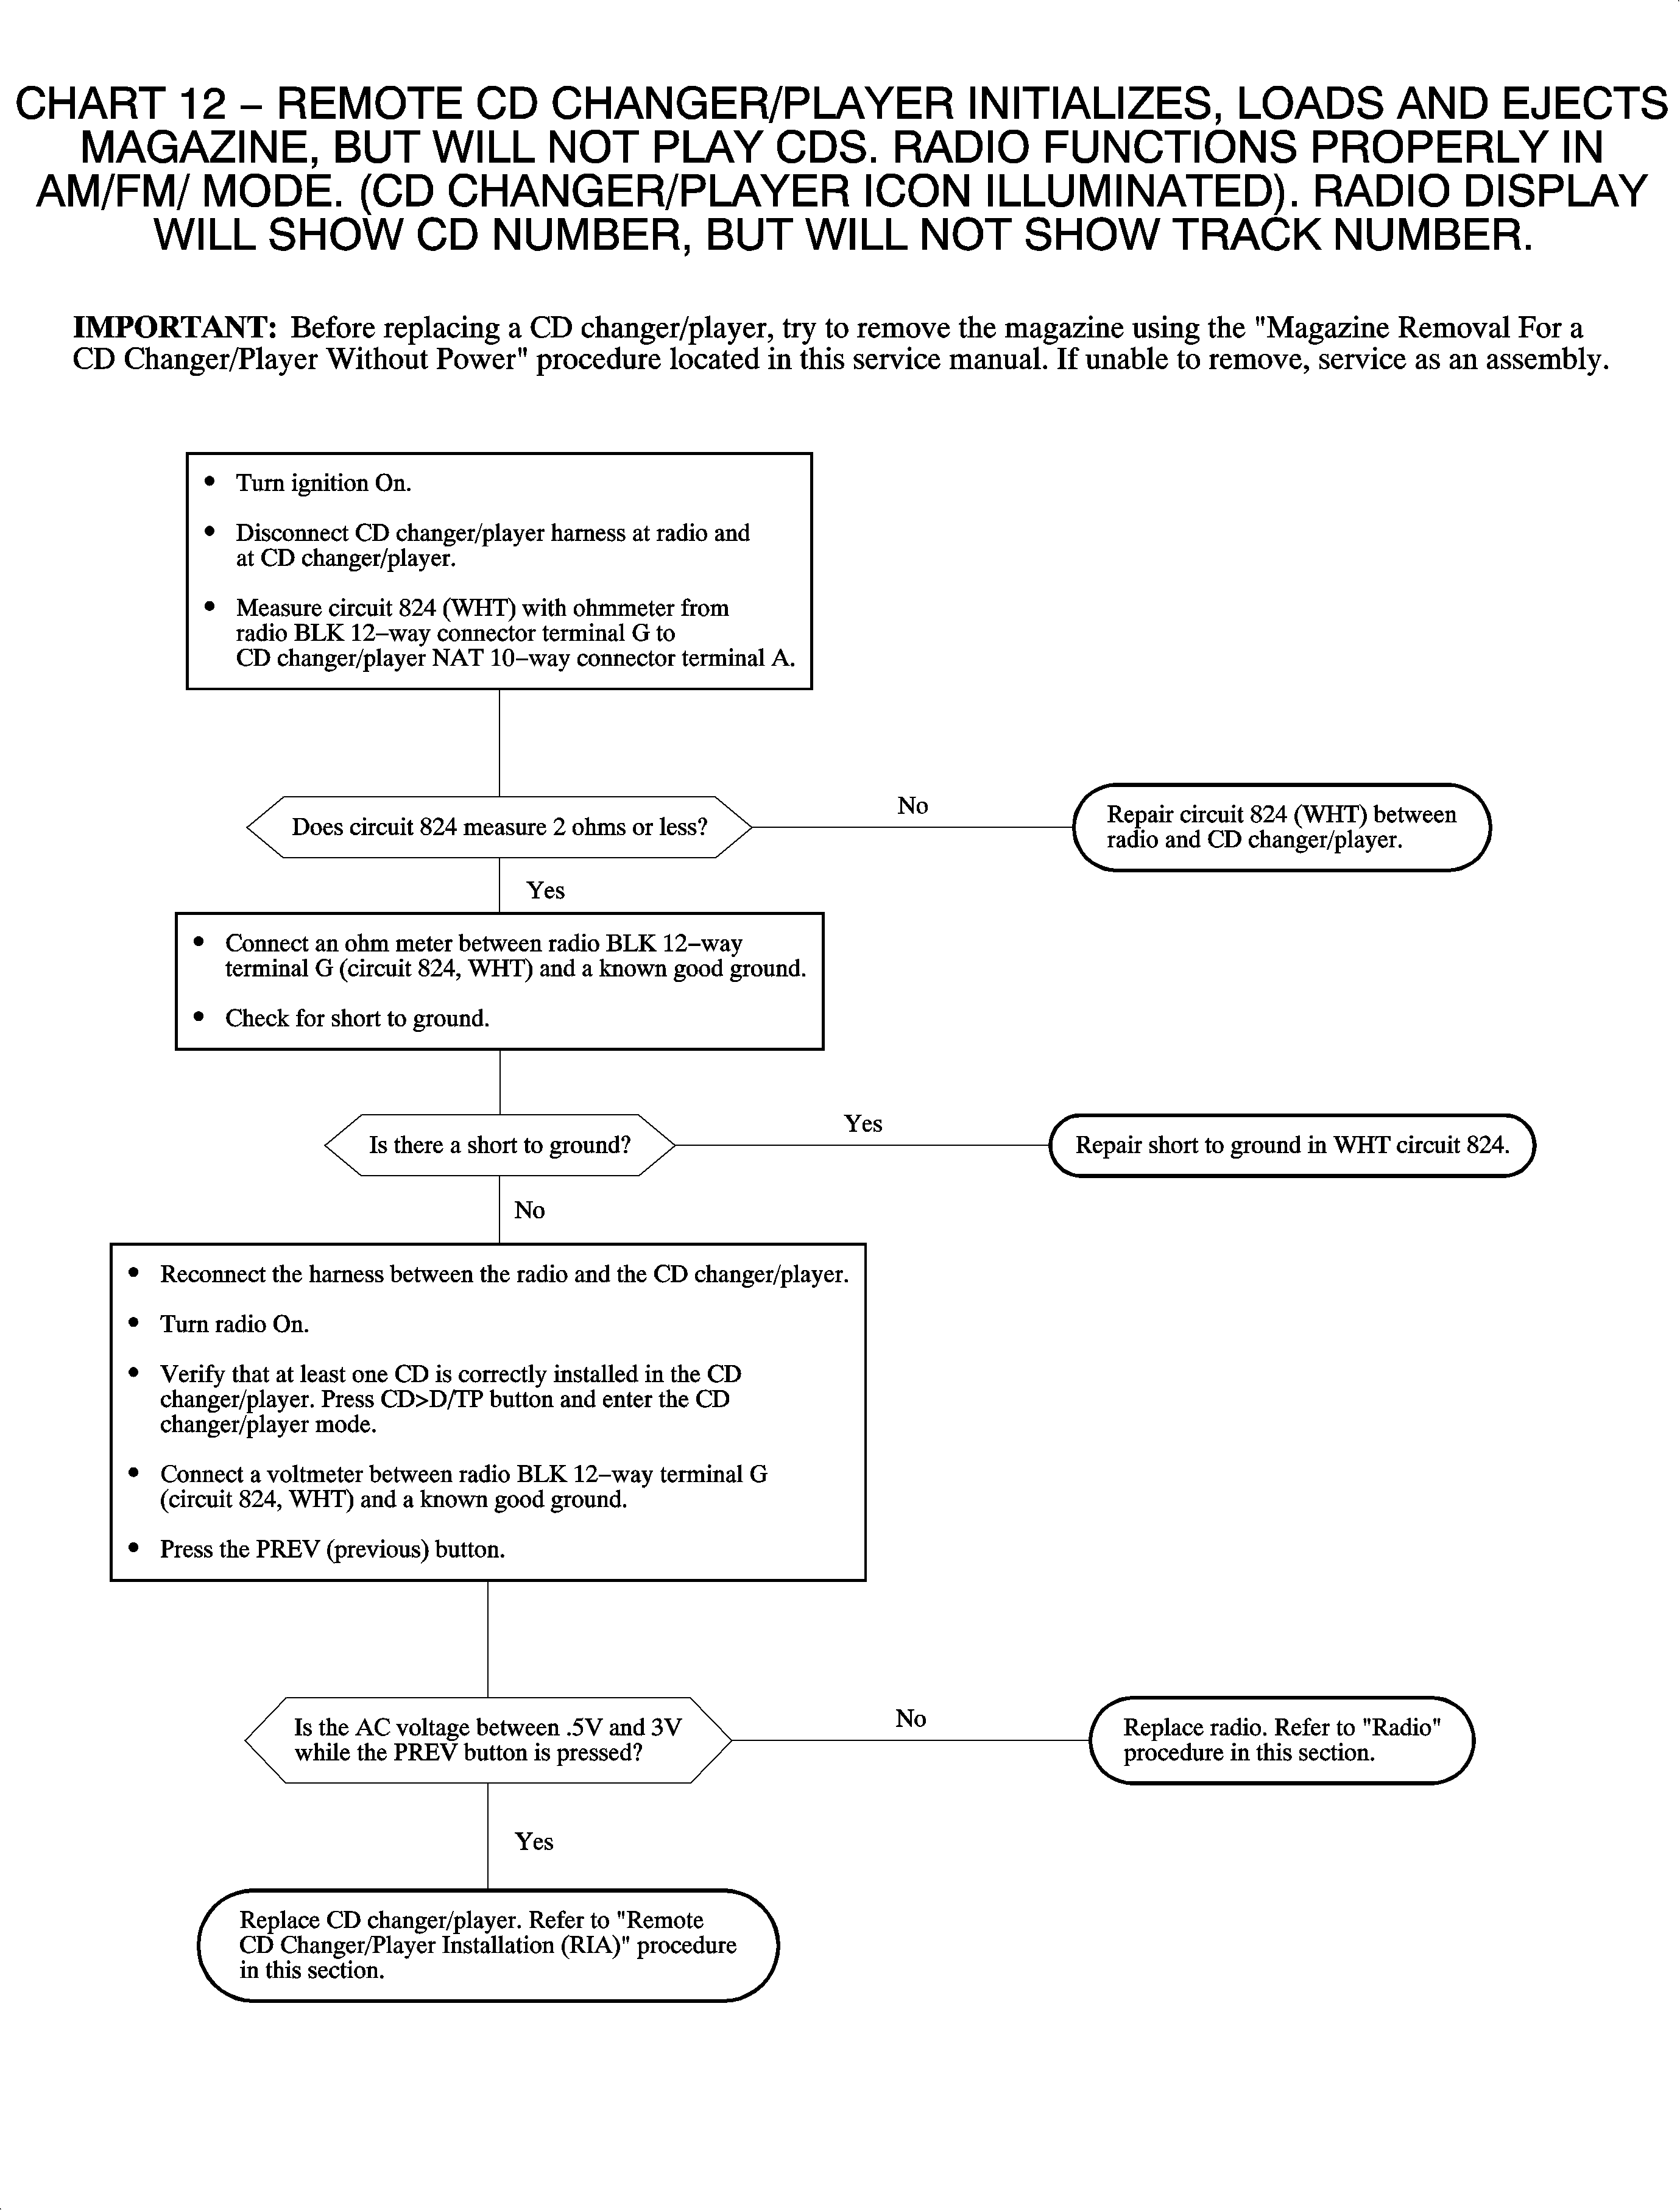
The CD changer/player initializes, loads, and ejects magazine, but will not play CDs. The radio functions properly in AM/FM mode. The CD changer/player icon is illuminated. The radio display will show the CD number, but will not show the track number. | Go to Chart 12. | ||||||||||
The CD changer/player magazine will not eject. | Refer to Radio/Audio System Description and Operation . | ||||||||||
The CD changer/player loads the magazine, initializes (reads CDs), then shows "Err" on the display. |
| ||||||||||
The CD changer/player operates (plays the CD and sound can be heard), but will not eject the magazine. | Refer to Radio/Audio System Description and Operation . | ||||||||||
The radio plays, but one or more push buttons do not function in all modes (including CD changer/player mode). |
| ||||||||||
The radio controls are inoperative, time of day is still displayed. |
| ||||||||||
The radio display does not dim with the I/P dimmer switch. | Check for an open or high resistance:
| ||||||||||
The radio display does not dim and/or radio face and buttons do not illuminate with park lights On. |
| ||||||||||
The audio displays "Err". | Refer to On-Board Diagnostic (OBD) section. | ||||||||||
The radio displays " --- -", "Err 1," "Err 2," or "LOCK." |
| ||||||||||
The radio knob falls off. | Replace the knob using the knob kit. See parts catalog. | ||||||||||
Some segments on the display do not light up. |
| ||||||||||
The ape player, the in-dash CD player, or the CD changer/player plays the same selection/track repeatedly. |
| ||||||||||
The clock will not set. |
| ||||||||||
Seek and/or scan will not stop on any station. |
| ||||||||||
Clock functions, but all other radio functions are inoperative. |
| ||||||||||
Display, clock, and radio inoperative. |
|
On-Board Diagnostics (OBD) For AM/FM CD Radio

Diagnostic Trouble Code Mode (T--01) For AM/FM CD Radio
If an error is made while the customer is using the radio, an error message will momentarily appear on the display alerting the customer that an error has been made. The T- -01 mode in the OBD is available to check which error codes have been set and how many times each error code has been set.
- Press the RCL button one time to display E04 and the number of times the error code has been stored in memory, then use the SEEK rocker button to tab through all the possible error codes (E04, E05, E06).
- When you are finished checking the error codes, press the RCL button to return to the T- -01 display.
The following is the list of all possible error messages along with the probable causes and procedure to correct the problem.
Possible Causes | Procedure | ||||||||
|---|---|---|---|---|---|---|---|---|---|
E04 (CD EJECT Error) | |||||||||
The CD is warped or cracked. | Check the CD.
| ||||||||
The CD player opening is blocked by foreign material. |
| ||||||||
CD player failure |
| ||||||||
E05 (CD PLAY Error) | |||||||||
The CD is scratched. | The CD will skip around, eject unexpectedly, eject right after loading, or mute intermittently.
| ||||||||
The CD is dirty. | Clean the CD. Refer to Radio/Audio System Description and Operation . | ||||||||
CD optical focus assembly failure (if from condensation) | Turn ON the car blower motor to evaporate the condensation. Wait about 60 minutes to play a CD so the dew can dry up after blower motor is turned on. | ||||||||
CD player failure |
| ||||||||
The CD is badly scratched. | CD will skip around, eject unexpectedly, eject right after loading, or mute intermittently.
| ||||||||
E06 (CD INSERTION Error) | |||||||||
The CD is warped. |
| ||||||||
The CD is upside down. | The CD will eject right after loading. The CD should be installed label side up. | ||||||||
CD player failure |
| ||||||||
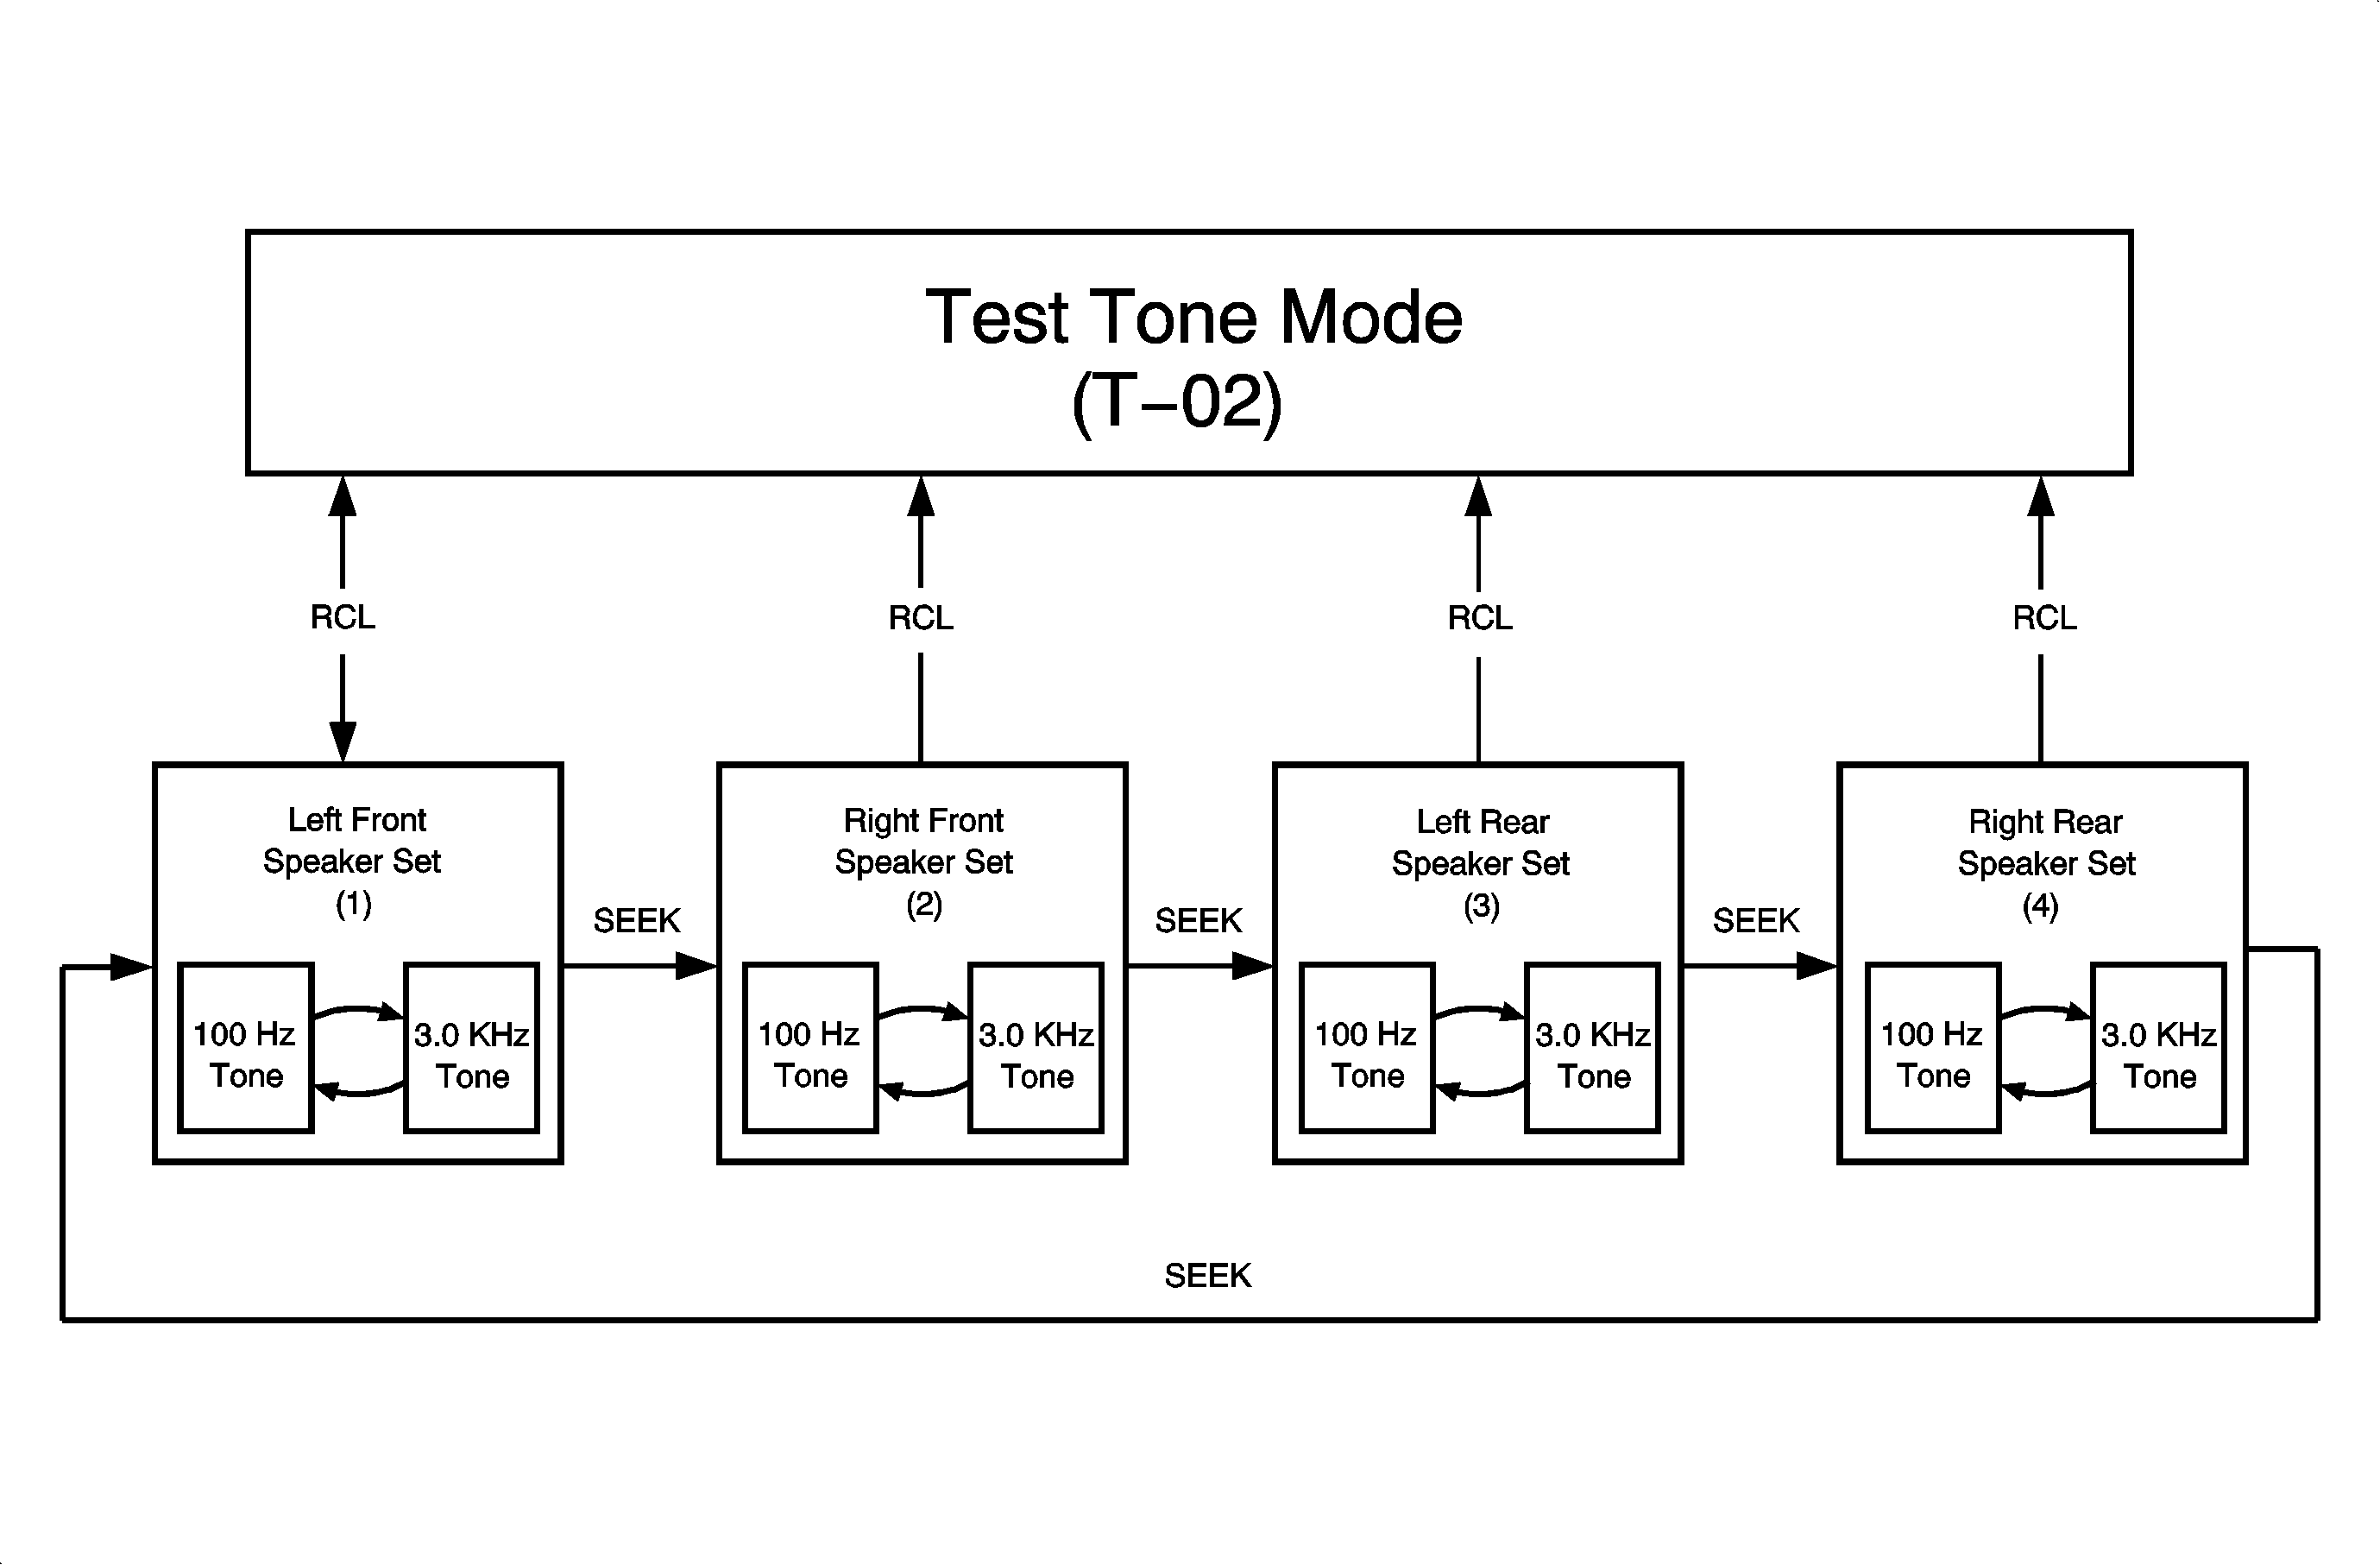
Test Tone Mode (T--02) For AM/FM CD Radio
Press the RCL button and the display will show "1." Balance and fade will automatically adjust to the left front speaker. Two test tones will be checked, the first at 100 Hz for 2 seconds, there will be a half-second pause, and then the second tone at 3.0 kHz for 2 seconds. These 2 tones will continue to check the left front speaker until the SEEK rocker button is pressed, which automatically adjusts the balance and fade to the right front speaker "2" will appear on the display and the 2 test tones will check the right front speaker. Press it again to adjust to left rear speaker "3" will appear on the display and the 2 test tones will check the left rear speaker. Press it again to adjust to the right rear speaker "4" will appear on the display and the two test tones will check the right rear speaker. To exit the test tone mode, press the RCL button.
If you do not hear the test tones, turn the volume up by using the volume knob. If either of the test tones is not heard for a particular speaker, refer to the appropriate chart (chart 2, 3, or 4) to correct the problem.
LCD Segment Test Mode (T--03) For AM/FM CD Radio
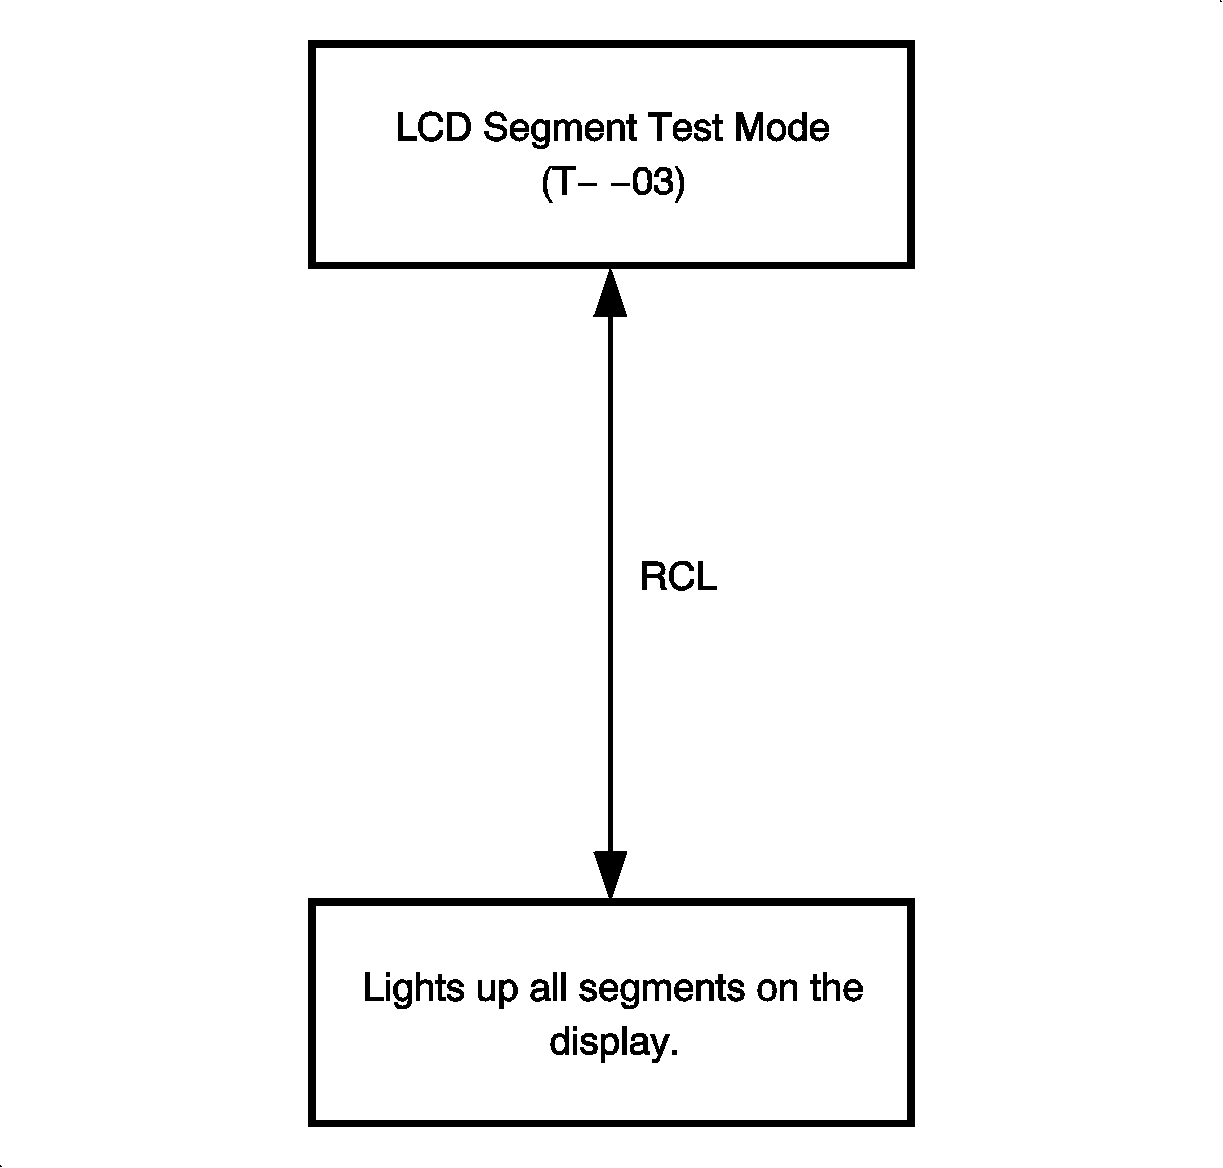
Press the RCL button and the display will show every possible segment at one time that can be displayed. Refer to Diagnostic System Check - Radio/Audio System to see what should be on the display. If something is not displayed, replace the radio. To exit the LCD segment test mode, press the RCL button.
Key Test Mode (T--04) For AM/FM CD Radio
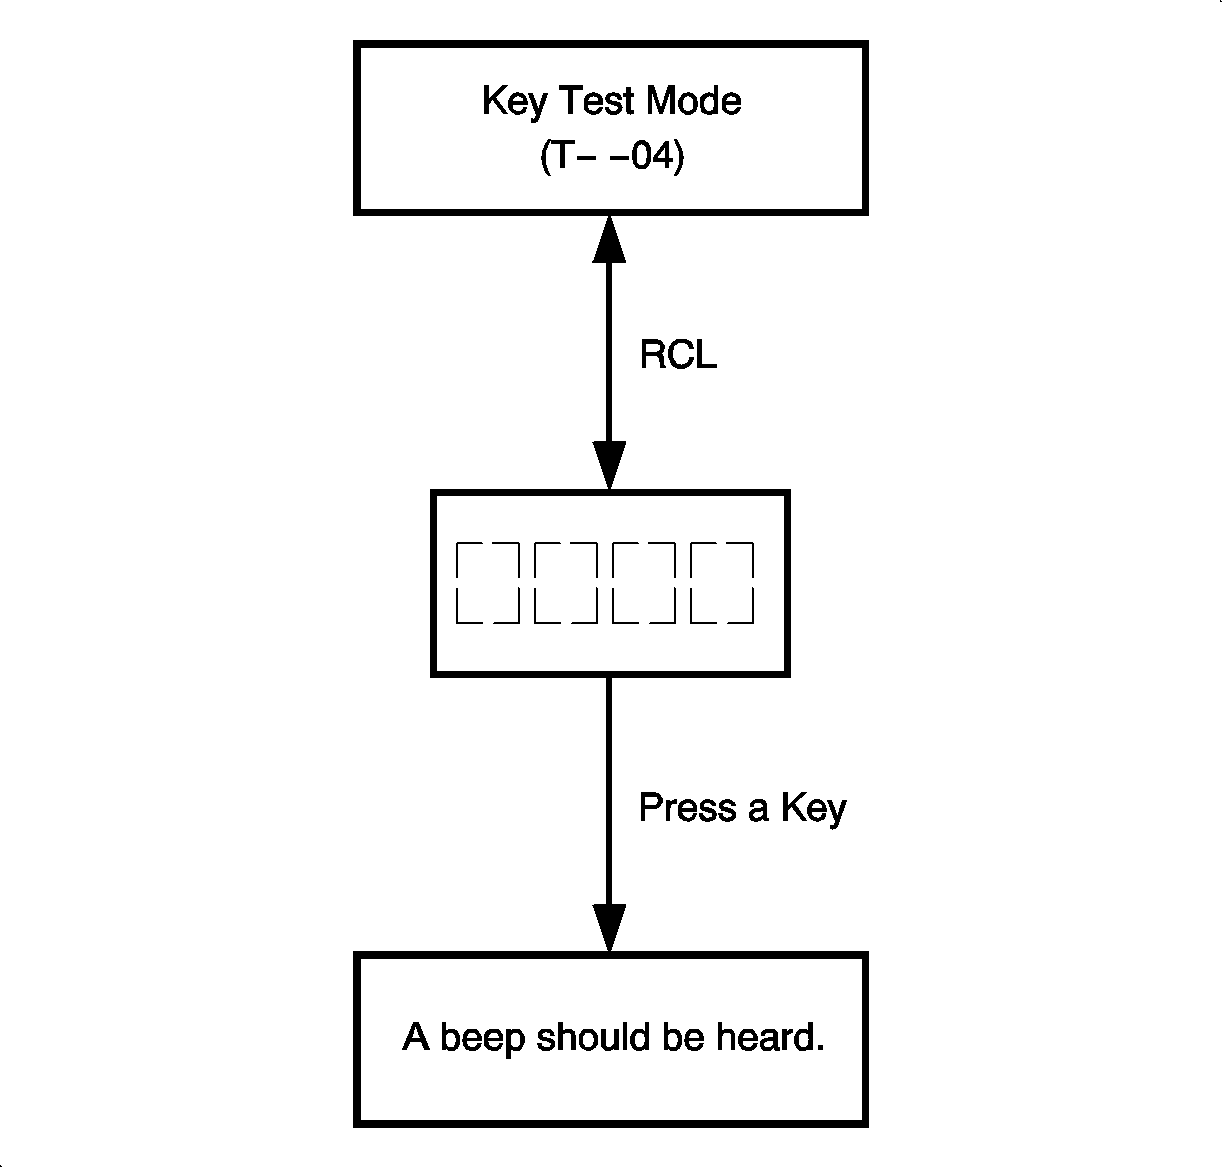
Press the RCL button to activate the key test mode, then press each button to verify it works. If the button works, a beep will be heard after the button is pressed. If the button does not work, nothing will be heard when the button is pressed. Also, nothing will be heard when the RCL button or volume knob is pressed, but performance will be known once the desired functions are chosen. To exit the key test mode, press the RCL button.
Antenna Signal Meter Mode (T--05) For AM/FM CD Radio
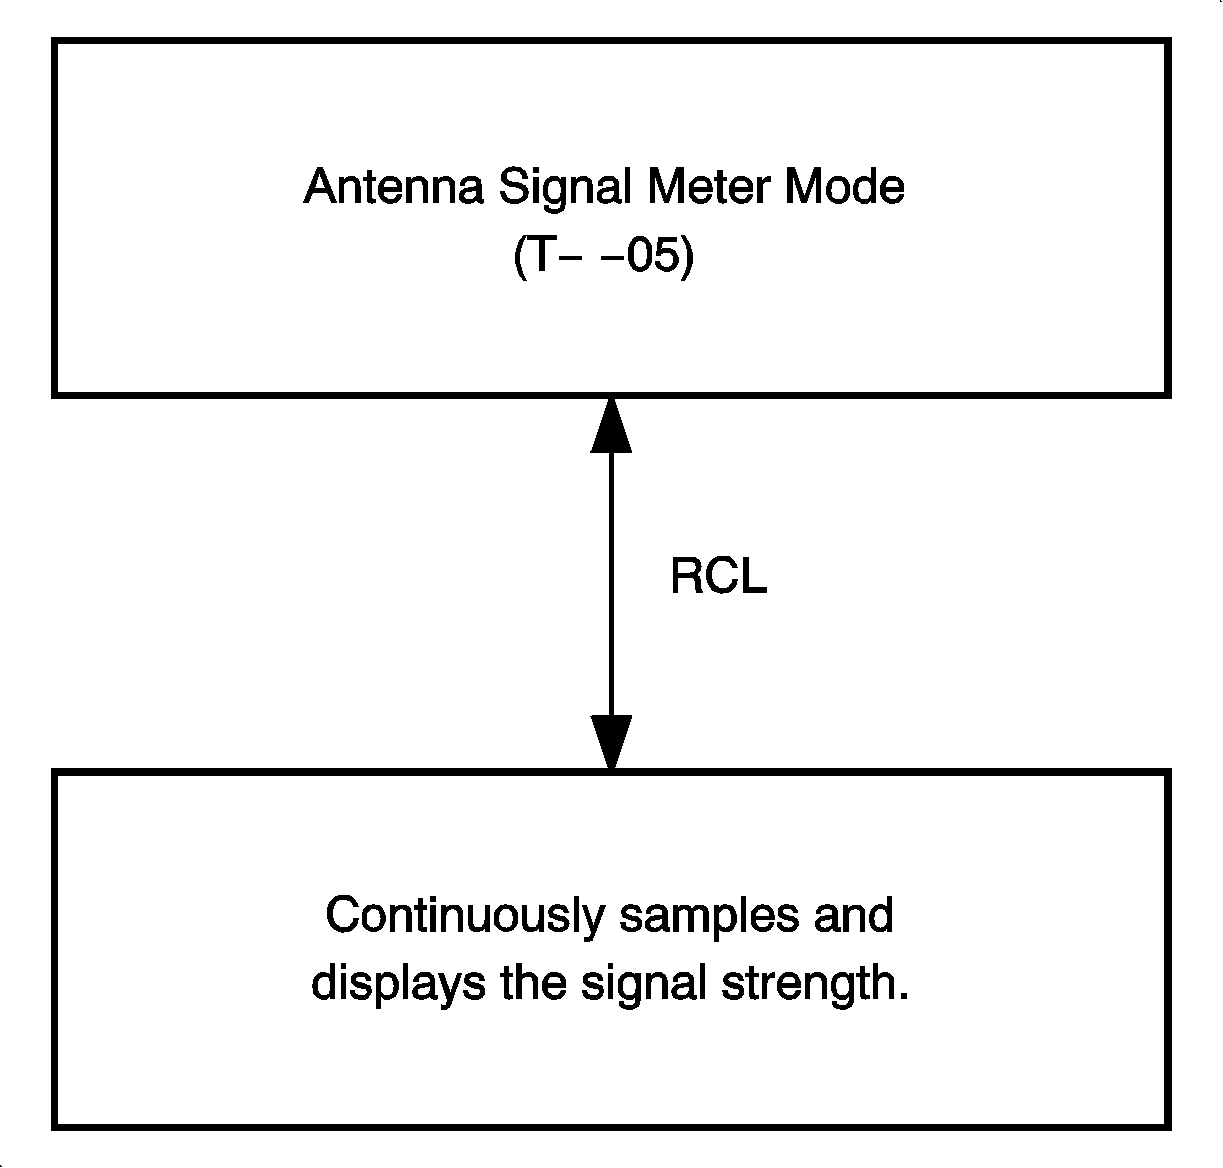
Press the RCL button to view the antenna signal strength of the last tuned station. The music of the last station will be heard while the signal is continuously sampled and displayed. The signal will continue to be sampled and displayed until the RCL button is pressed, returning T--05 to the display.
| • | Compare the signal strength of 2 vehicles playing the same station when the vehicles are side by side and use these values to compare for problems with the audio system. |
| • | If familiar with the signal strength of a particular station, use this value to compare for problems with the audio system. |
Clear Diagnostic Trouble Code Mode (T--06) For AM/FM CD Radio
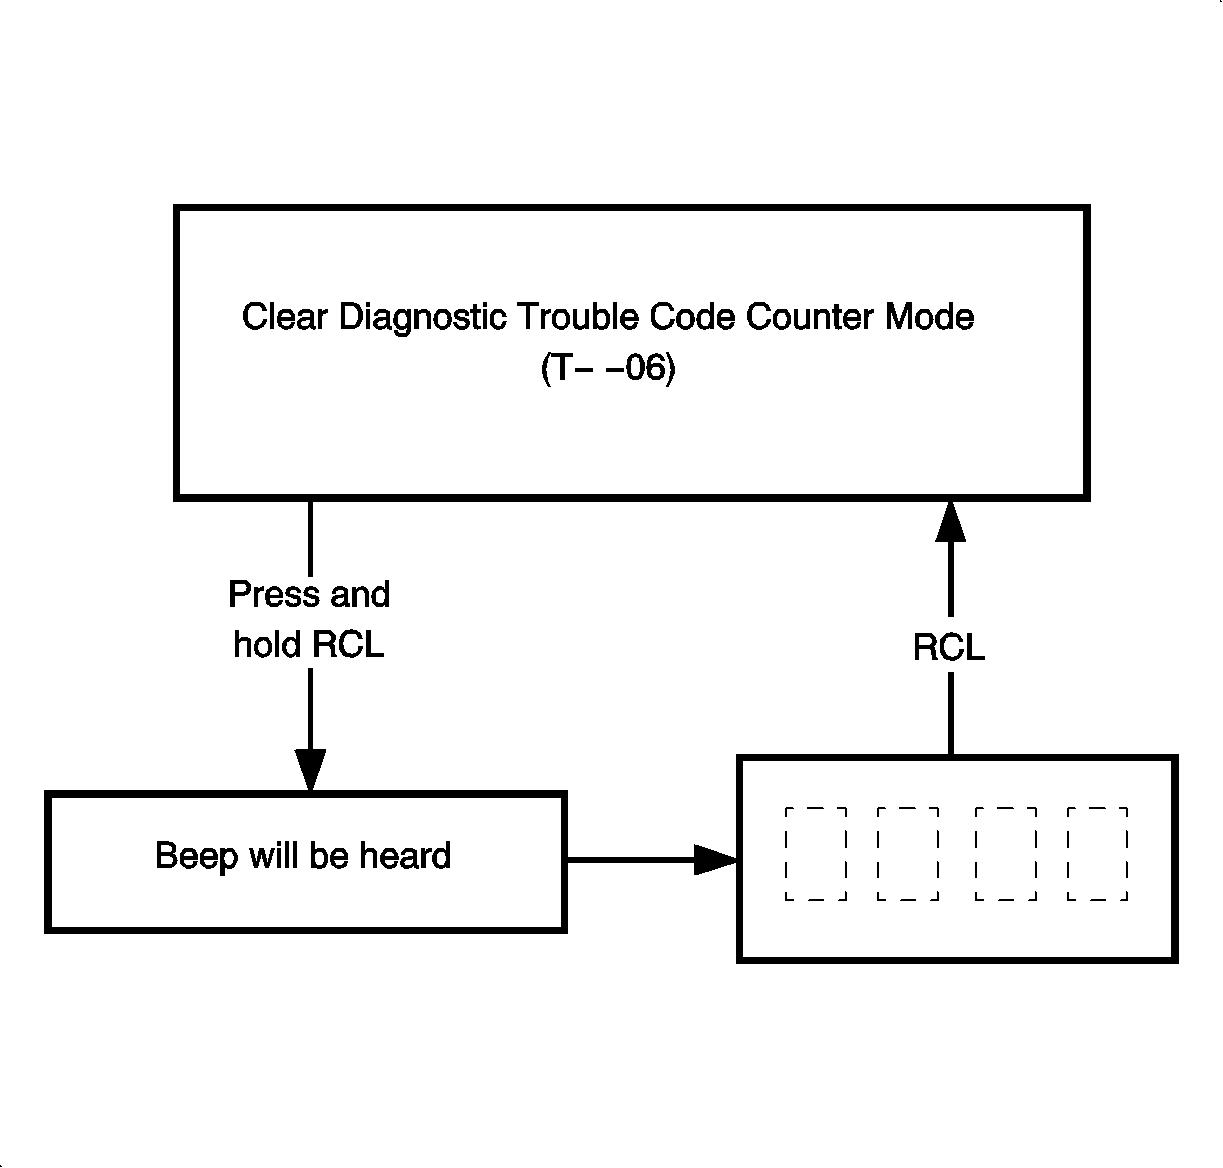
When T- -06 is on the display, press and hold the RCL button for 2 seconds to reset/clear the DTCs. After 2 seconds, an audible tone will be heard and the codes will be reset. To exit the clear codes mode, press the RCL button.
On-Board Diagnostics (OBD) For AM/FM Cassette/CD Radios
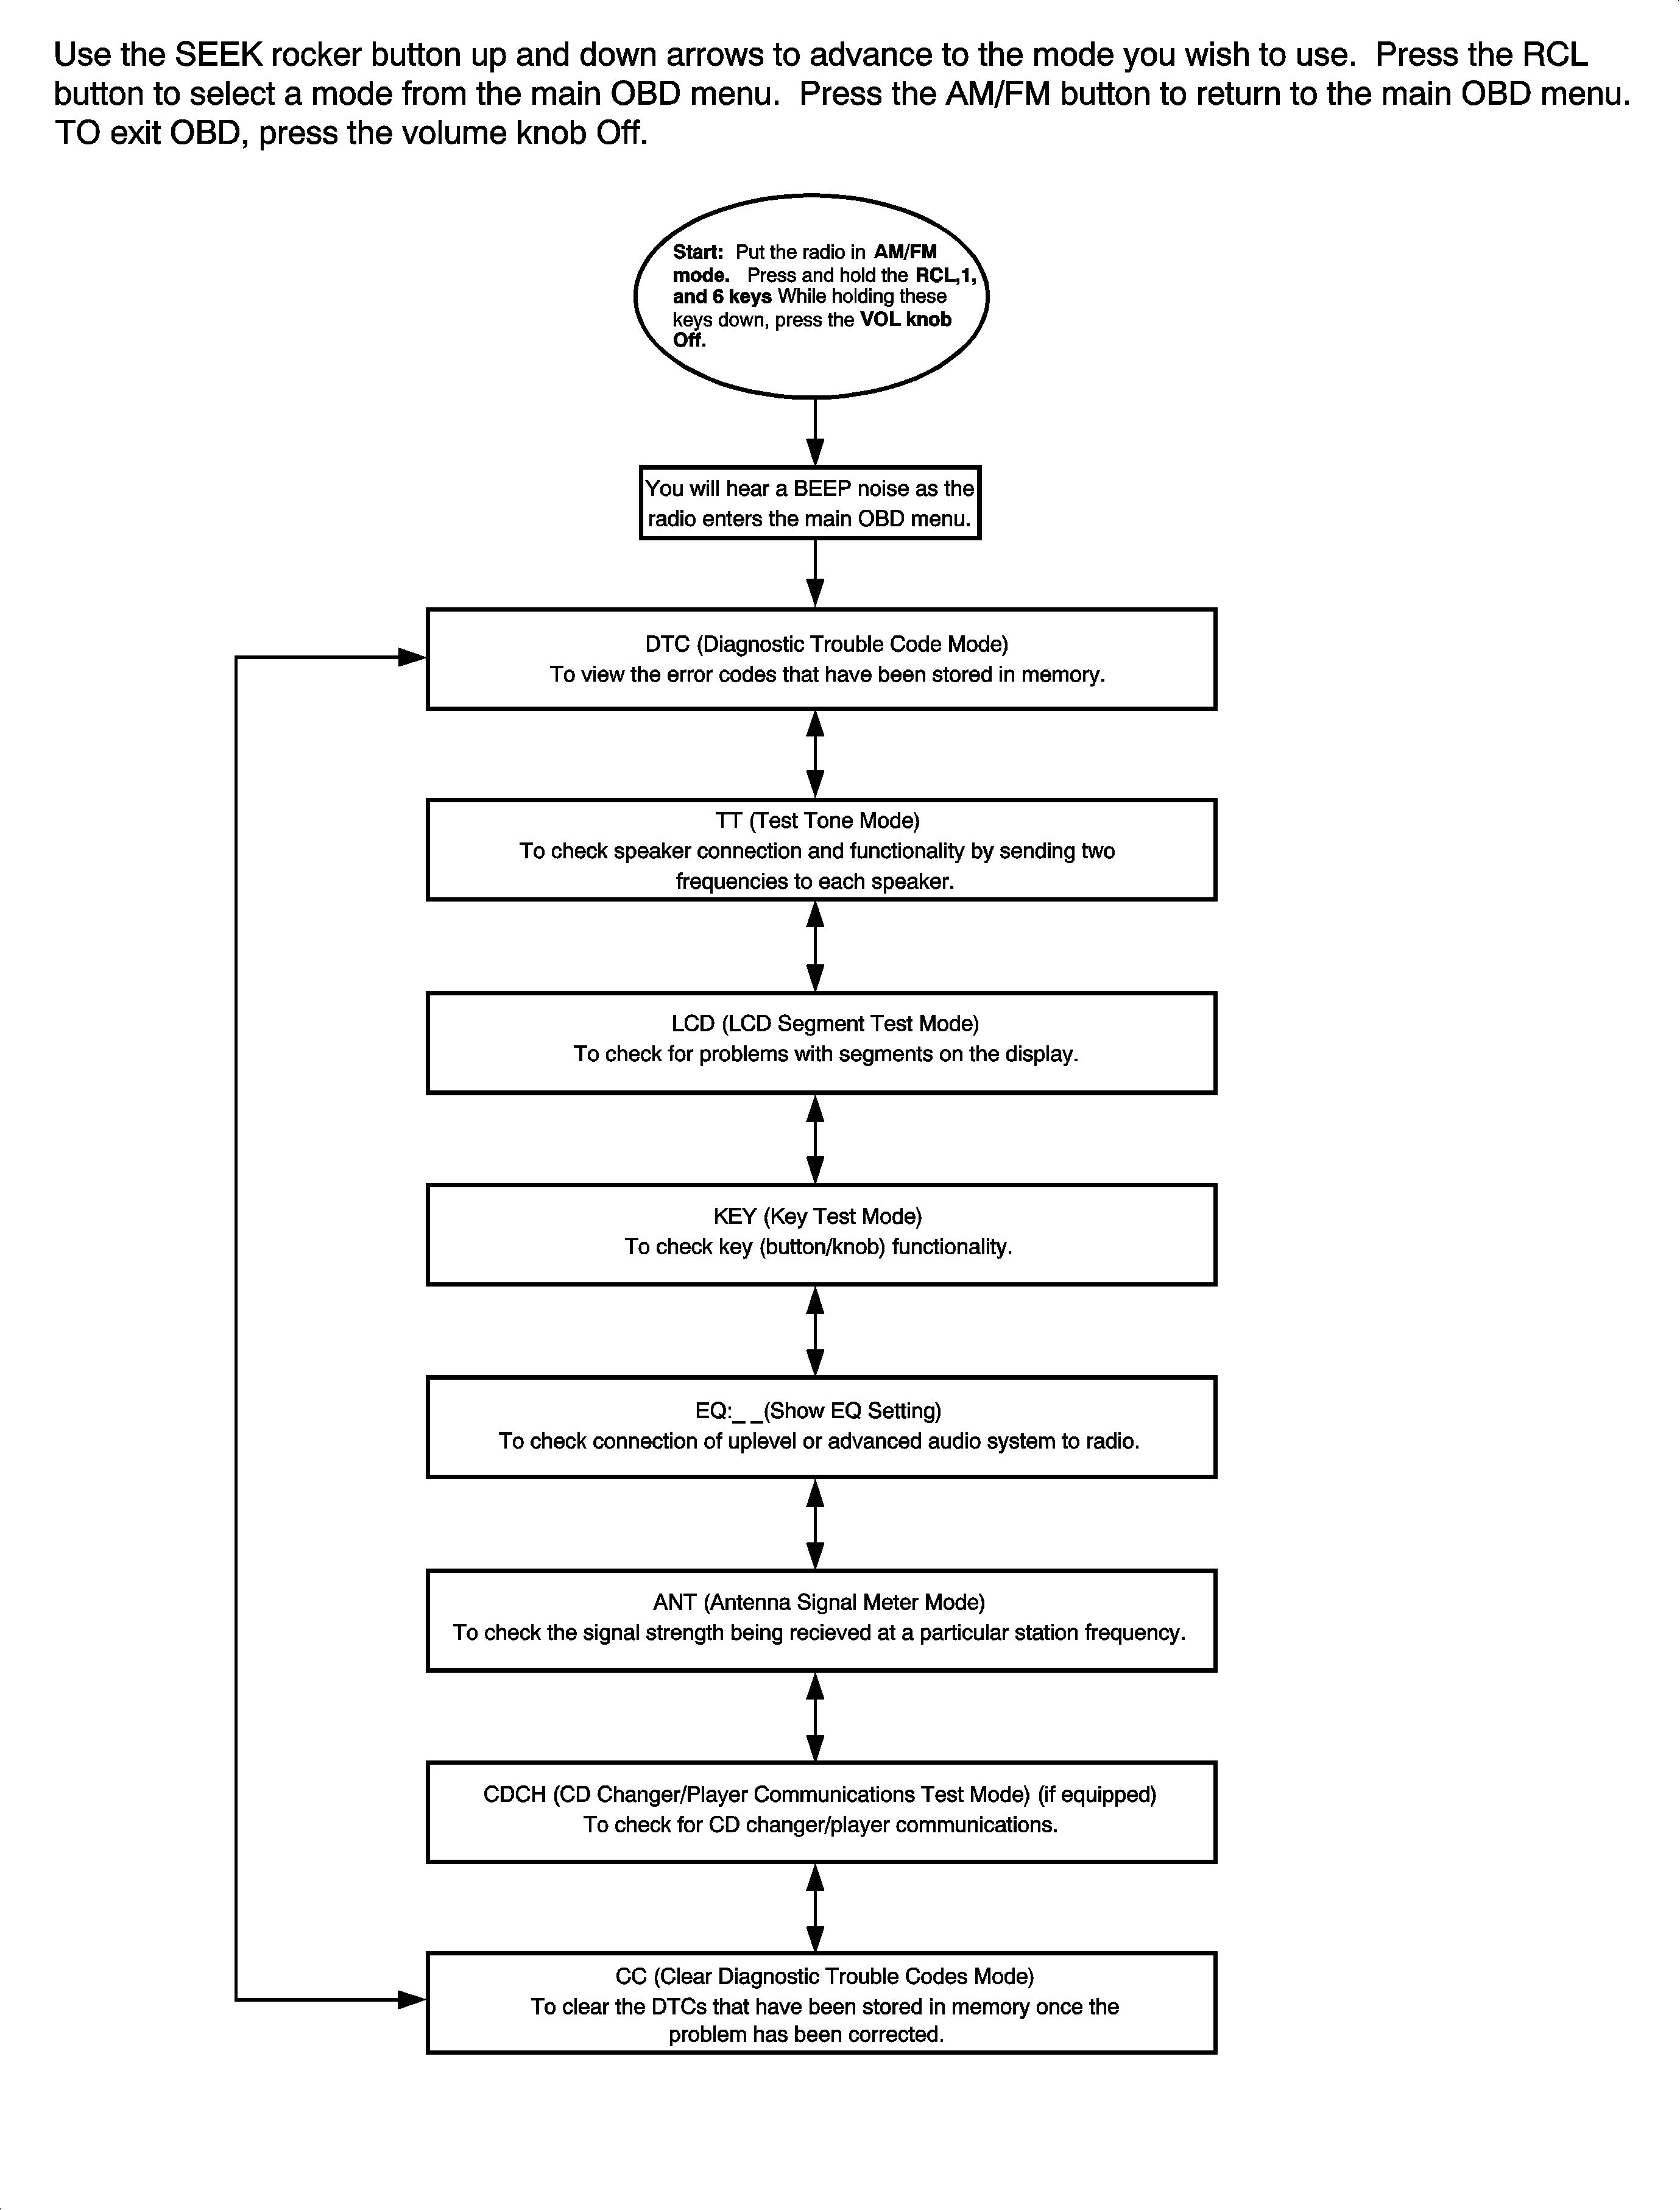
Diagnostic Trouble Code Mode (DTC) For AM/FM/Cassette/CD Radios
If an error is made while the customer is using the radio, an error message will momentarily appear on the display alerting the customer that an error has been made. The DTC mode in the OBD is available to check which error codes have been set and how may times each error code has been set.
- Press the RCL button one time to display "E- -01", then use the SEEK rocker button to tab through all of the possible error codes (E- -01, ..., E- -09). At each error code, use the RCL button to display the number of times the error has occurred. Press the AM/FM button to return back to display the error code. Once the error code is again displayed, press the SEEK rocker button to check another error code.
- When you are finished checking the error codes, press the AM/FM button until DTC is again on the display.
The following is the list of all possible error messages along with the probable causes and procedure to correct the problem.
Possible Causes | Procedure |
|---|---|
E- -01 (Tape EJECT Error) | |
The tape is tangled in radio. | This could be caused by a dirty tape or a dirty radio tape unit. Clean the radio tape player and discard the damaged tapes. |
Tape label is caught in radio. | The result would be the tape player won't eject tapes or it won't accept tapes. Remove the peeled label. |
Tape player failure |
|
E- -02 (Tape PLAY Error) | |
Tape is tangled in radio. | This could be caused by a dirty tape or a dirty radio tape unit. Clean the radio tape player and discard the damaged tapes. |
Tape is too long for radio. | Ensure that tape is not longer than 90 minutes. |
Tape is damaged or dirty. | This could cause poor sound, channel low or no sound, or weak treble. Clean the radio tape player and discard the damaged tapes. |
Tape player failure | Refer to Chart 5.
|
E- -03 (Tape INSERTION Error) | |
Tape is badly damaged or dirty. | This could cause poor sound, channel low or no sound, or weak treble. Clean the radio tape player and discard the damaged tapes. |
Tape is too long for radio. | Ensure that tape is not longer than 90 minutes. |
Tape is tangled in radio. | This could be caused by a dirty tape or a dirty radio tape unit. Clean the radio tape player and discard the damaged tapes. |
Tape player failure. |
|
Possible Causes | Procedures | ||||||||||
|---|---|---|---|---|---|---|---|---|---|---|---|
E- -04 (CD EJECT Error) | |||||||||||
The CD is warped or cracked. |
| ||||||||||
The CD player opening is blocked by foreign material. |
| ||||||||||
CD player failure |
| ||||||||||
The CD is scratched. | The CD will skip around, eject unexpectedly, eject right after loading, or mute intermittently.
| ||||||||||
The CD is dirty. | Clean the CD. Refer to Radio/Audio System Description and Operation . | ||||||||||
CD optical focus assembly failure (if from condensation) | Turn on car blower motor to evaporate the condensation. Wait to play the CD player for about 60 minutes so the dew can dry up after blower motor is turned on. | ||||||||||
E- -05 (CD PLAY Error) | |||||||||||
The CD is scratched. | The CD will skip around, eject unexpectedly, eject right after loading, or mute intermittently.
| ||||||||||
The CD is dirty. | Clean the CD. Refer to Radio/Audio System Description and Operation . | ||||||||||
CD optical focus assembly failure (if from condensation) | Turn on car blower motor to evaporate the condensation. Wait to play the CD player for about 60 minutes so the dew can dry up after blower motor is turned on. | ||||||||||
CD player failure |
| ||||||||||
E- -06 (CD INSERTION Error) | |||||||||||
The CD is badly scratched. | The CD will skip around, eject unexpectedly, eject right after loading, or mute intermittently.
| ||||||||||
The CD is warped. |
| ||||||||||
The CD is upside down. | The CD will eject right after loading. The CD should be installed label side up. | ||||||||||
CD player failure |
| ||||||||||
Possible Causes | Procedures | ||||||||||
|---|---|---|---|---|---|---|---|---|---|---|---|
E- -07 (CD Changer/Player COMMUNICATION Error) | |||||||||||
The CD changer/player connection is disconnected. | Check the connection. | ||||||||||
The CD changer/player jumper is shorted, open, or damaged. | Check for shorts/open/damage in CD changer/player jumper. | ||||||||||
The CD changer/player is not getting power. | Check the fuse. Check the terminal contact and for shorts/open/damage in CD changer/player jumper. | ||||||||||
CD changer/player failure. | Replace the CD changer/player. | ||||||||||
Radio failure |
| ||||||||||
E- -08 (CD Changer MAGAZINE LOADING Error) | |||||||||||
The CD is warped or cracked. |
| ||||||||||
CD changer/player failure |
| ||||||||||
E- -09 (CD Changer/Player PLAY Error) | |||||||||||
The CD is scratched or dirty. | The CD will skip around, eject unexpectedly, eject right after loading, or mute intermittently.
| ||||||||||
All CDs are inserted upside down. | All CDs should be inserted label side up. | ||||||||||
CD changer/player failure |
| ||||||||||
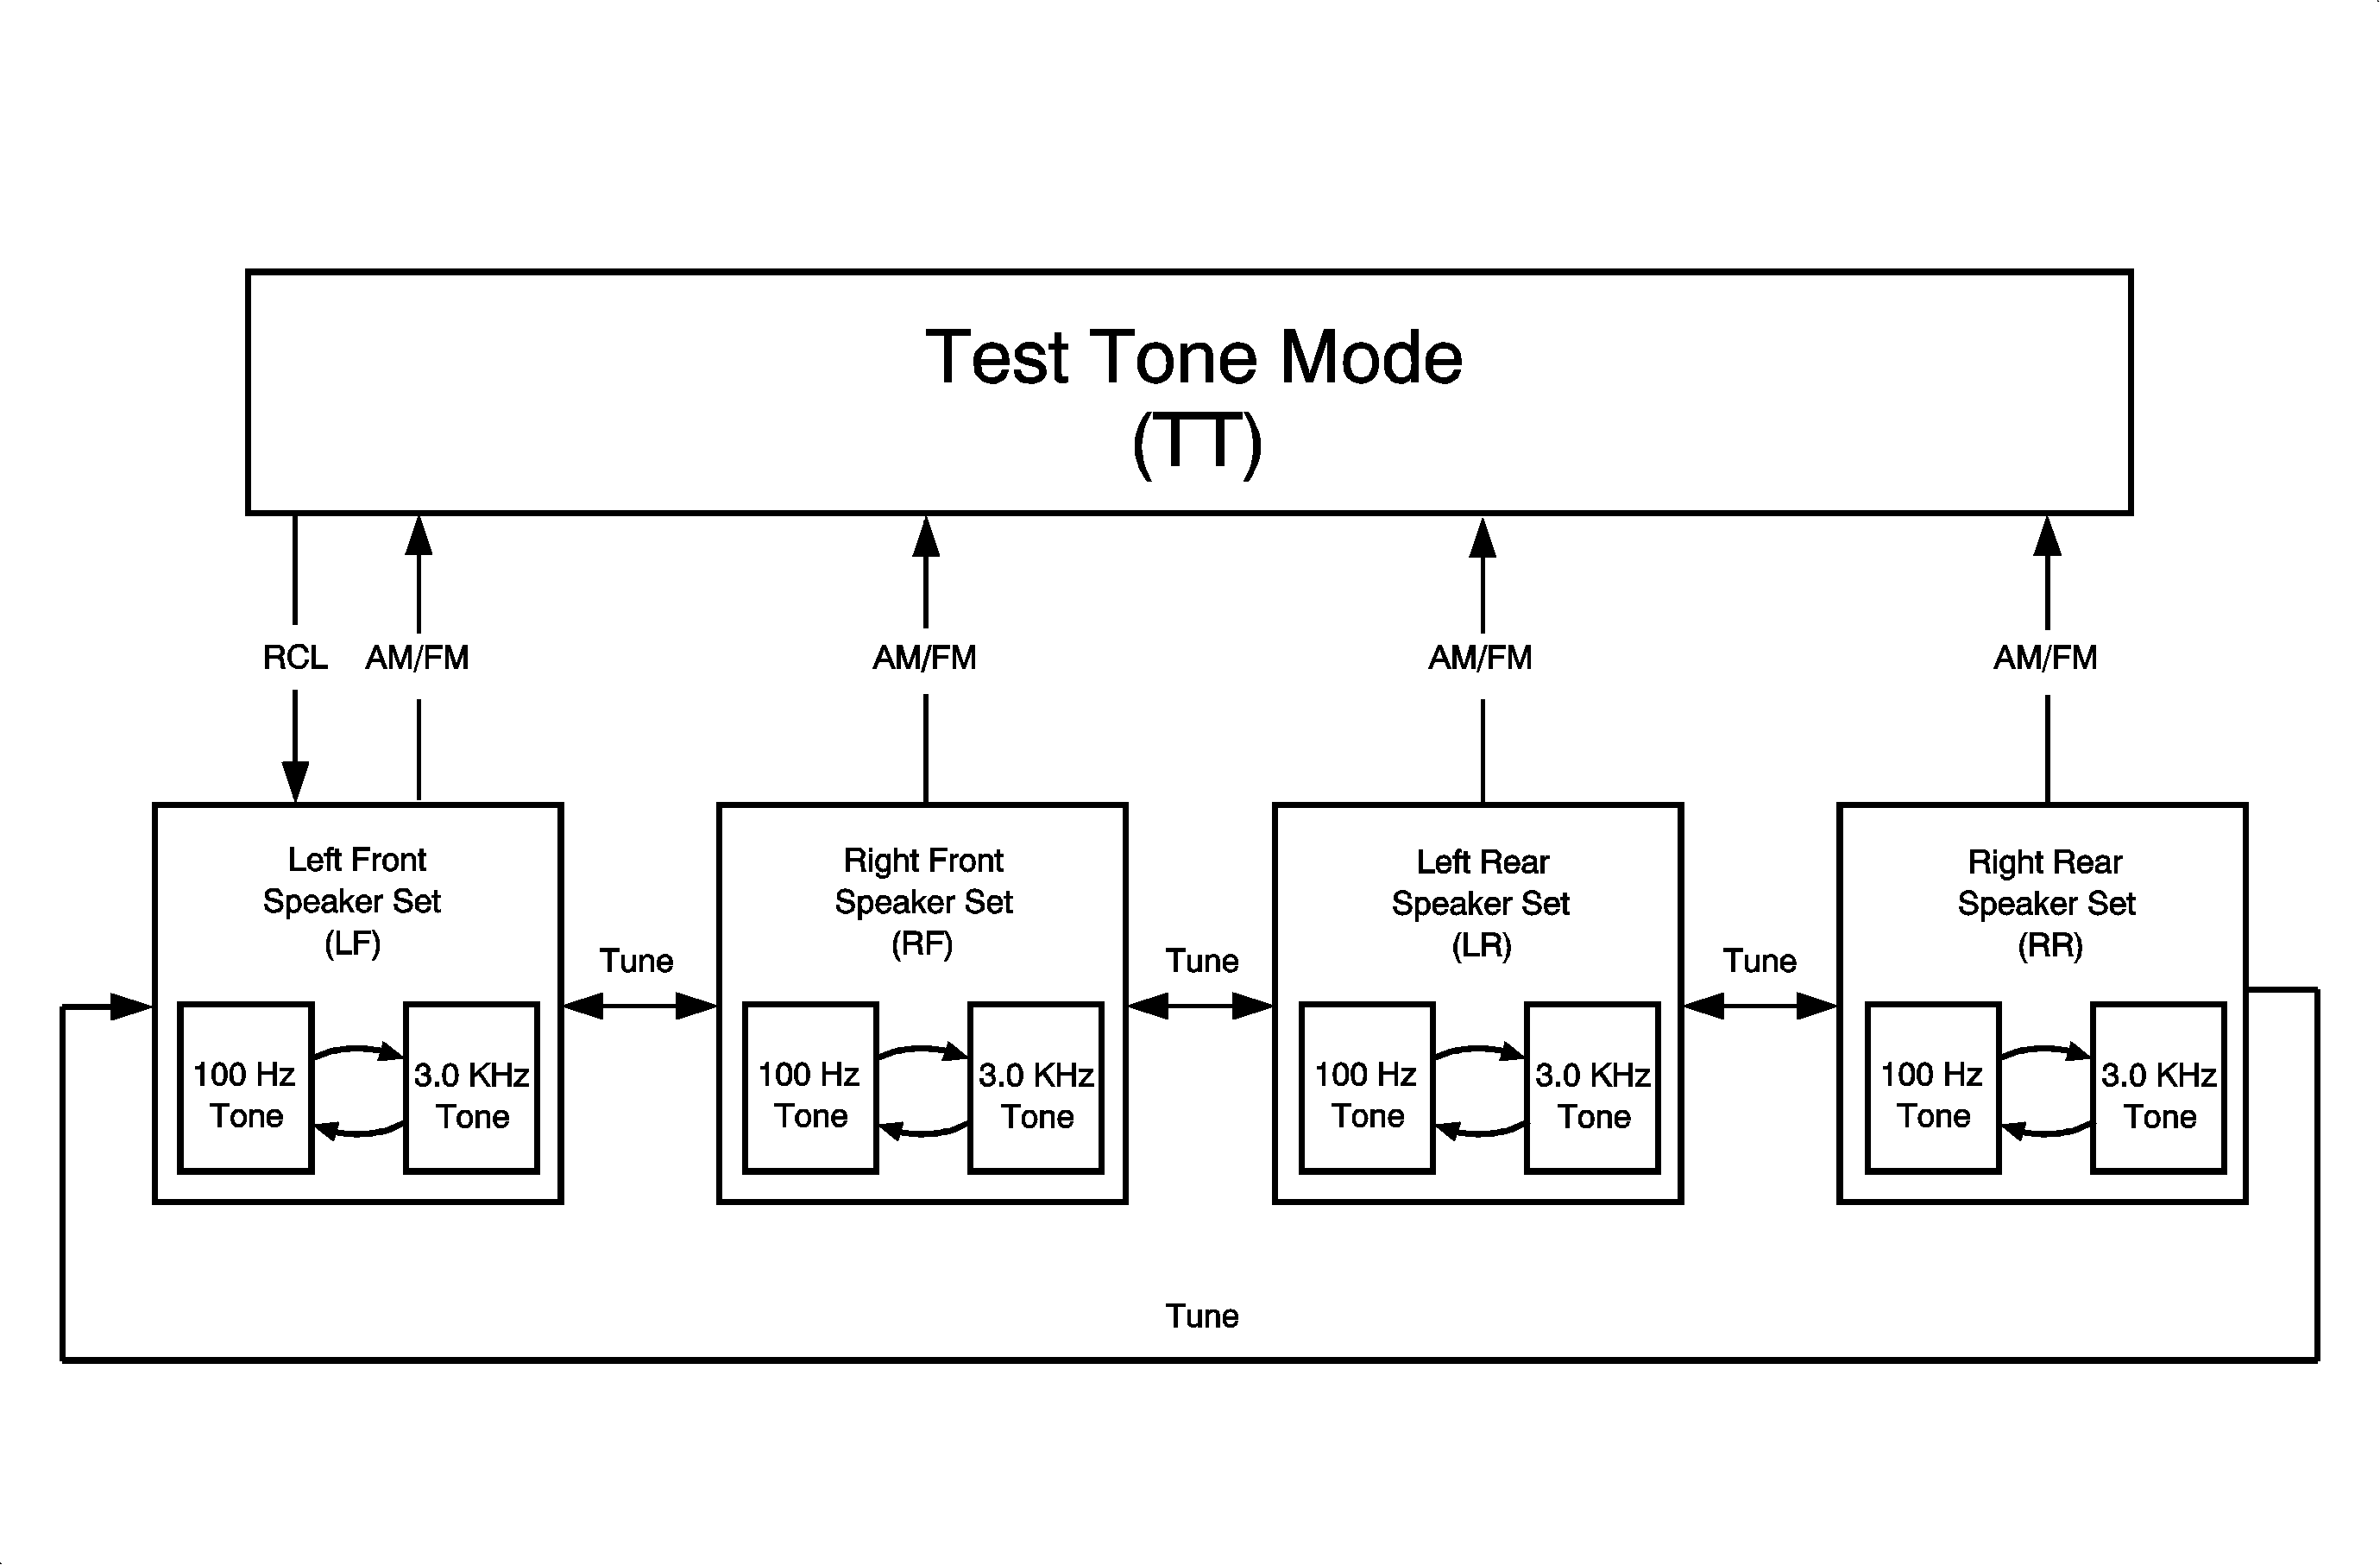
Test Tone Mode (TT) For AM/FM Cassette/CD Radios
Press the RCL button and the display will show LF. Balance and fade will automatically adjust to the left front speaker. Two test tones will be checked, the first at 100 Hz for 2 seconds, there will be a half-second pause, and then the second tone at 3.0 kHz for 2 seconds. These 2 tones will continue to check the left front speaker until the TUNE rocker button is pressed, which automatically adjusts the balance and fade to the right front speaker. RF will appear on the display and the 2 test tones will check the right front speaker. Press it again to adjust to left rear speaker. LR will appear on the display and the two test tones will check the left rear speaker. Press it again to adjust to the right rear speaker. RR will appear on the display and the 2 test tones will check the right rear speaker. To exit the test tone mode, press the AM/FM button.
If you cannot hear the test tones, turn the volume up by using the volume knob. If either of the test tones is not heard for a particular speaker, refer to the appropriate chart (Chart 2, 3, or 4) to correct the problem.
LCD Segment Test Mode (LCD) For AM/FM Cassette/CD Radios
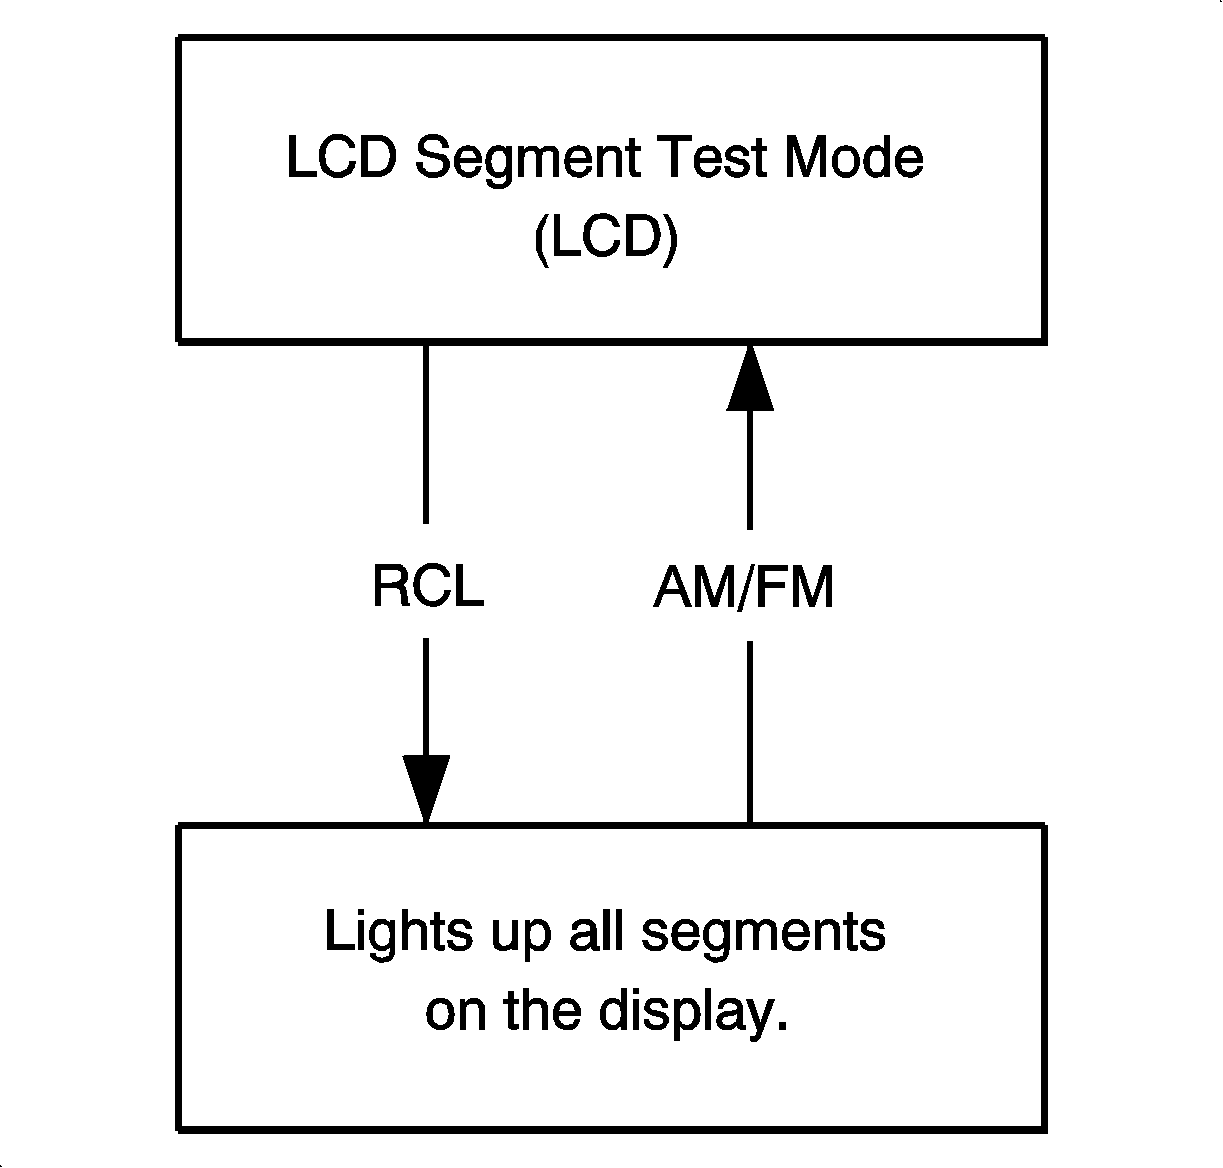
Press the RCL button and the display will show every possible segment at one time that can be displayed. Refer to "System Checks" section in this service manual to see what should be on the display. If something isn't displayed, replace the radio. To exit the LCD test mode, press the AM/FM button.
Key Test Mode (KEY) For AM/FM Cassette/CD Radios
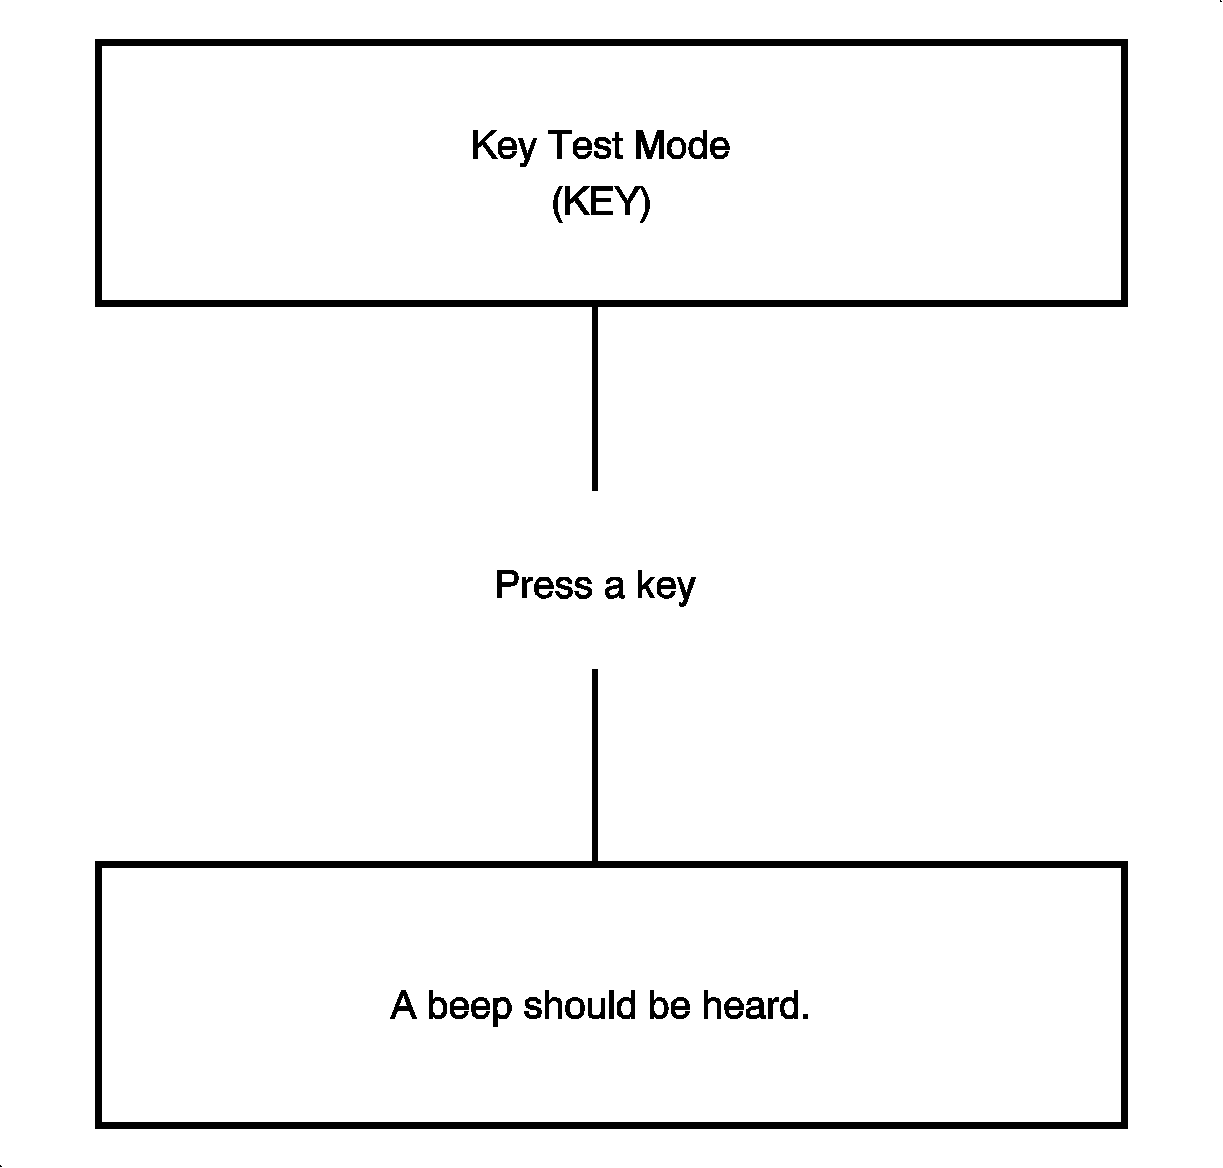
Press the RCL button to activate the key test mode, then press each button/knob to verify it works. If the button/knob works, a beep will be heard after each button or knob is pressed. If the button/knob does not work, nothing will be heard when the button/knob is pressed. Also, nothing will be heard when the AM/FM button or volume knob is pressed, but performance will be known once the desired functions are chosen. The AM/FM button will take the radio out of the key test mode and the volume knob will take the radio out of the on board diagnostic mode. To exit the key test mode, press the AM/FM button.
Antenna Signal Meter Mode (ANT) For AM/FM Cassette/CD Radios
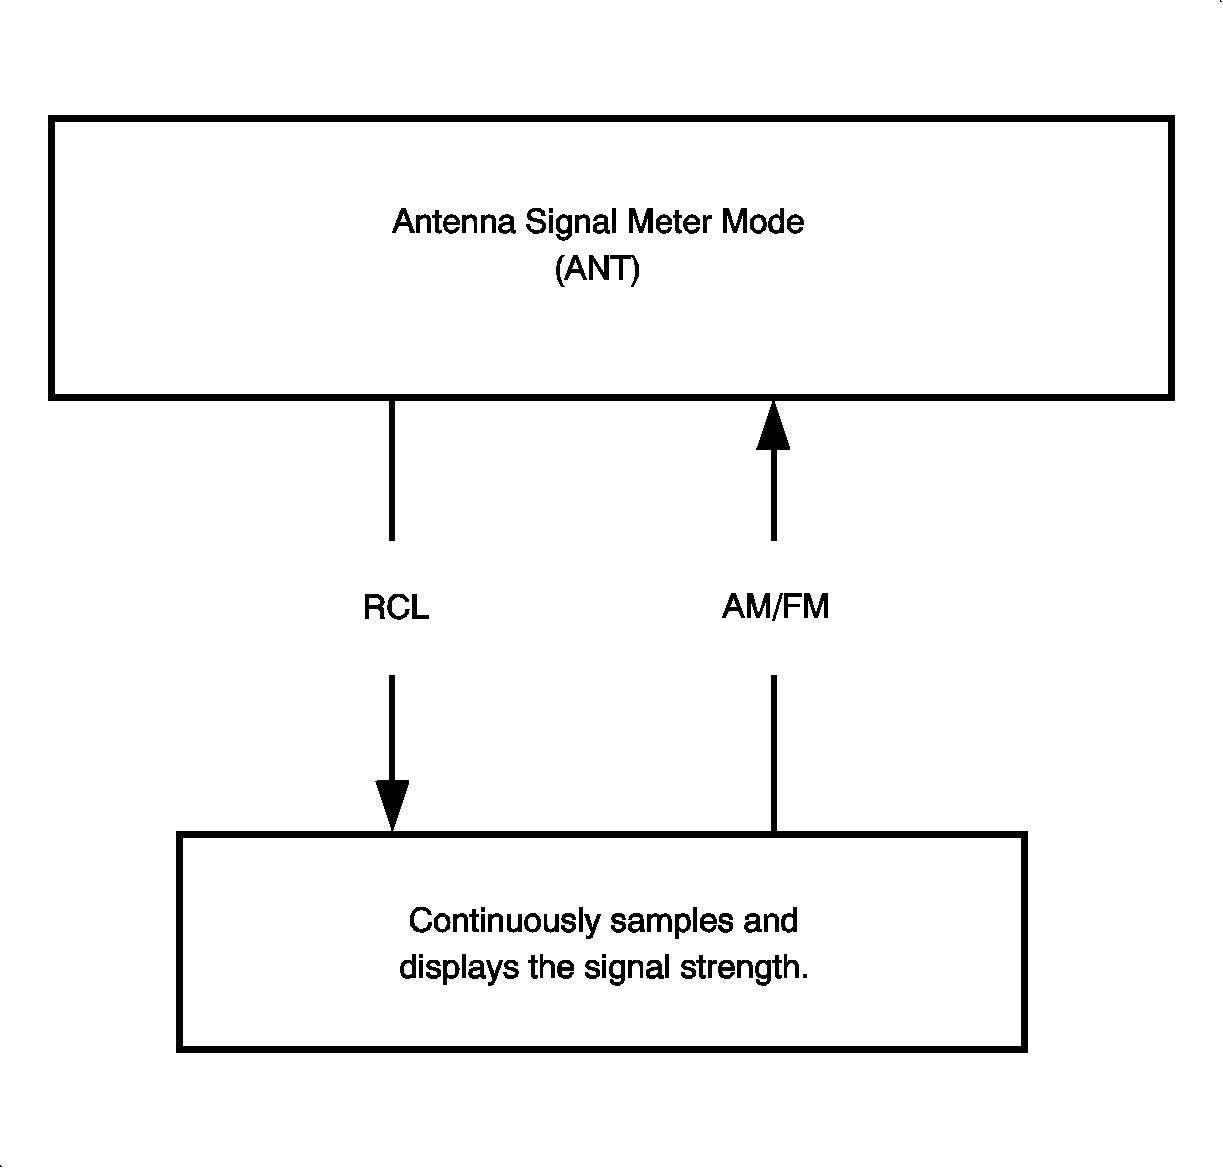
Press the RCL button to view the antenna signal strength of the last tuned station. The music of the last station will be heard while the signal is continuously sampled and displayed. The signal will continue to be sampled and displayed until the AM/FM button is pressed, returning ANT to the display.
| • | Compare the signal strength of two vehicles playing the same station when the vehicles are side by side and use these values to compare for problems with the audio system. |
| • | If familiar with the signal strength of a particular station, use this value to compare for problems with the audio system. |
Clear Diagnostic Trouble Code Mode (CC) For AM/FM Cassette/CD Radios
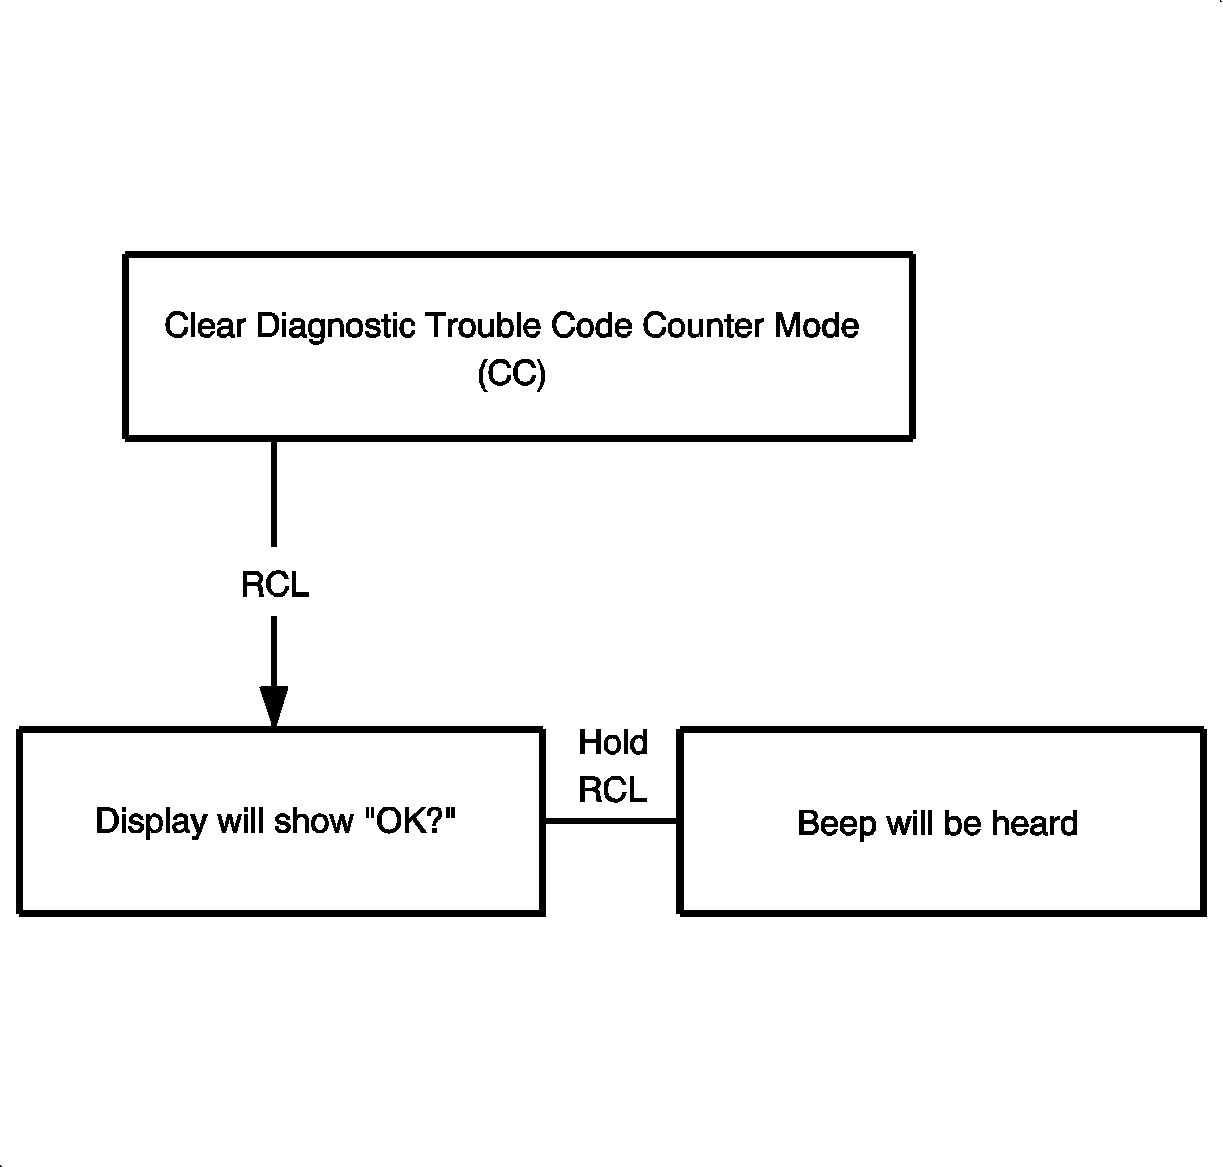
When CC is on the display, press the RCL button and the display will show "OK?". Then hold down the RCL button for 2 seconds to reset/clear the DTCs. After 2 seconds, an audible tone will be heard and the codes will be reset.
EQ Setting (EQ: 00, EQ: 01) For AM/FM Cassette/CD Radios
Displays which audio system the radio is connected to.
EQ Setting | Audio System Option |
|---|---|
EQ:00 | Advanced Audio System |
EQ:01 | Up-Level Audio System |
If the EQ setting does not reflect which audio system is in the vehicle, check for proper connection of the appropriate radio connector, fix any problems, and then check the EQ setting.
Remote CD Changer/Player Communication Test Mode (If Equipped) (CDCH) For AM/FM Cassette/CD Radios
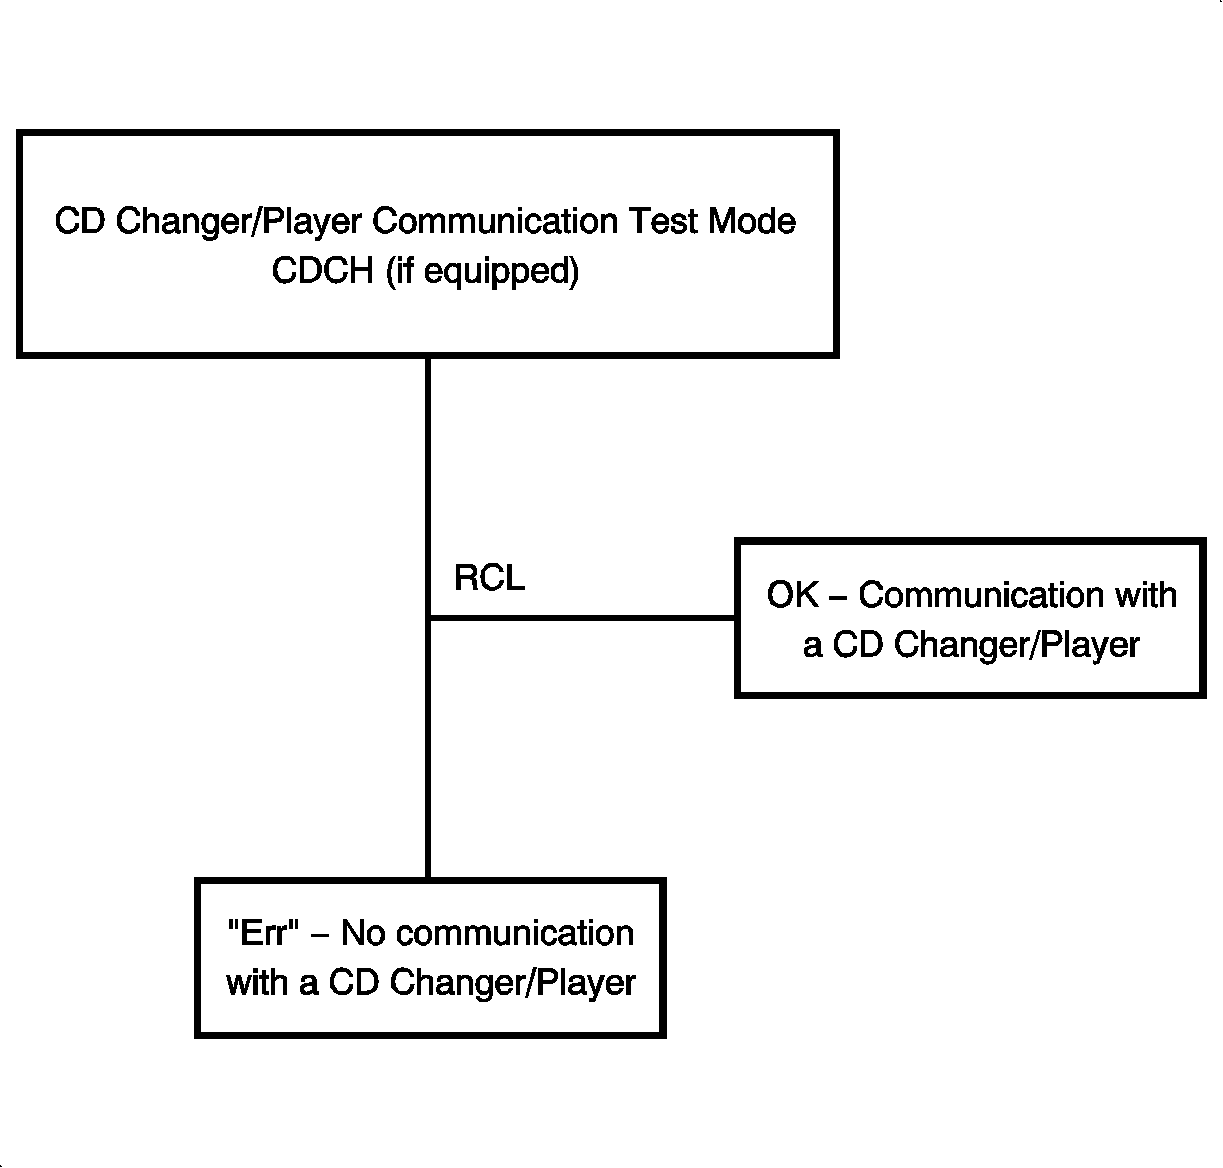
Important: If the vehicle is not equipped with a CD changer/player, "Err" will appear on the display, but there is no problem with the system.
When CDCH is on the display, press the RCL button to see if the CD changer/player is receiving messages from the radio. If the CD changer/player does not receive the message, "Err" will appear on the display for 2 seconds, then CDCH will again be displayed. If the CD changer/player does receive the message, OK will appear on the display for 2 seconds, then CDCH will again be displayed.
Chart 1
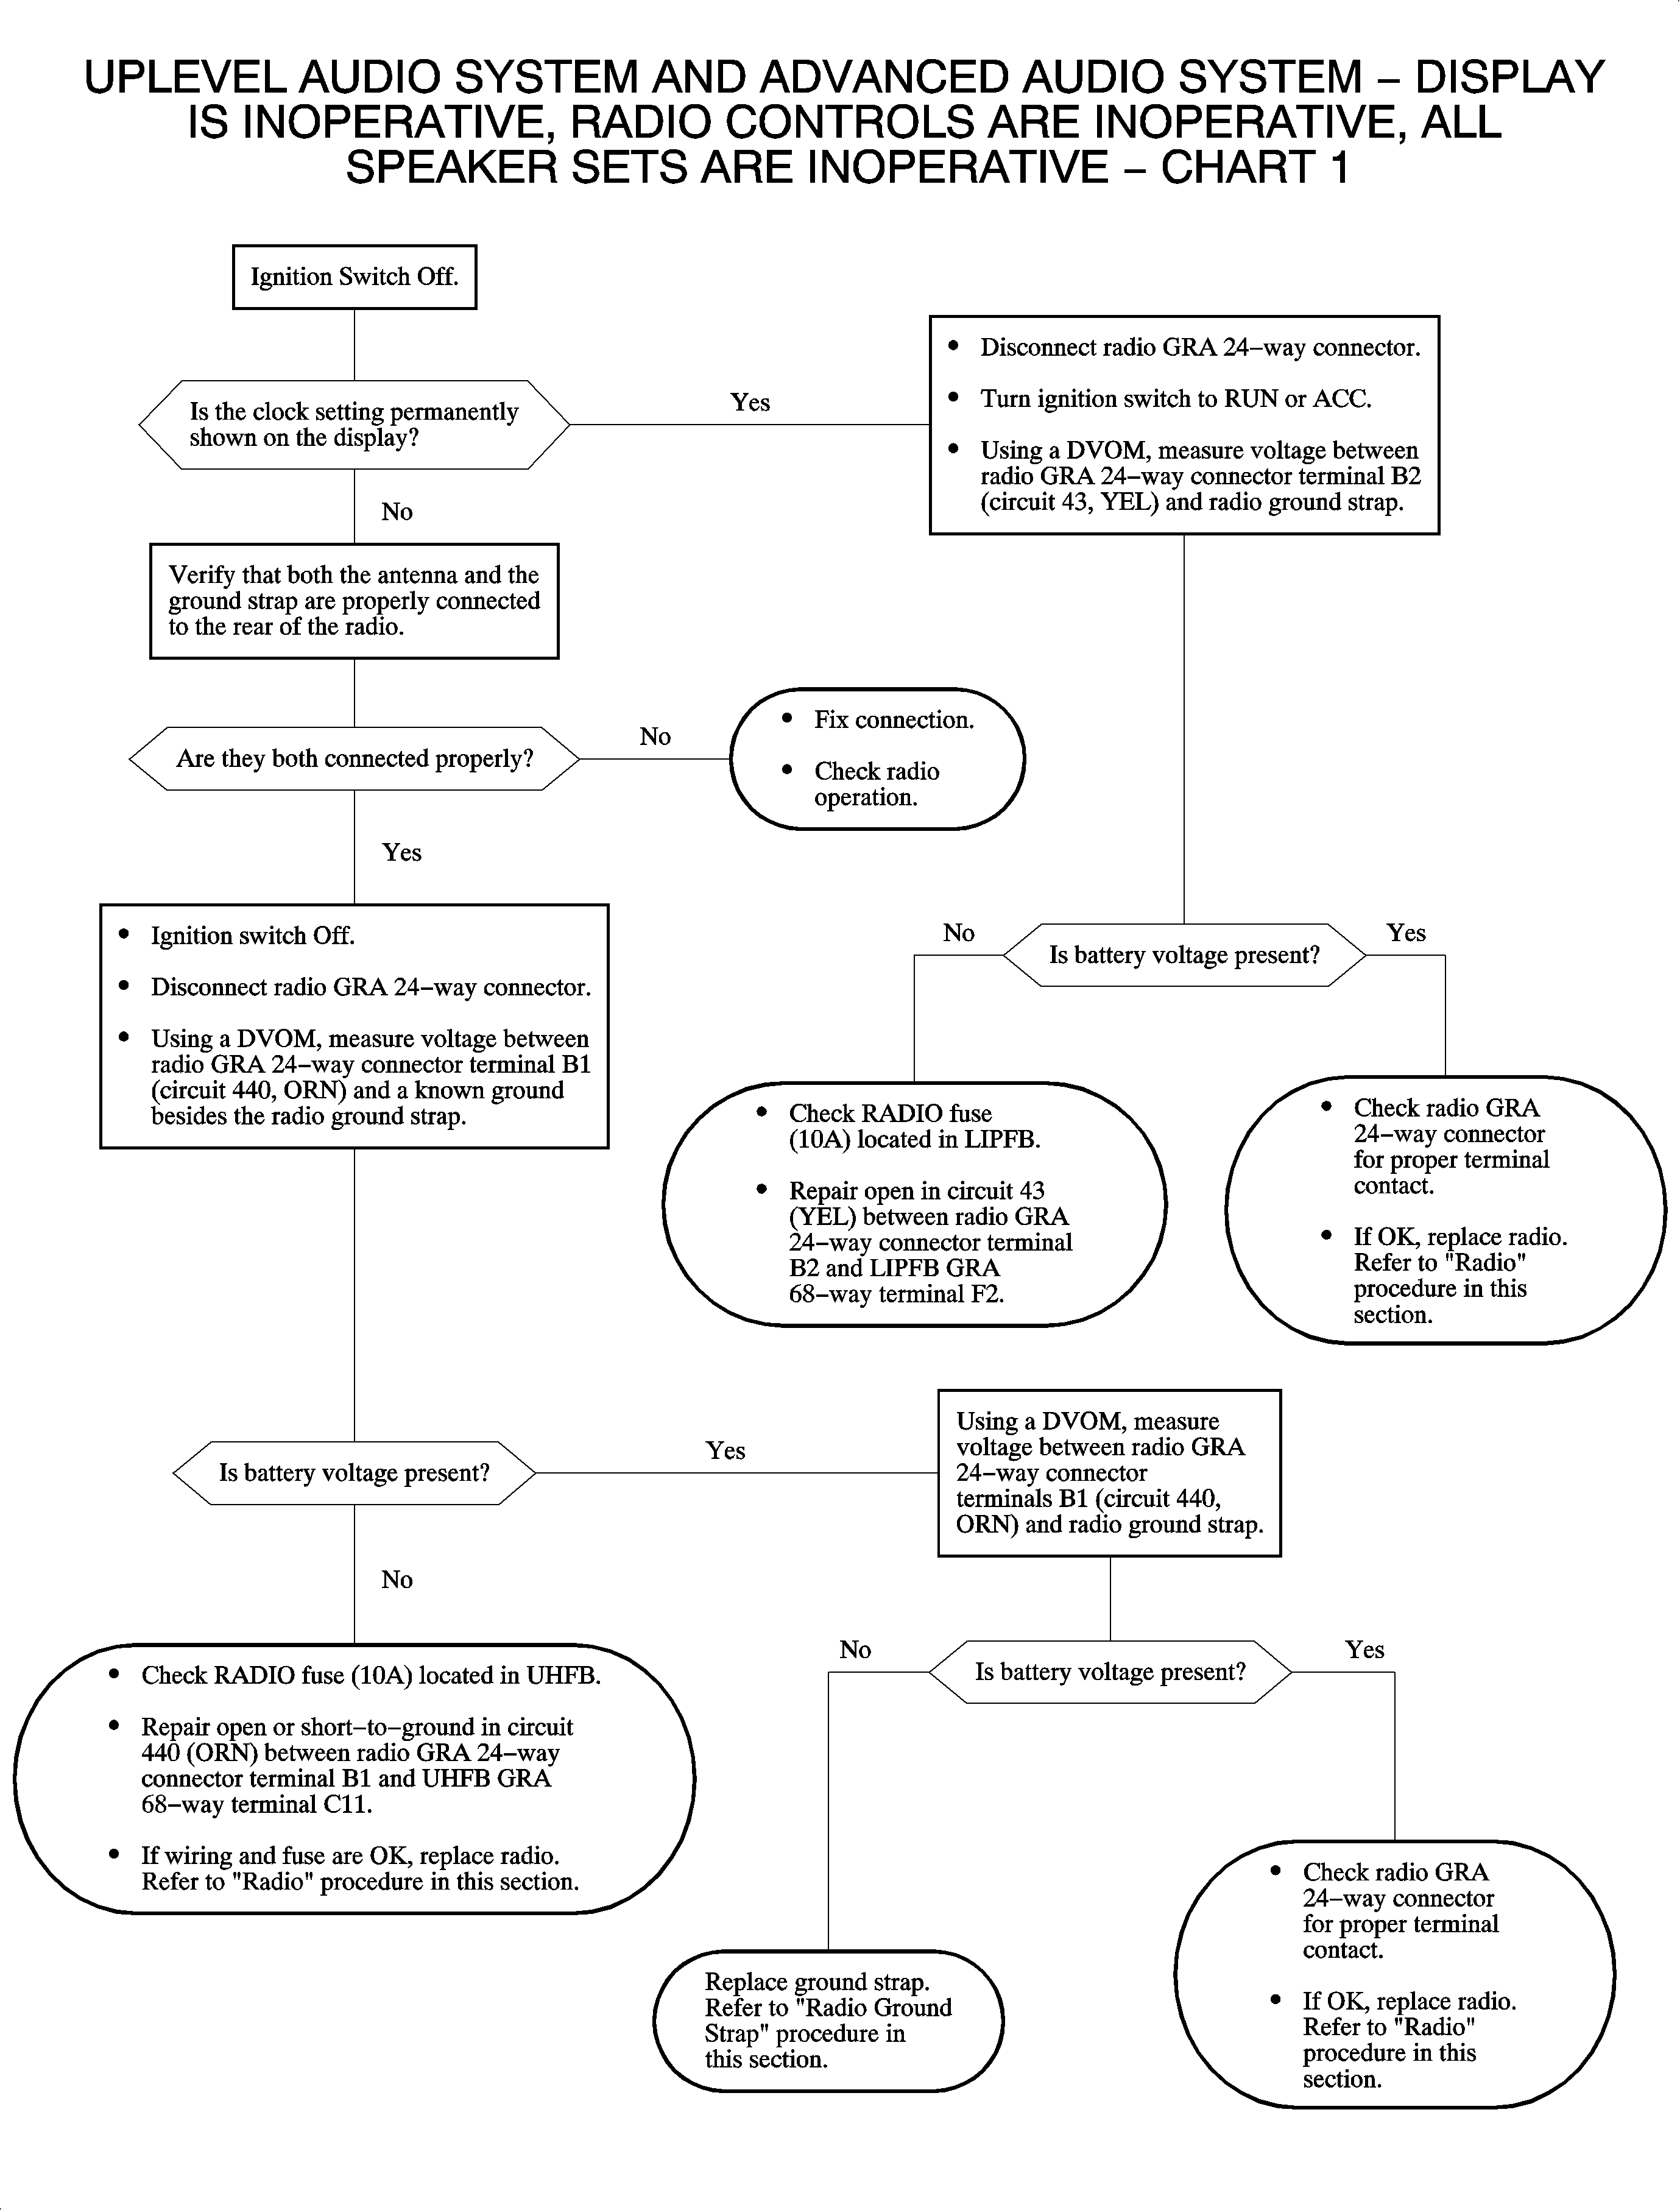
Chart 2
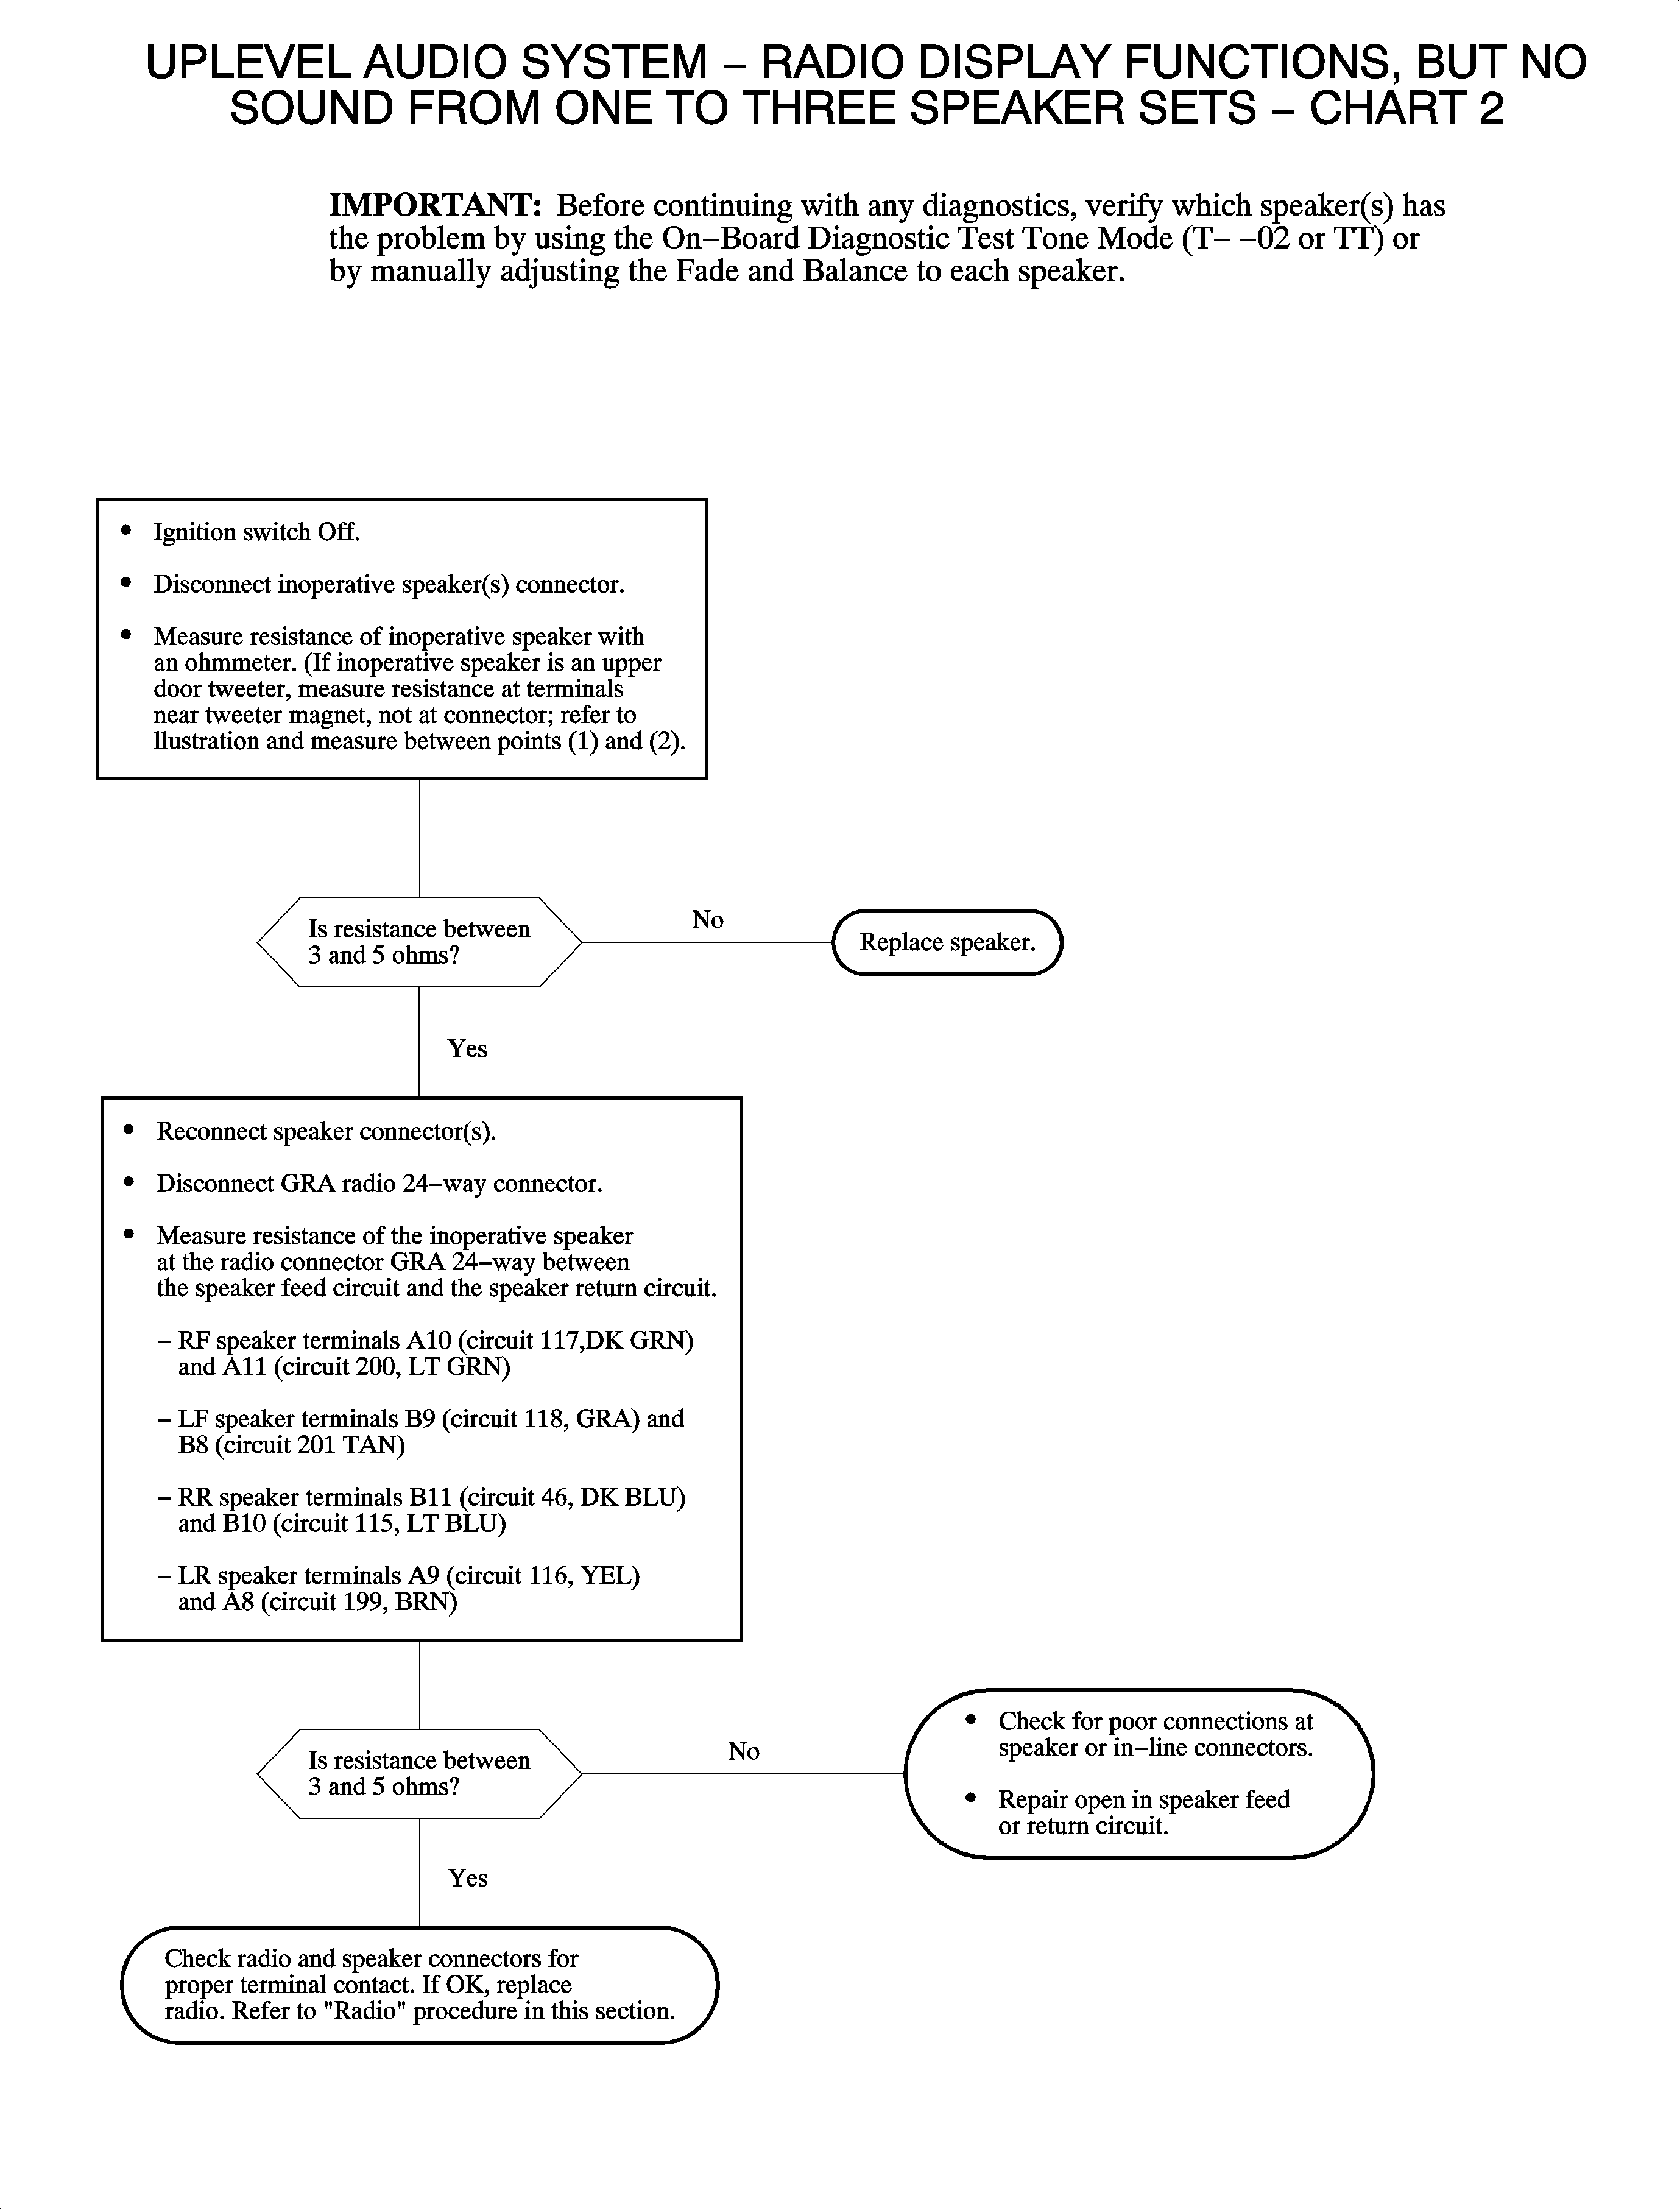
Chart 3
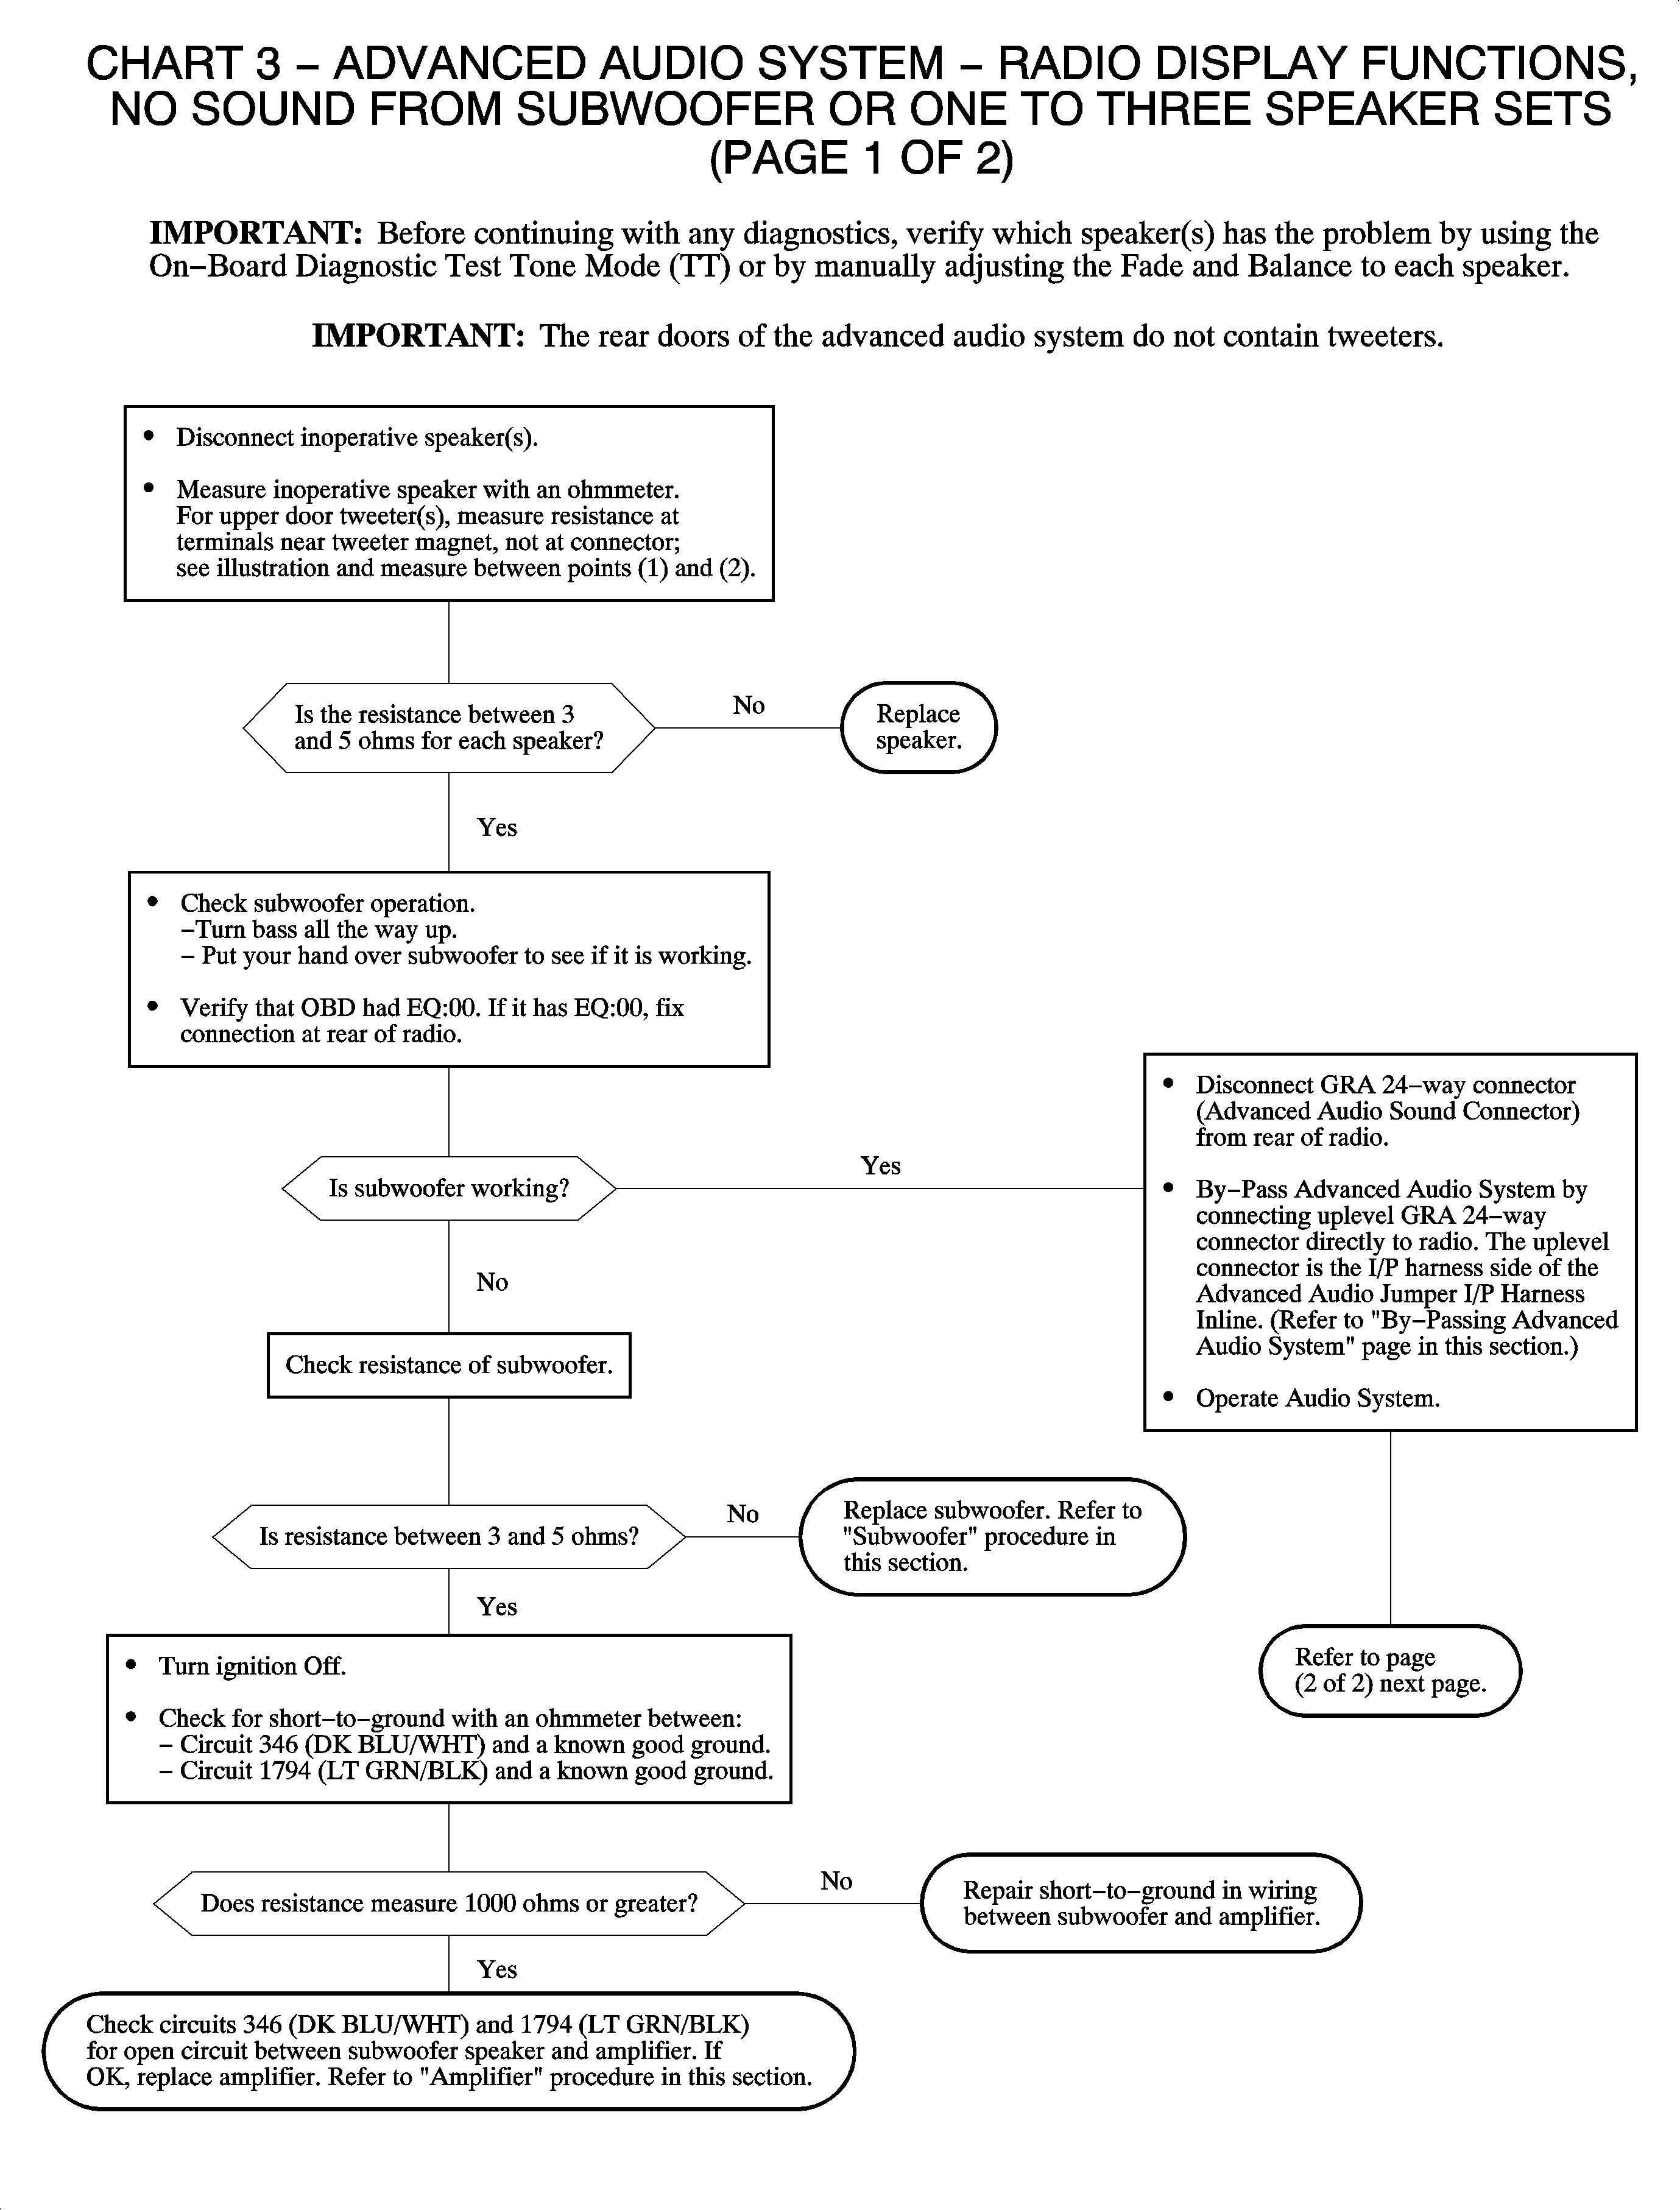
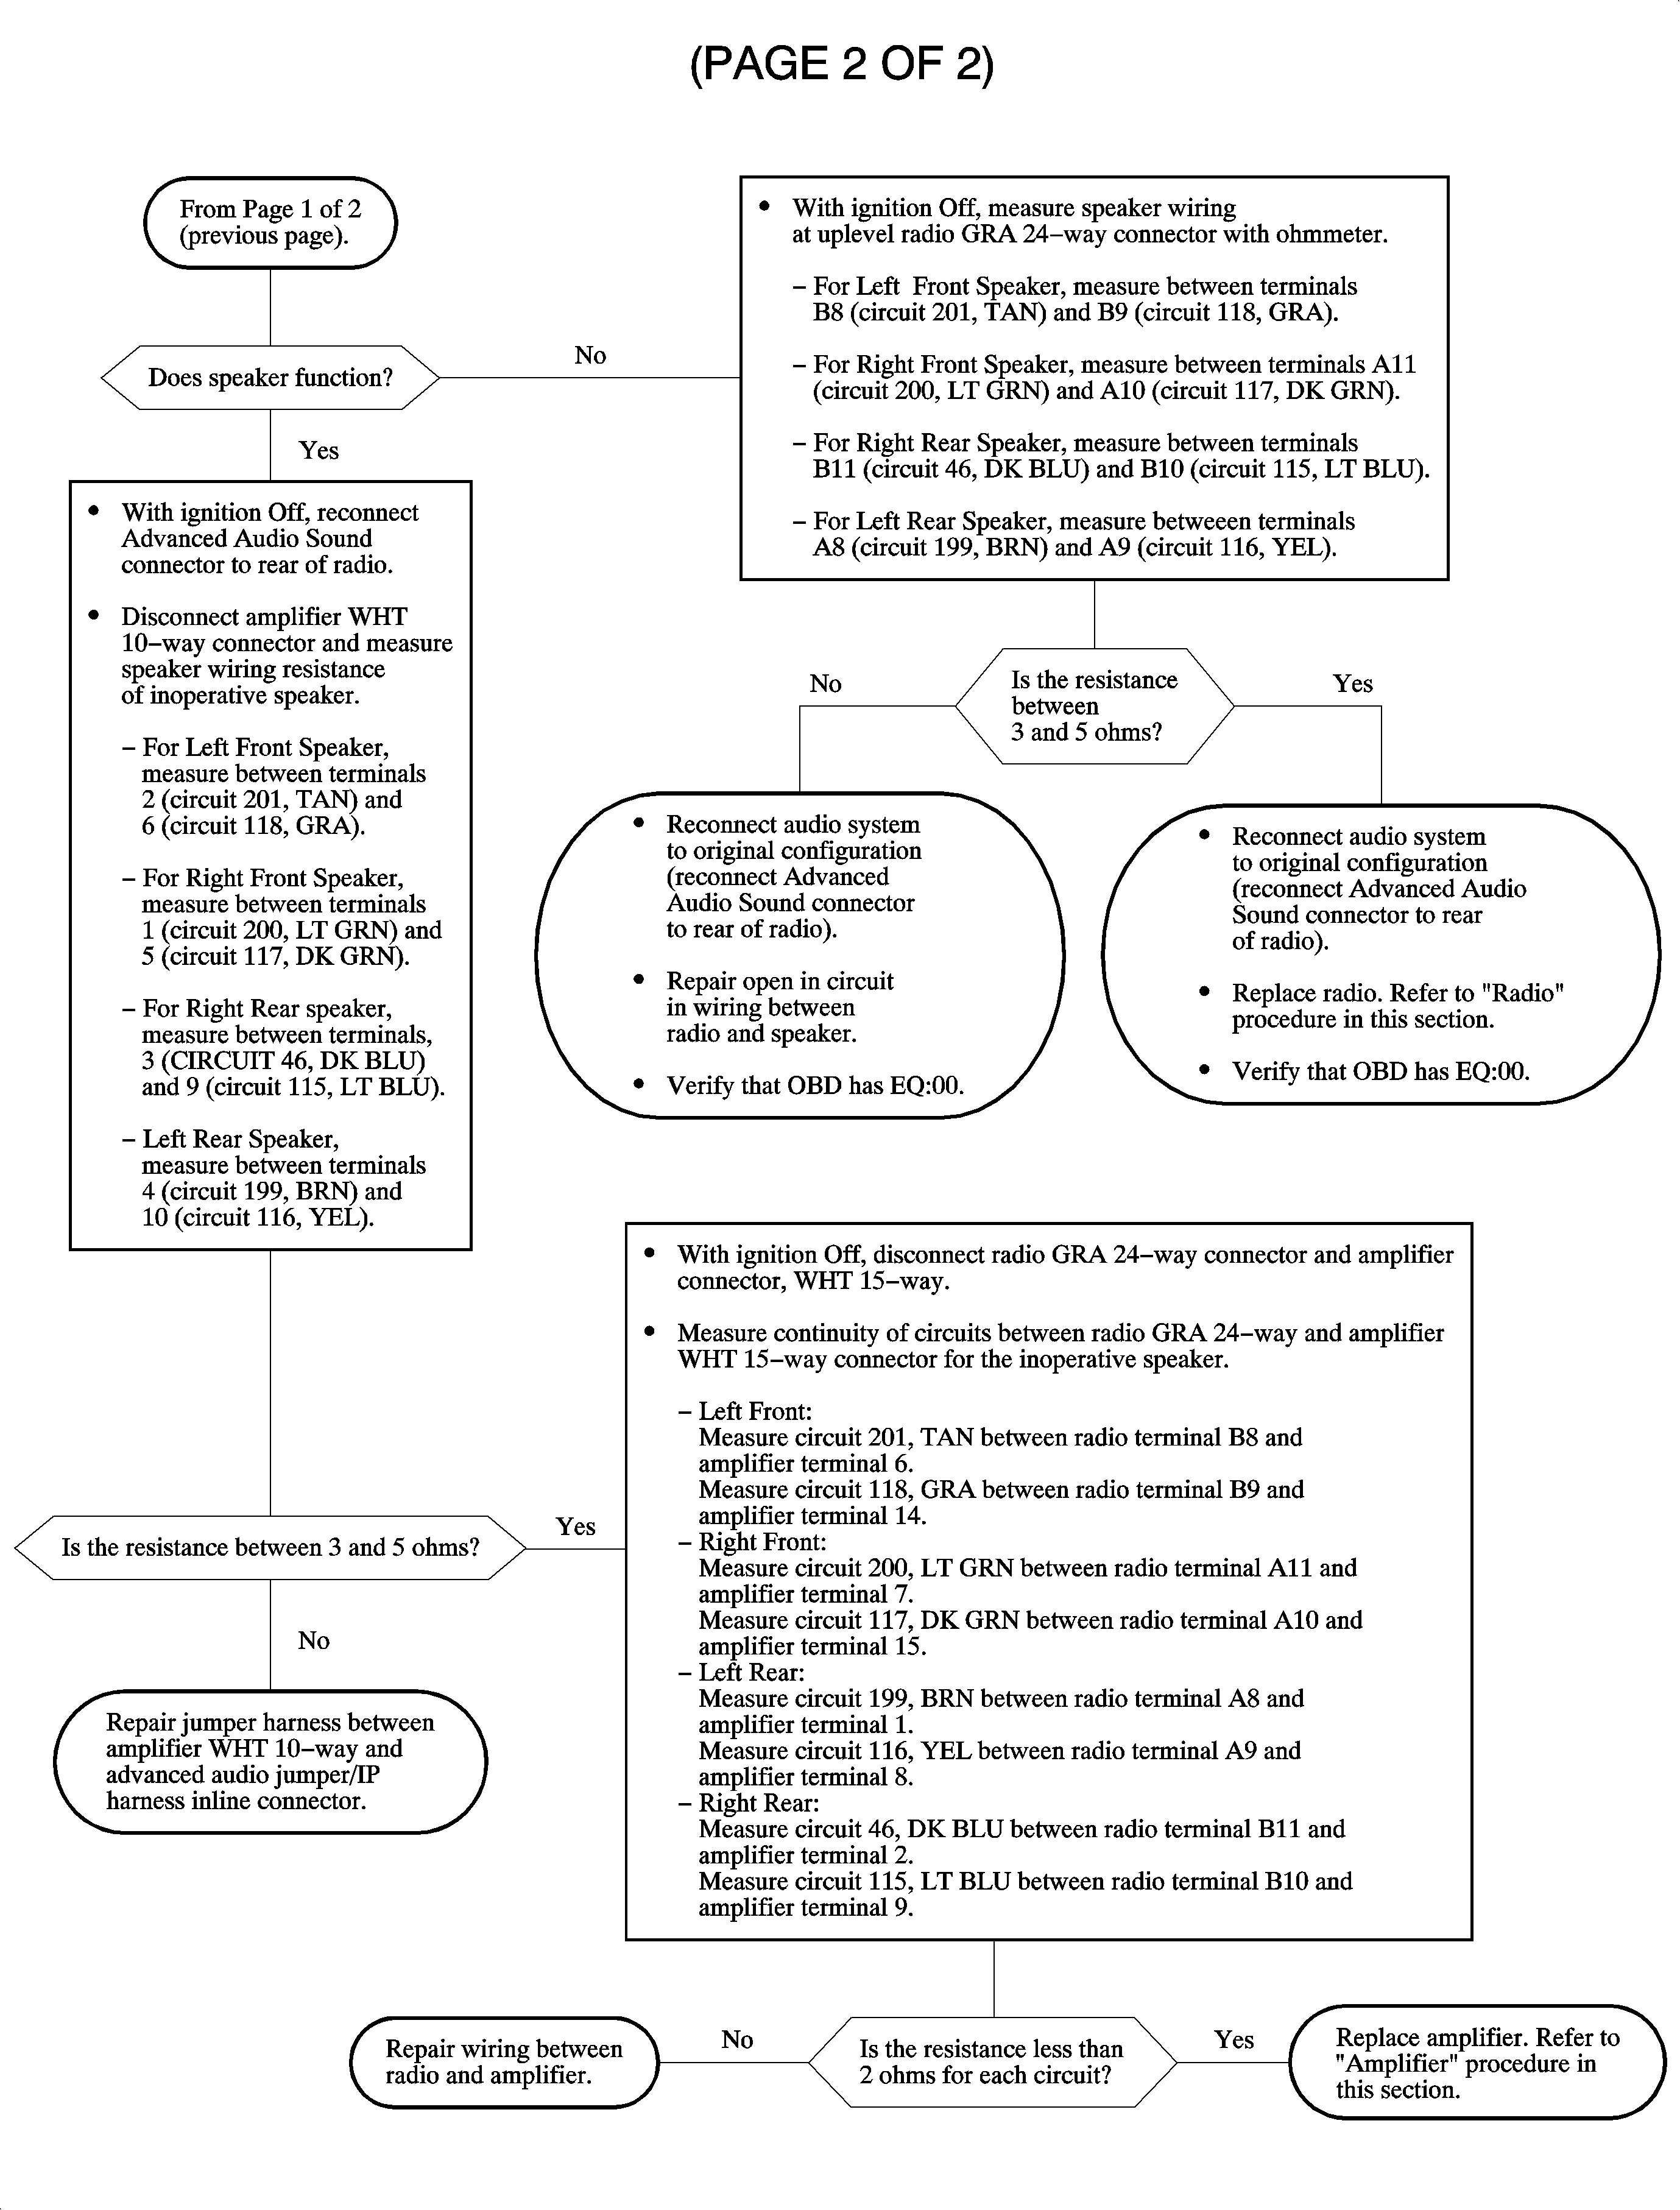
Chart 4
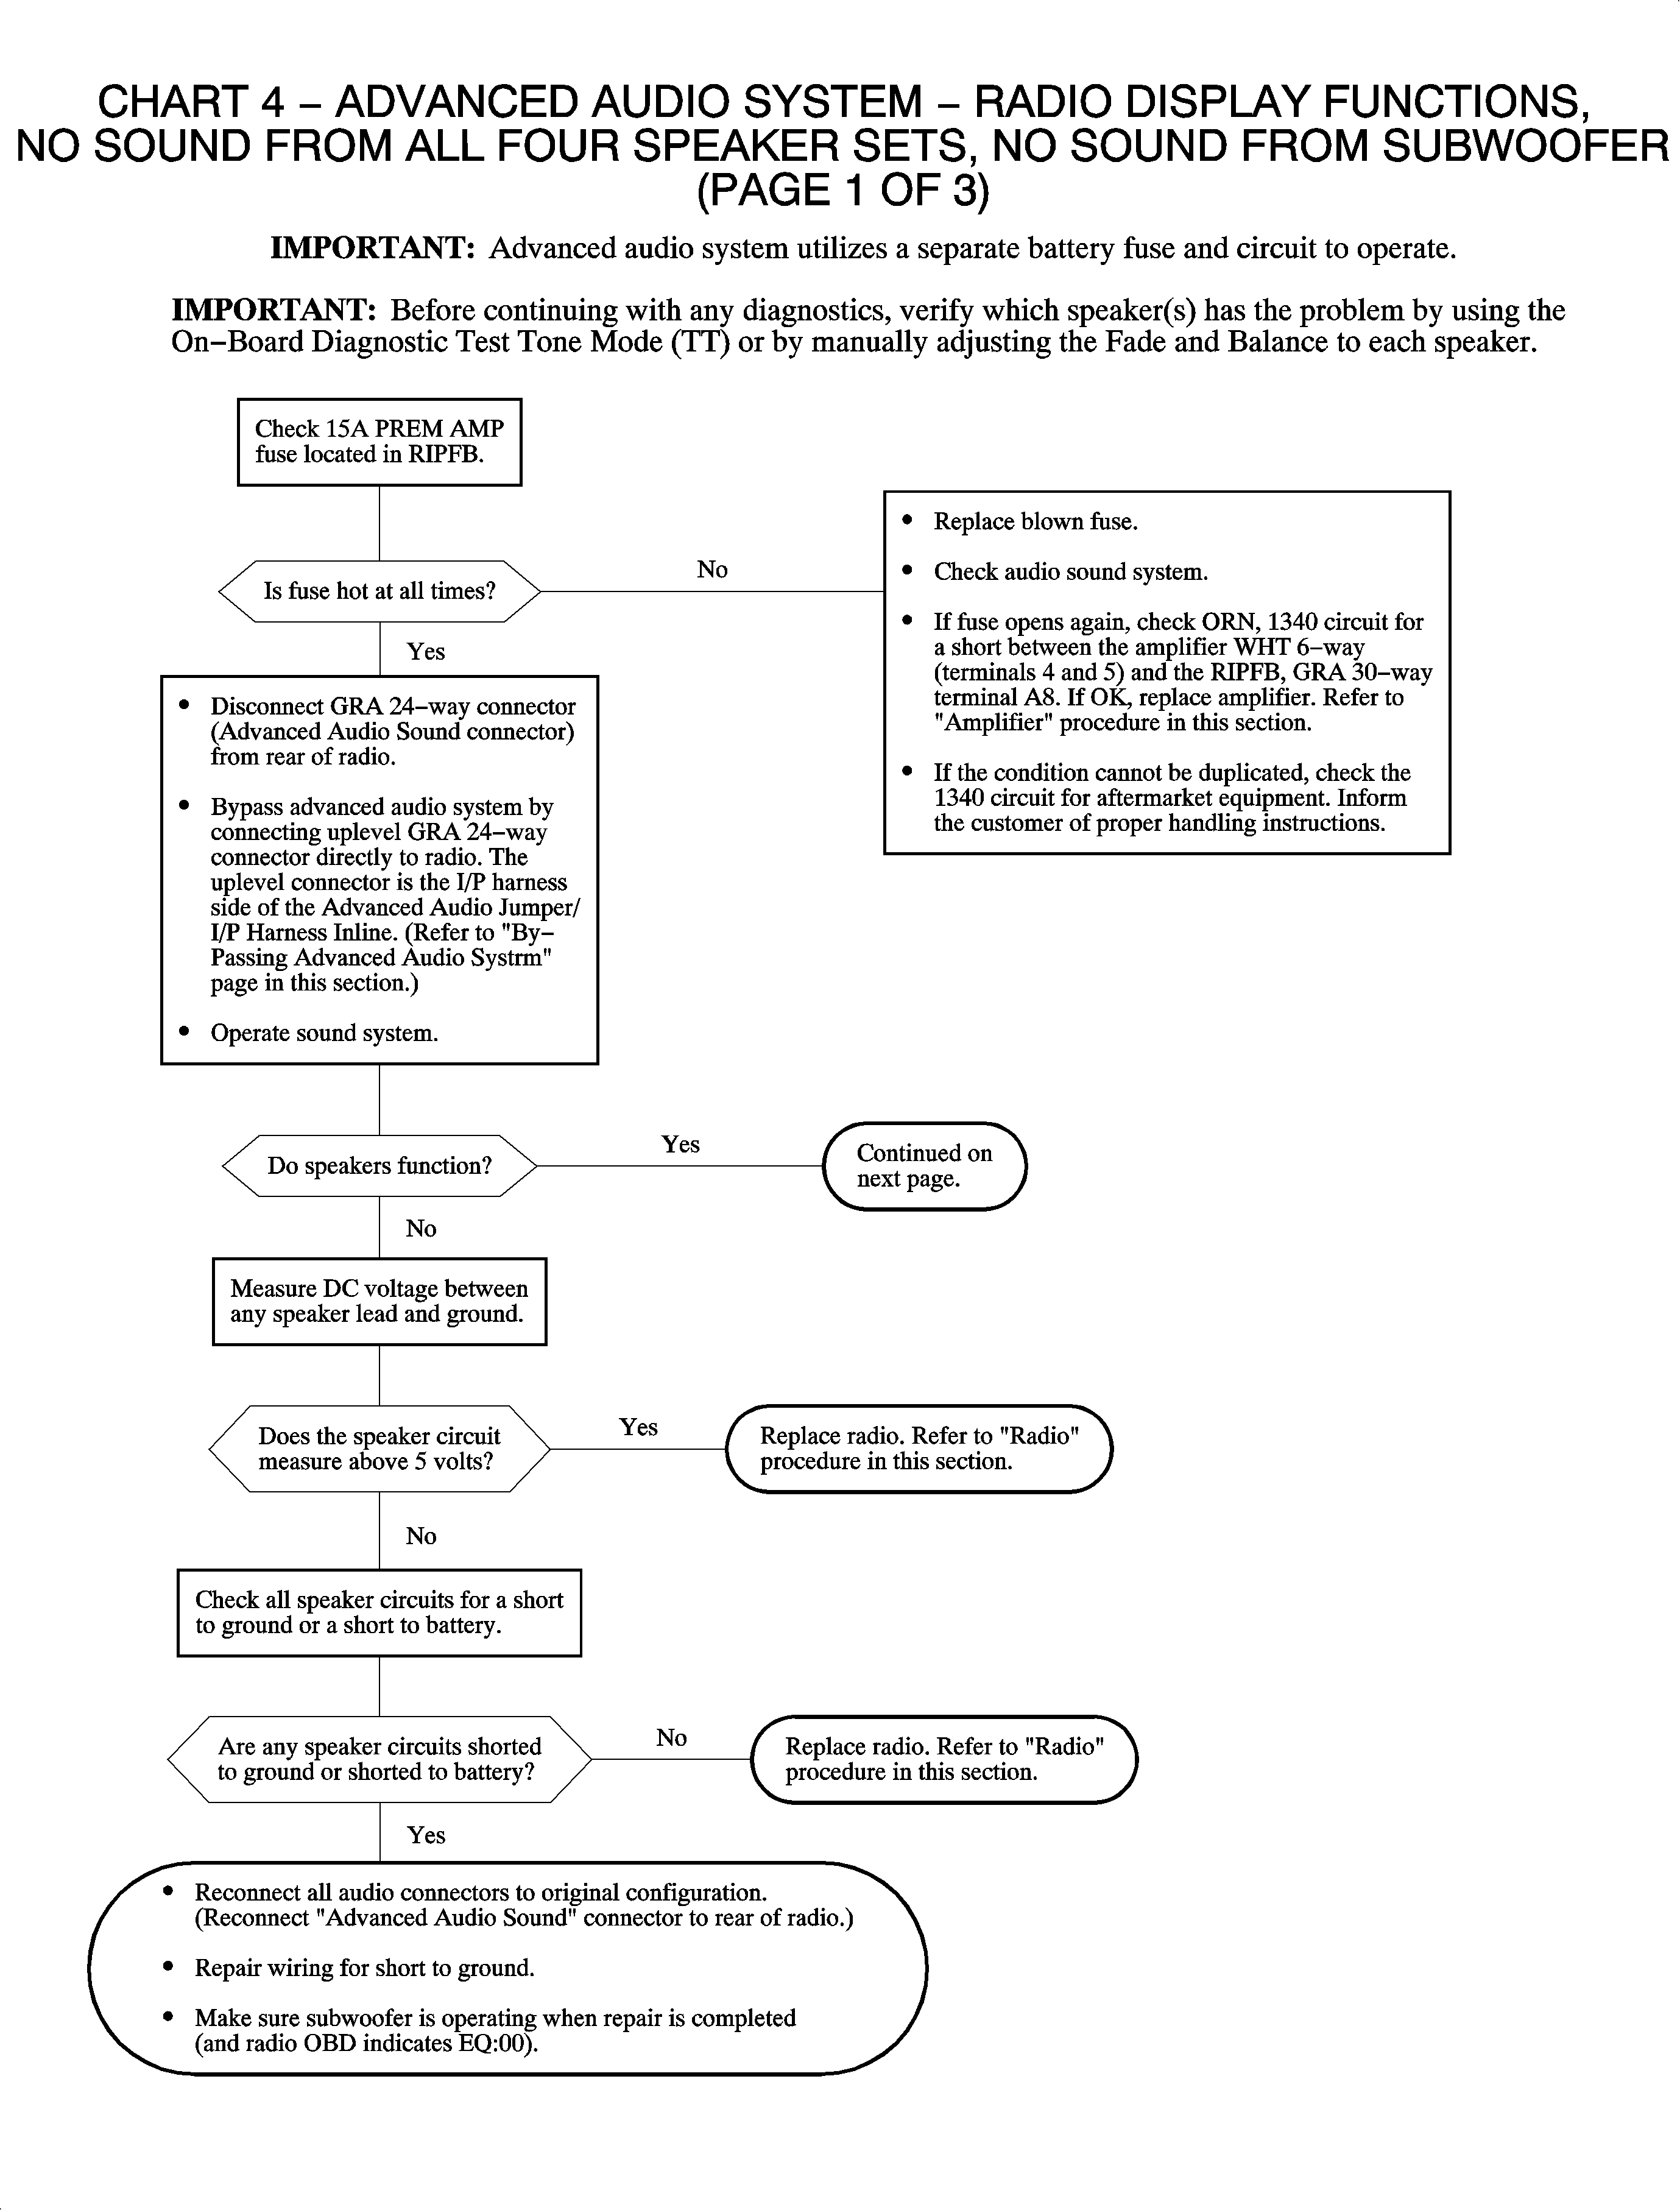
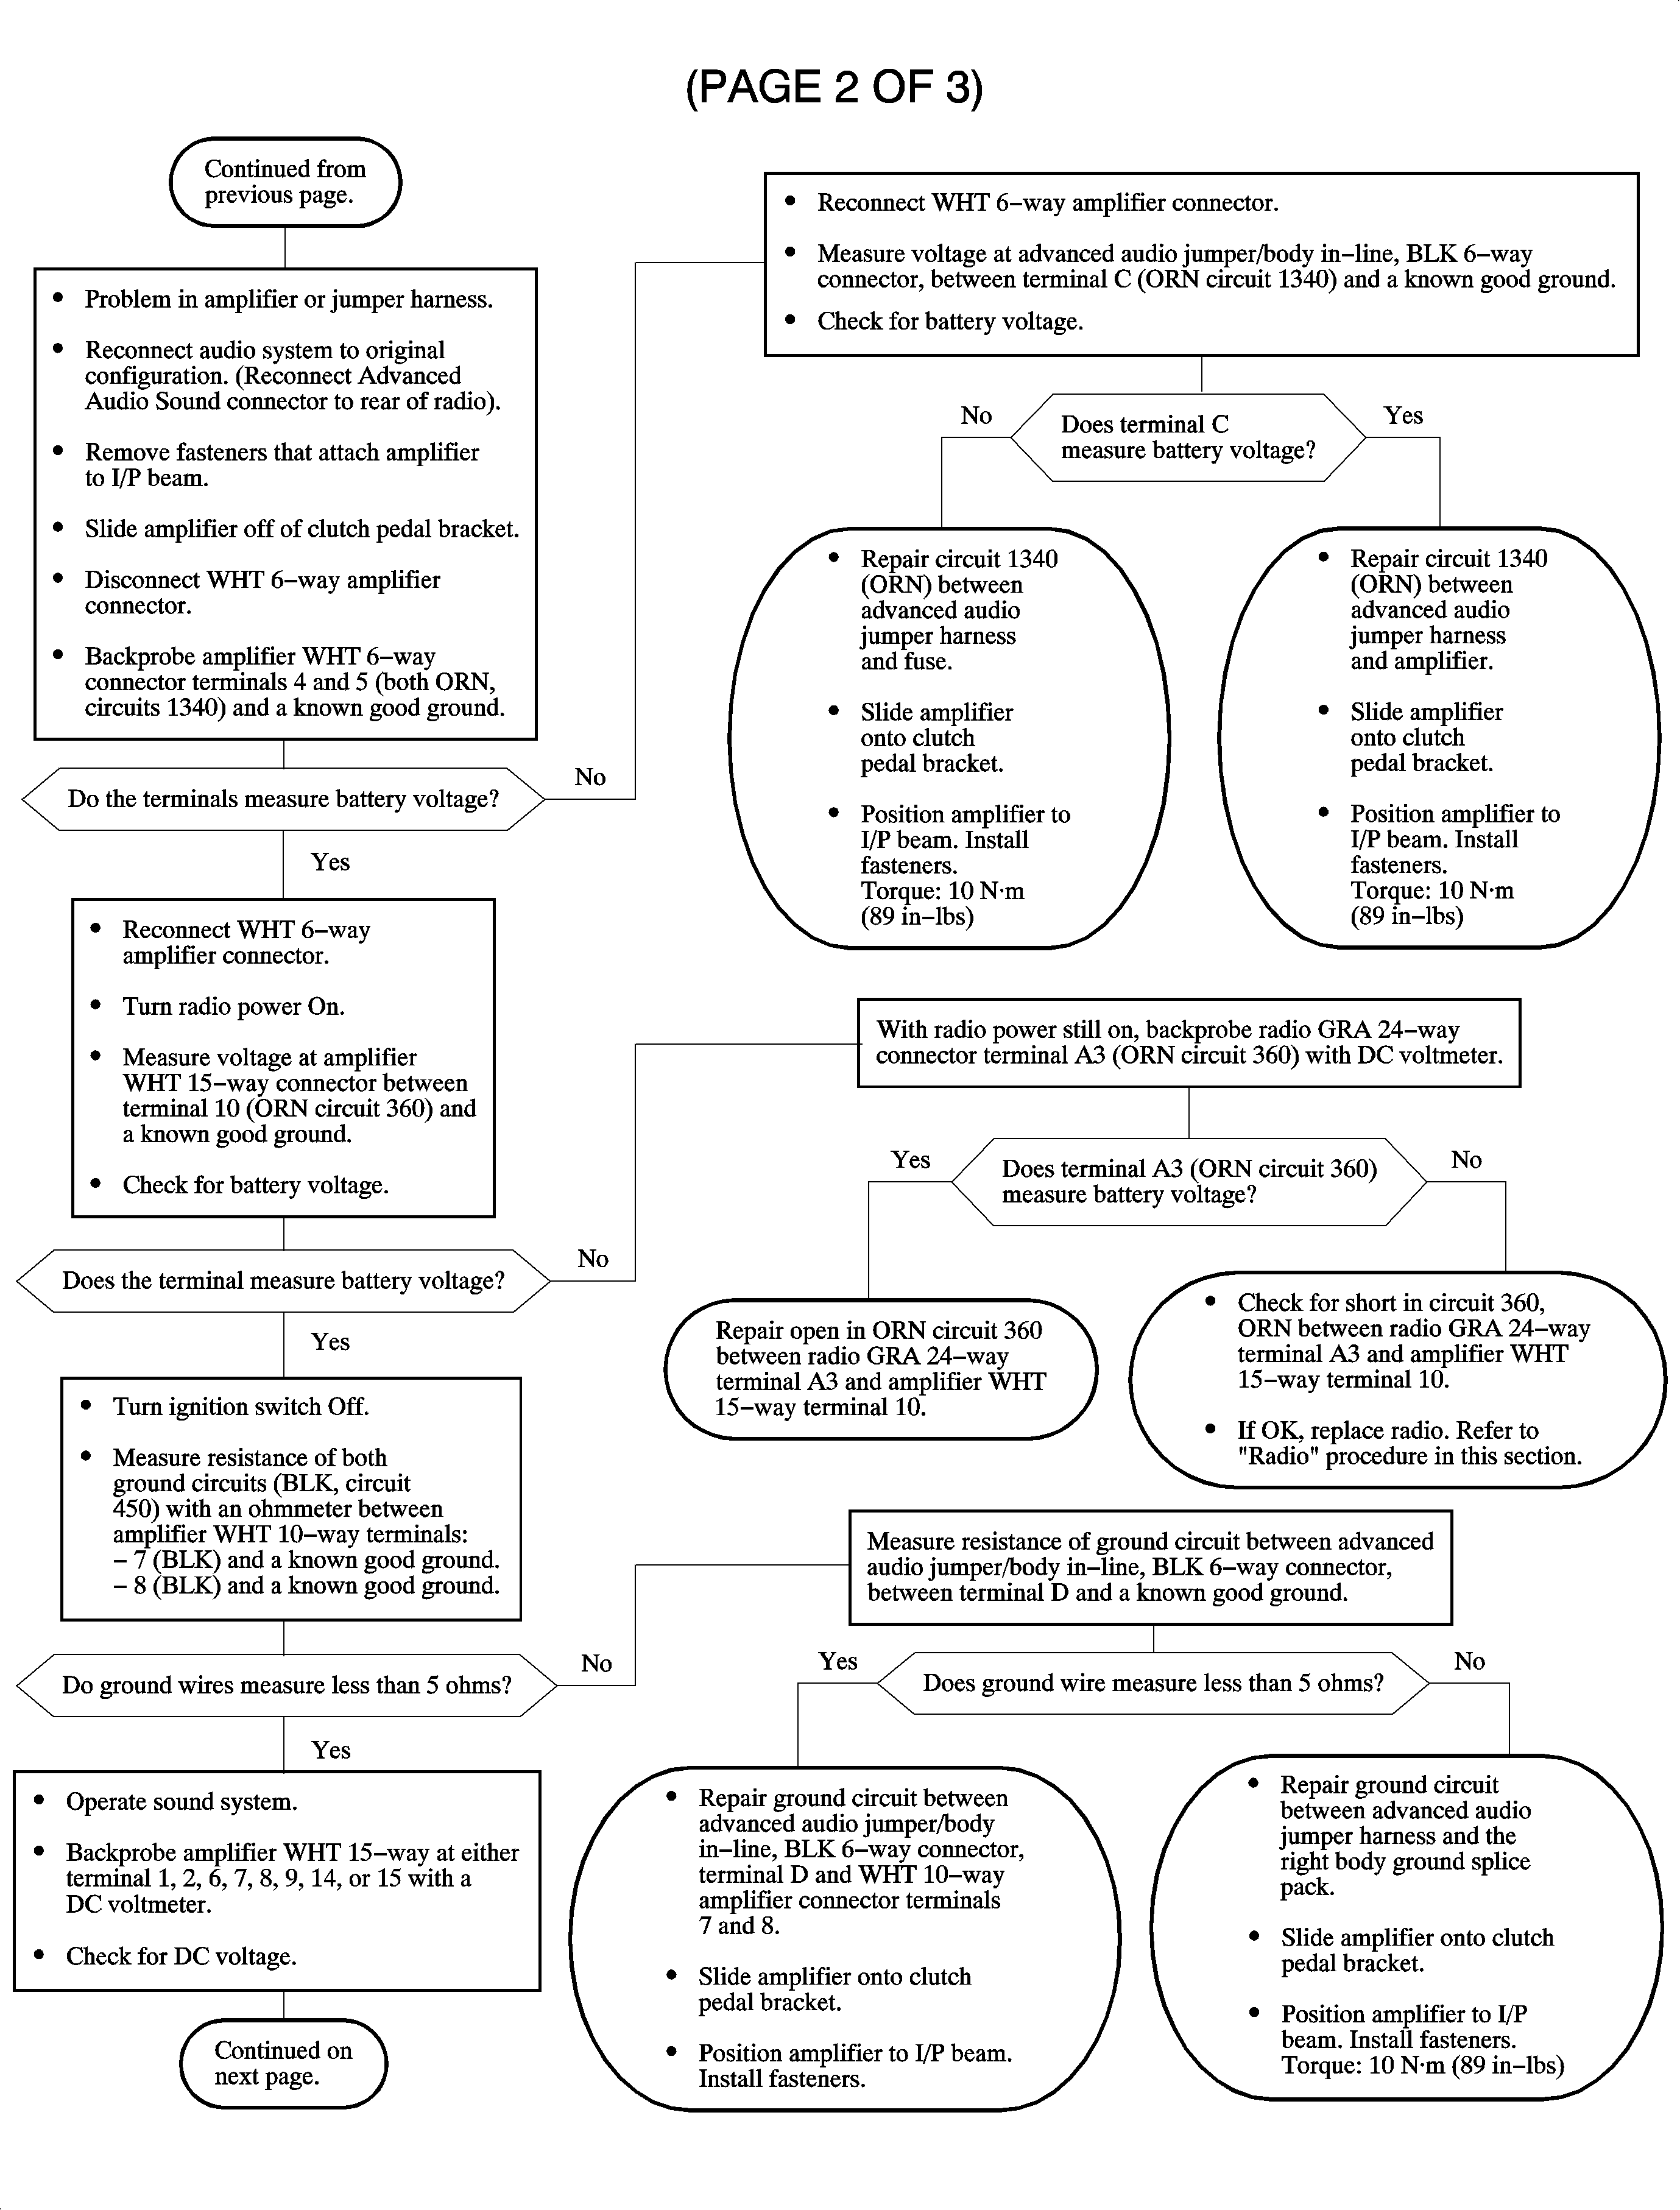
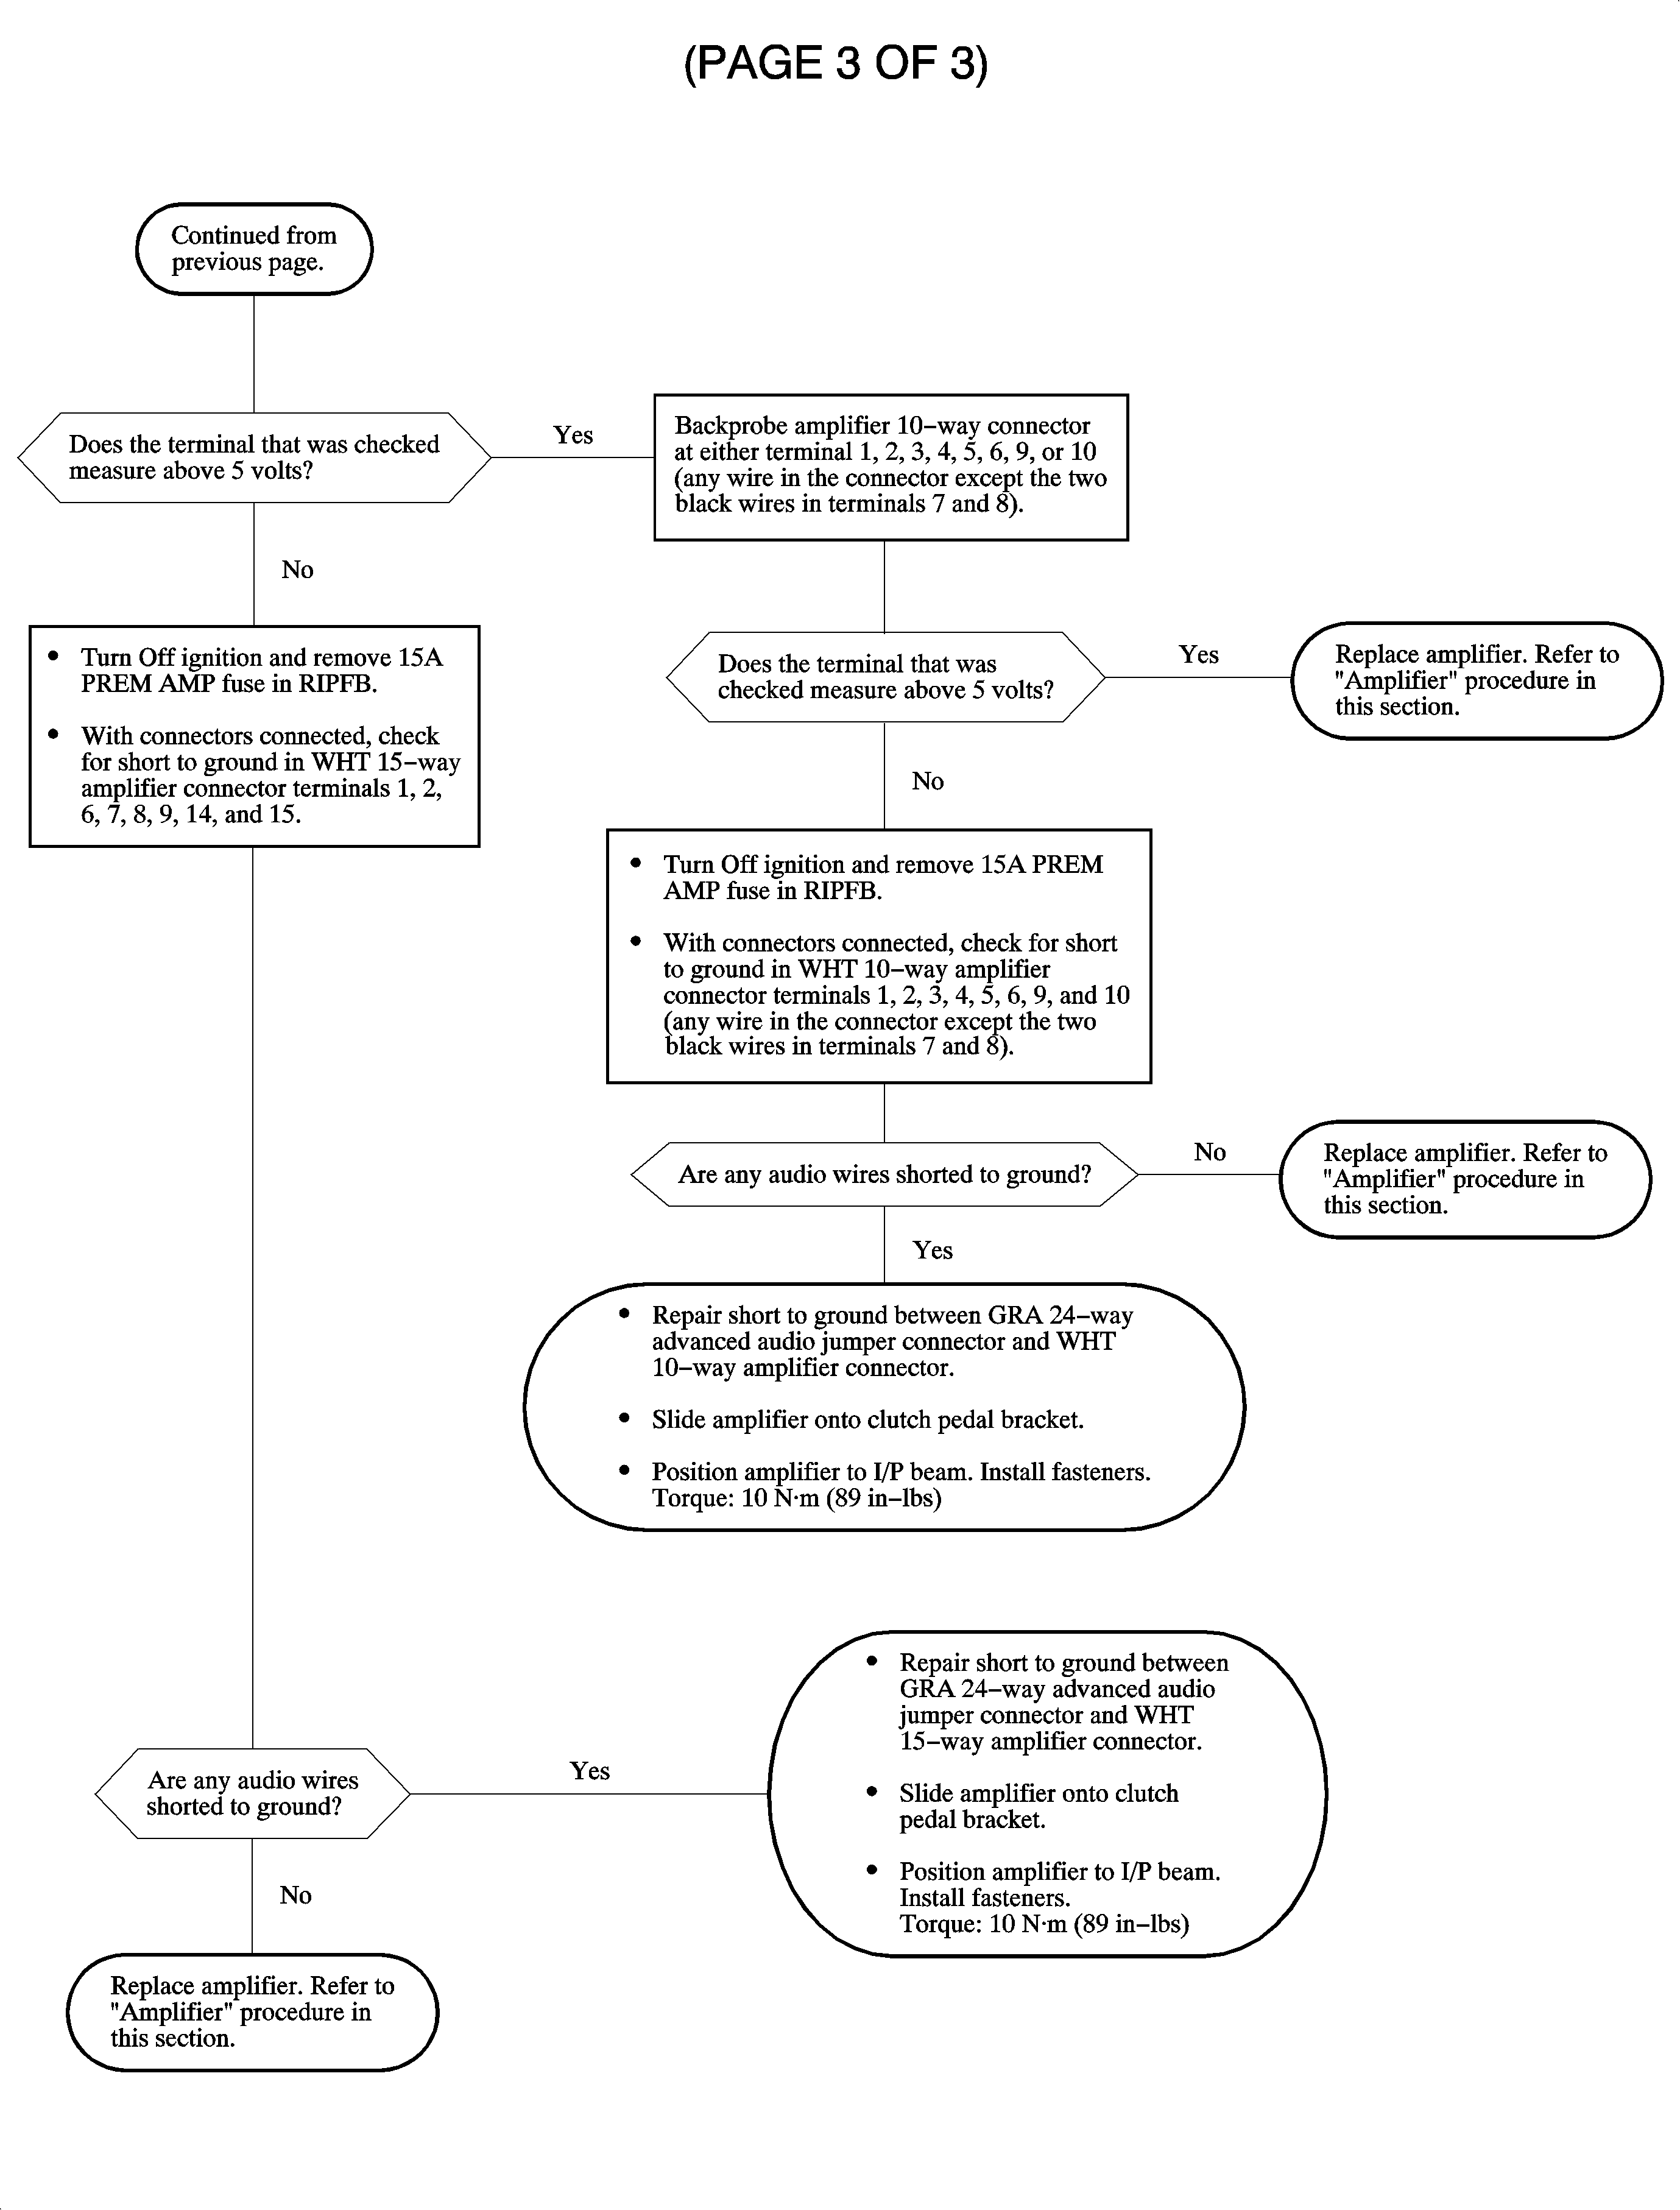
Chart 5
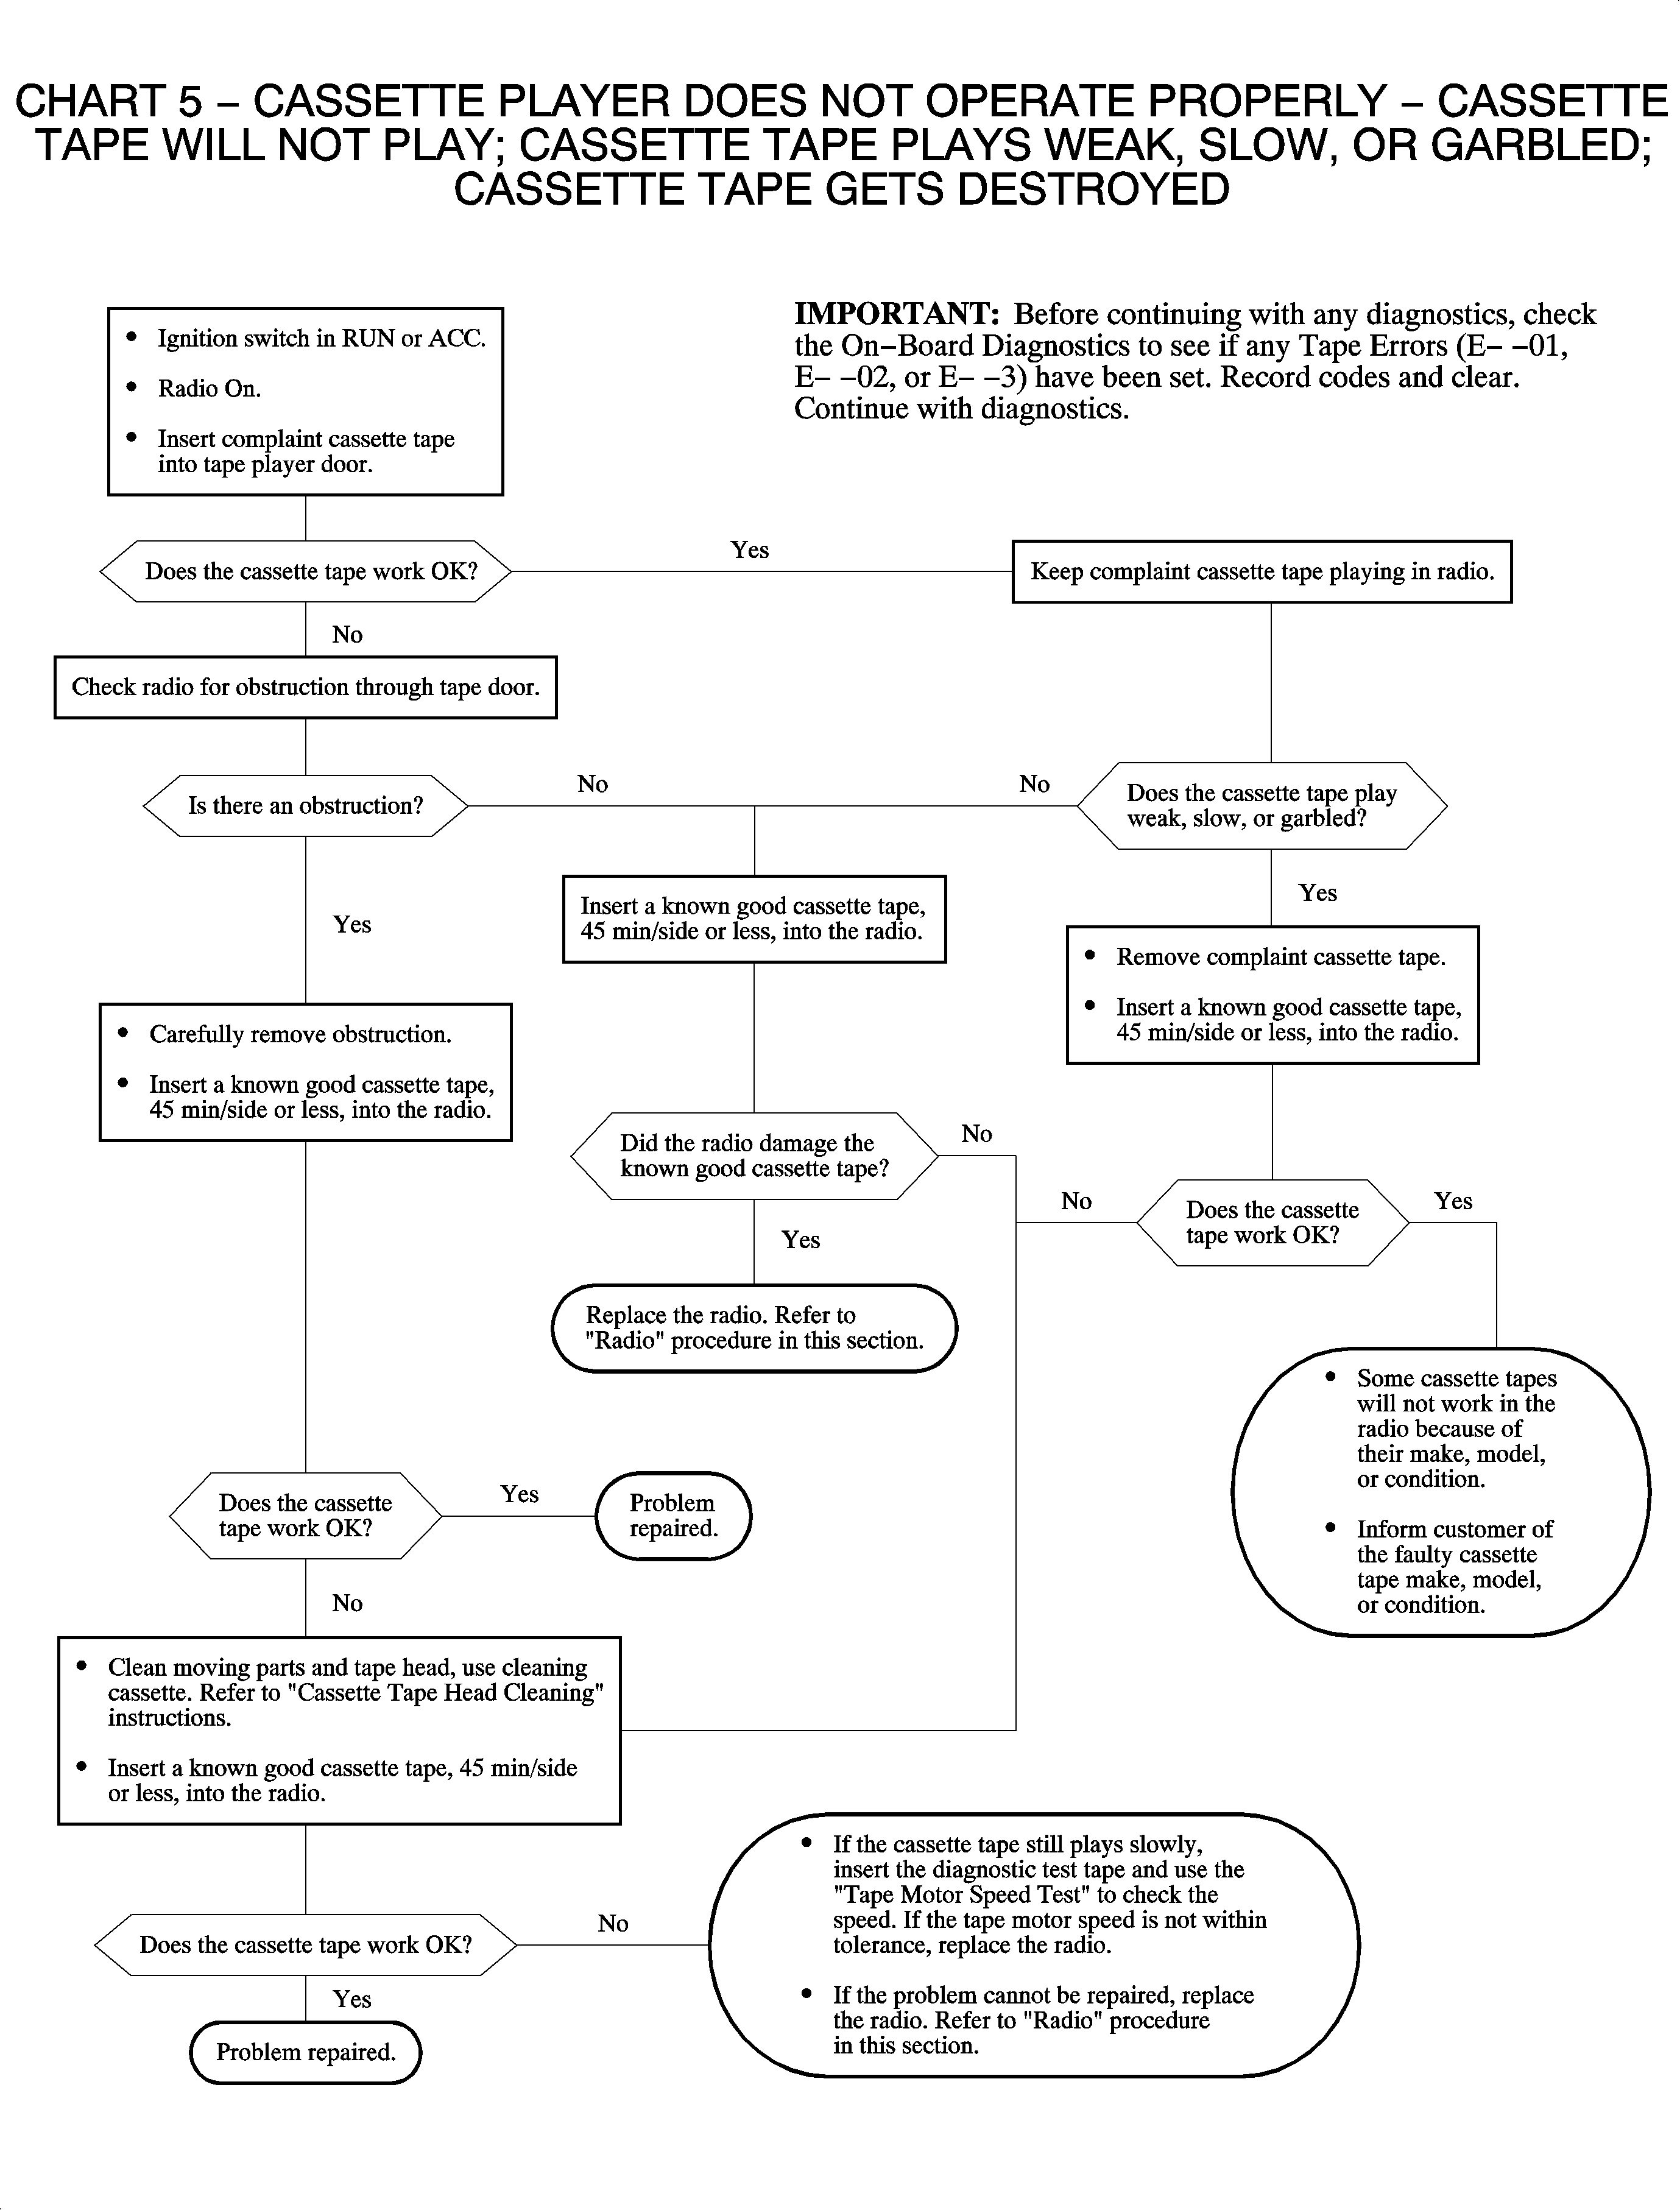
Chart 6
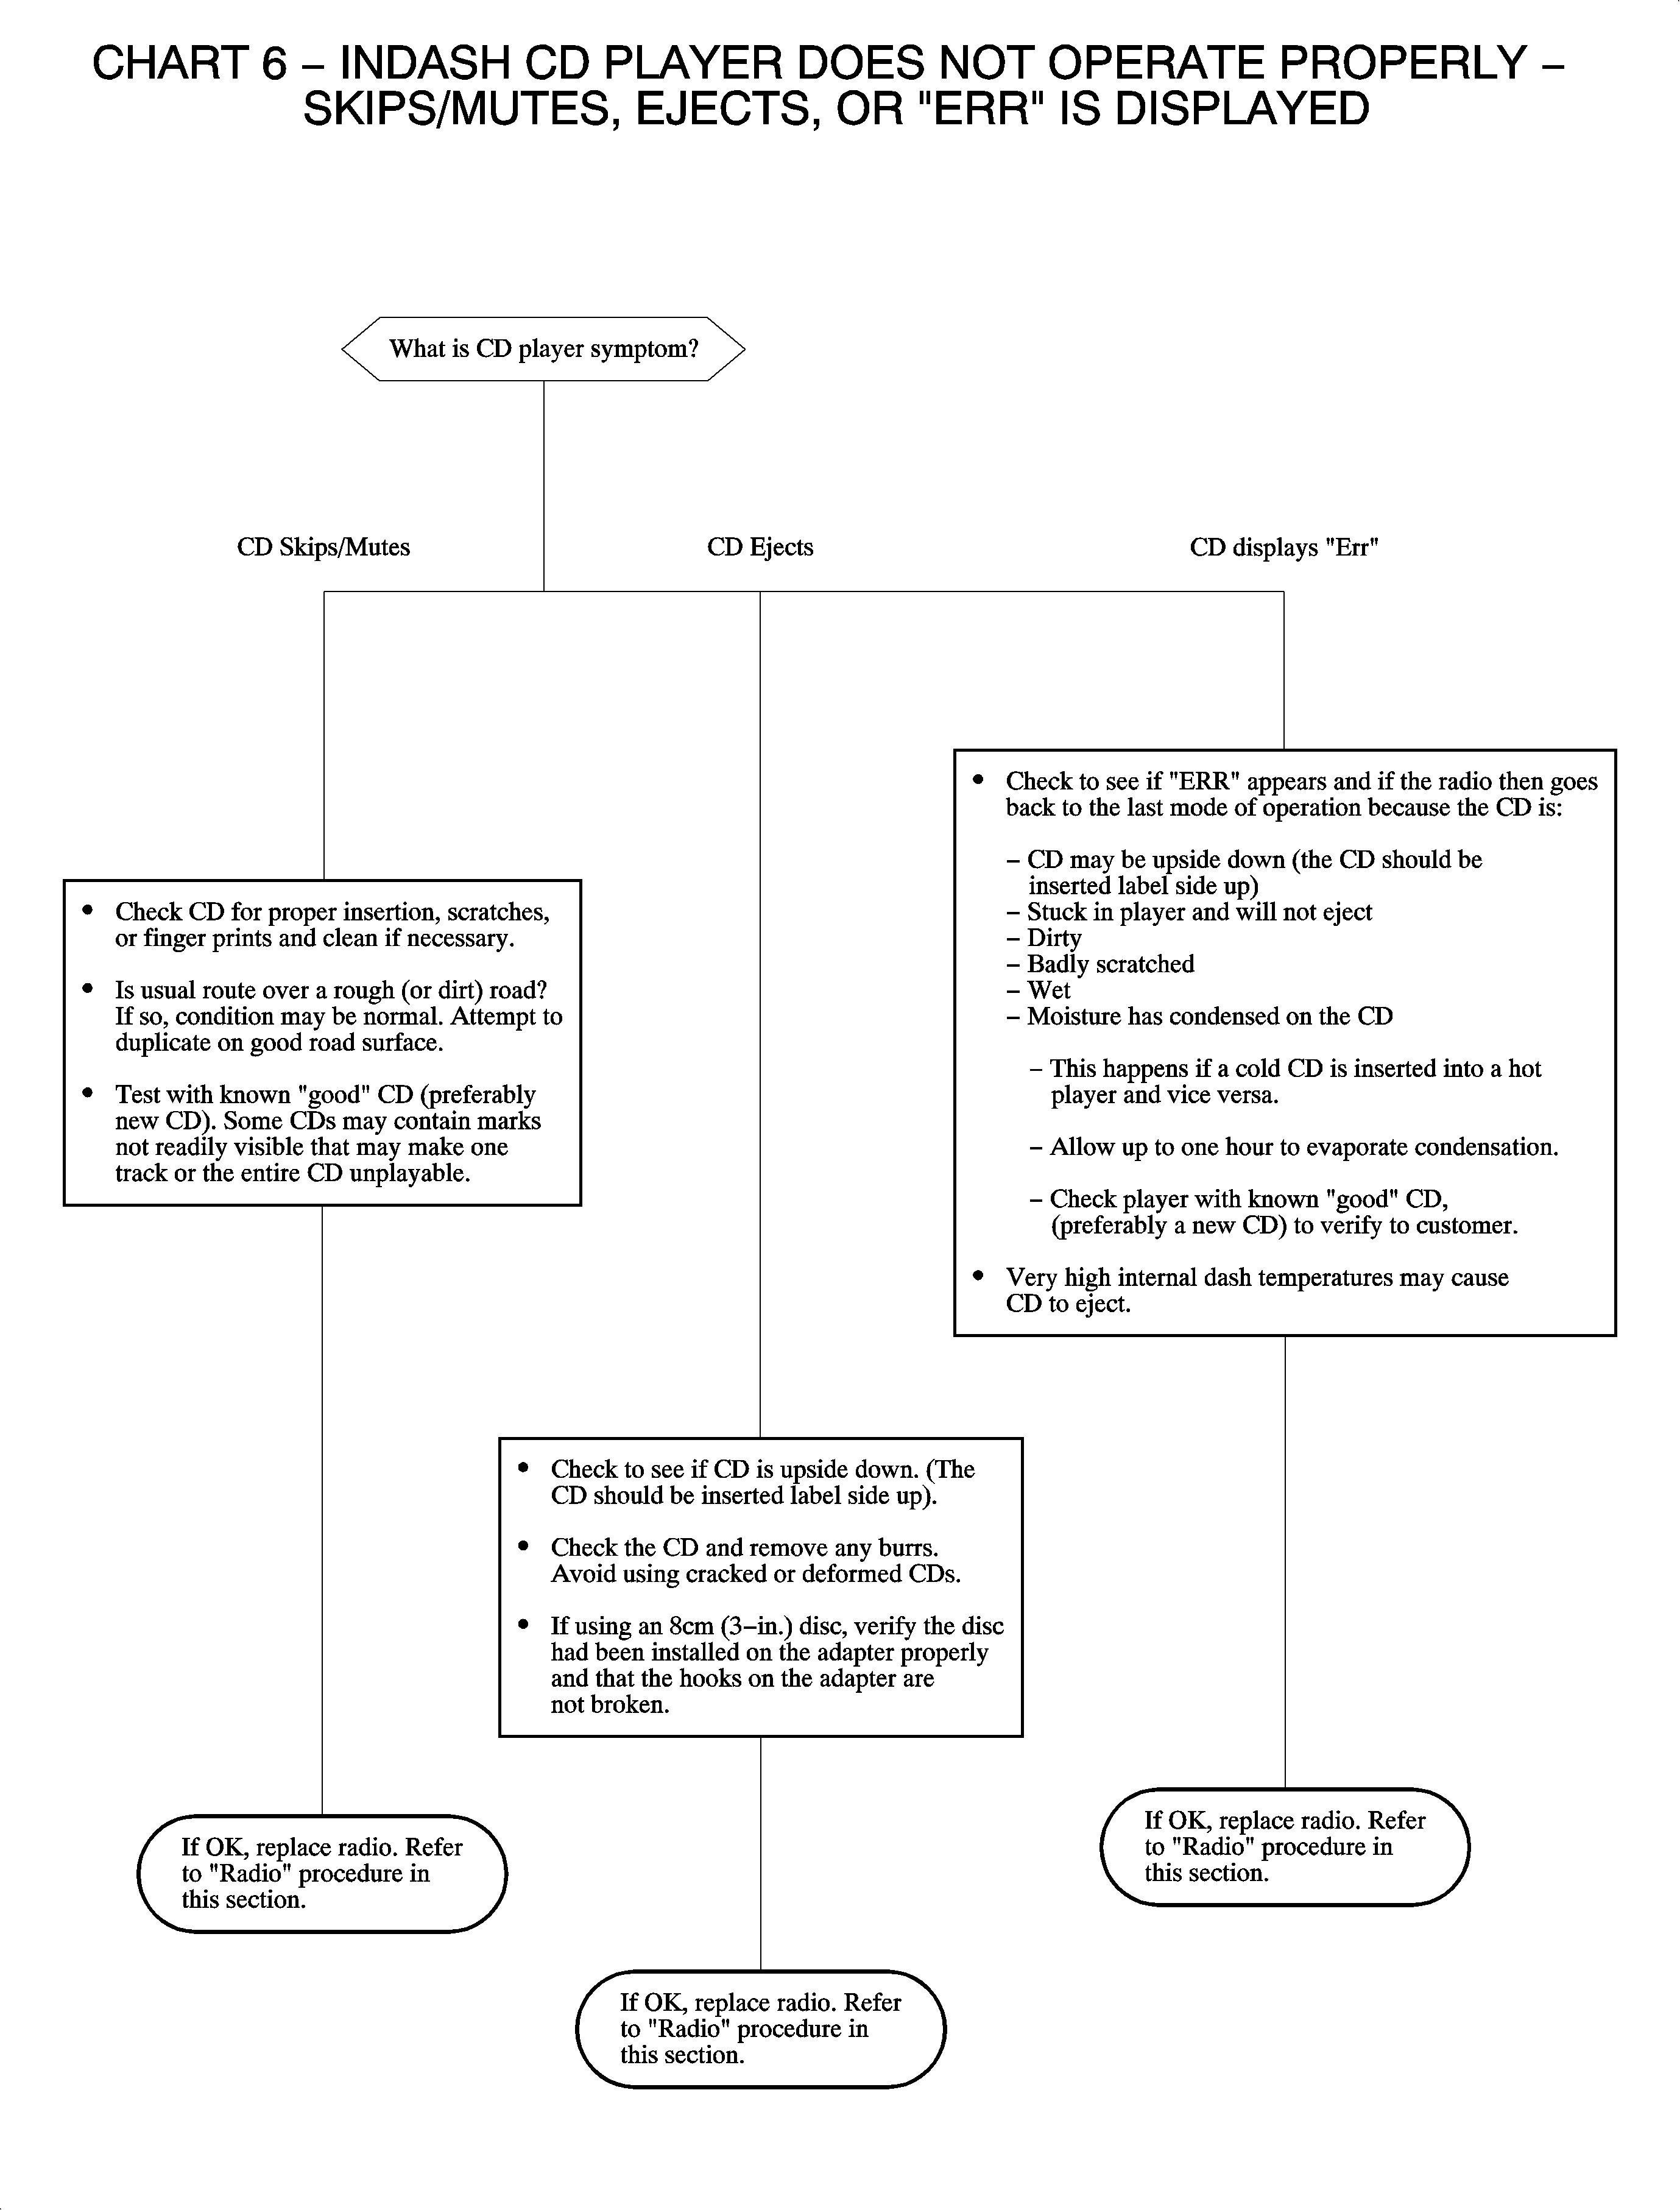
Chart 7
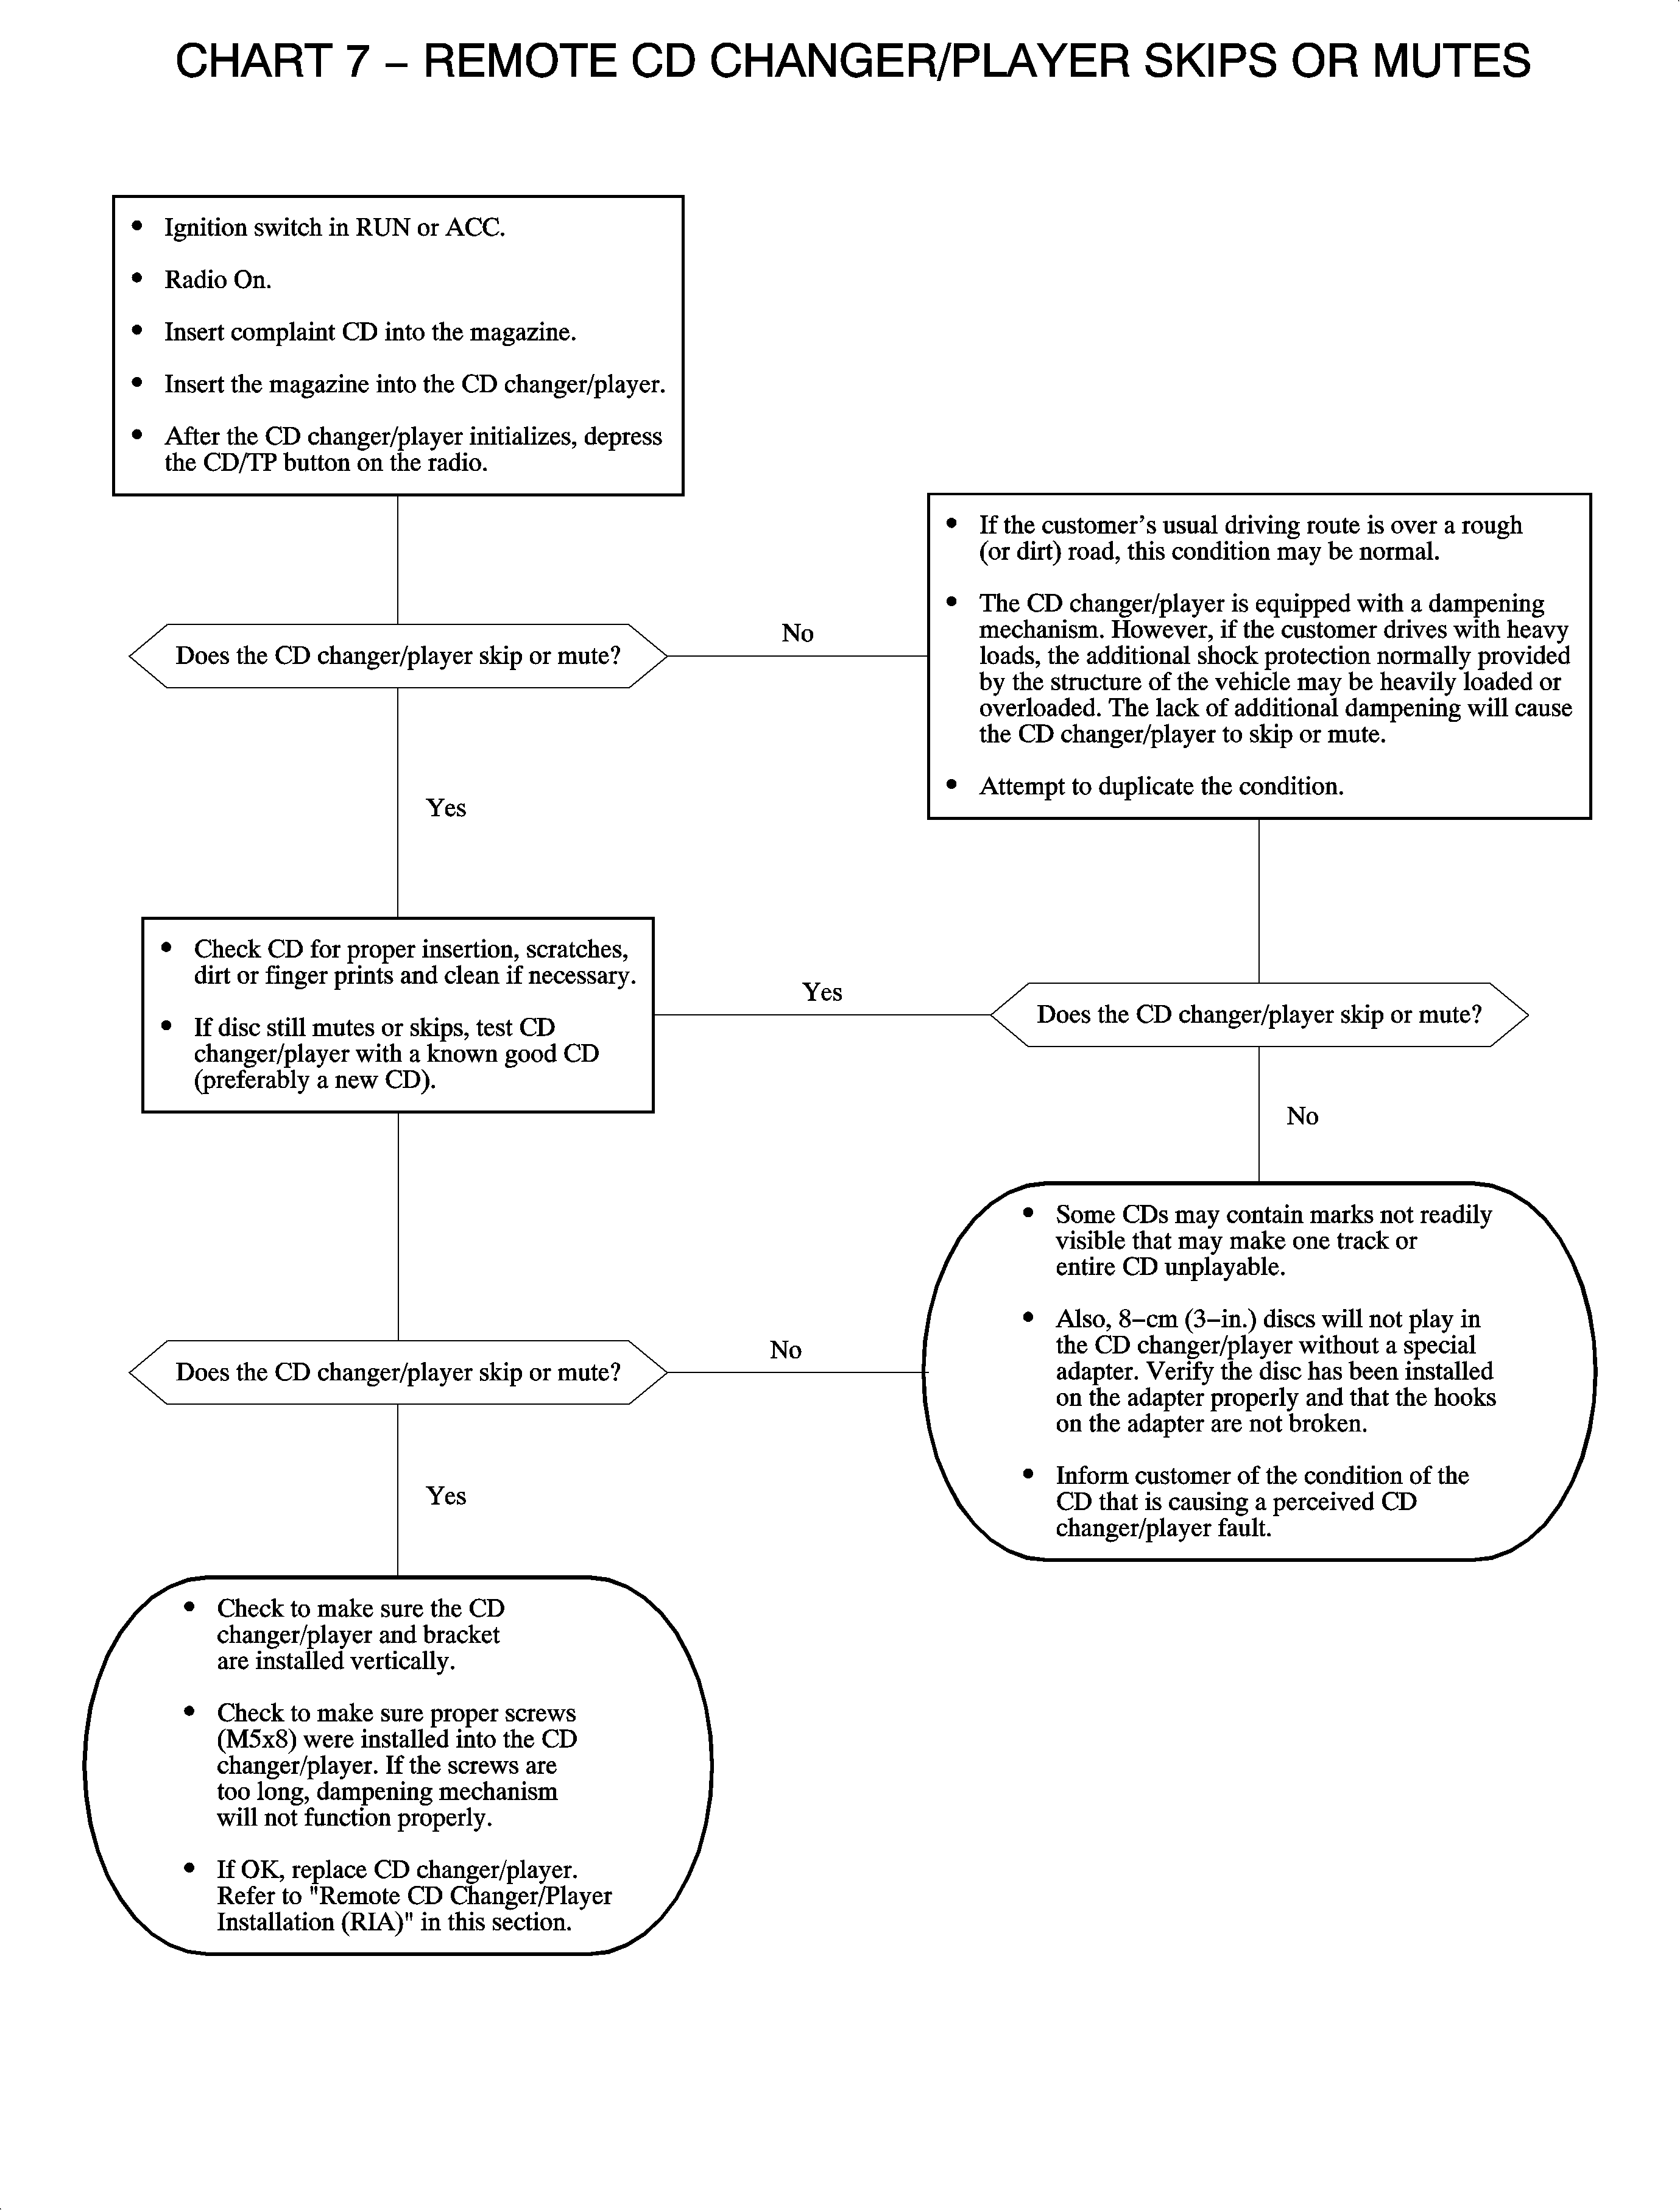
Chart 8
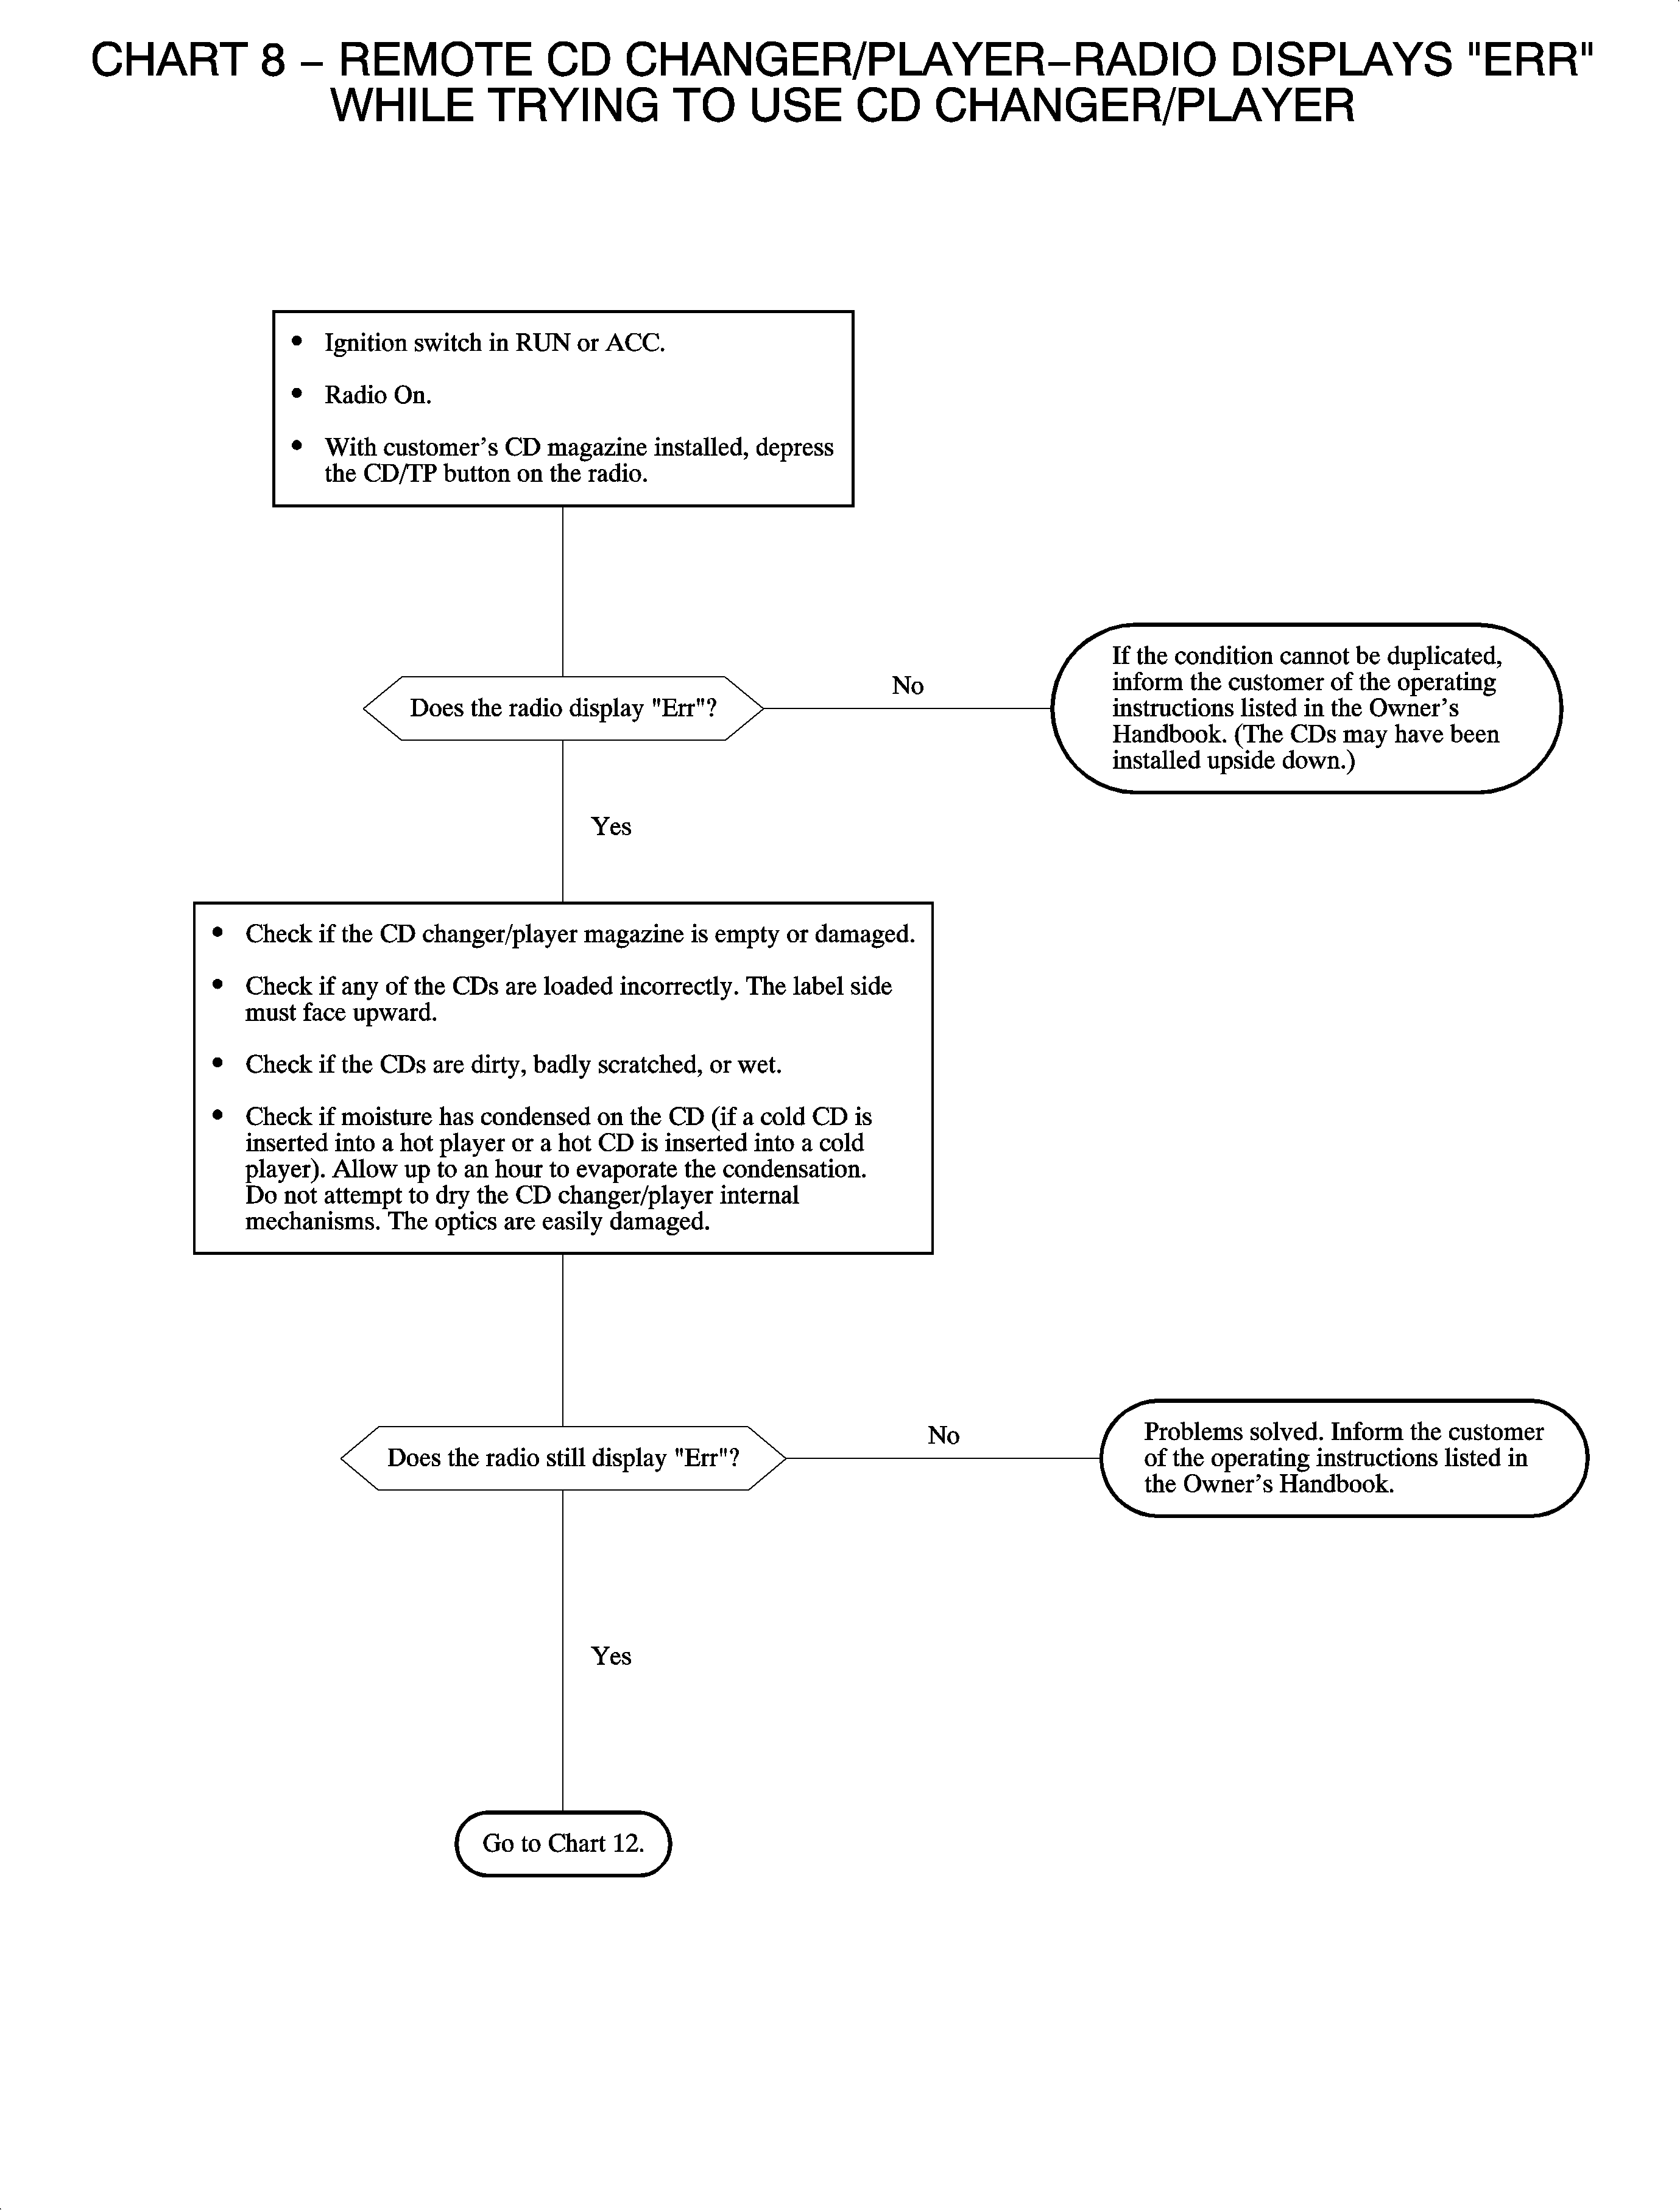
Chart 9
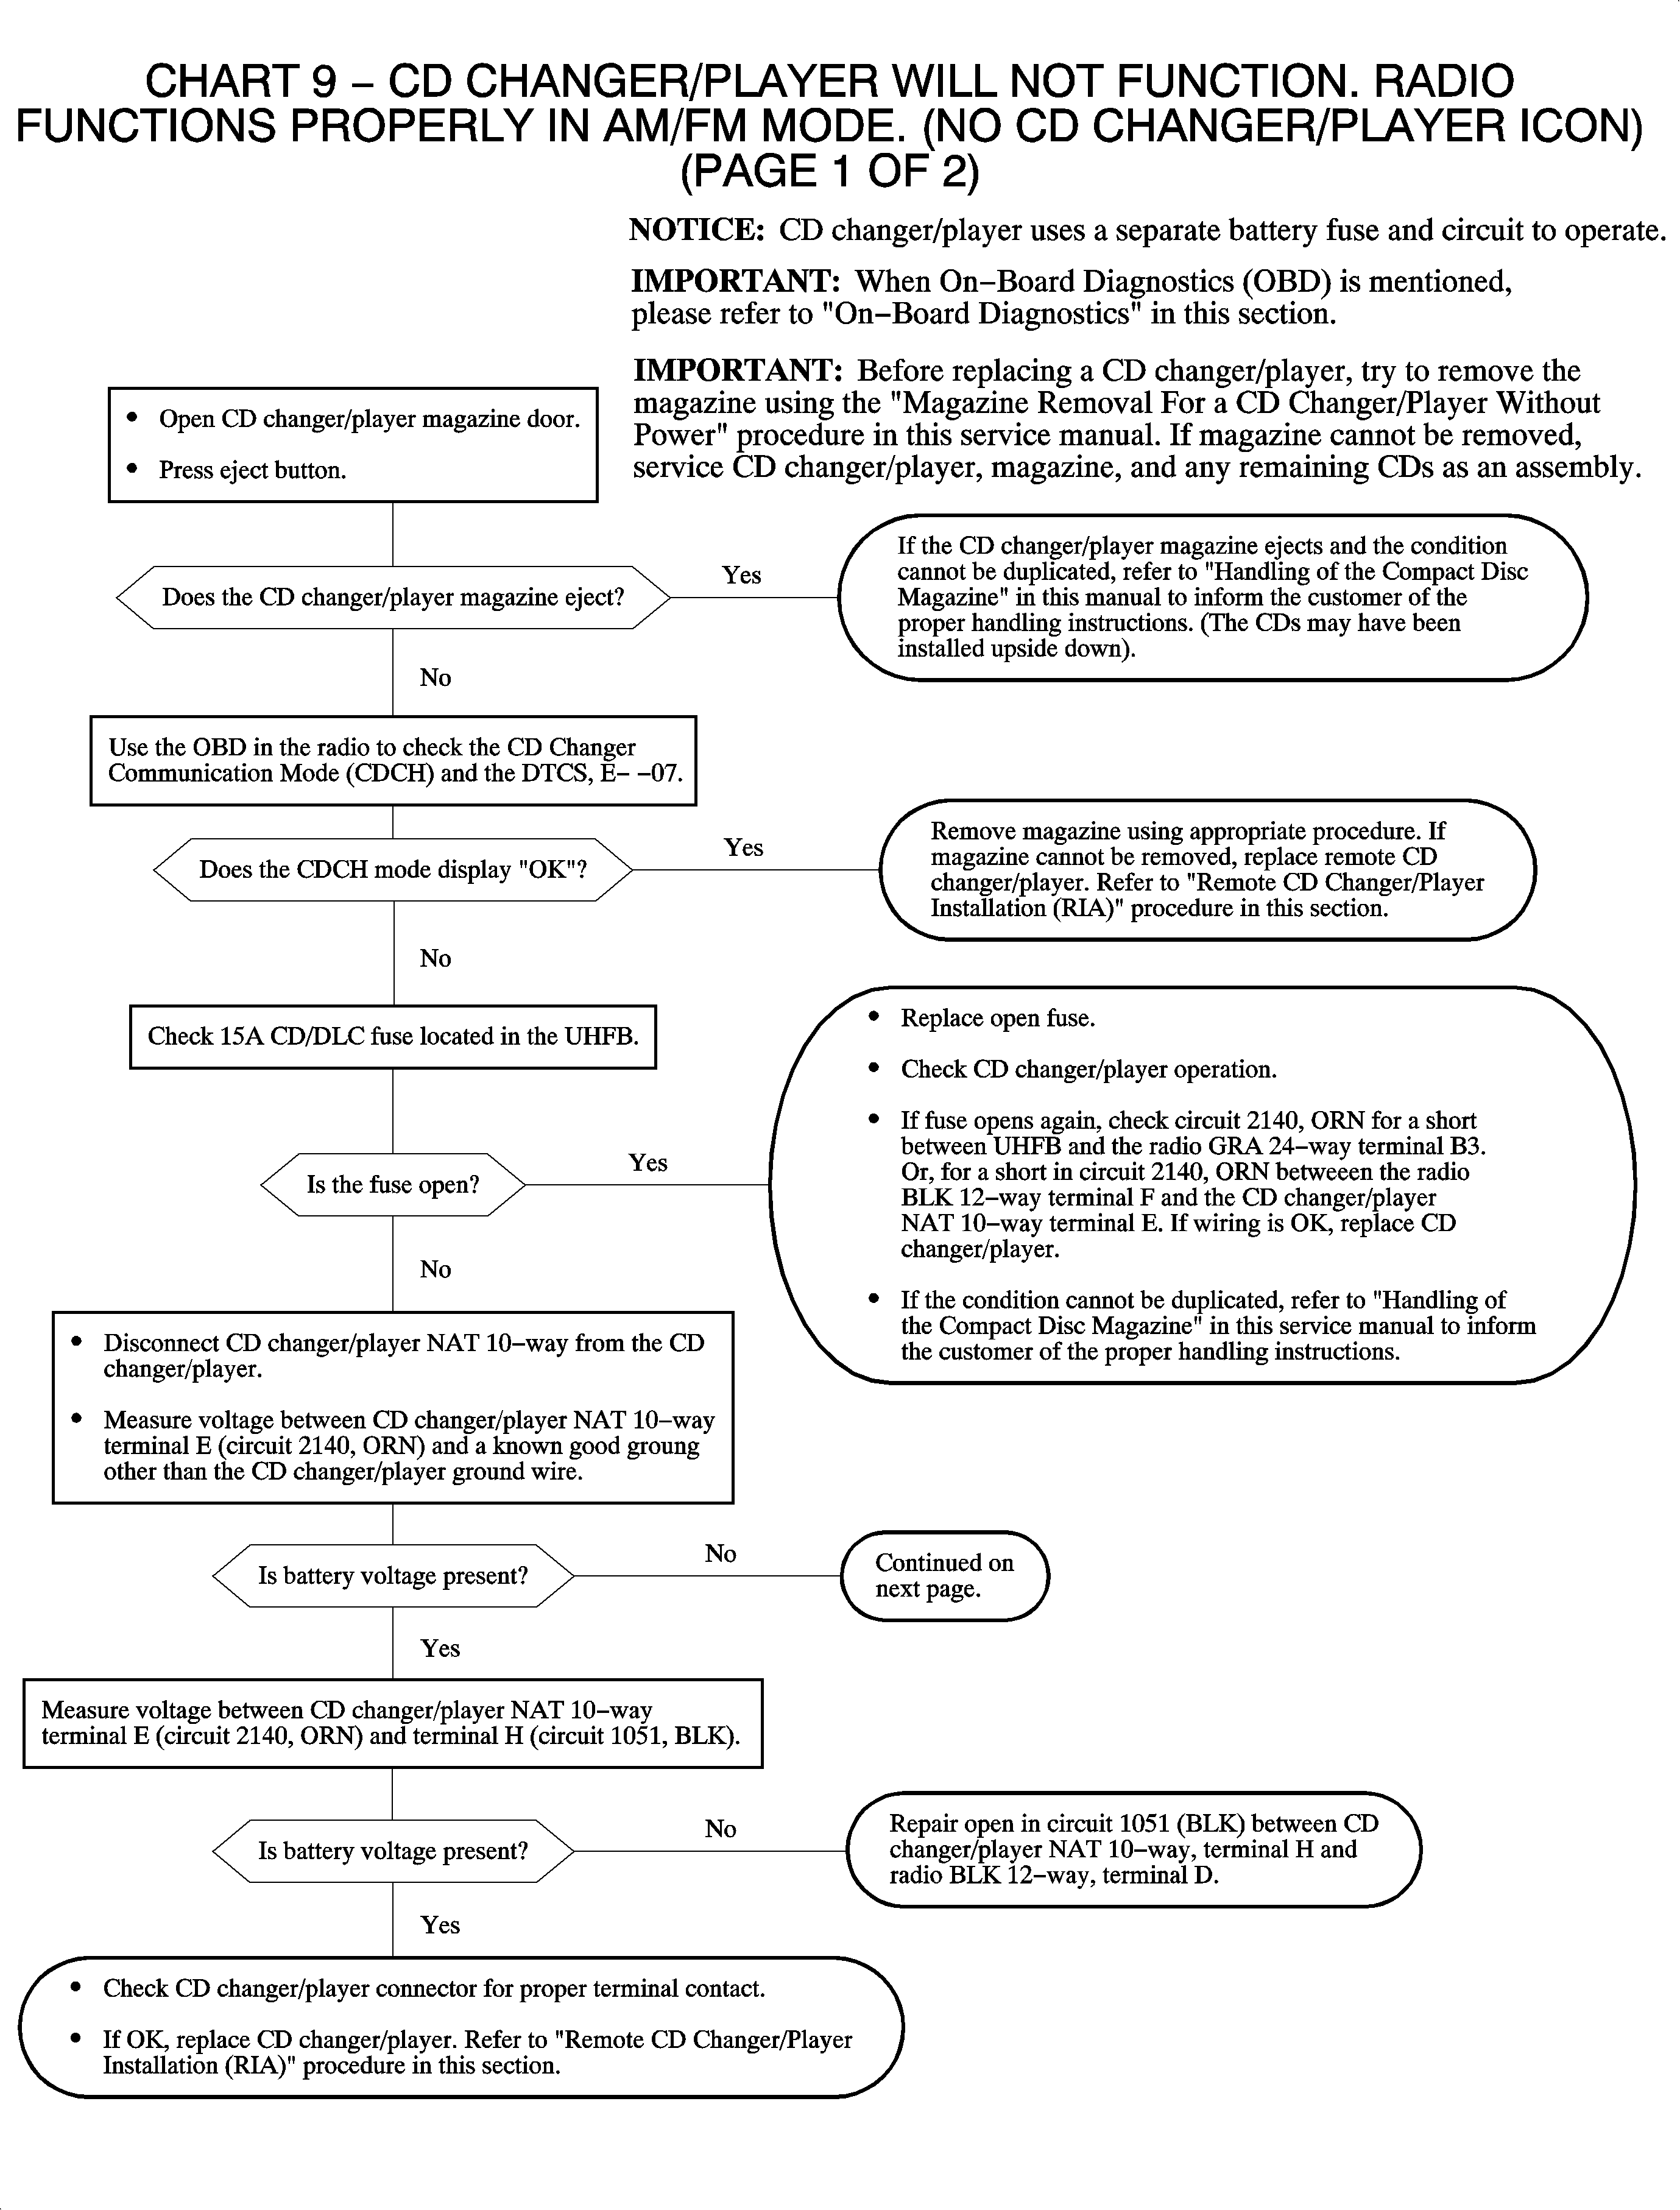
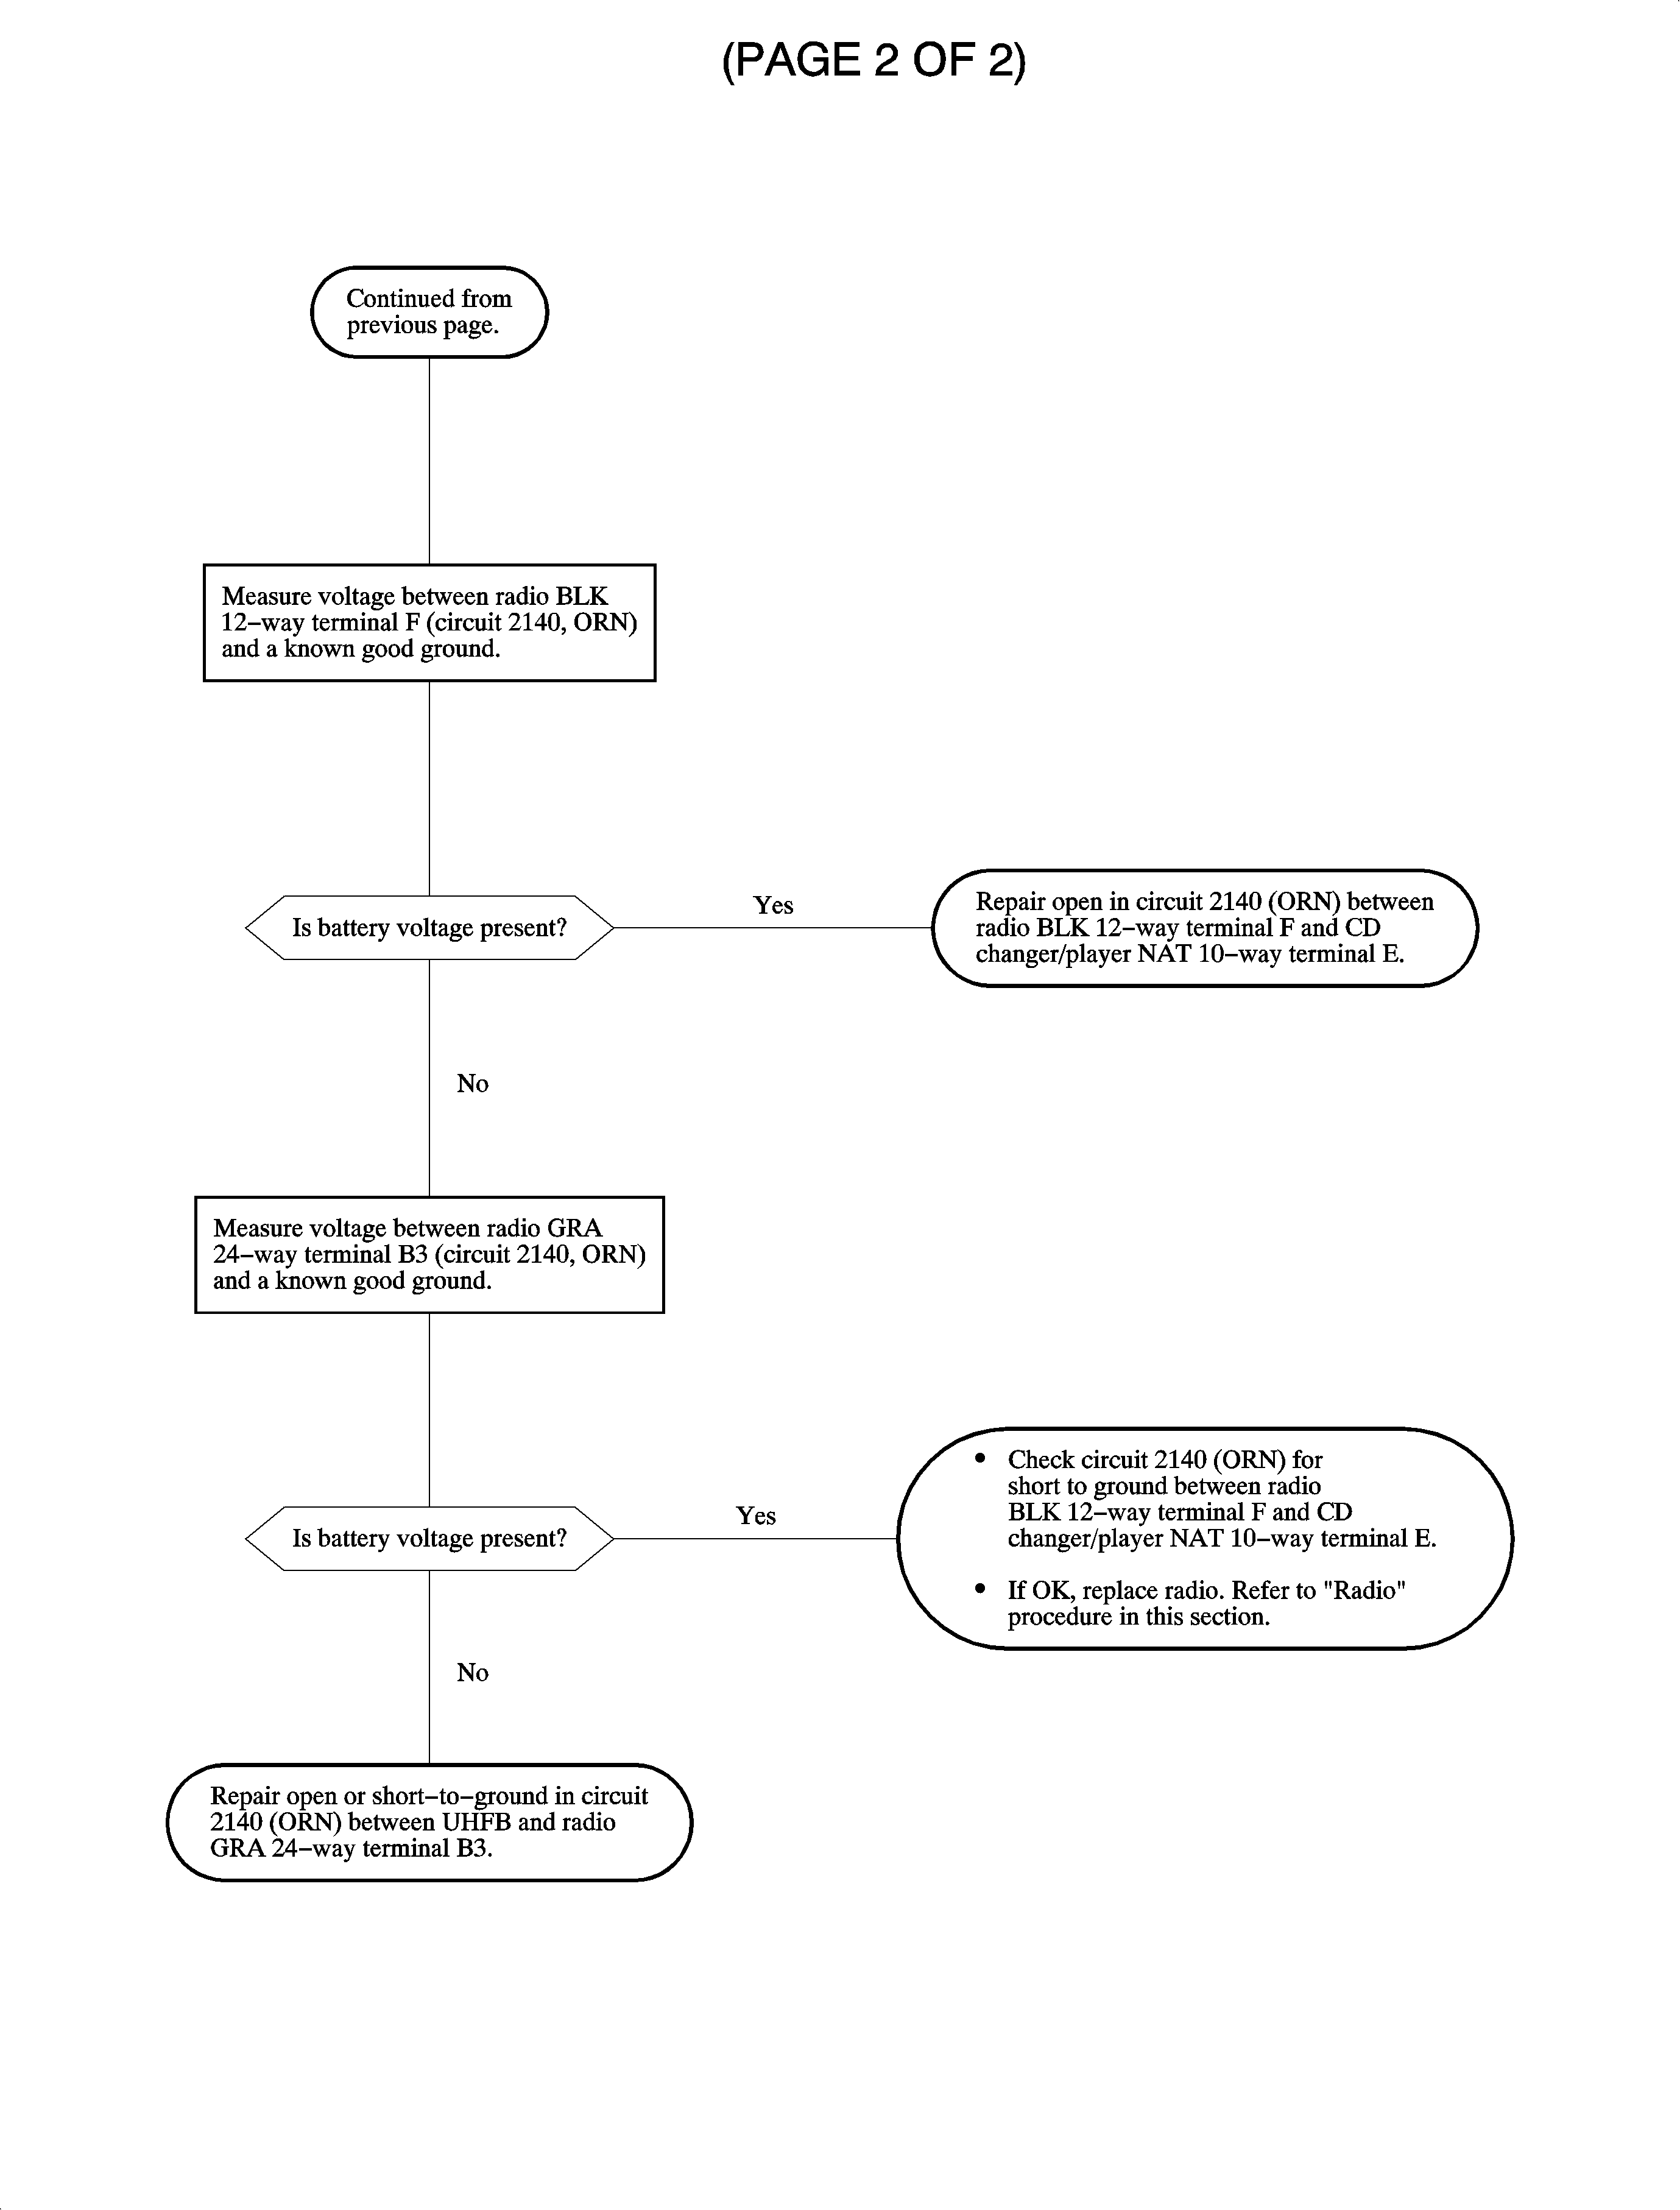
Chart 10
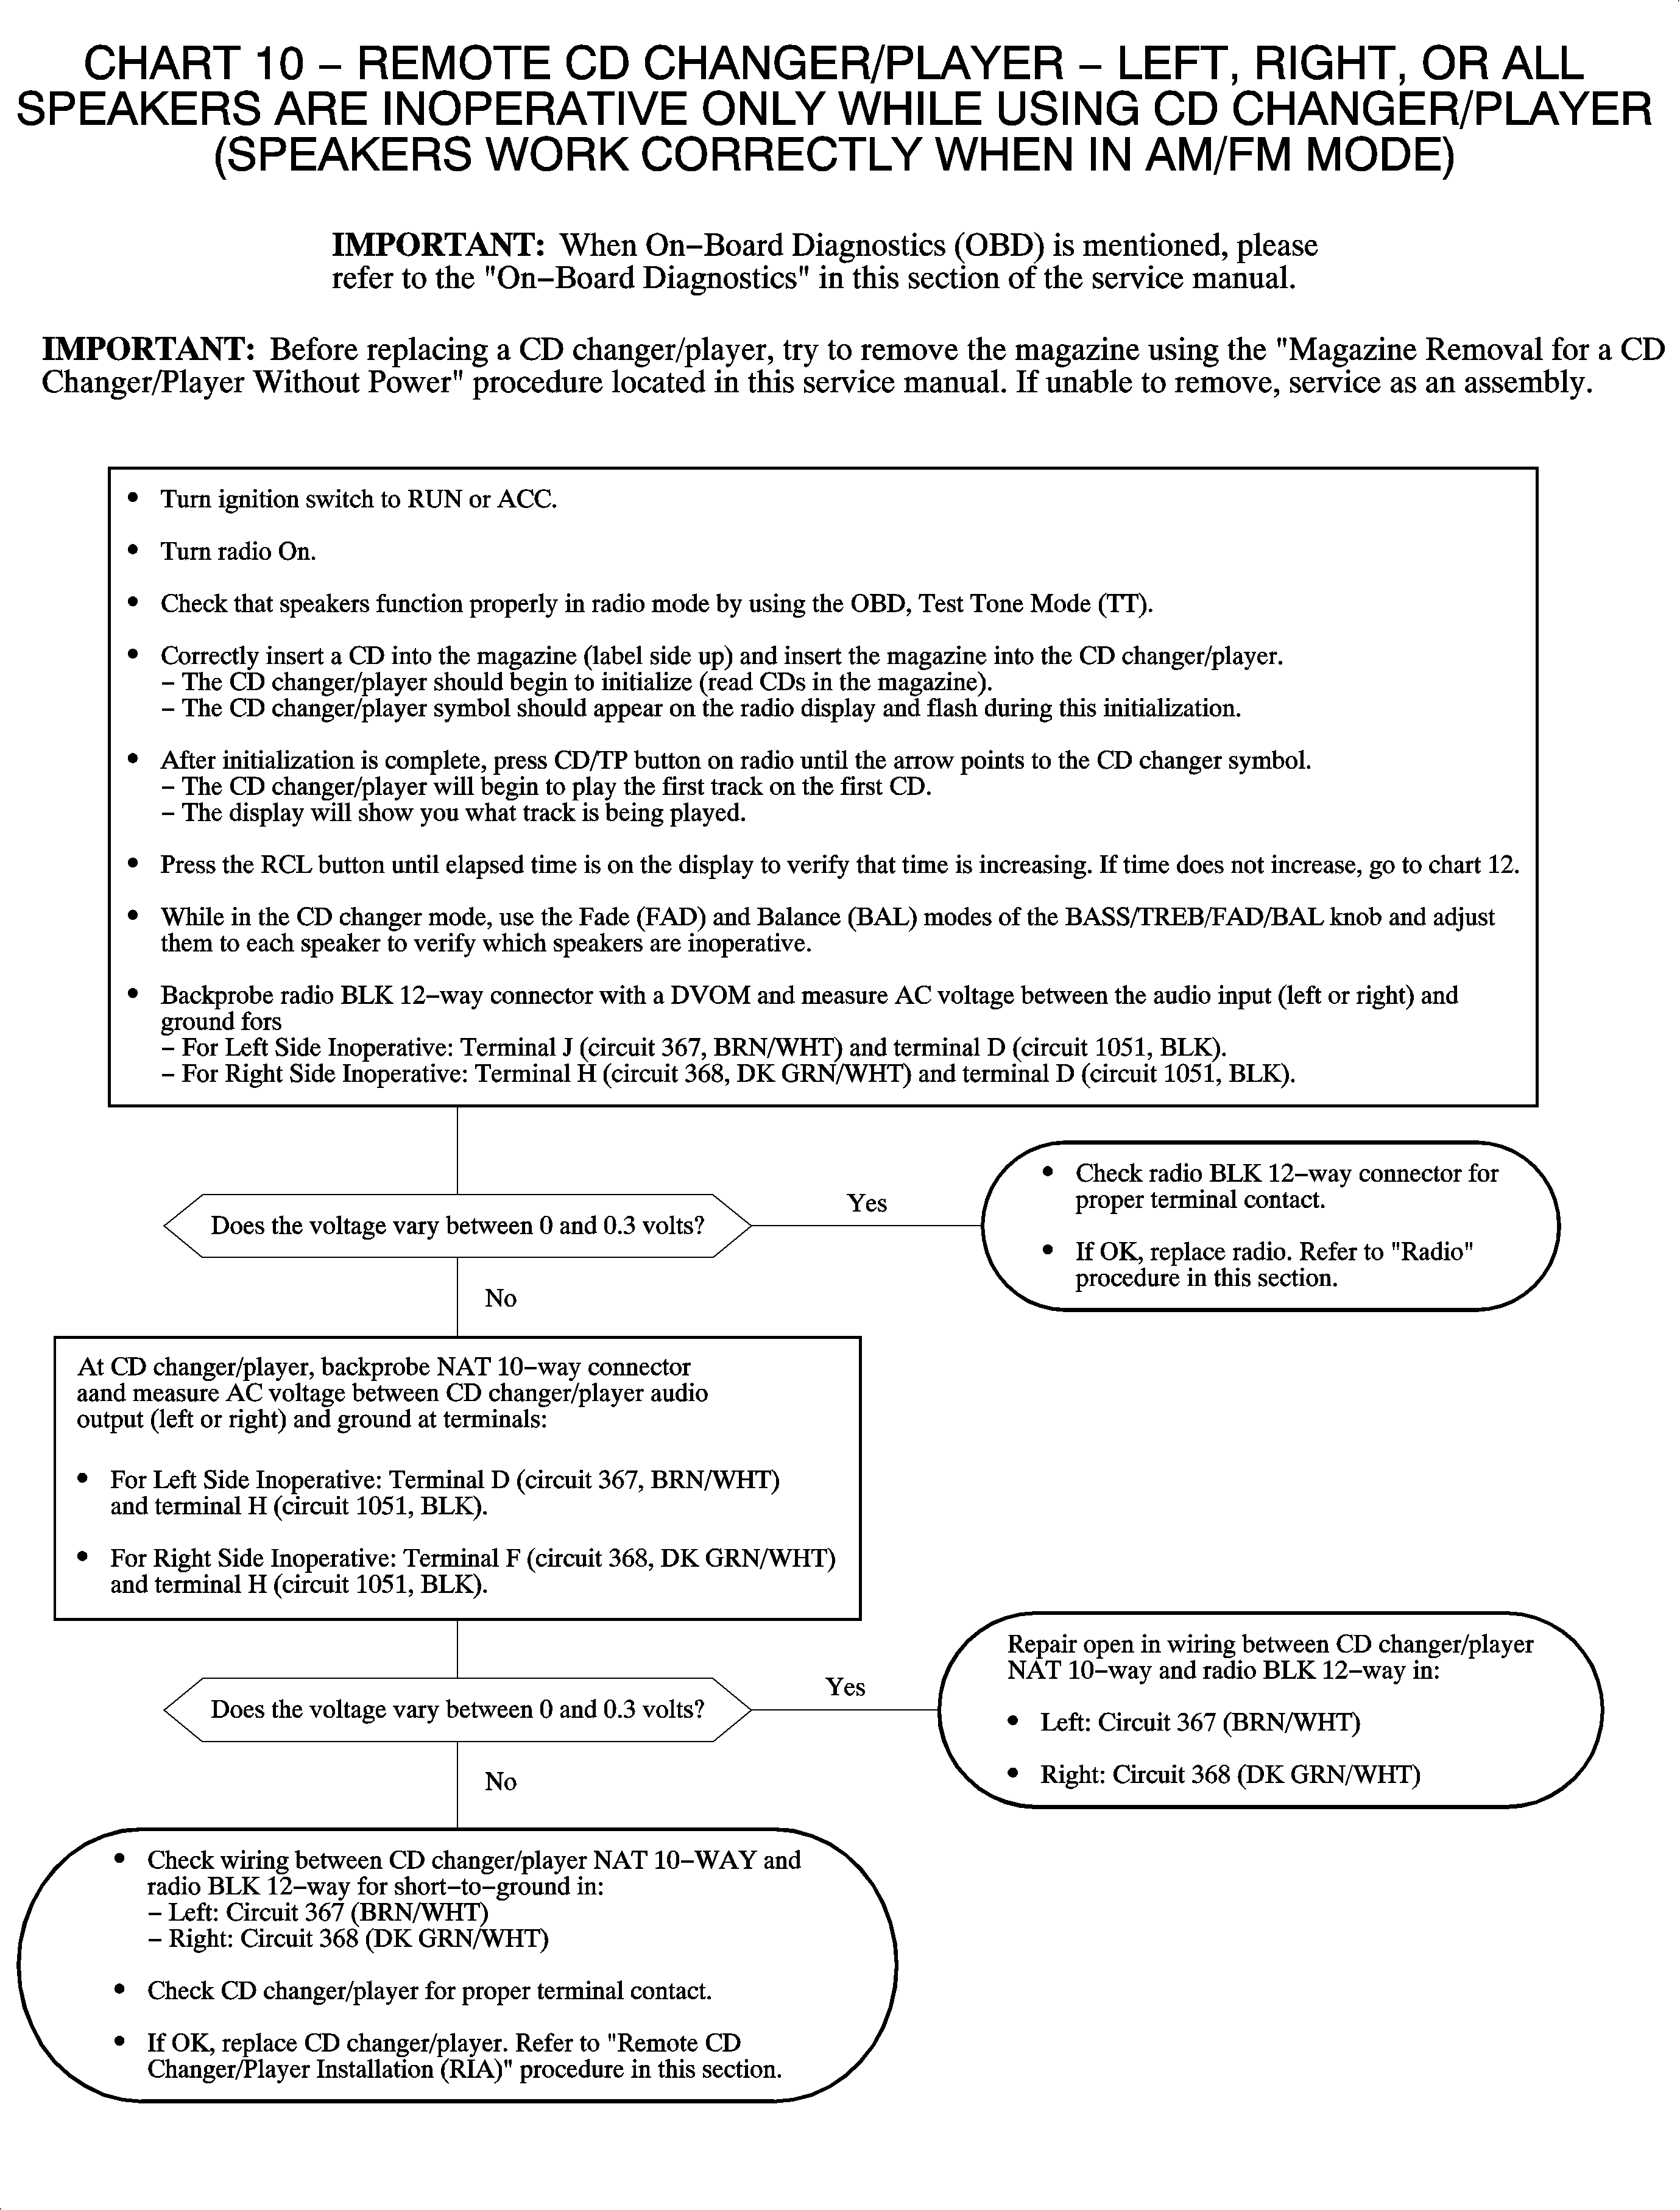
Chart 11
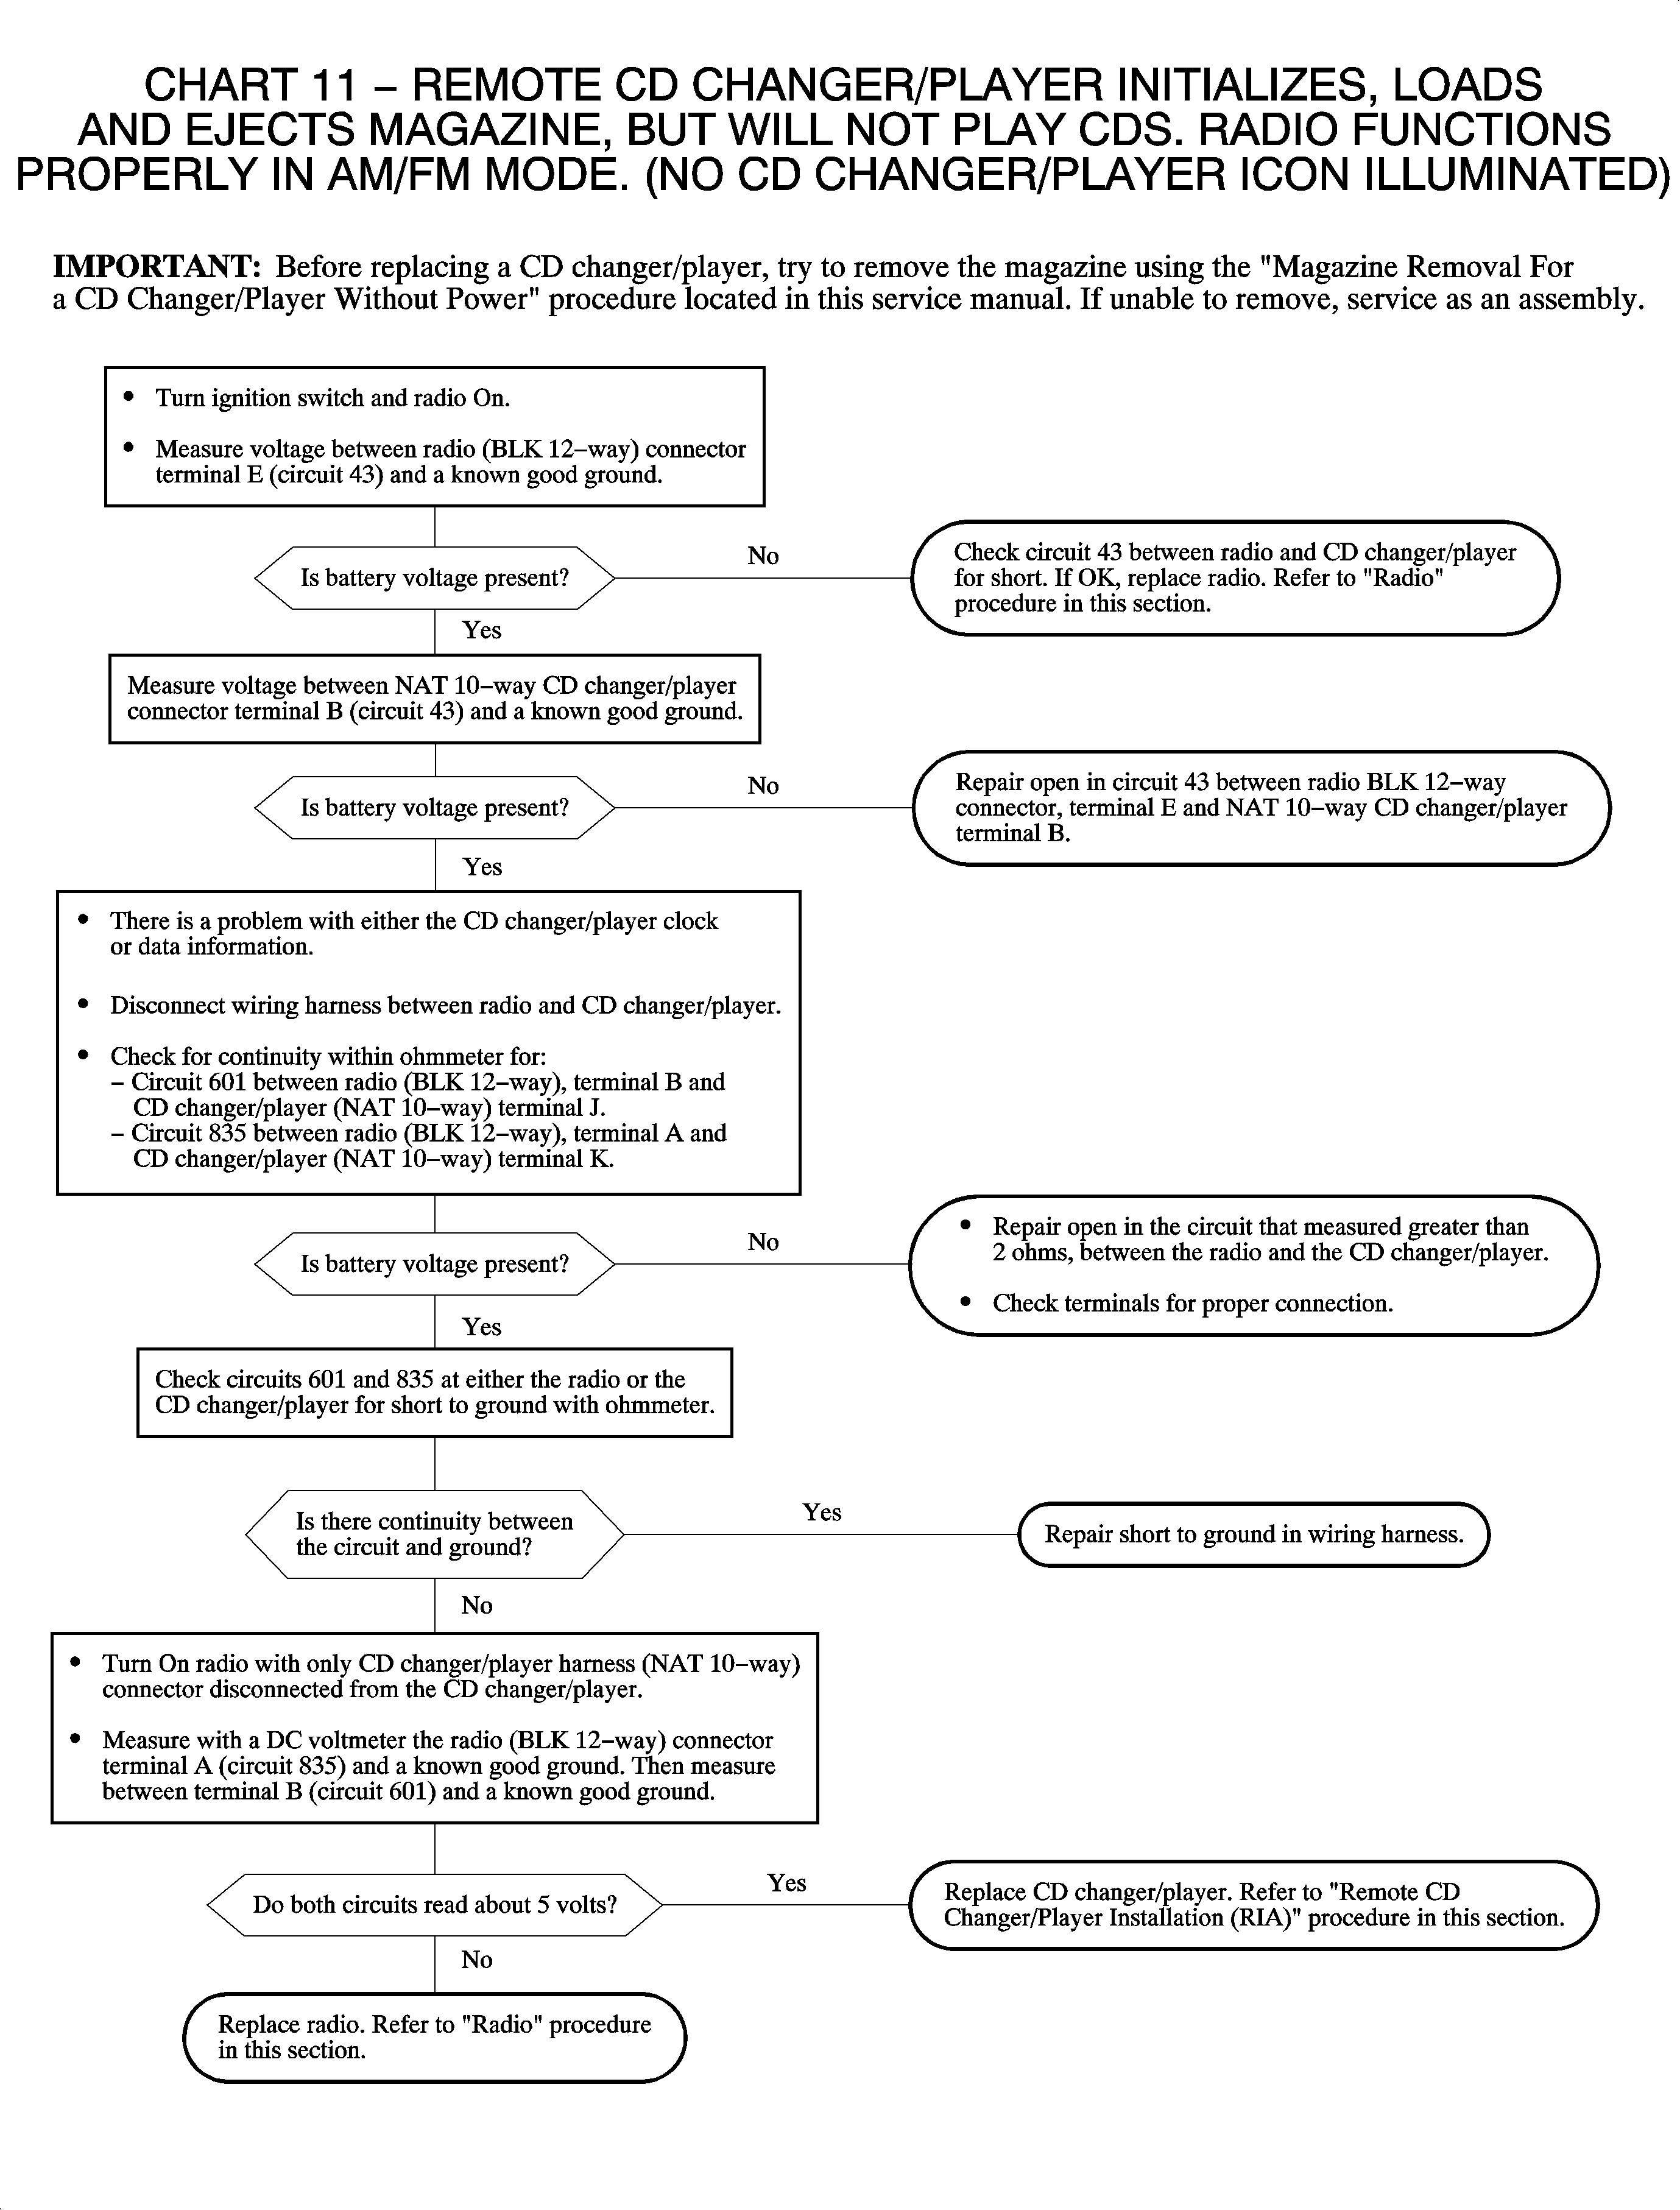
Chart 12
