Service Manual Update for 2002 L Series Body Electrical Volume II Service Manuals Regarding AM FM Stereo with Cassette and CD Player Check Charts

| Subject: | Service Manual Update for 2002 L-Series Body/Electrical Volume II Service Manuals Regarding AM/FM Stereo with Cassette and CD player Check Charts |
| Models: | 2002 L-Series Vehicles |
Purpose:
The purpose of this bulletin is to update all 2002 L-Series Body/Electrical Volume II Service Manuals at your location.
Please obtain all 2002 L-Series Body/Electrical Volume II Service Manuals and make necessary updates as indicated below.
- Cross out the following pages with a marker or pen:
- Remove the staple from the upper corner of this bulletin.
- Follow location instructions at the top of the remaining pages of this bulletin and update the service manual.
| • | Page 852 fro AM/FM Stereo with Cassette and In-Dash CD Player (ART) |
| • | Page 859 for emote CD Changer/Player Operation (AM/FM Stereo wit Cassette and In-Dash CD Player) (ART) |
| • | Pages 862-866 AM/FM Stereo with Cassette and 6 DISC CD Player |
Service Manual update for page 852 of the 2002 L-Series Body/Electrical Volume II Service Manual. Refer to Technical Information Bulletin 01-T-38. August, 2001.
AM/FM Stereo with Cassette and In-Dash CD Player
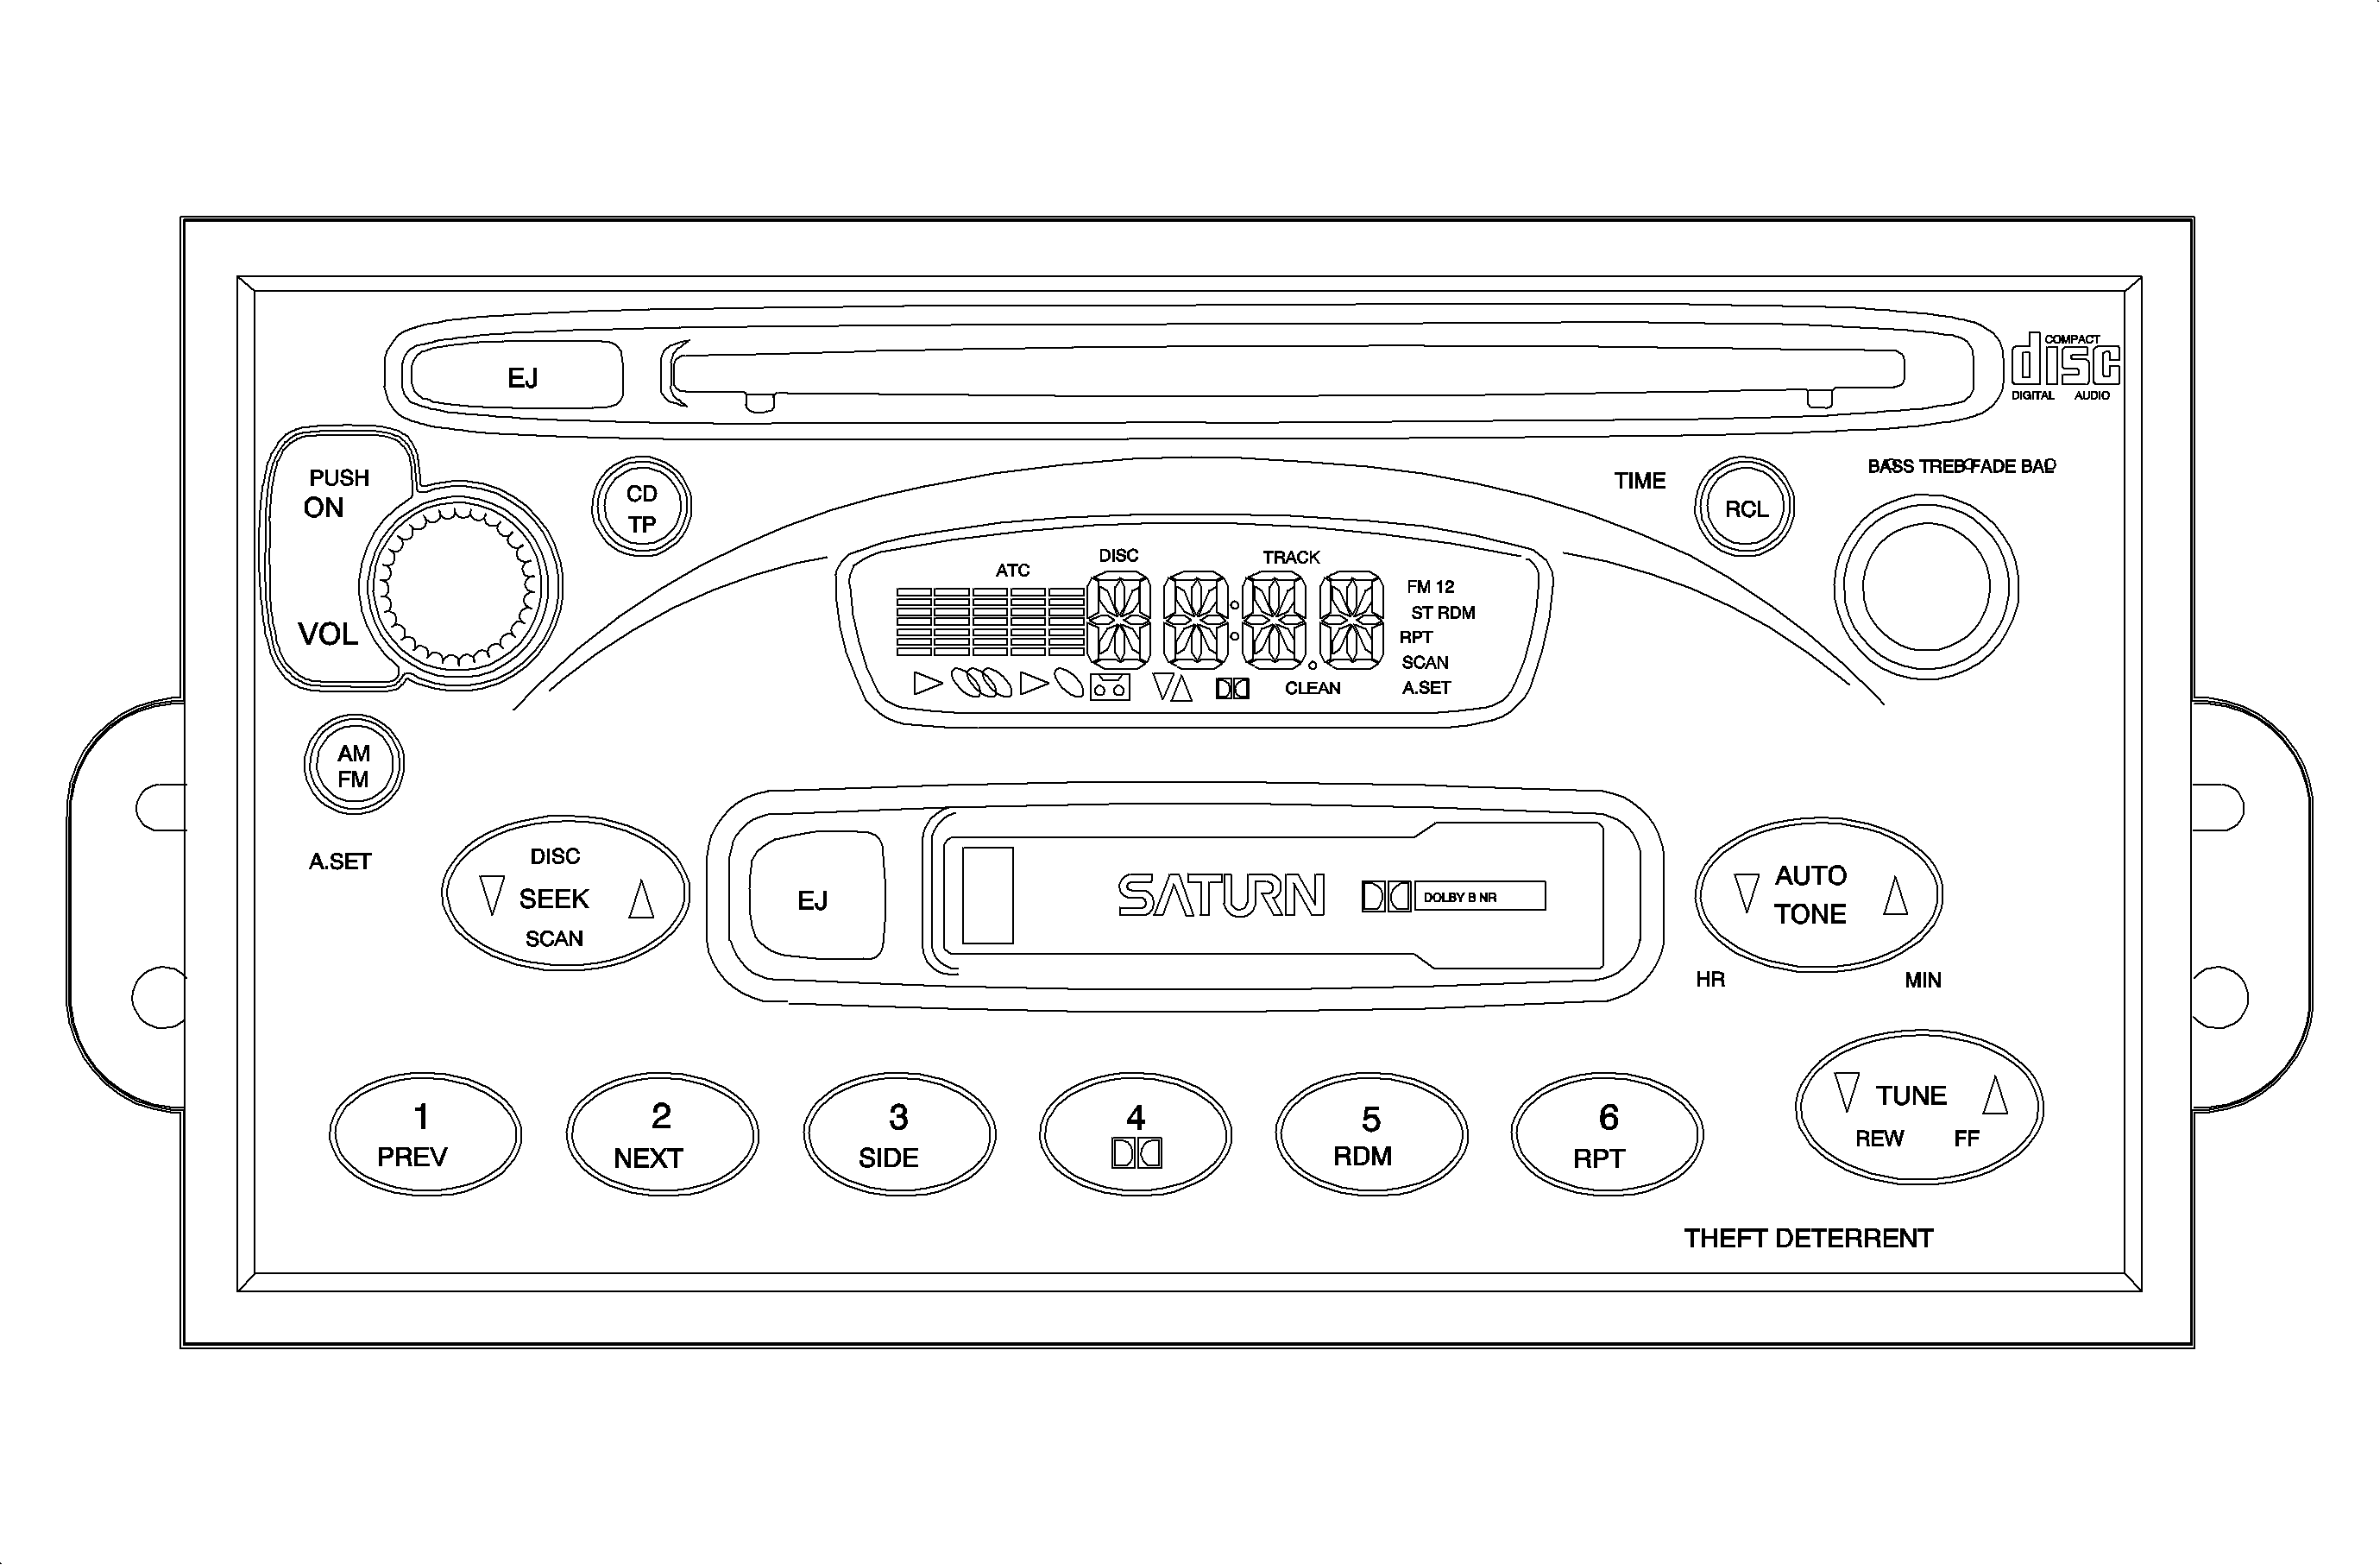
Service Manual update for page 859 of the 2002 L-Series Body/Electrical Volume II Service Manual. Refer to Technical Information Bulletin 01-T-38. August, 2001.
Remote CD Changer/Player Operation (AM/FM Stereo with Cassette and In-Dash CD Player)
Remote CD Changer/Player Operation (AM/FM Stereo with Cassette and In-Dash CD Player) System Check Chart | |
|---|---|
Action | Verify |
Push the magazine into the remote CD changer/player. Align the embossed arrow on the magazine to the embossed arrow on the remote CD changer/player mechanism. | The CD changer/player begins checking the CDs in the magazine which takes almost 20 seconds. The CD changer/player symbol will be displayed on the radio display to indicate the magazine is loaded. If the magazine is inserted without any CDs loaded, the symbol will not illuminate. The remote CD changer/player symbol will flash during the CD check and initialization. |
Press eject button on the remote CD changer/player. | The eject button is available if a magazine is in the remote CD changer/player. Pushing and releasing the CD changer/player eject button will cause the magazine to eject with no other effect to the tape, radio, or In-Dash CD player operation. If no magazine is present, pushing this button will cause no action. The eject button is available when the ignition is ON or OFF. |
Service Manual update for pages 862-866 of the 2002 L-Series Body/Electrical Volume II Service Manual. Refer to Technical Information Bulletin 01-T-38. August, 2001.
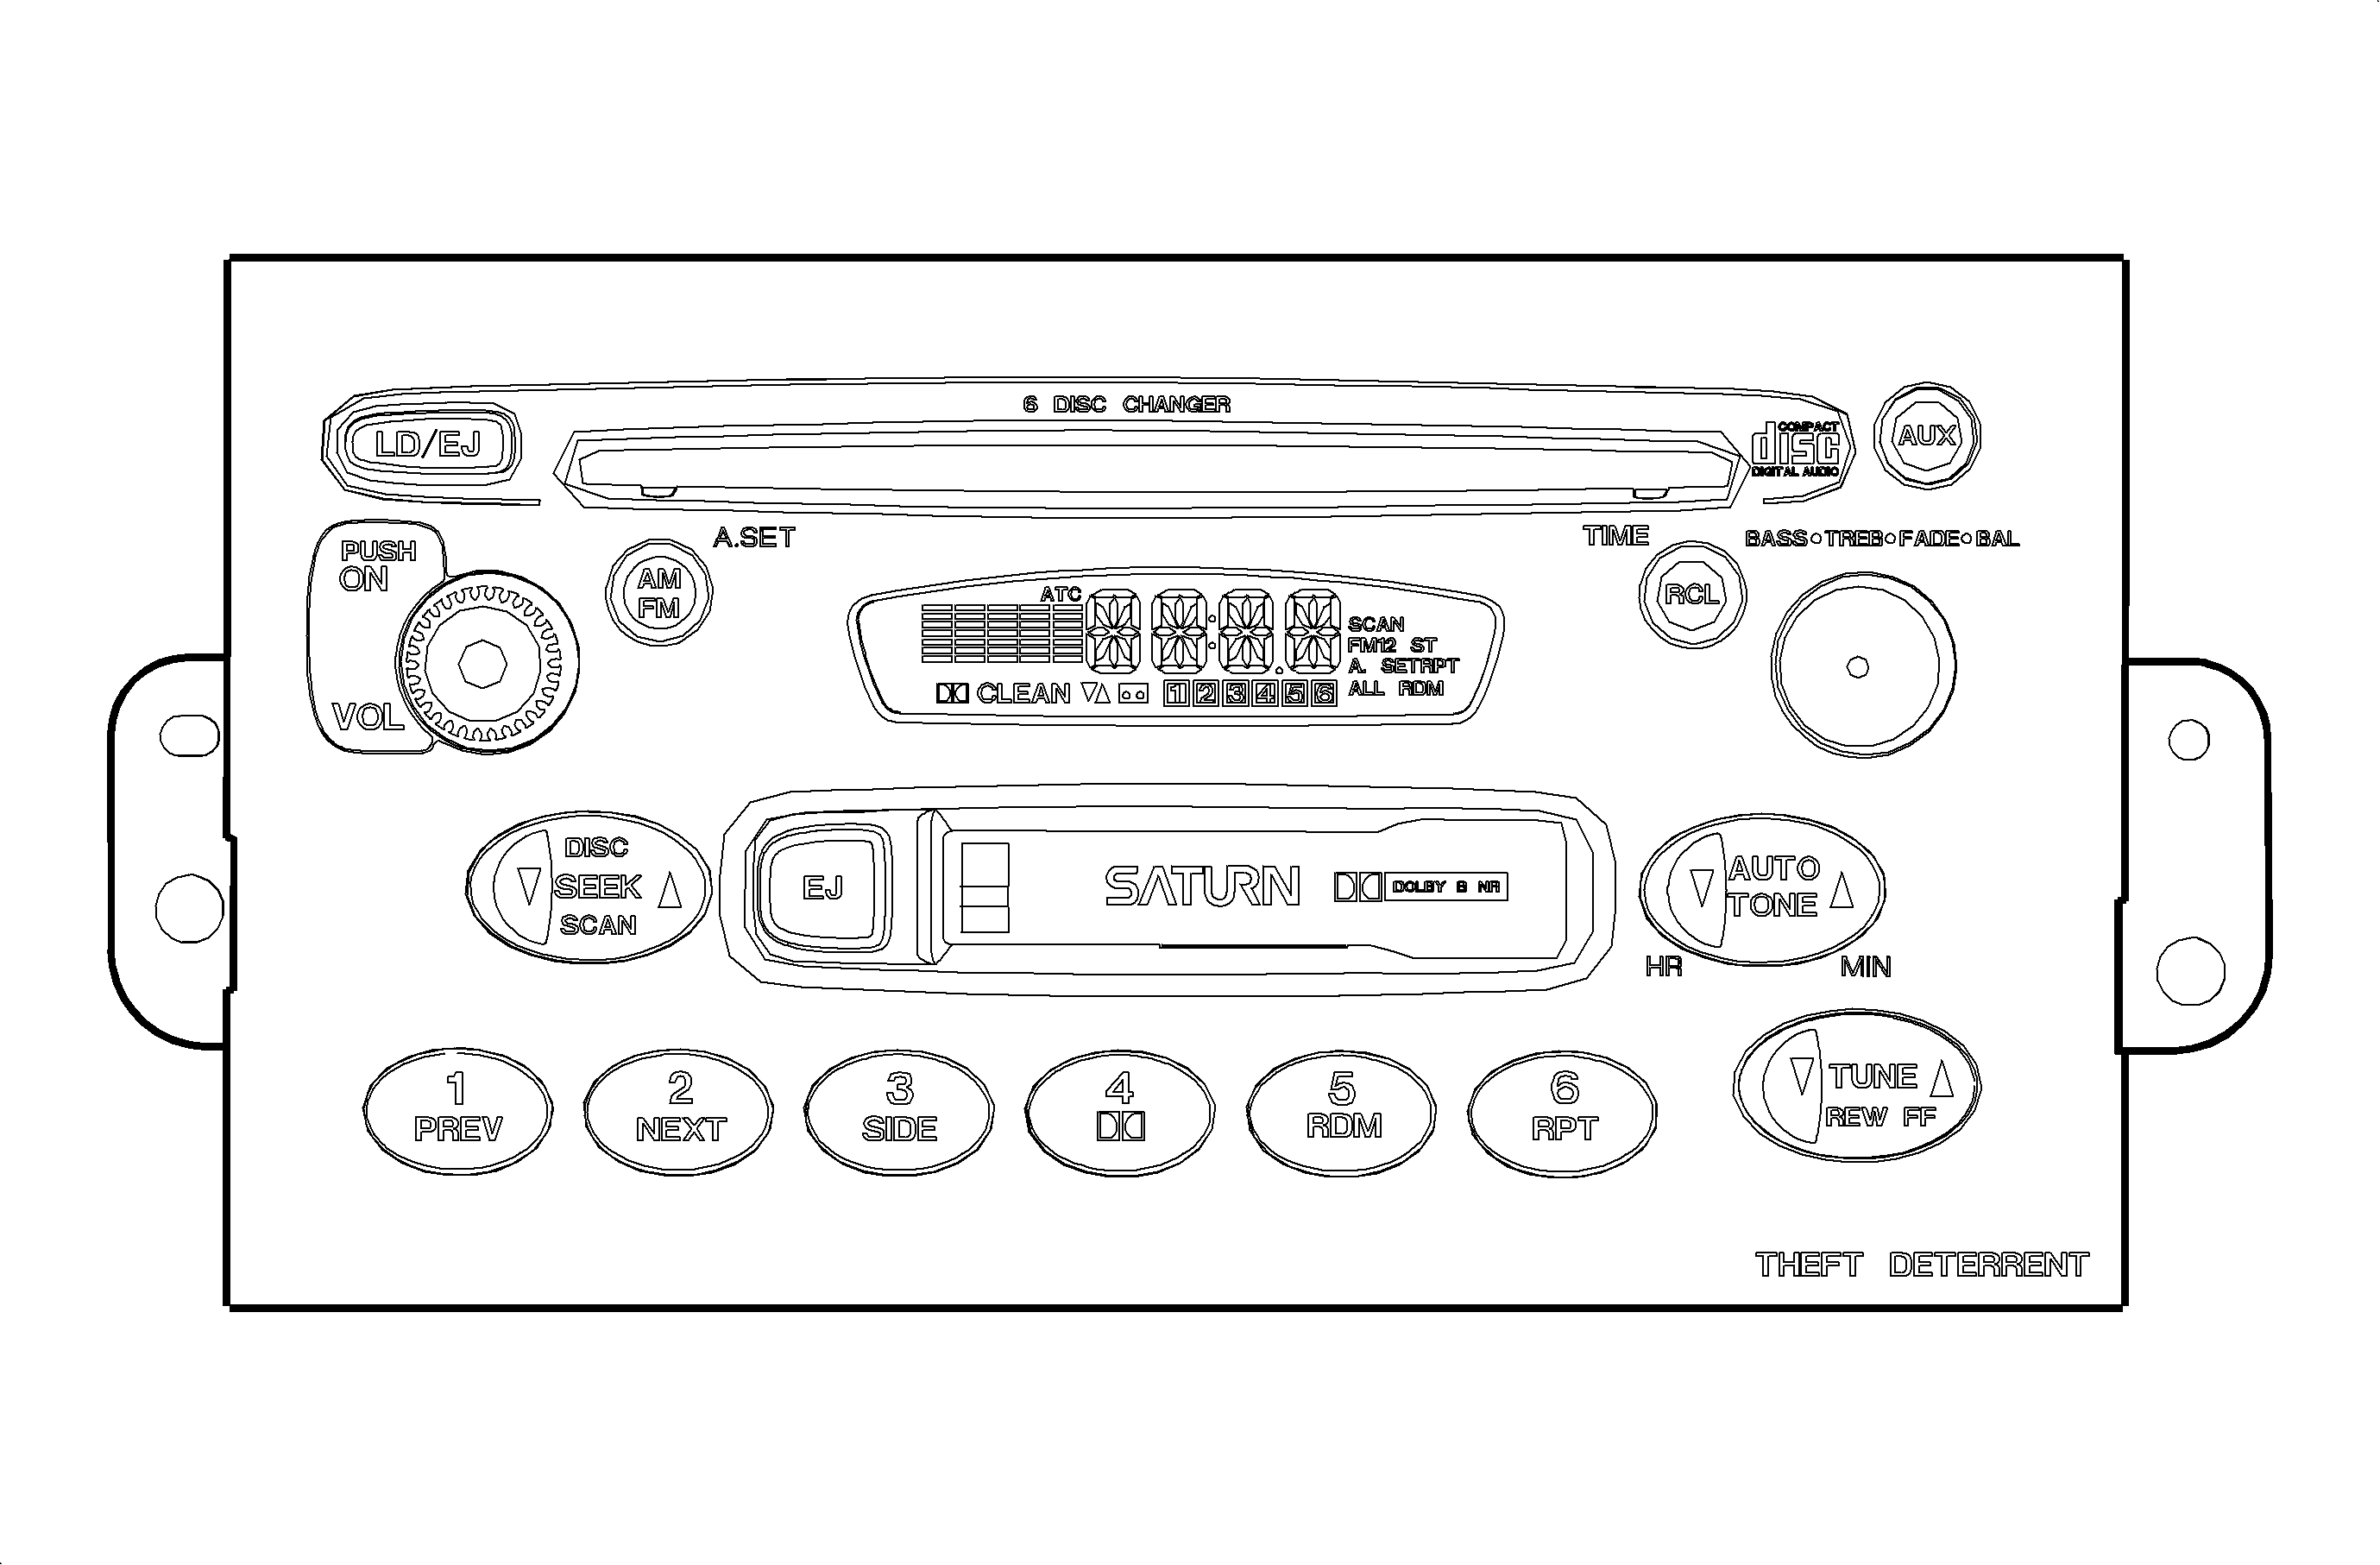
AM/FM Stereo with Cassette and 6 DISC CD Player Check Chart | |||||||
|---|---|---|---|---|---|---|---|
Action | Verify | ||||||
1 Press the VOL knob. | Radio turns ON or OFF | ||||||
2 Rotate VOL knob. | Volume increases rotating the knob clockwise or volume decreases rotating the knob counterclockwise. The VOL knob is continuously rotatable. | ||||||
3 Press the RCL button. | Radio Mode: display is switched from time-to-frequency or frequency-to-time. Frequency is displayed for 10 seconds and returns to the time display. Tape Mode: Pressing RCL button, display will show TAPE. CD Mode: Pressing RCL button once, the display will show the track being played. Pressing the RCL button a second time (within 10 seconds), the display will show elapsed track time. Ignition Off Mode: Pressing the RCL button lights the display to read the time of day. | ||||||
4 Press station select buttons (1-6). | When pressed, frequency changes to radio station that was preset to that button. Station setting: Tune to the desired station, press and hold the desired preset button until tone is heard. The station is now set. The frequency is displayed for 10 seconds and returns to time display. | ||||||
5 Press AM/FM button. | Radio Mode: Pressing AM/FM button will change between FM1, FM2, and AM bands. Band selected is displayed. Tape or CD Mode: Pressing AM/FM button stops tape/CD play and returns to AM/FM mode. Ignition ON/Radio OFF; Pressing AM/FM turns radio ON. | ||||||
6 Press and hold AM/FM button for more than 3 seconds until an audible tone is heard (A.SET Mode). | Radio will sample and pick out the strongest radio stations, starting from the lowest frequency, by searching through the current band, AM or M. It will then store the 6 strongest AM stations or the 12 strongest FM stations onto the station preset buttons. When finished, you will see that it is no longer searching and that the station presets are set. Also, A.SET will be on the display. The radio retains the originally stored stations so that they may be recalled when the A.SET mode is cancelled. To cancel the A.SET mode and recall the previously stored stations, press and hold the AM/FM button for more than 3 seconds, until an audible tone is heard. This function is used when traveling outside of the normal area to automatically set the radio station preset buttons to the strongest stations in the area. | ||||||
7 Press AUX (Auxiliary) button. | The AUX button is used to select and switch between players that are loaded and available (CD, Cassette, or rear seat DVD). Ignition ON/Radio OFF Mode: Pressing AUX button will turn ON the radio and begin playing the last CD or Cassette tape that was played. This button has no function when none of the media players (CD, Cassette, or DVD) are loaded. | ||||||
8 Press either side of the AUTOTONE rocker button. | As the button is pressed, the radio will switch to each of the 7 selectable preset tones: Flat factory preset, optimized for the vehicle), POP, ROCK, C/W (country/western), CLSC (classical), JAZZ and NEWS. A different AUTOTONE tone can be set for :
ATC is displayed when the radio station preset, cassette player or CD changer location has an AUTOTONE tone set. When BASS or TREB are adjusted manually, any AUTOTONE setting will be cancelled and the CSTM (CUSTOM) mode is entered. The BASS and TREB adjustments made in CUST mode will apply to any radio station preset, cassette player, or CD changer location using CSTM mode tone. | ||||||
9 Press and hold BASS/TREB/FADE/BAL knob until an audible tone is heard. | Each time this action is performed, the equalizer display will switch between being displayed permanently and temporarily. | ||||||
10 Press BASS/TREB/FADE/BAL knob until BASS is displayed. Rotate the knob to control BASS. | Bass increases by turning the knob clockwise. The left 2 columns of the display get larger. Bass decreases by turning the knob counterclockwise. The left 2 columns of the display get smaller. If the knob is not pressed or rotated within 10 seconds, the time will be displayed. | ||||||
11 Press BASS/TREB/FADE/BAL knob until TREB is displayed. Rotate the knob to control TREBLE. | Treble increases by turning the knob clockwise. The right 2 columns of the display get larger. Treble decreases by turning the knob counterclockwise. The right 2 columns of the display get smaller. If the knob is not pressed or rotated within 10 seconds, the time will be displayed. | ||||||
12 Press BASS/TREB/FADE/BAL knob until FADE is displayed. Rotate the knob to control FADE. | Sound is moved to the front speakers as the knob is turned clockwise or to the rear speakers as the knob is turned counterclockwise. If the knob is not pressed or rotated within 10 seconds, the time will be displayed. | ||||||
13 Press BASS/TREB/FADE/BAL knob Until BAL is displayed, Rotate the knob to control balance. | Sound moves to the right speakers as the knob is turned clockwise or to the left speakers as the knob is turned counterclockwise. If the knob is not pressed or rotated within 10 seconds, the time will be displayed. | ||||||
14 Press the right side of the TUNE rocker button. | Manually increases the radio tuner frequency until the rocker button is released. | ||||||
15 Press the left side of the TUNE rocker button. | Manually decreases the radio frequency until the rocker button is released. | ||||||
16 Press the right side of the SEEK rocker button. | Radio tuner will seek the next higher frequency receivable station. | ||||||
17 Press the left side of the SEEK rocker button. | The radio tuner will seek the next lower frequency receivable station. | ||||||
18 Press and hold the right side of the Scan rocker button until an audible tone is heard. | The radio tuner will seek the next higher frequency receivable station, play the station for a few seconds, then seek the next higher frequency station. This process continues until the scan rocker button is pressed again. | ||||||
19 Press and hold the left side of the Scan rocker button until an audible tone is heard. | The radio tuner will seek the next lower frequency receivable station, play the station for a few seconds, then seek the next lower frequency station. This process continues until the scan rocker button is pressed again. | ||||||
AM/FM Stereo with Cassette and 6 DISC CD Player Check Chart | |
|---|---|
Cassette Tape Function | |
Action | Verify |
1 Insert Tape. | Tape symbol and tape directional arrow light up and tape begins to play. |
2 Press EJ (Eject) button next to the tape player opening | Tape stops and ejects. Radio returns to the last played station or the last played CD track. |
3 Press PREV (Previous) button. | The cassette player will rewind to the beginning of the current selection. If the PREV button is pressed at the beginning of a selection, the tape will rewind to the beginning of the selection. The radio will play during tape rewind. |
4 Press NEXT button. | The tape will advance to the next selection on the tape. The radio will play during tape advance. |
5 Press the SIDE button. | Tape direction and side will change. |
6 Press the Dolby B® Noise Reduction button. | Tape player noise is reduced. |
7 Press PRT button. | The current selection will be repeated until RPT is pressed again. The radio will play during tape rewind. |
8 Press REW (Rewind) button. | Rewinds the tape until the button is pressed again, or until the beginning of a tape side. |
9 Press FF (Fast Forward) button. | Advances the tape until the button is pressed again, or until the beginning of a tape side. |
AM/FM Stereo with Cassette and 6 DISC CD Player Check Chart | |
|---|---|
CD Loading Function (Single CD Load/Eject) | |
Action | Verify |
1 Press LD/EJ button. | Display will show NUM. This step prompts the user to select one of the 6 available CD locations. |
2 Press the desired radio preset button (1-6). | Selects the desired target CD location. Display will show WAIT. If a CD is present in the selected target location, the CD will be Ejected before the display shows to load a CD. If no CD is present, the display will show LOAD. |
3 When LOAD is displayed, load a CD. | CD will be loaded into the desired location. To Cancel Load/Eject Operation: Pressing the LD/EJ from LOAD will cancel the Load/Eject operation and return the radio to CD location selection operation or NUM. Pressing LD/EJ from NUM will cancel the CD selection operation and return the radio to the previous mode. |
AM/FM Stereo with Cassette and 6 DISC CD Player Check Chart | |||||||
|---|---|---|---|---|---|---|---|
CD Loading Function (Load/Eject All CDs) | |||||||
Action | Verify | ||||||
1 Press and hold LD/EJ button. | The radio will pause, then sound an audible tone and display will show EJT, The radio will eject all CDs sequentially. If no CDs are present, the radio will display WAIT. When the radio is ready to load a CD the display will show LOAD. | ||||||
2 When LOAD is displayed, load one CD. | The display will change to WAIT as each CD is loaded to the next available location. The display will show LOAD when the radio is ready to load the next CD. | ||||||
3 When LOAD is displayed, load the next CD. | The display will change to WAIT as each CD is loaded to the next available location. The display will show LOAD when the radio is ready to load the next CD. The load sequence will continue until:
| ||||||
AM/FM Stereo with Cassette and 6 DISC CD Player Check Chart | |||||||
|---|---|---|---|---|---|---|---|
6 CD Player Function | |||||||
Action | Verify | ||||||
1 Load the CD changer with at least two CDs. See CD Loading system check chart in this section. | At least two CDs are loaded and that this CD locations numbers that were loaded appear in the display | ||||||
2 Press and hold REW (Rewind) button. | Pressing and holding the REW button while a CD is playing will Quickly rewind within the current track. While rewinding, sound can be heard at a reduced volume and the display will show elapsed track time to assist in locating specific passages. When a new track is encountered during the rewind, the new track number is briefly shown, then the elapsed time of the new track is shown while rewinding continues. When the REW button is released, the current track number is displayed. After 10 seconds, with no other action, the display returns to the time of day. | ||||||
3 Press and hold FF (Fast Forward) button. | Pressing and holding the FF button while a CD is playing quickly moves forward within the current track. While fast forwarding, sound can be heard at a reduced volume and the display will show elapsed track time to assist in locating specific passages. When a new track is encountered during the fast forward, the new track number is briefly shown, then the elapsed time of the new track is shown while fast forward continues. When the FF button is released, the current track number is displayed. After 10 seconds, with no other action, the display returns to the time of day. | ||||||
4 Press PREV (previous) button. | CD player returns to the beginning of the current track. Pressing PREV at the beginning of a track selects the next lower-number track available. Pressing PREV at the beginning of the first track on the CD selects the last track available (highest number) on the same CD (wrap around selection). | ||||||
5 Press the NEXT (next) button. | CD player moves to the next higher-number track. Pressing NEXT while playing the last (highest numbered) track on the CD selects the first track (lowest --numbered) on the same CD (wrap around selection). | ||||||
6 Press DISC rocker button. | The DISC rocker button provides fro forward and reverse CD selection. DISC directs the changer to select the next higher-numbered CD location and begin playing the first track of the CD in that location. DISC directs the changer to select the next lower-numbered CD location and then begin playing the first track of the CD in that location. DISC can be pressed multiple times while the CD changer is selecting discs. | ||||||
7 Press RDM (random play) button. | Three modes of random play are available. When active, the mode selected appears in the display:
Each press of the RDM button selects the next random play mode. Pressing PREV or NEXT in either of the random modes begins play of another randomly-selected track. The CD player remembers the tracks that have already been played, so no track is played twice during a random play mode. Random modes are cancelled, and the player repeats the current track, when RPT is pressed. | ||||||
8 Press RPT (repeat) button. | Pressing the RPT button will toggle the repeat-disc function On or OFF. When the repeat-disc feature is ON, RPT will appear in the display, and the currently selected disc will repeat at the end of the last track on that disc. Pushing RDM, or DISC will cancel the repeat feature. | ||||||
Important: If a CD has moisture on it, is not a digital audio CD, or is loaded into the changer upside-down, initialization of that CD will not be completed. The CD player will eject the CD.
