Water leaks into Passenger Compartment and/or Rear Compartment/Rear Cargo Area

| Subject: | Waterleaks into Passenger Compartment and/or Rear Compartment/Rear Cargo Area (Add Body Seam Sealer to Specified Locations as Necessary) Due to a change n model years affected, this bulletin has been revised and supersedes bulletin 00-T-41, which should be discarded. |
| Models: | 2000 - 2002 Saturn L-Series Vehicles |
Condition
Some customers may comment about water leaking into the passenger compartment and/or rear compartment/rear cargo area.
Cause
This condition may be caused by insufficient body seam sealer being applied at the locations shown in this bulletin.
Correction
Refer to one or more of the following procedures in the bulletin as needed.
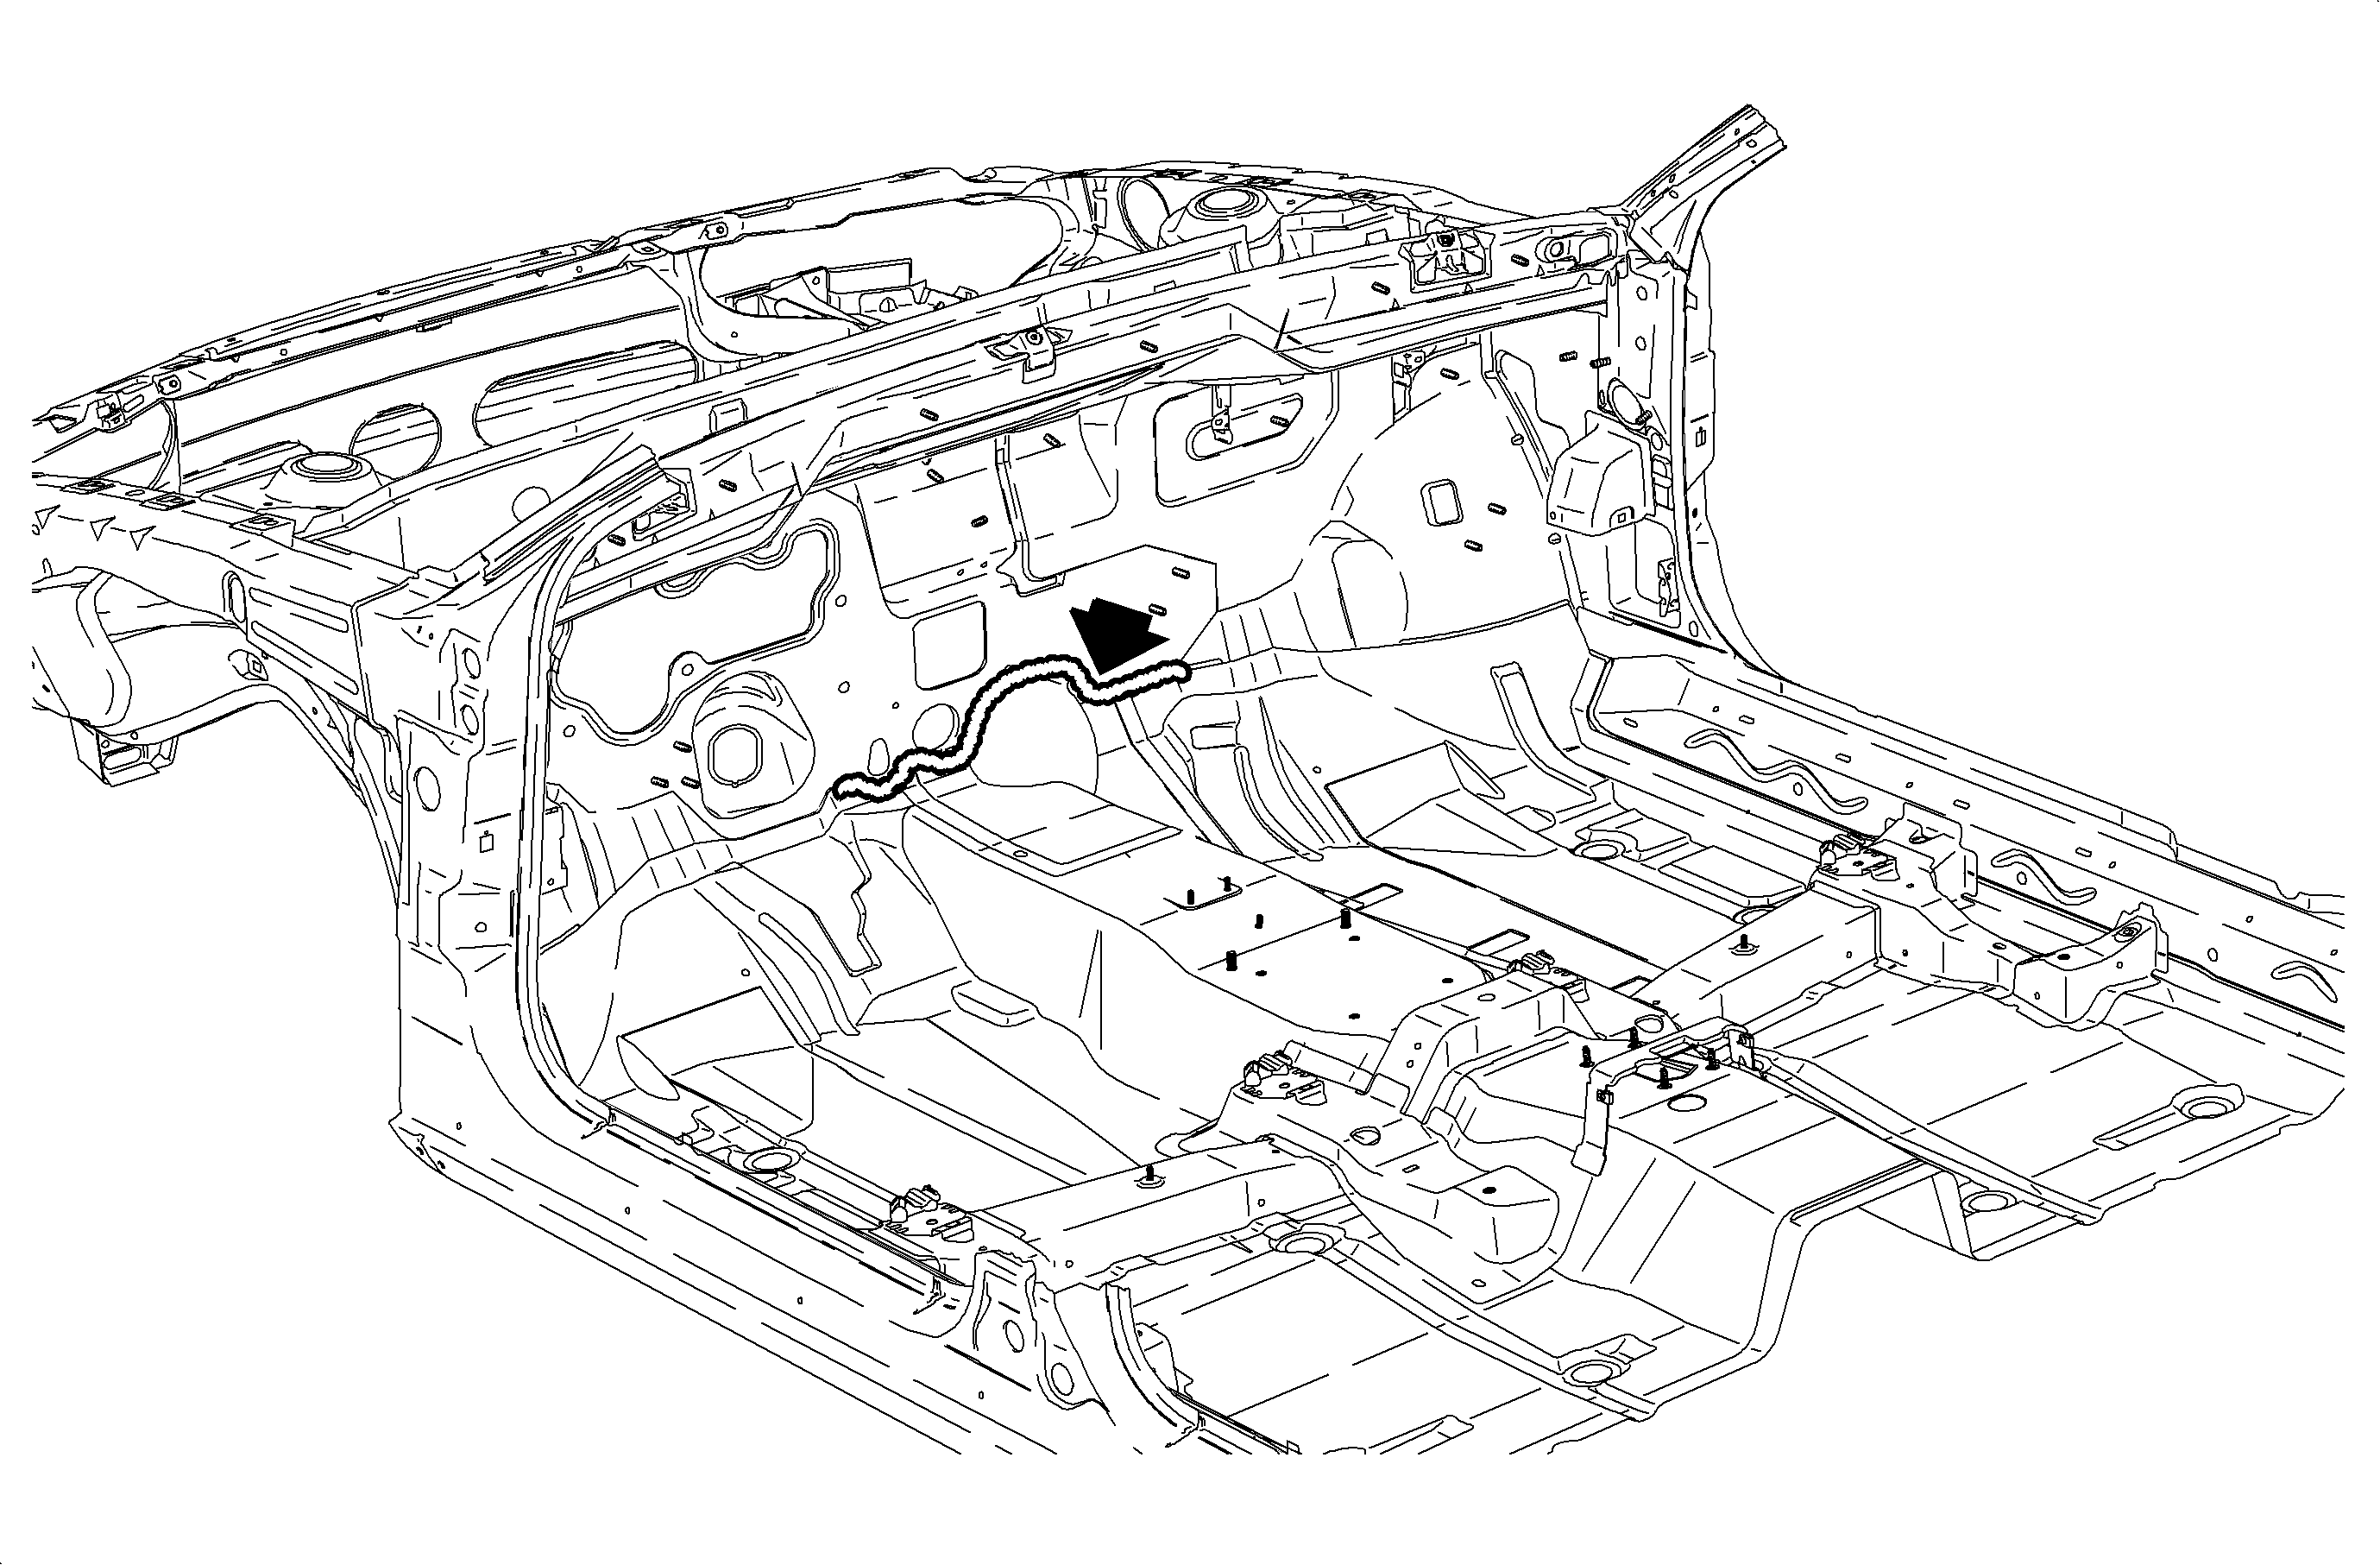
| • | Passenger compartment - front of dash-to-floor pan seam (Sedan and Wagon) |
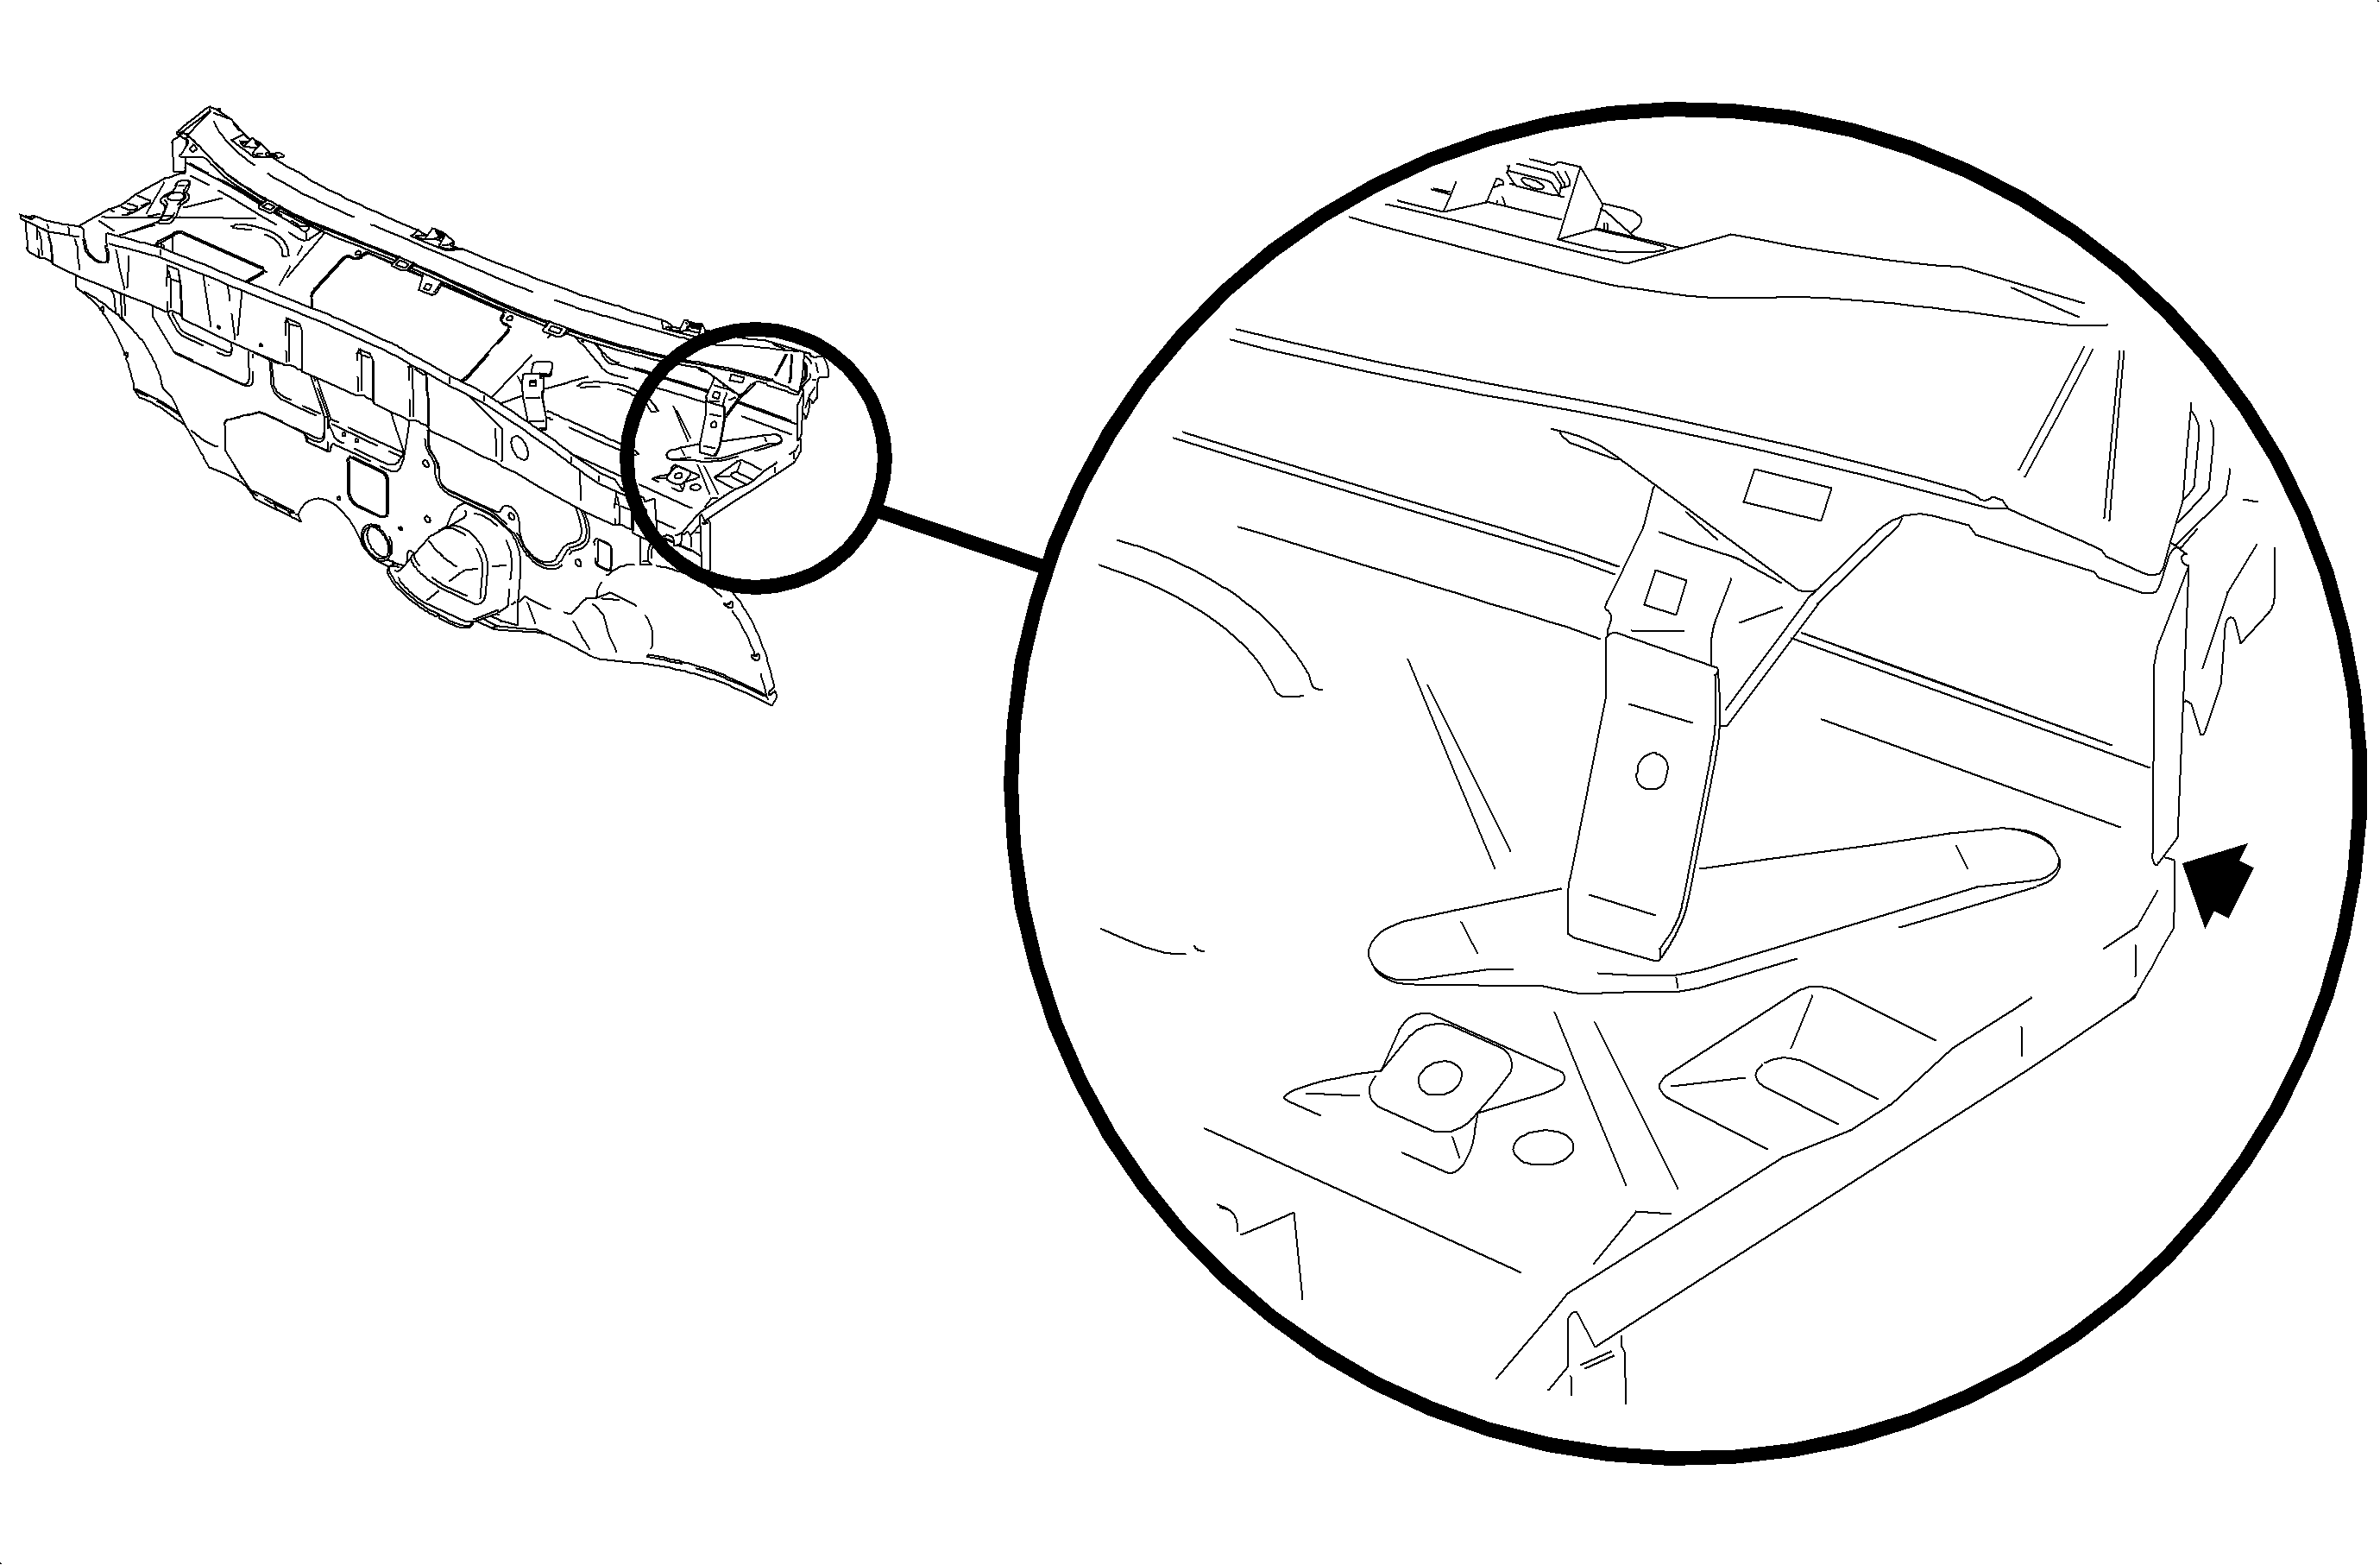
| • | Passenger compartment - cowl (die notch) seam (Sedan and Wagon) |
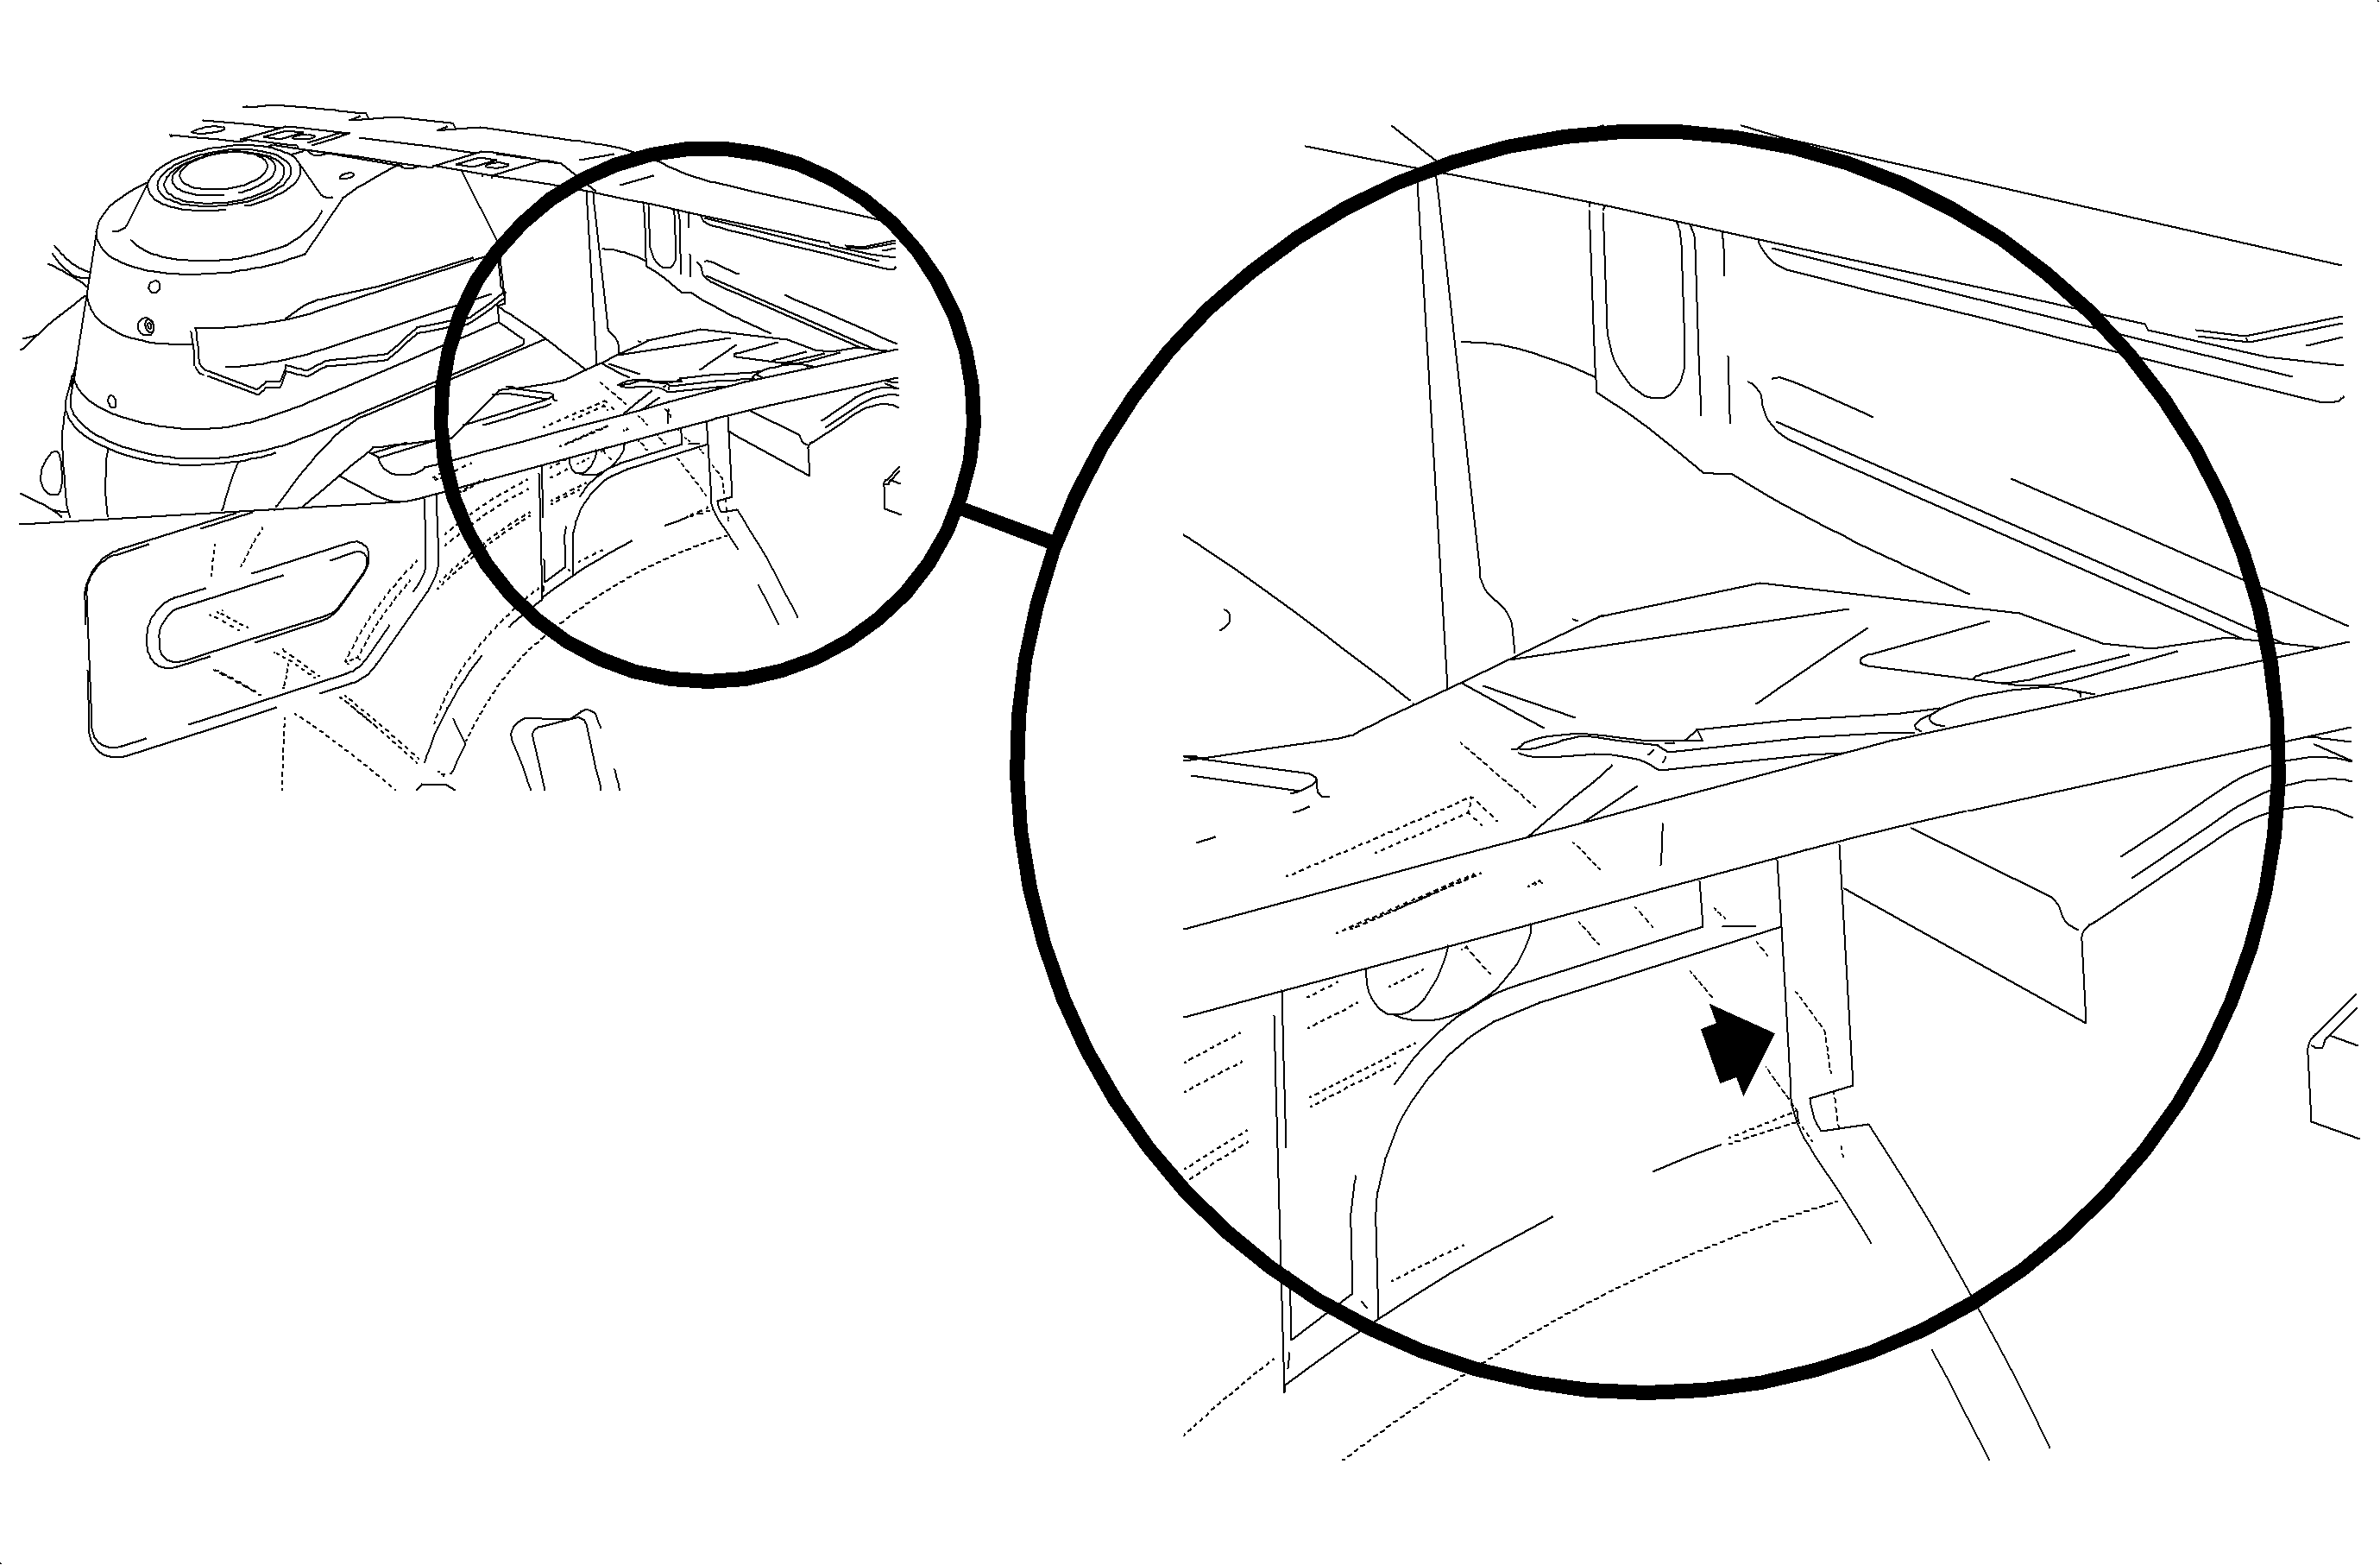
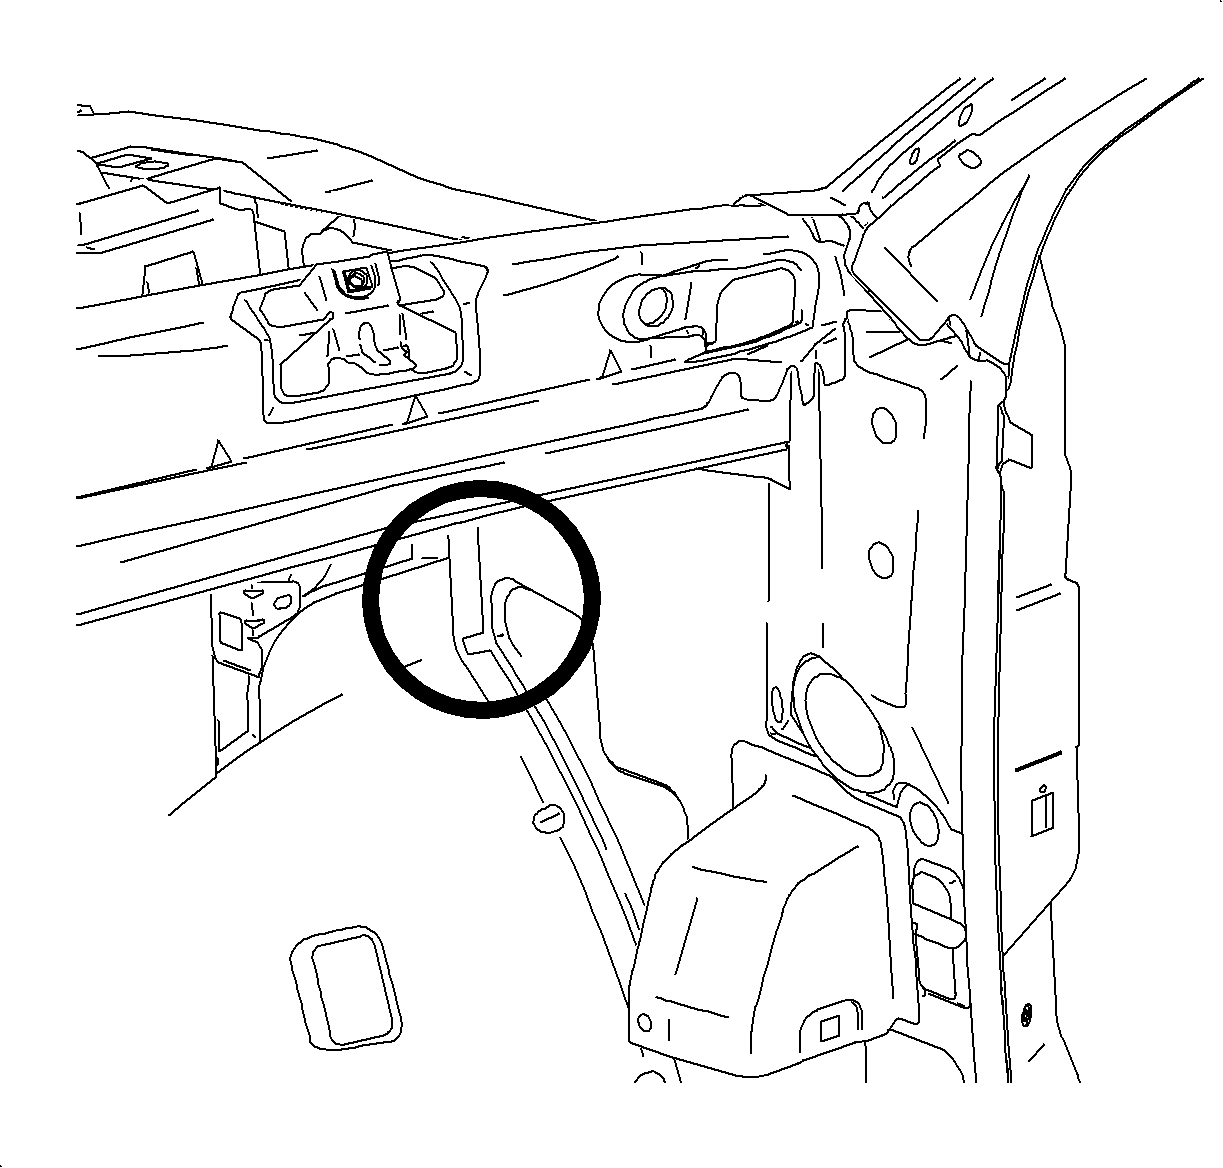
| • | Passenger compartment - engine compartment side rail-to-front of dash seam (Sedan and Wagon) |
| • | Passenger compartment - outside rear view mirror mounting panel-to-door seal (Sedan and Wagons) |
| • | Rear compartment/rear cargo area- (spare tire well) rear body panel-to-floor seam (Sedan and Wagon) |
| • | Rear compartment - roof ditch seam (Sedan and Wagon) |
| • | Rear compartment - drain gutter seams (Sedan Only) |
| • | Rear compartment - rear window bonding flange void in urethane bead (Sedan Only) |
| • | Rear compartment - weatherstrip mounting flange seal (Sedan Only) |
| Important: Before proceeding with any procedure in this bulletin perform a generalized water test using the Saturn waterleak test stand SA9408NE (or equivalent), and a visual inspection. Once the general area of water entry has been located, use the diagnostic procedures contained within this bulletin to pinpoint the location of water entry. Refer to "Waterleaks" in the Windnoise/Waterleak/Appearance section of the Body/Electrical Volume I Service Manual for more information on waterleak testing. |
Passenger Compartment - Front of Dash-to-Floor Pan Seam (Sedan and Wagon)
- Remove carpet. (Refer to "Front Floor Carpet" removal procedure in the Interior Trim section of the 2000 - 2001 or 2002 L-Series Body/Electrical Volume II Service Manual).
- Visually inspect front of dash to floor pan seam inside and outside vehicle.
- With an assistant, apply an unrestricted (no nozzle) flow of water from the engine compartment side to the suspected area.
- Inspect for water entering the vehicle at the dash-to-floor pan seam.
- Seal the seam using KENT Industries Quick Seal (P/N 10552) or equivalent, and allow to cure.
- Water test area verify repair.
- Install carpet. (Refer to "Front Floor Carpet" installation procedure in the Interior Trim section of the 2000 - 2001 or 2002 L-Series Body/Electrical Volume II Service Manual.
Passenger Compartment - Cowl (Die Notch) Seam (Sedan and Wagon)
- Remove carpet. (Refer to "Front Floor Carpet" removal/procedure in the Interior Trim section of the 2000 - 2001 or 2002 L-Series Body/Electrical Volume II Service Manual).
- Remove air inlet grill panel fasteners and panel.
- Locate the cowl die notch seam at the rear most outer corner of the cowl area on the affected side of the vehicle.
- With an assistant, apply an unrestricted (no nozzle) flow of water from the engine compartment side to the suspected area.
- Inspect for water entering the vehicle at the inner hinge pillar behind the instrument panel.
- Using KENT Industries High Tech Seam Sealer (P/N 10070) or equivalent, apply a bead of sealer to the die notch seam accessed through the plenum opening.
- Using a brush work the sealer into the seam, allow time to cure.
- Water test the area to verify repair.
- Install air inlet grill panel and fasteners.
- Install carpet. (Refer to "Front Floor Carpet" installation procedure in the Interior Trim section of the 2000 - 2001 or 2002 L-Series Body/Electrical Volume II Service Manual.
Passenger Compartment - Engine Compartment Side Rail-to-Front of Dash Seam (Sedan and Wagon)
- Remove carpet. (Refer to "Front Floor Carpet" removal procedure in the Interior Trim section of the 2000 - 2001 or 2002 L-Series Body/Electrical Volume II Service Manual).
- With an assistant, apply an unrestricted (no nozzle) flow of water to the engine compartment side rail-to-front of dash seam. This seam is located behind the strut tower, and below the strut tower brace to front of dash.
- Inspect for water entering the vehicle at the front of dash to inner hinge pillar seam behind the instrument panel.
- Using Kent Industries Quick Seal (P/N 10552) or equivalent, apply a bead of sealer to the engine compartment side of the seam.
- Use a brush to work the sealer into the seam and allow to cure.
- Apply a bead of sealer to the passenger compartment side of the seam.
- Use a brush to work the sealer into the seam and allow to cure.
- Water test area to verify the repair.
- Install carpet. (Refer to "Front Floor Carpet" installation procedure in the Interior Trim section of the 2000 - 2001 or 2002 L-Series Body/Electrical Volume II Service Manual).
Note: Right side shown, left side similar.
Note: Right side shown, left side similar.
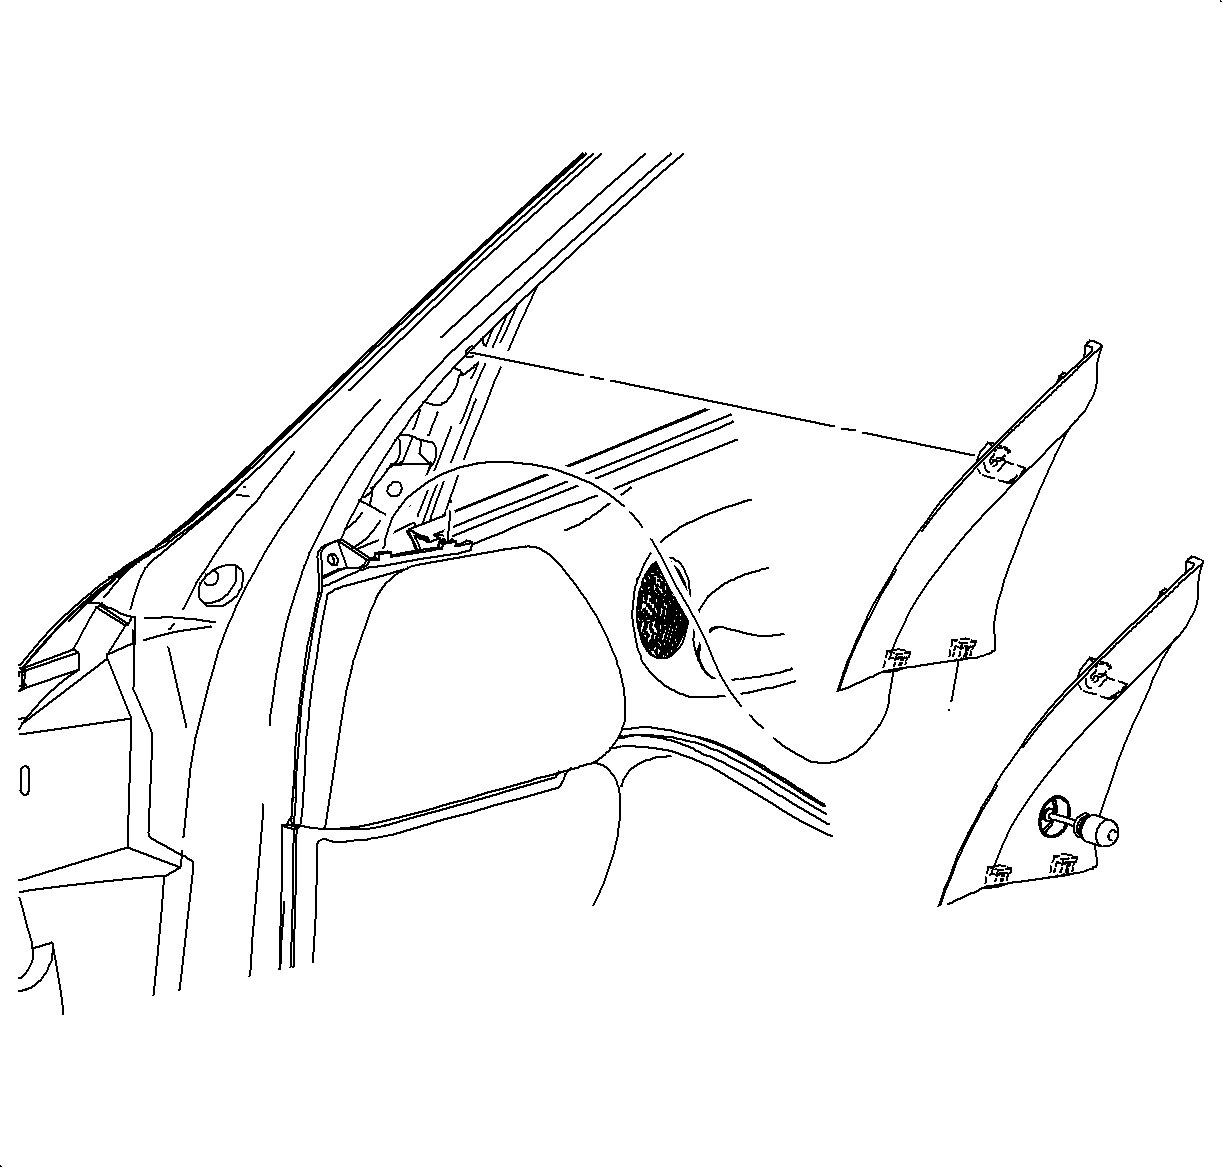
Passenger Compartment - Outside Rear View Mirror Mounting Panel-to-Door Seal (Sedan and Wagon)
- Remove front door mirror inner trim panel by pulling on panel to disengage attaching clips.
- Apply water to mirror mounting panel upper edge and inspect for water entry at mirror fastener access hole locations.
- Remove outside rear view mirror. (Refer to "Outside Rear View Mirror" removal procedure in the Door/Windows/Mirrors Section of the 2000 - 2001 or 2002 L-Series Body/Electrical Volume I Service Manual).
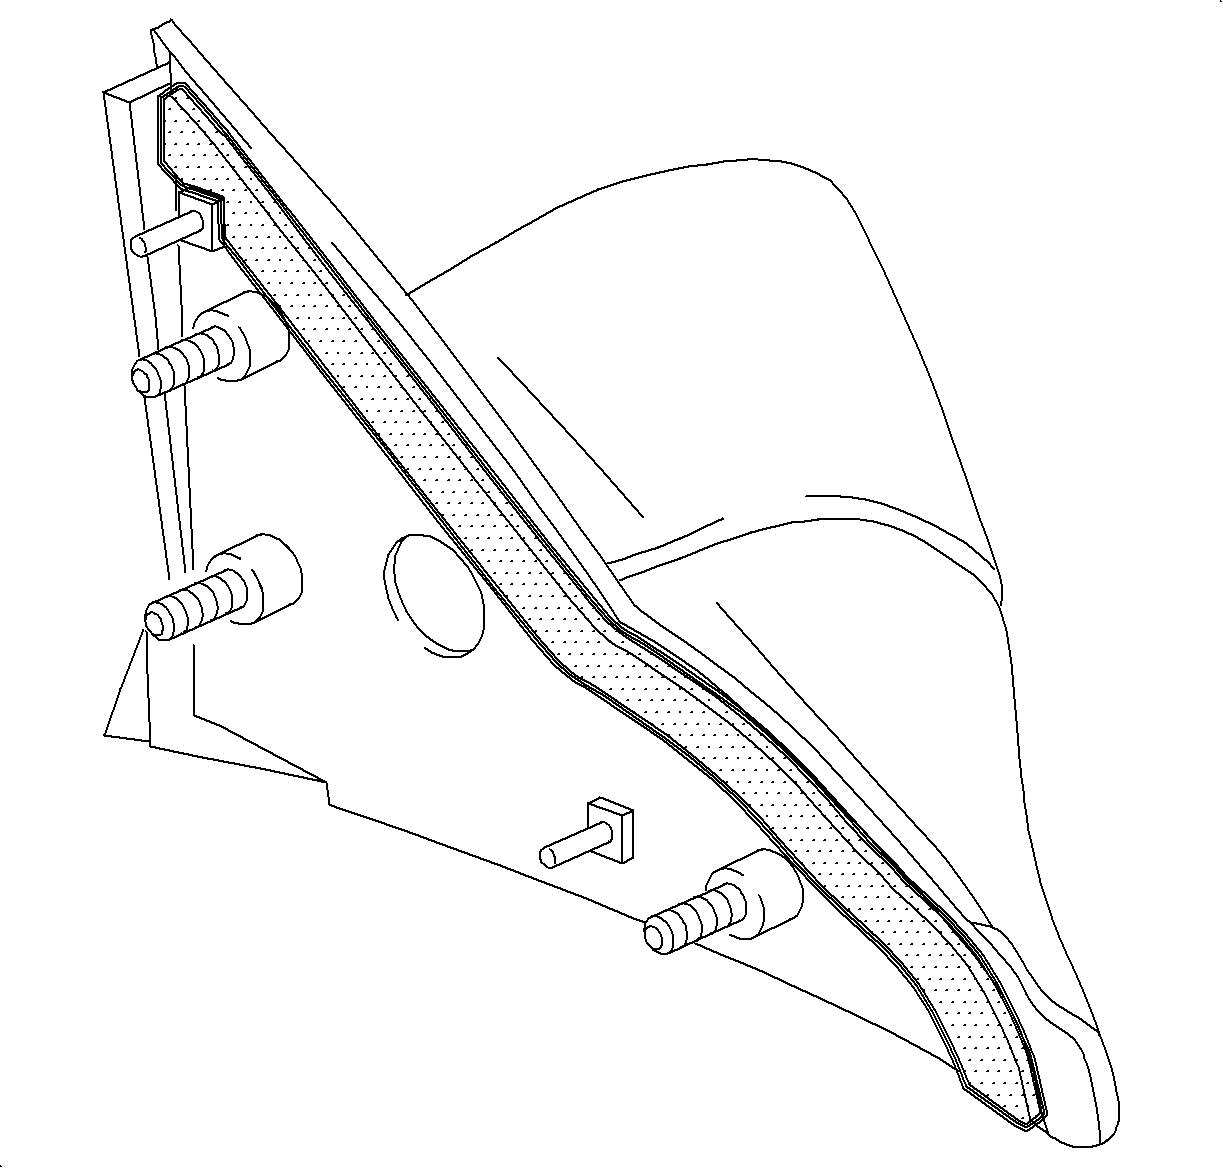
- Remove foam material from upper edge of the mirror mounting panel.
- Apply KENT Industries Clear Transfer Adhesive tow sided tape (P/N 32735) or equivalent, on the back side at the upper edge of the mirror mounting panel. The tape should run the length of the foam pad contact area and be trimmed to fit around the upper alignment pin.
- Install from a material, align edge of foam inboard of the mounting panel upper edge by no more than 2 mm (0.078 in). This will ensure a water tight seal when the mirror is installed on the door.
- Install outside rear view mirror. (Refer to "Outside Rear View Mirror" installation [procedure om the Doors/Windows/Mirrors Section of the 2000 - 2001 or 2002 Saturn L-Series Body/Electrical Volume I Service Manual).
- Water test area to verify the repair. Inspect for water entry at mirror fastener access hole locations.
- Position mirror trim panel onto door and snap into place.
Note: Right side shown, left side similar.
Rear Compartment/Rear Cargo Area-(Spare Tire Well) Rear Body Panel-to-Floor Seam (Sedan and Wagon)
- Remove rear compartment or rear cargo area trim as necessary to gain access.
- Place water test stand under vehicle and direct spray at rear body panel and floor seam. Focus on the area of the rear longitudinal frame rail.
- Inspect the rear body panel seam inside the rear compartment or rear cargo area for water entry.
- Using KENT Industries Quick Seal (P/N 10556) or equivalent, extend the factory applied sealer beads to the side surfaces of the longitudinal frame rail.
- Place water test strand under vehicle and direct spray at rear body panel and floor seam. Focus on the area of the rear longitudinal frame rail to verify the repair.
- Inspect rear compartment or rear cargo area for water entry.
- Install rear compartment or rear cargo area trim.
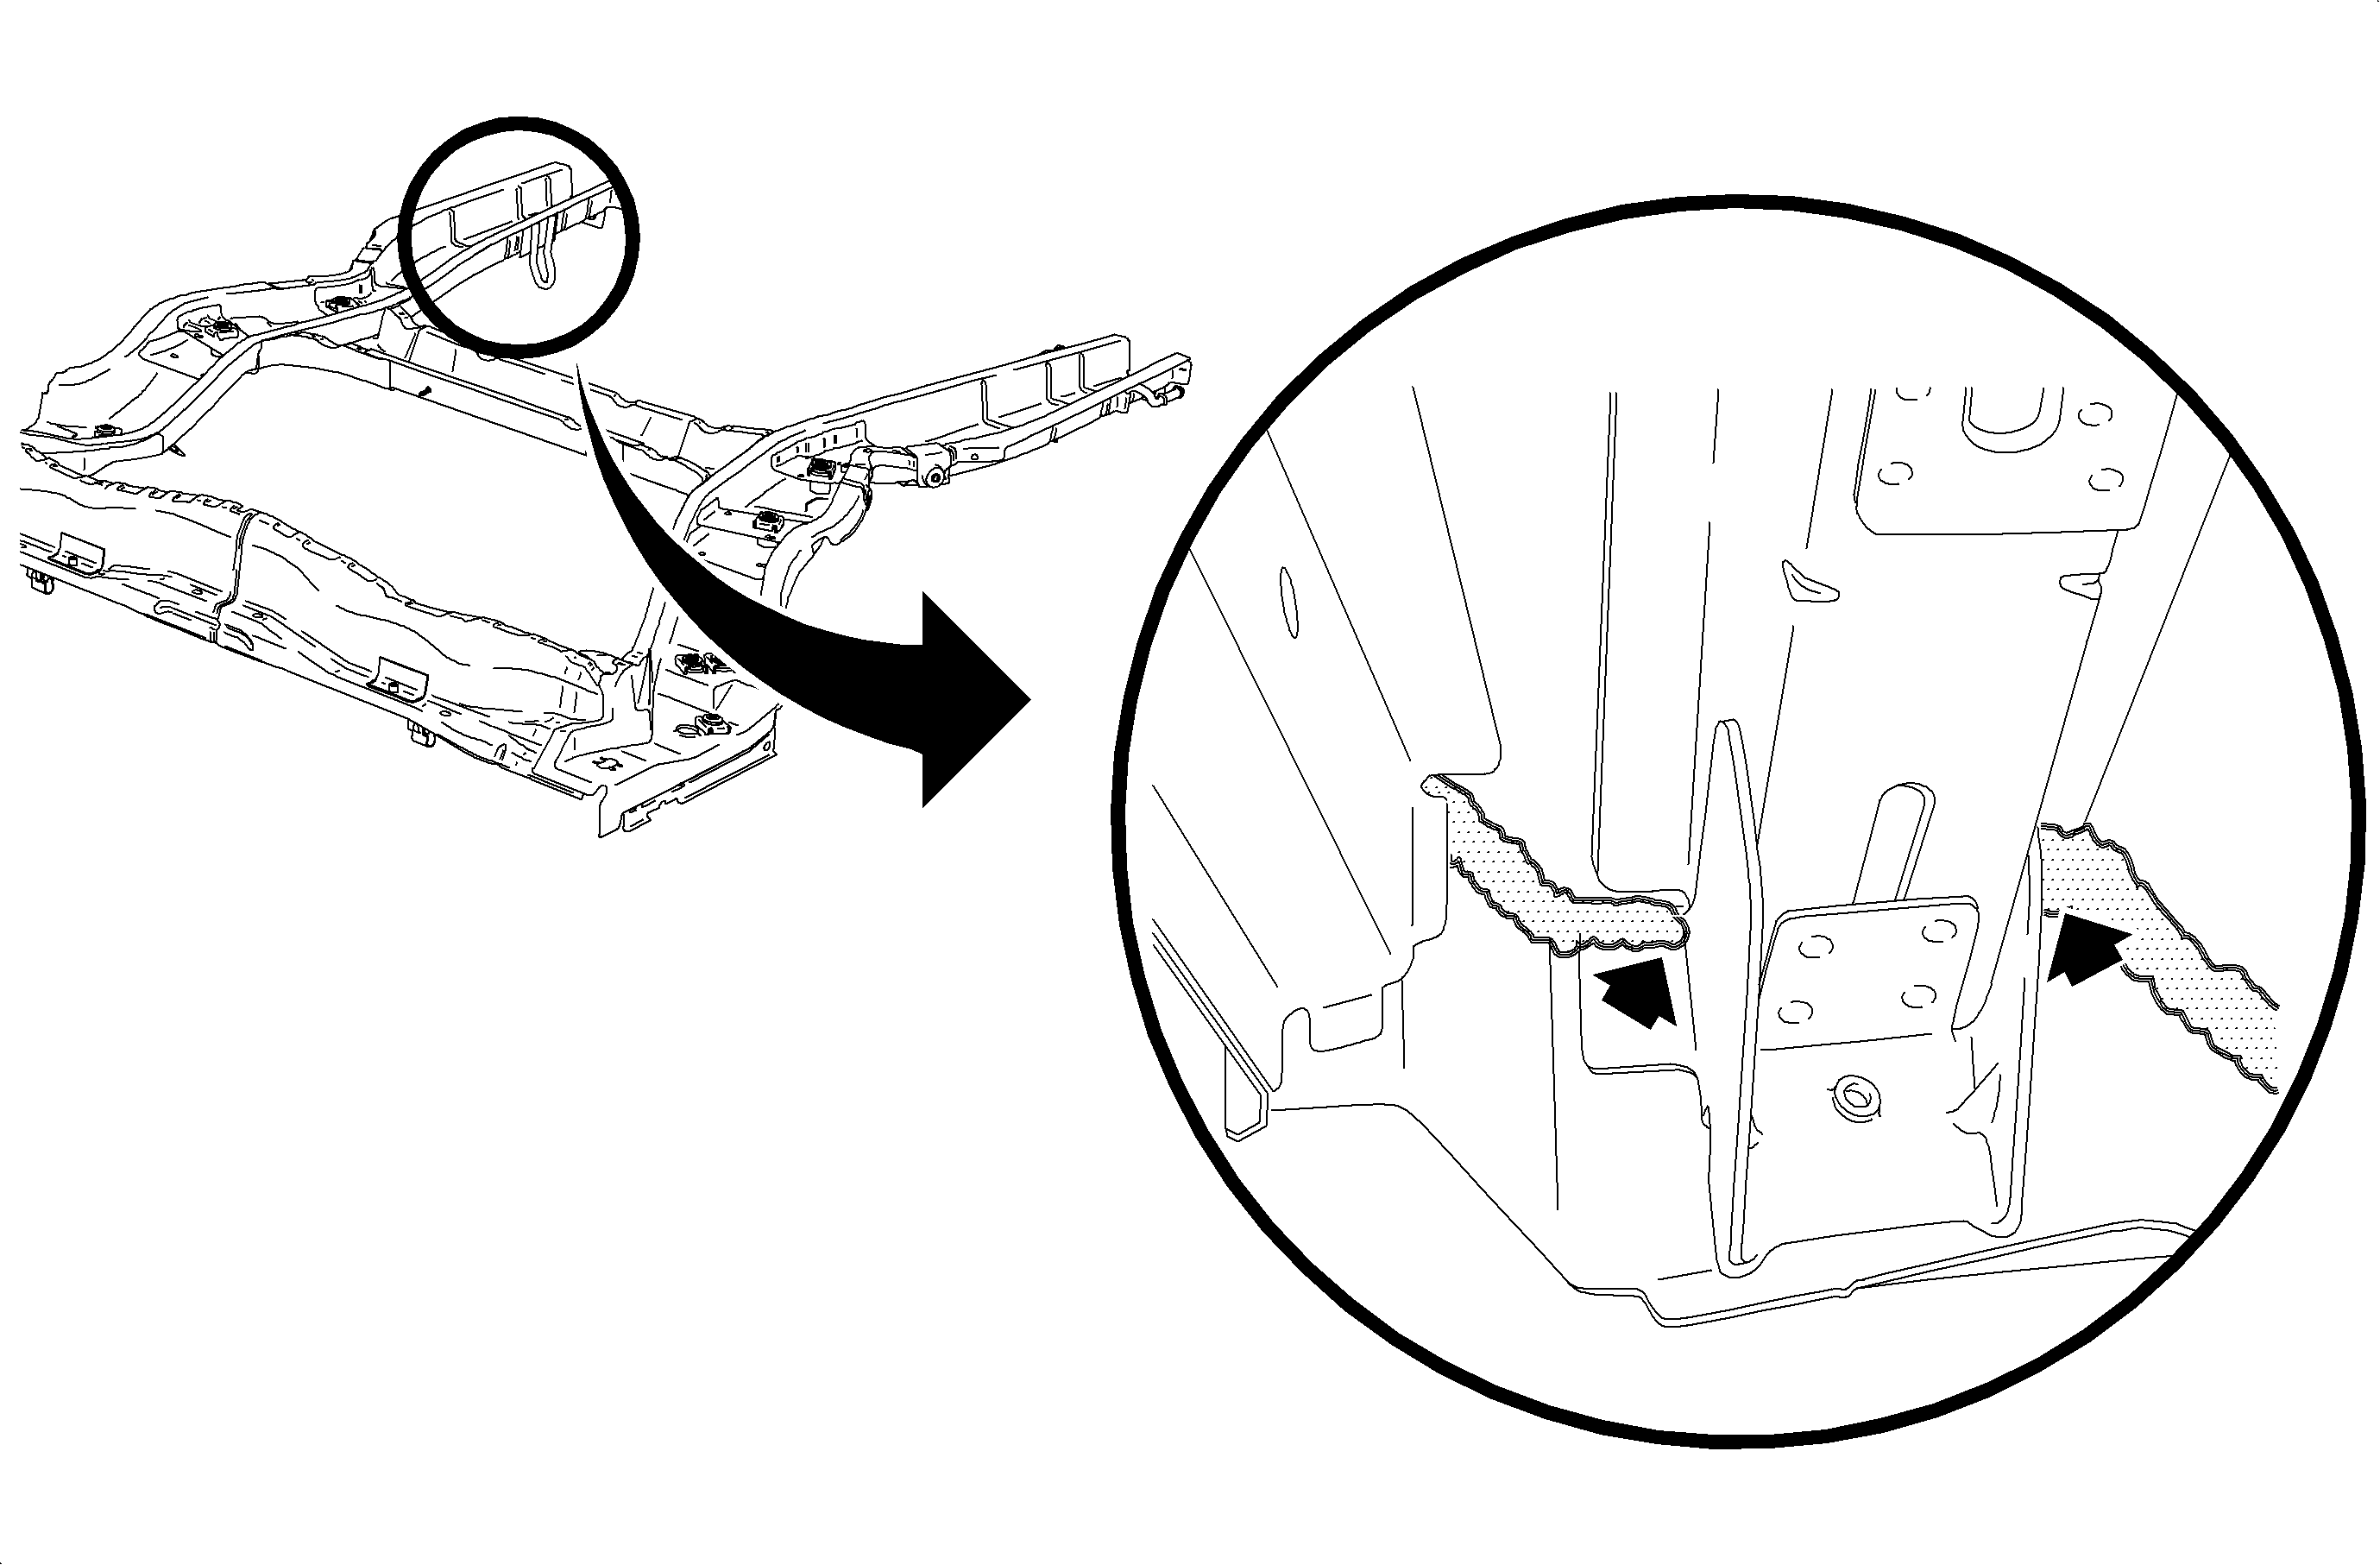
Important: the procedure should be performed on the left and right sides of the longitudinal rail (Right side shown, left side similar).
Rear Compartment - Roof Ditch Seam (Sedan and Wagon)
- Remove C-Pillar Trim (Sedan) or Quarter Glass Side Molding (Wagon).
- Using a garden hose with an unrestricted (no nozzle) flow of water, apply a low volume of water directly into the roof ditch area.
- Inspect inside of rear compartment area for water entry. It may take some time for the water to work its way under the roof ditch molding and into the rear compartment.
- Remove roof ditch molding , and clean all adhesive tape from the roof ditch seam.
- Carefully inspect the seam for water entry locations
- Seal these areas using KENT Industries High Tech Clear seam sealer (P/N 10200) or equivalent, and allow time to cure.
- Retest the seam using a water test sand. Set at 155kPa (22 psi) water pressure. The retest should last longer than the initial test to ensure all points of water entry have been detected and repaired.
- Remove old adhesive tape from back of roof ditch molding and apply KENT Industries High Strength Side Molding tape (P/N 40519) or equivalent.
- Center roof ditch molding in opening and install onto vehicle.
- Install C-Pillar Trim (Sedan) or Quarter Glass Side Molding (Wagon)>
| • | On Sedan Models, remove C-Pillar Trim, refer to "C-Pillar Trim" removal procedure in the Interior Trim section of the 2000 - 2001 or 2002 L-Series Body/Electrical Volume II Service Manual. |
| • | On Wagon Models, remove Quarter Glass Side Molding, refer to "Quarter Glass Side Molding" removal procedure in the Interior Trim section of the 2000 - 2001 or 2002 L-Series Body/Electrical Volume II Service Manual. |
Note: Left side shown, right side similar.

Important: Remove ONLY the adhesive tape used to retain the Ditch Molding. DO NOT remove body colored tape seam seal in the base of the roof ditch area.
| • | On Sedan Models, install C-Pillar Trim, refer to C' Pillar Trim" installation procedure in the Interior Trim section of the 2000 -- 2001 or 2002 L-Series Body/Electrical Volume II Service Manual. |
| • | On Wagon Models, install Quarter Glass Side Molding, refer to "Quarter Glass Side Molding" installation procedure in the Interior Trim section of the 2000 -- 2001 or 2002 L-Series Body/Electrical Volume II Service Manual. |
Rear Compartment - Drain Gutter Seams (Sedan Only)
- Apply a soapy water solution to the front weld seam in the rear compartment drain gutter.
- Apply air pressure with an air hose at the underside of the seam. Do not exceed 205 kPA (30 psi).
- Observe for bubbles on the exterior surface of the seam at the suspected leak area.
- Seal the areas using KENT Industries High Tech Clear seam sealer (P/N 10200) allow time to cure.
- Retest the seam using a water test stand. Set at 155 kPa (22 psi) water pressure.
- Inspect for water entry from inside the rear compartment.
- Install rear compartment trim.
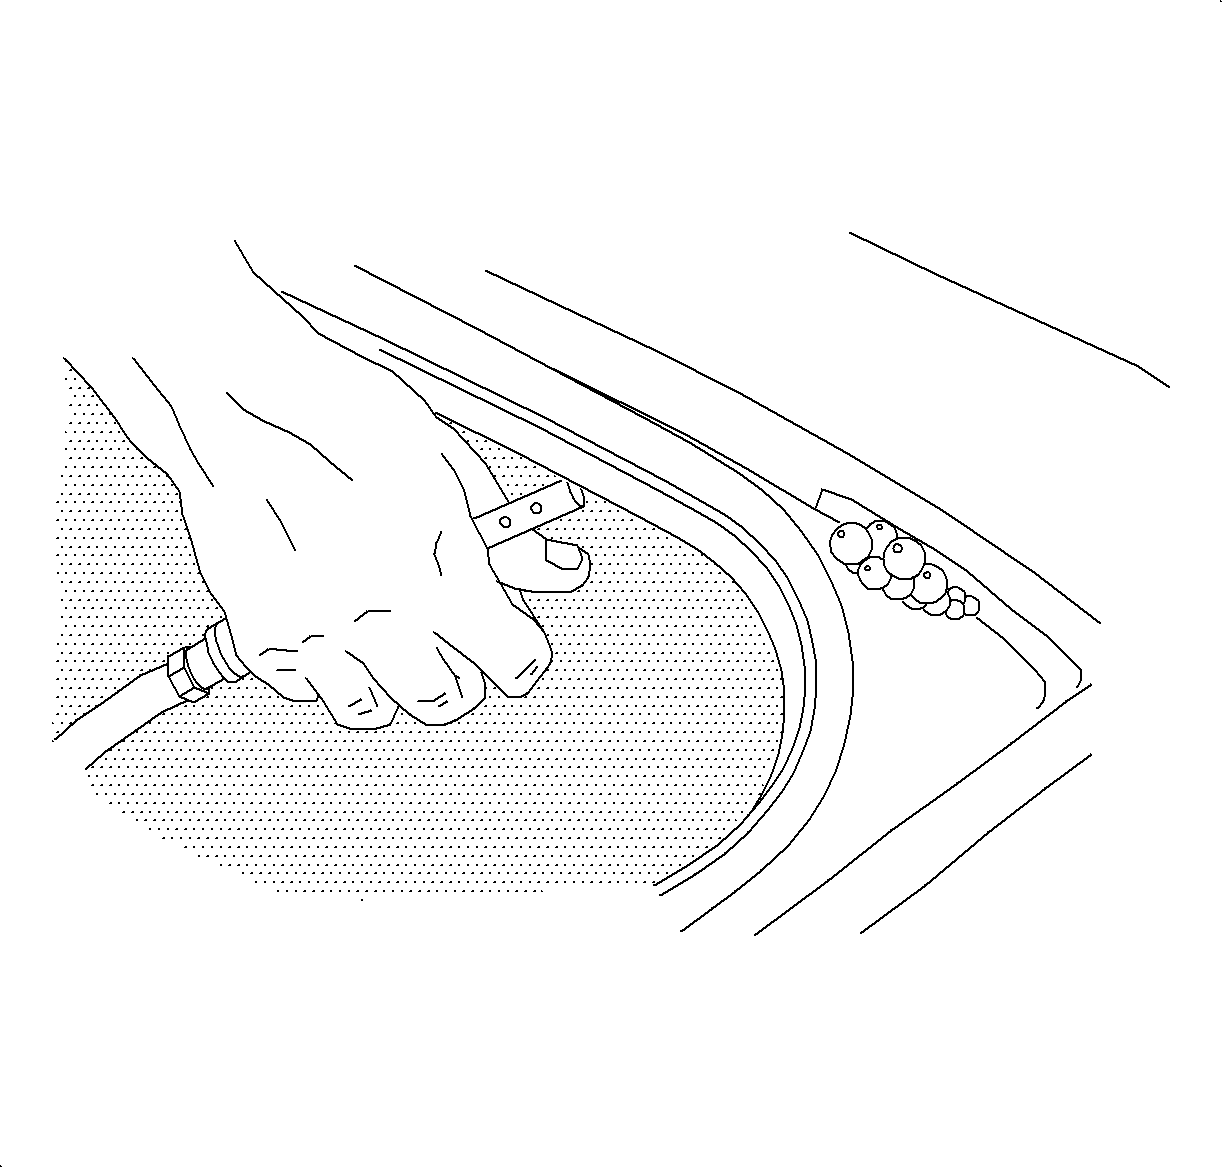
Note: Right side shown, left side similar.
Rear Compartment - Rear Window Bonding Flange Void in Urethane Bead (Sedan Only)
- With rear compartment lid open use a garden hose with an unrestricted (no nozzle) flow of water, direct water flow at lower corners of rear window lace.
- Inspect for water entry in the rear compartment, at the rear shelf panel.
- Remove rear window assembly. (Refer to "Rear Window Assembly - Sedan" removal procedure in the Stationary Glass section of the 2000 - 2001 or 2002 L-Series Body/Electrical Volume I Service Manual).
- Carefully inspect the lower corners for a void in the urethane bead where the side vertical weld flange meets the lower horizontal weld flange. Also check for a void between the vertical and horizontal flanges, outboard of the urethane bead.
- Install rear window assembly. (Refer to "Rear Window Assembly - Sedan" installation procedure in the Stationary Glass section of the 2000 -- 2001 or 2002 L-Series Body/Electrical Volume I Service Manual.
- Water test the area to verify the repair.
- Inspect for water entry from inside the rear compartment, at the rear shelf panel.
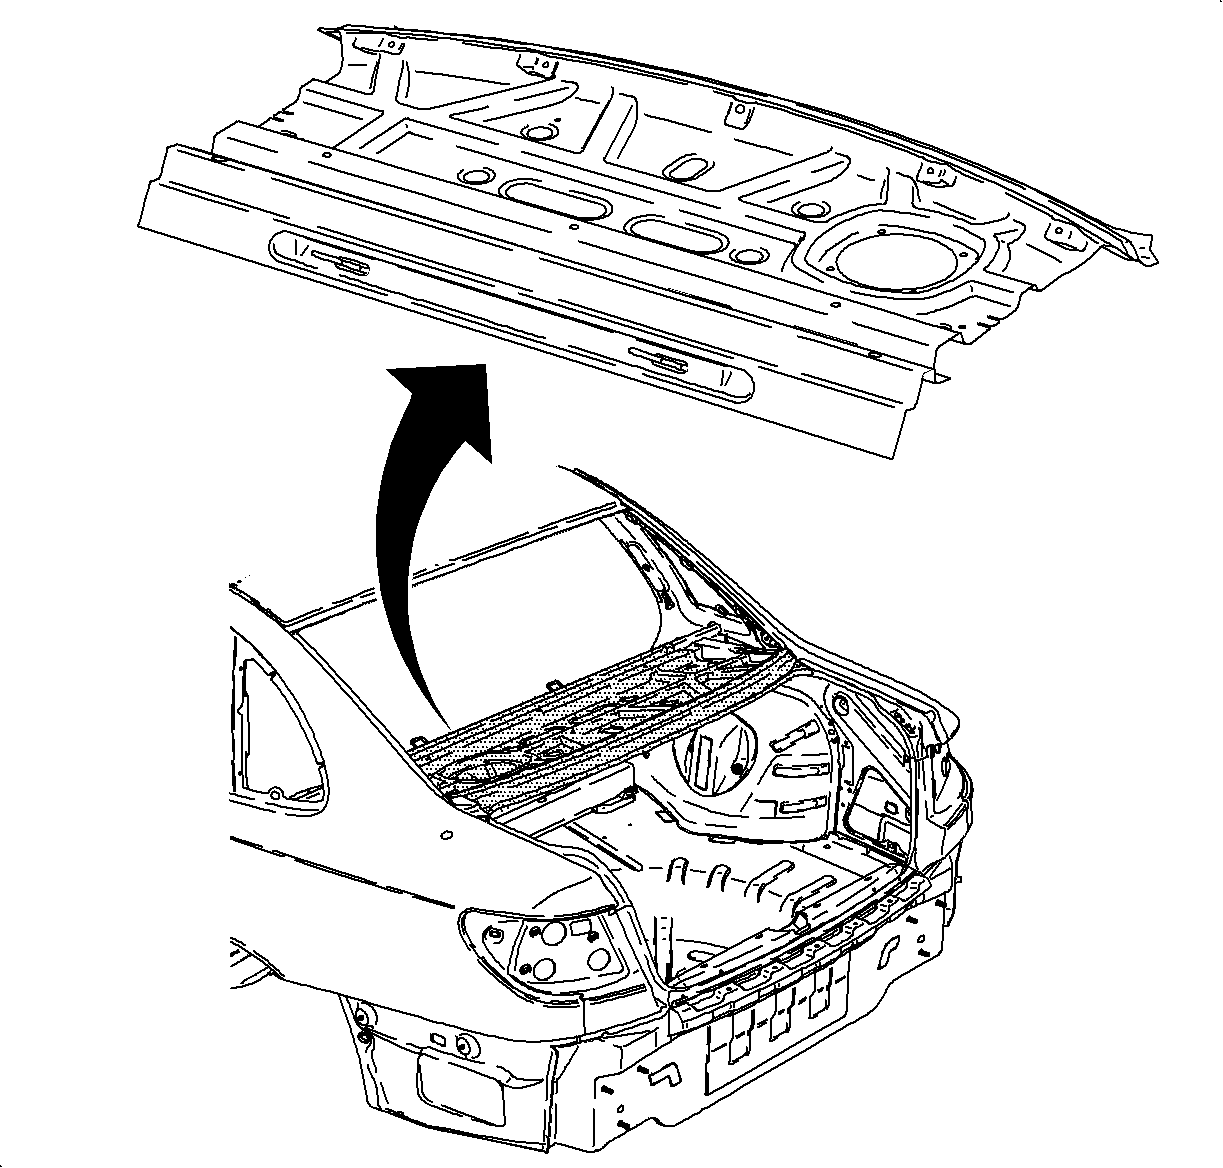
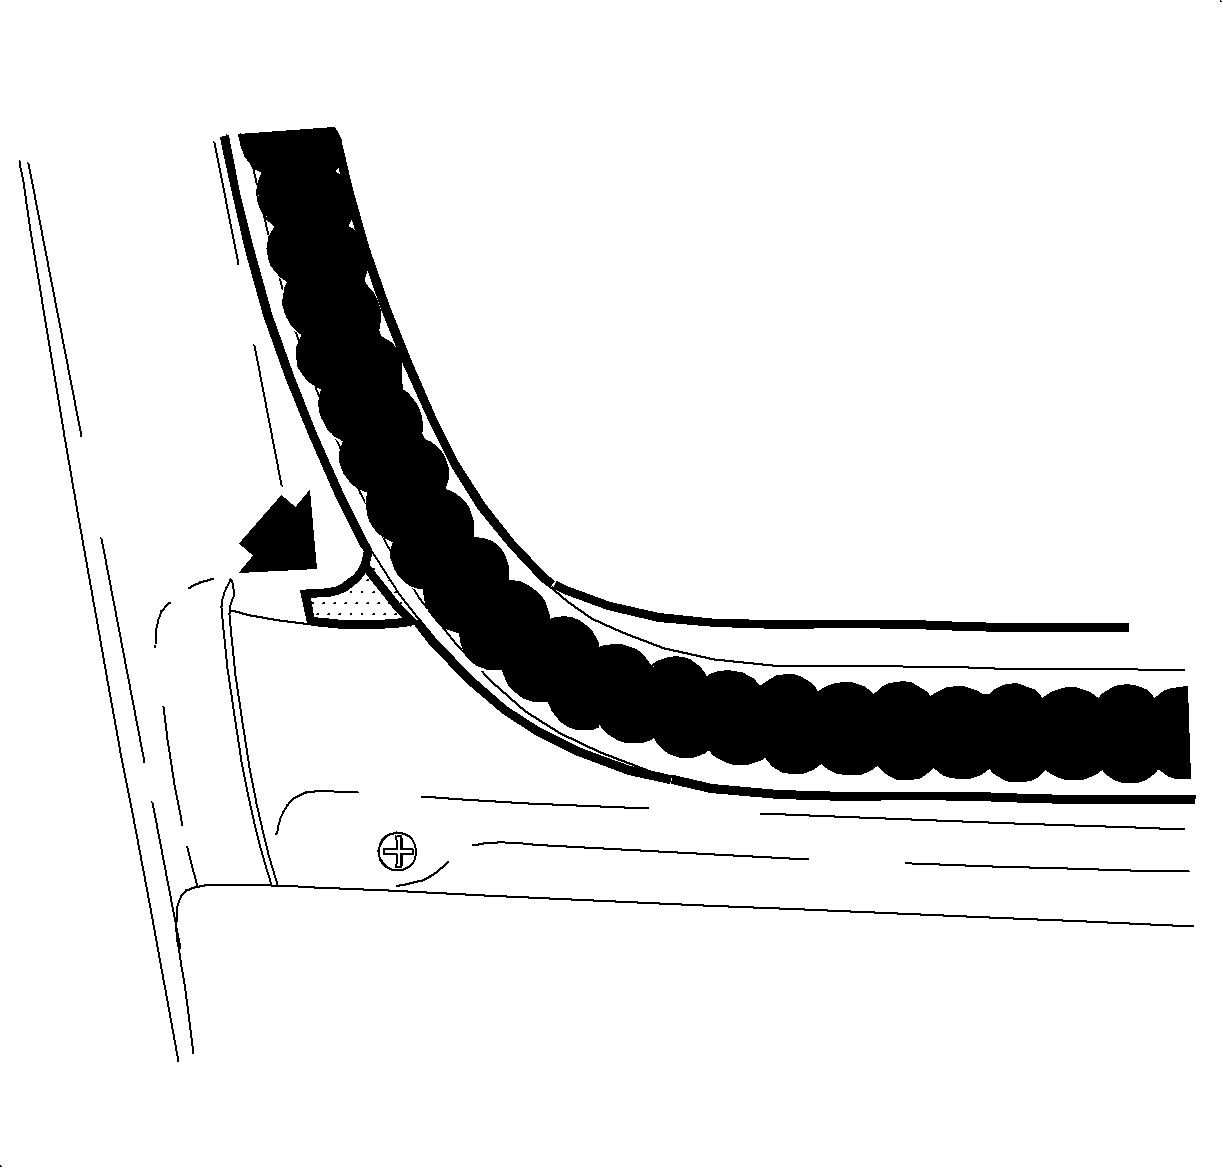

Important: Any sealer voids detected should be resealed using urethane during glass installation.
Rear Compartment - Weatherstrip Mounting Flange Seal (Sedan Only)
- With rear compartment lid open use a garden hose with an unrestricted (no nozzle) flow of water, direct water flow at the weatherstrip mounting flange seal.
- Inspect for water entering the rear compartment under the weatherstrip.
- Remove the weatherstrip completely from the mounting flange.
- Clean the flange and the weatherstrip of any excess mastic.
- Apply a bead of KENT Industries Ultra-Stick weatherstrip adhesive (P/N 10192) or equivalent to the entire length of the weatherstrip adhesive (P/N 10192) or equivalent to the entire length of the weathersrtip flange.
- Center the seam on the weatherstrip with the striker on the lower mounting flange. Install the weatherstrip around the remainder of the opening.
- Once the weatherstrip is installed, ensure it is completely seated on the flange. Gently tap the weatherstrip onto the flange with a rubber mallet around the entire opening.
- Water test to verify the repair.
- Inspect for water entry from the inside of the rear compartment.
10552 KENT Industries Quick Seal Neutral* (or equivalent) | |
10070 KENT Industries High Tech Seam Sealer* (or equivalent) | |
32735 KENT Industries Clear Transfer Adhesive Two Sided Tape* ( or equivalent) | |
10566 KENT Industries Quick Seal Black* (or equivalent) | |
10200 KENT Industries High Tech Clear Seam Sealer* (or equivalent) | |
40519 KENT Industries High Strength Side Molding Tape* (or equivalent) | |
10192 KENT Industries Ultra-Stick Weatherstrip Adhesive* | |
10192 KENT Industries Ultra-Stick Weatherstrip Adhesive* | |
*KENT Industries Telemarketing 1-800-654-6333 USA 1-800-663-2800 |
CLAIM INFORMATION:
To receive credit for this repair during the warranty coverage period, submit a claim through the Saturn Dealer System as follows:
CASE TYPE | DESCRIPTION | LABOR OPERATION CODE | TIME | ||||
|---|---|---|---|---|---|---|---|
VW | Diagnose and Repair Sealer Skip(s) in Front of Vehicle Add: A To Remove Air Inlet Grill to Repair Waterleak in Cowl Area | Z4099 | 1.7 hrs 0.4 hrs | ||||
VW | Diagnose and Repair Seal at Outside MirrorAdd: A To Repair Waterleak at Second Mirror | Z4100 | 0.3 hrs 0.3 hrs | ||||
VW | Diagnose and Repair Sealer Skip at Rear Body Panel Seam
Diagnose and Repair of Sealer at Roof Ditch Seam Add: A To Repair Waterleak on Both Sides of Vehicle | Z4101 | 0.4 hrs 0.5 hrs 0.2 hrs | ||||
VW | Diagnose and Repair of Sealer at Roof Ditch Seam Add: A | Z4102 | 0.5 hrs 0.4 hrs | ||||
VW | Diagnose and Repair Sealer Skip at Drain Gutter Seam Add: A To Repair Waterleak on Both Side of Vehicle | Z4103 | 0.2 hrs 0.1 hrs | ||||
VW | Diagnose and Repair Urethane Bead in Rear Window Flange INC: Time to water test and repair both sides of rear window flange. | Z4104 | 1.2 hrs | ||||
VW | Diagnose and Repair Weatherstrip Mounting Flange Seal | Z4105 | 0.3 hrs |
Important: If the use of the KENT Industries products are required and claimed, sell the product to the Customer Service Order (CSO) as material using net item code "M". Claims exceeding the material amounts listed per vehicle will be returned with reason 143 - material amount greater than maximum allowed.
10552 KENT material amount $1.79 ($1.38 retailer cost plus 30%) | |
10070 KENT material amount $1.30 ($1.00 retailer cost plus 30%) | |
40045 KENT material amount $0.41 ($0.31 retailer cost plus 30%) | |
10552 KENT material amount $1.79 ($1.38 retailer cost plus 30%) | |
10200 KENT material amount $1.63 ($1.25 retailer cost plus 30%) | |
40519 KENT material amount $1.72 ($1.32 retailer cost plus 30%) | |
10192 KENT material amount $6.47 ($4.98 retailer cost plus 30%) |
