Squeak, Creak or Chirp Noise from Left and/or Right Rear Quarter Panel (Install Squeak Reduction Tape to Left and Right Rear Quarter Panel Retaining Slots)

| Subject: | Squeak, Creak or Chirp Noise from Left and/or Right Rear Quarter Panel (Install Squeak Reduction Tape to Left and Right Rear Quarter Panel Retaining Slots) |
| Models: | 2008 Buick Enclave |
| 2007-2008 GMC Acadia |
| 2007-2008 Saturn OUTLOOK |
Condition
Some customers may comment on a squeak, creak or chirp noise coming from inside the vehicle at the left and/or right rear quarter panel while driving.
Cause
The noise may be caused by the left and/or right quarter trim panel high retention retainers contacting the sheet metal at the rear quarter panel retaining slots.
Correction
Install Squeak Reduction Tape to the left and right rear quarter panel retaining slots using the steps below:
- Verify the noise is coming from the left and/or right rear quarter panel.
- Open the rear liftgate and all the doors.
- Position the front and second row seats to the full forward positions.
- Remove the rear storage compartment. Refer to Rear Storage Compartment Replacement in SI.
- Remove the rear liftgate door sill plate. Refer to Liftgate Door Sill Plate Replacement in SI.
- Remove the third row seats. Refer to Rear Number 2 Seat Replacement in SI.
- Remove the right rear door sill plate. Refer to Rear Carpet Retainer Replacement in SI.
- Remove the right rear quarter upper trim panel. Refer to Rear Quarter Upper Trim Panel Replacement in SI.
- Remove the right rear lower quarter trim panel. Refer to Rear Quarter Lower Trim Panel Replacement in SI.
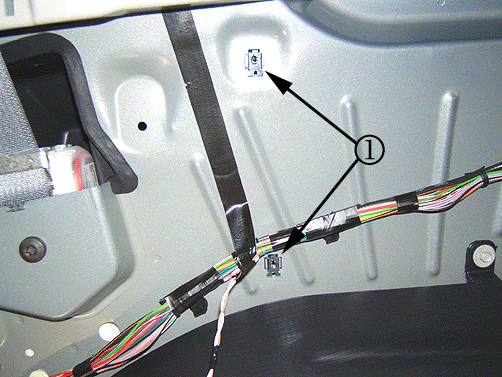
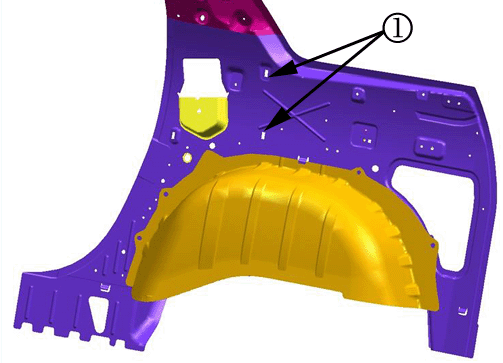
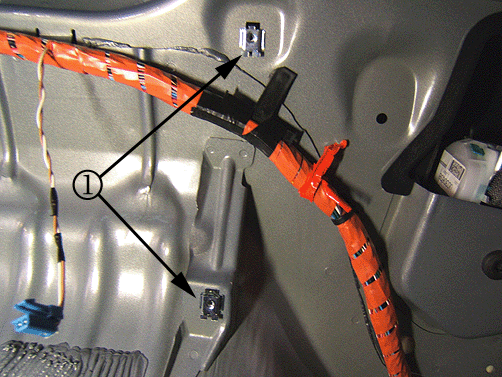
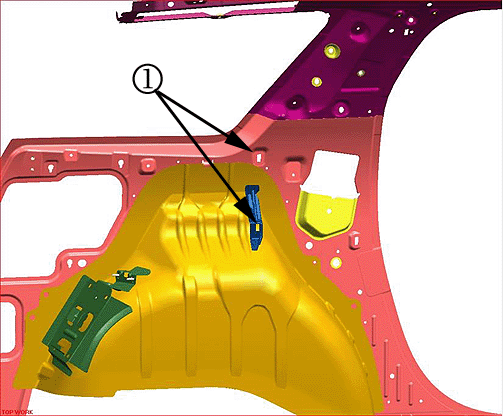
- Use a screwdriver to release the metal tabs on each side of the two high retention retainers (1) and remove the retainers (1) from the right rear quarter panel.
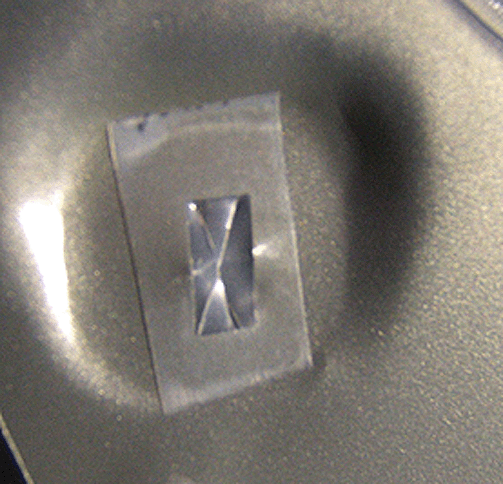
- Cut four pieces of 3M™ Squeak Reduction Tape, or equivalent, into 25 mm (1 in) width by 35 mm (1.38 in) lengths.
- Install two pieces of tape onto the two right rear quarter panel retaining slots (1).
- Cut two diagonal slices in the tape at the hole opening as shown above.
- Install the two high retention retainers back into the two right rear quarter panel retaining slots.
- Install the right rear lower quarter trim panel. Refer to Rear Quarter Lower Trim Panel Replacement in SI.
- Install the right rear upper quarter trim panel. Refer to Rear Quarter Upper Trim Panel Replacement in SI.
- Remove the left rear door sill plate. Refer to Rear Carpet Retainer Replacement in SI.
- Remove the left rear upper quarter trim panel. Refer to Rear Quarter Upper Trim Panel Replacement in SI.
- Remove the left rear lower quarter trim panel. Refer to Rear Quarter Lower Trim Panel Replacement in SI.
- Use a screwdriver to release the metal tabs on each side of the two high retention retainers (1) and remove the retainers (1) from the left rear quarter panel.
- Install two pieces of tape onto the two left rear quarter panel retaining slots (1).
- Cut two diagonal slices in the tape at the hole opening as previously.
- Install the two high retention retainers back into the two left rear quarter panel retaining slots.
- Install the left rear lower quarter trim panel. Refer to Rear Quarter Lower Trim Panel Replacement in SI.
- Install the left rear upper quarter trim panel. Refer to Rear Quarter Upper Trim Panel Replacement in SI.
- Install the third row seats. Refer to Rear Number 2 Seat Replacement in SI.
- Install the left and right rear door sill plates.
- Install the rear liftgate door sill plate.
- Install the rear storage unit.
- Reposition the front and second row seats back into the forward positions.
- Close the rear liftgate and the doors.
- Verify that the noise is gone.
Important: The cargo screen retainer will need to be turned and twisted prior to pulling outward to release. There are two hidden bolts, one under the armrest and one behind the cargo screen retainer.
Important: The liftgate actuator rod will need to be removed. Refer to Liftgate Actuator Rod Replacement in SI.
Parts Information
3M™ Squeak Reduction Tape, P/N 06356, can be purchased locally from automotive paint specialists.
Part Number | Description | Material Allowance |
|---|---|---|
06356 | 3M™ Squeak Reduction Tape | $2.20 (U.S.) $2.40 (Canada) |
Warranty Information
For vehicles repaired under warranty, use:
Labor Operation | Description | Labor Time |
|---|---|---|
C9795* | Install Squeak Reduction Tape to Both Rear Quarter Panel Retaining Slots-Left and Right | 1.8 hrs |
*This labor operation number is for bulletin use only. This number will not be published in the Labor Time Guide. | ||
