Info - New Model Features and Service Guide

| Subject: | New Model Features and Service Guide |
| Models: | 2007 GMC Acadia |
| 2007 Saturn Outlook |
| Attention: | It is recommended that this bulletin be reviewed by the Vehicle Prep Department, Service Manager and Sales Manager. |
The purpose of this bulletin is to introduce the new 2007 GMC Acadia and Saturn Outlook. Included is a description of the vehicle's features as well as actions your Service Department will need to take to ensure that your dealership is able to fully service these exciting new models.
ABOUT THE VEHICLE
The GMC Acadia is available in three trim levels: the base SLE, the midlevel SLT1 Luxury Edition, and the up-level SLT2 Special Edition.
The Saturn Outlook is available in two trim levels: the base XE and the up-level XR.
This all-new crossover vehicle is built on a body-frame integrated (BFI) platform that enabled engineers to provide a vehicle with a low step-in height and the ride and responsive handling of a car, combined with a generous interior space and has the cargo carrying capabilities of a full-size SUV.
Powertrain
Engine
The Acadia and Outlook come with a 3.6L DOHC V6 (VIN Code 7 -- RPO LY7) with variable valve timing (VVT). The camshaft actuator system enables the engine control module (ECM) to change camshaft timing of all 4 camshafts for maximum fuel economy, low emissions and exceptional smoothness. The engine also features an intake manifold tuning valve that optimizes engine performance at low and high speeds.
The single-exhaust version is rated at an estimated 270 hp and 248 lb-ft torque.
The higher-output, dual-exhaust version is rated at an estimated 275 hp and 251 lb-ft torque.
The additional horsepower for the dual-exhaust version is obtained through modifications in the cylinder heads and induction system that increase airflow through the engine. Intake ports are reshaped to enhance flow and a new intake manifold features longer runners that reduce airflow restrictions. Exhaust cam profiles are adjusted to speed the flow of exhaust gas out of the engine at wide-open throttle. The new profile does not change maximum valve lift but duration increases to keep the exhaust valves open a friction longer.
The fuel injectors on the 2007 3.6L LY7 engine now have two small spray nozzles instead of single-tips. Developed with Bosch®, the dual-spray injectors improve fuel atomization in the combustion chambers for a more efficient burn.
Transmission
The vehicle is equipped with the new 6T75 (RPO MH6) fully automatic, 6-speed, electronic-controlled transmission. Two variations are used: the front-drive configuration (MY9) and the all-wheel-drive configuration (MH6).
The 6T75 use an on-axis design in which all of the gearing is in line with the crankshaft centerline of the engine. This allows chassis designers more space to enhance crush zones, to increase interior space, lower the hood line of the vehicle compared to a conventional off-axis transaxle. Also, the helical gears are ground and honed to ensure exact dimensions and tolerances so as to minimize gear noise and vibration.
The 32-bit transmission control module (TCM) monitors transmission performance and compensates for normal wear in components such as clutch plates, so transmission performance remains consistent. The compact TCM is designed to fit within the case and is assembled as part of the transmission build.
The TCM's adaptive shift controls include automatic grade braking, which commands the transmission to remain in a lower gear and take advantage of engine braking when the vehicle is decelerating or coasting on a downgrade. The control module receives input that monitors brake pedal usage, vehicle acceleration rate, throttle position, and whether a trailer is connected to the vehicle.
Chassis
Brake System
Stopping power is provided by 12.8" vented front and 13" vented rear power disc brakes with standard four-wheel Antilock Brake System ABS. The Bosch® brake system also provides the following enhancements:
| • | Electronic Brake Distribution (EBD) |
| • | Power Brake Booster Solenoid Vacuum Supply |
| • | Traction Control System (TCS) |
| • | Vehicle Stability Enhancement System (VSES) |
Electrical Architecture
Data Link Communication
The communication among control modules is performed primarily through the GMLAN high speed serial data circuit and the GMLAN low speed serial data circuits. The modules that need real time communication are attached to the high speed GMLAN network. The body control module (BCM) is the serial data gateway between the networks. The purpose of the gateway is to translate serial data messages between the GMLAN high speed buss and the GMLAN low speed buss. The controller area network (CAN) is another serial data communication network used on this vehicle which is dedicated to the electronic brake control module (EBCM) subsystem for stabilization. The gateway will interact with each network according to that network's transmission protocol.
Important: A loss of serial data DTC does not represent a failure of the module that the code is set in.
SI Document ID 1853738 identifies which serial data link that a particular module uses for in-vehicle data transmission. There are potentially 24 different modules that can be found on the Acadia and Outlook. SI Document ID 1693614 provides a list of modules as well as links to schematics, repair instructions and programming and set-up information.
Body
Driver Information Center
The optional driver information center (DIC) display is located on the instrument cluster. The DIC control buttons are located on the instrument panel below the radio on the Acadia and below the instrument cluster on the Outlook. Access to the DIC information is not available while the vehicle is moving. The vehicle must be in "P" Park for the DIC controls to function.
Steering Wheel Controls
The following features can be accessed using the steering wheel controls:
| • | Audio Mute/Voice Recognition |
| • | Audio Volume |
| • | Audio Source |
| • | Audio Seek |
| • | Audio Next/Previous |
| • | Cruise Control On/Off |
| • | Cruise Control set and decrease set speed |
| • | Cruise Control resume and increase set speed |
| • | Cruise Control cancel |
Exterior Lamp Control Positions
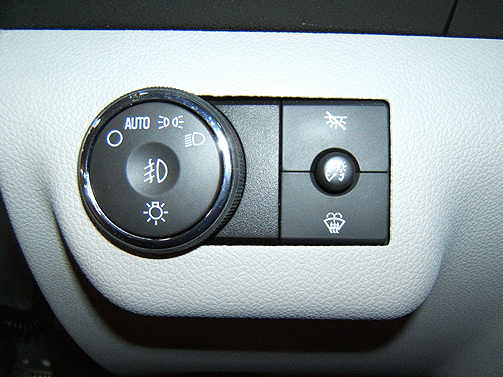
The exterior lamps control is located on the instrument panel to the left of the steering wheel.
| • | Off |
| • | Automatic |
| • | Parking Lamps |
| • | Headlamps Manually On |
The fog lamp switch is located in the center of headlamp switch and is a push on/off type switch.
Passenger Air Bag Status Indicator
The vehicle's passenger sensing air bag system has a status indicator located in the center of the instrument panel, below the audio system. With the key in Run or Start, the indicator blinks on/off for several seconds as a system check. Following, the light will stay on or off to indicate passenger side air bag status. If it shows that the air bag is on, it means that the air bag is enabled (could inflate). If it shows that the air bag is off, the passenger air bag is disabled.
Rear Parking Assist
The available ultrasonic rear parking assist (URPA) can help a driver determine how close an object is to the rear bumper within a defined rearward field of view.
The rear parking assist display is located on the rear headliner. The display has 3 indicators that can be seen through the rearview mirror or by turning around when seated in the driver seat.
When the ignition is ON and the vehicle is placed into reverse, the URPA performs a bulb check. During the bulb check, the 3 indicators on the display illuminate for approximately 2 seconds to indicate that the system is working. The URPA performs a bulb check and operates when the following conditions are present:
| • | The ignition is ON |
| • | The vehicle is placed in REVERSE (R) |
| • | The vehicle speed is less than 5 km/h (3 mph) |
| At speeds greater than 5 km/h (3 mph), the URPA is disabled. The red indicator flashes to warn the driver that the URPA is disabled. |
The URPA senses how close the vehicle is to an object. The distance is determined by the four ultrasonic sensors located on the rear bumper. When the system detects an object, one of the following will occur:
| • | At distances less than 0.3 m (12 in), the amber outside, amber middle, and the red outside indicators flash and the chime sounds continuously. |
| • | At distances between 0.3 m to 0.6 m (12 to 23 in), the amber outside, amber middle, and the red outside indicators are on. |
| • | At distances between 0.6 to 1.0 m (23 to 40 in), the amber outside, and the amber middle indicators are on. |
| • | At distances between 1.0 to 2.5 m (40 in to 8 ft), the amber outside indicator is on and the chime sounds one time on the first detection of an object. |
If the red indicator flashes continuously, the on-board diagnostic needs to be entered to determine if a malfunction is present.
Retained Accessory Power (RAP)
These vehicle accessories can be used for up to 10 minutes after the ignition key is turned off:
| • | Audio System |
| • | Power Windows |
| • | Sunroof (if equipped) |
Power to the windows and sunroof will work up to 10 minutes or until a door is opened.
The radio continues to work for 10 minutes or until the driver's door is opened.
For an additional 10 minutes of operation, close all of the doors and turn the key to ON and then back to OFF.
Heated Windshield Washer Fluid (RPO XA7)

If equipped, the heated windshield washer fluid system may be used to help clear the windshield. The button is located to the left of the steering column on the instrument panel. Push the button to activate the heated windshield washer fluid system. This activation will initiate four heated wash/wipe cycles. The first heated wash/wipe cycle may take up to 40 seconds to occur, depending on the outside temperature. After the first wash/wipe cycle, it may take up to 20 seconds for each of the remaining cycles. Press the button again to turn off the heated windshield washer fluid system or it will automatically turn off after four wipe cycles have been completed.
Rear Wiper and Washer
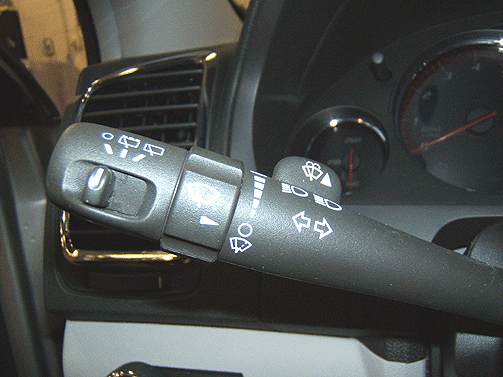
The rear wiper and washer controls are located on the multifunction lever.
Sunroof (RPO C3U)
A power dual SkyScape sunroof with a tilt-sliding front and fixed rear panel with a powered sunshade is available. The front panel includes express open/close and a pop-up wind deflector to reduce wind noise. The Solar-Ray tinted glass panel open and closes with the touch of a button. The front panel automatically fully closes any time it is within 8 mm (0.31496 in) of being closed.
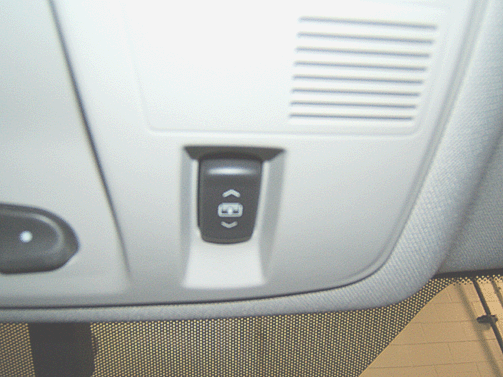
The switch for the rear powered-operated sunshade is in the front overhead console, above the rearview mirror.
Front Seat Manual Lumbar
If the vehicle has manual lumbar on the front seats, the control handle is located on the inboard side of the seatback.
Smart Slide Seat System
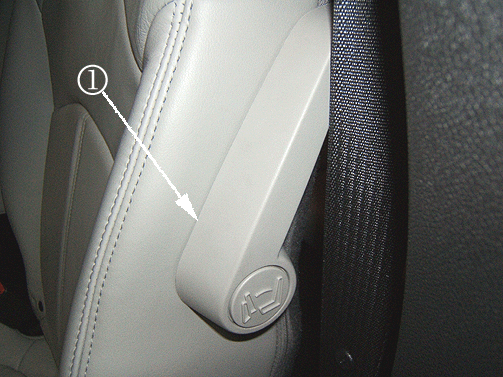
An industry-first Smart Slide feature is standard on all second-row configurations.
The Smart Slide seat system operates with a single lever (1) to flip the seat cushion up while the seatback slides forward to provide easy access to the third row. When adjusted rearward, the second-row seat provides more leg room and when adjusted forward, it provides more storage space.
Important: Be sure to follow all service information cautions whenever removing or servicing the second row seats.
Third Row Seat
The head restraints on the third row seat can be folded down to increase visibility.
UNIQUE VEHICLE CHARACTERISTICS
The purpose of this section is to familiarize you with some of the unique characteristic of the vehicle. The following functions may operate differently than what the customers are used to and are considered normal.
Remote Vehicle Start (HVAC Operation)
On remote start, automatic HVAC equipped vehicles will adjust cabin temperature and turn on defoggers according to outside temperature and default back to the previous key off setting when the key is inserted and rotated forward. Refer to the table below for system operation.
RPO CJ2 | RPO C67 | |||||
|---|---|---|---|---|---|---|
OAT | High (above 30°C) | Mid (10°C - 30°C) | Low (below 10°C) | High (above 30°C) | Mid (10°C - 30°C) | Low (below 10°C) |
Front Blower | auto | auto | auto | 90% | 45% | 90% |
Front Mode | panel | panel | defrost | panel | panel | defrost |
Front Temp | full cold | 73tset | full hot | full cold | 50% | full hot |
Compressor | on | on | on (above 2°C) | on | on | on (above 2°C) |
Recirc | auto recirc | auto recirc | auto recirc | recirc | osa | osa |
Rear Blower | same as front | same as front | same as front | 90% | 45% | 90% |
Rear Mode | same as front | same as front | same as front | panel | panel | floor |
Rear Temp | same as front | same as front | same as front | full cold | 50% | full hot |
Rear Defog | off | off | on | off | on | on |
Heated Seats | off | off | on | off | off | on |
Rear Electronic Climate Control
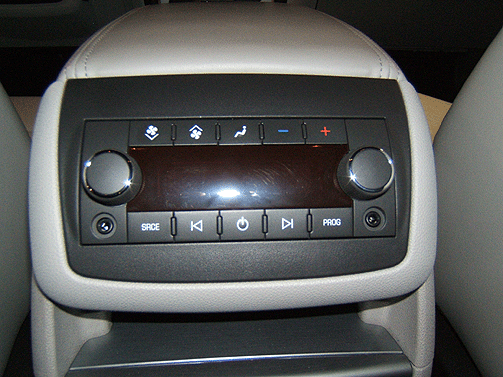
If the vehicle has this feature, the rear system is controlled through the AUX button on the front climate control panel. Press the AUX button to turn the system on or off. An indicator light near the AUX button comes on when the rear climate control system is on. The display on the rear control panel will NOT light up until one of the buttons are pressed.
Heated Windshield Washer Fluid (RPO XA7)
When the heated windshield washer fluid system is activated under certain outside temperature conditions, steam may flow out of the washer nozzles for a short period of time before washer fluid is sprayed. This is a normal condition. The first heated wash/wipe cycle may take up to 40 seconds to occur, depending on the outside temperature. After the first wash/wipe cycle, it may take up to 20 seconds for each of the remaining cycles.
Audio Mute/Voice Recognition Button
Press and release this button to silence the vehicle speakers only. The audio of the wireless or wired headphones, if the vehicle has these features, does not mute. Press and release this button again, to turn the sound on. Press and hold this button for longer than one second to interact with the OnStar® system. If the vehicle is also equipped with the Navigation system, push and hold this button for longer than one second to initiate voice recognition, and say "OnStar" to enter OnStar® mode.
Lockout Protection
This feature protects from locking the key in the vehicle when the key is in the ignition and a front door is open. If the driver's side power door lock switch is pressed when the driver's door is open and the key is in the ignition, all of the doors will lock and then the driver's door will unlock. If the passenger's side power door lock switch is pressed when the front passenger's door is open and the key is in the ignition, all of the doors will lock and then the front passenger's door will unlock.
SERVICE SUPPORT AND TIPS
Buzz or Whine Noise Heard Underhood
A high pitched buzz or whine noise may be heard after the engine is shut off. This buzz or whine noise is coming from the solenoids in the transmission. These solenoids will stay active during the TCM shut down, which will last about ten seconds. Do NOT make any attempts to repair this condition. This is a normal characteristic of this vehicle.
Power Steering
The power steering reservoir is located under the engine cover.
Battery
The battery is located behind the front passenger seat in the floor. Remove the panel to access. Jump start connections can be easily accessed in the engine compartment using the remote terminals.
Optional Navigation Radio (RPO UZR)
There may be concerns that the Navigation DVD is inoperative. It has been revealed that the Navigation DVD was being installed in the CD media slot. This radio has one media slot for CD/MP3 disks and a second media slot for Navigation DVD. The CD media slot is located above the screen and the Navigation DVD media slot is located behind the screen. To insert the Navigation DVD, press and hold the eject button next to the CD media slot for approximately 15 seconds. The radio will then eject/tilt the screen. To close the screen, it will require two hands (one at each side of the screen) and push the screen in evenly toward the radio until it is secured.
Headliner Removal
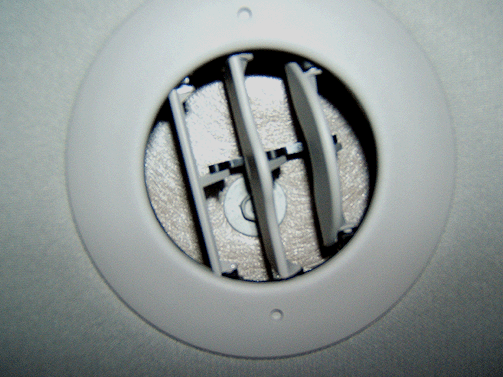
There are four headliner retaining bolts located in the roof A/C vents that need to be removed prior to headliner removal.
Power Liftgate
Power liftgate operation is only allowed when certain operating criteria are met. Any of the following may prevent the power liftgate from functioning:
| • | A loss of the low current battery power supply (until the ignition is cycled) |
| • | Vehicle is not in PARK |
| • | Engine cranking is present |
| • | Ambient temperature at the liftgate module is NOT between -17 to +80°C (+1 to +176°F) |
| • | Liftgate motor excess current is detected |
| • | System voltage is out of range |
| • | A DTC is set that disables power liftgate functionality |
| • | The liftgate is locked when attempting to open from exterior handle |
| • | The theft deterrent system is enabled |
If a signal from either of the 2 pressure sensing object detection sensors indicates an object may be pinched as the liftgate is brought to the closed position, the liftgate reverses direction and the power close operation is suspended until pressure against the sensor is released.
If any part of the power liftgate is repaired or replaced, the Liftgate Calibration Procedure must be performed. Using the Tech 2®, select Special Functions in the Liftgate Module menu. Select "LGM Open/Close Test" and follow the directions on the screen.
Electronic Service Information
All required service information is currently online on GM SI. A dealership can also find the most current Owner's Manual and Labor Time Guide* online at website http://service.gm.com and under Service Information link.
*In Canada, the Labor Time Guide is located on the GMinfoNET.
QUALITY PRE-DELIVERY INSPECTION (PDI)
The PDI form was revised to ensure special attention is paid to the areas listed below. Refer to Corporate Bulletin # 03-00-89-006D. For Dealers in Canada, the PDI form is available for download from the "GM World of Warranty" on the GMinfoNET.
Reset Fuel Economy
Be sure to reset the fuel economy display to zero prior to delivery to the customer.
Tire Pressures
Vehicles are shipped from the assembly plant with higher than recommended tire pressure. The pressures are optimized for transportation of the vehicle. Tire pressures are a key ingredient of ride quality. It is very important to adjust the tire pressures to the recommended level, as noted on the tire label located on the driver's door, prior to delivery.
Battery Life
Check and charge the battery, if necessary. It is the dealer's responsibility to maintain the battery until delivery to the customer.
Brake Burnish
If the vehicle has set for a long period of time, it will be necessary to burnish the brakes during the PDI test drive, prior to delivering the vehicle to the customer. Refer to Corporate Bulletin # 00-05-22-002I (Brake Pulsation -- Corrosion) for more details.
Window Cleaning
A hazy film may build up on interior glass surfaces due to plasticizers emitted from the interior trim components. To remove this film, use the following procedure:
- Spray the entire glass surface with plain water. Avoid any type of chemical cleaner.
- Use a dry sponge covered with a paper towel. Avoid any type of cloth. Use of a dry sponge to back the paper towel pieces is recommended in order to apply uniform pressure on the glass.
- Wipe the glass surface in a uniform, linear, length-wise fashion, one swipe at a time. Avoid circular swipes.
- Discard paper towel after each swipe.
