General Waterleak Guide

| Subject: | General Waterleak Guide |
| Models: | 2006-2008 Pontiac Solstice |
| 2007-2008 Saturn Sky |
| 2007-2008 Opel GT |
| 2007-2008 Daewoo G2X |
This bulletin is being revised to change the conditions. Please discard Corporate Bulletin Number 05-08-67-011A (Section 08 - Body and Accessories).
Leak Location Index
Condition | Best Described In |
|---|---|
Waterleak Along Top of Windshield | #1 |
Front Floor Carpet Wet | #s 2 |
Front Floor Carpet Wet by Bottom of "A" Pillar | #s 2,3,4,5 |
Waterleak From #1 Weatherstrip Joint | #s 6 |
Waterleak From #2 Weatherstrip Joint. | #s 7 |
Inside "B" Pillar or Rear Carpet Wet | #s 8,9 |
Waterleak at Front of Trunk | #s 10,11 |
Water on Sides of Trunk Carpet | #12 |
Waterleak at Rear of Trunk | #s 13,14,15,16,16,17, 18,19 |
Important: The 2006 Solstice and early built 2007 Sky were built with Plan-A top assemblies. All convertible tops built on or after VIN 6Y118652 (Pontiac) and 7Y103259 (Saturn), were built with Plan-B convertible tops and will require Plan-B designed weatherstrip. Plan-A and Plan-B tops and weatherstrips are not interchangeable. Refer to Corporate Bulletin Number 06-08-67-009A for further information
Some of the following information may be specific for Plan-A or Plan-B weatherstripsCondition #1
The customer may comment of water anywhere across the top of the windshield.
Cause
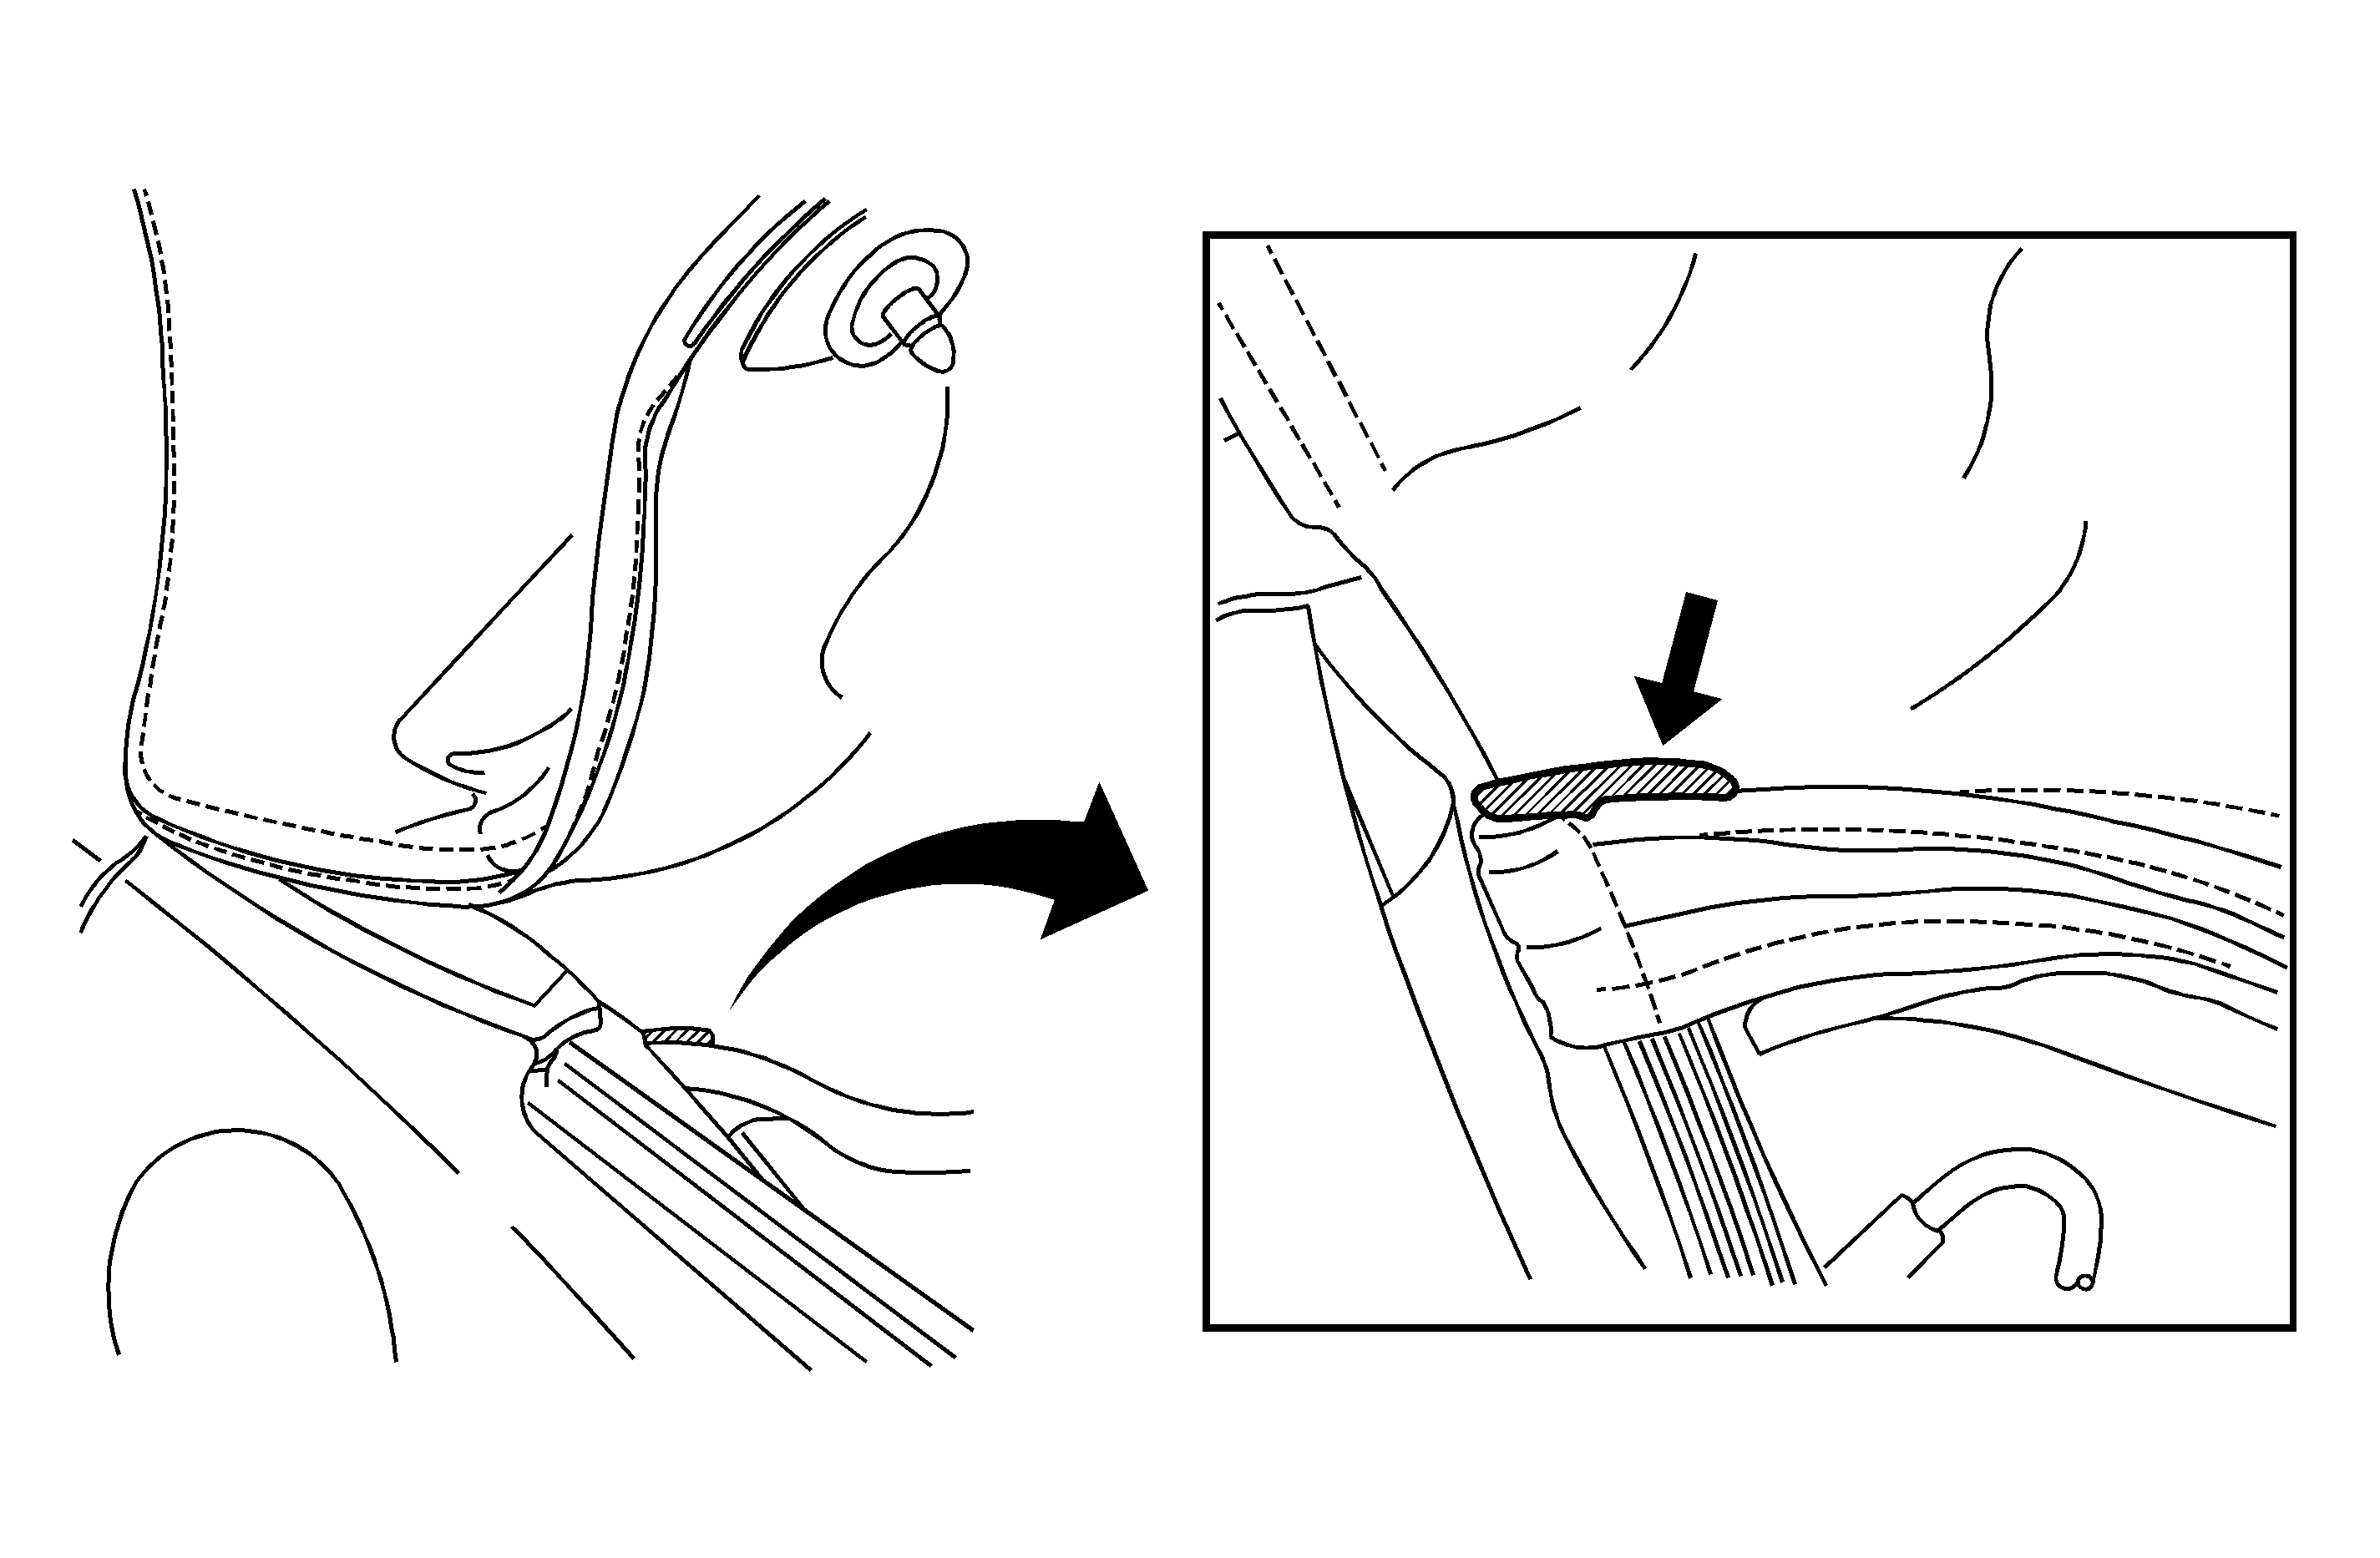
Plan-A top built before December 2005: During a torrential rain storm, the drain hole in the weatherstrip may not be large enough to accommodate all the water.
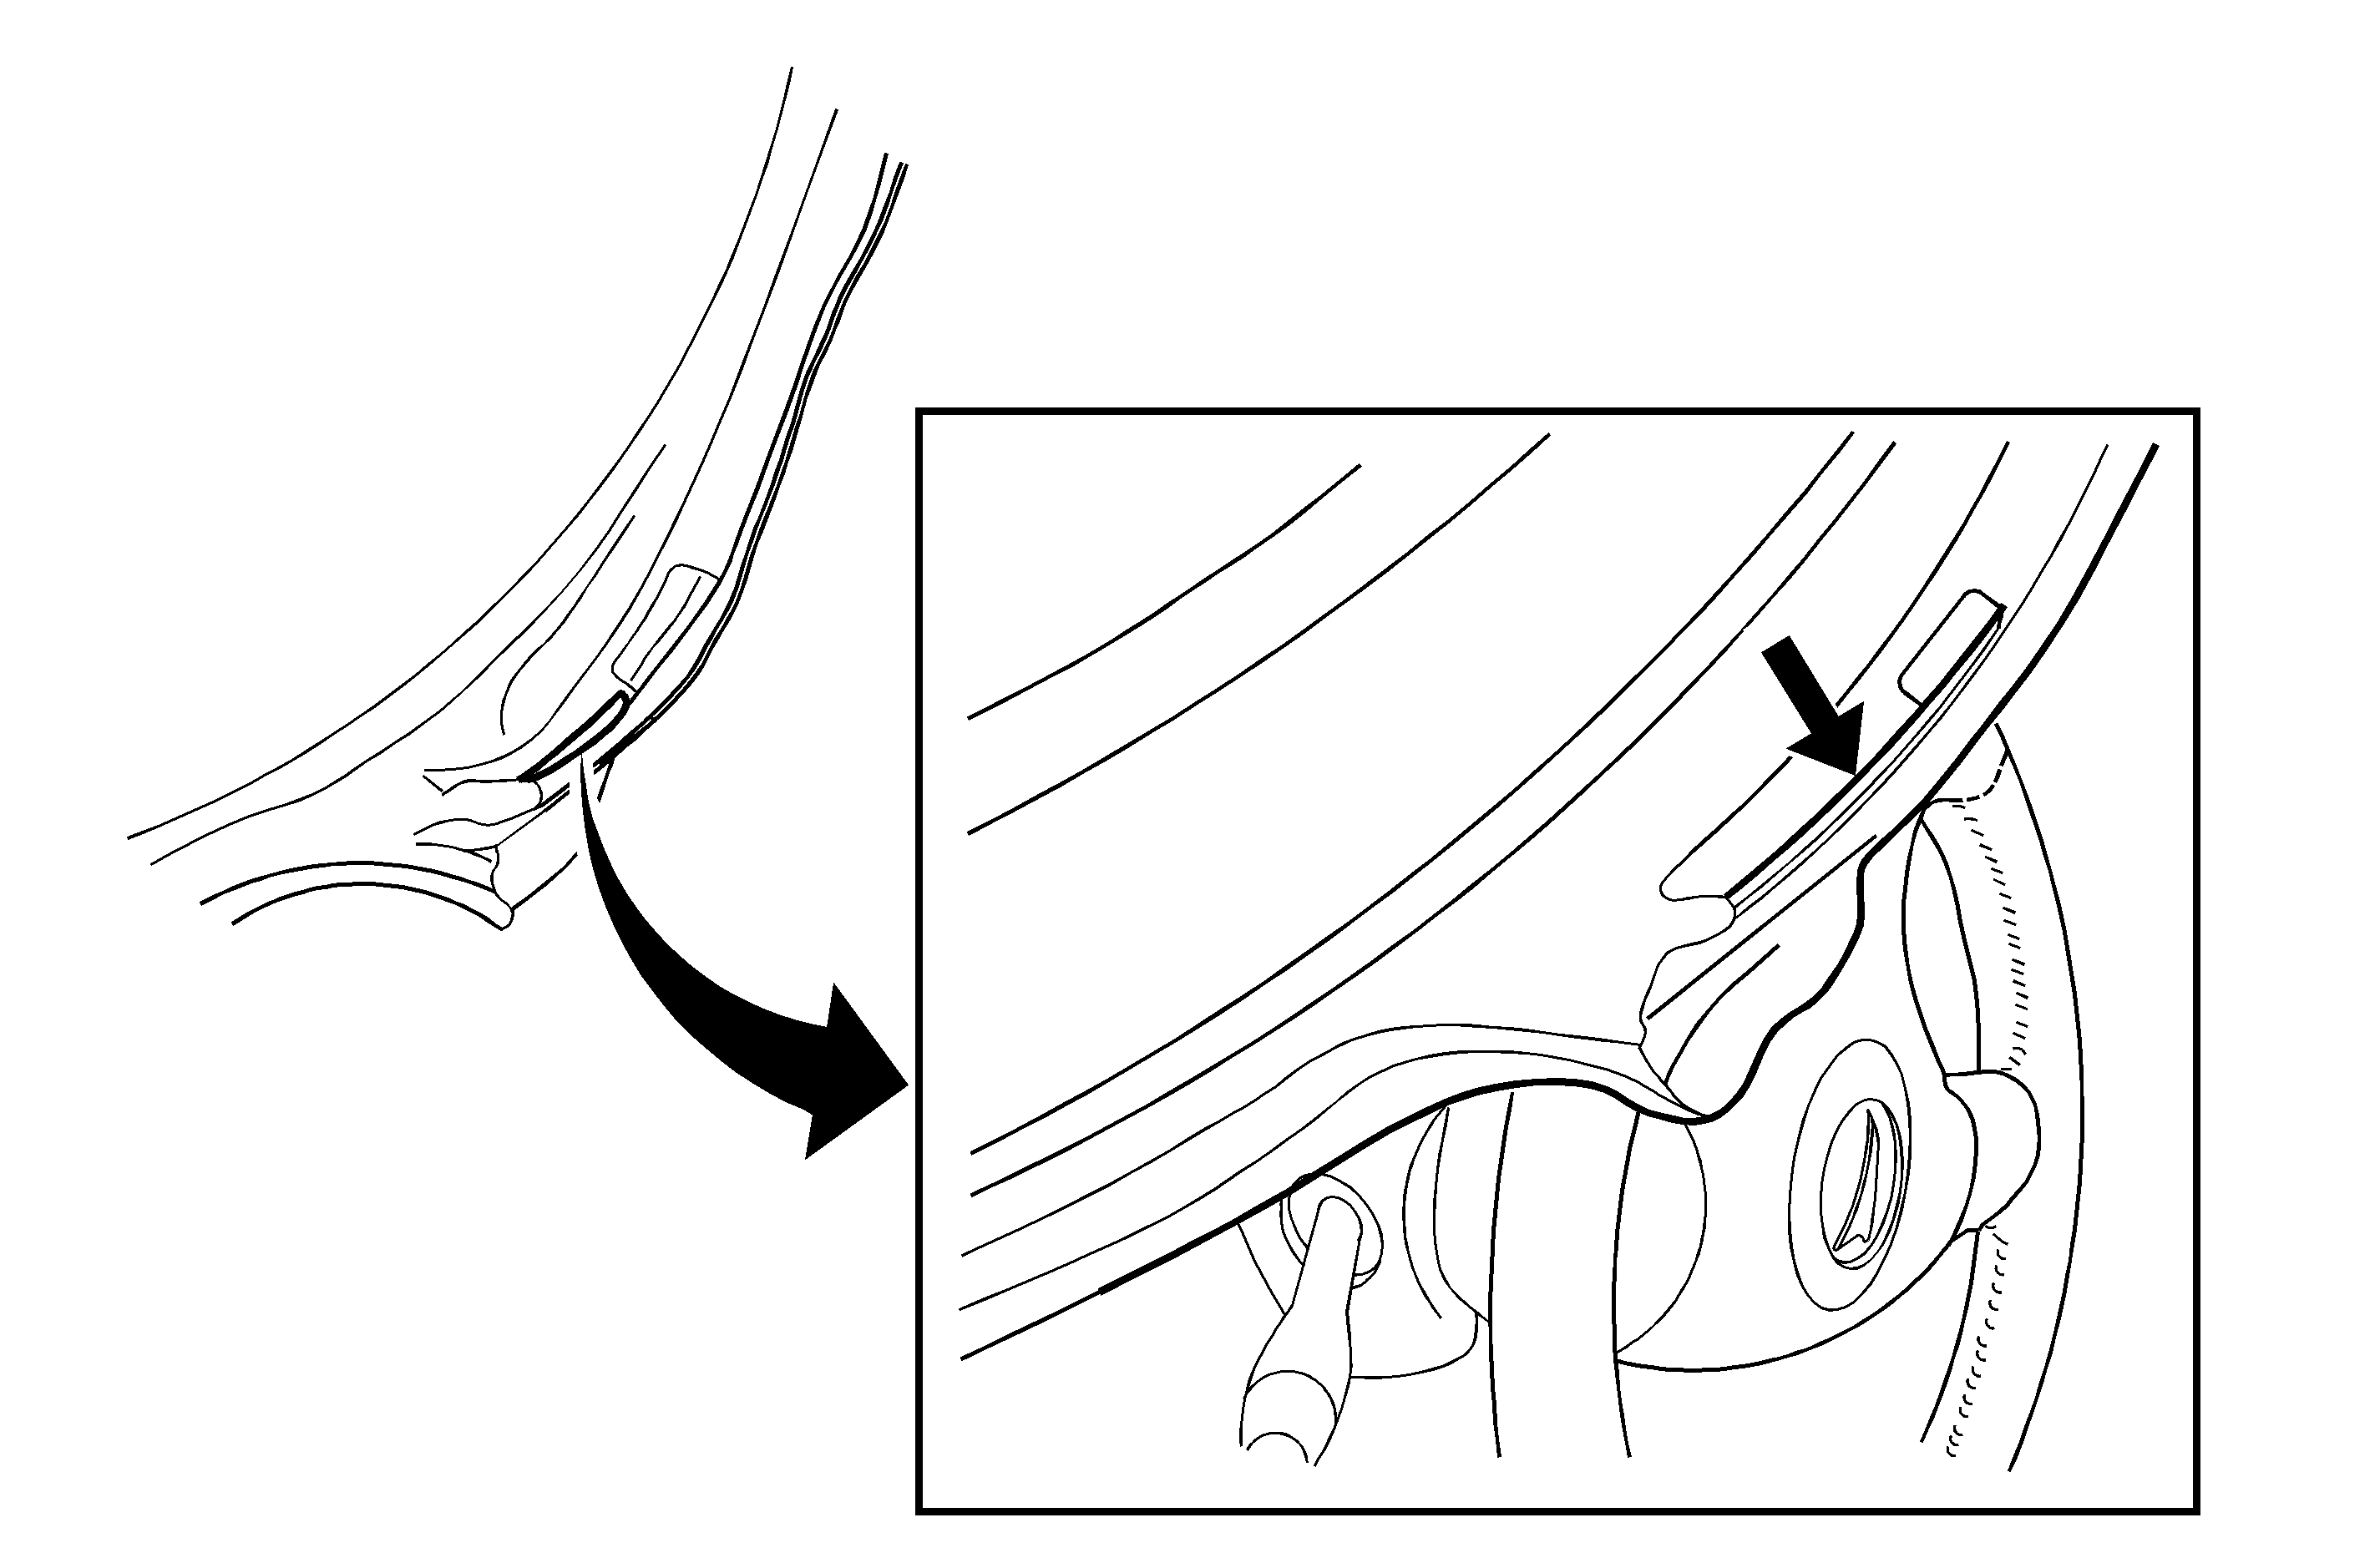
Cut a longer, thin 30 mm (1-1/8 in) slit in the weatherstrip. The left hand illustration above shows the original weatherstrip, while the right hand illustration shows the slit cut in the weatherstrip to the end of the square mold lines.
Cut a 3 mm (1/8 in) wider piece of weatherstrip out of the bottom of the weatherstrip.
Plan-A and Plan-B Weatherstrips: Make sure that the windnoise weatherstrip located on the front edge of the door is not blocking the drain opening of the windshield weatherstrip.
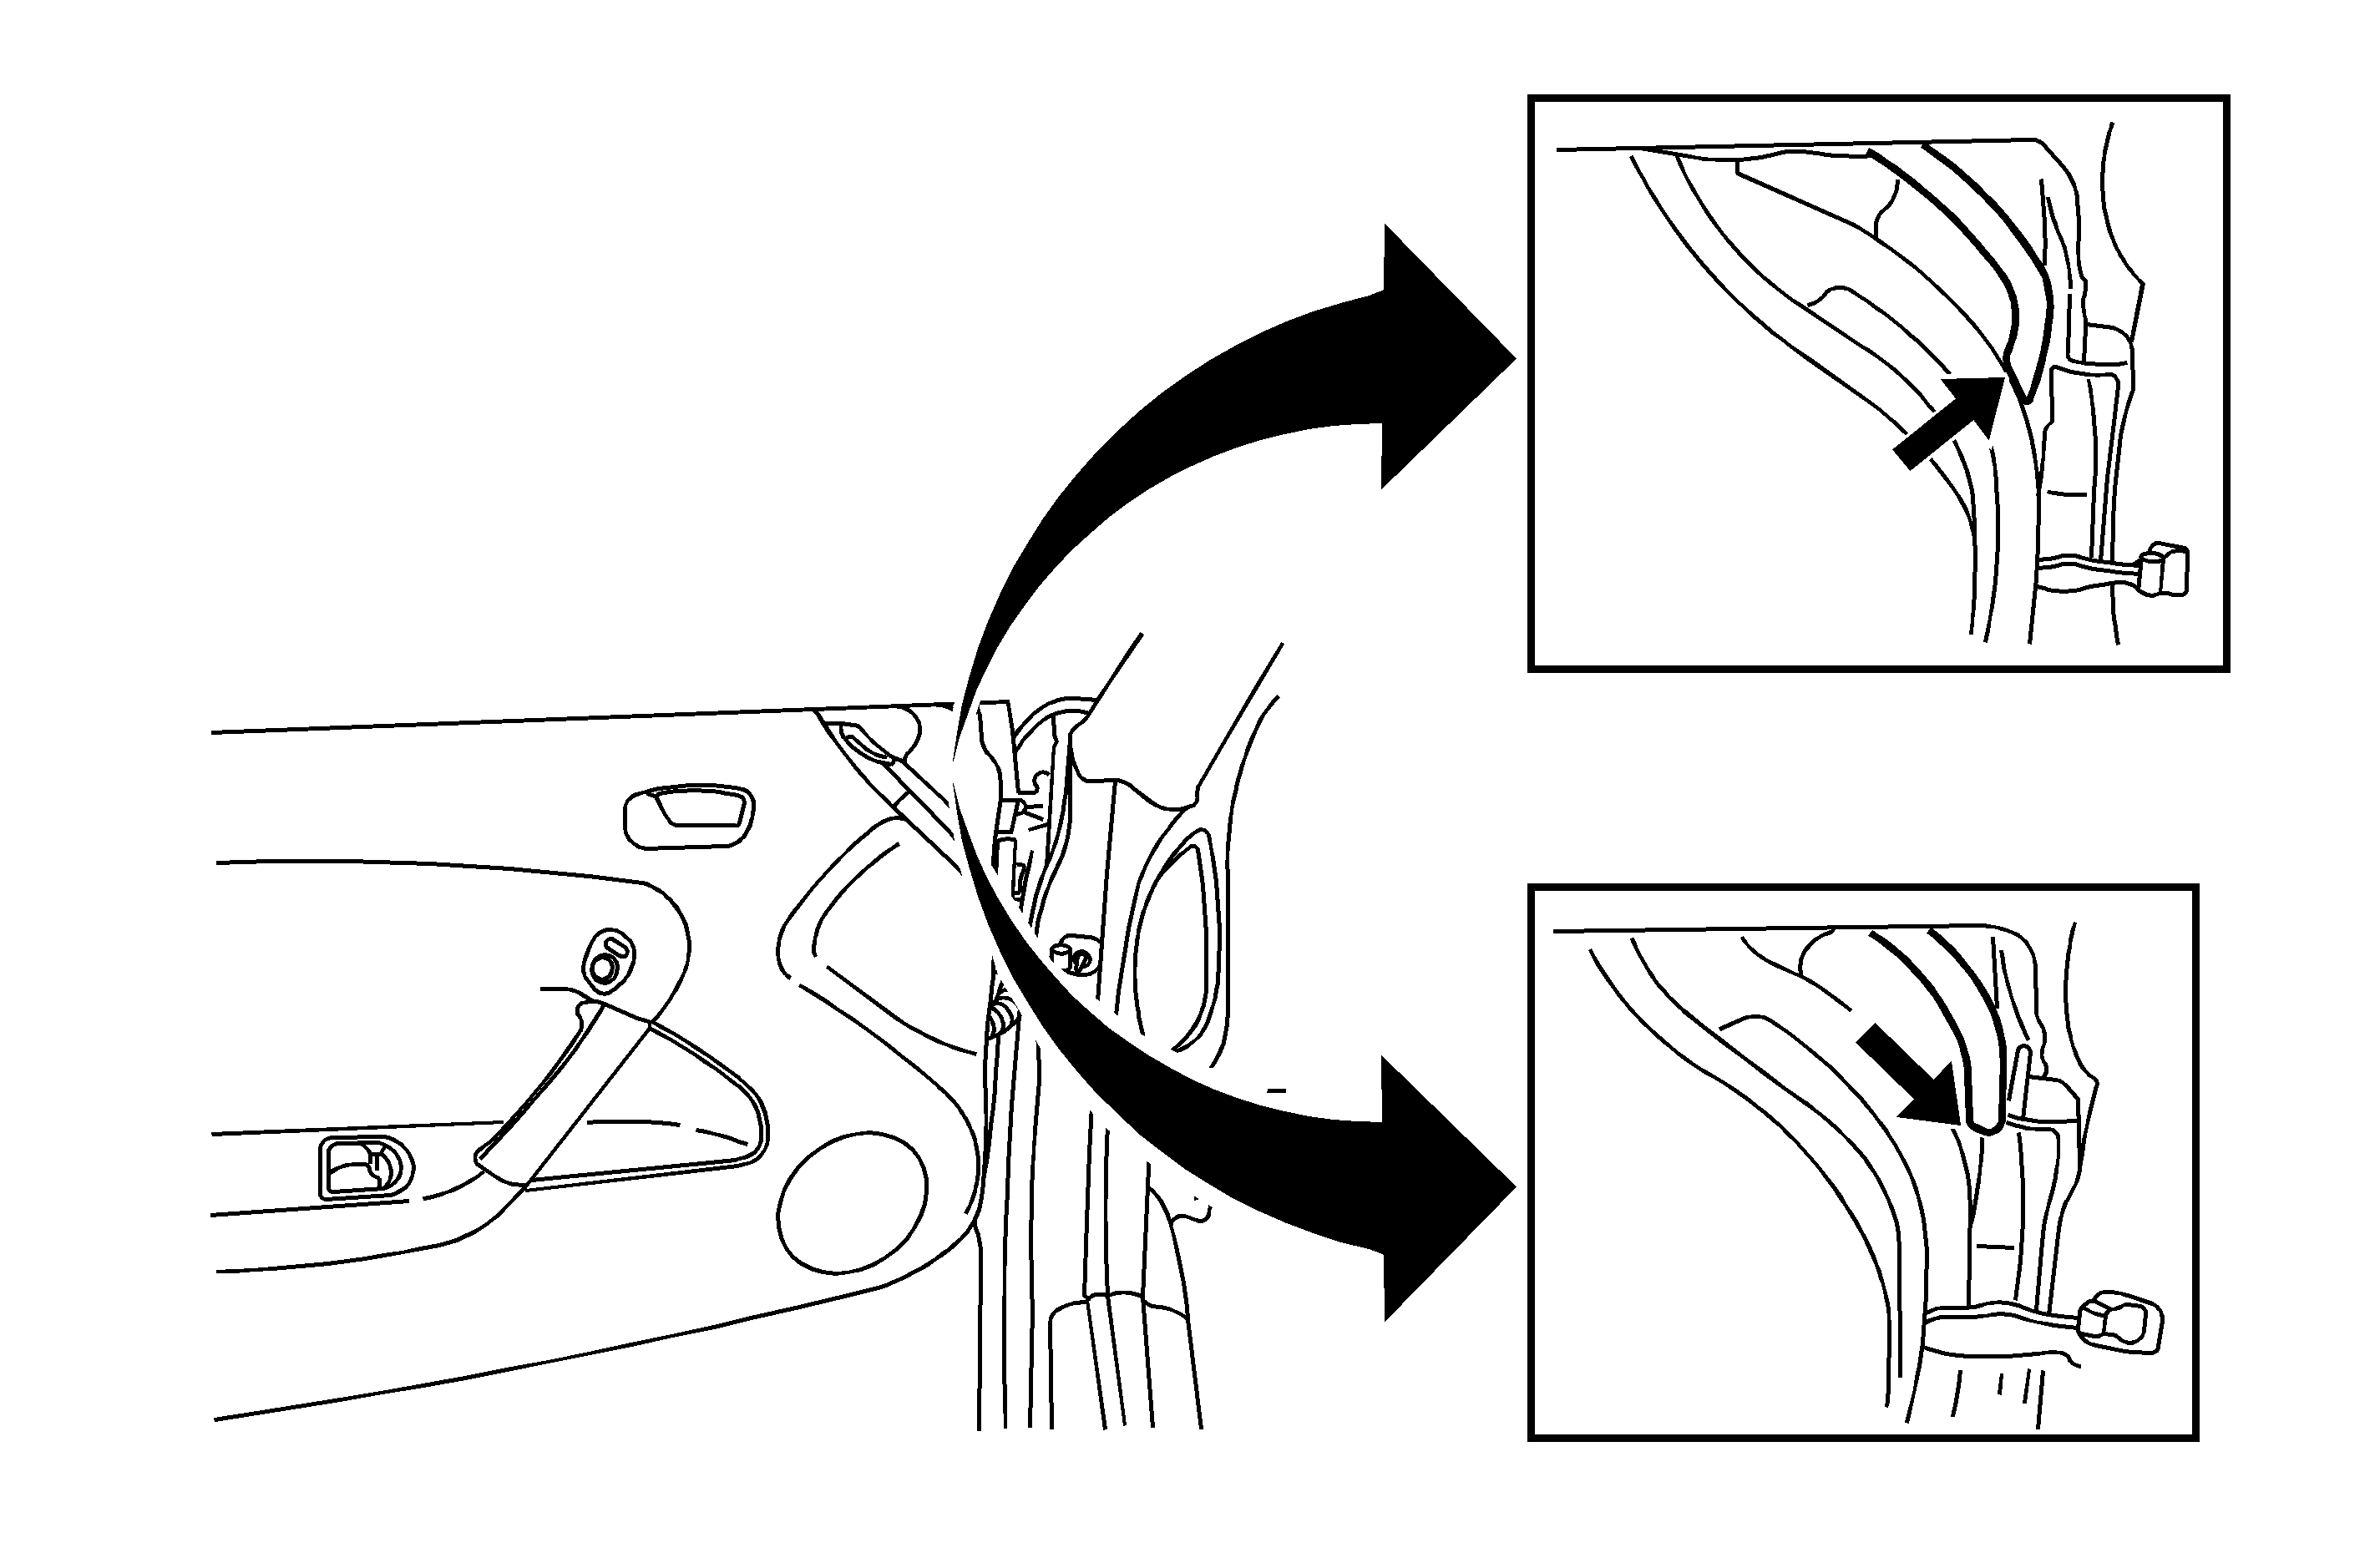
Relocate the weatherstrip so there is an approximate 5 mm (¼ in) gap between the windnoise weatherstrip and the primary door seal. The illustration above shows the mispositioned weatherstrip (top) and then the correct position (bottom).
Plan-A and Plan-B Weatherstrips: During a torrential rain storm water may leak down the A-Pillar, drip from the top receiver pin cup or drip from roof header onto the shifter. Refer to Corporate Bulletin Number 06-08-67-016 (Apply Sealer to Convertible Top Seam) for further information.
Condition #2
Important: A leak in this area may only be present when driving in rain.
The front floor carpets are wet or the carpet may be wet by the bottom of the "A" pillar near the sill plate.
Cause
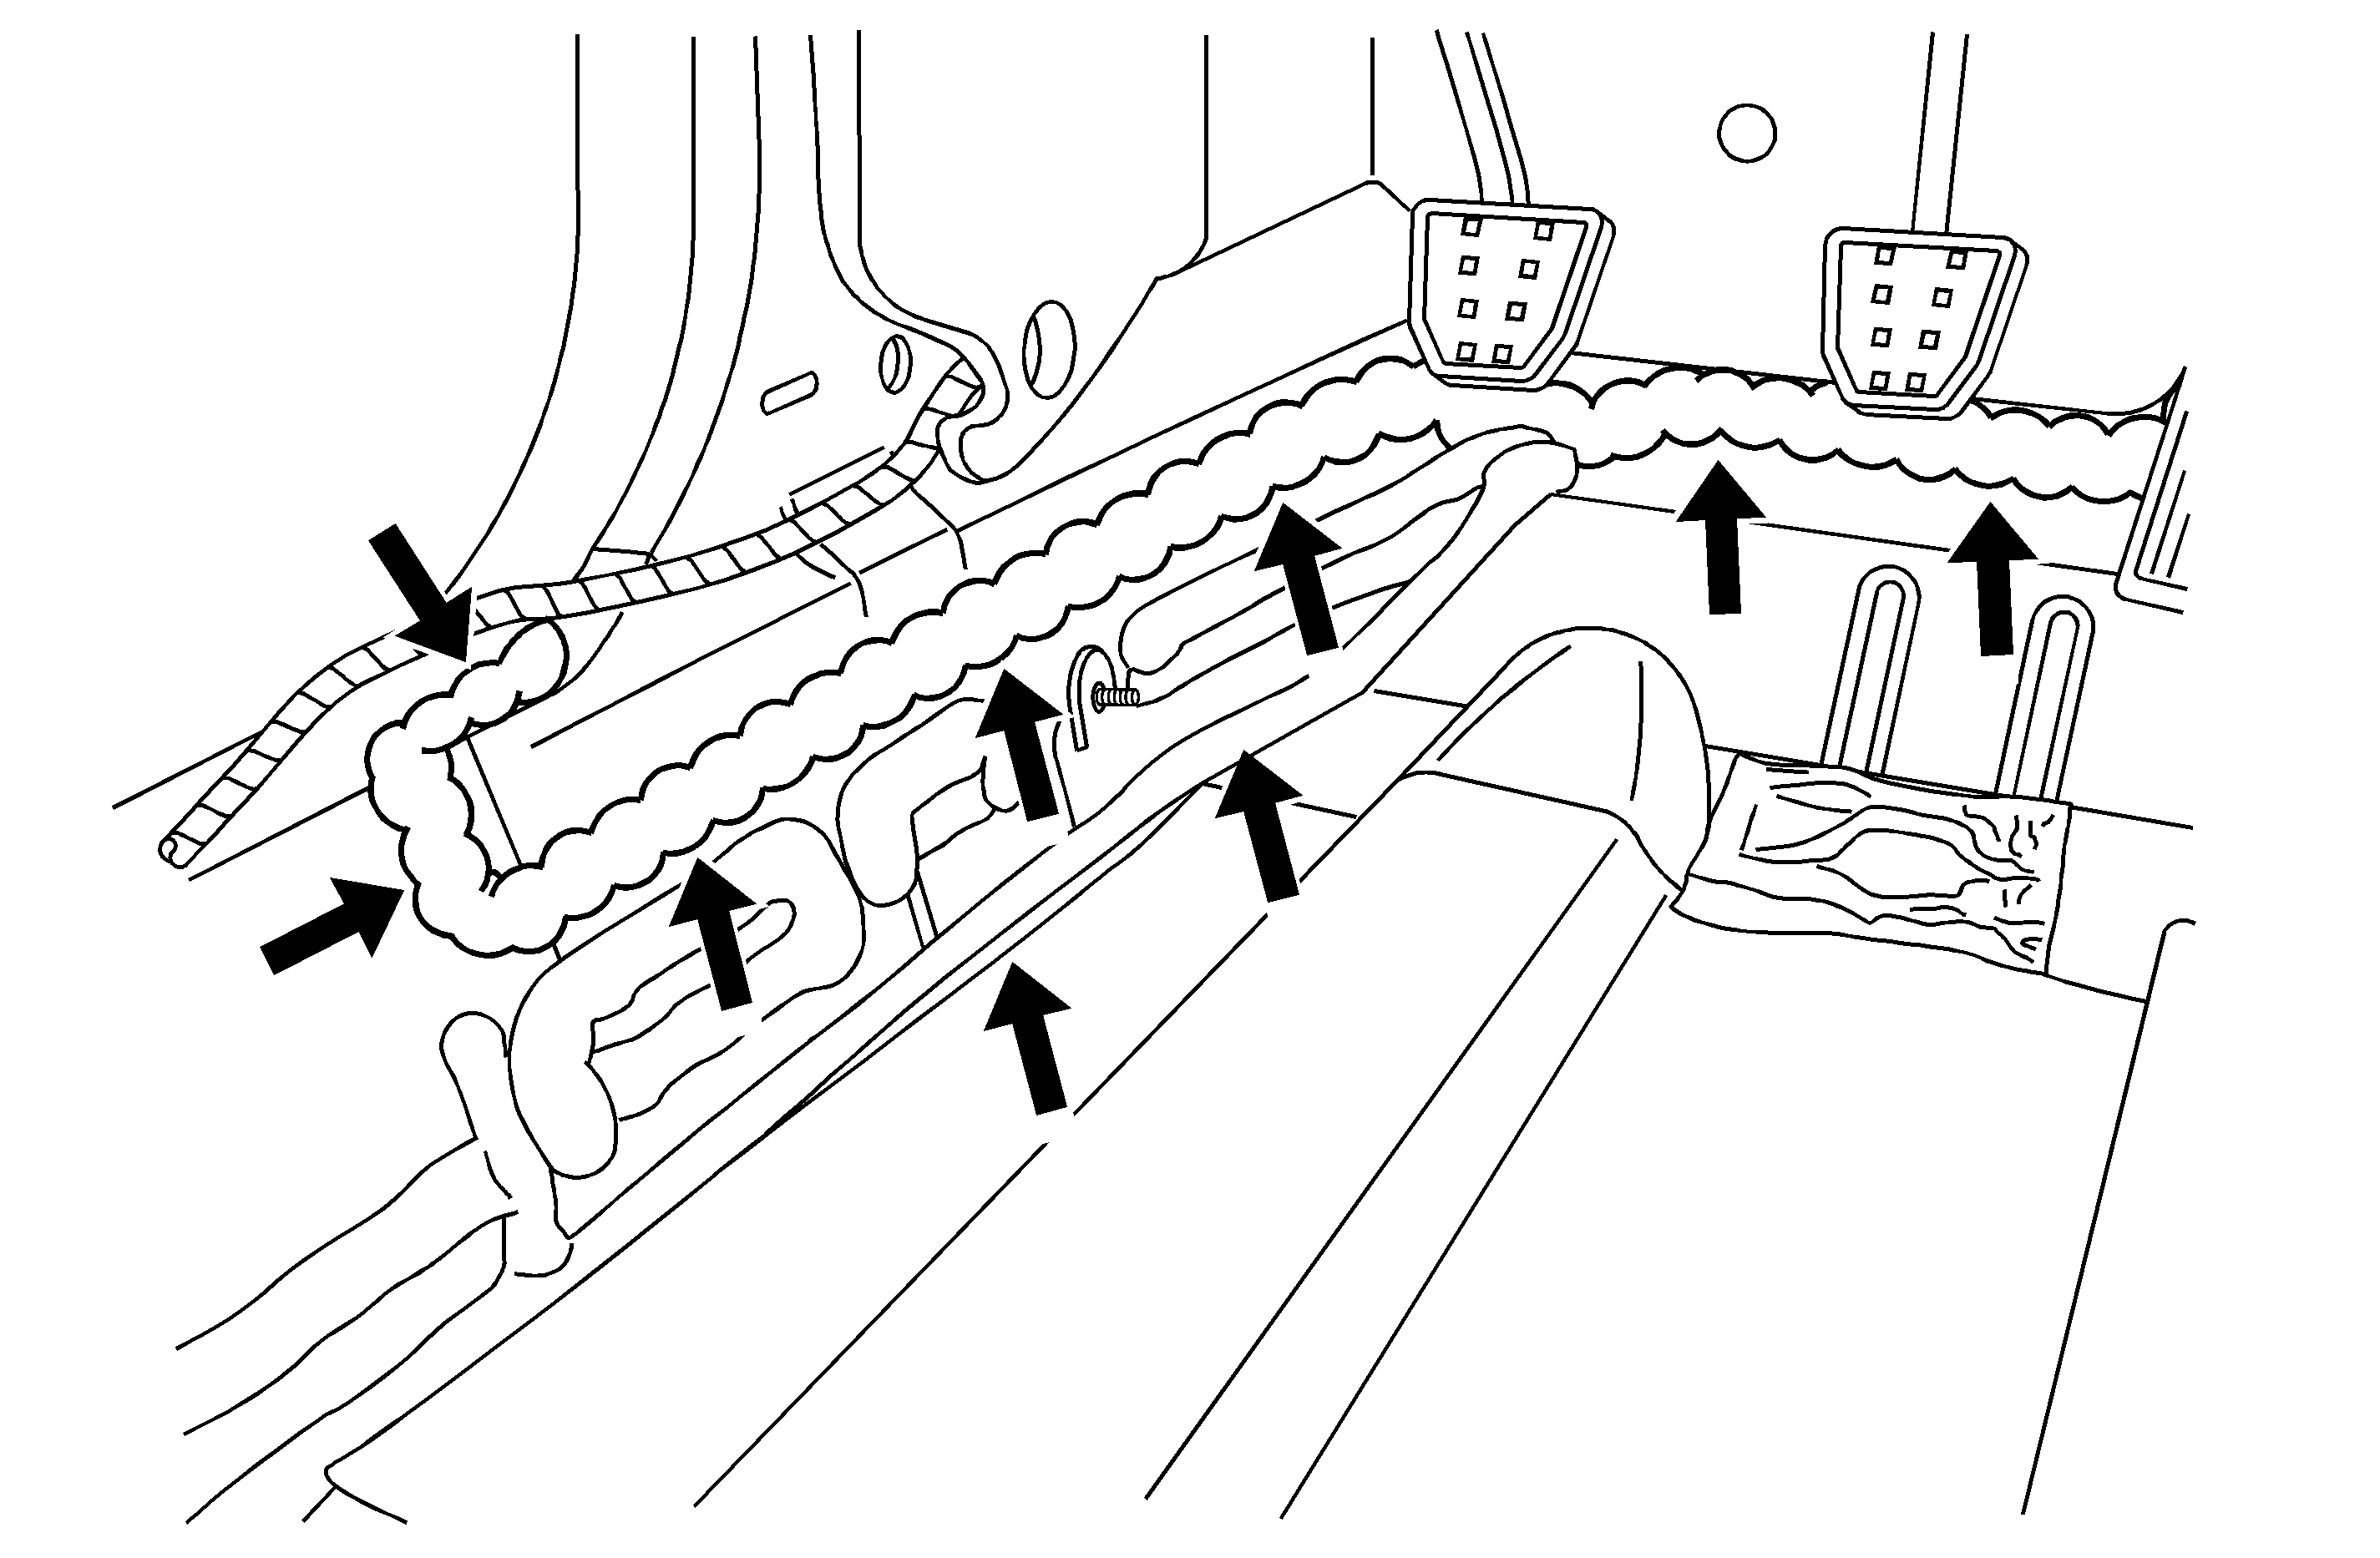
The front of the dash and the floor pan seam may have a void in the sealer.
Correction
- Shine a light from inside the vehicle and use a mirror to look up at the seam from inside the engine compartment or below the car. Clean the area with a non-oil based cleaner and reseal with urethane.
- Run water down the front of the "A" pillar to locate the leak. Clean the area with a non-oil based cleaner and reseal with urethane.
Condition #3
The carpet may be wet by the bottom of the "A" pillar near the sill plate.
Cause #1
Water may be entering the "A" pillar at the windshield weatherstrip and flowing down the "A" pillar.
Correction #1
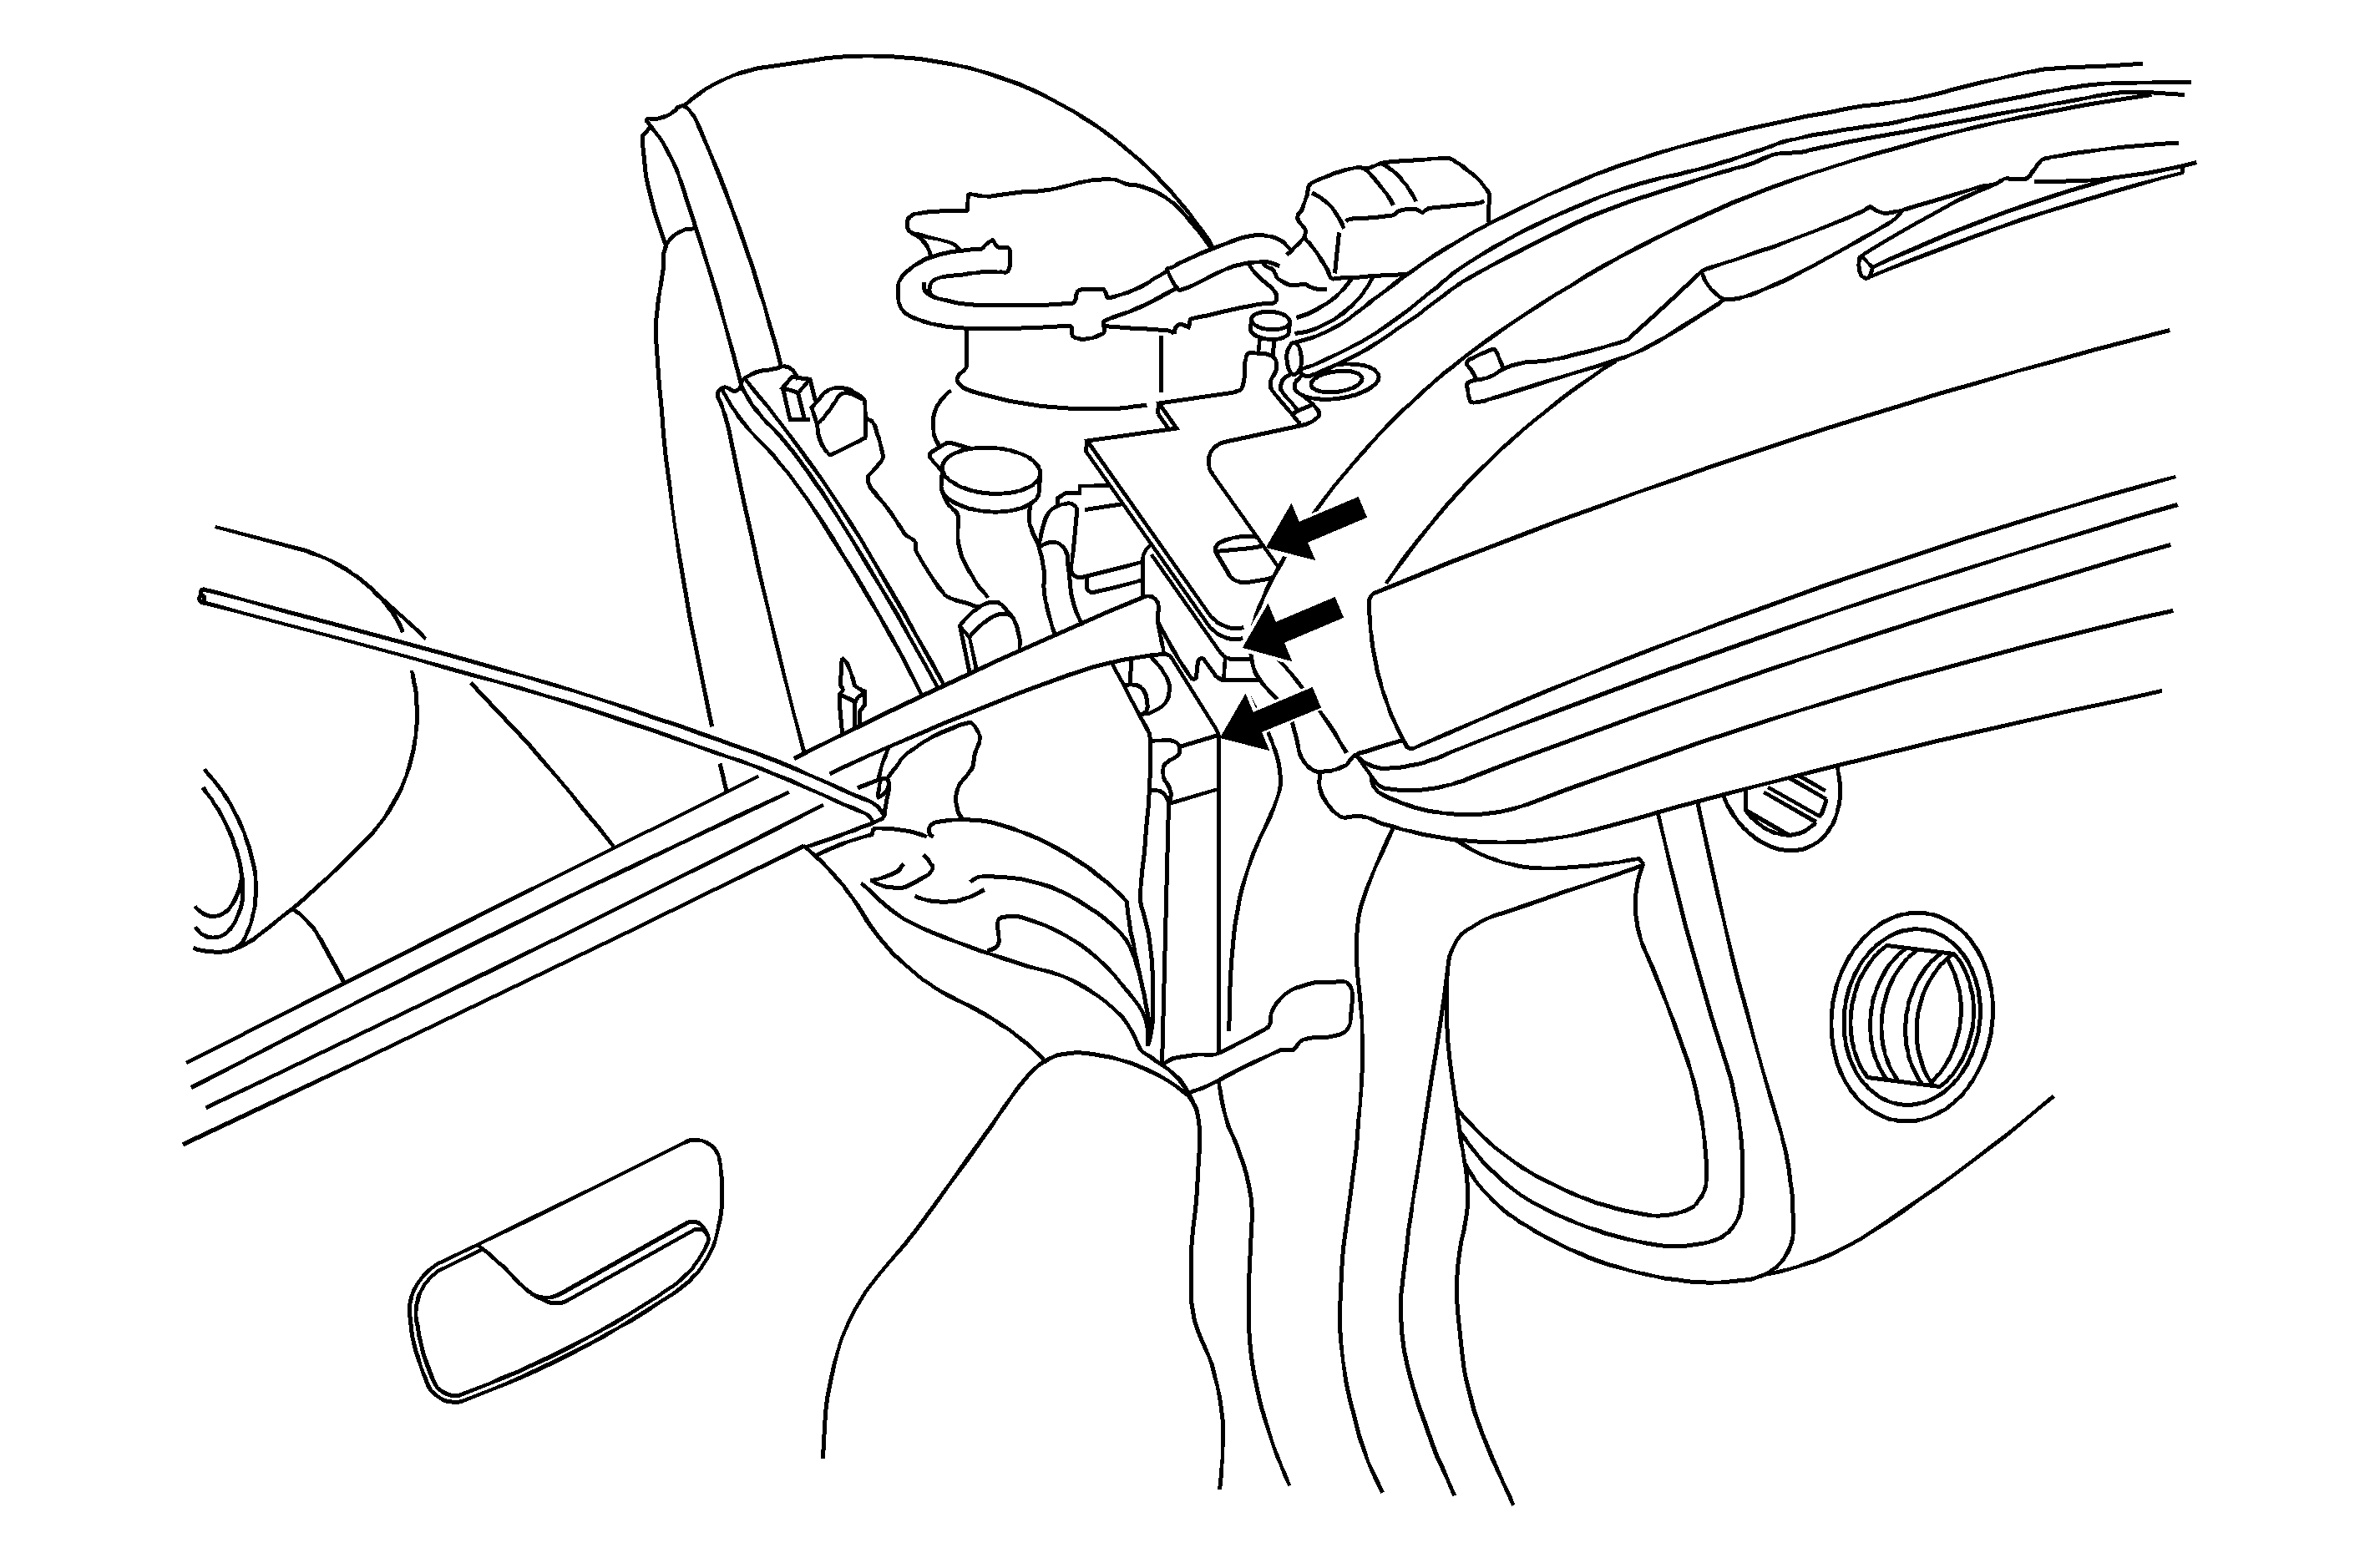
Remove the left or right cowl screen cover and seal three locations:
| • | Make sure the hole at top of the pillar is covered. Refer to the top arrow in the illustration. |
| • | Seal the seam at the top of the pillar with butyl. Refer to the middle arrow in the illustration. |
| • | Seal around the front top and back side of the upper door hinge with Kent seam sealer, P/N 10200. Refer to the bottom arrow in the illustration. |
Cause #2
There may be a lack of sealer at the sill plate to the lower "A" pillar.
Correction #2
Remove the trim at the top of the "A" pillar. Run water down the top of the "A" pillar to locate the leak.
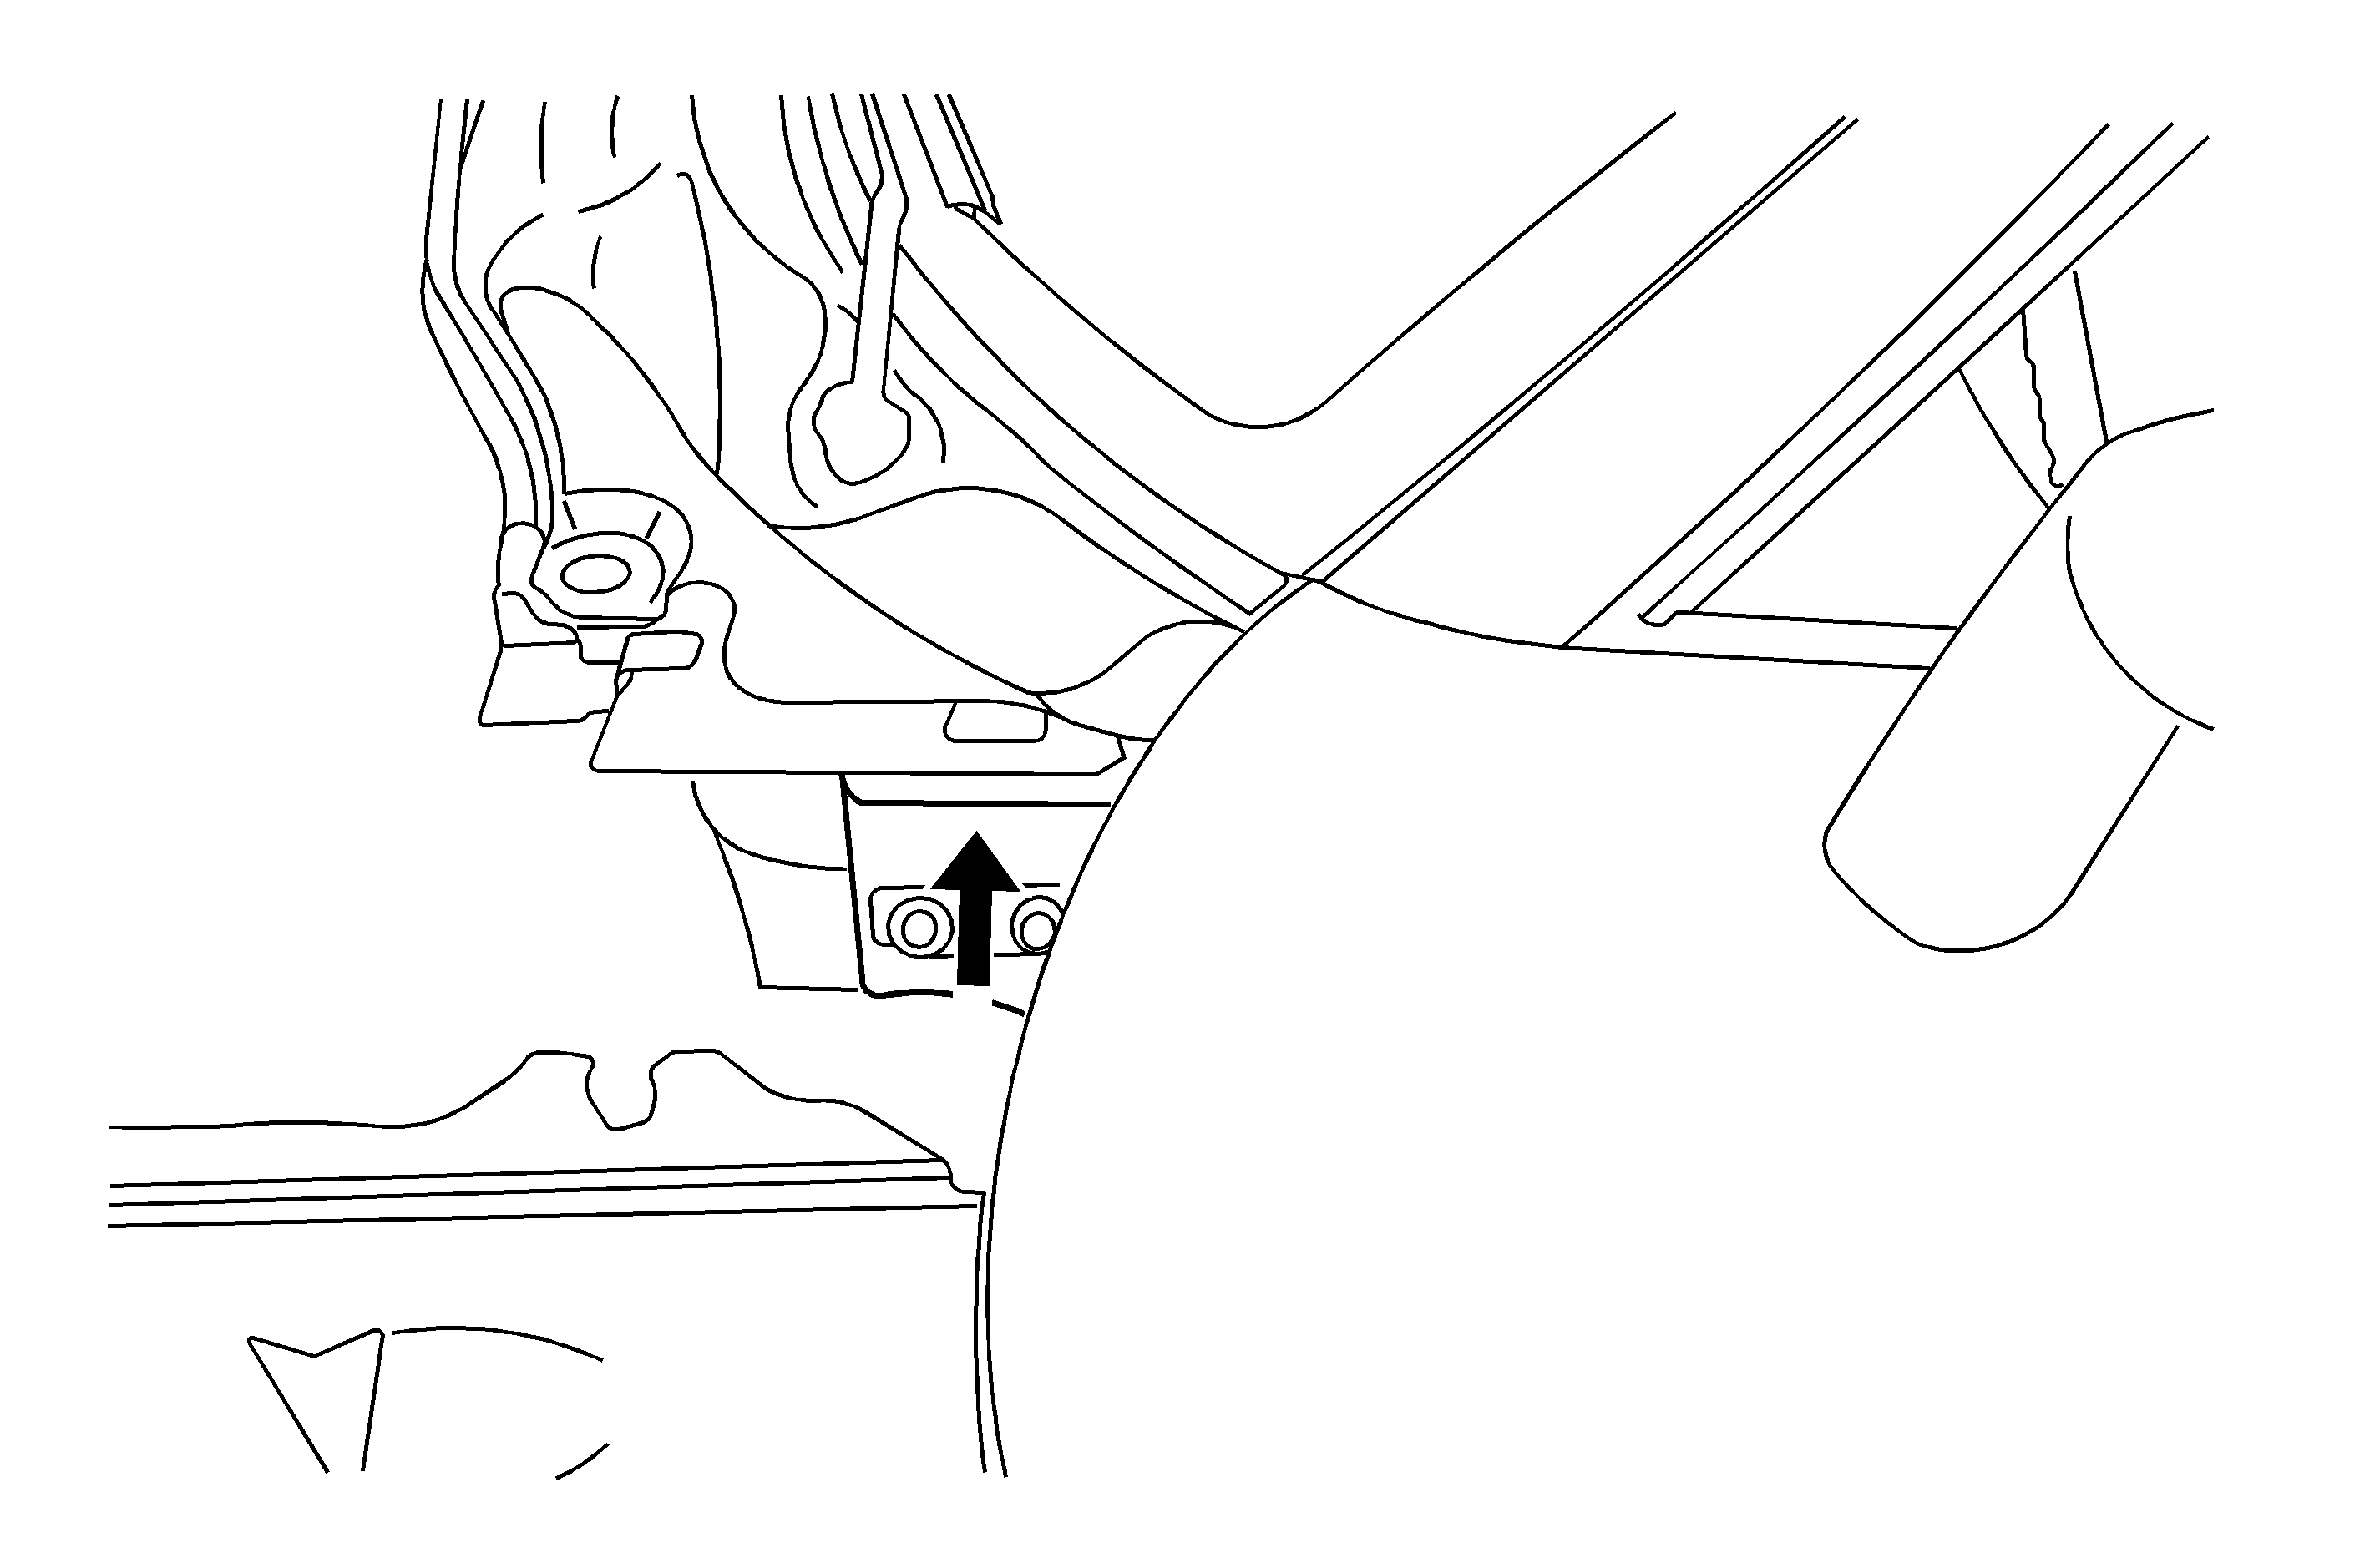
Water will gather down at the bottom rear of the "A" pillar, pool up and drain into the car at the rearmost arrow. Making sure the seam is sealed at both of the arrows will create a water path to the outside. Clean the area with a non-oil based cleaner and reseal with urethane.
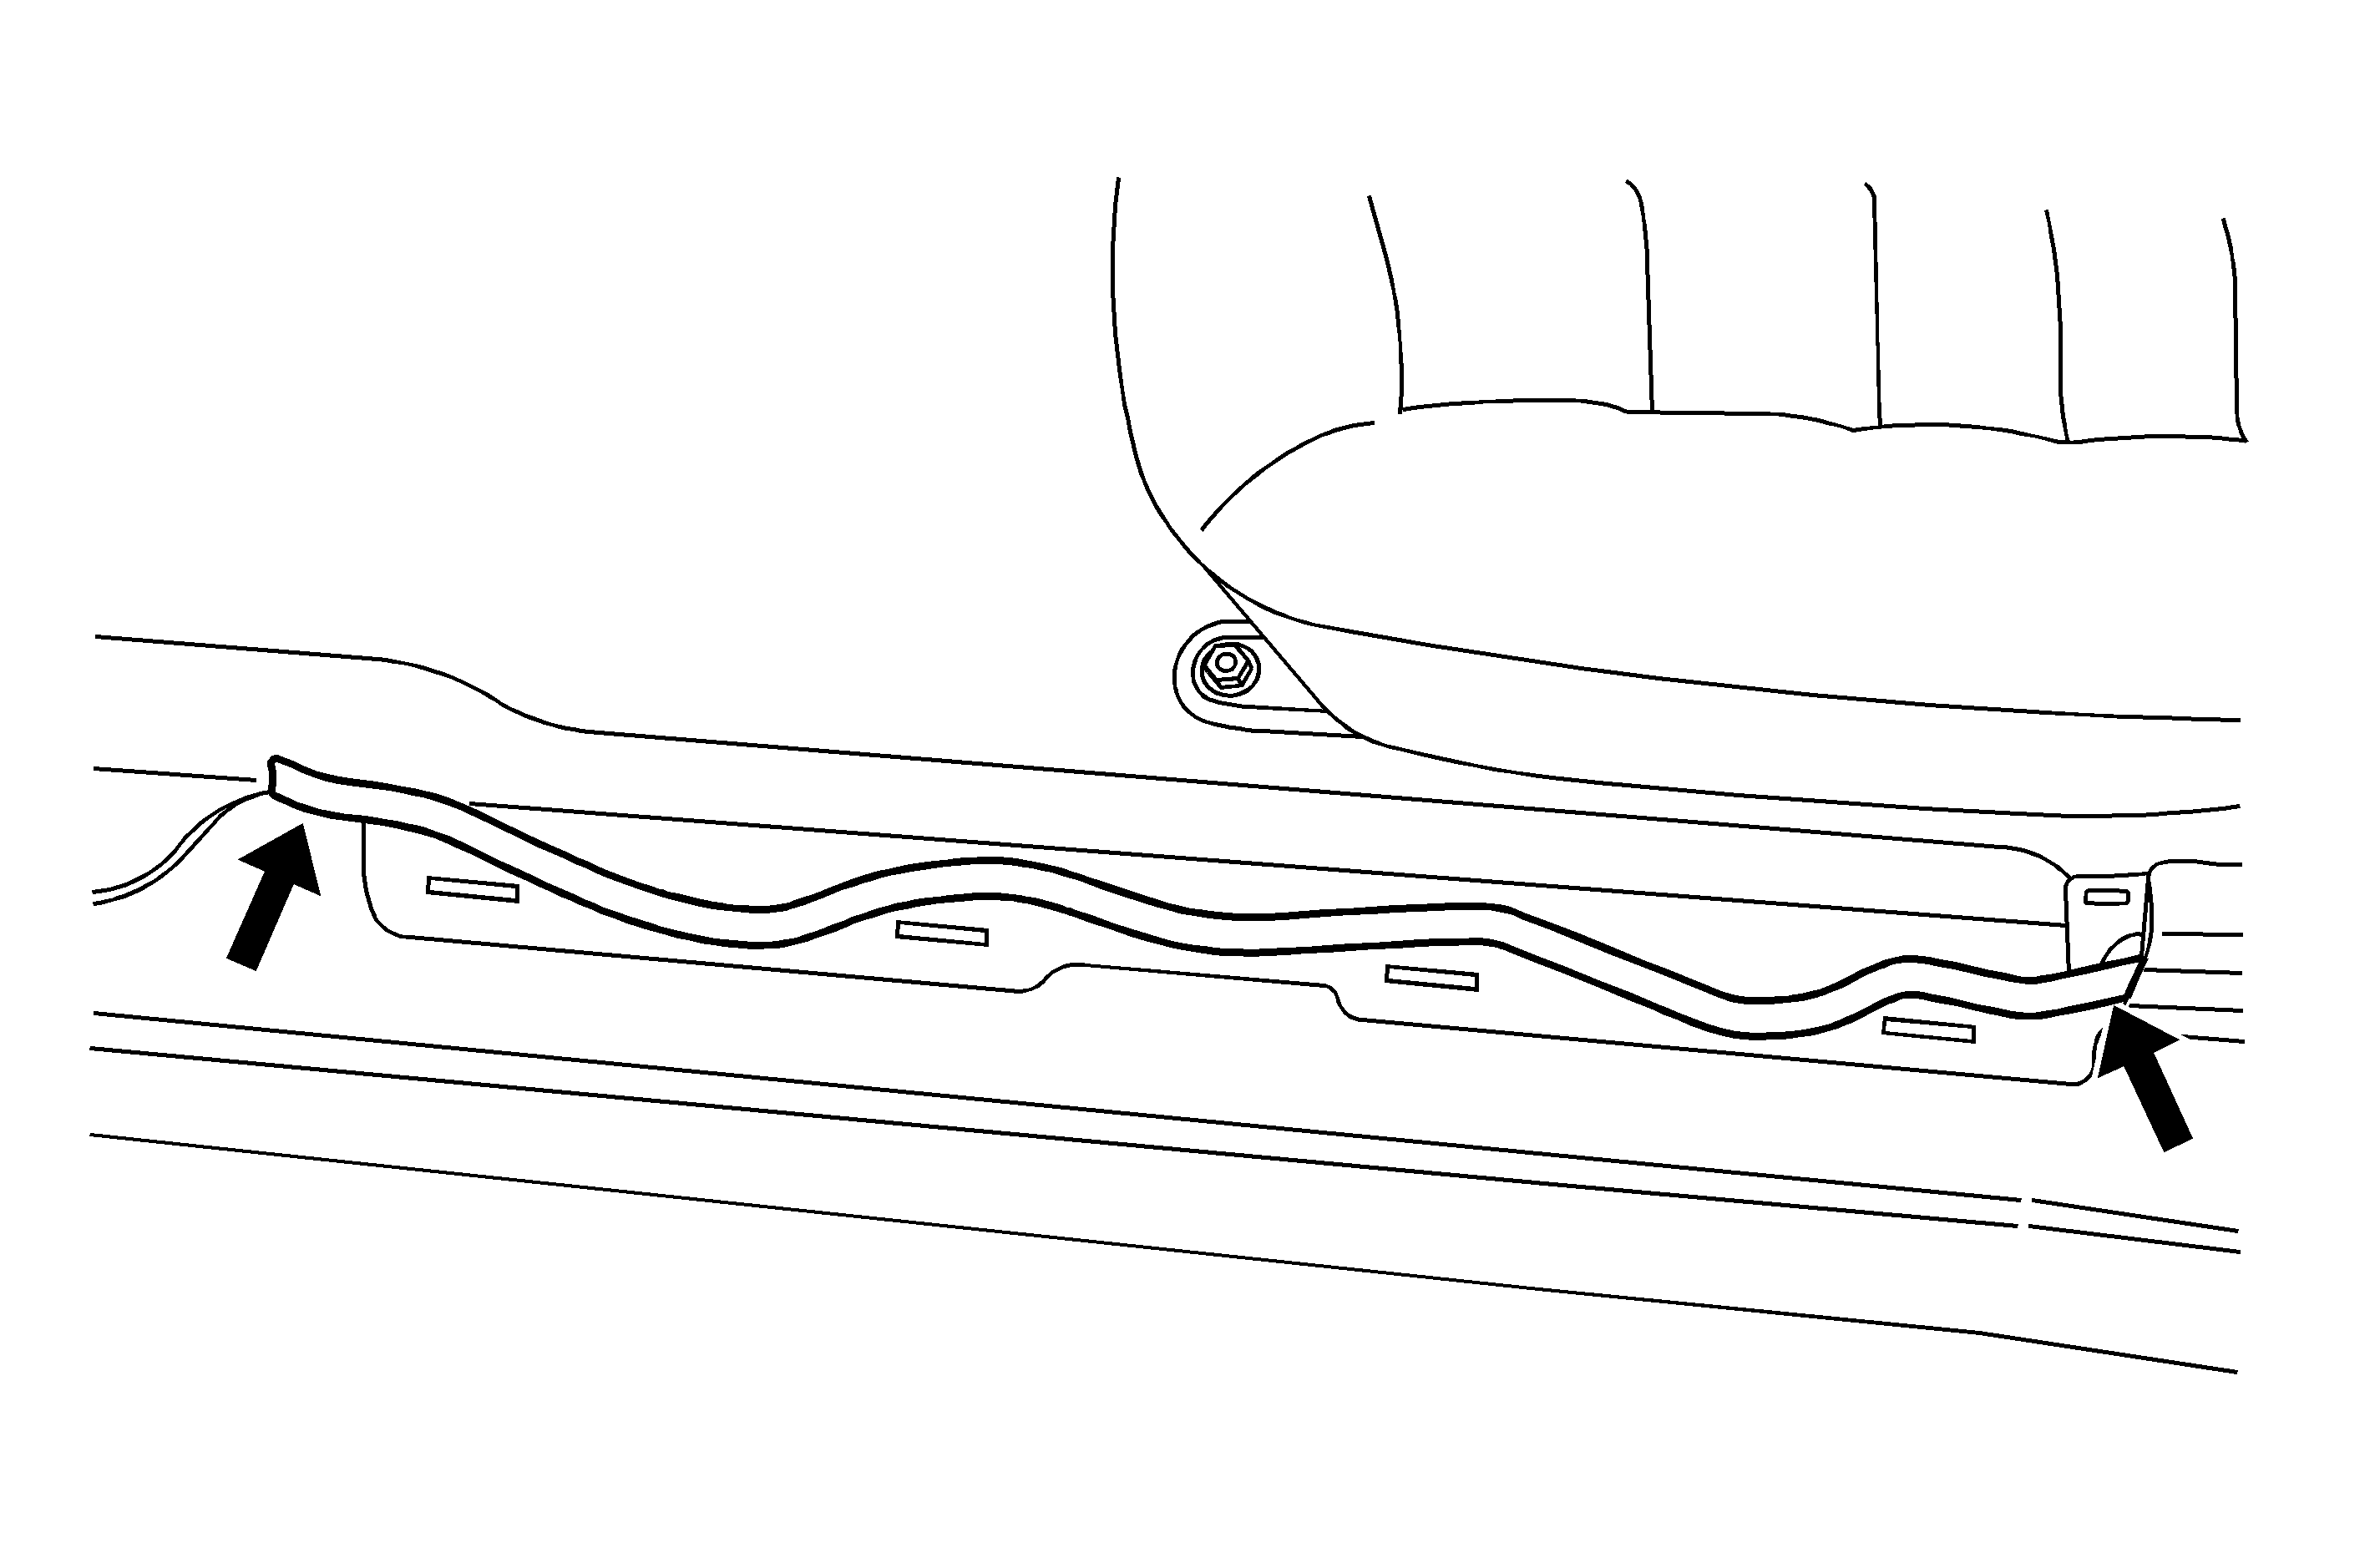
2006 Solstice Only: Apply a piece of foam from the front inboard urethane inboard of the sill plate retaining holes all the way to the "B" pillar. Remove the foam gaskets from the sill plate clips.
Condition #4
The carpet may be wet by the bottom of the "A" pillar.
Cause
The under hood wire harness on the left hand side just forward of the "A" pillar may not be routed properly causing water to enter the wire harness and flow inside the vehicle.
Correction
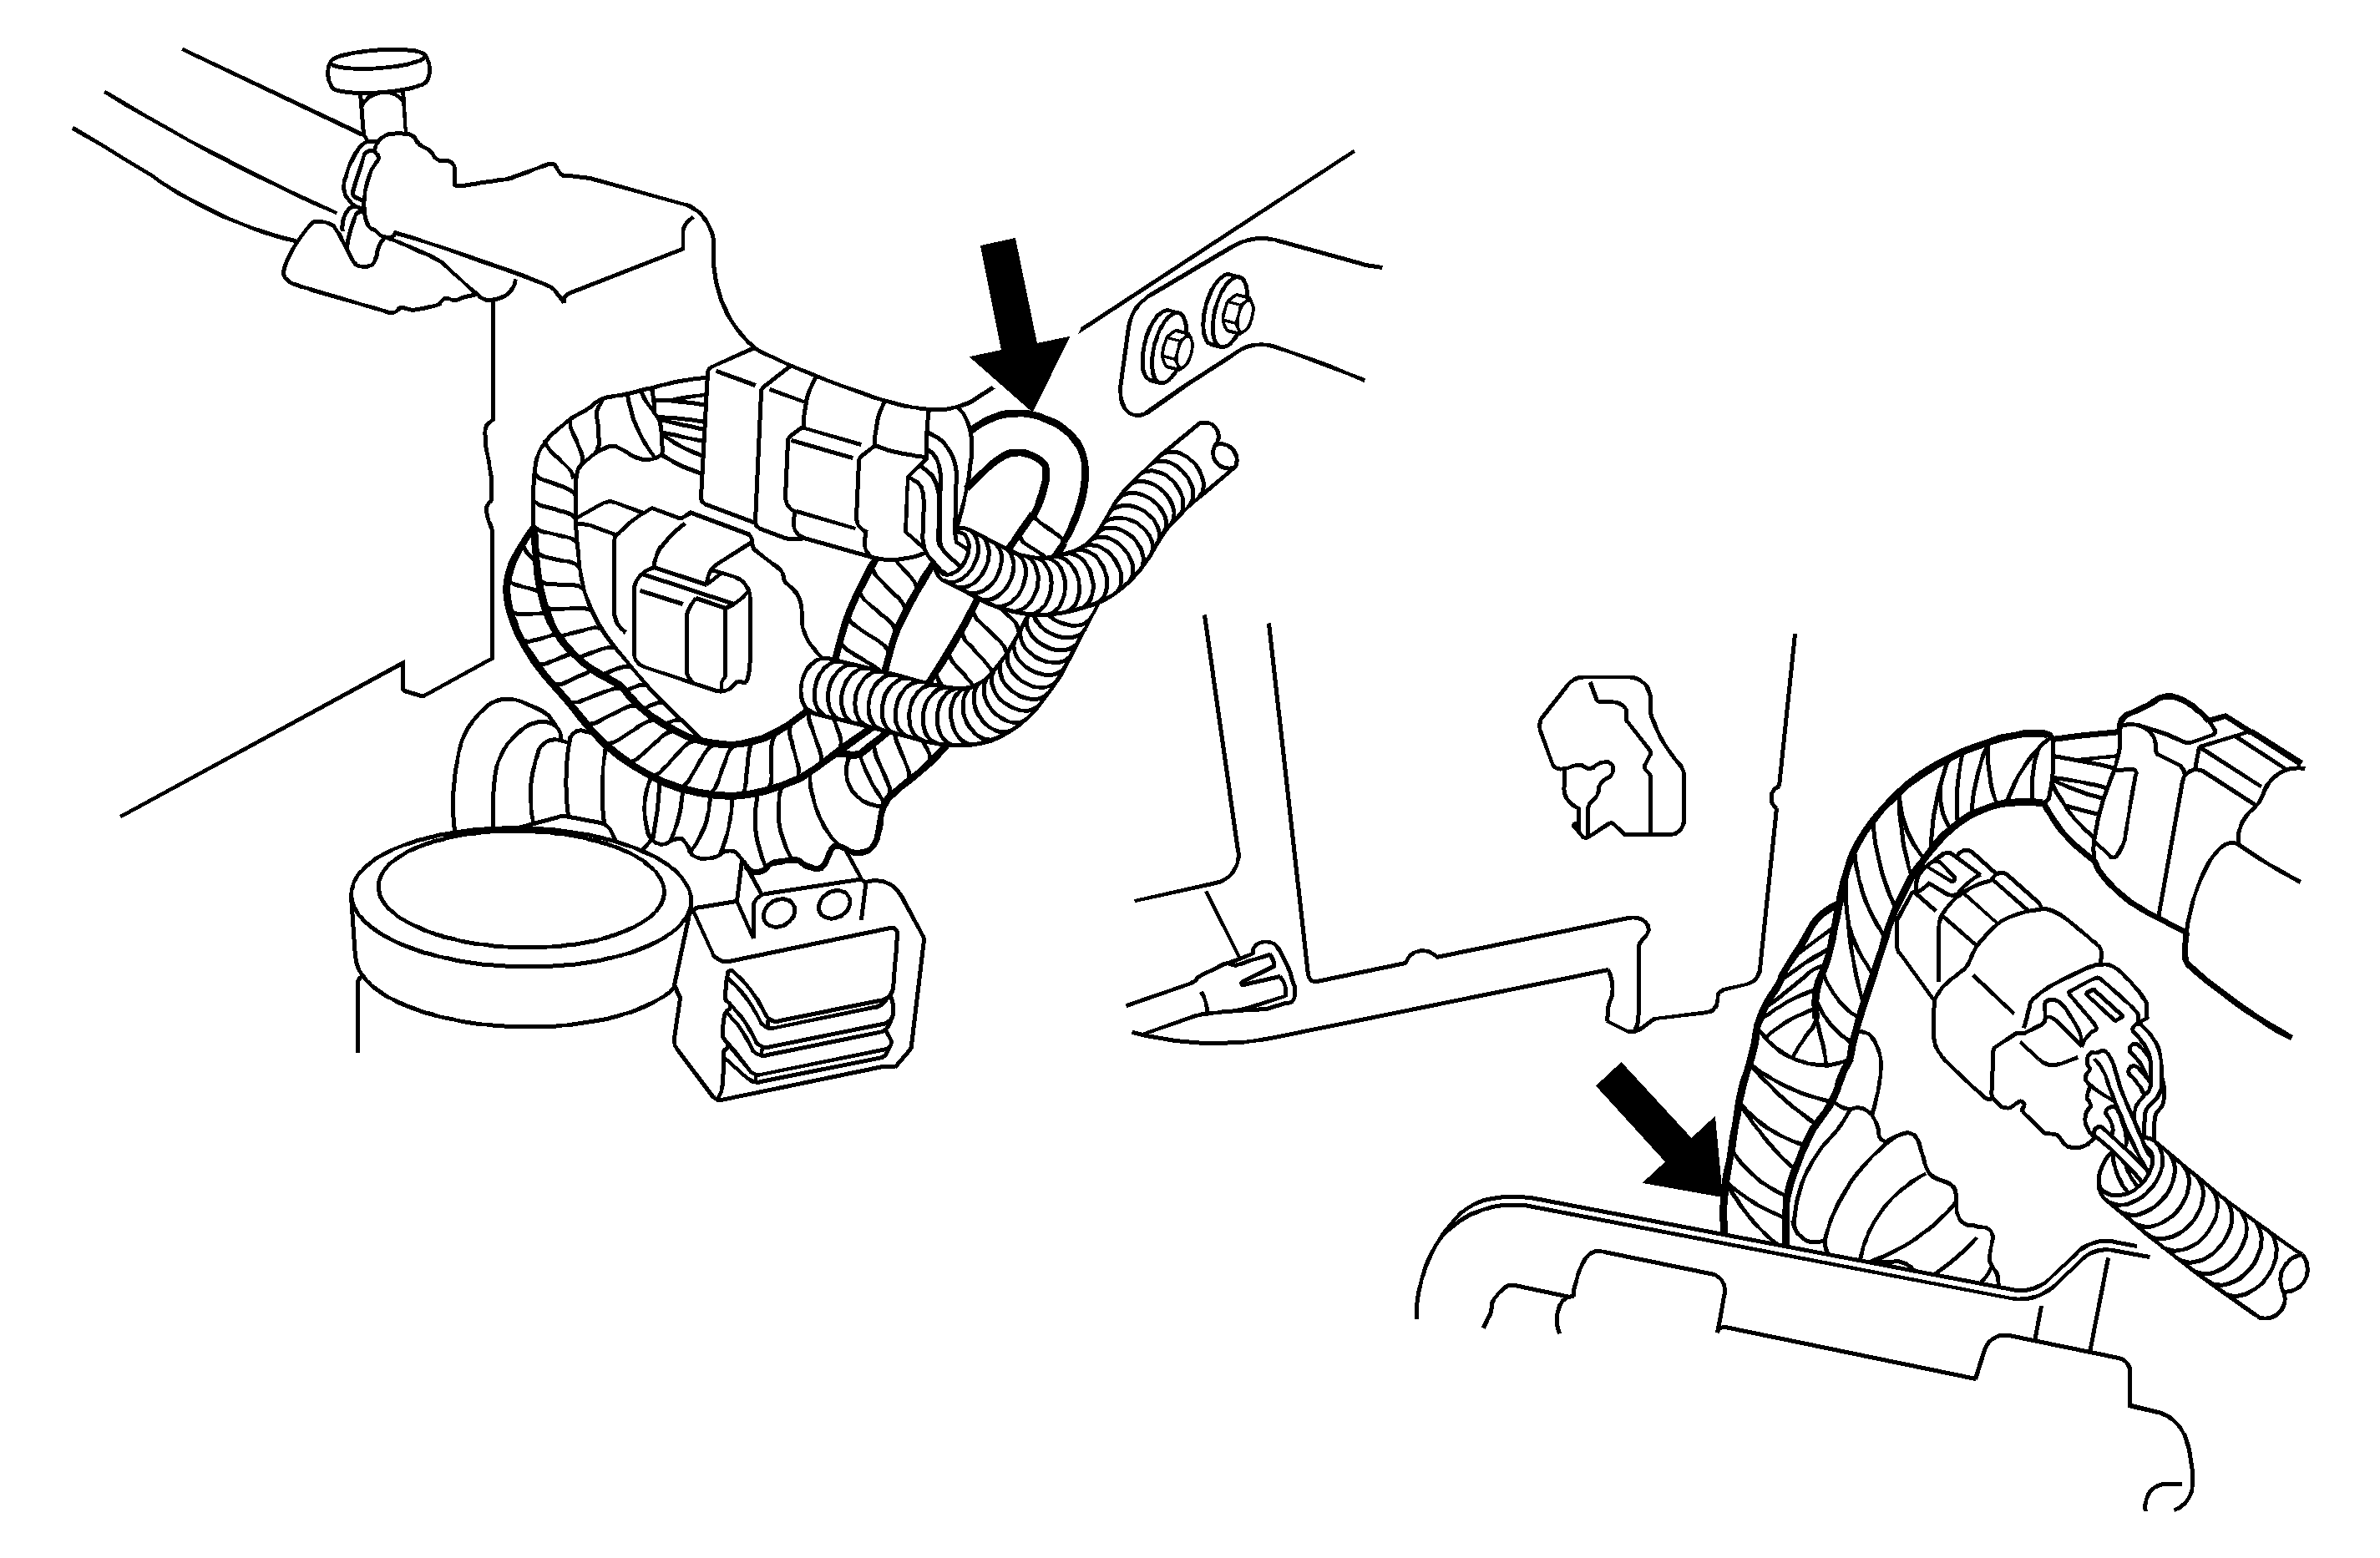
The upper picture shows the drip loop pointing upward. The correct position should be pointing downward as show in the bottom picture of the illustration above. Also, ensure that the grommet is fully seated.
Condition #5
The customer may comment of water running down the "A" pillar and dripping into the car.
Cause
The two-way tape or butyl on the backside of the weatherstrip may not be sealing to the "A" pillar.
Correction
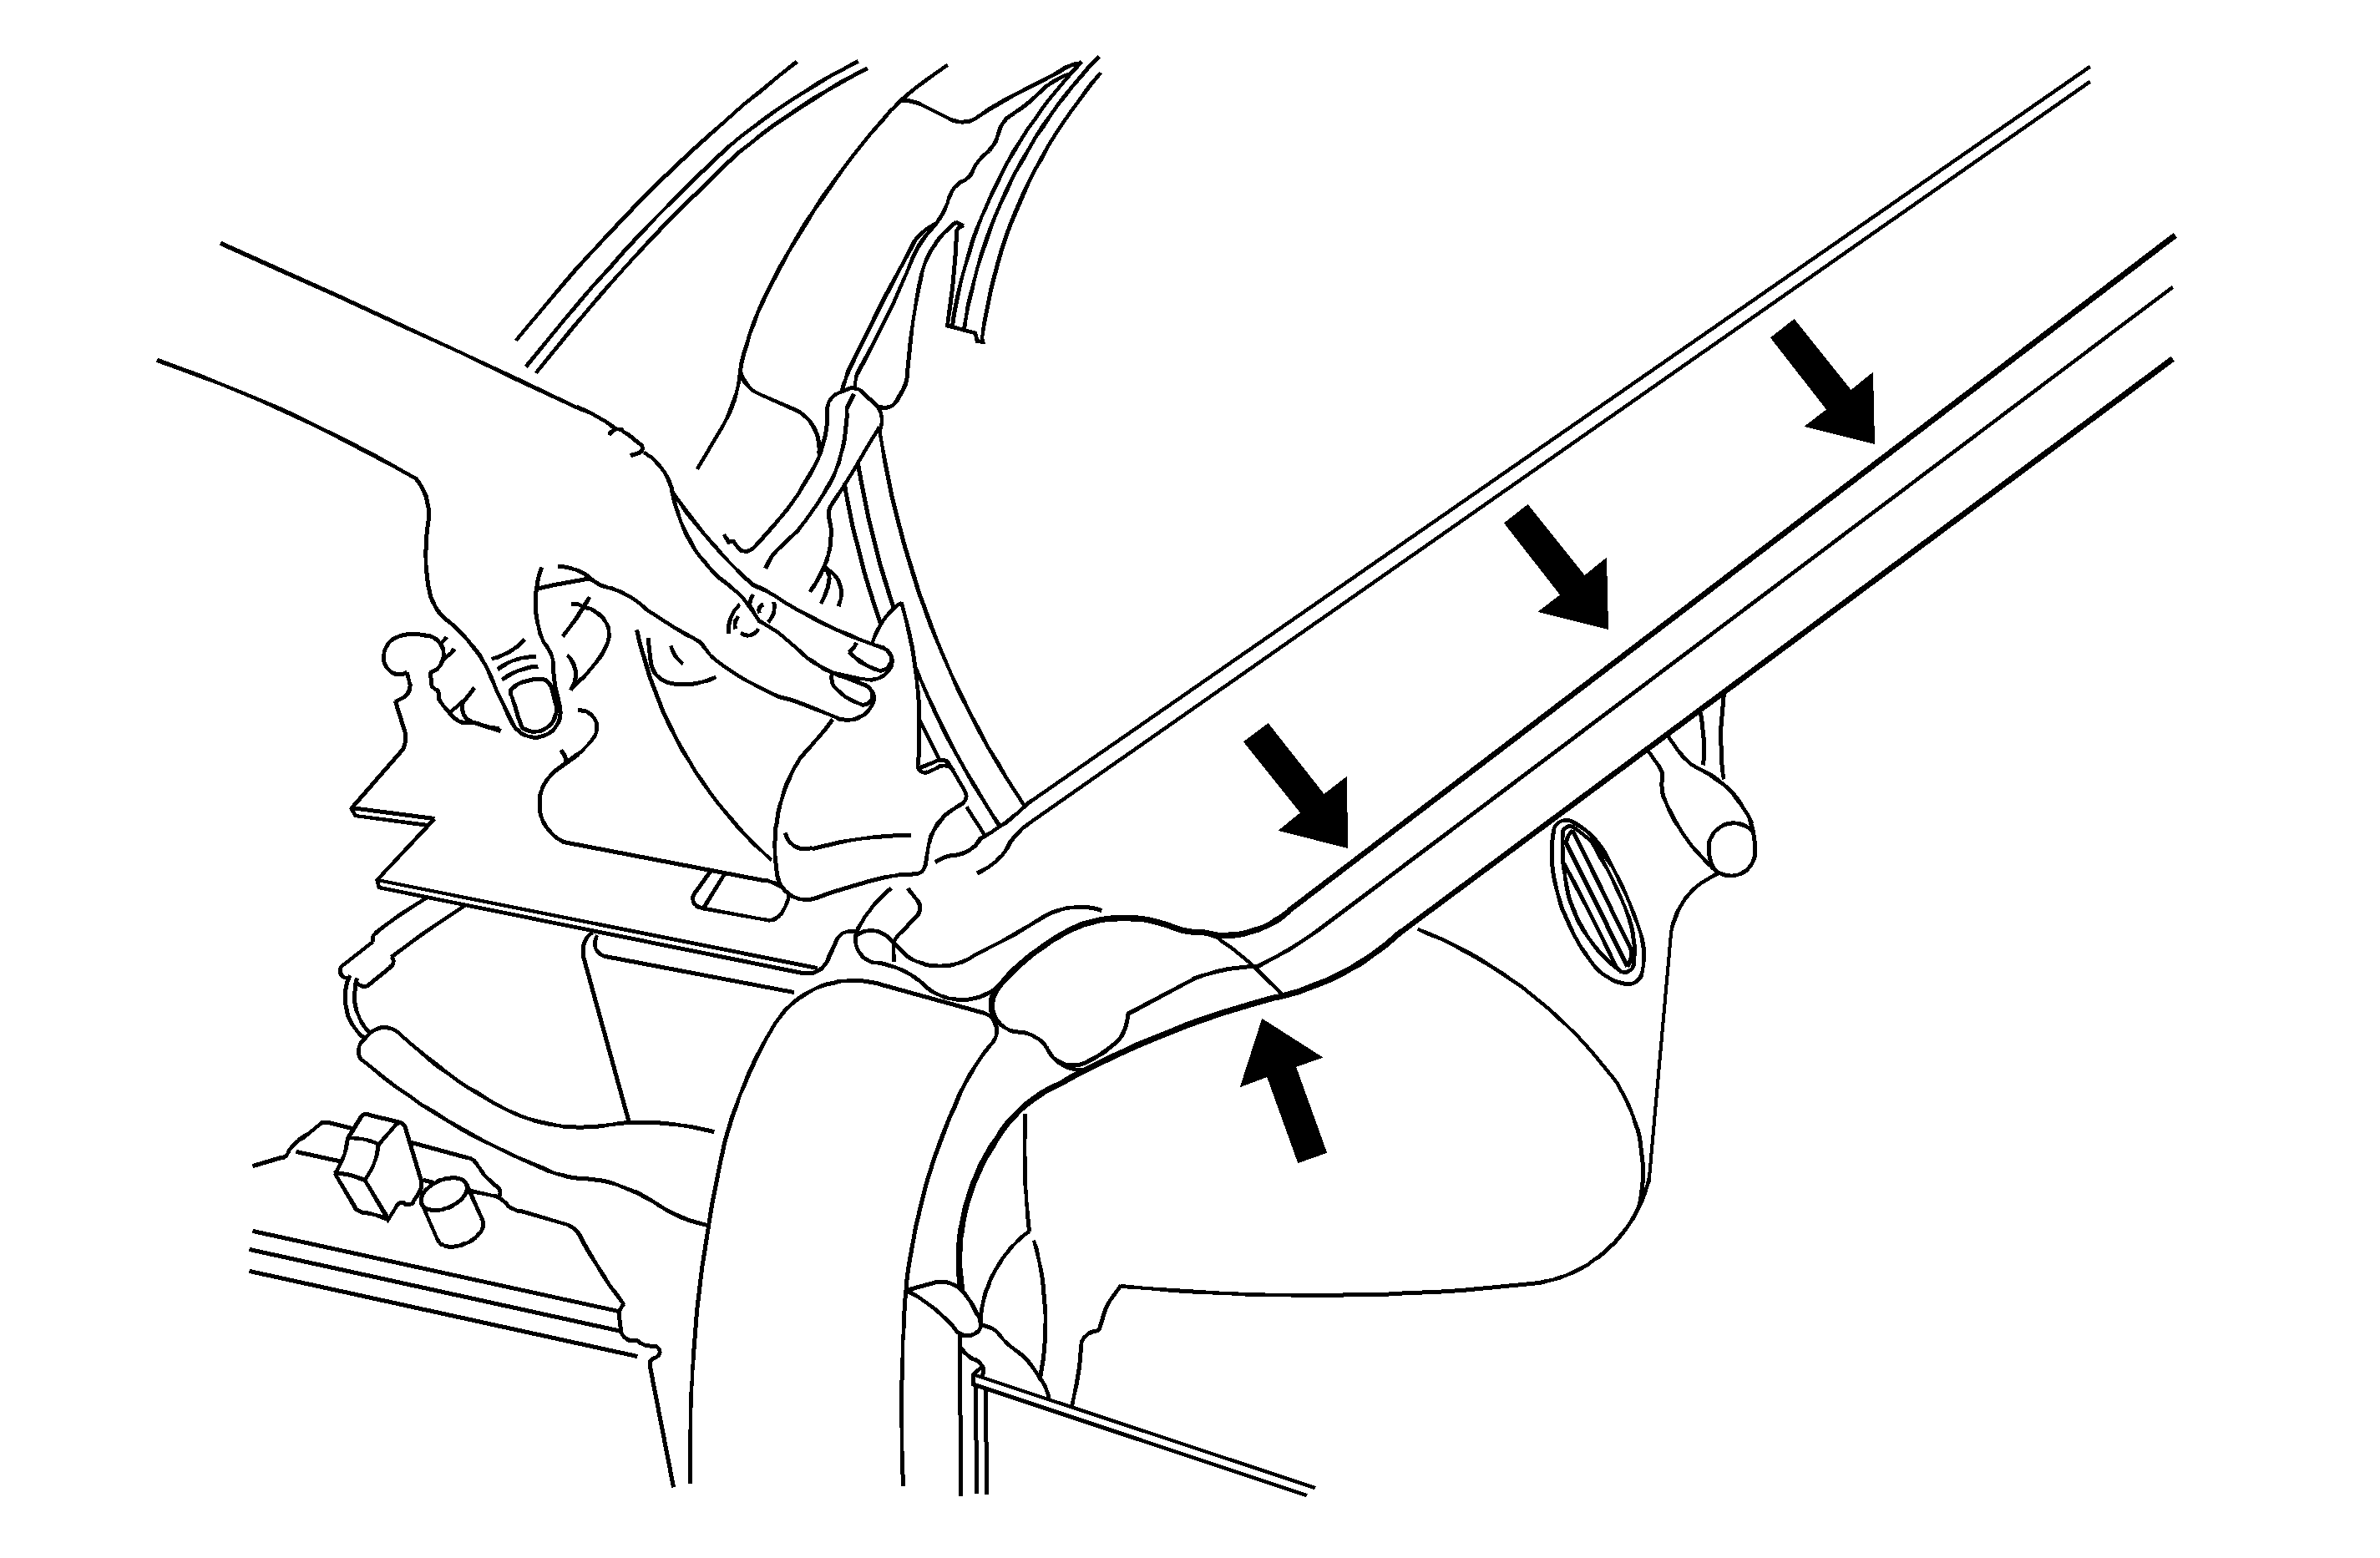
Clean the backside of the weatherstrip and seal the upper portion (upper three arrows) with GM weatherstrip adhesive. The bottom portion (bottom arrows) should be sealed with thin strips of butyl
Convertible Top Leaks
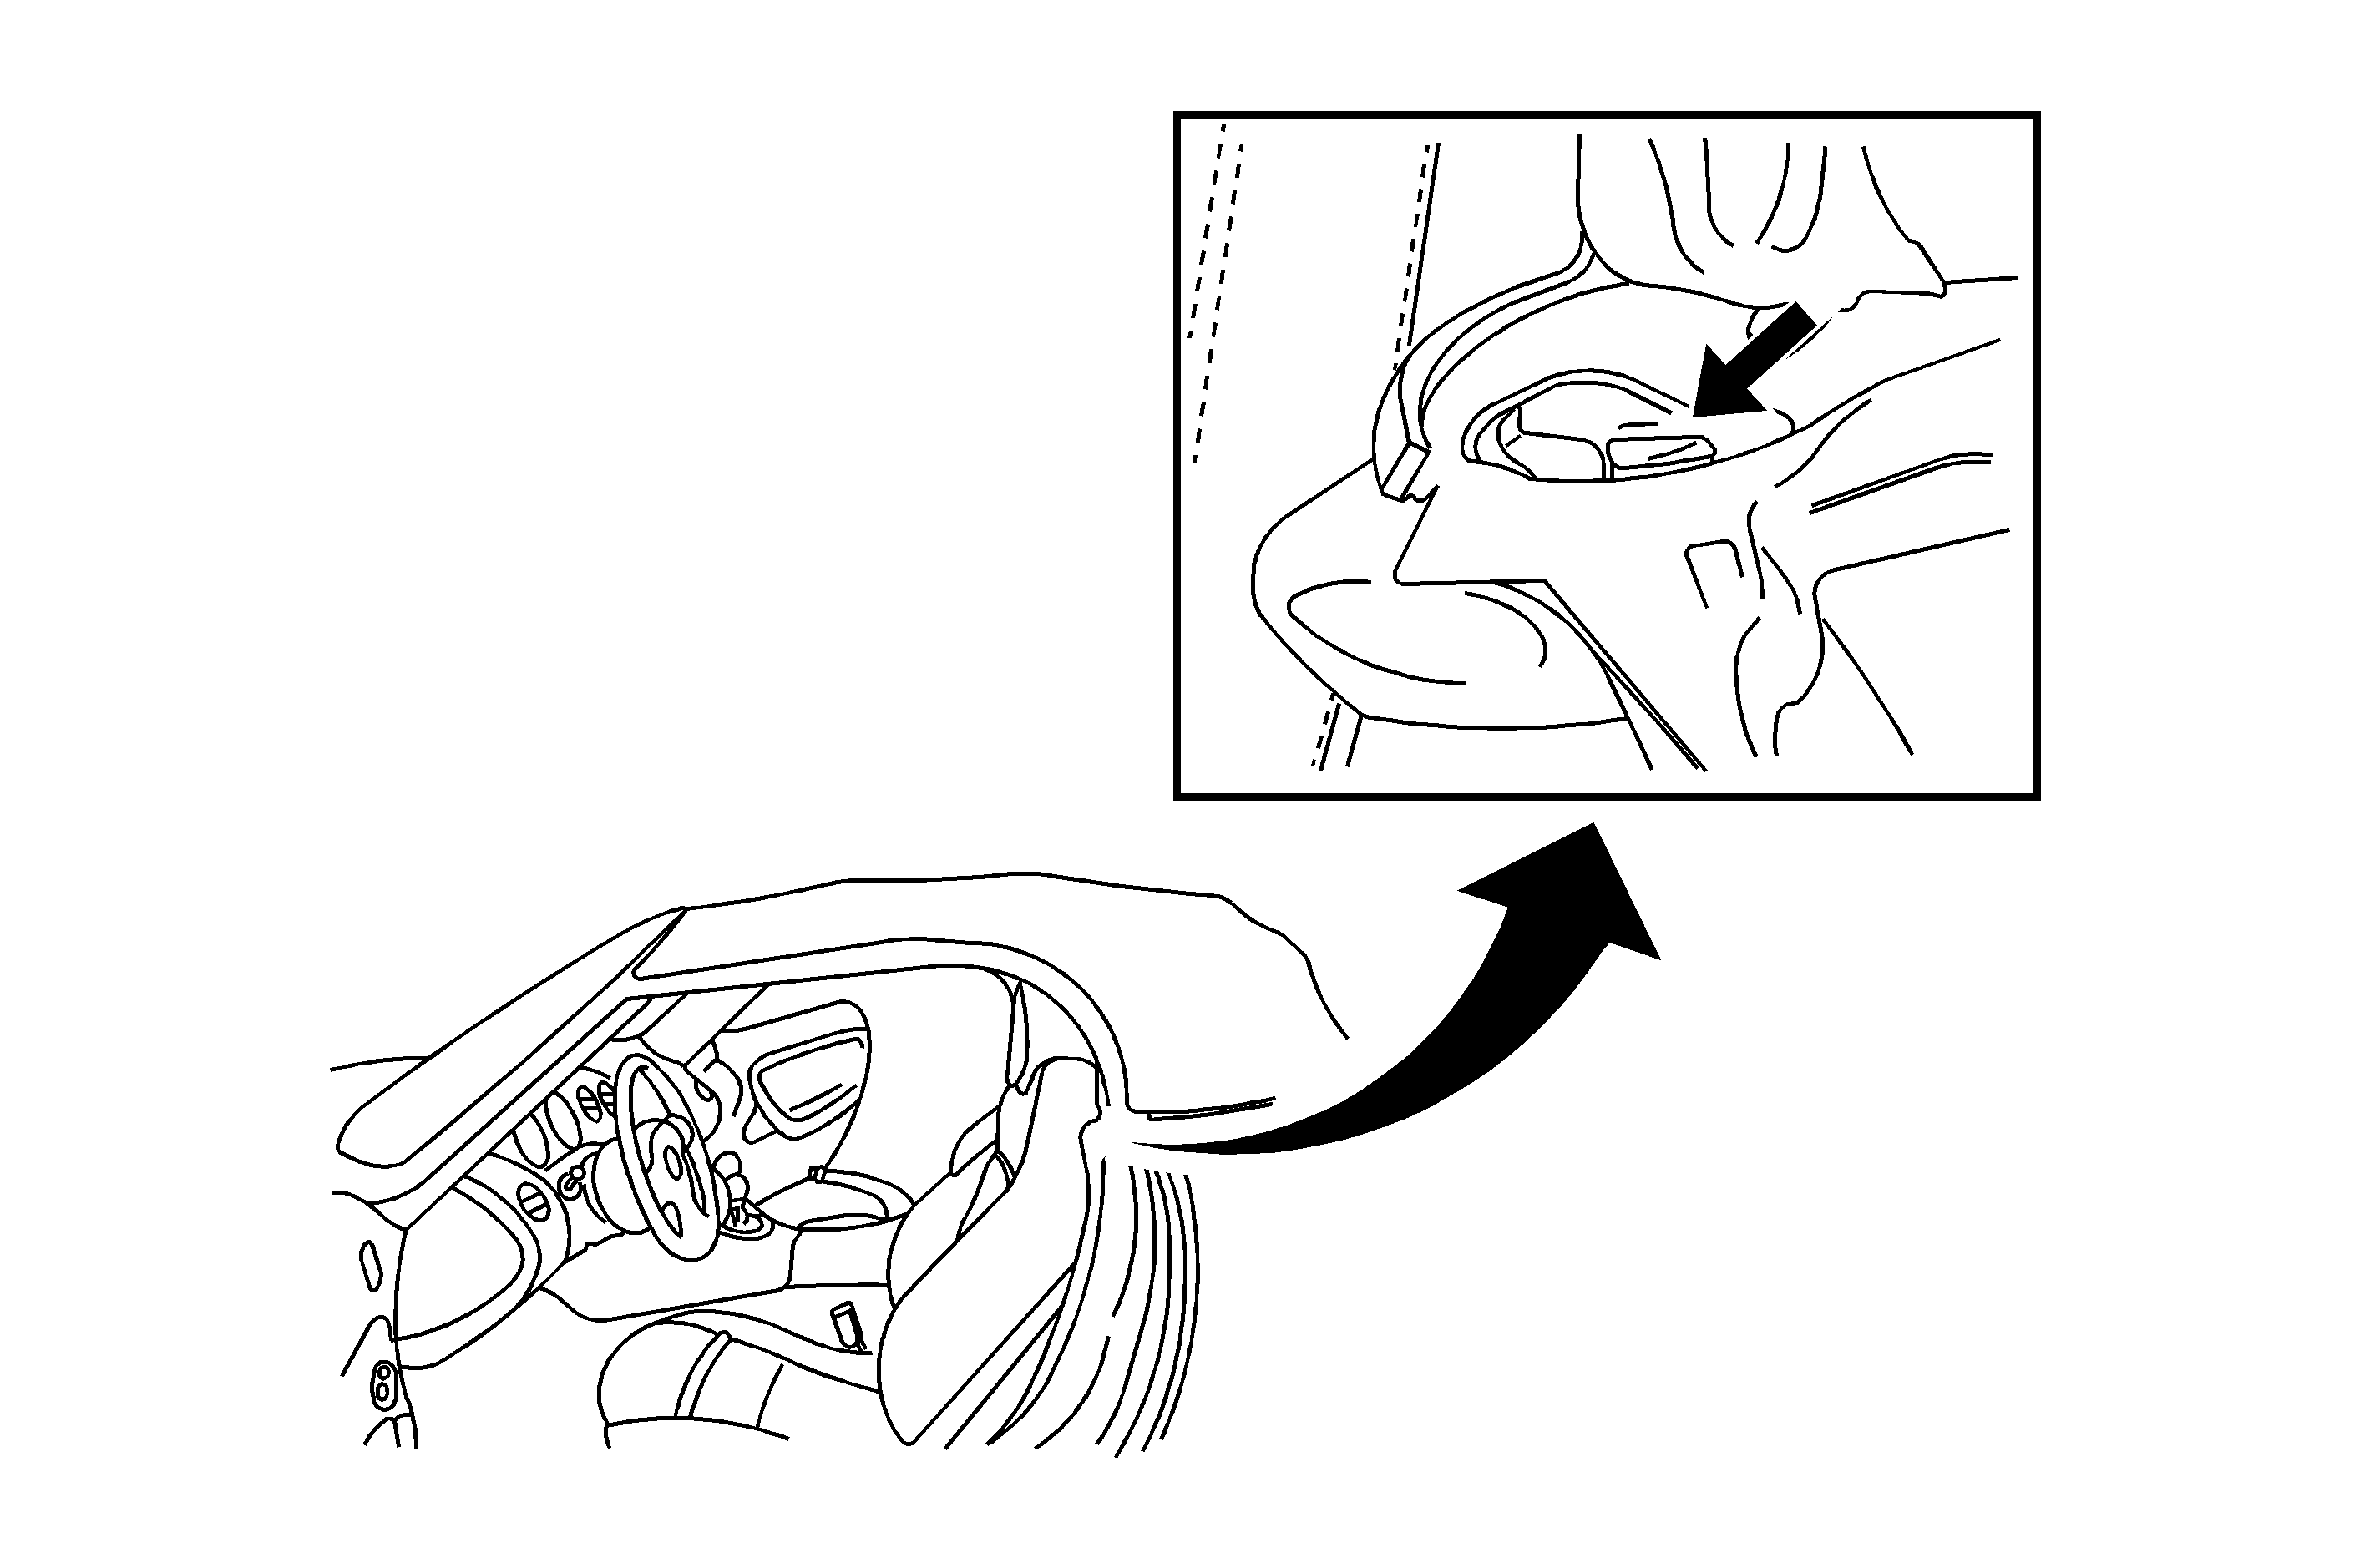
Prior to any repair or water testing of the convertible top:
- Make sure the convertible top "B" pillar pins are falling into their proper position. These pins control the line up of all the seals.
- Check if the door glass is coming in contact with the webbing of the convertible top in the upper rear corners. Refer to Corporate Bulletin Number 07-08-67-005
- Check to see if the convertible top front center latch is bent or difficult to latch. Refer to Corporate Bulletin Number 08-08-67-002.
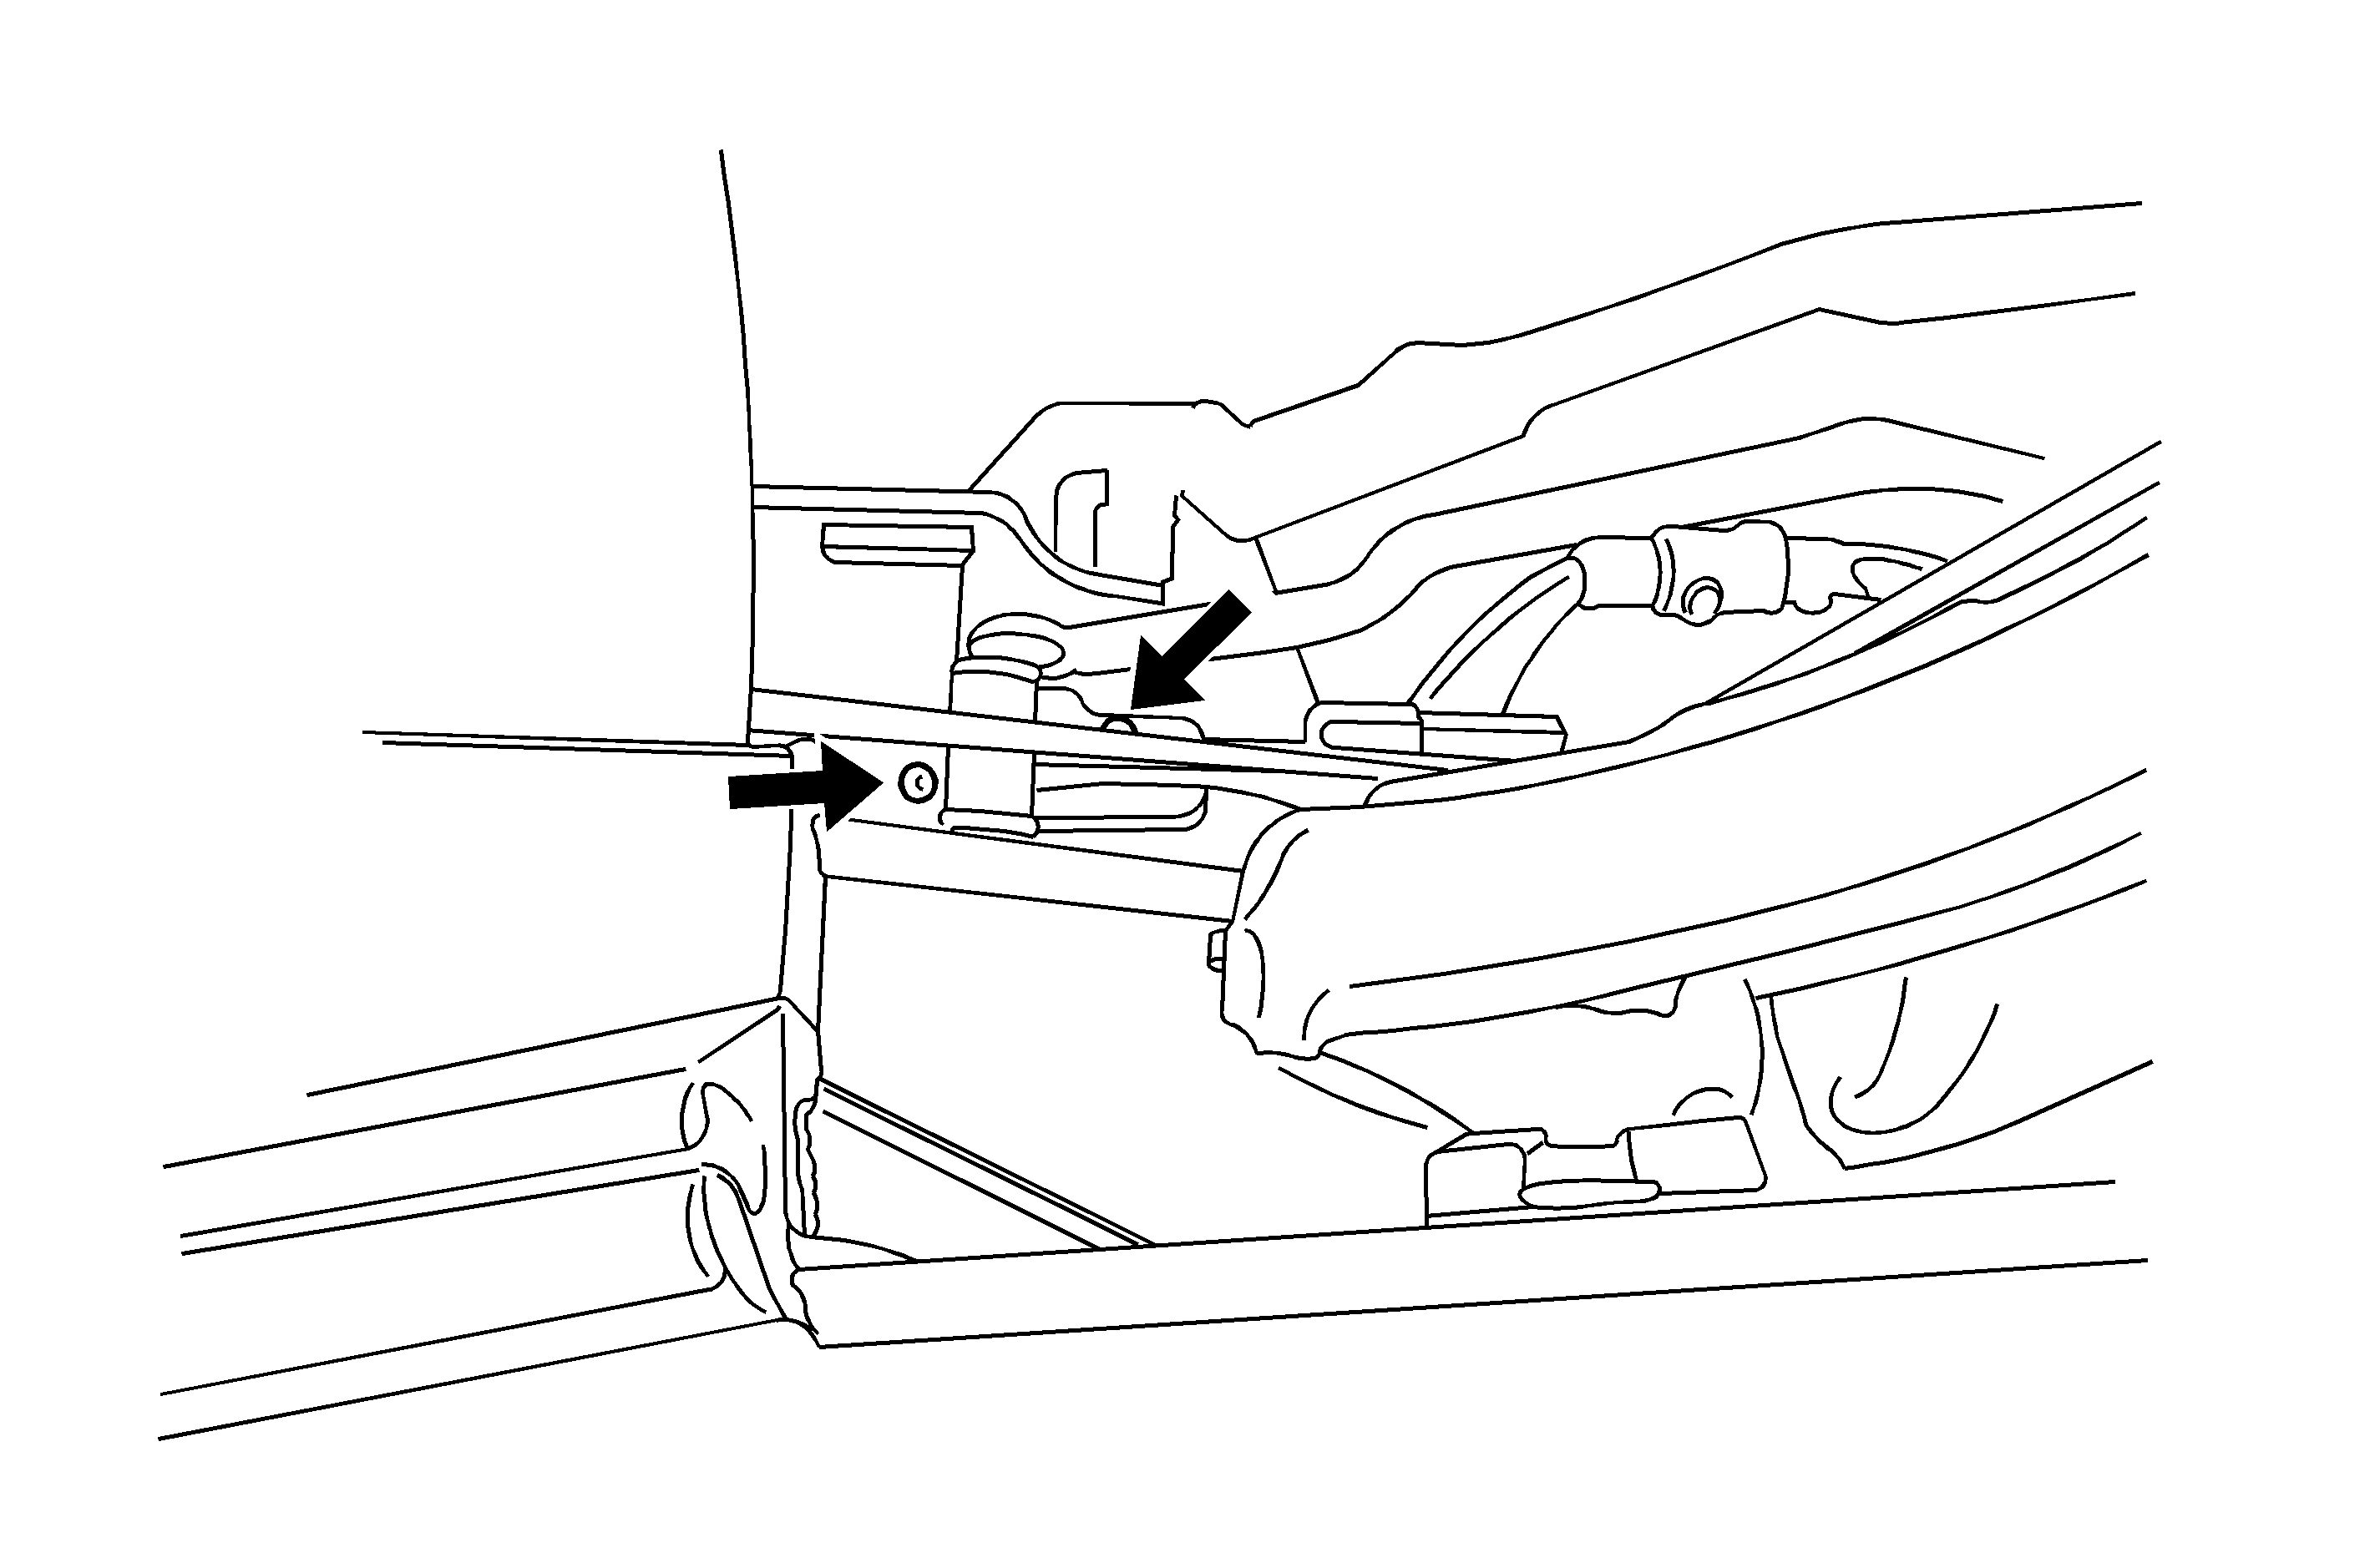
If the pins do not fit properly, loosen the convertible top attaching bolts to the body and locator pin. Latch and secure the top and then tighten the attaching bolts and locator pin.
Work the top back and forth and retest.
Condition #6
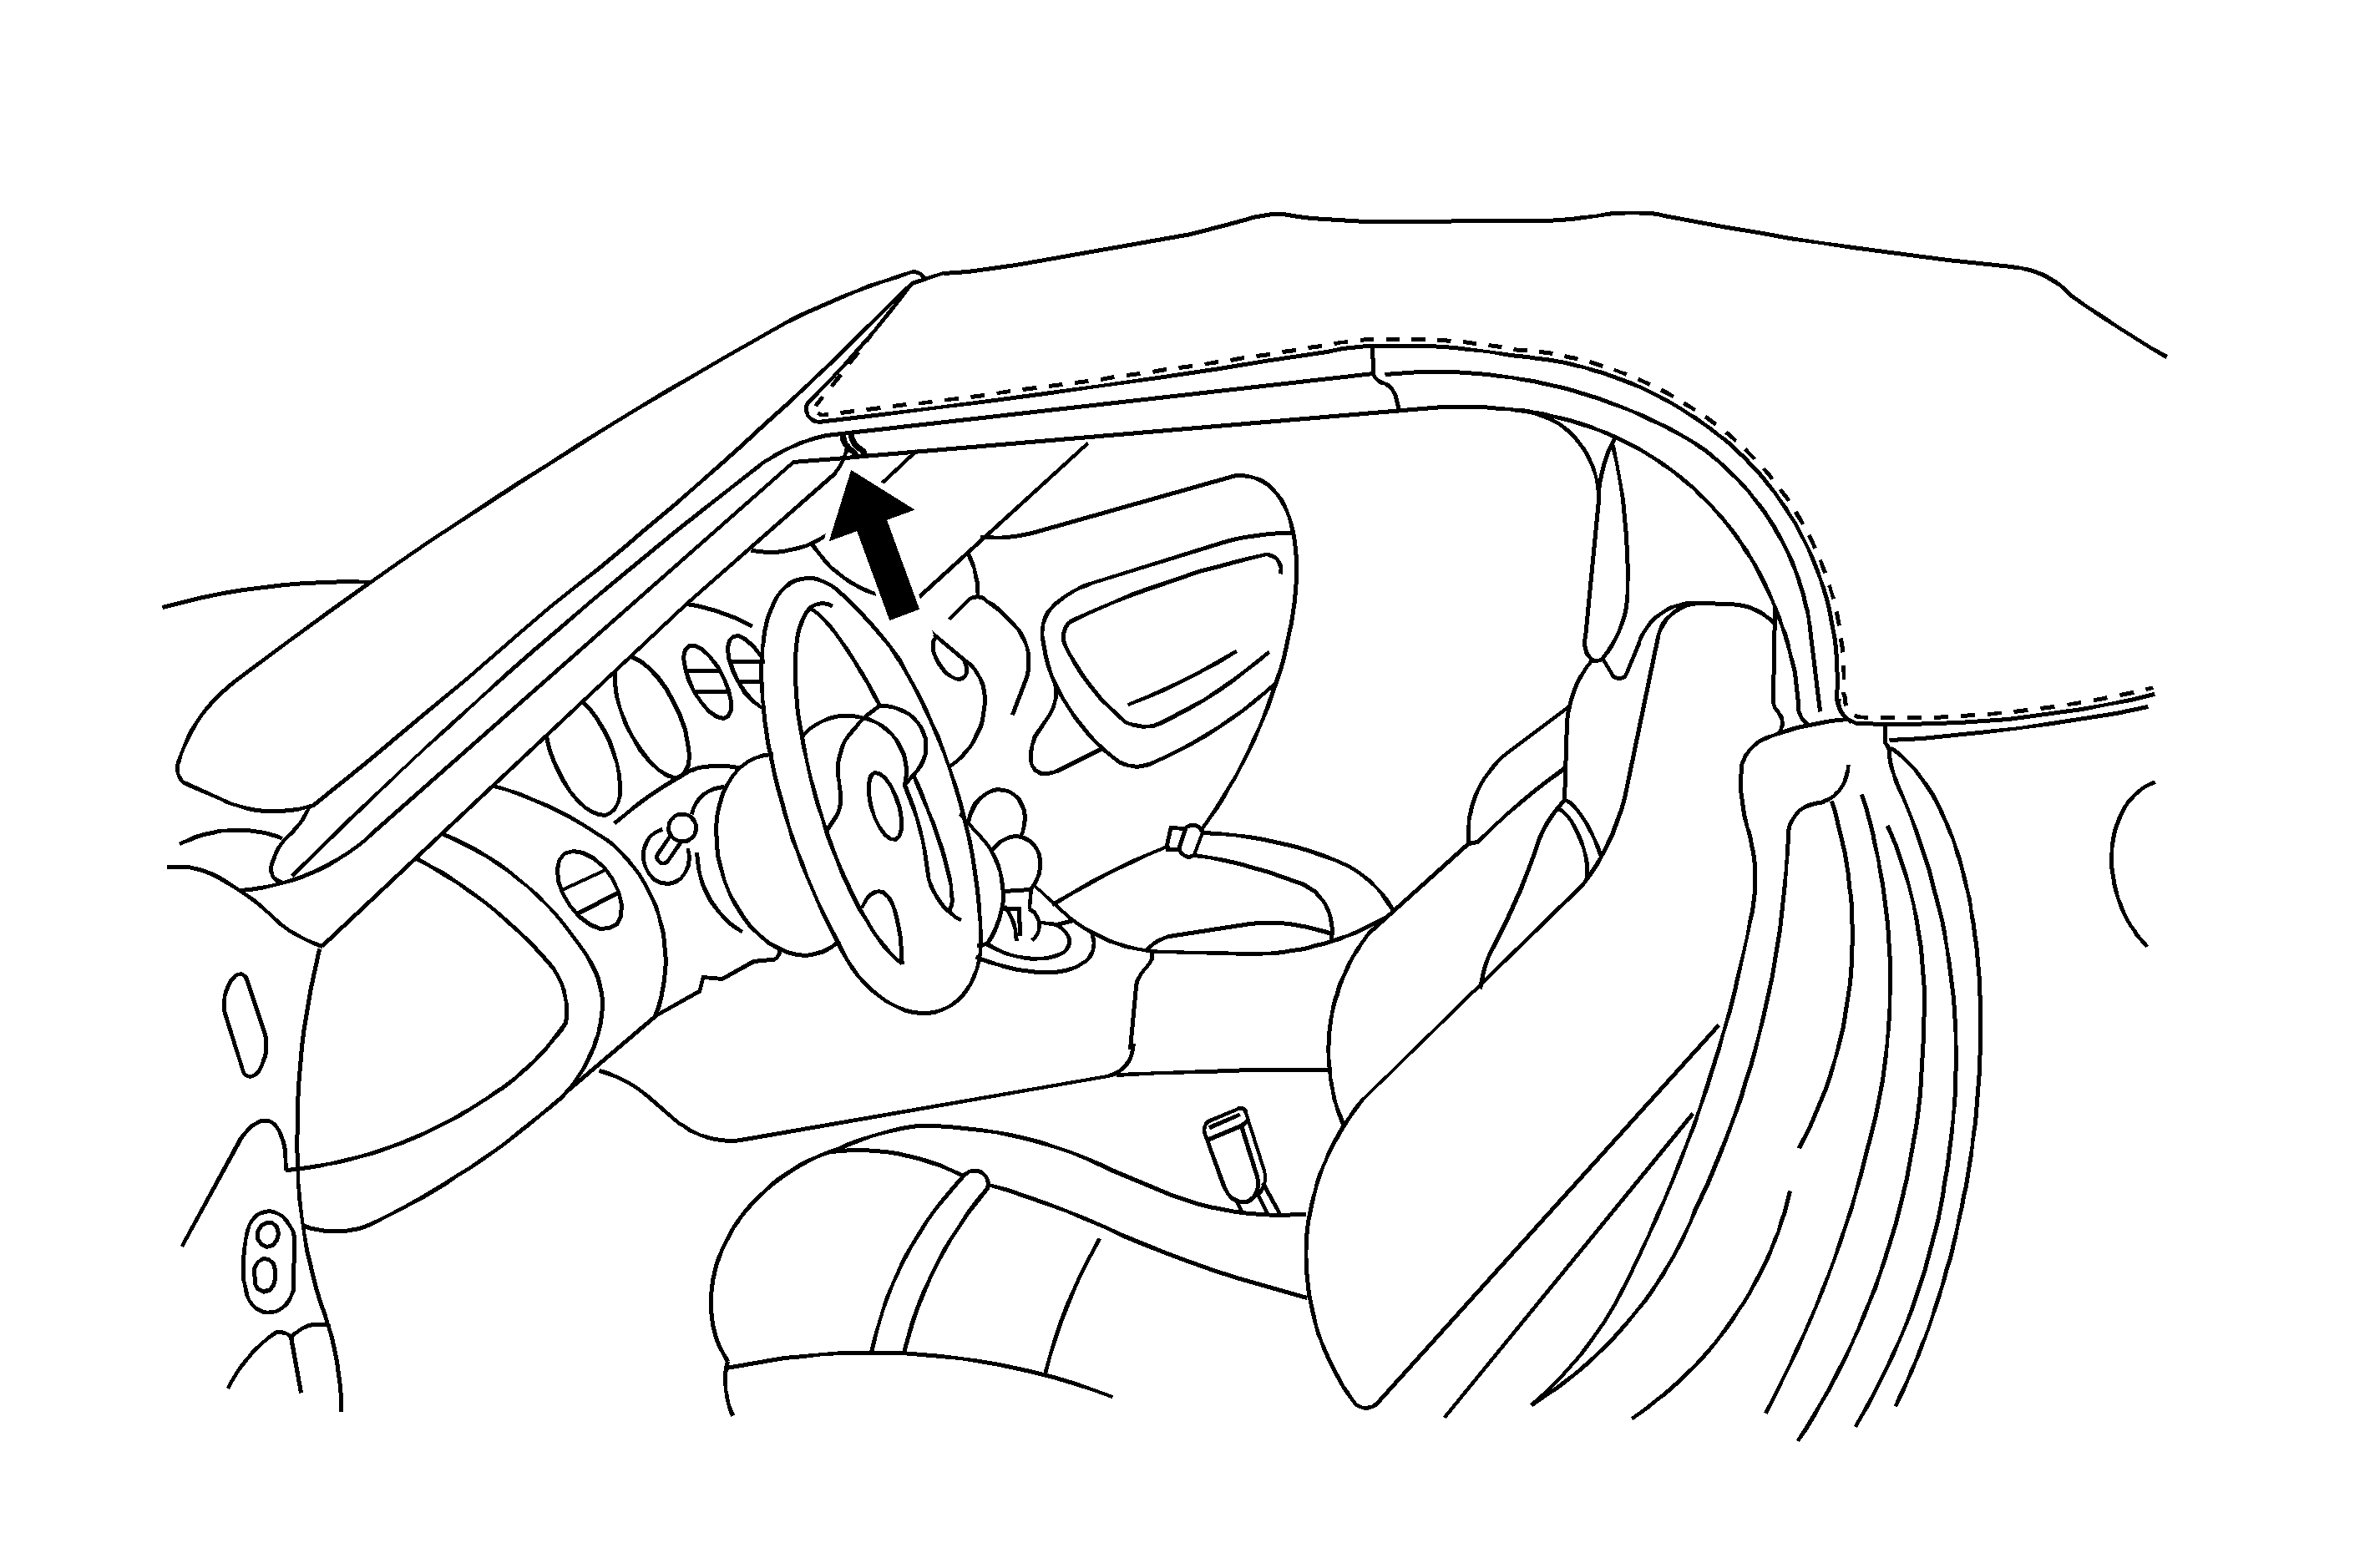
The customer may comment about a weep from joint #1 (water runs down the inside of the glass) or a leak from the #1 joint
Cause #A
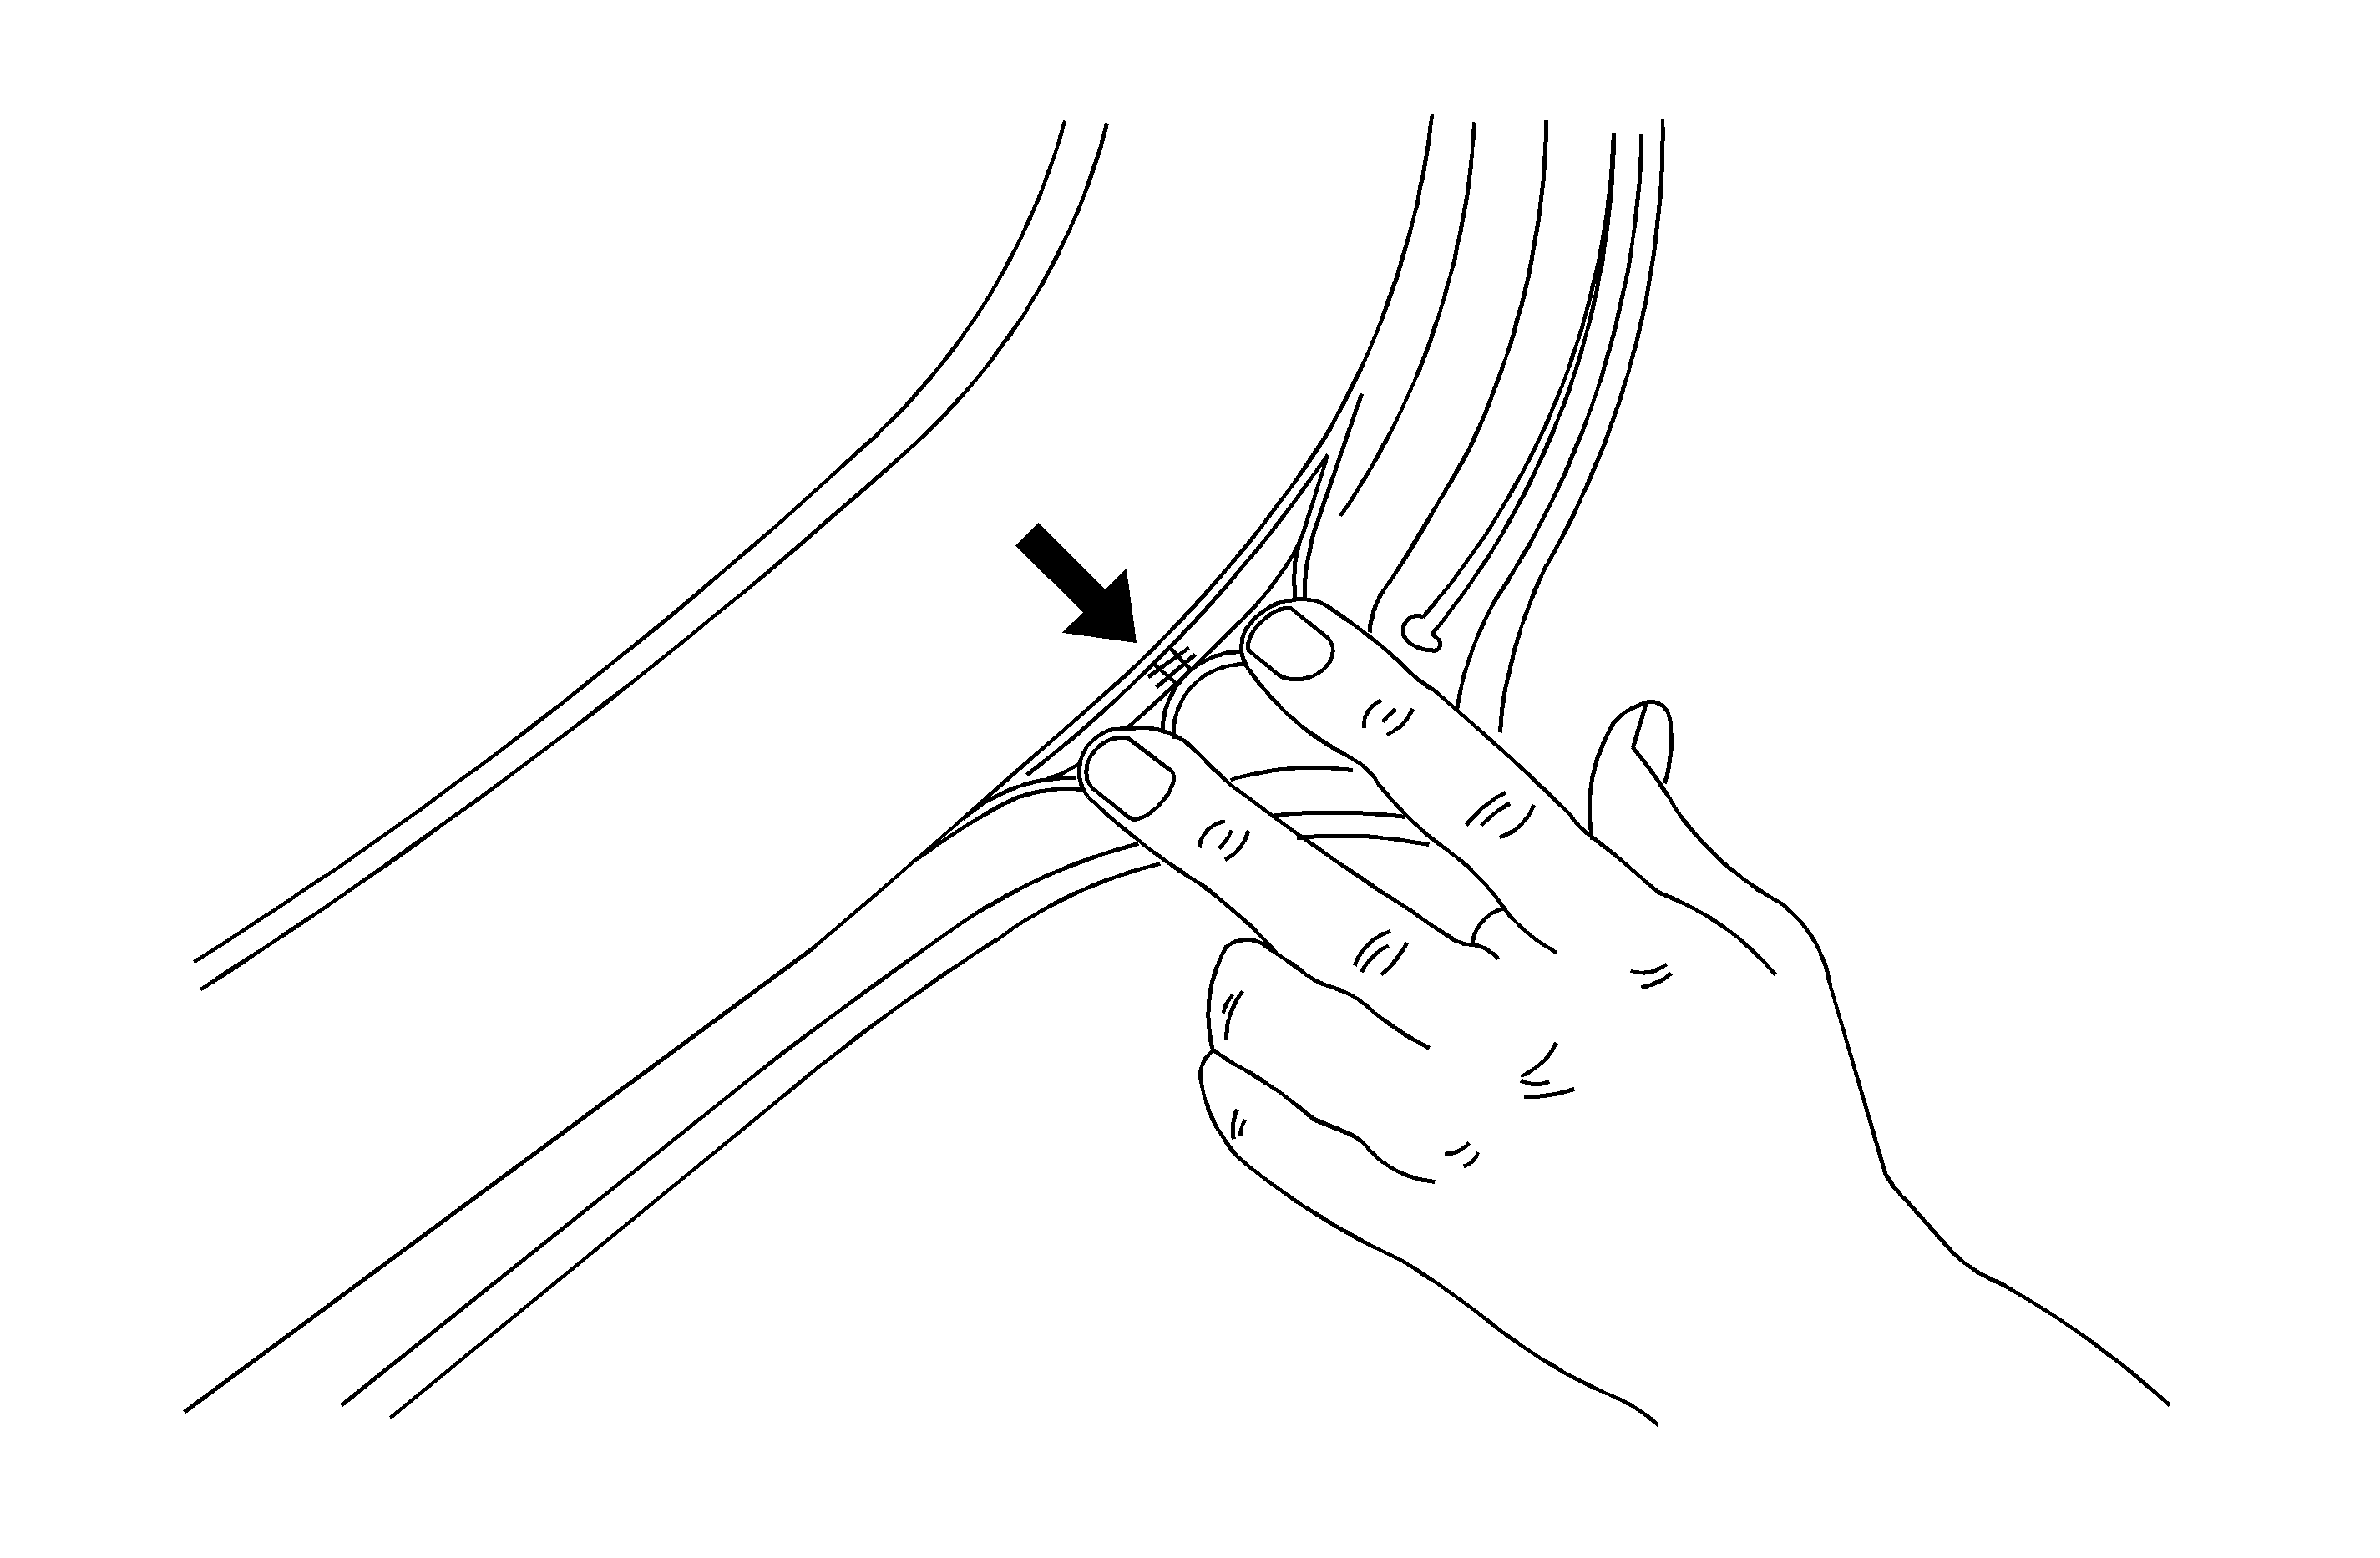
Make sure the push pin retainer is straight in the top corner of the "A" pillar of the windshield. If the pin is on a slight angle, the weatherstrip will not align properly with the top weatherstrip.
Adjust the weatherstrip up or down so that the pin is straight in the "A" pillar
Important: A weep at the #1 or #2 joint may be corrected by cleaning the glass then apply a thin coat of Rain X or Aqupal on the top inside and top edge of the door glass. This will condition the weatherstrip
Cause #B
The door glass may not be high enough in the opening and not closing the gap in joint #1.
Correction #B
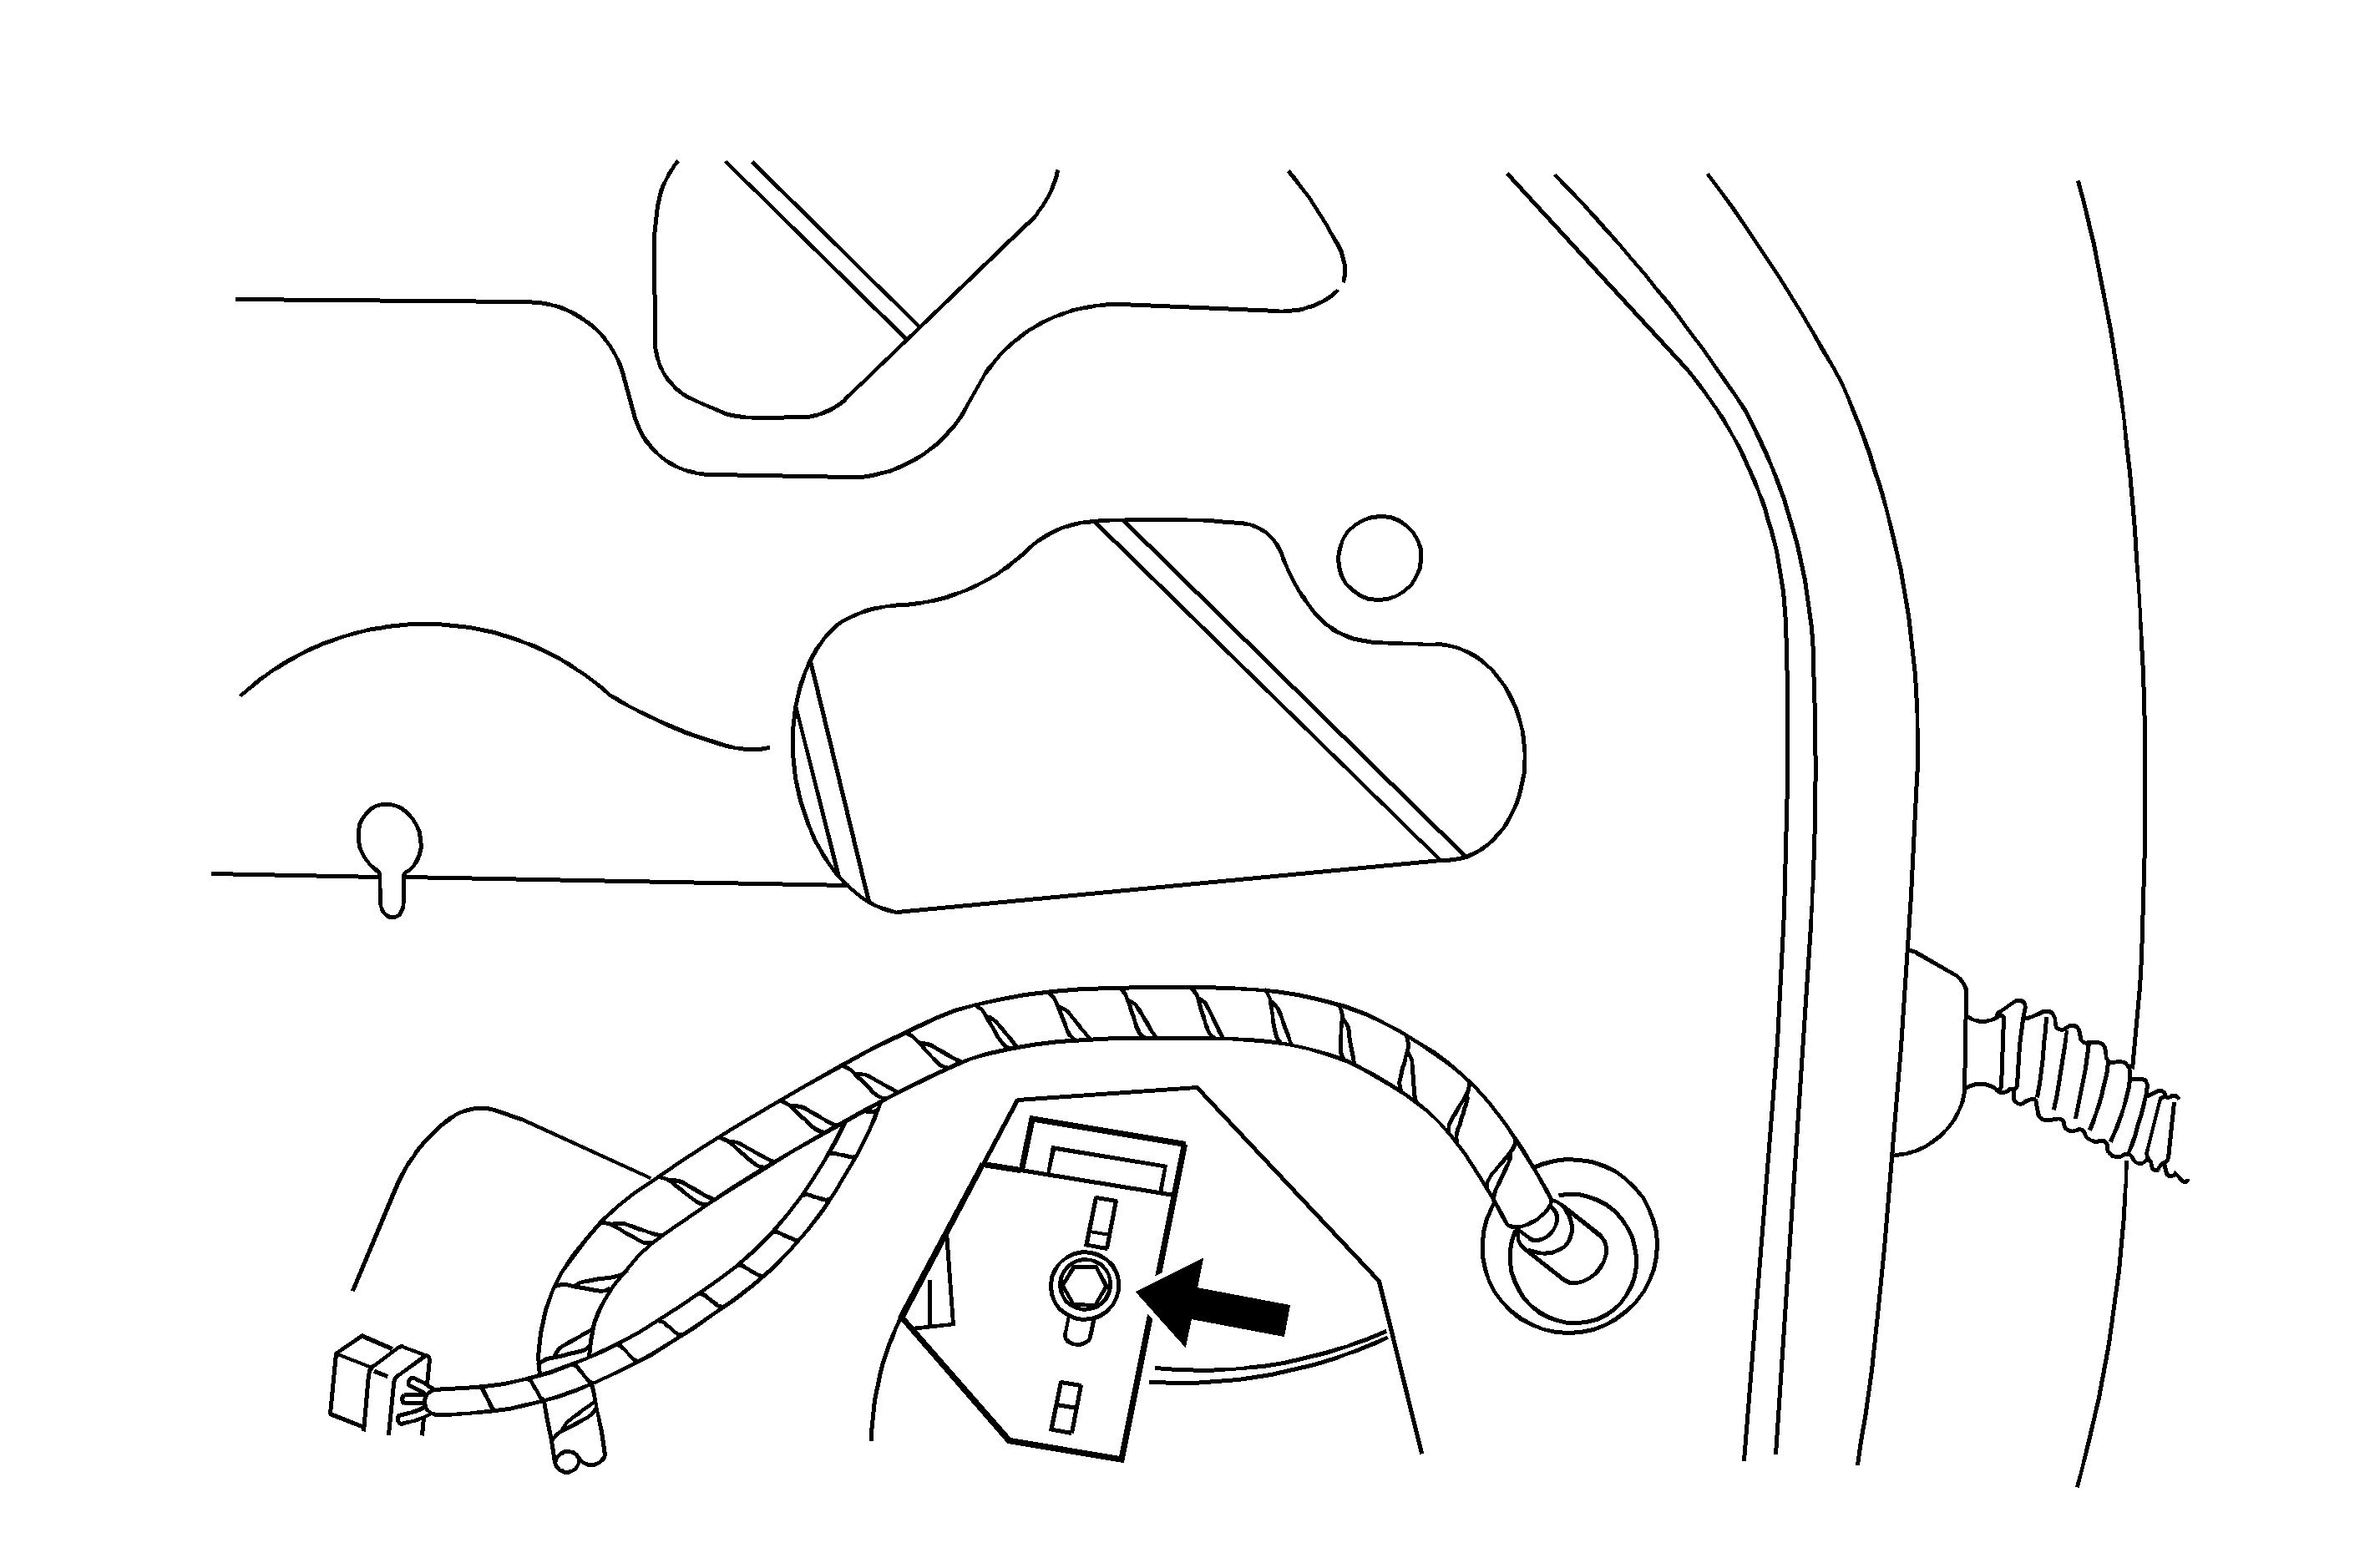
Mark the glass with a grease pencil and adjust the front of the glass 2 mm (3/16 in) upward or forward. Make sure that the stud stays in the top of the adjustment slot. This slot controls the tip in at the top of the glass.
Cause #C
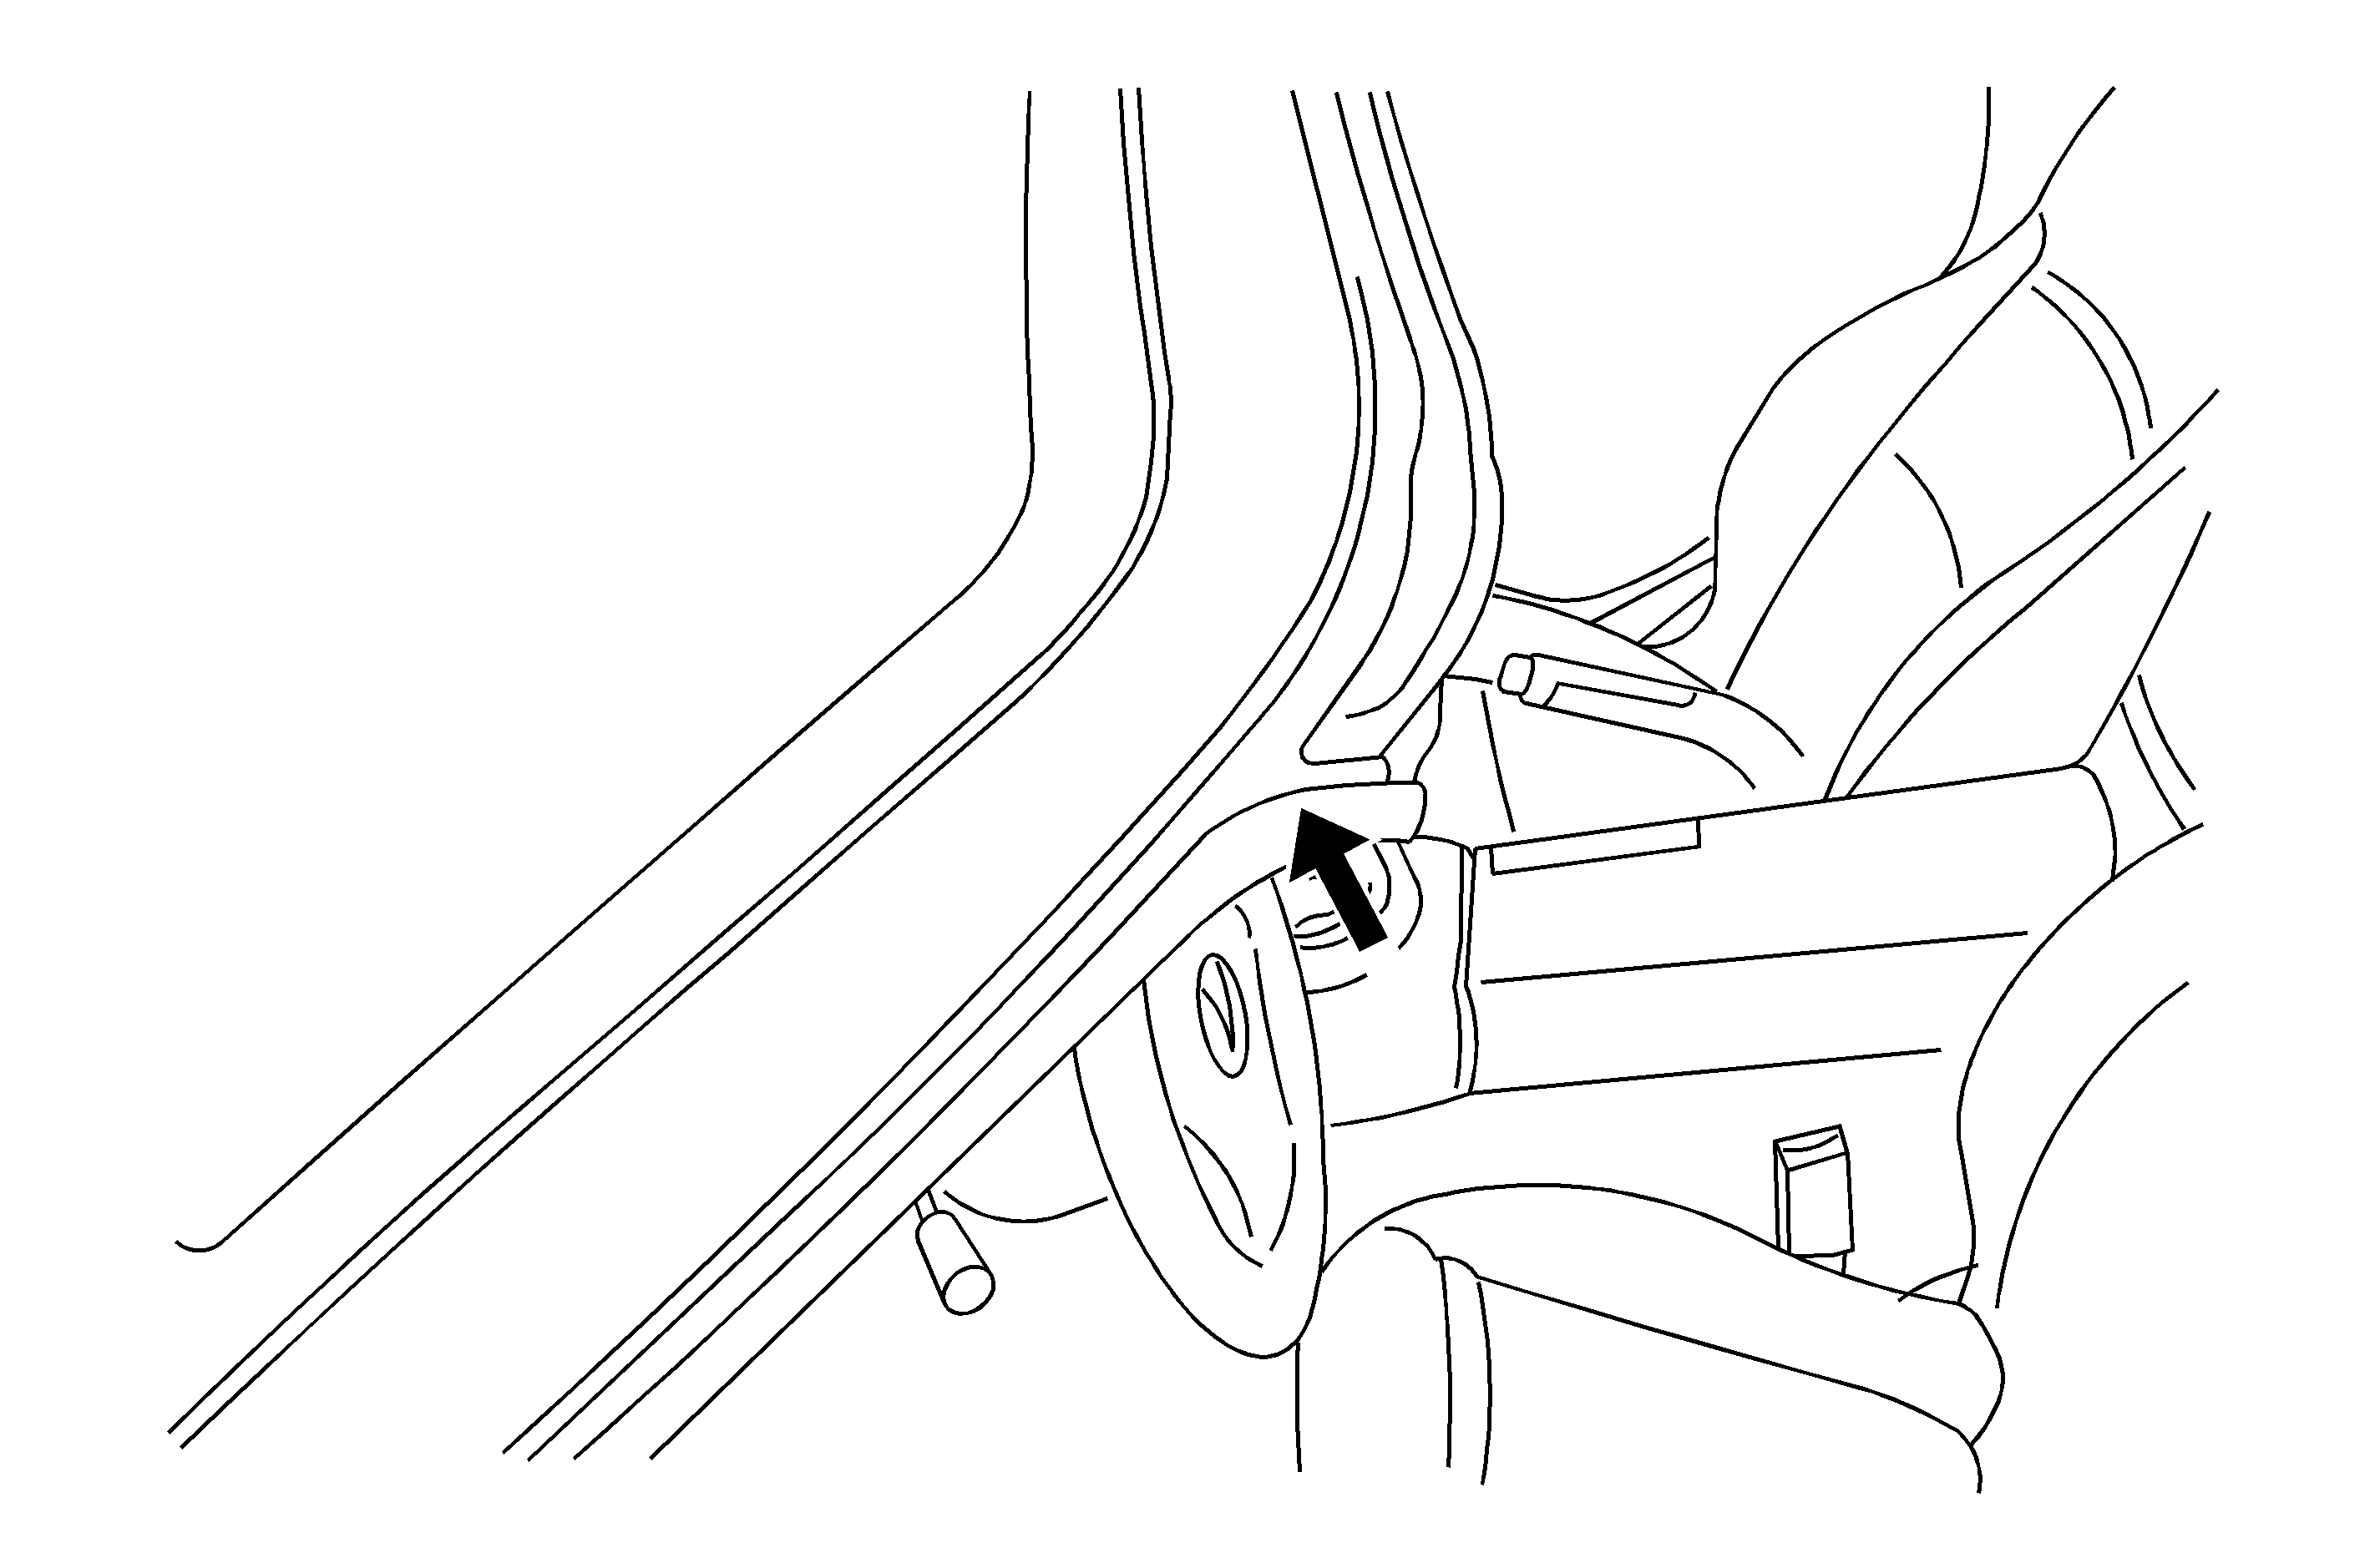
Plan-A Weatherstrip Only (Plan-B does not have stuffers): The stuffer may not be in place inside the weatherstrip. There should be a bulge in the weatherstrip which will close the gap between the weatherstrip and the top.
Correction #C
If the stuffer is missing, replace the weatherstrip.
Cause #D
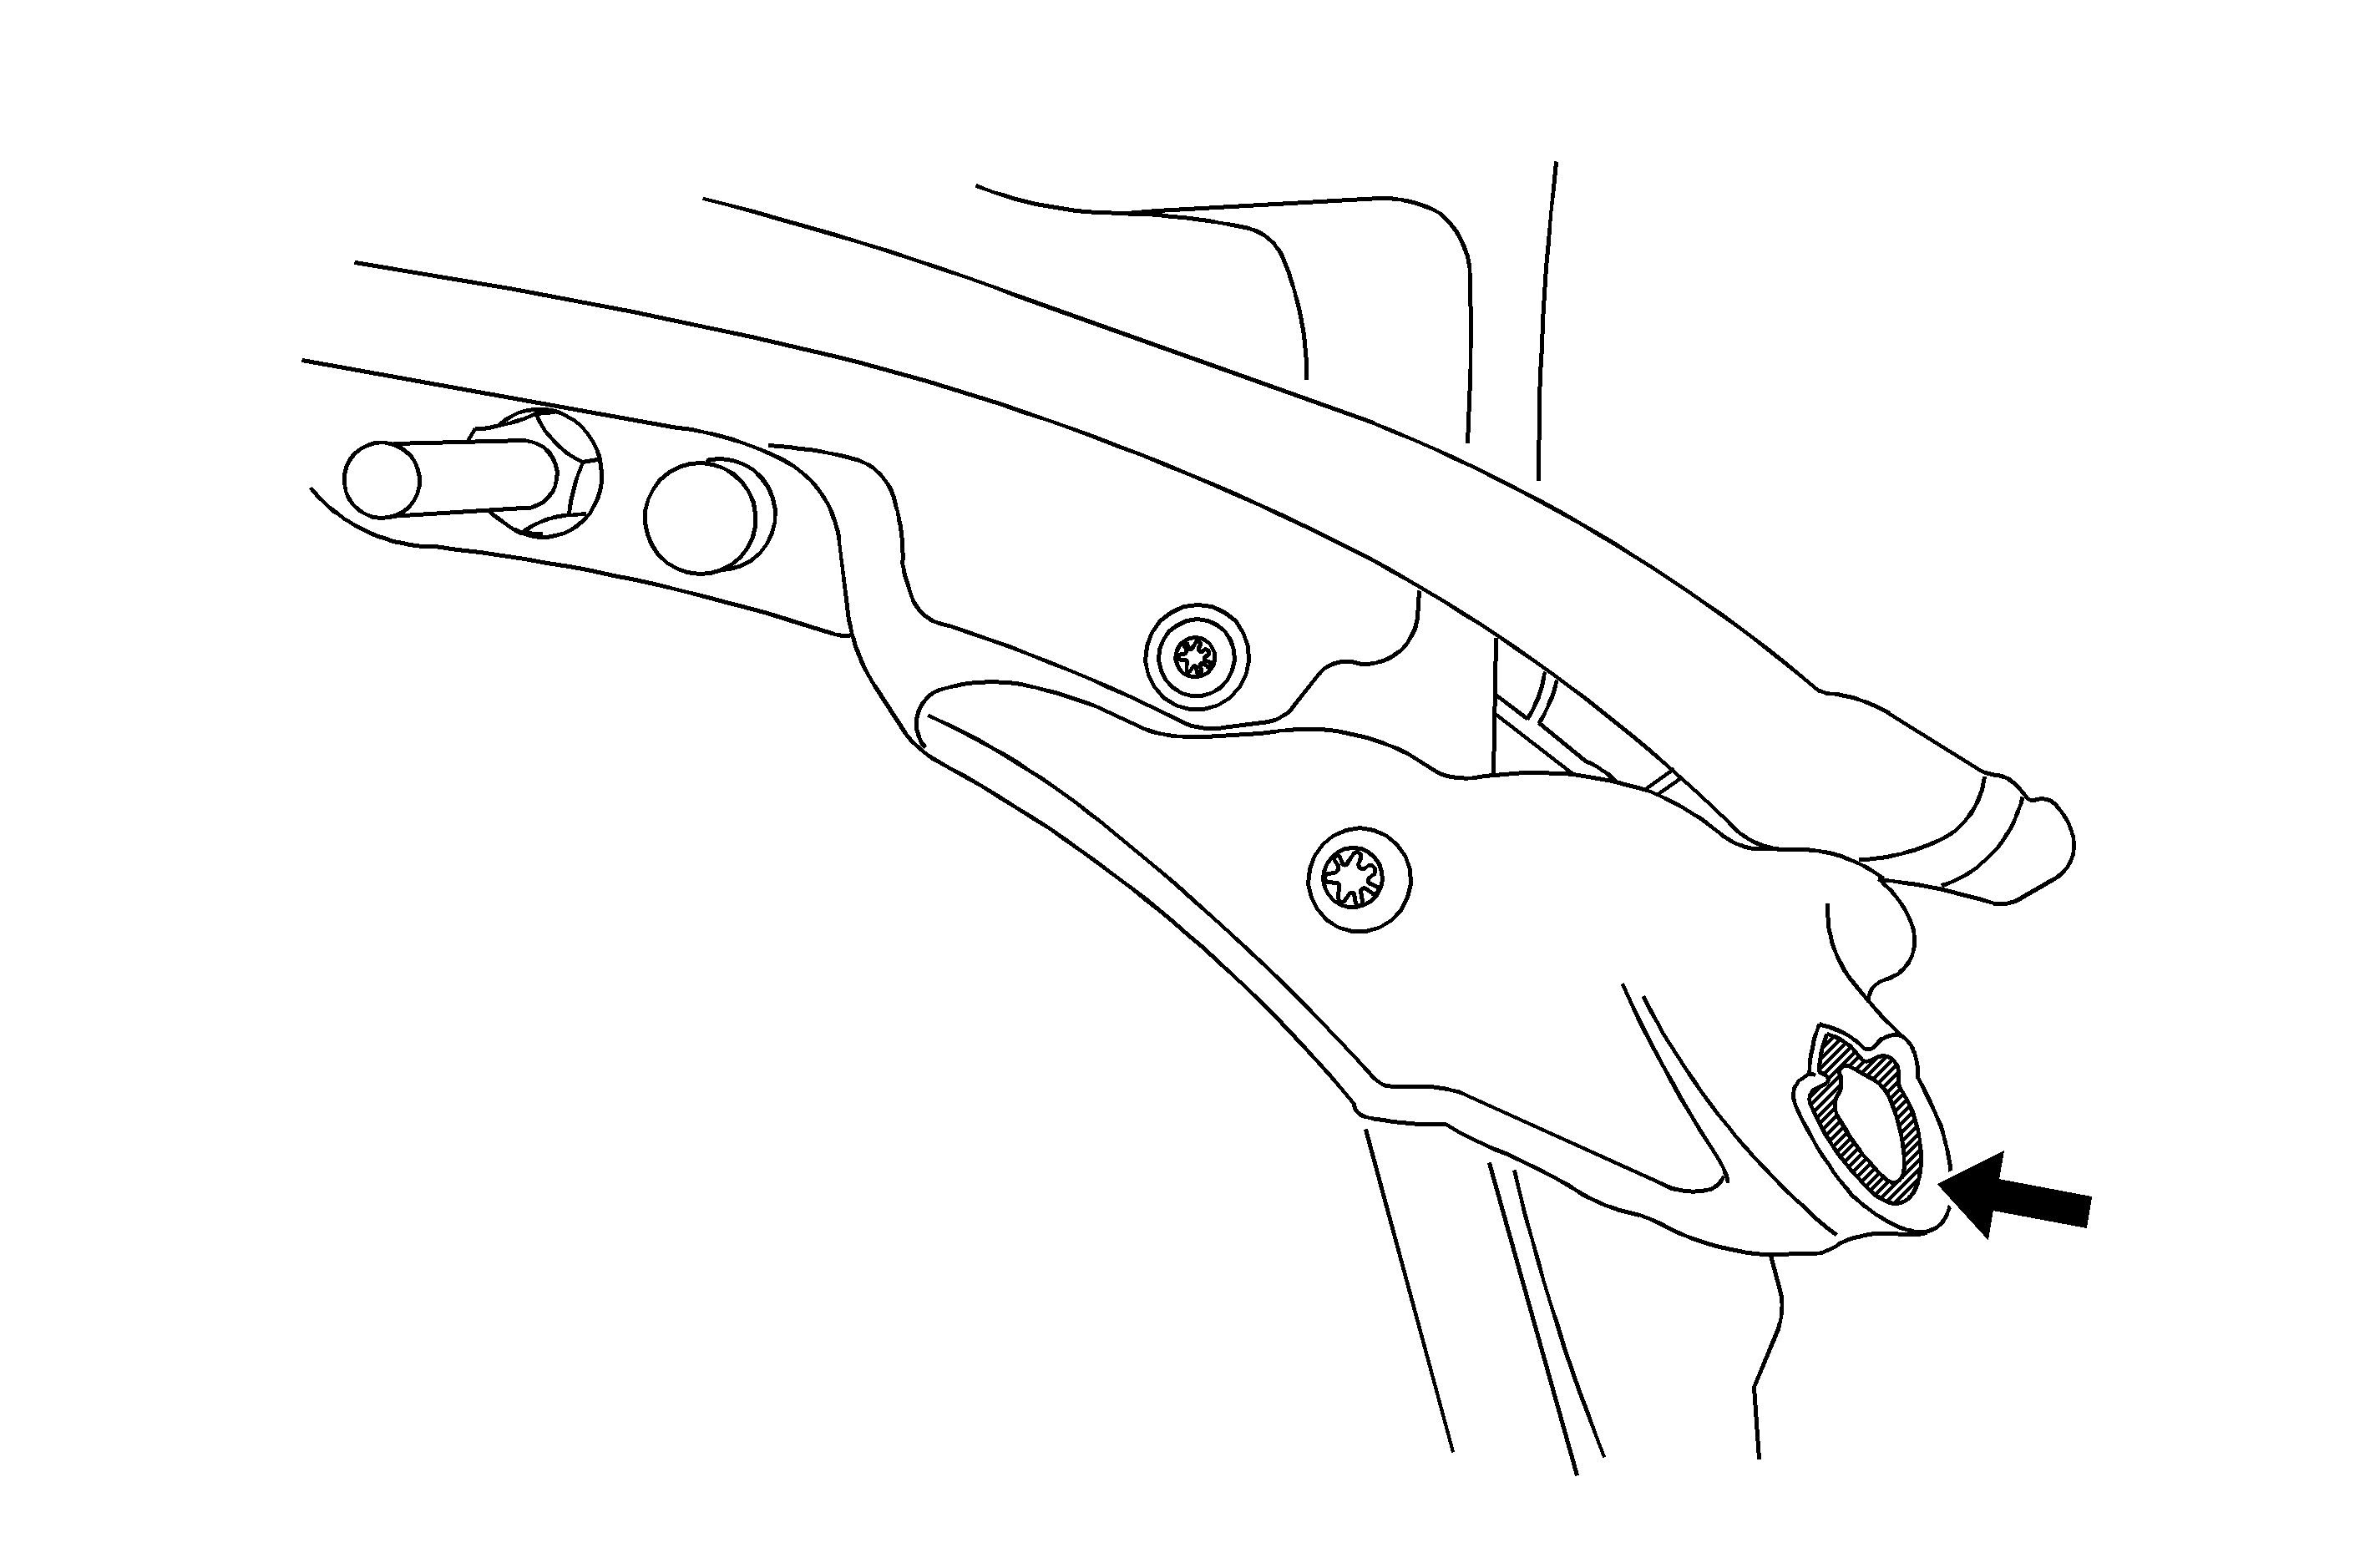
Plan-A Weatherstrip Only (Plan-B does not have stuffers): The stuffer may not be in place inside the weatherstrip in the front of the convertible top.
Correction #D
If the stuffer is missing or out of place, replace the weatherstrip.
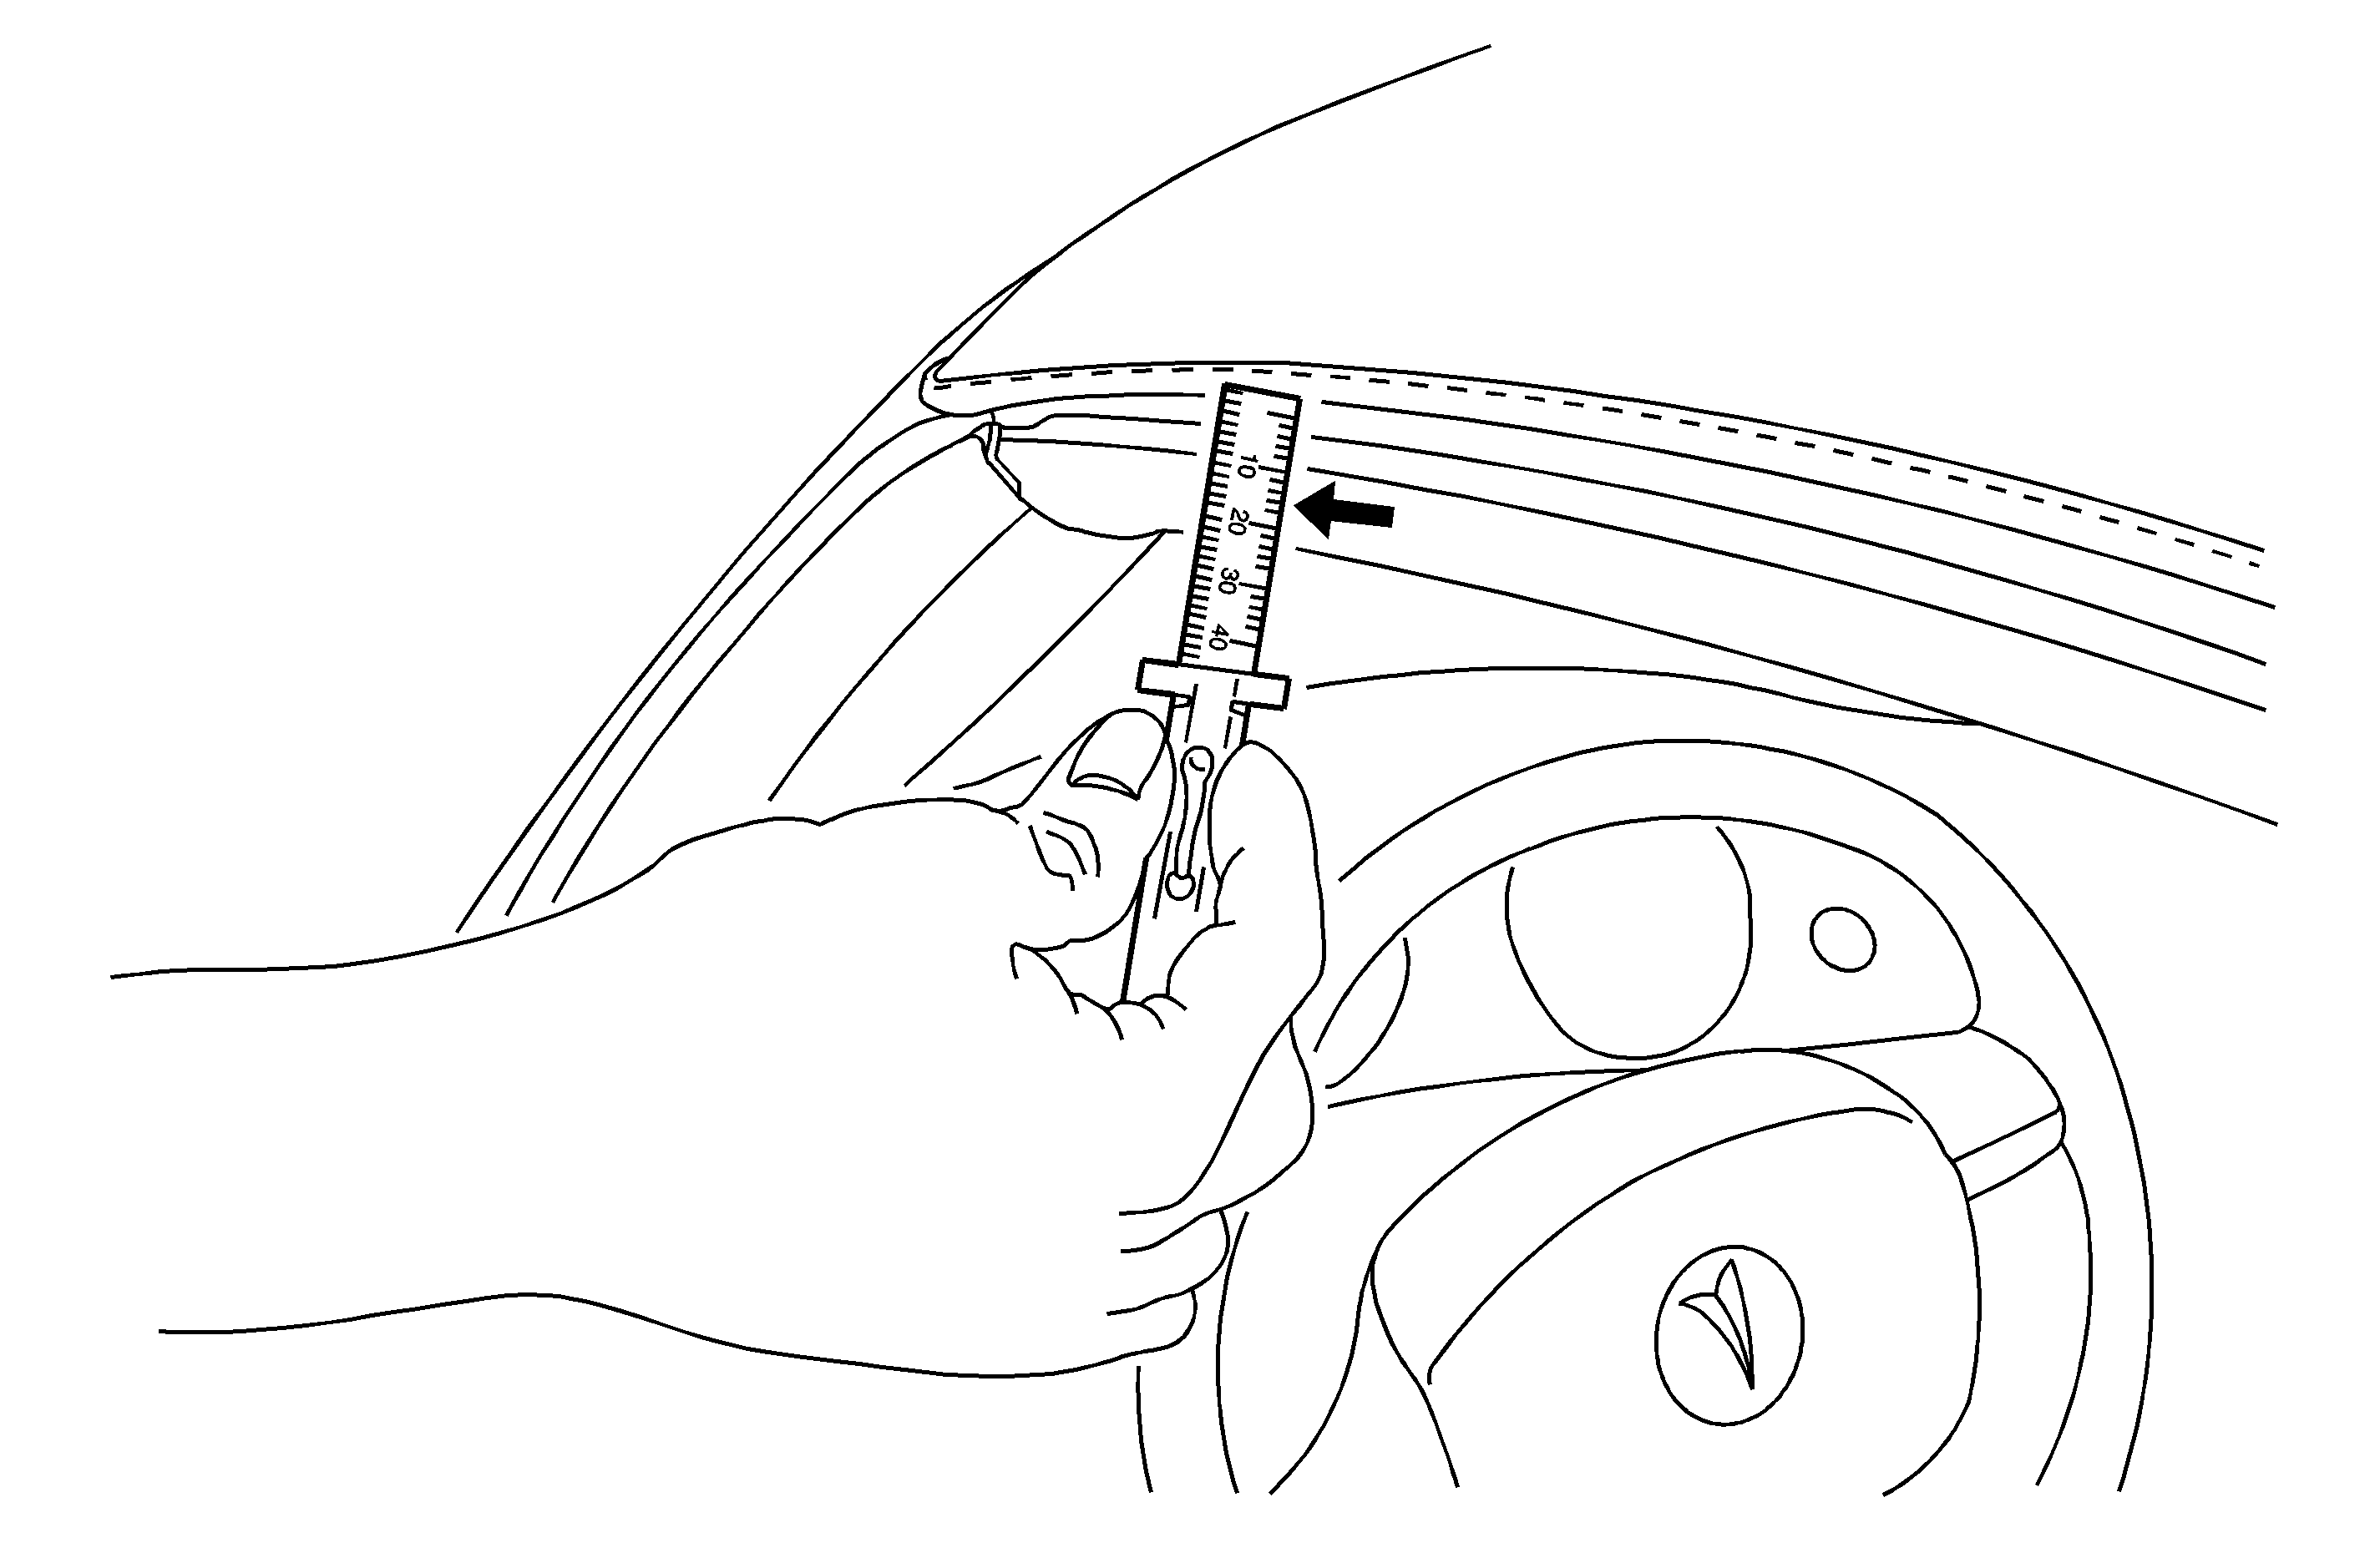
Plan-A Weatherstrip: Replace the weatherstrip. When replacing the weatherstrip, make sure the lip on the weatherstrip to top measures 7 mm (1/4 in).
Condition #7
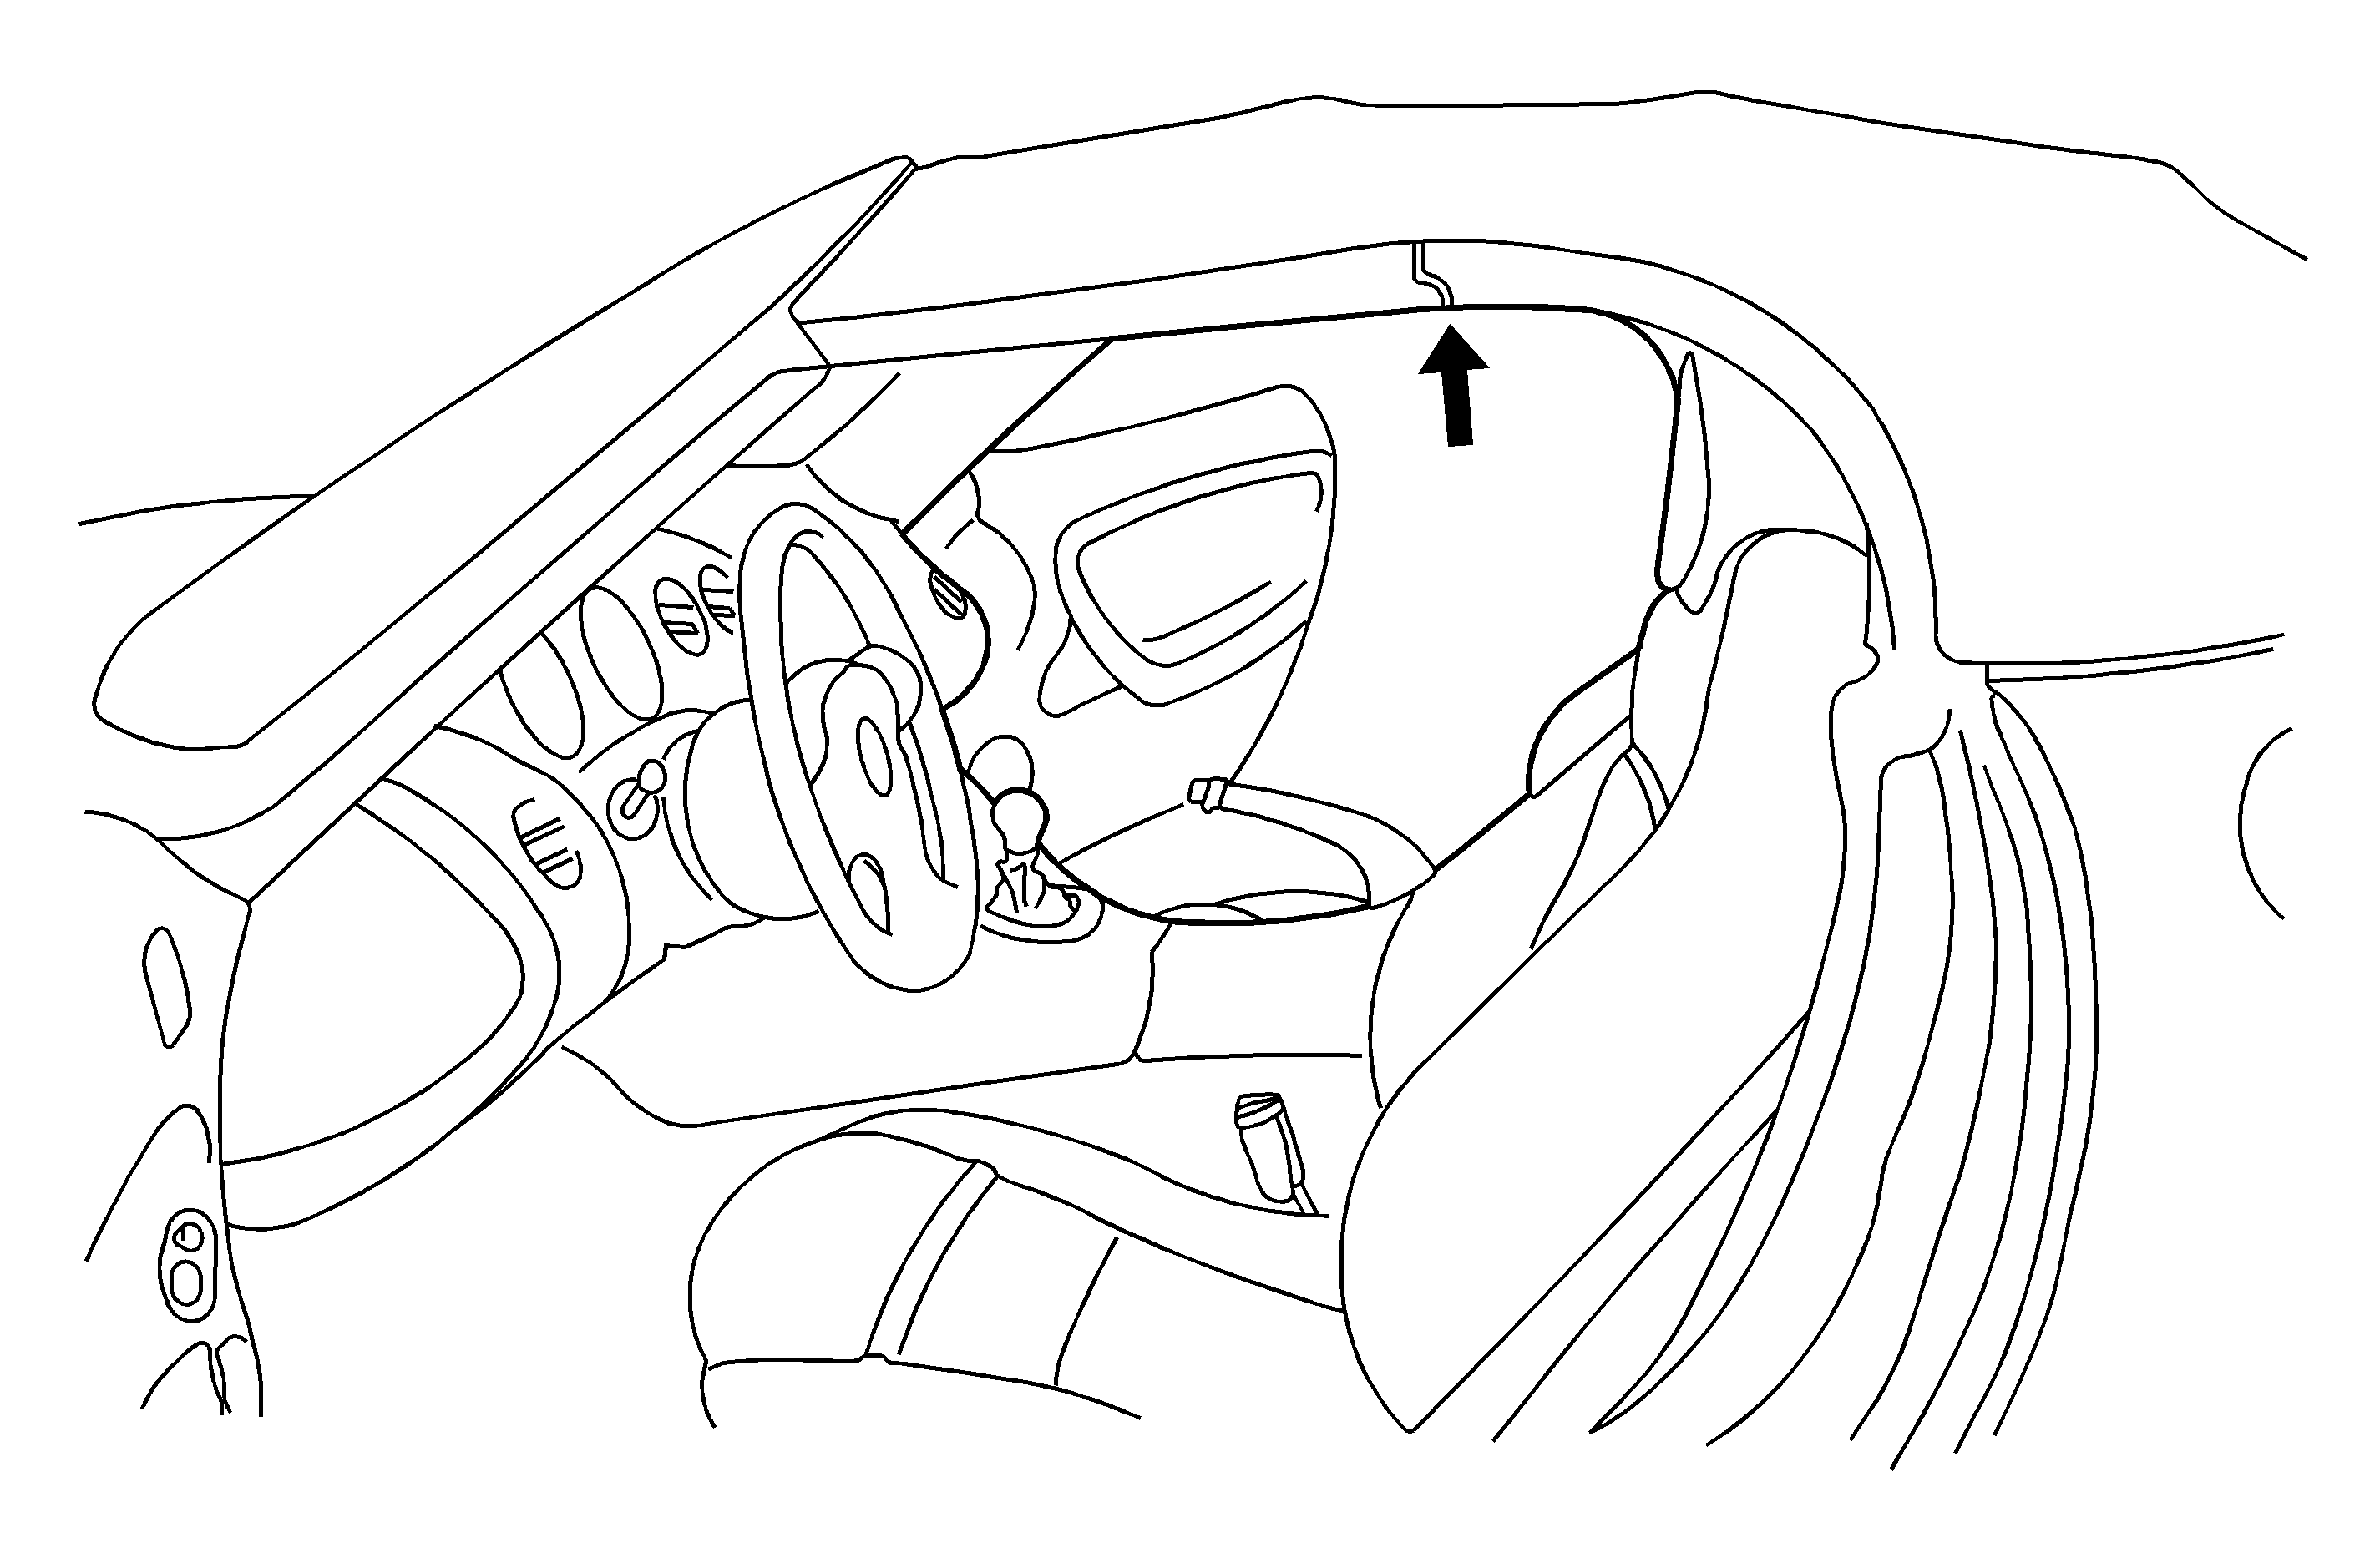
The customer may comment about a weep from joint #2 (water runs down the inside of the glass), or a leak from the #2 joint.
Cause #1
The door glass may not be high enough in the opening and not closing the gap in joint #2. Verify by closing door to first latch position. If glass is contacting the seal all around, do not adjust.
Correction #1
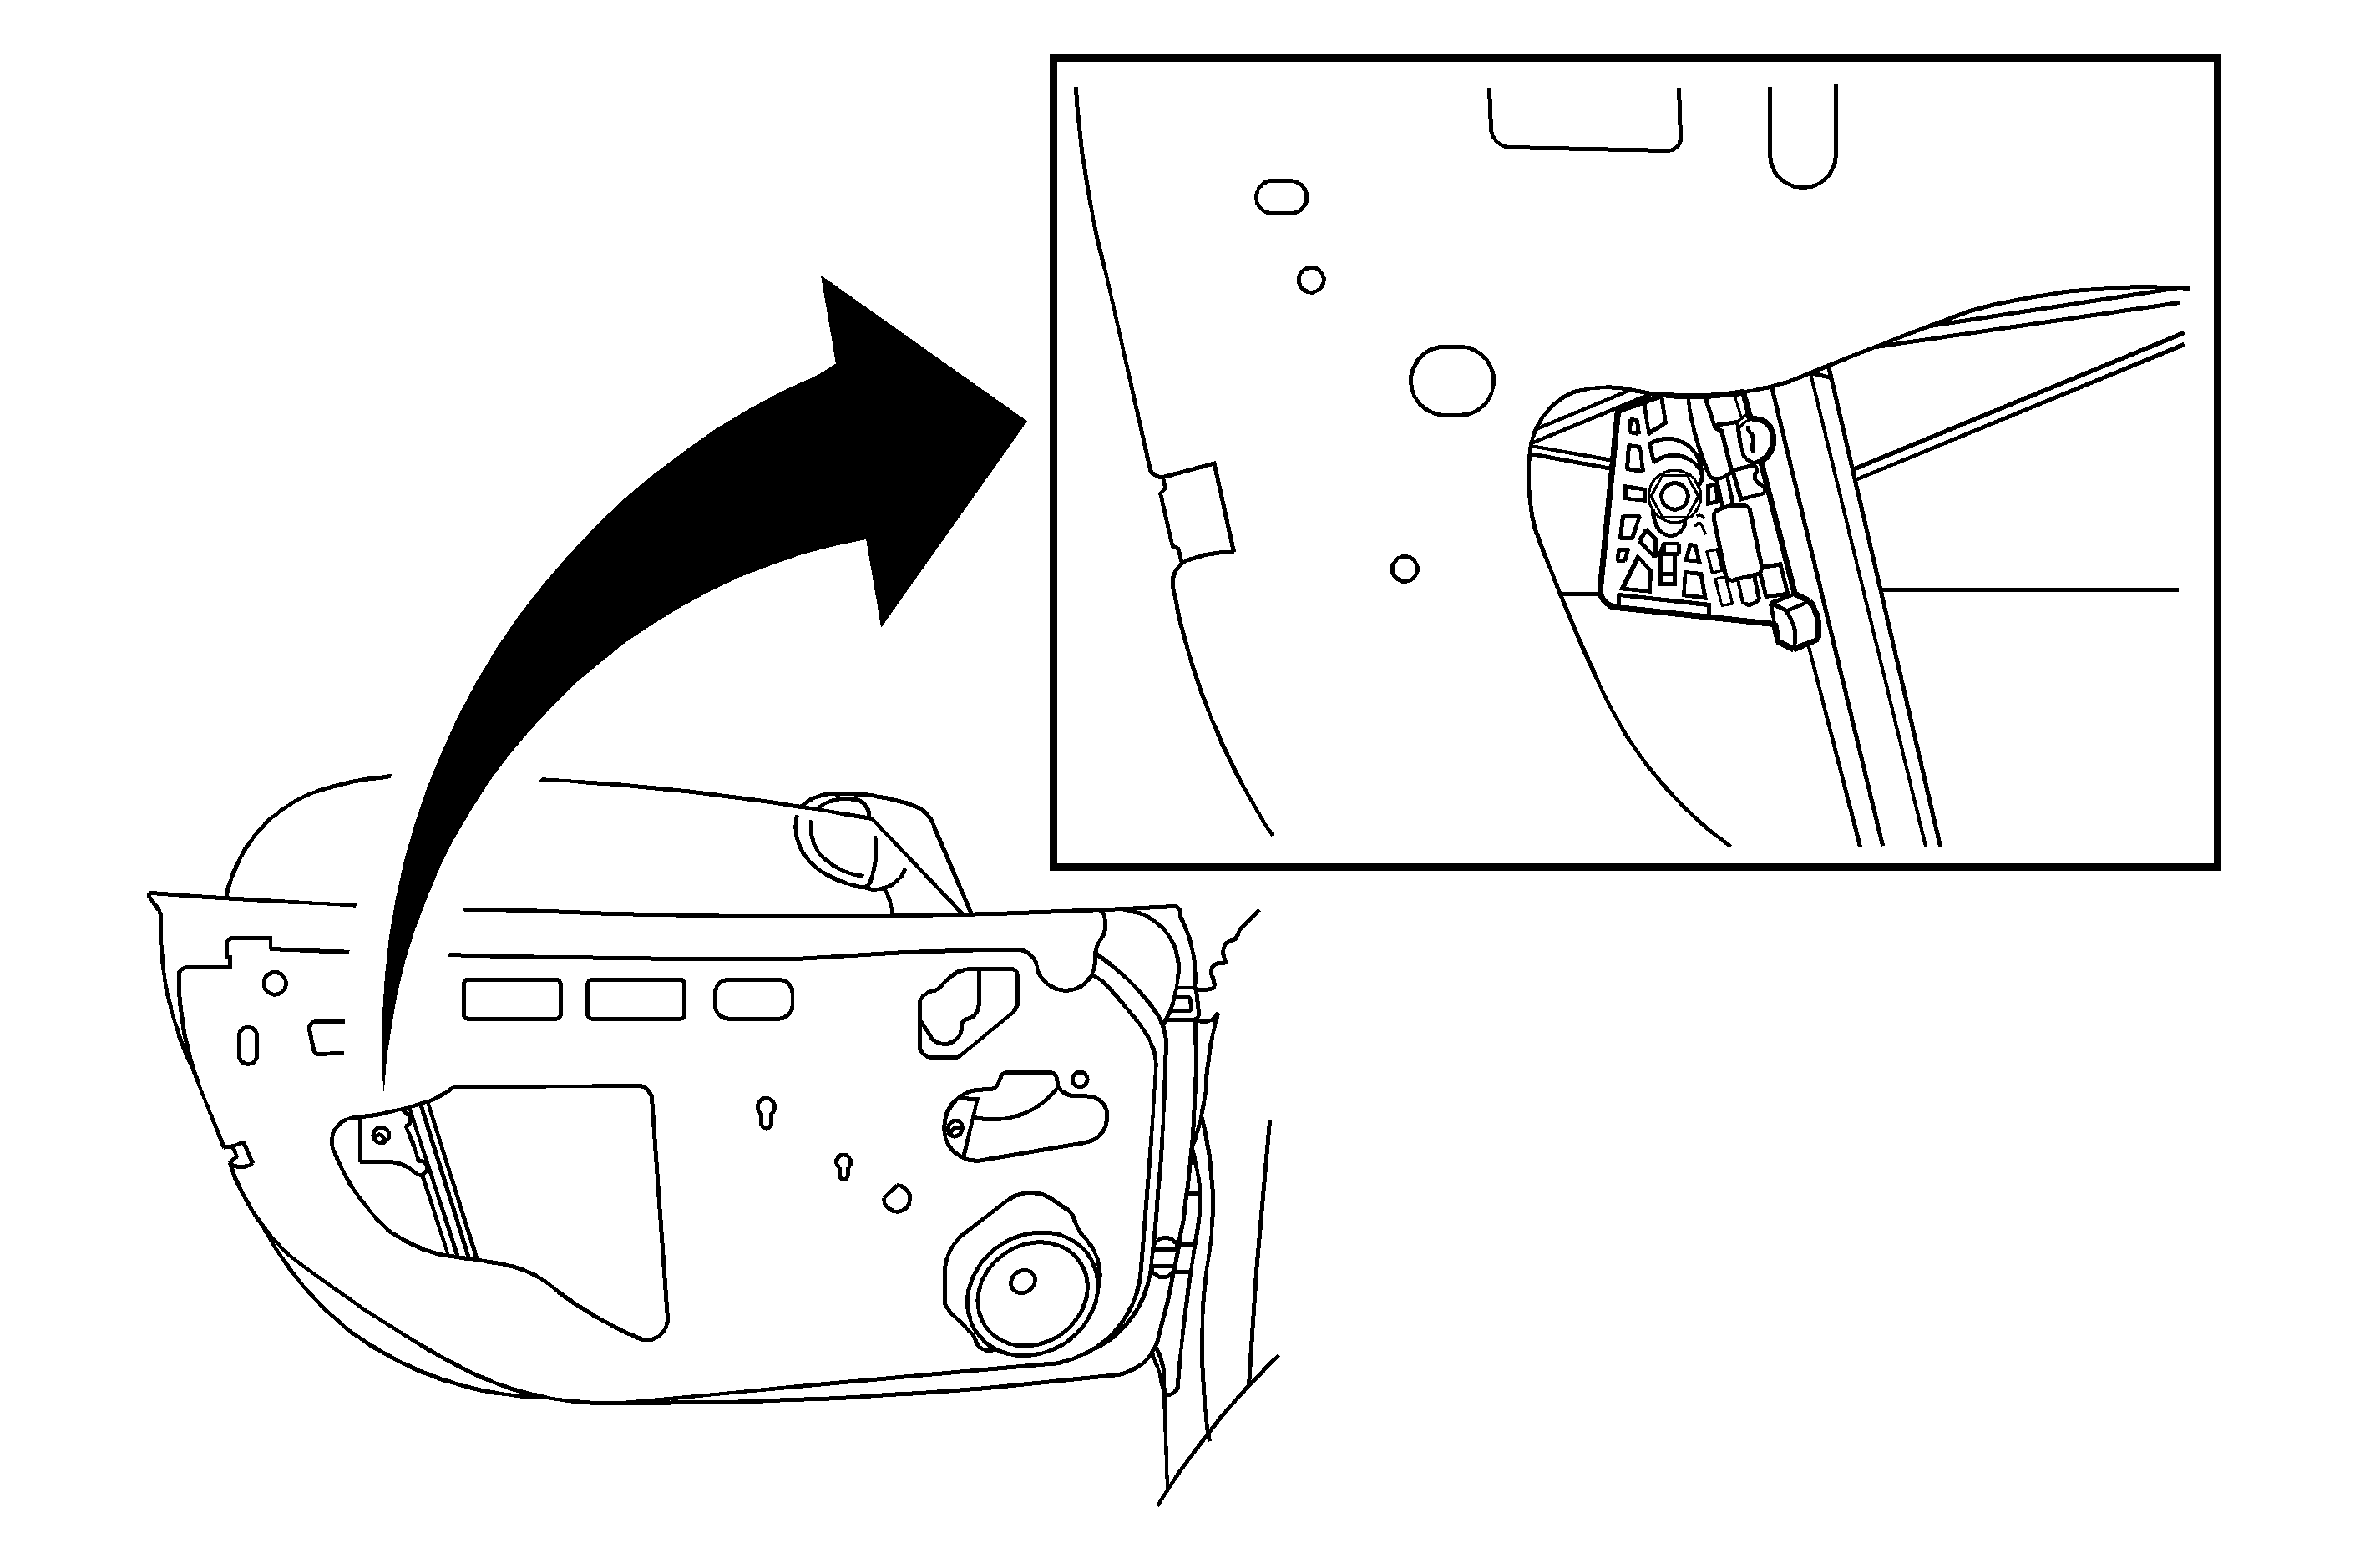
Mark the glass with a grease pencil and adjust the glass 2 mm (3/16 in) upward at the rear.
Cause #2
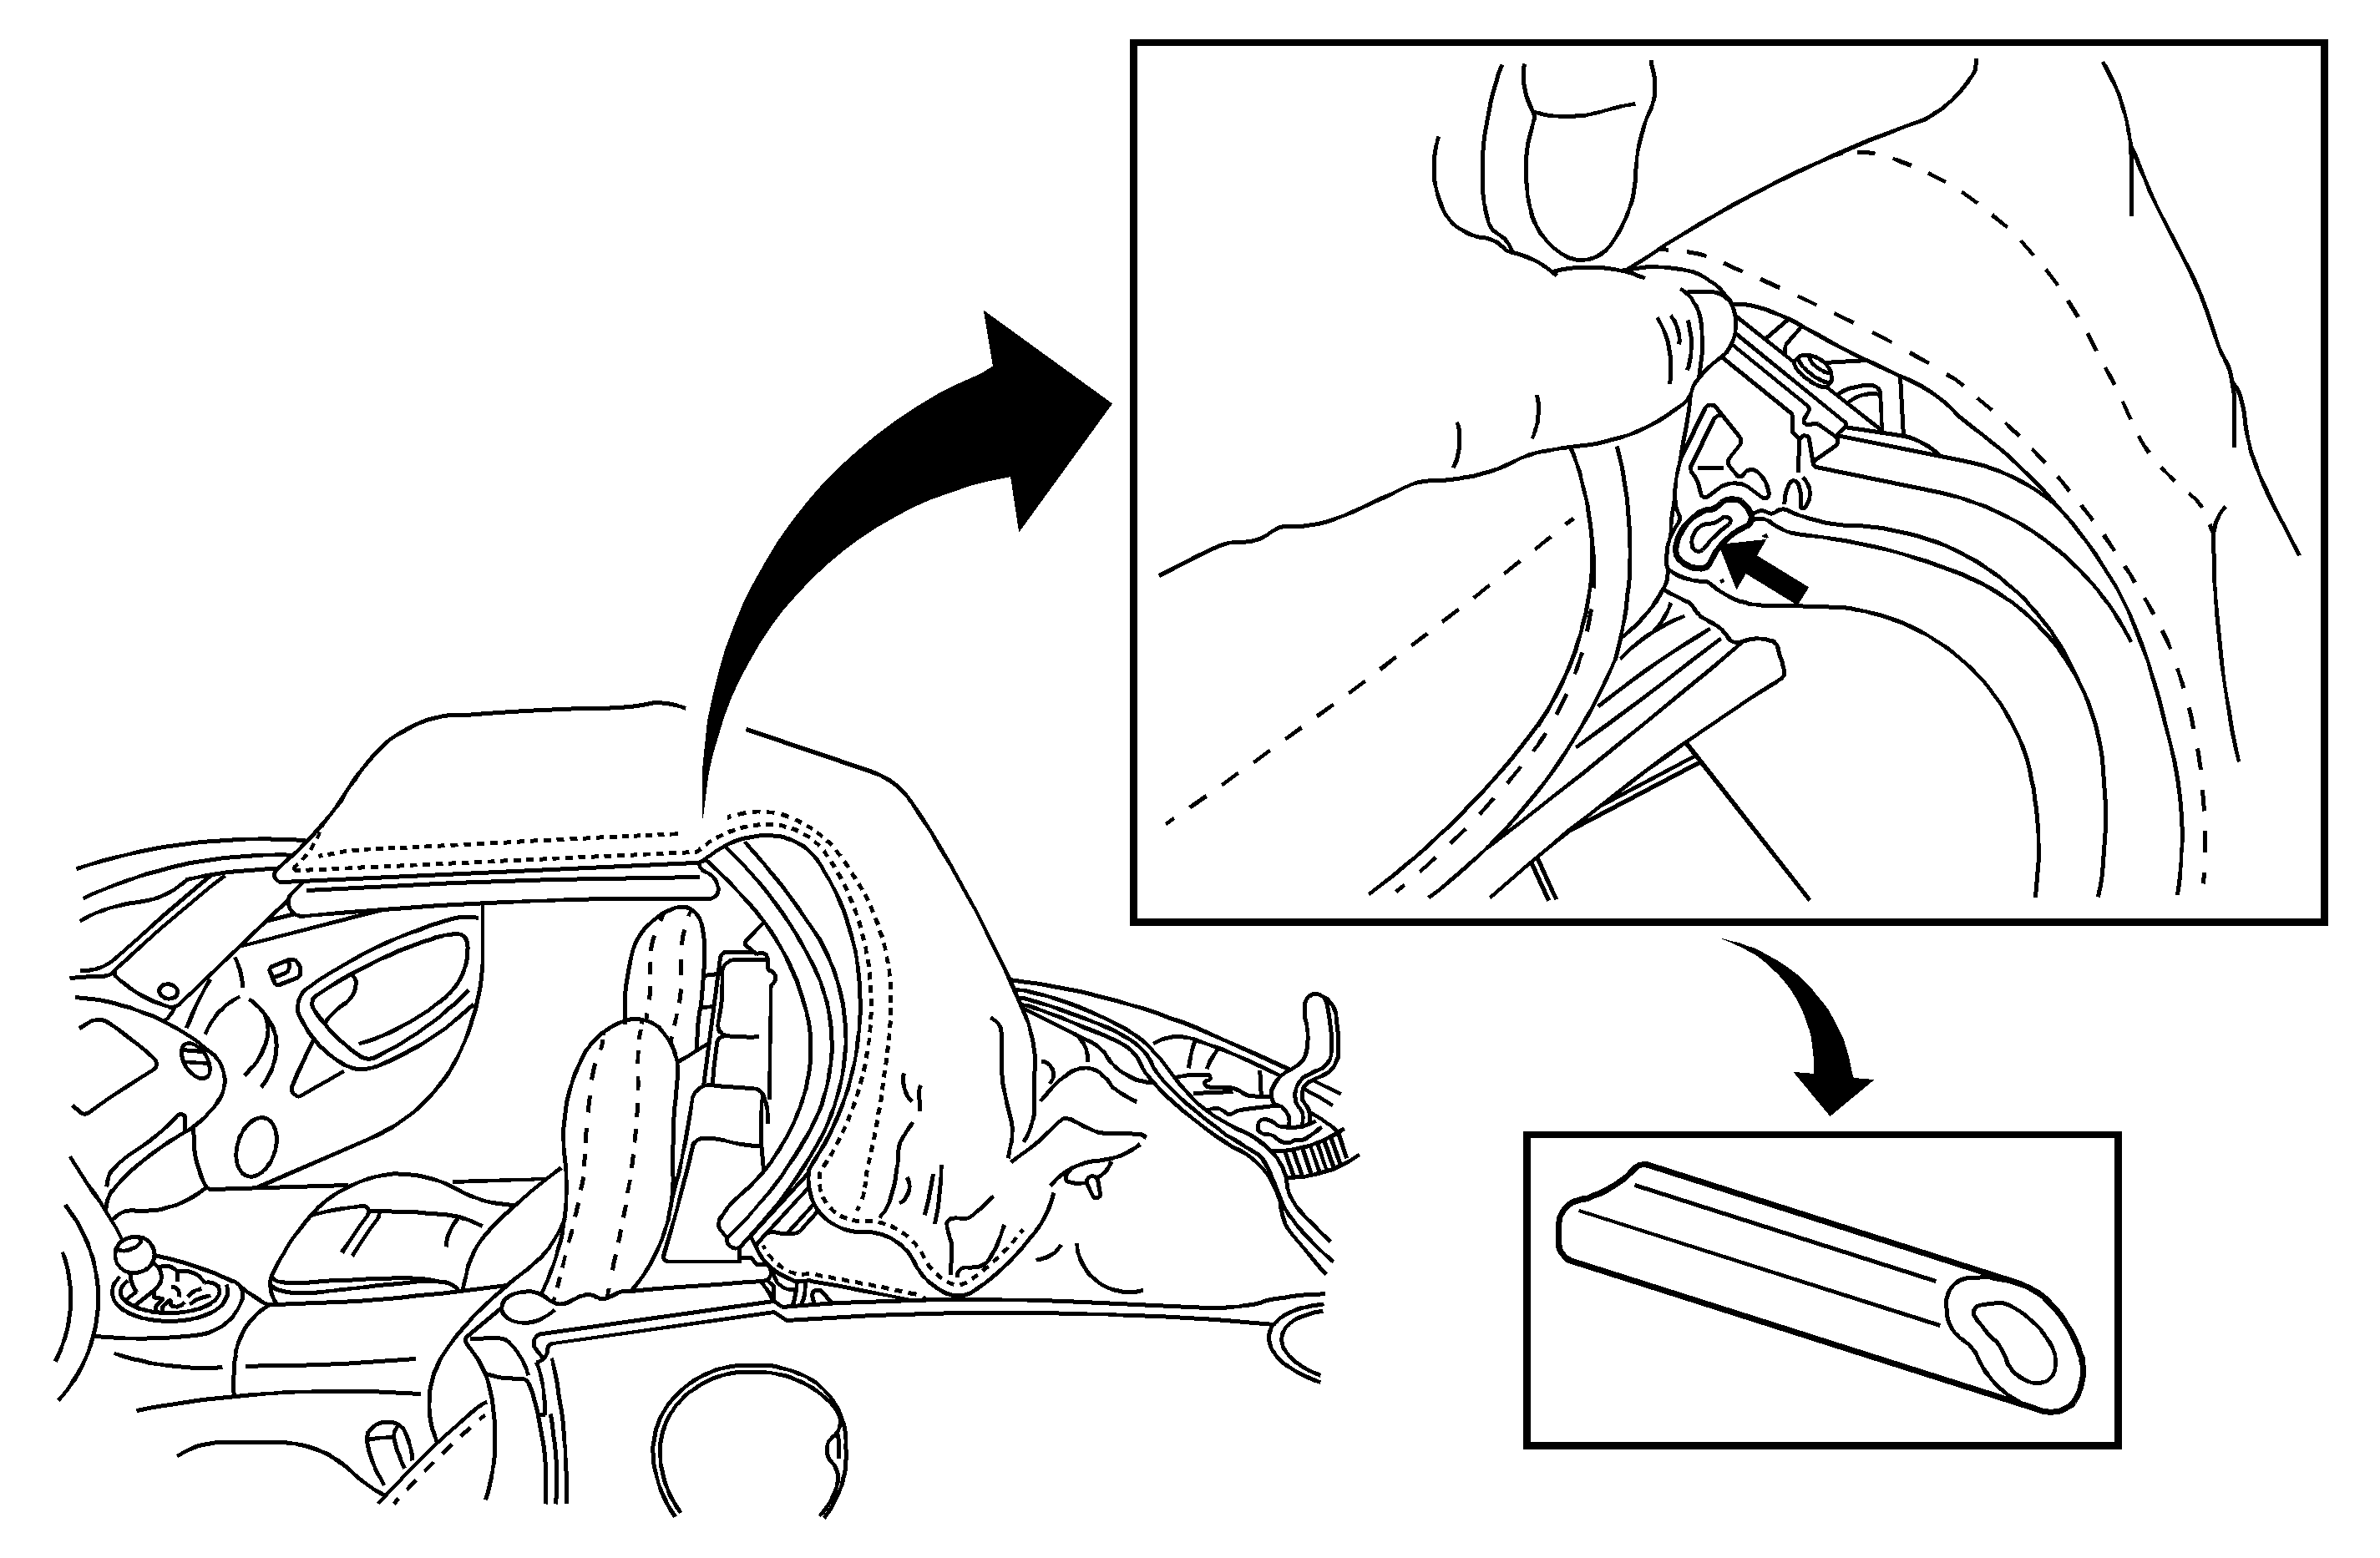
Plan-A Weatherstrip (Plan-B does not have stuffers): The stuffer may be mispositioned in the weatherstrip. It should be flush to the end of the weatherstrip.
Correction #2
Replace the weatherstrip if it is mispositioned.
Cause #3
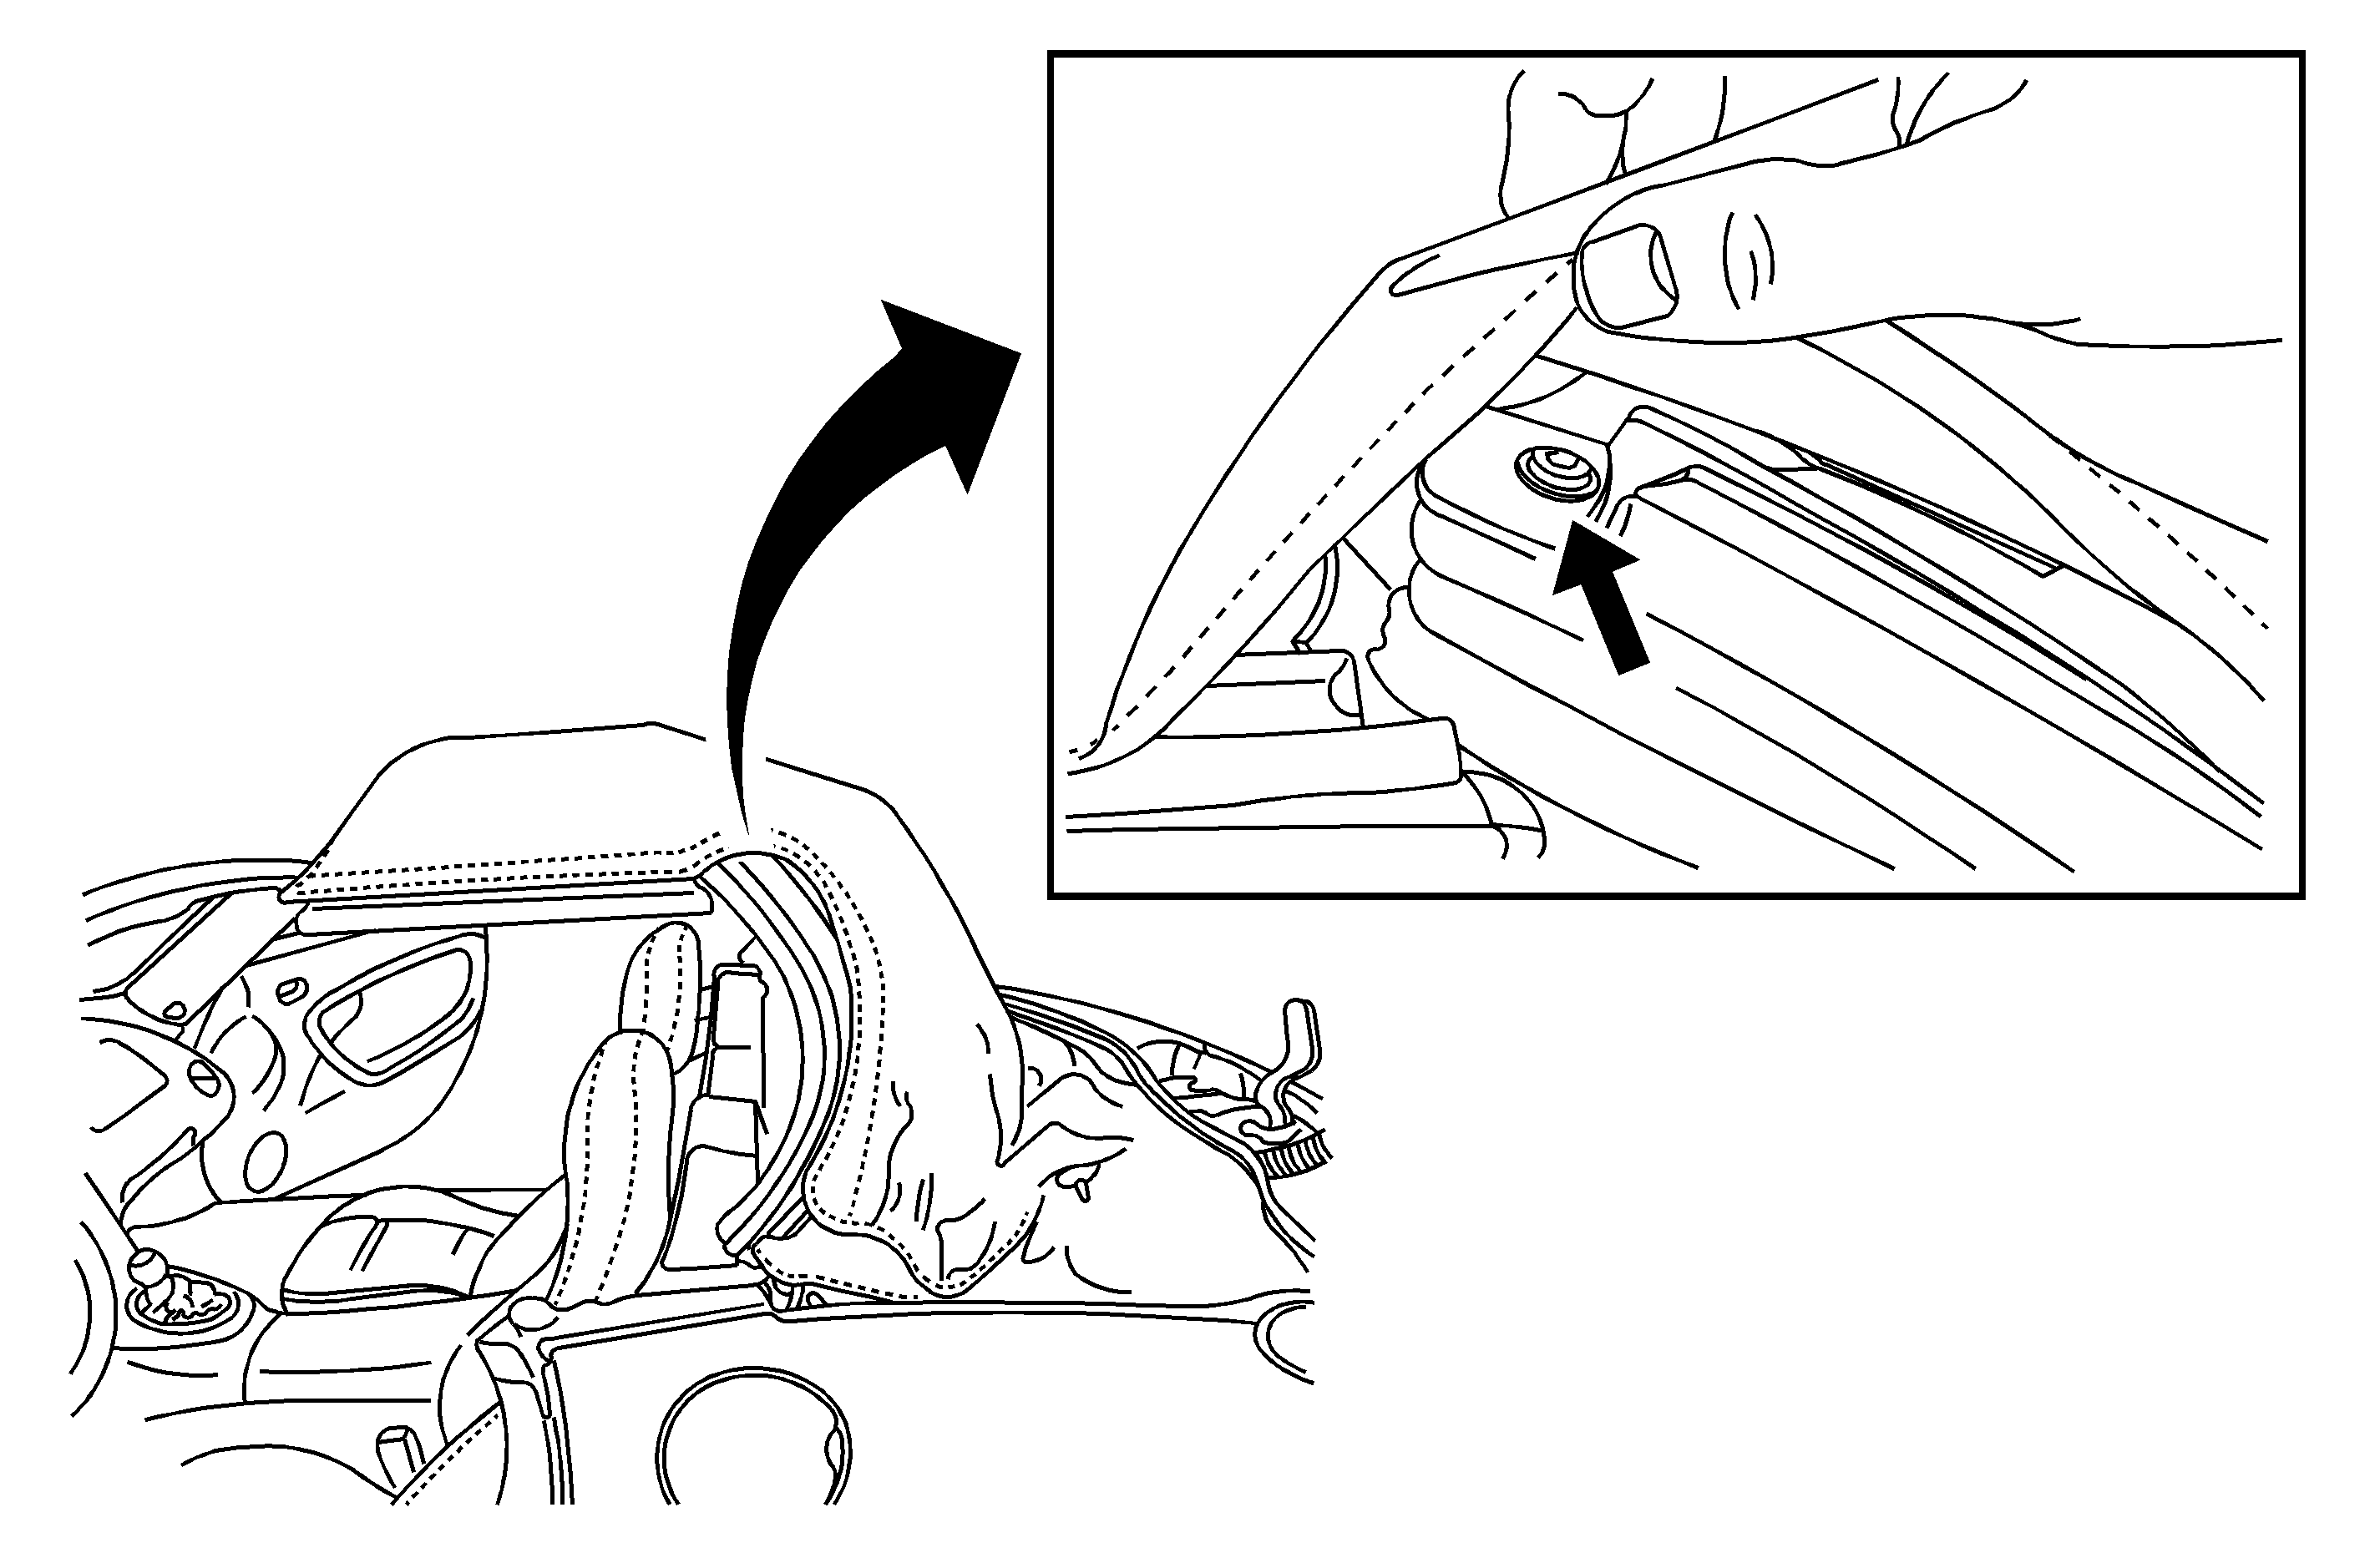
Plan-A Weatherstrip: The screw that retains the weatherstrip may be loose.
Correction #3
Hand tighten the screw.
Condition #8
The customer comment that the inside "B" pillar or the rear carpet is wet.
Cause #A
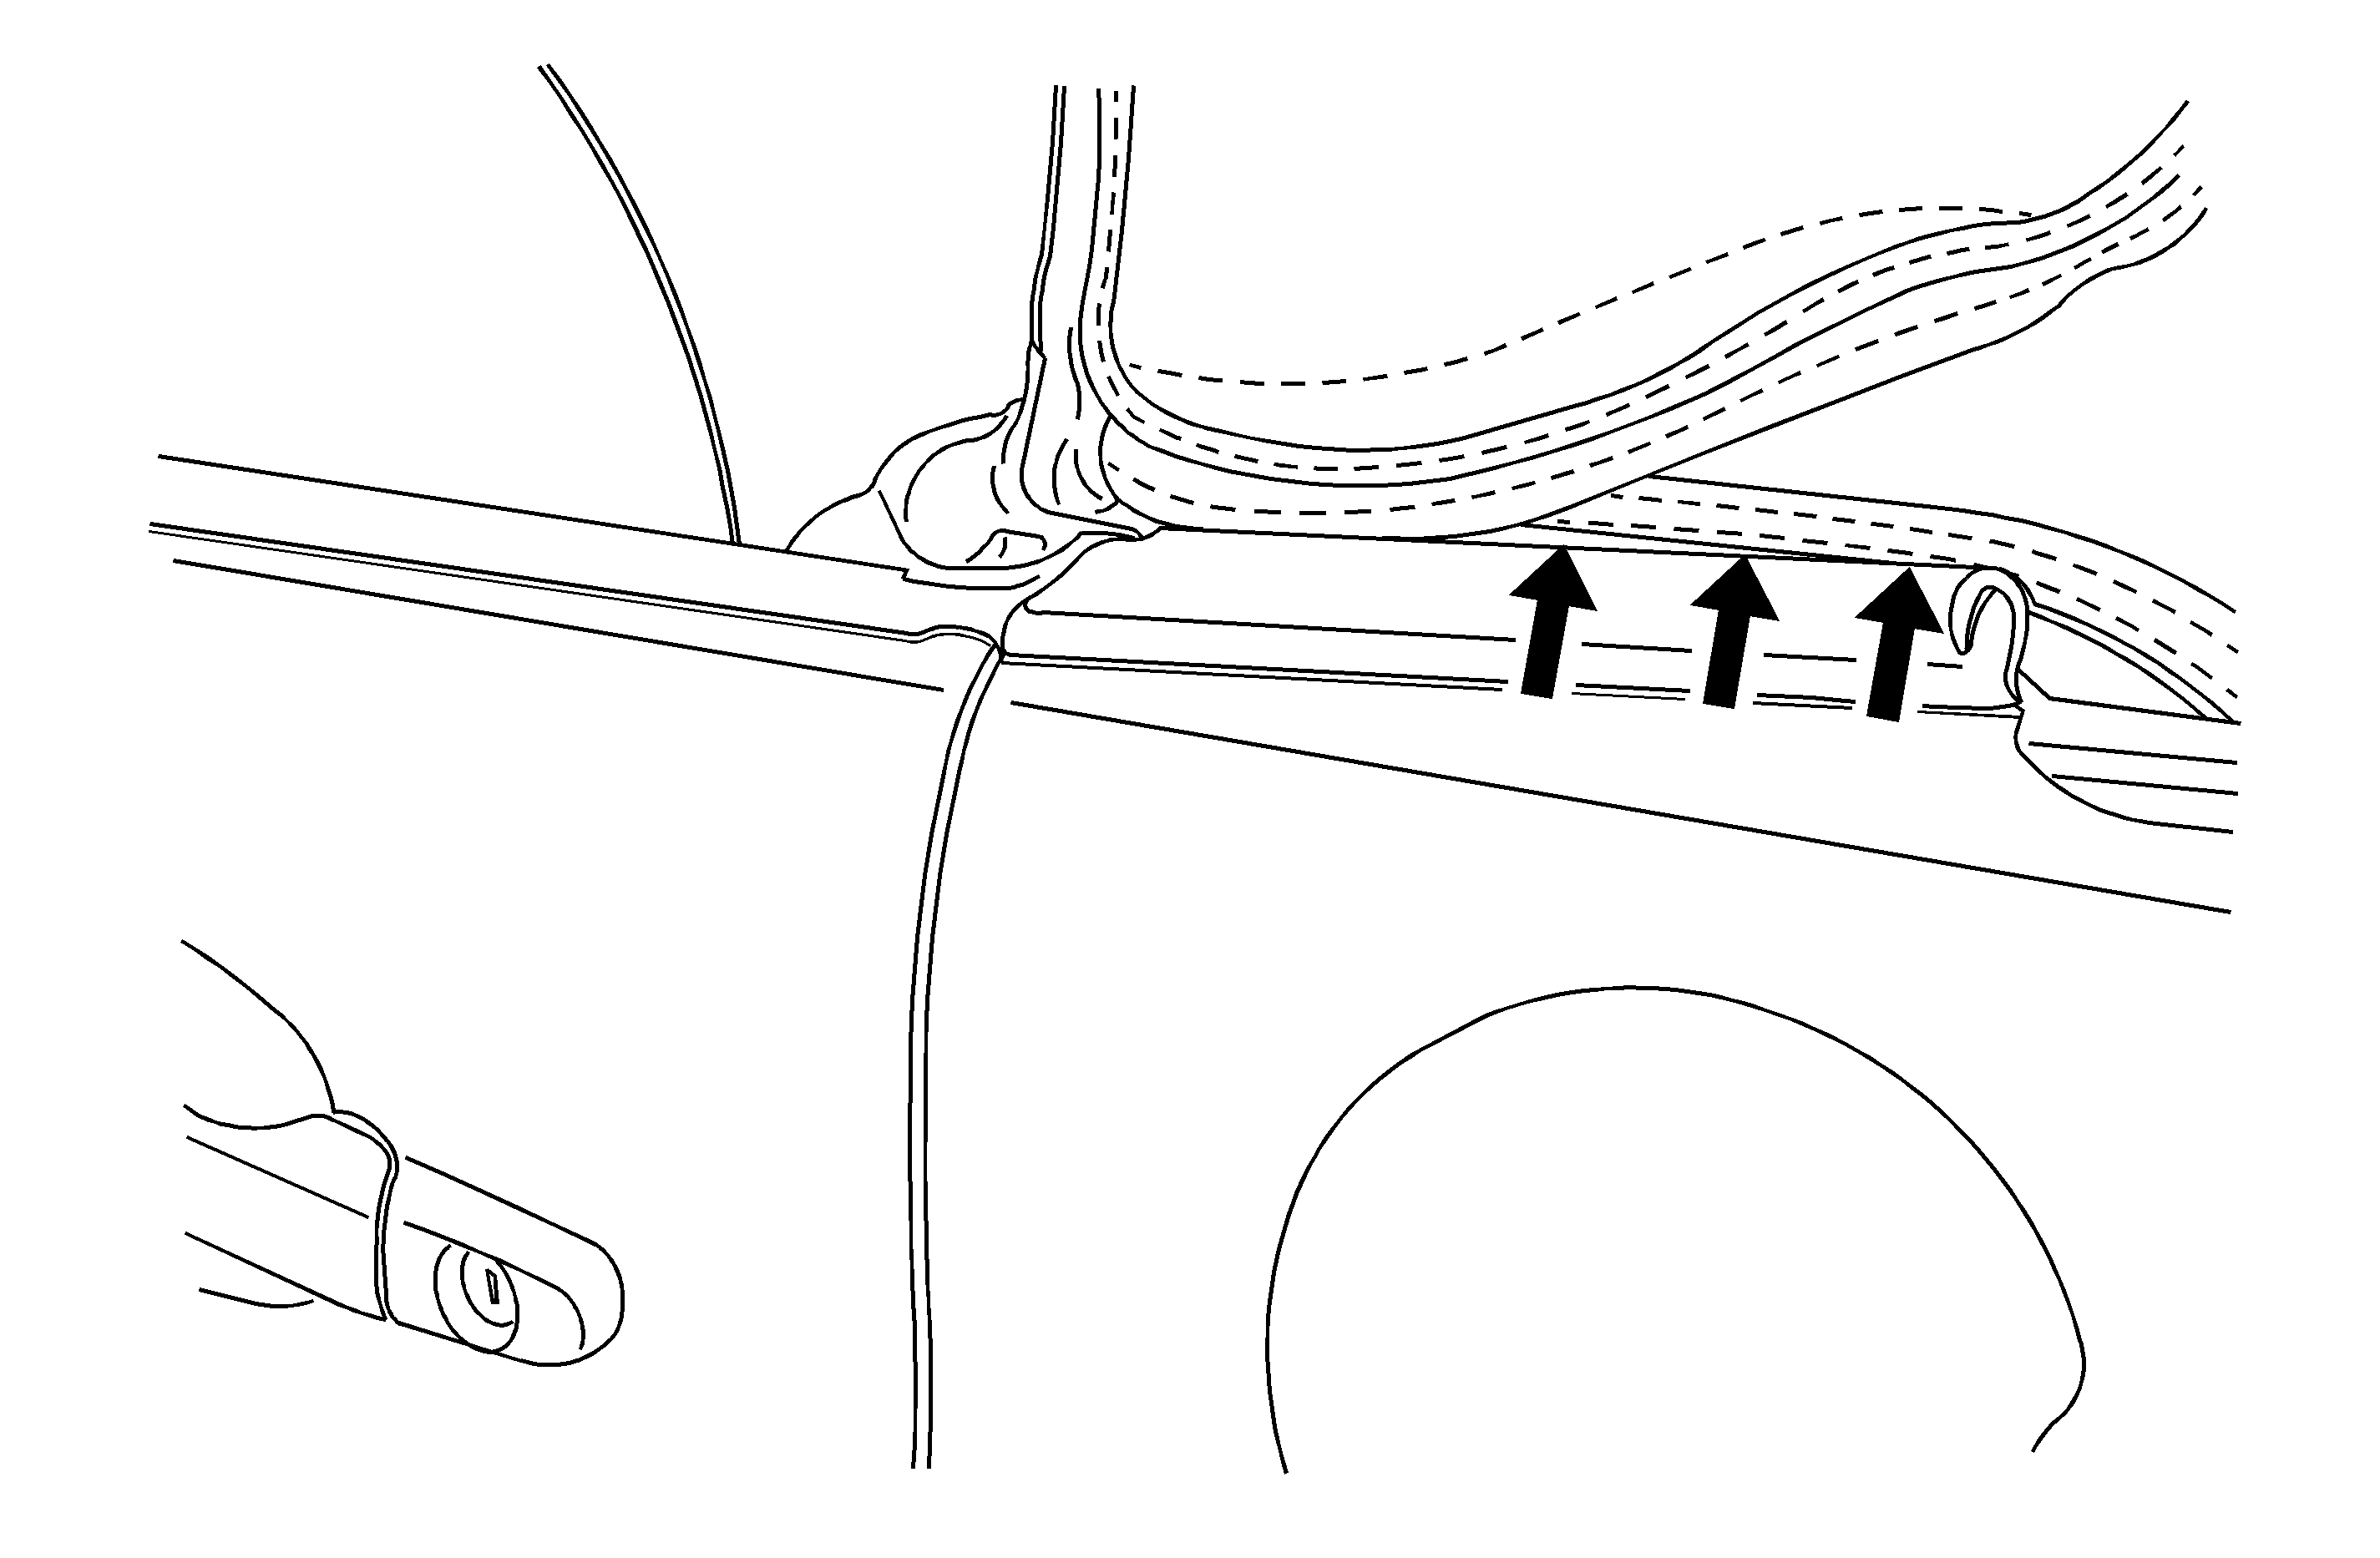
The convertible top strap may not be in the correct position.
Correction #A
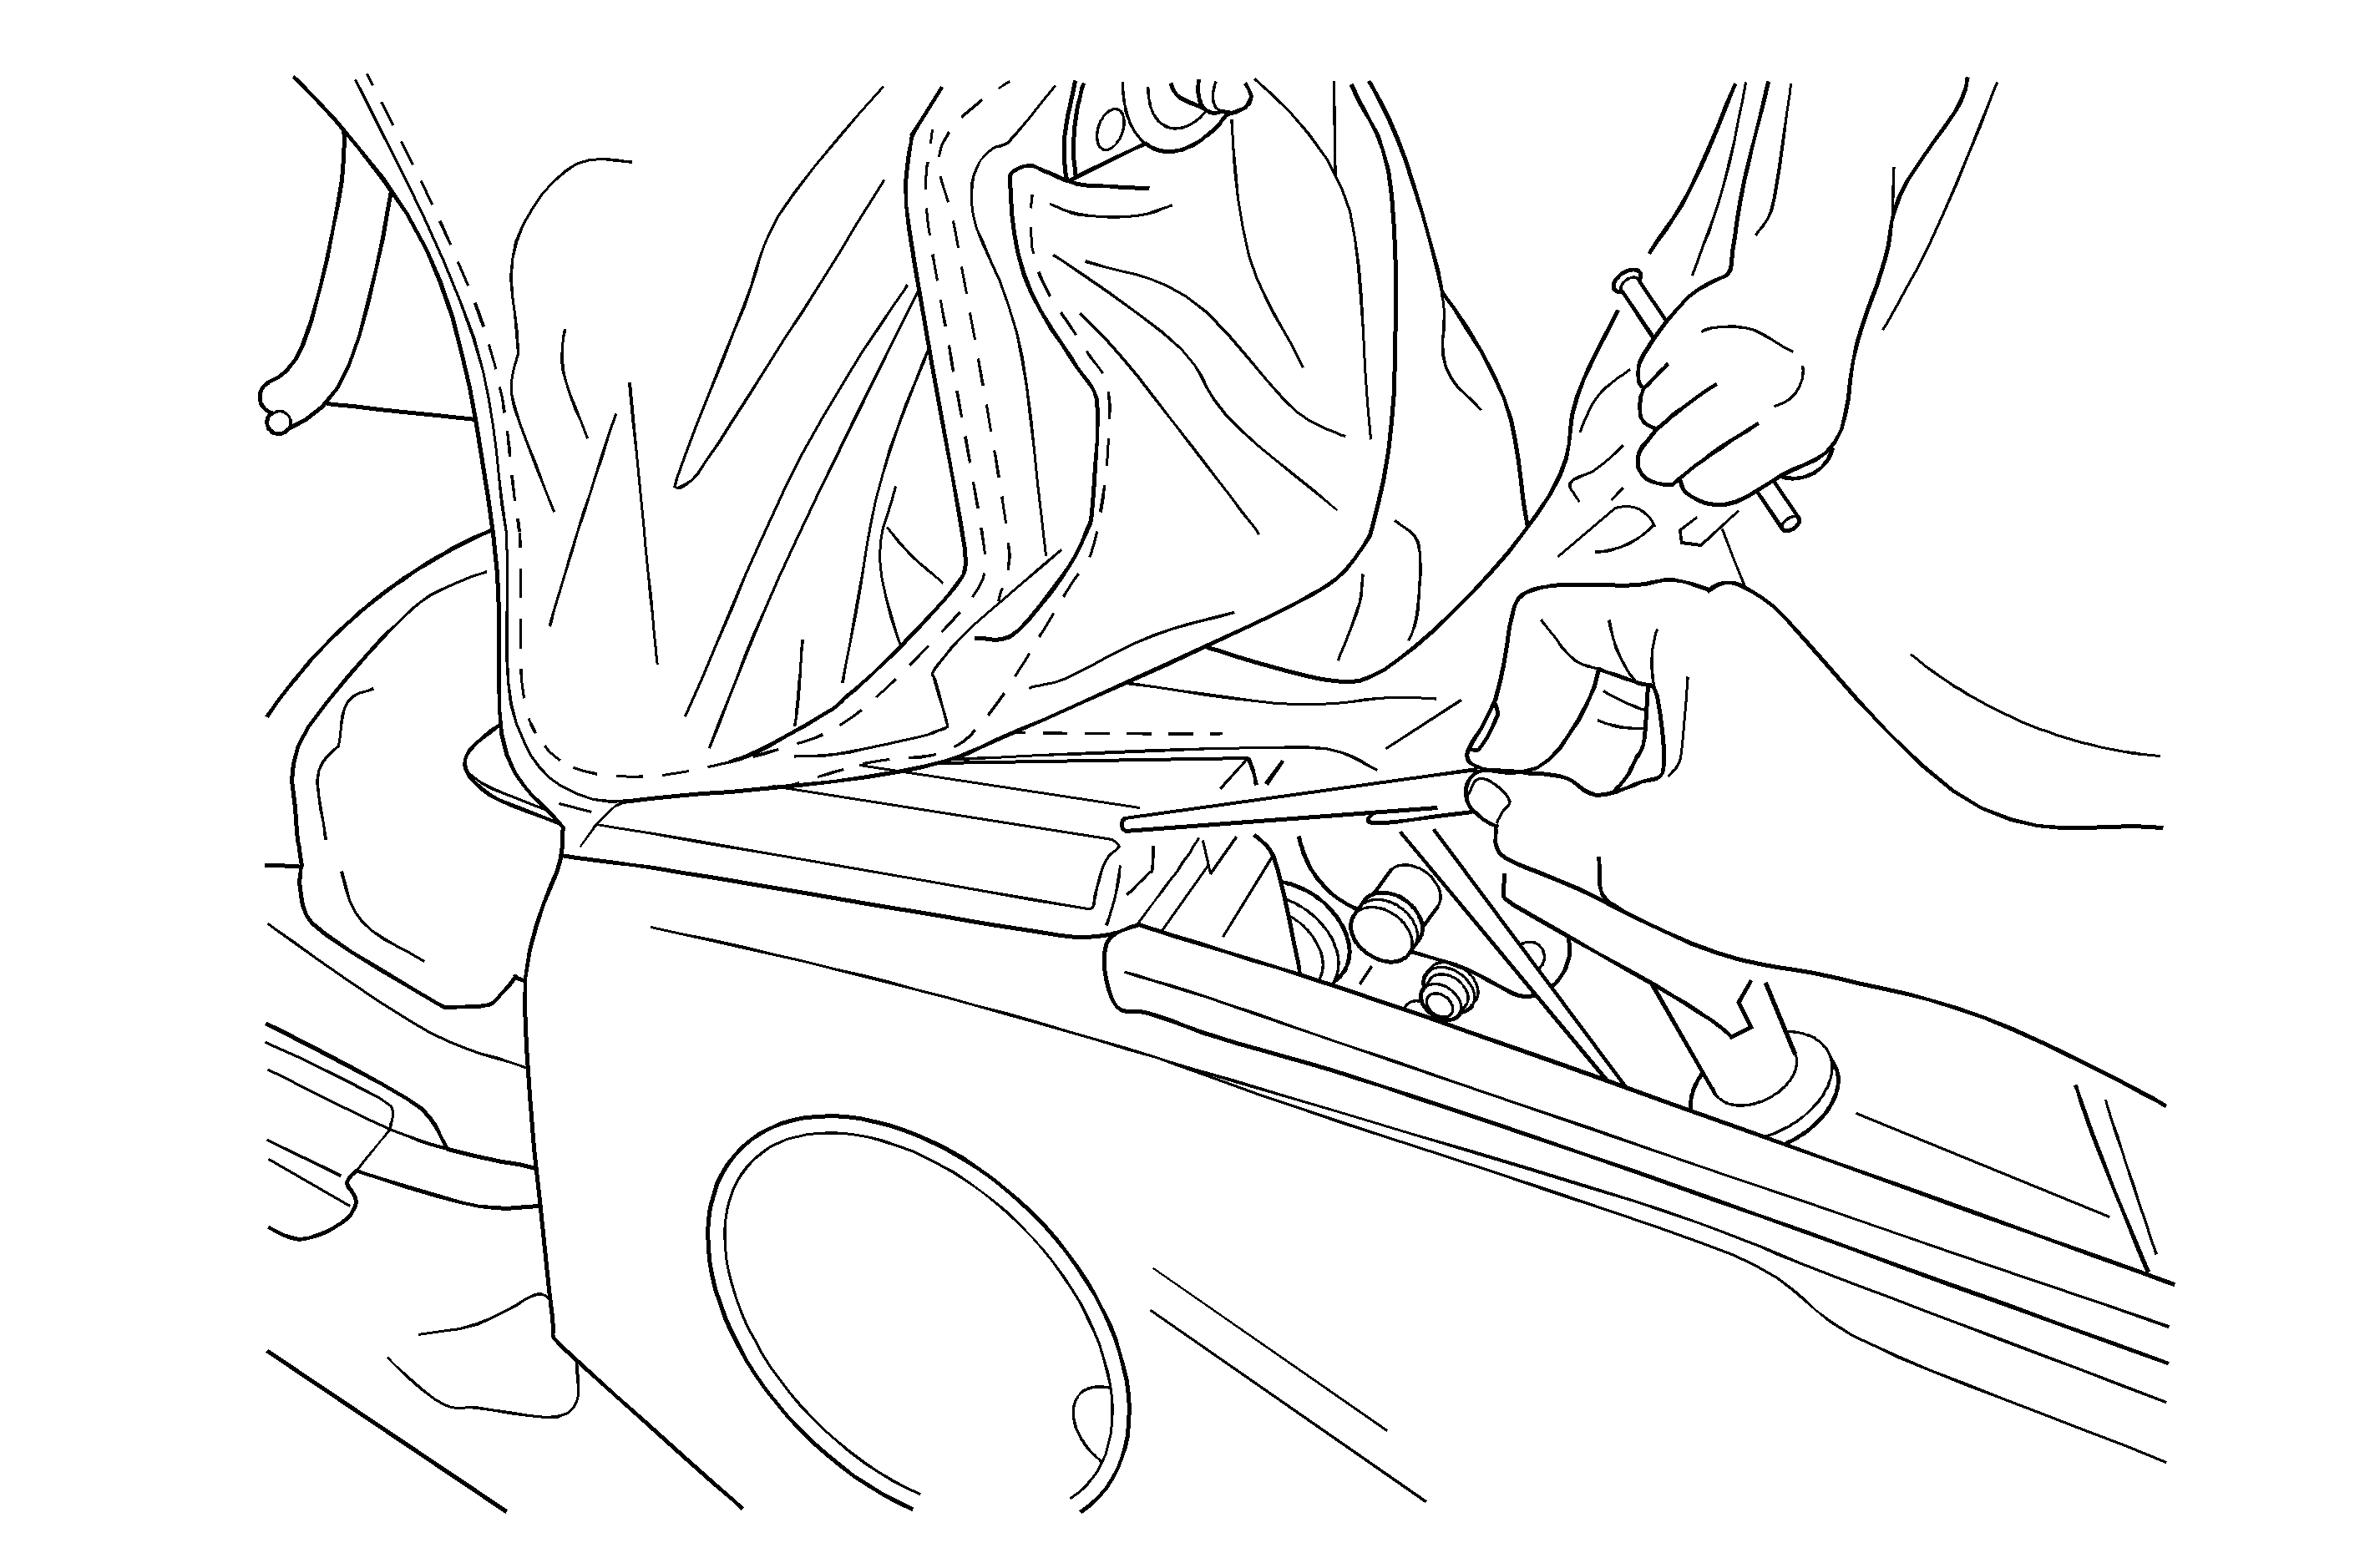
Ensure the winter flap covers the rub strip slot. Rotate the canvas around the B-pillar pin to bias the winterflap over the rub strip slot.
Cause #B
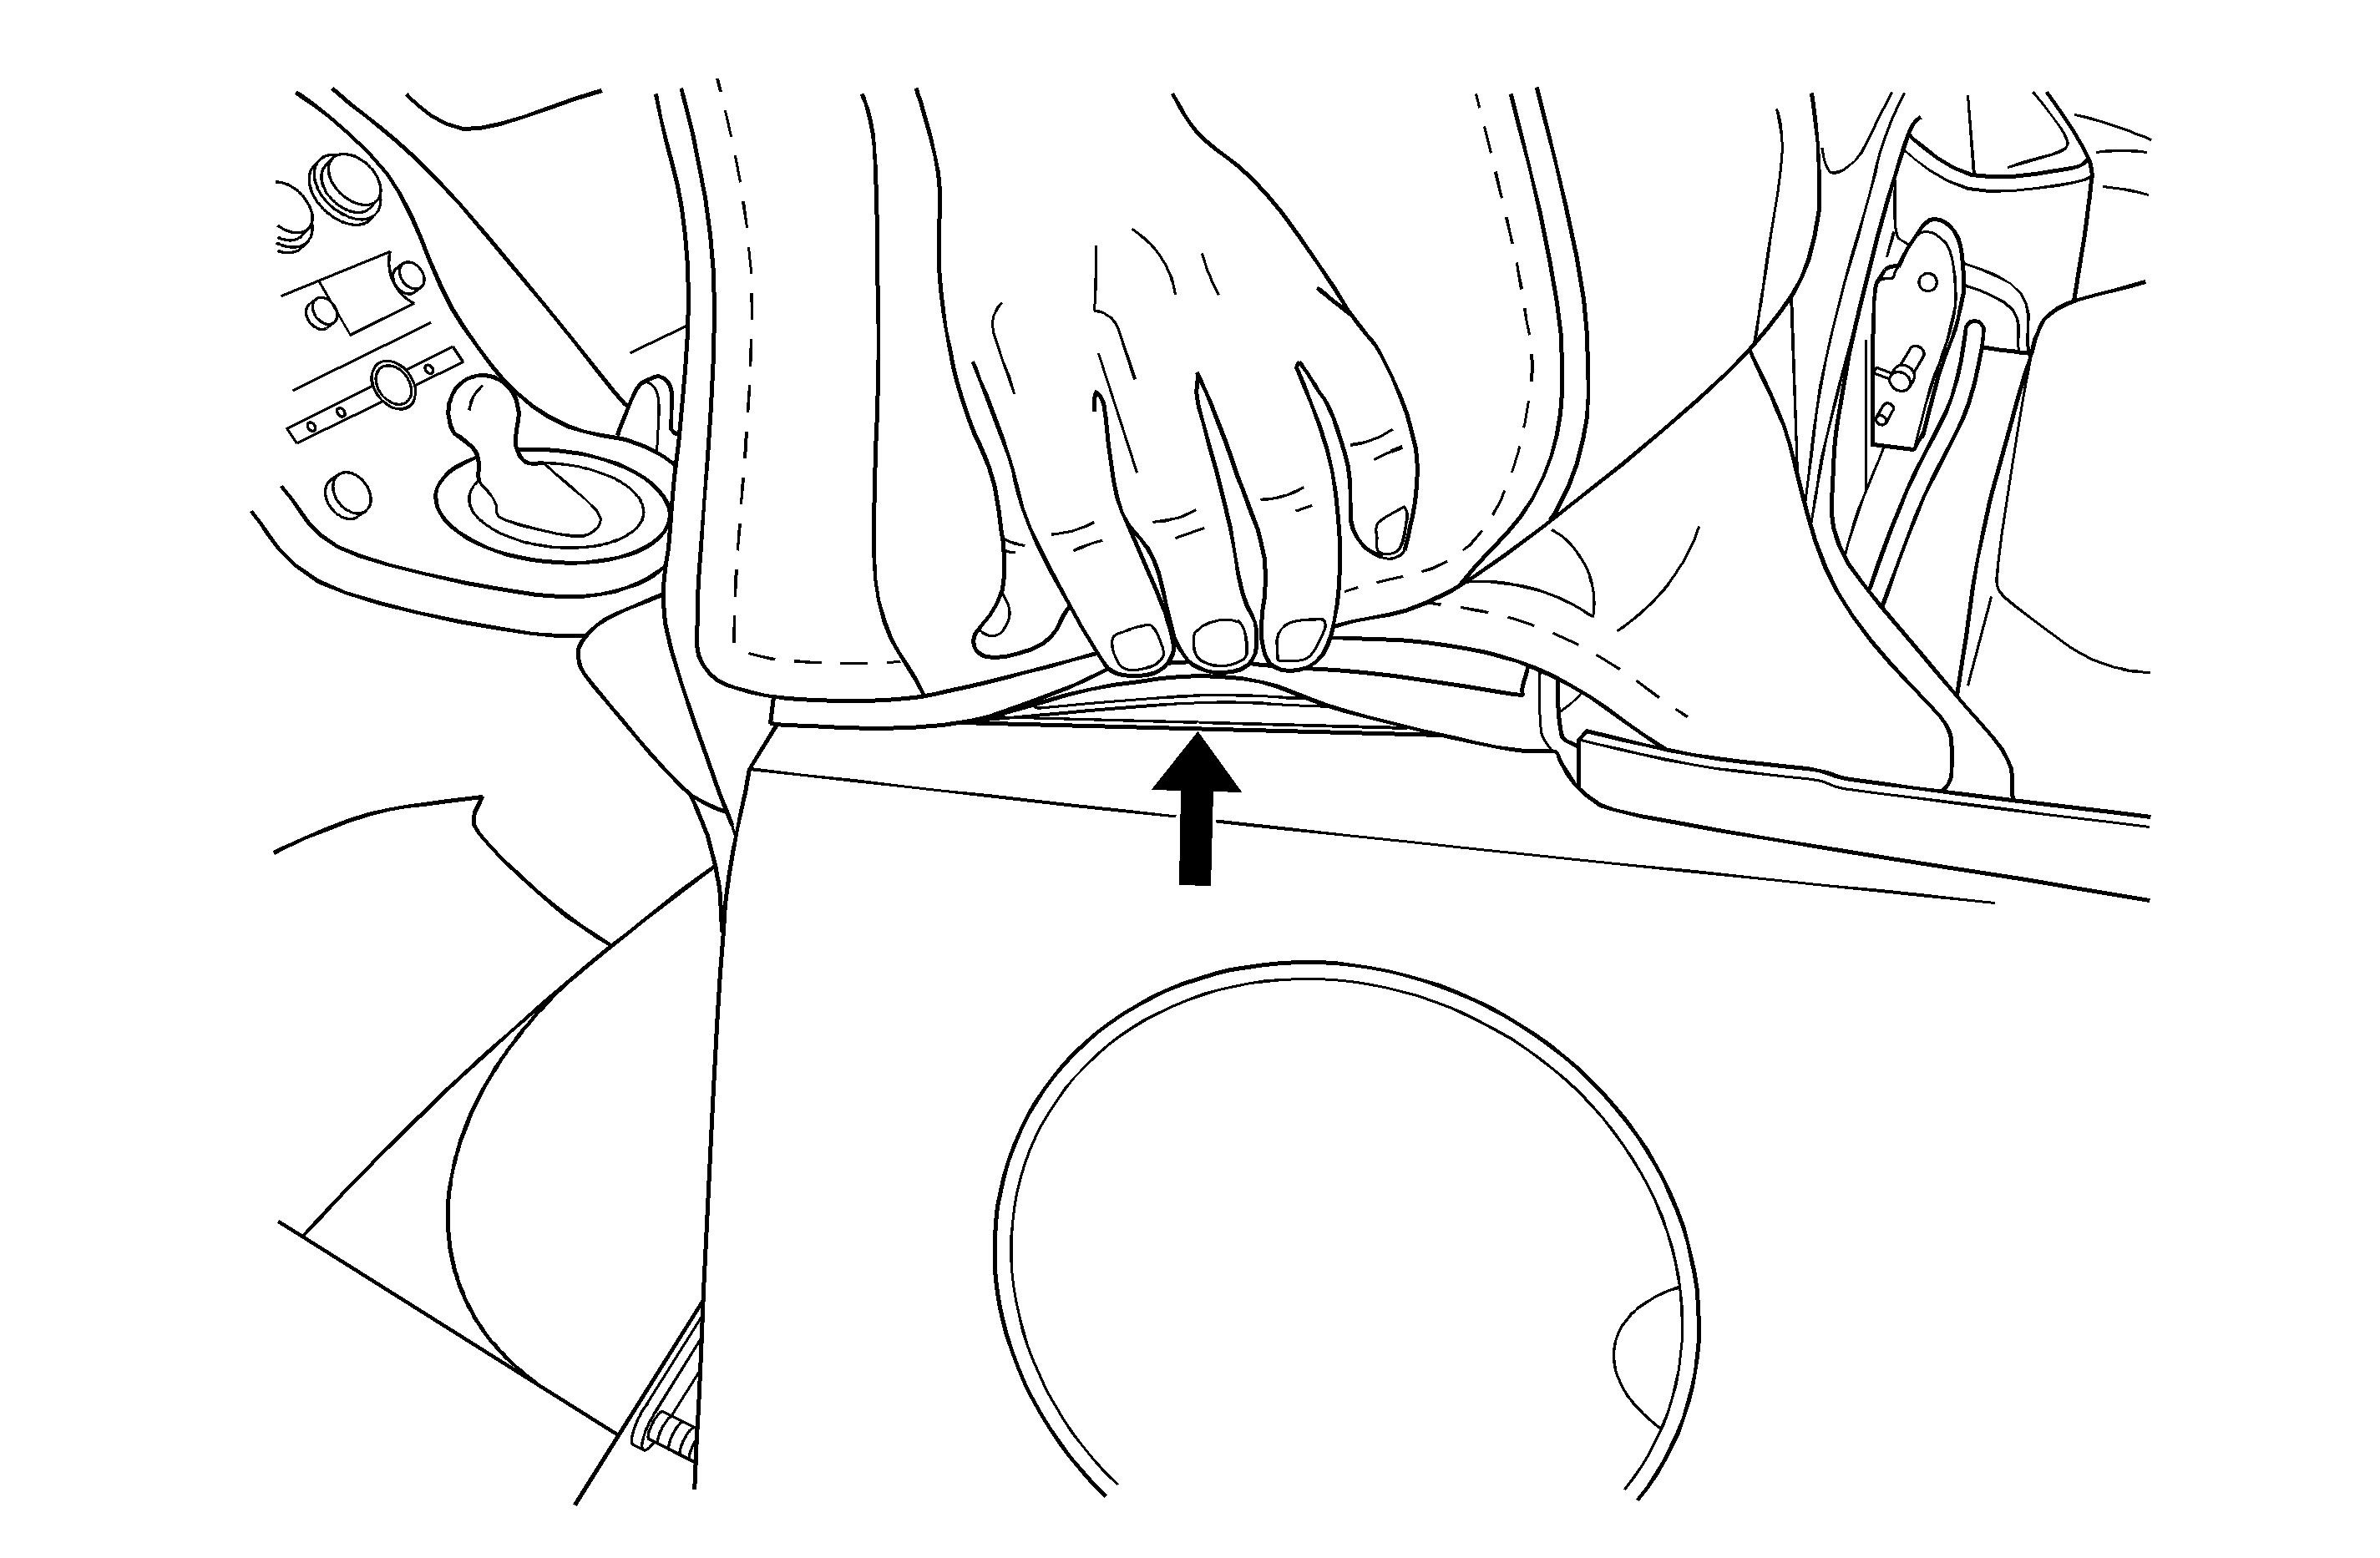
The mucket weatherstrip two-way tape may not be adhered to the body.
Correction #B
Replace the mucket rub strip.
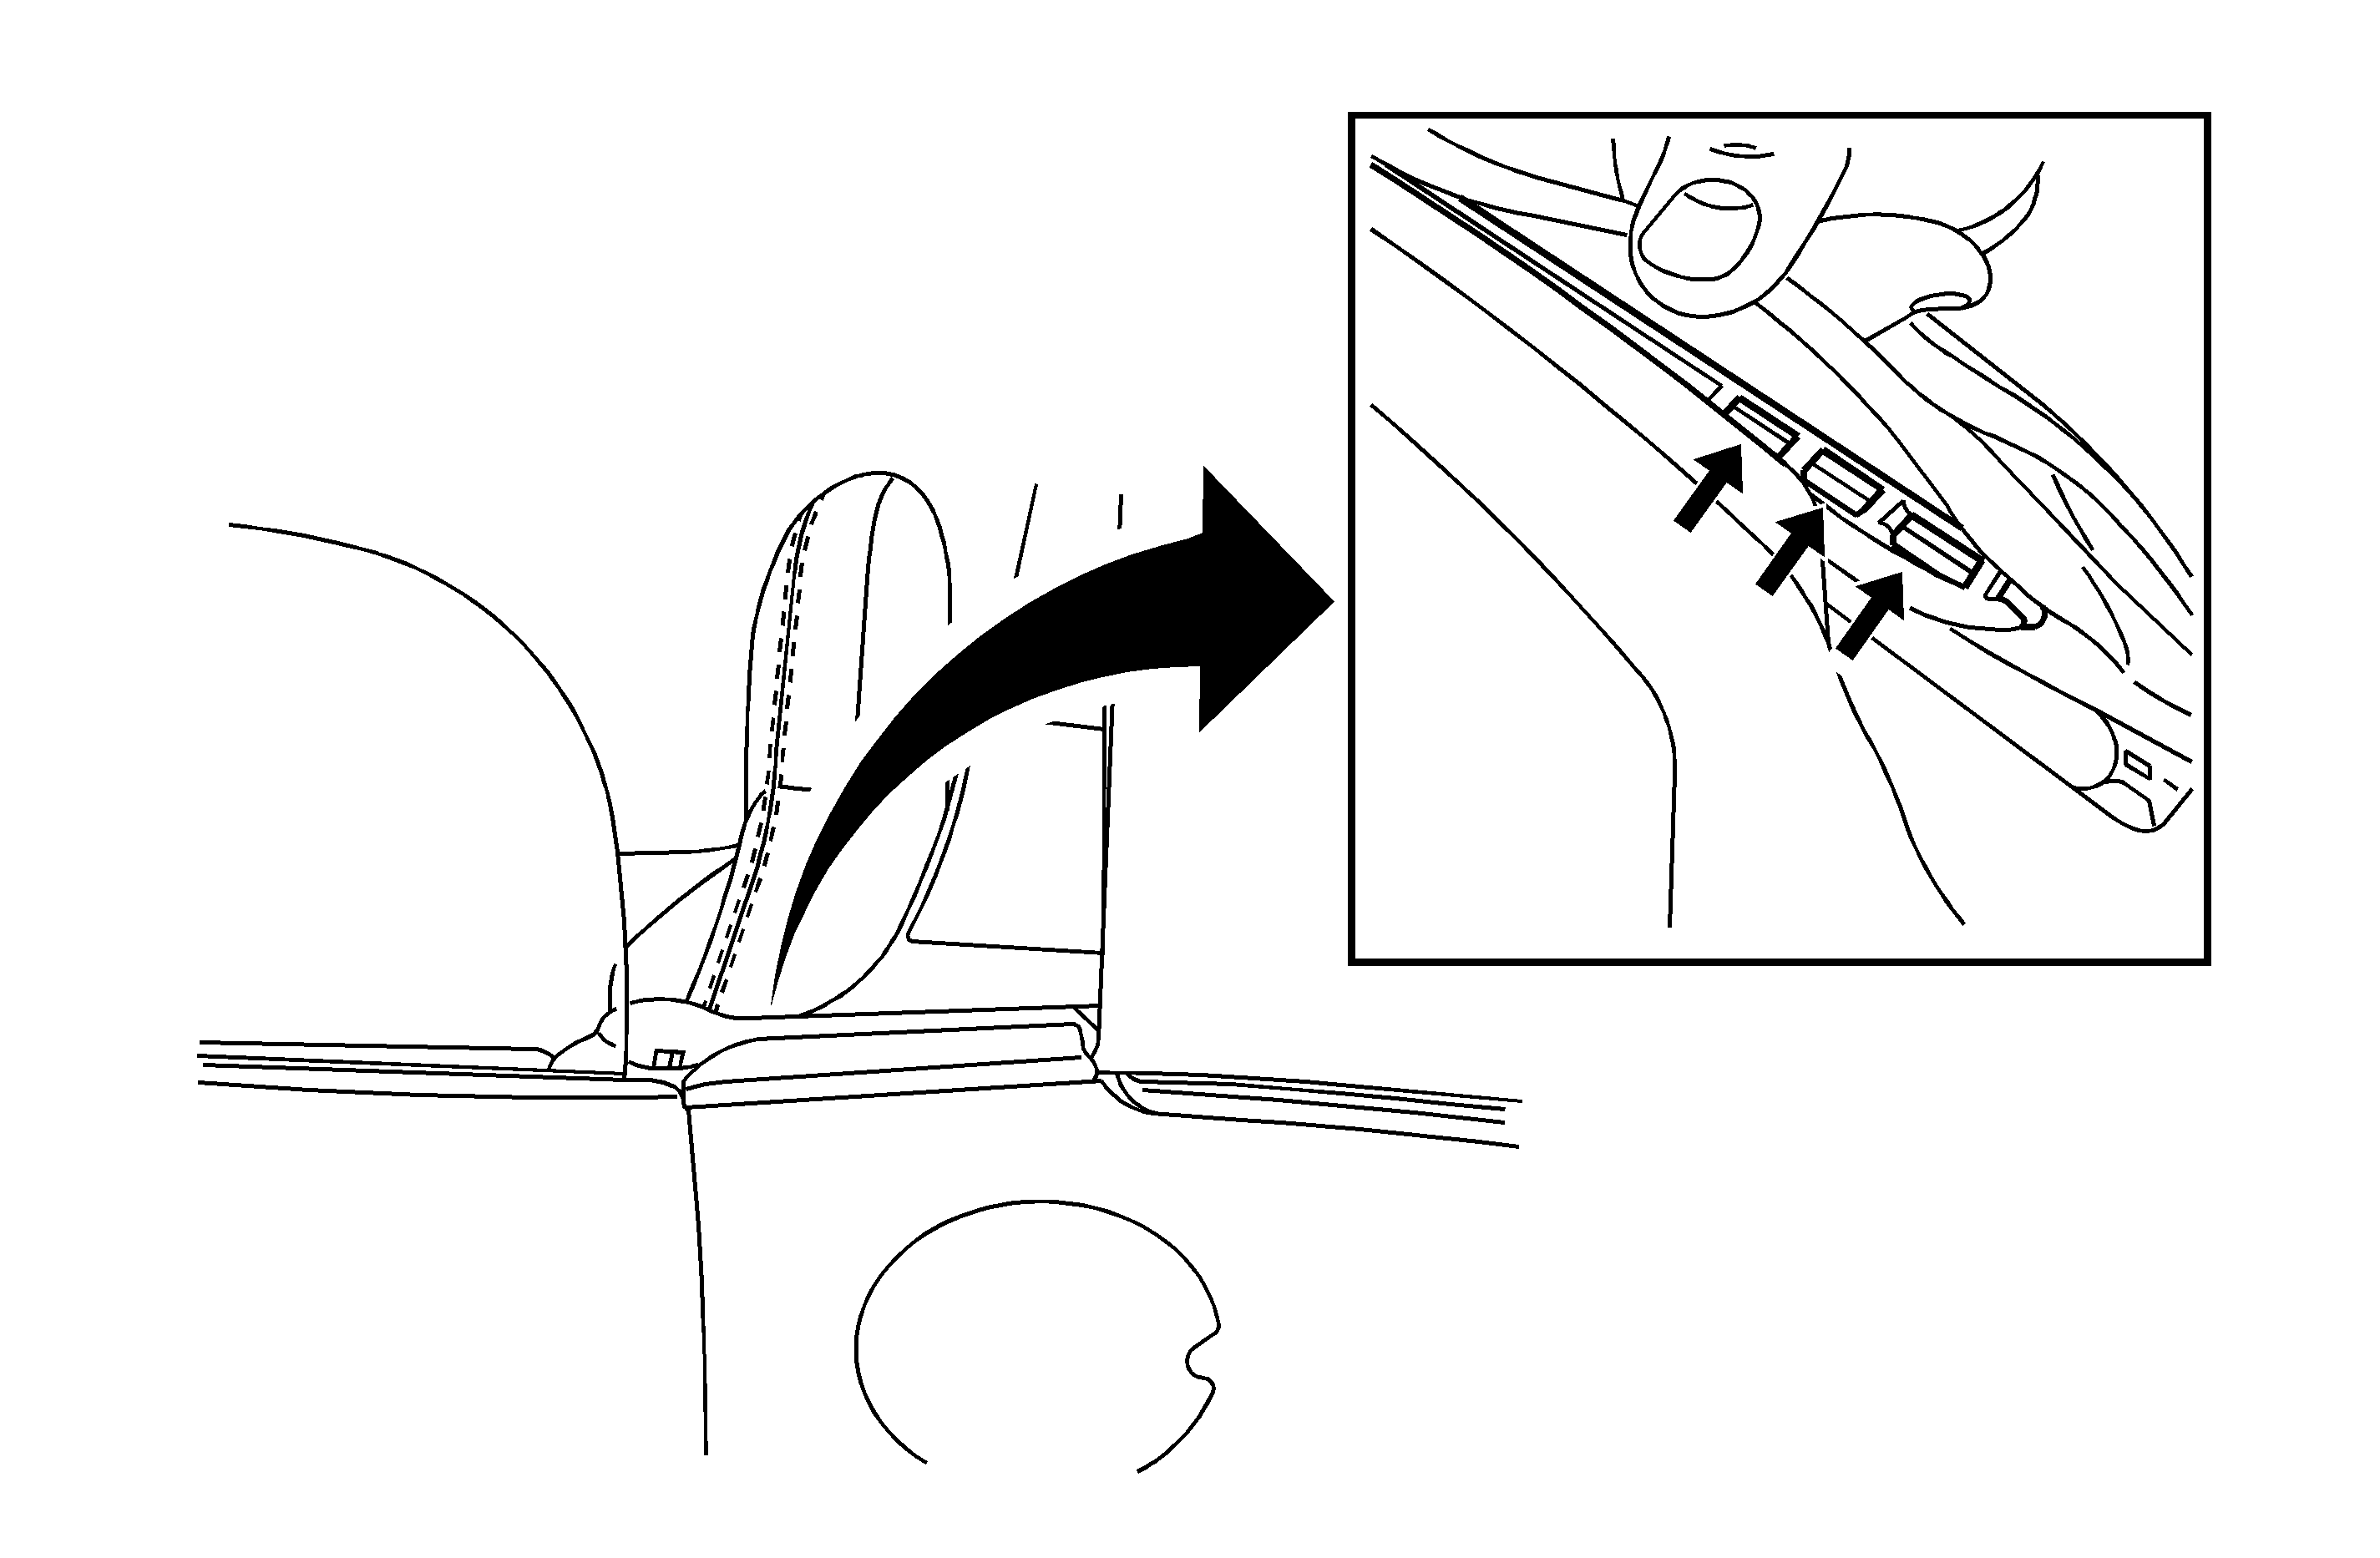
Squirt water into the weatherstrip as shown. The water should flow into the square drains in the weatherstrip and exit into the rear fender and onto the ground.
Condition #9
The customer may comment that the rear carpet is wet behind the seat or the seat belt is wet.
Cause
Water is leaking past the tulip panel to quarter panel location.
Correction
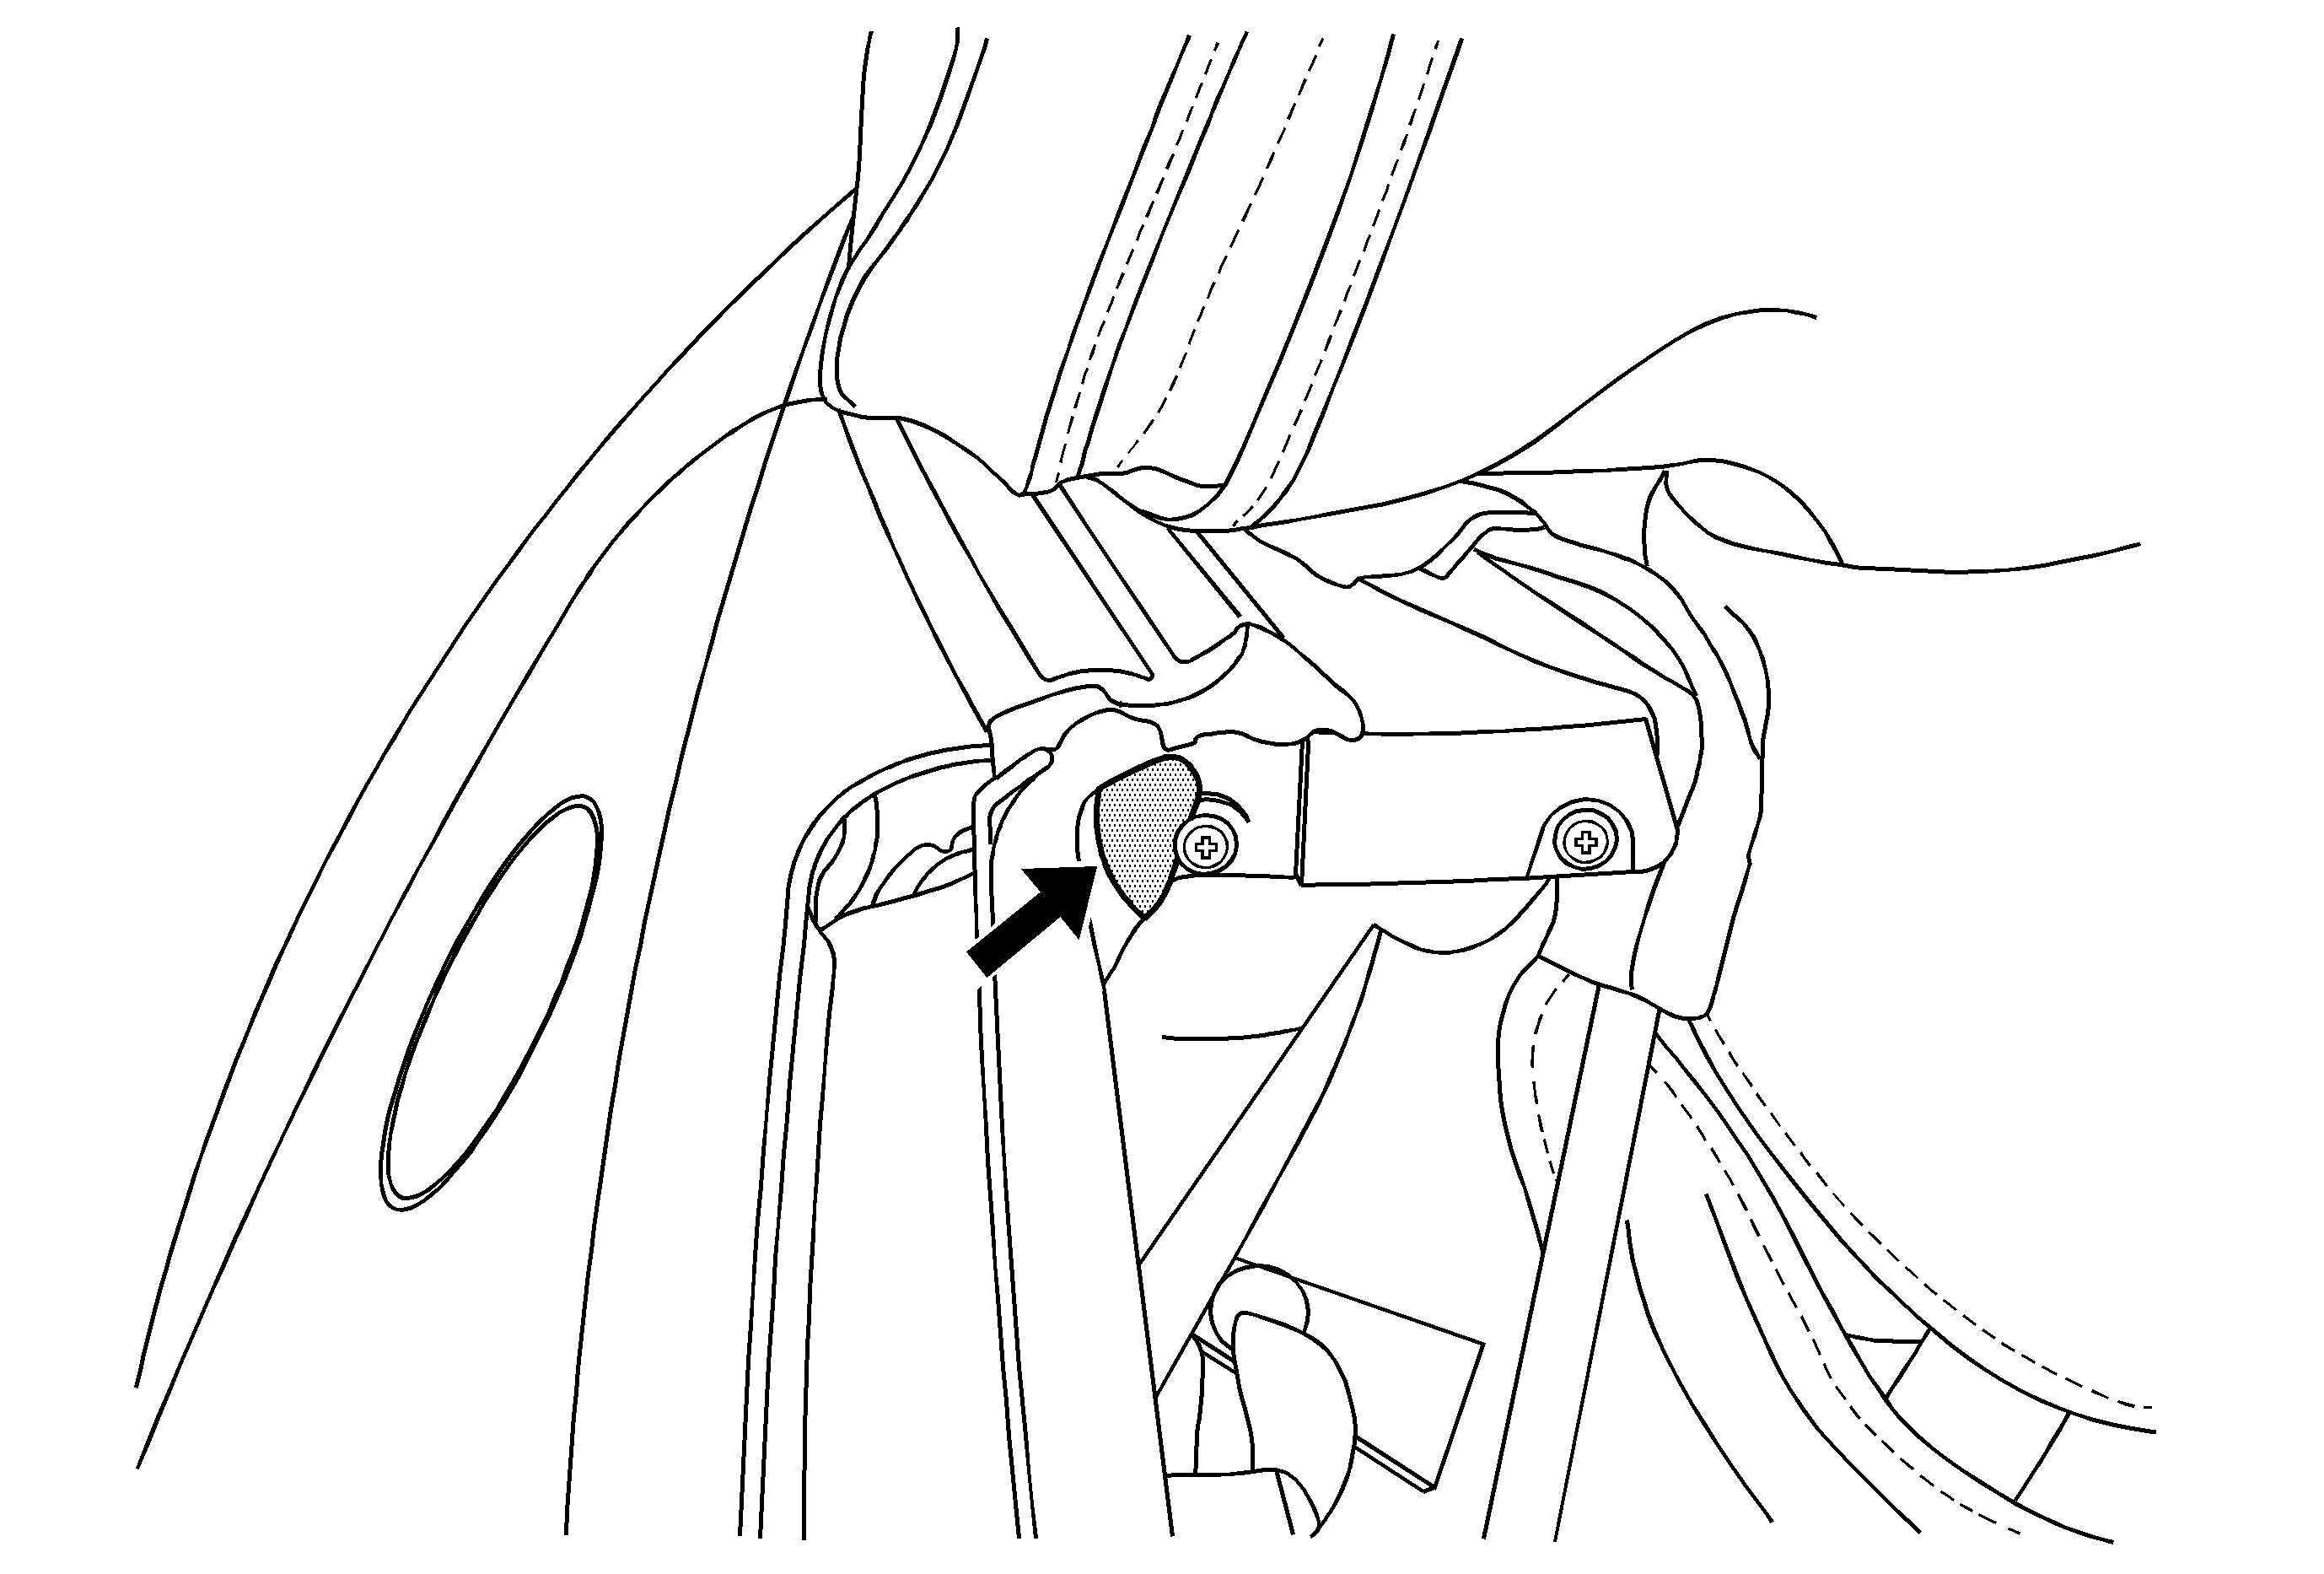
Use strip caulk to fill in the void and smooth out the transition between the weatherstrip and the trim.
Condition #10
The customer may comment that the carpet is wet under the two forward trunk drains.
Cause
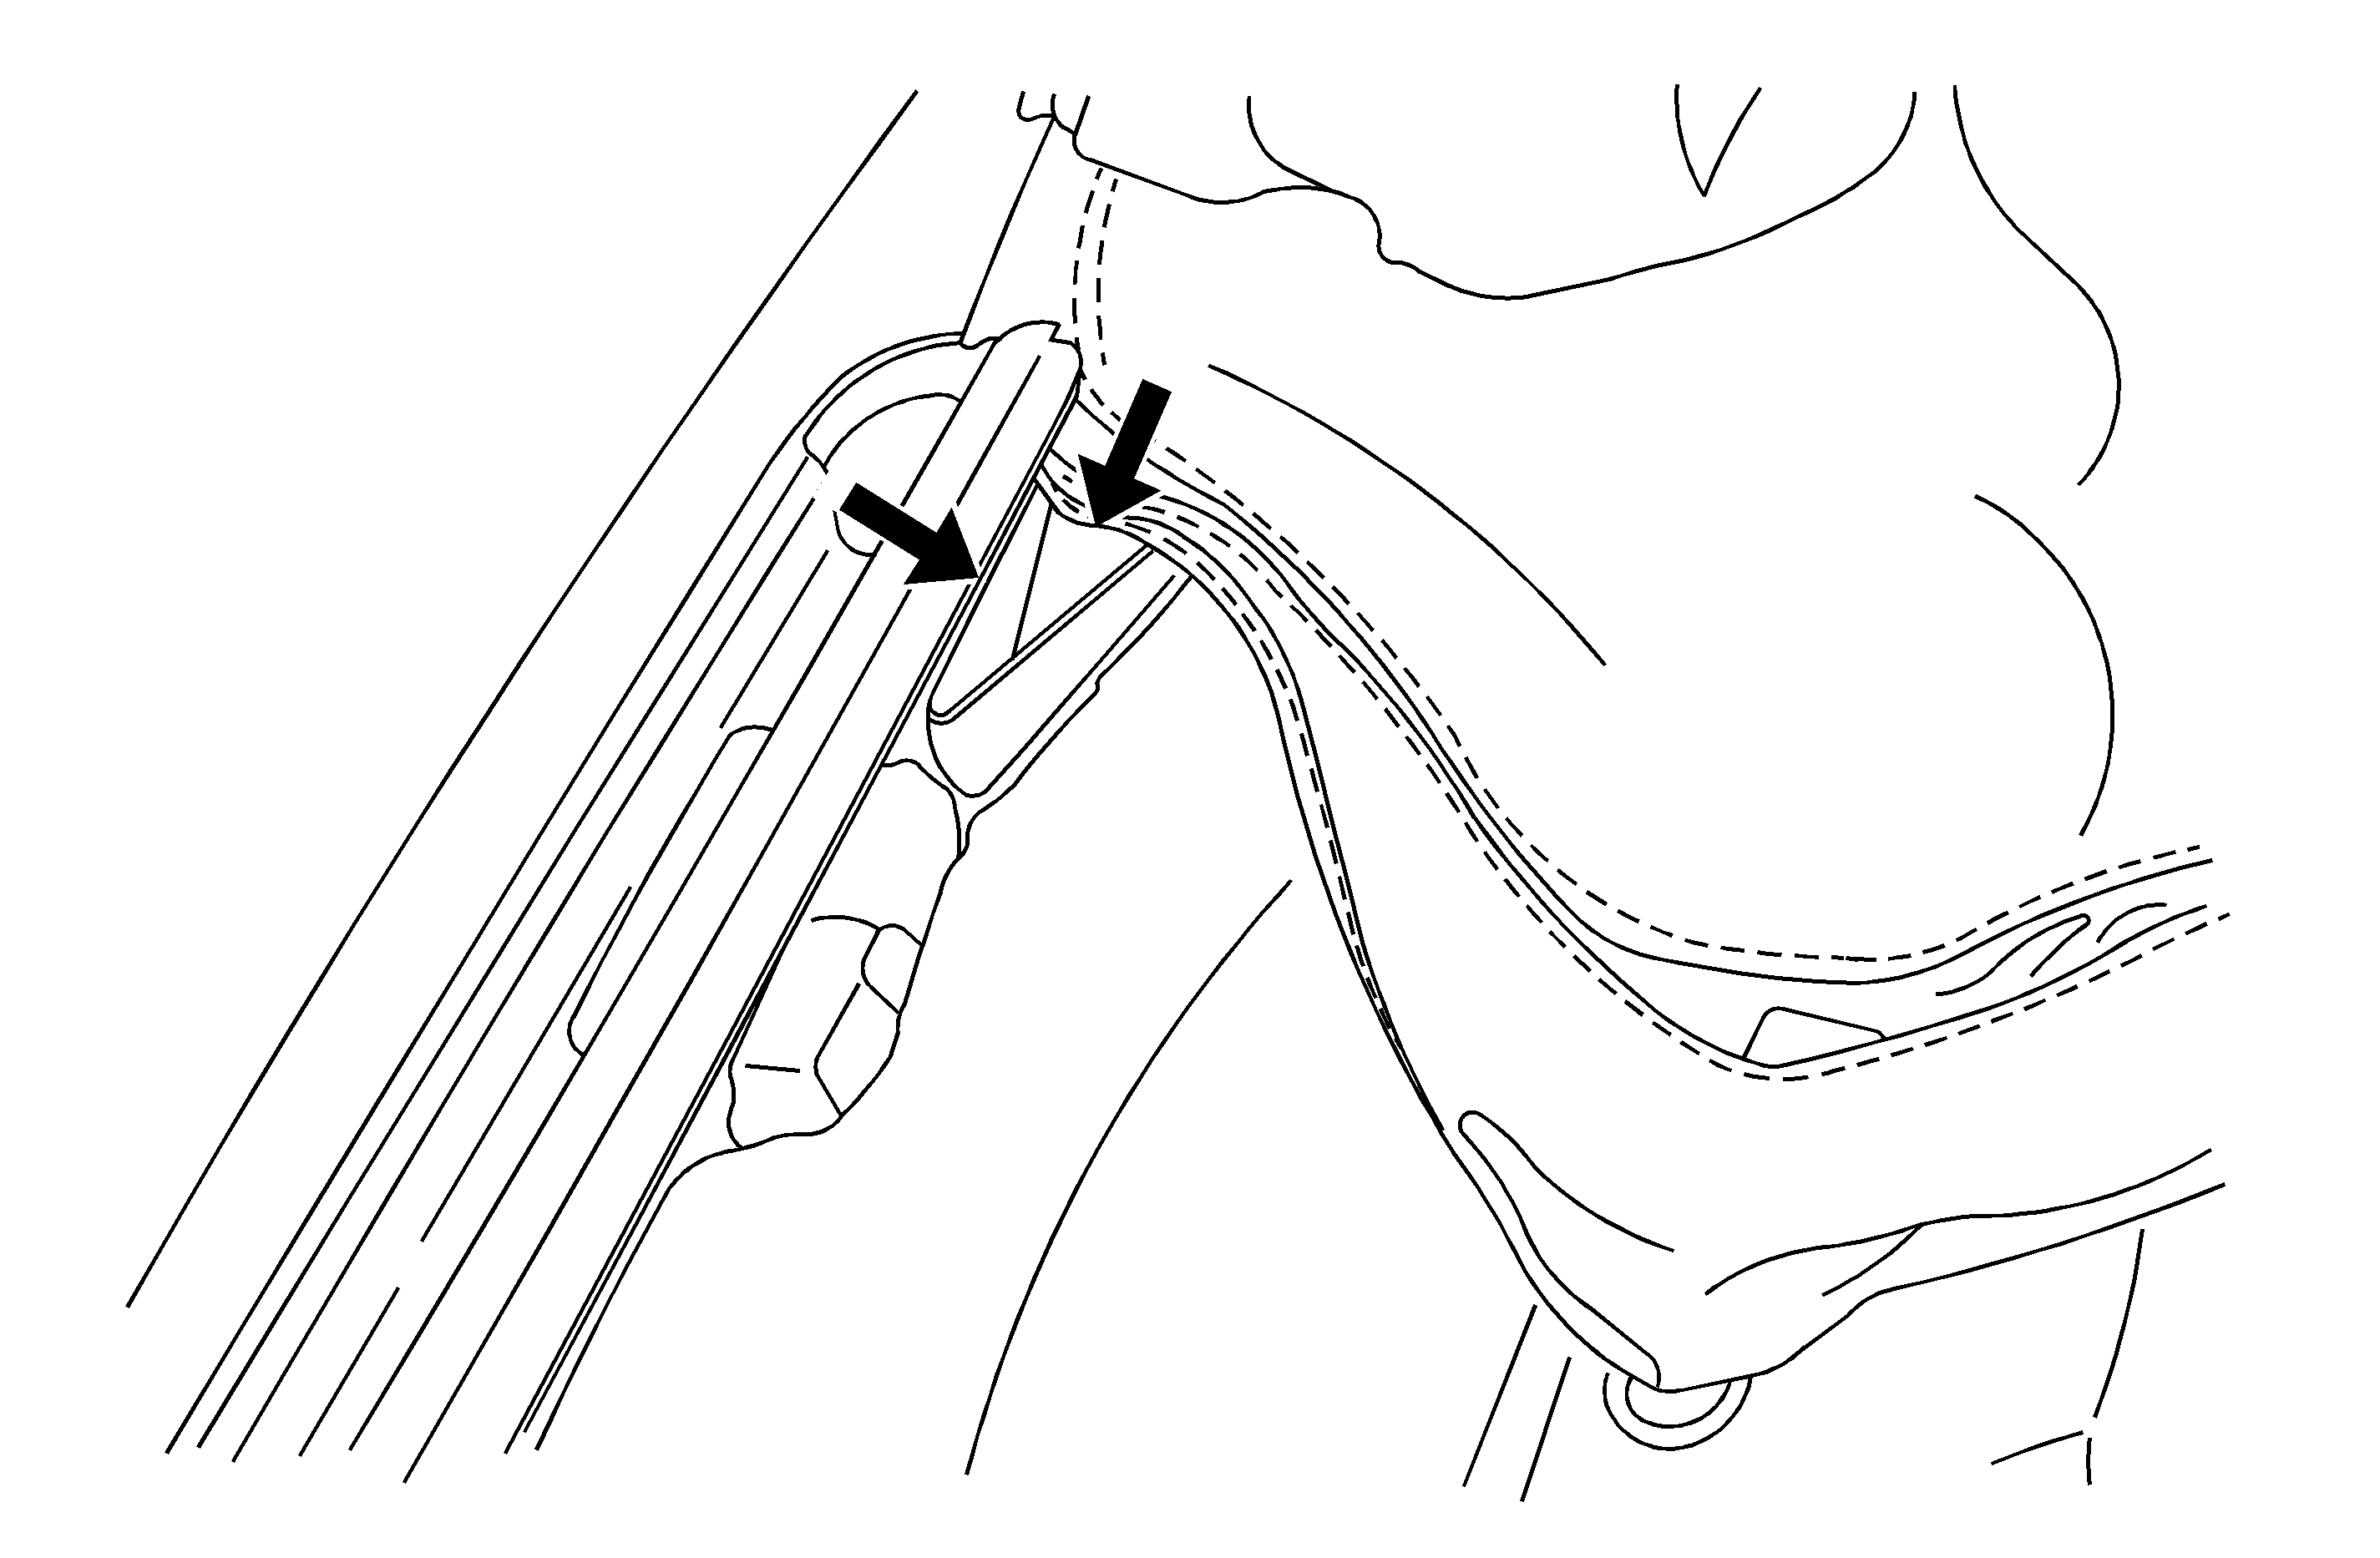
The two drains may have a void in the sealer between the drain and the body or to much squeeze out or not enough ahsland (exposed ledge).
Correction
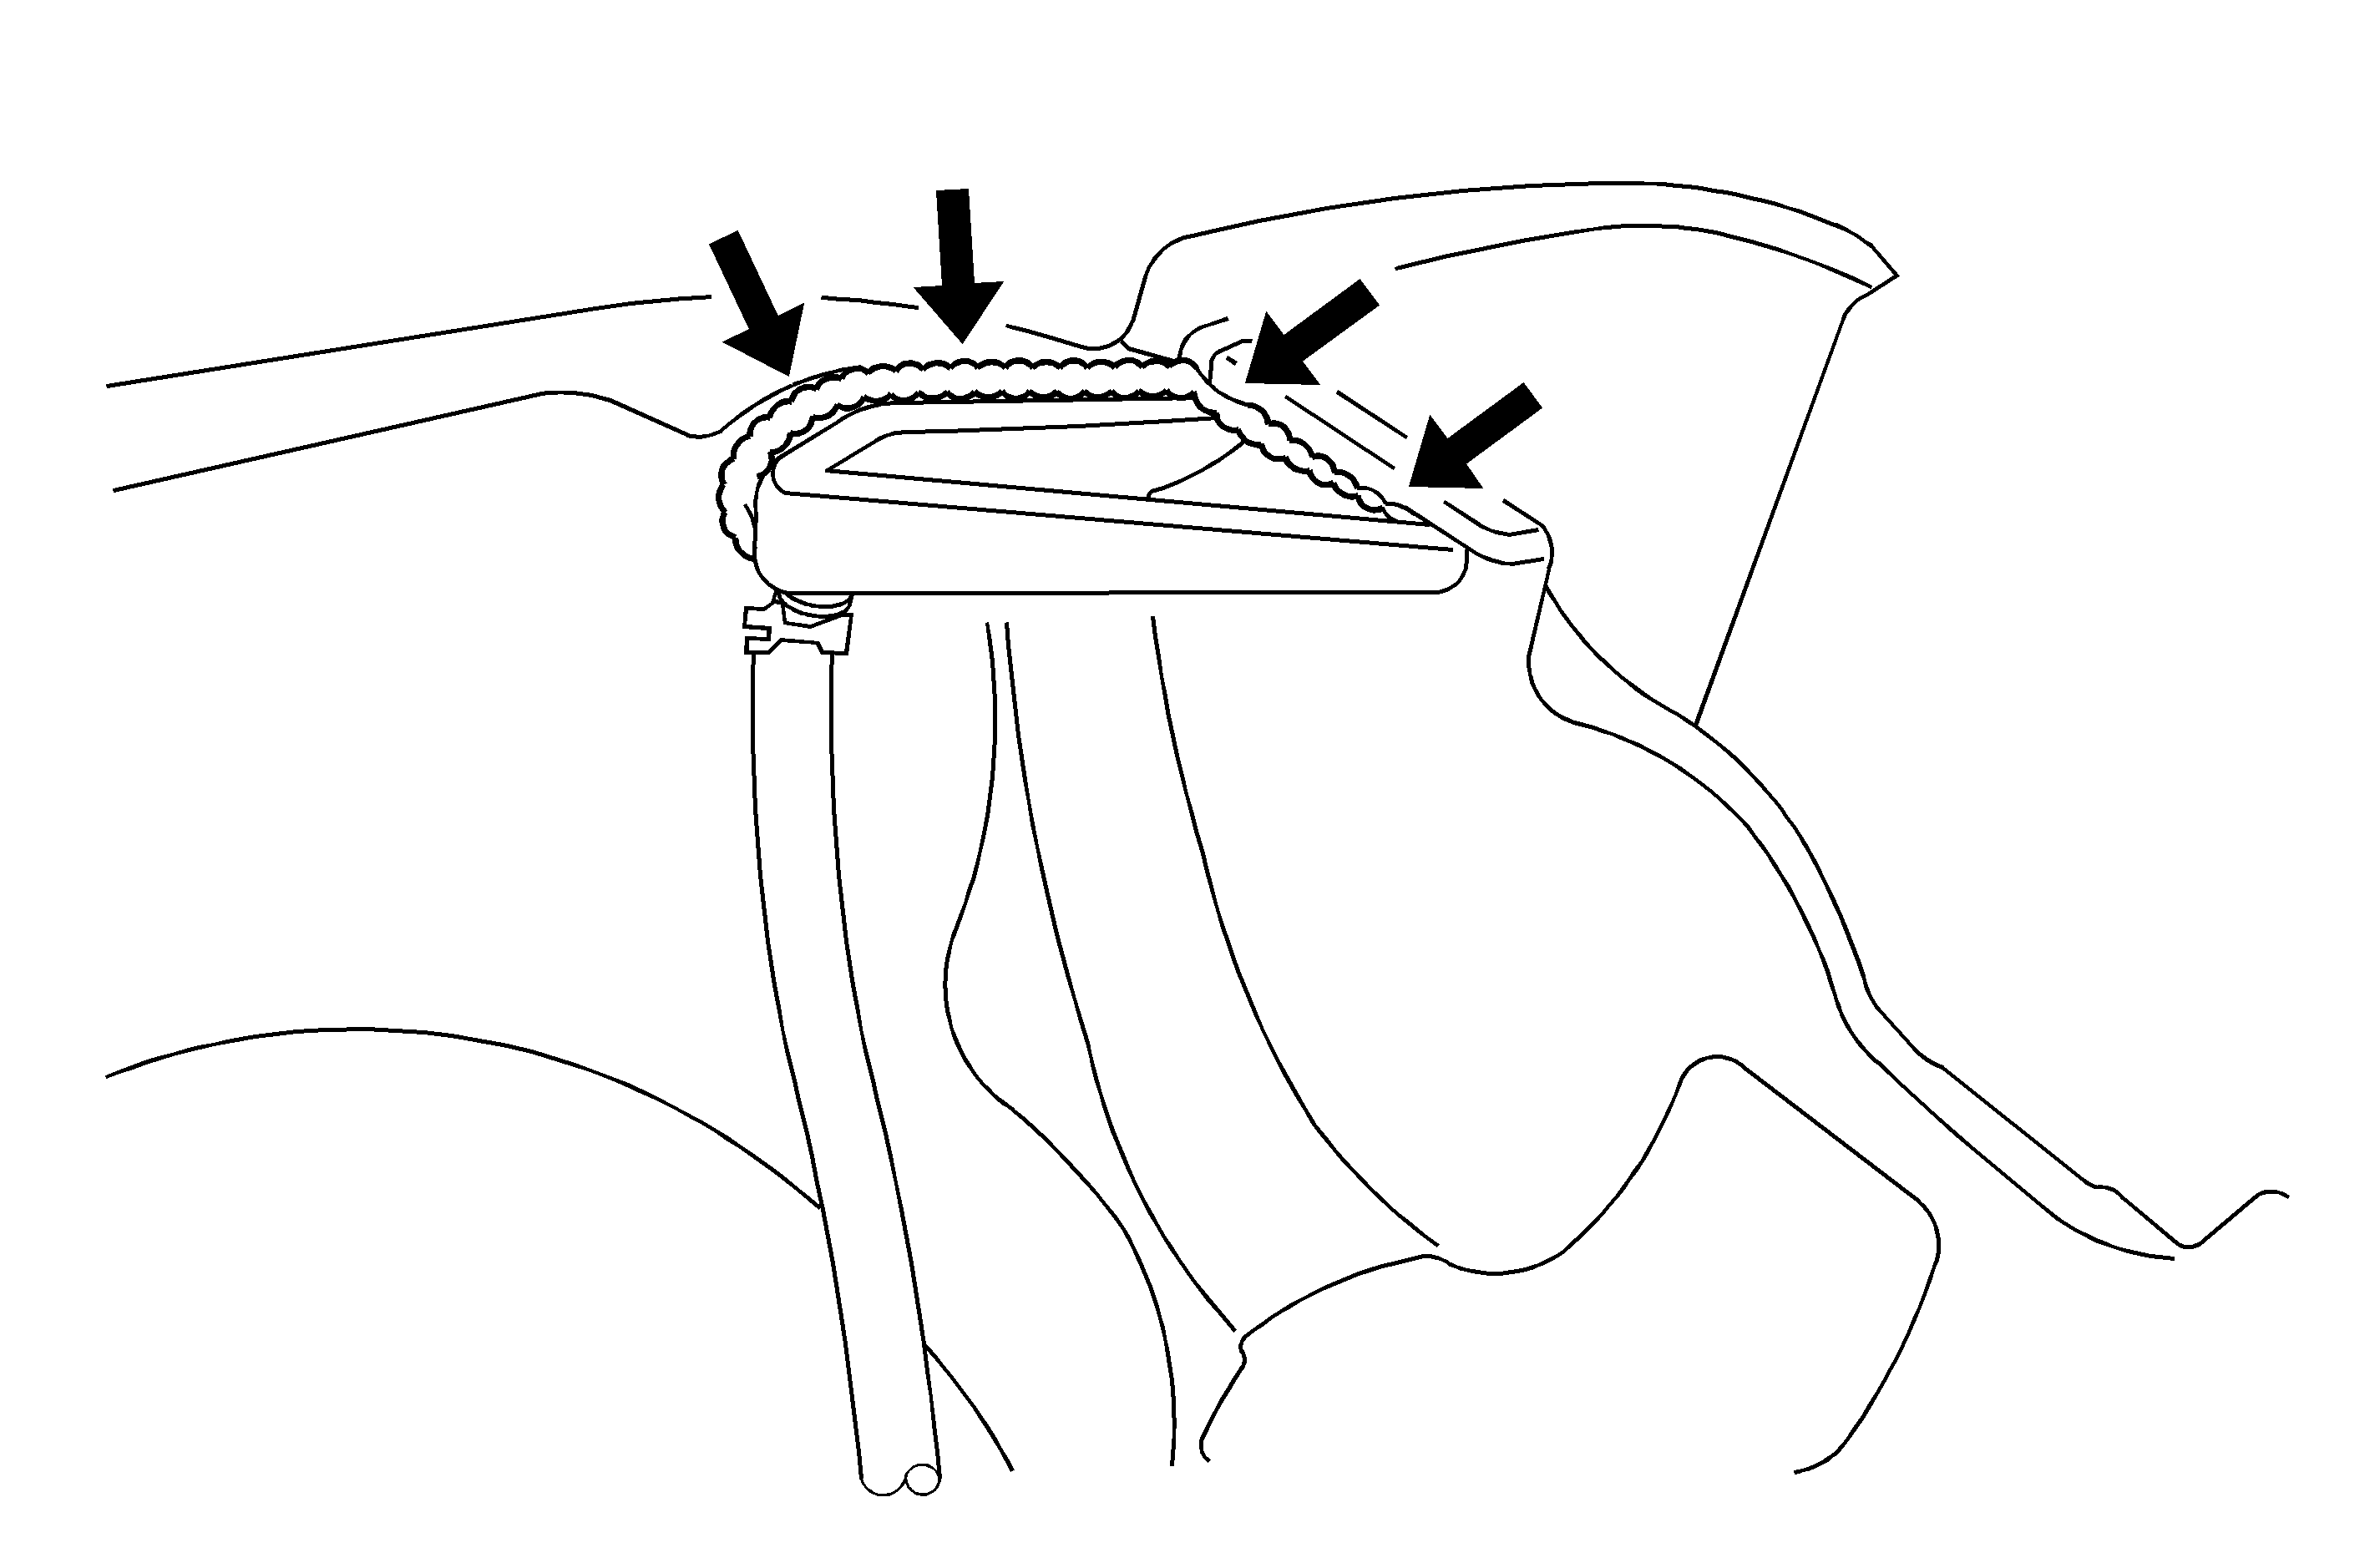
Clean the area with a non-oil based cleaner and reseal with urethane.
Condition #11
The customer may comment about a waterleak at the front of the trunk.
Cause
The drain bag in the trunk may be stuck together.
Correction
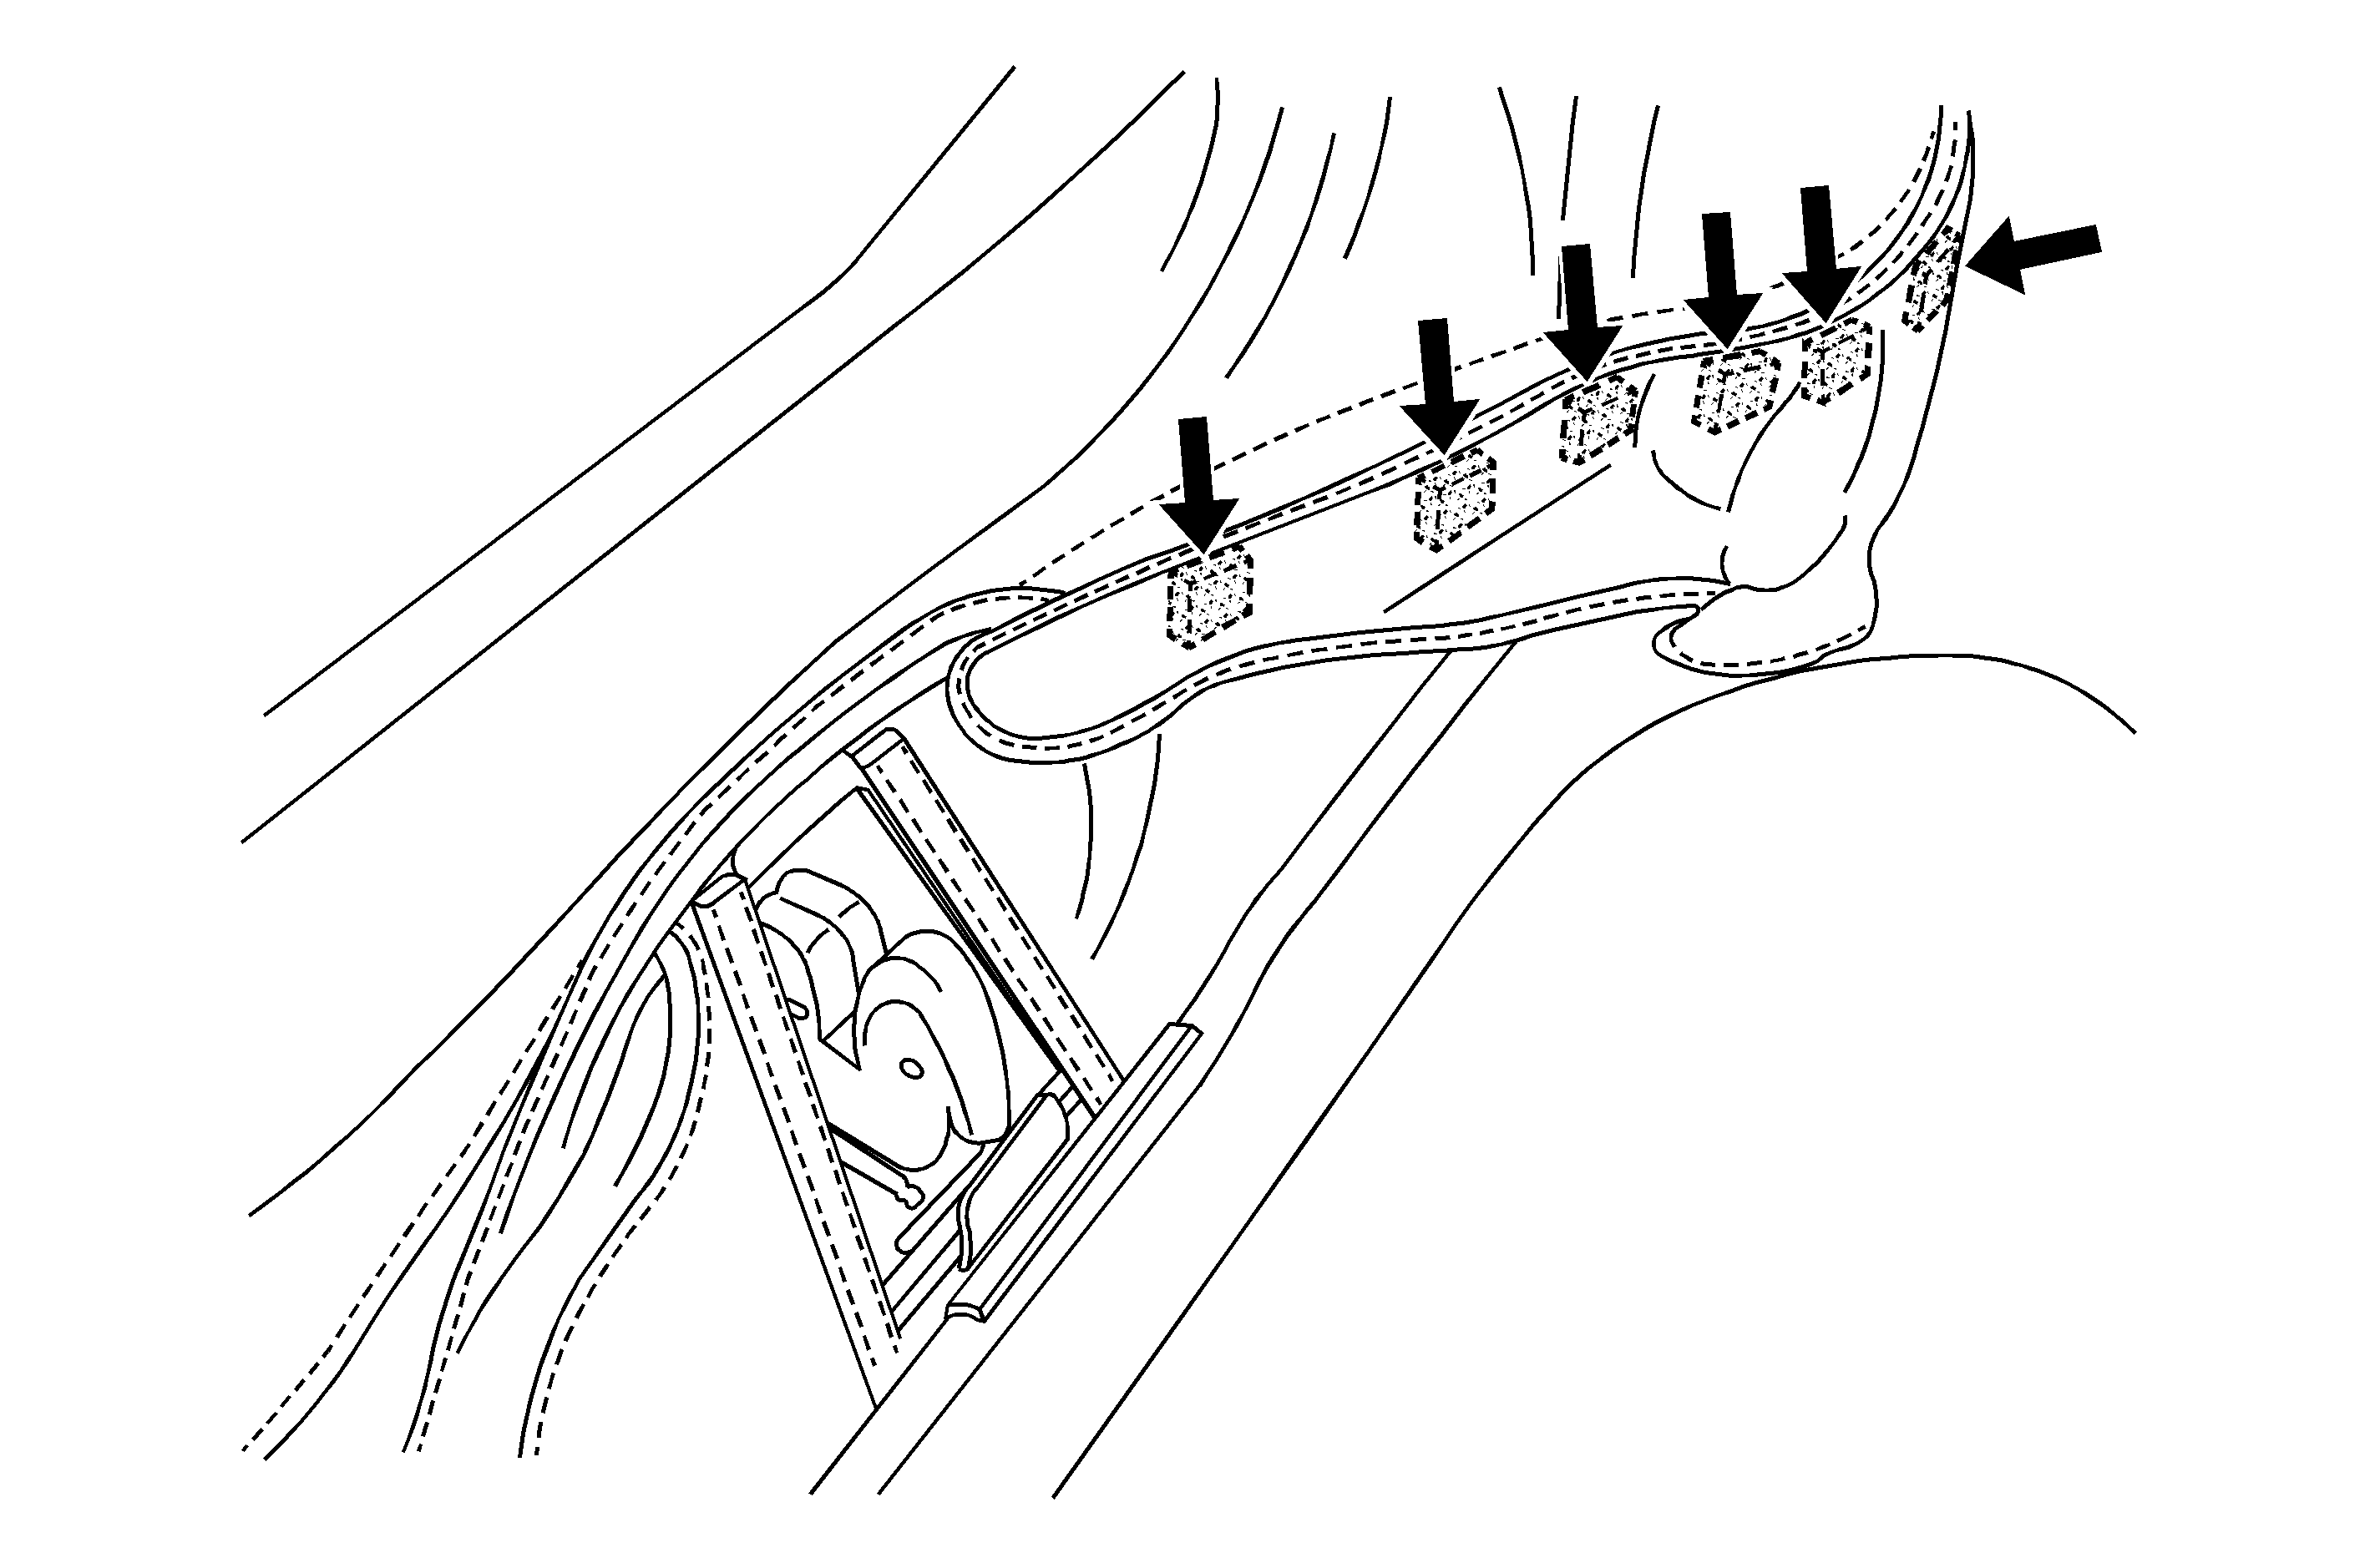
2006 and early 2007 built vehicles: Clean the inside of the drain bag and install 25 mm x 25 mm x 13 mm thick (1 in x 1 in x 9/16 in thick) foam blocks to the inside of the bag. Place the foam blocks three inches apart. These foam blocks can be cut from a roll and purchased from Kent Automotive, P/N P46515.
Condition #12
Some customers may comment of water on the sides of the carpet in the rear trunk.
Cause
Water may be entering the trunk through a seam in the tonneau cover.
Correction
Clean the tonneau cover and seal with a small amount of Kent seam sealer, P/N 10200.
Condition #13
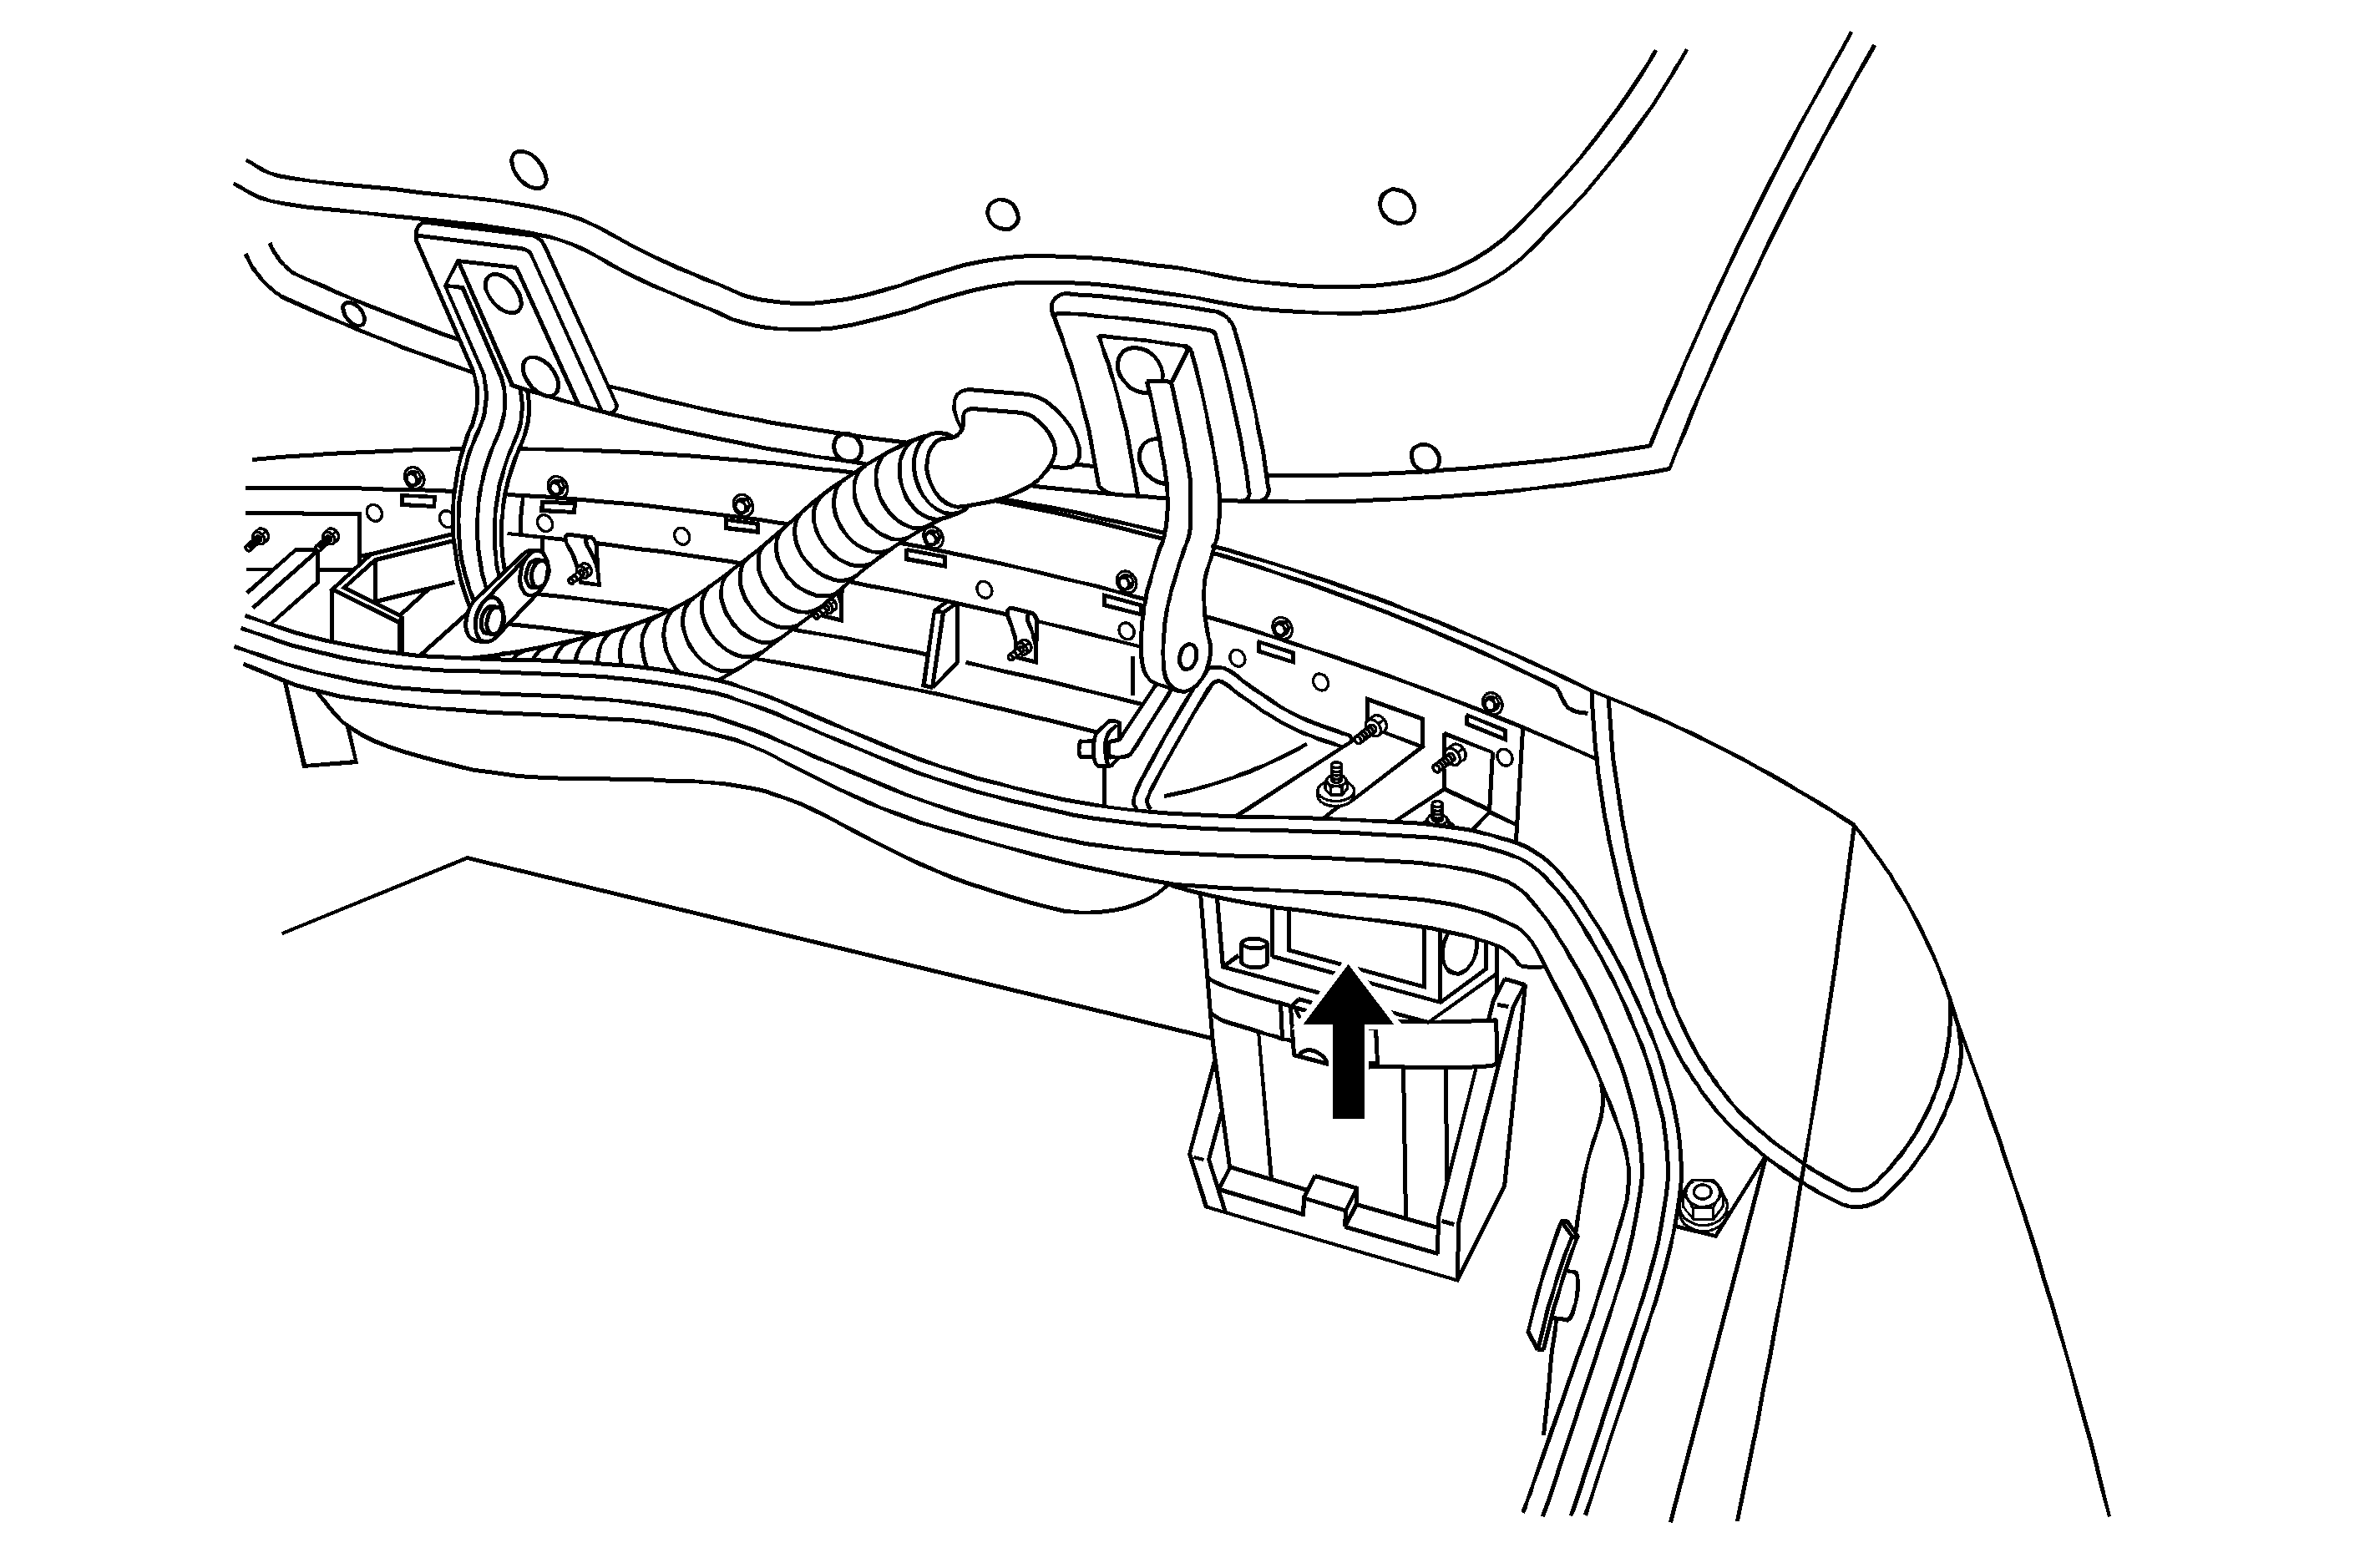
The customer may comment about a waterleak at the rear of the trunk.
Cause
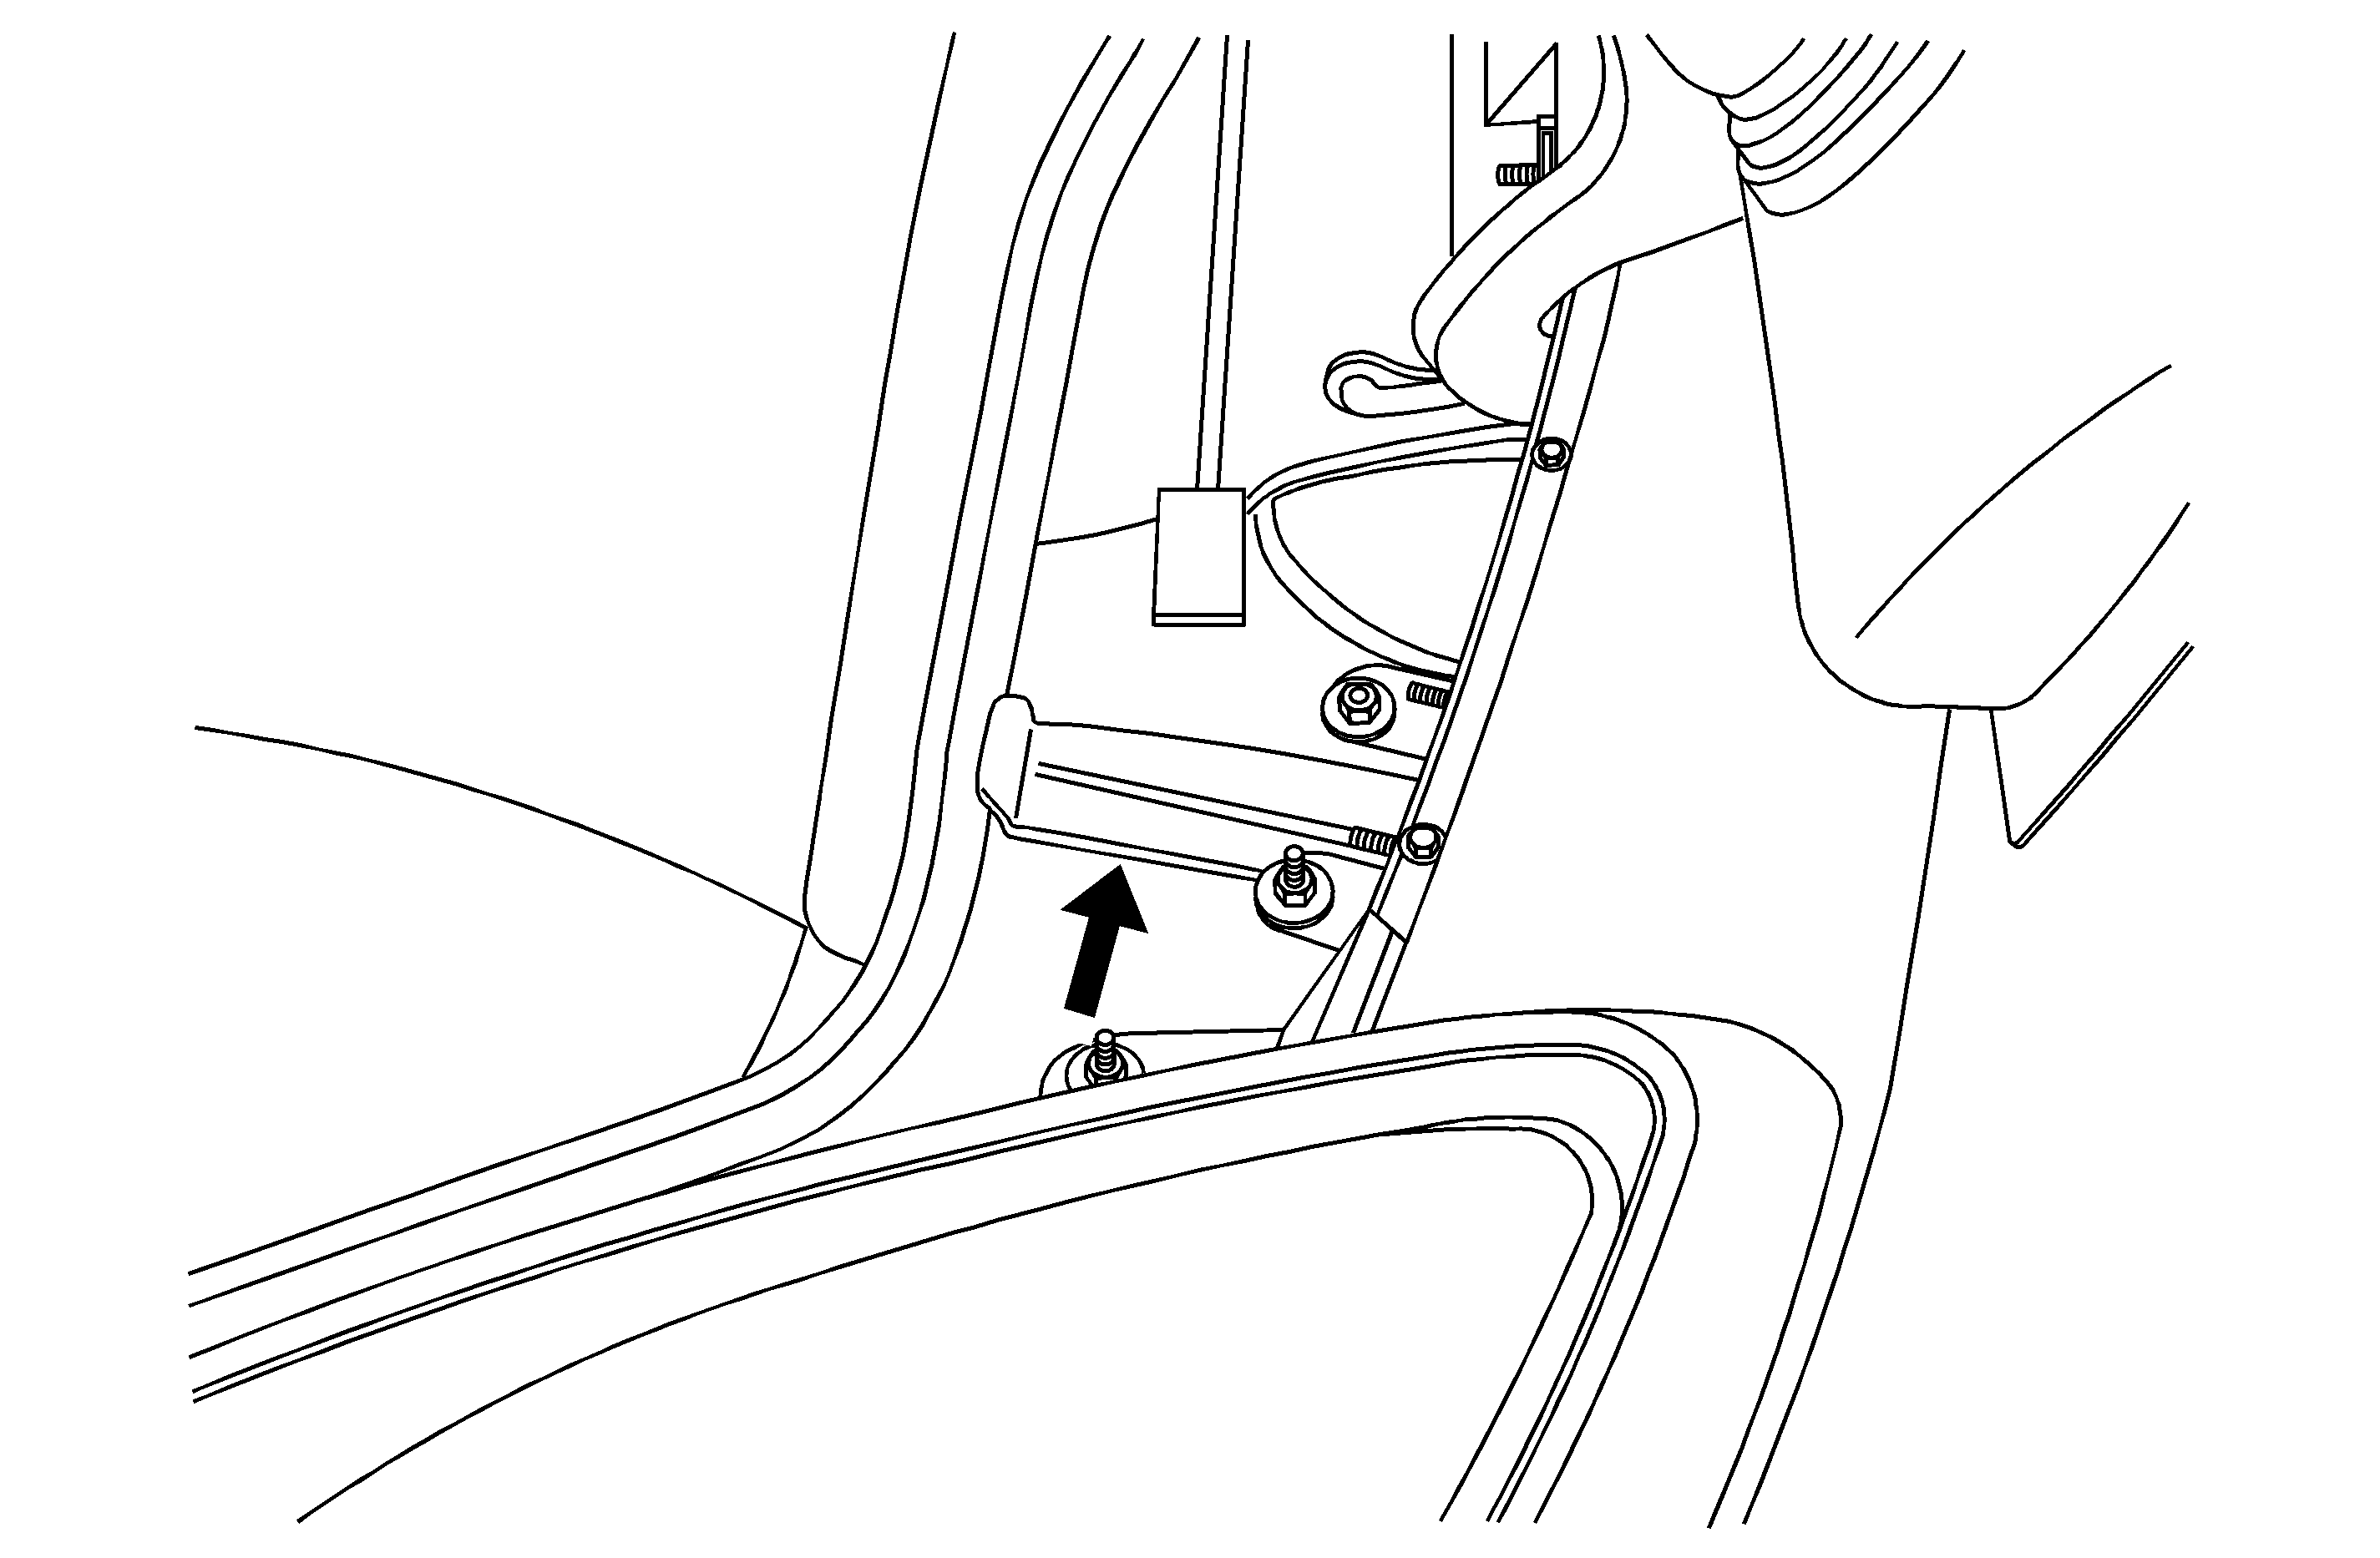
Tip
This patch was removed for the 2008 model
The seam sealer patch may not be sealing in the corners.
Correction
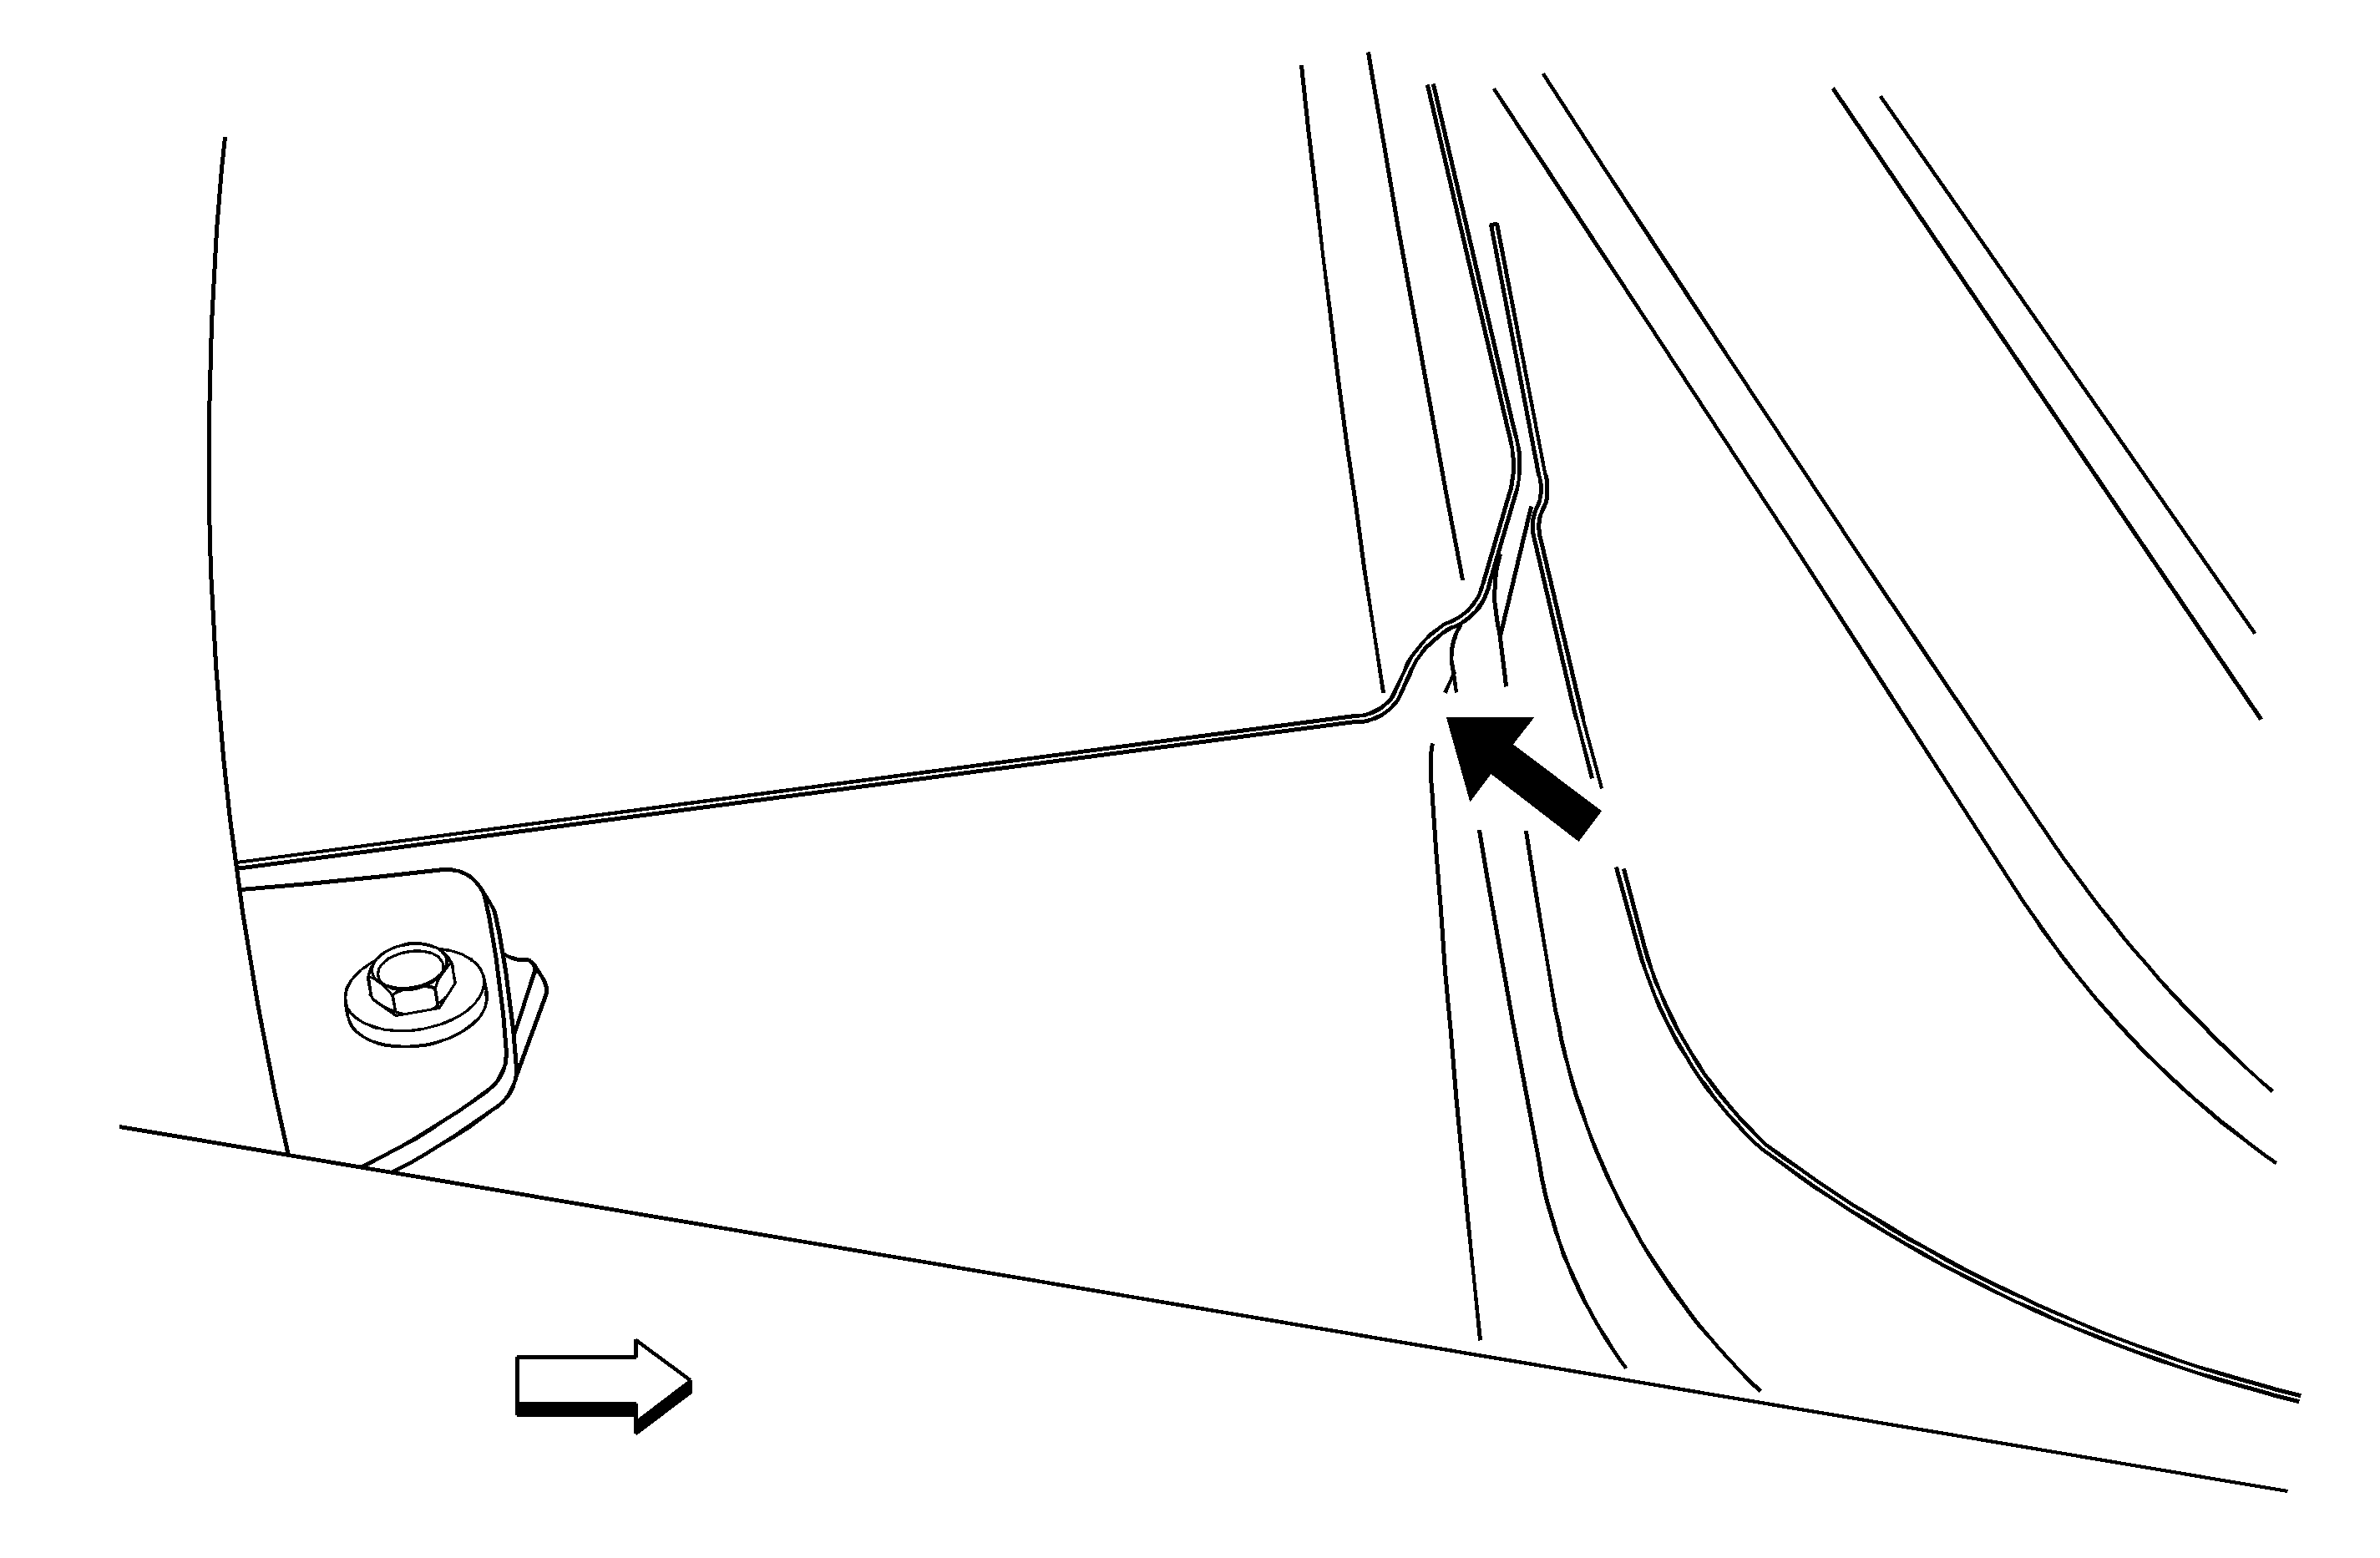
Clean the surface in the corner where the mastic is up and reseal with Kent seam sealer, P/N 10200.
Condition #14
The customer may comment about a waterleak at the rear of the trunk.
Cause
The fascia studs may not be sealed properly.
Correction
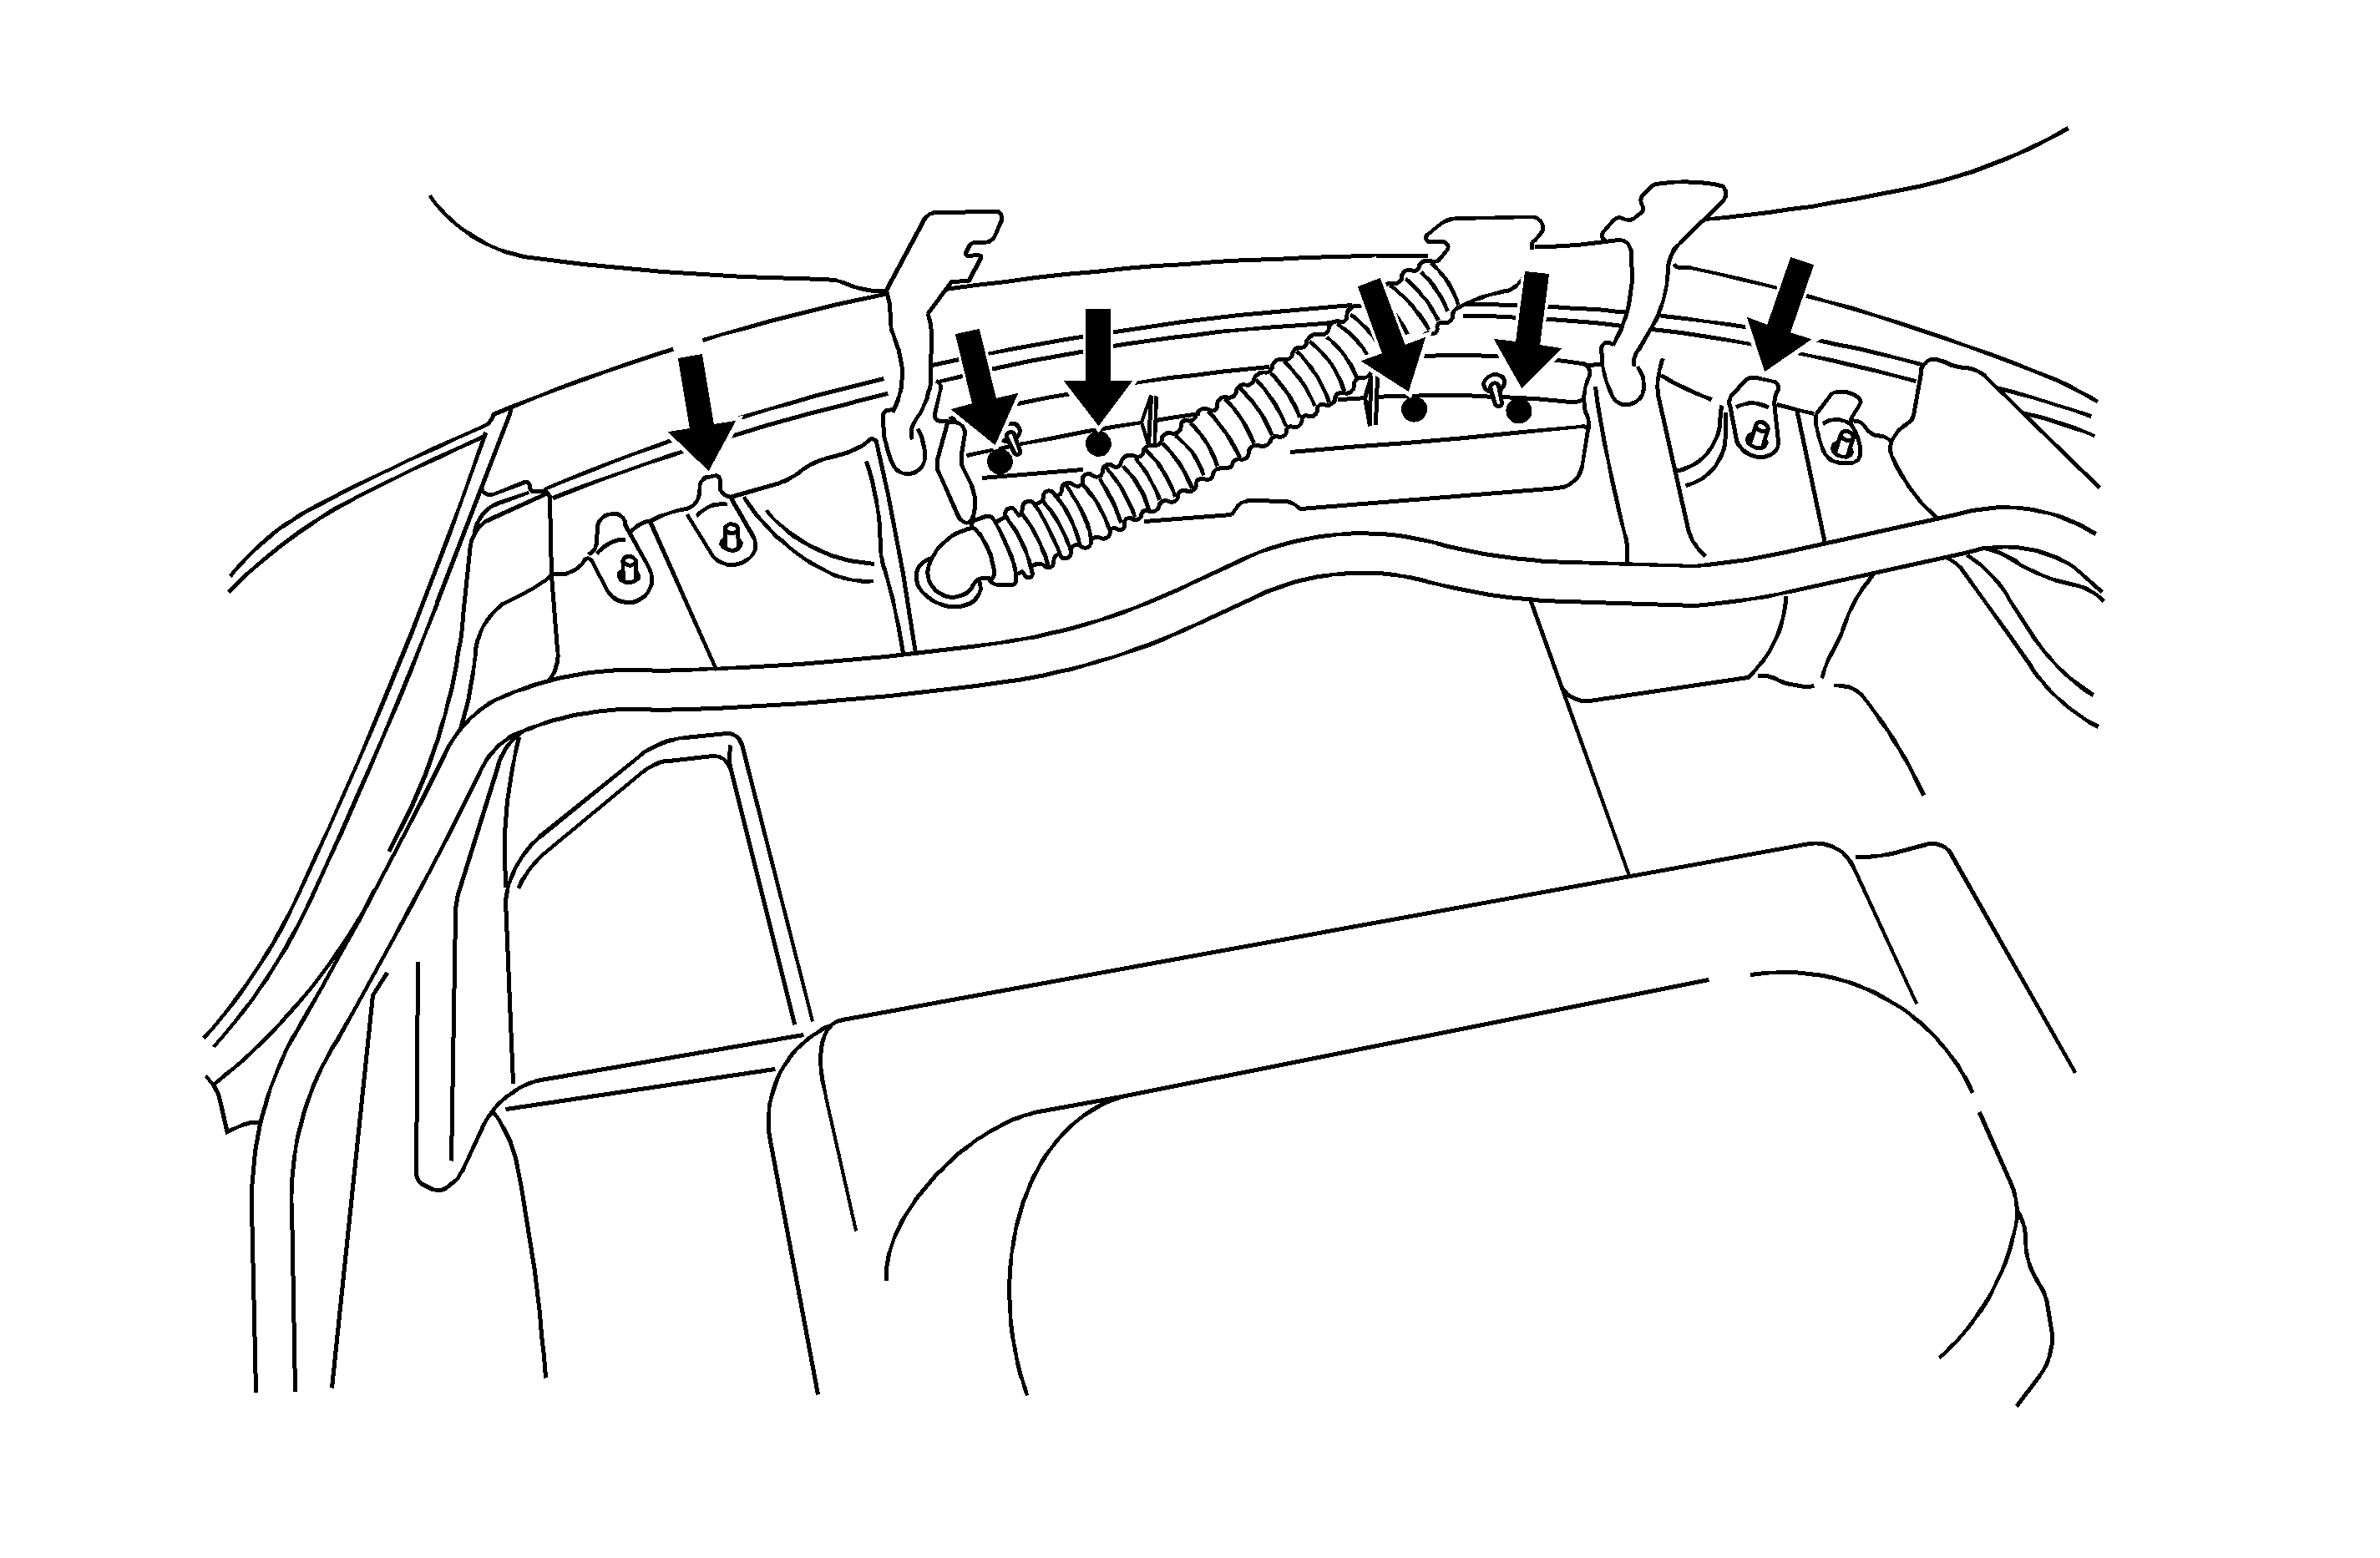
Clean the underside surface around the six inboard studs with Kent Seam sealer, P/N 10200.
Condition #15
The customer may comment about a waterleak at the rear of the trunk.
Cause
Solstice Only: The hem flange that holds the weatherstrip may not be positioned properly.
Correction
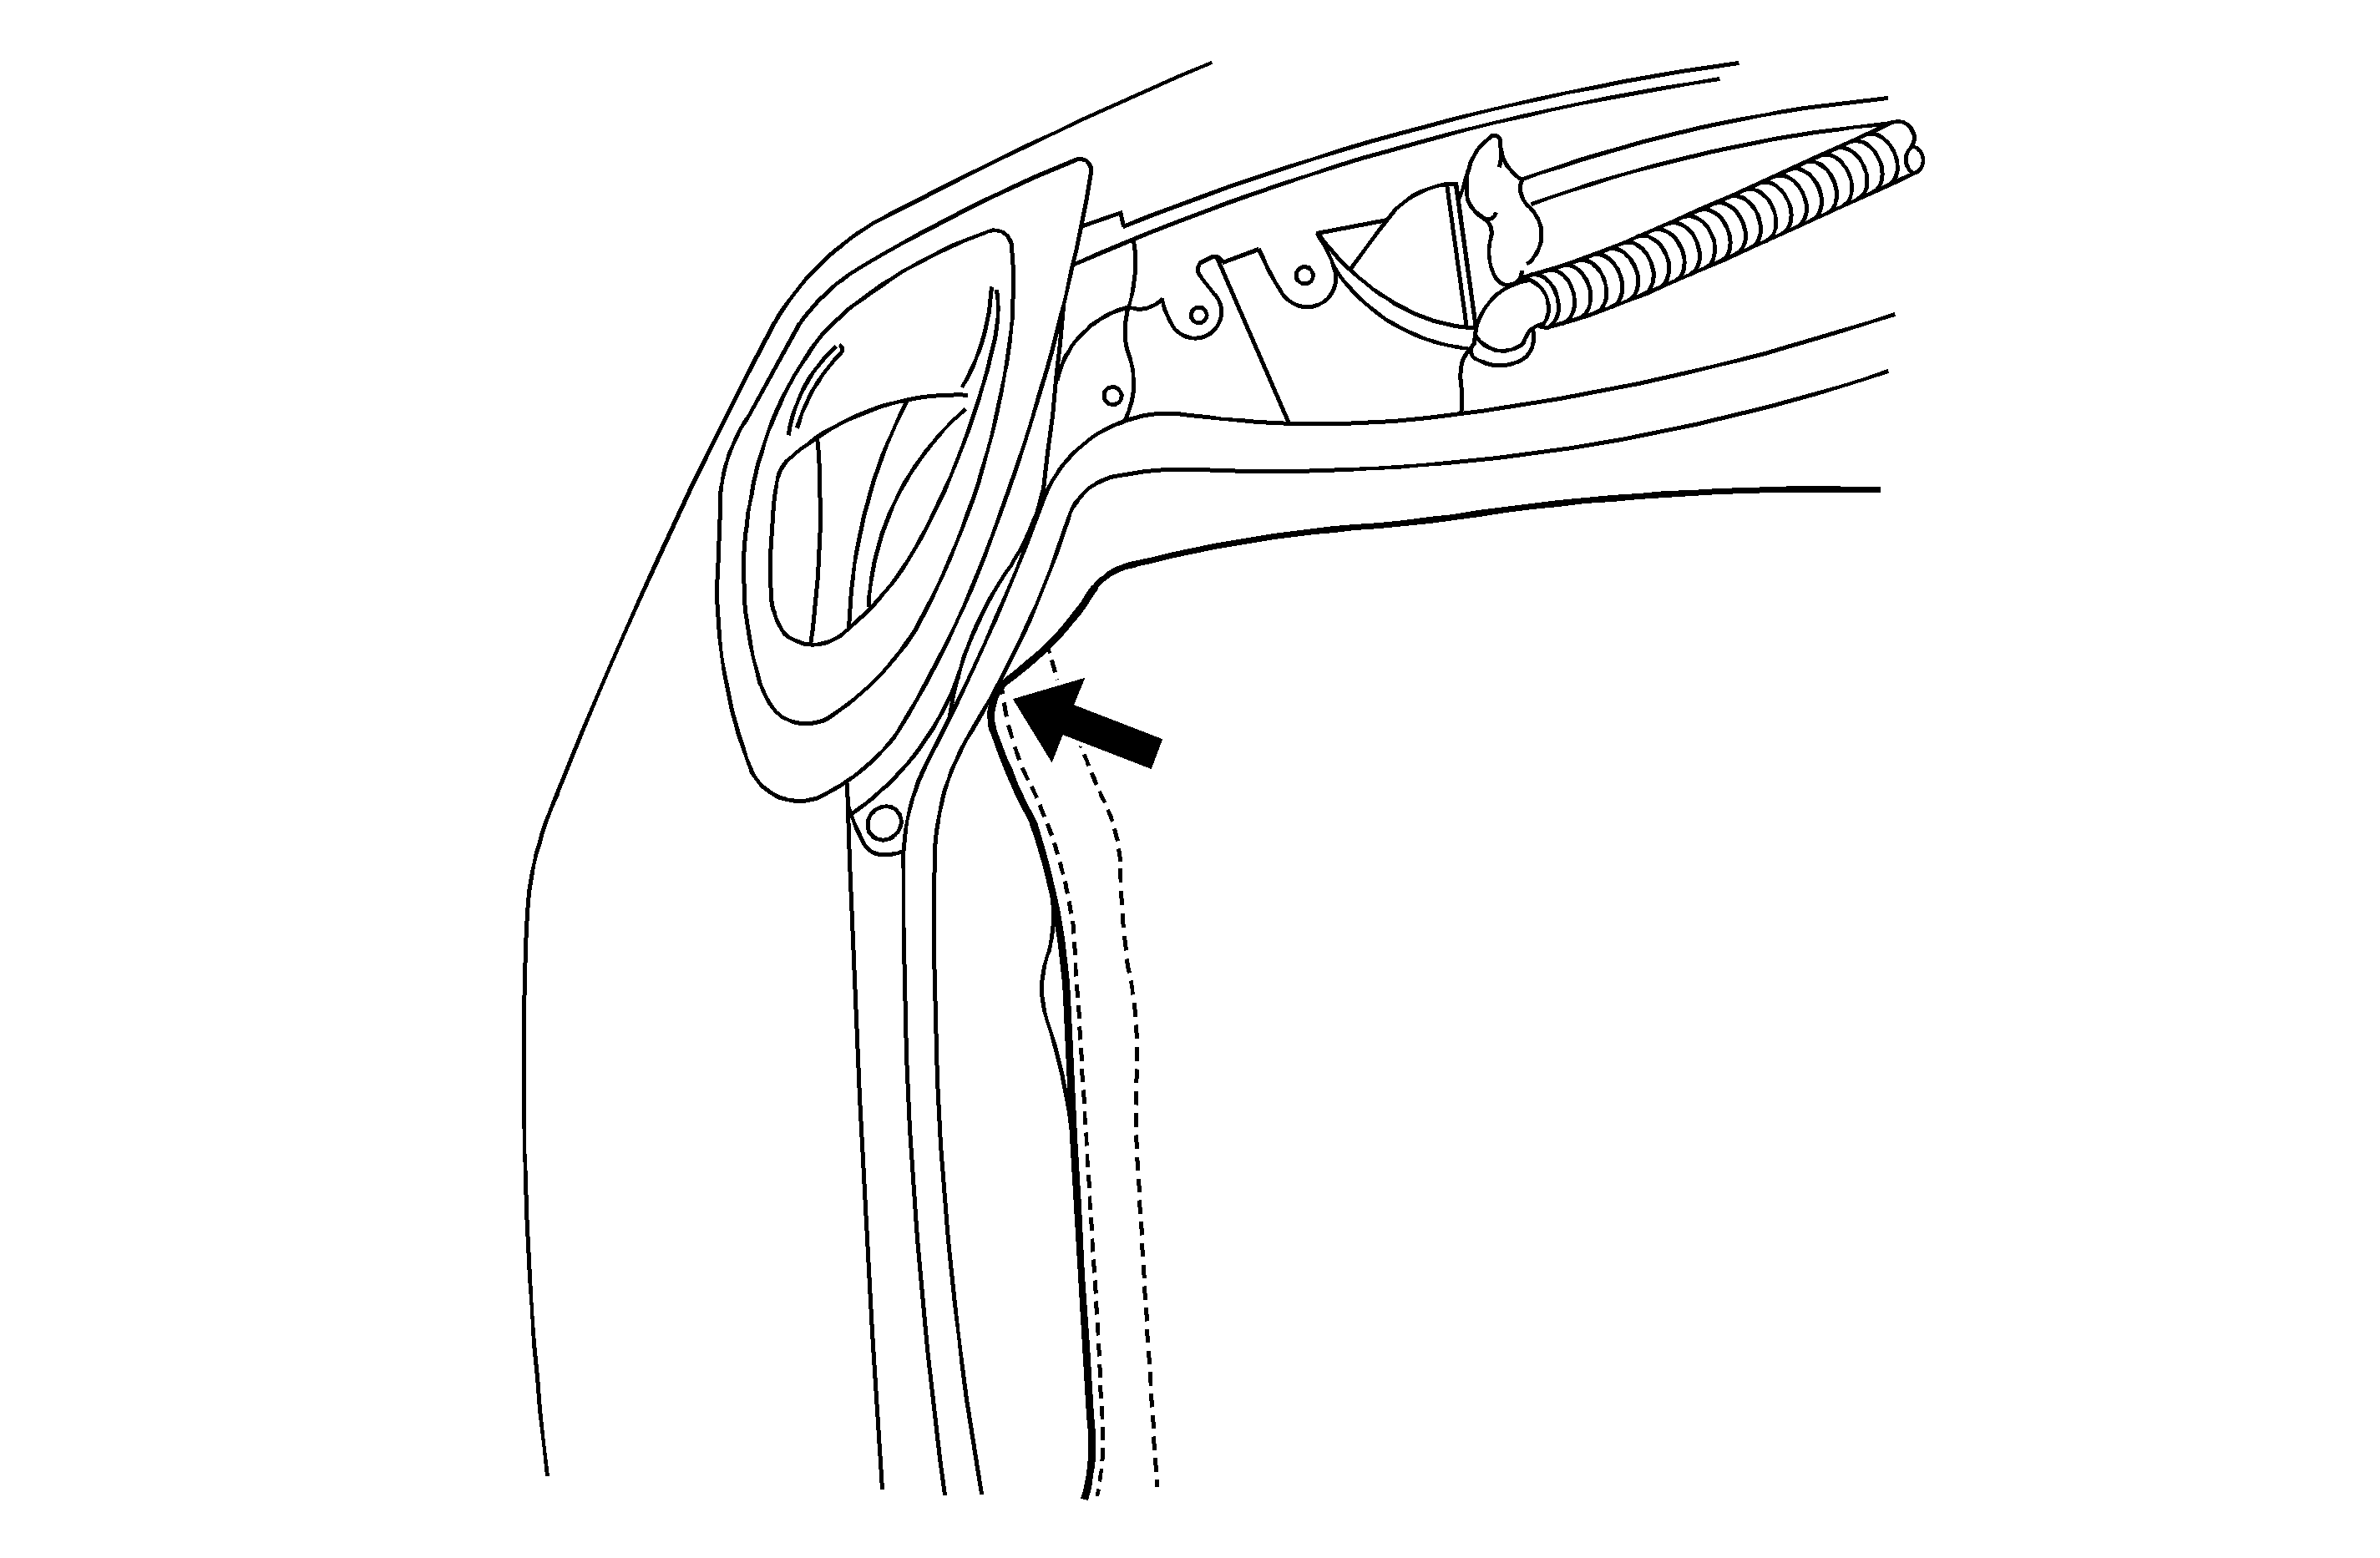
Bend the hem flange inboard at the tail lamp until the corner of the stowed top just contacts the weatherstrip.
Condition #16
The customer may comment about a waterleak at the rear of the trunk.
Cause
The pressure relief valve may not be seated.
Correction
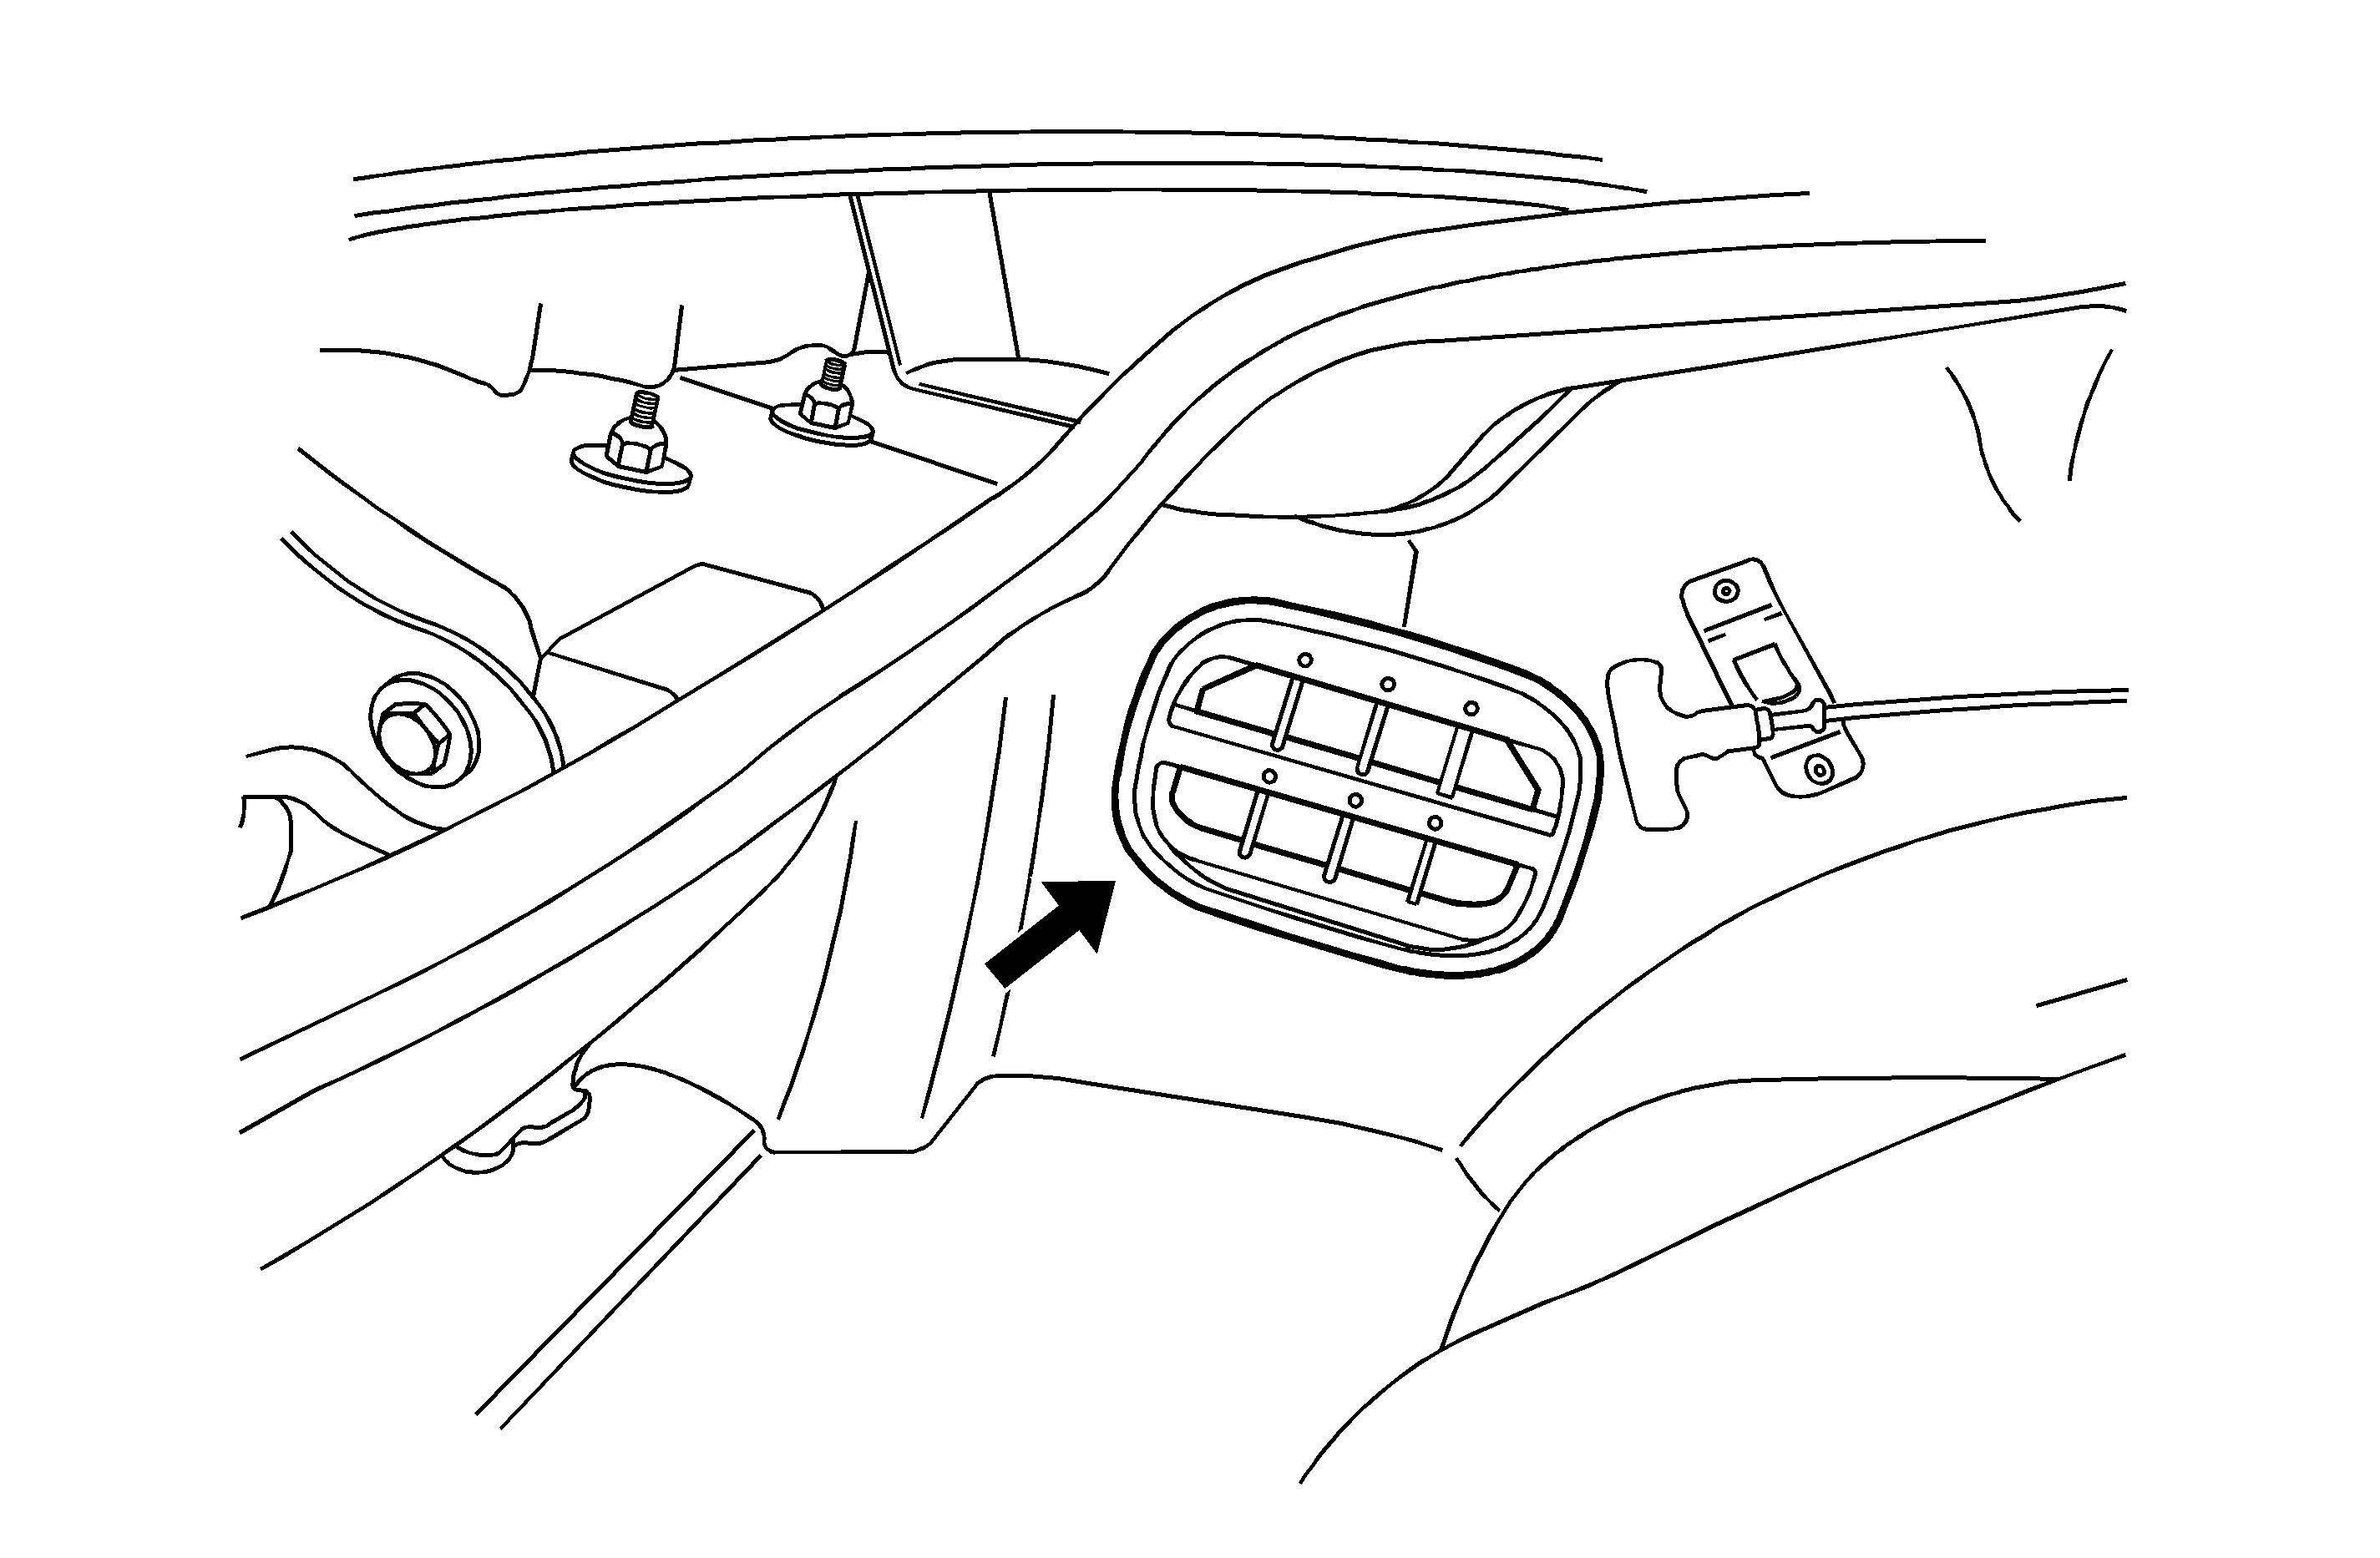
Replace the pressure relief valve as the clips will take a set from not being fully engaged.
Condition #17
The customer may comment about a waterleak at the rear of the trunk.
Cause
The chrome bezels on the trunk lid surface for the tonneau cover latches may not be sealed properly.
Correction
Replace the bezel.
Condition #18
The customer may comment about a waterleak at the rear of the trunk.
Cause
The flange that holds the trunk seal may not be sealed properly.
Correction
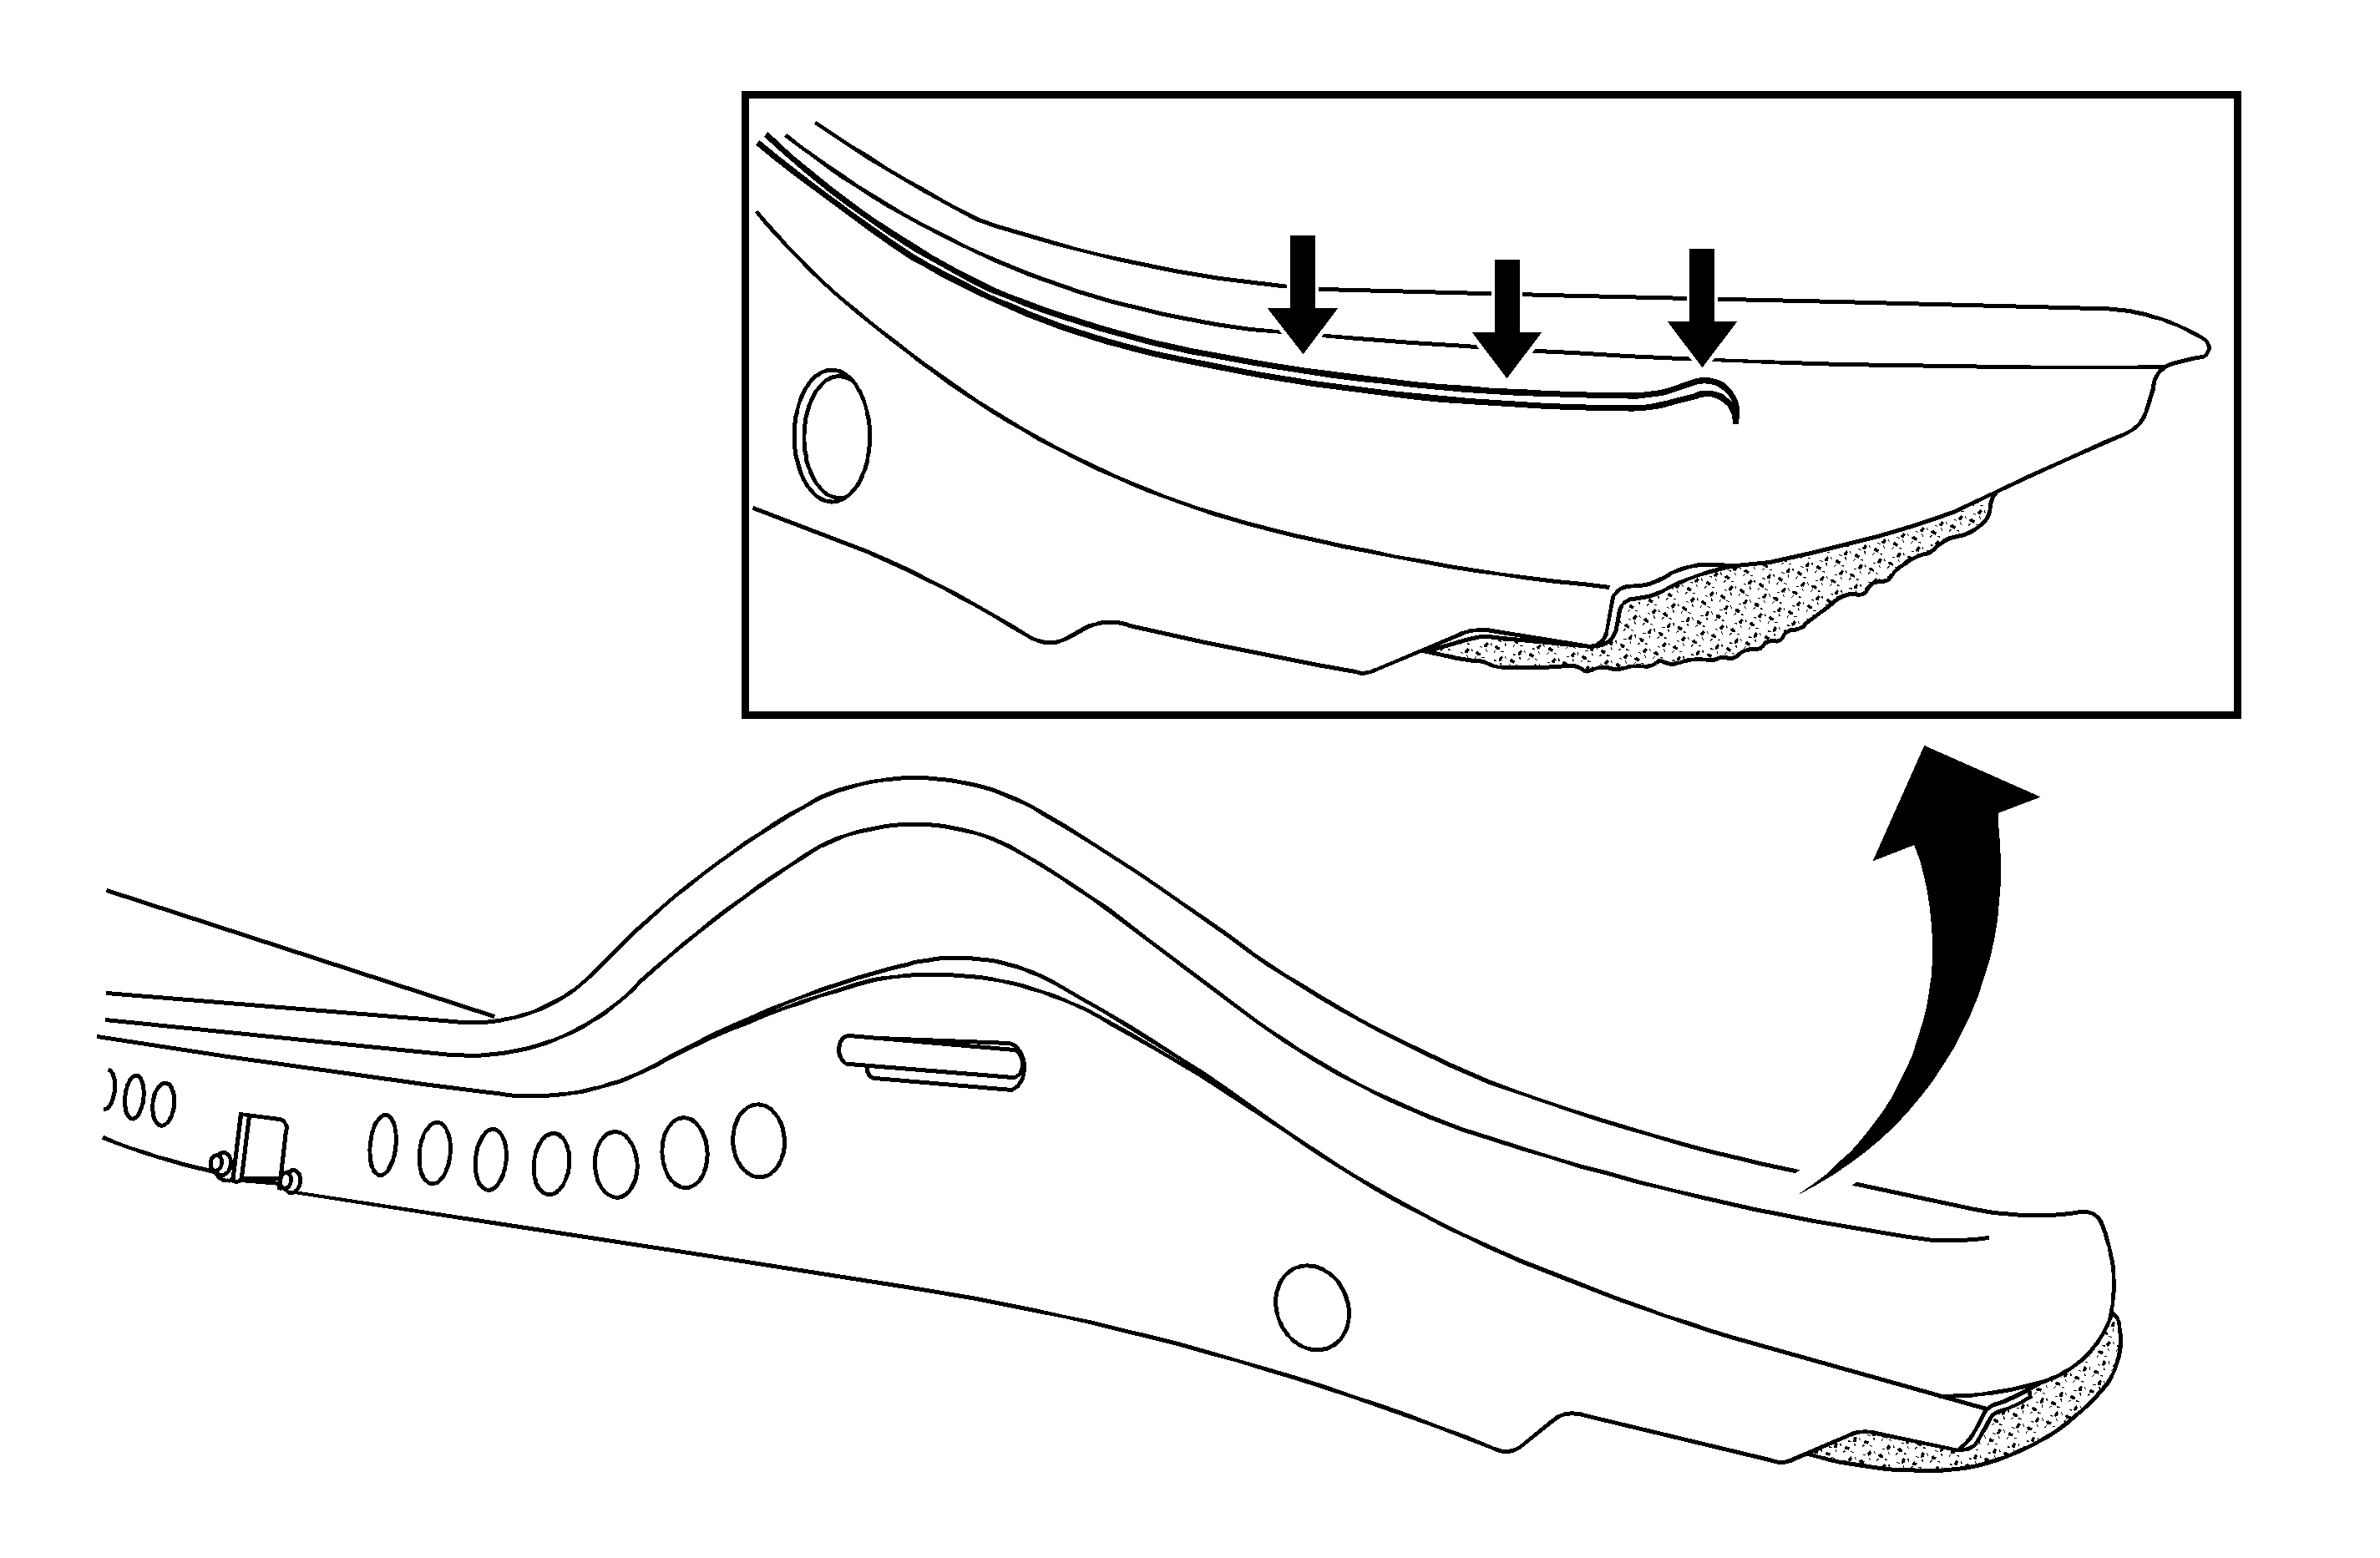
Remove the seal and dry out the retainer. Reseal with Kent seam sealer, P/N 10200.
Condition #19
The customer may comment that the carpet is wet in the rear of the trunk.
Cause
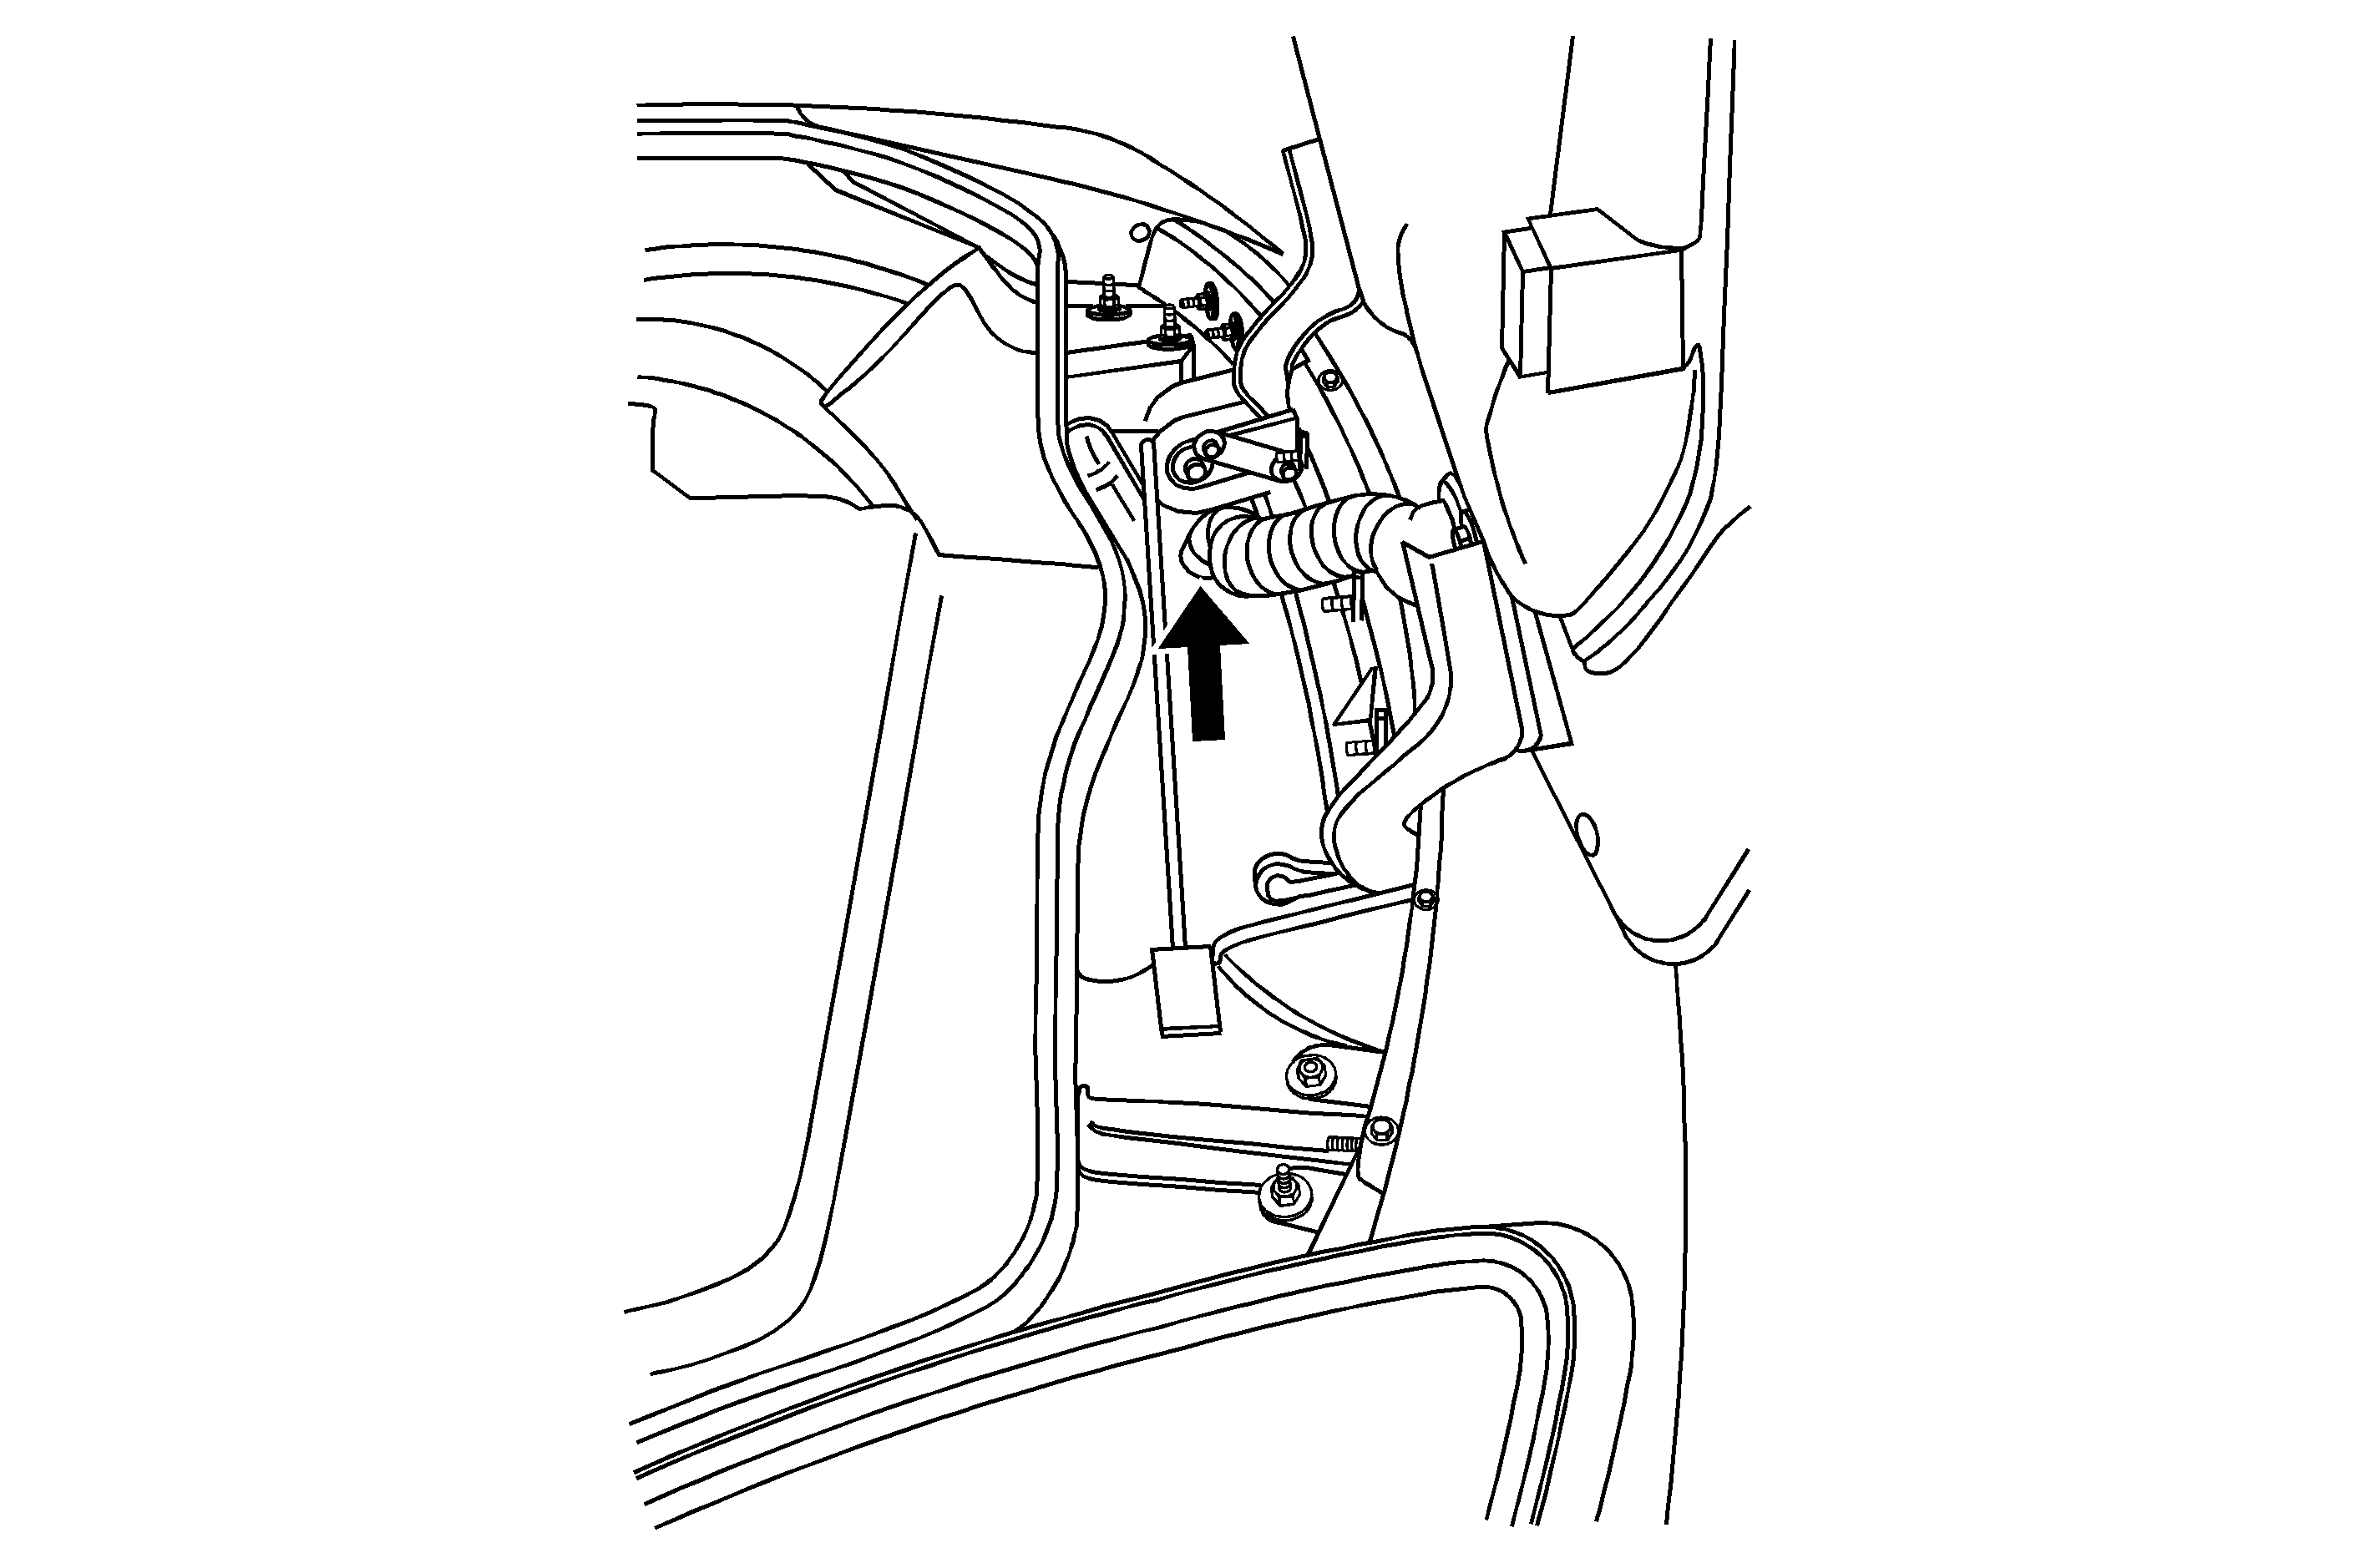
The wiring harness rubber housing end may not be seated to the body.
Correction
Clean the rubber boot with a non-oil based cleaner and apply a bead of weatherstrip adhesive around the hole and reinstall the boot into the body.
Condition #20
The customer may comment that the carpet is wet in the rear of the trunk.
Cause
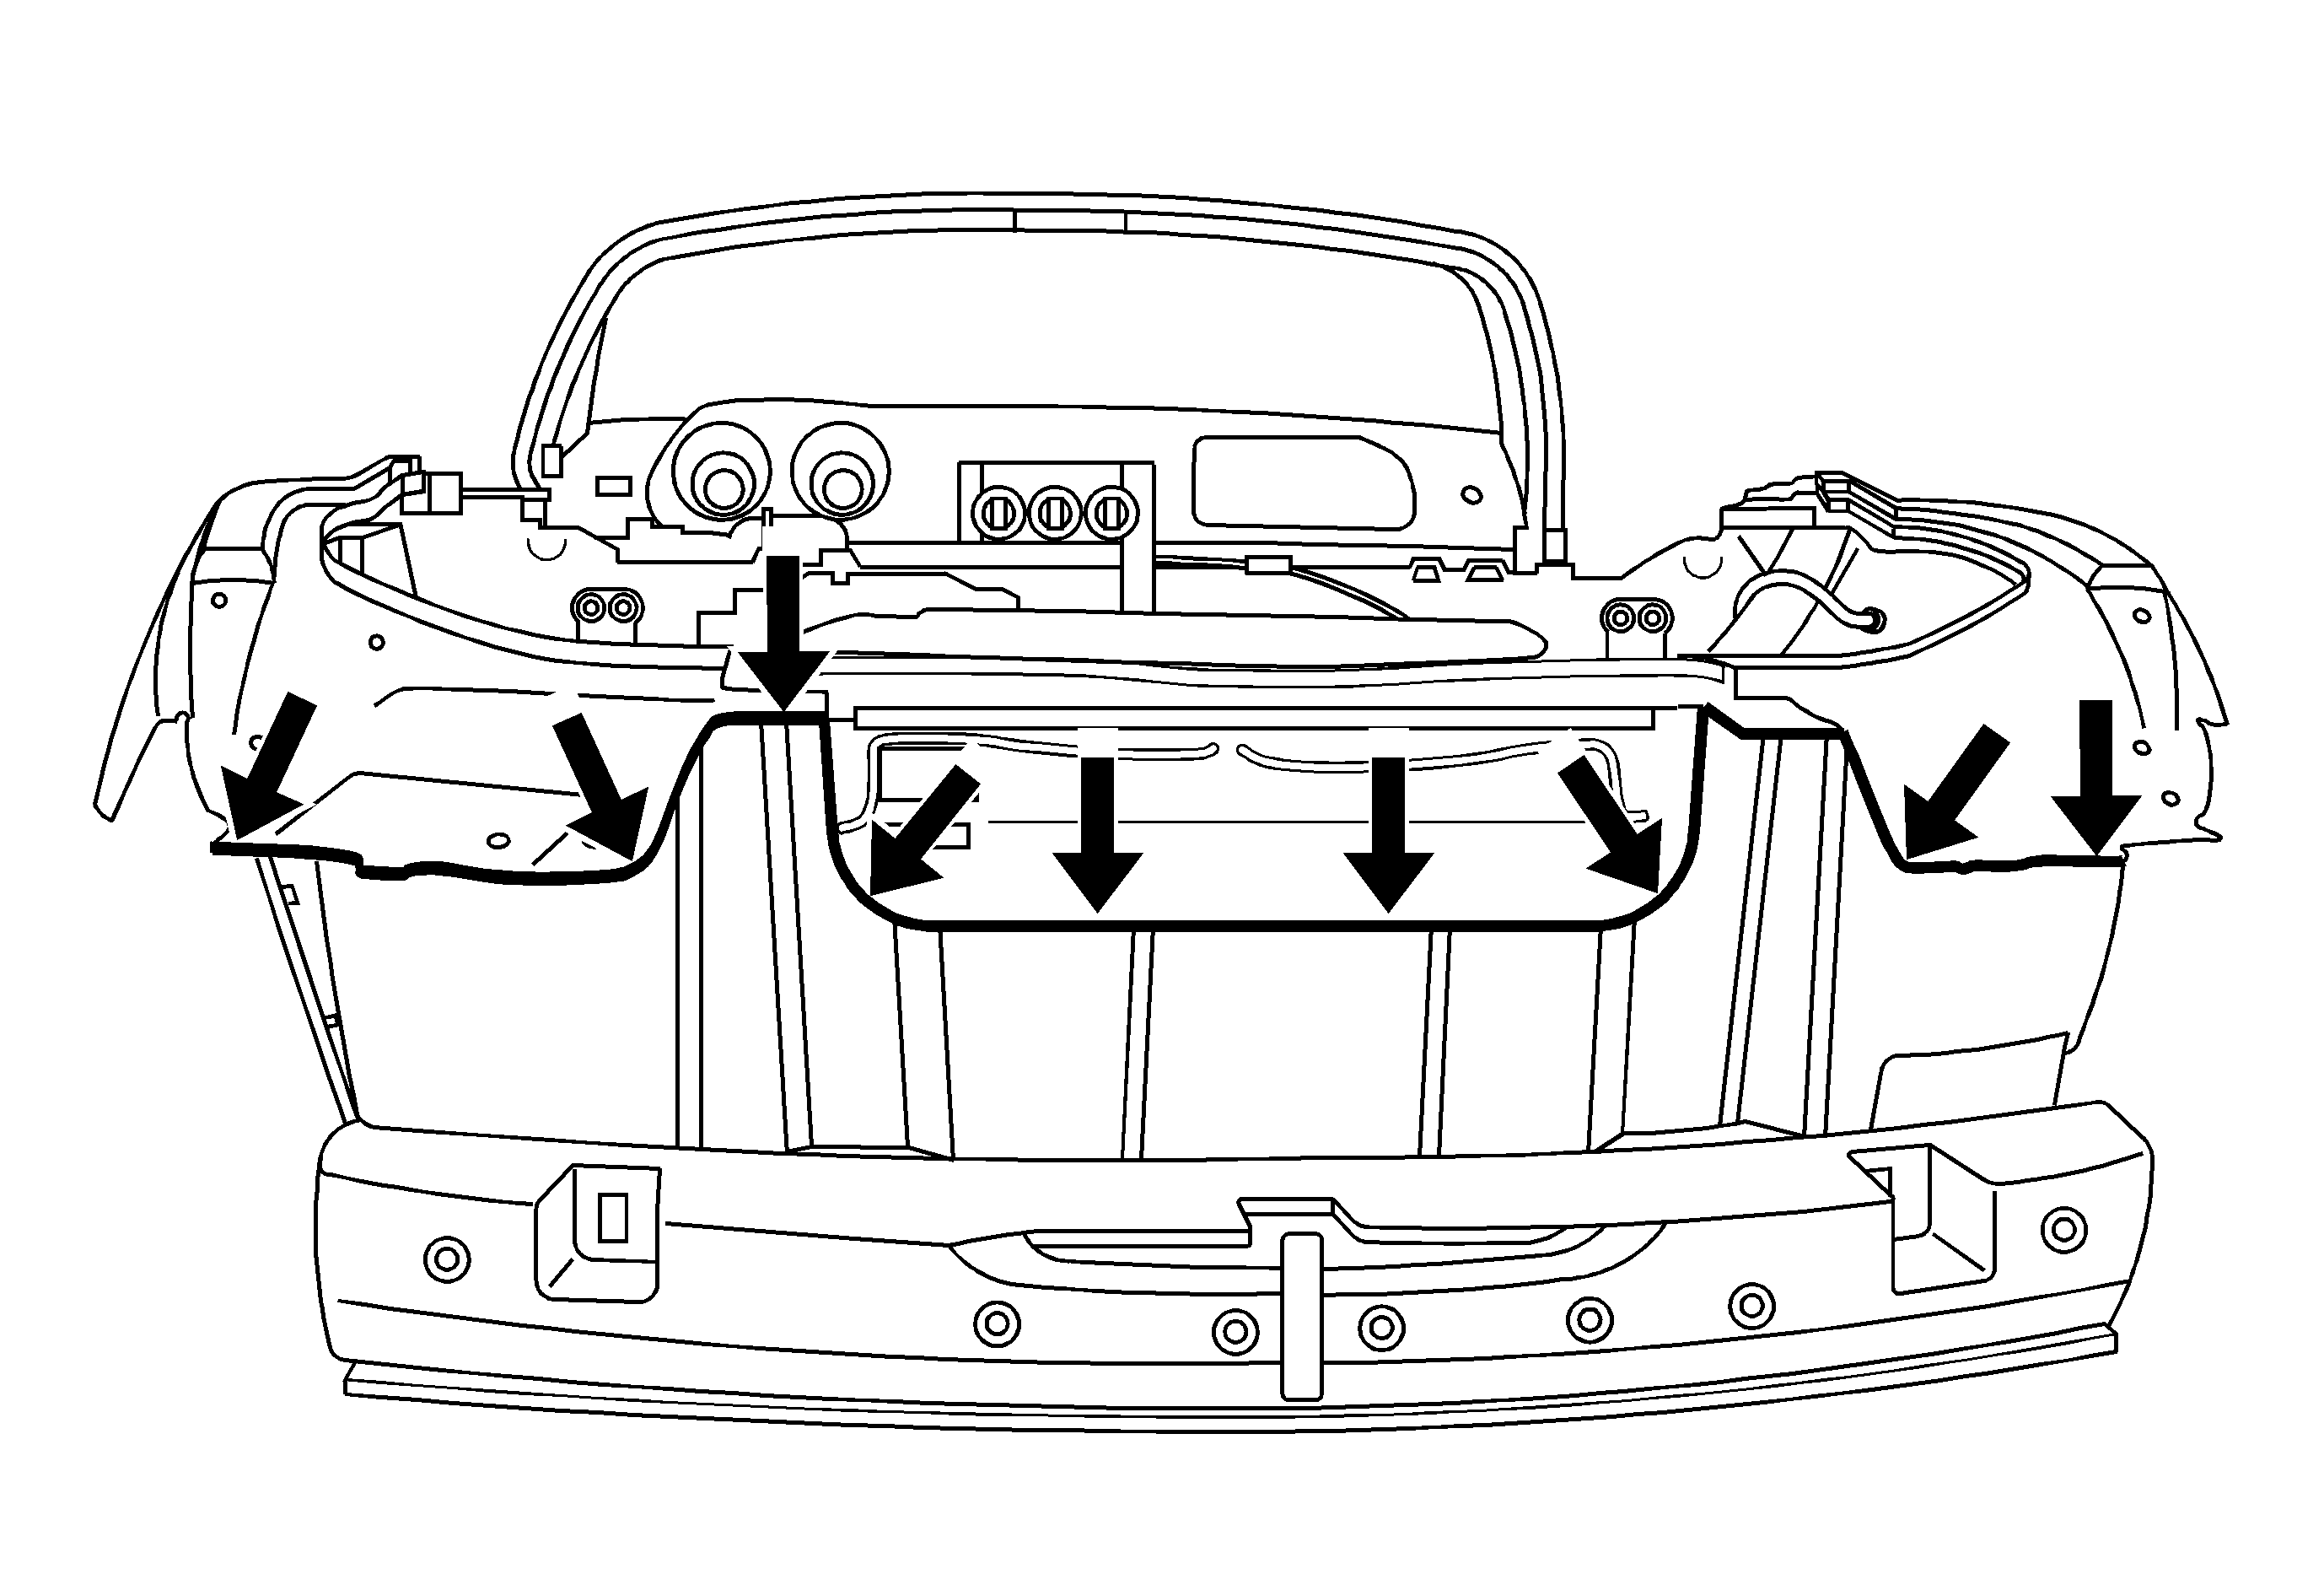
There may be a void in the sealer at the rear of the trunk. Refer to the arrows in the illustration above.
Correction
Remove the rear fascia and clean the area effected and seal with urethane.
Door Glass Adjustment
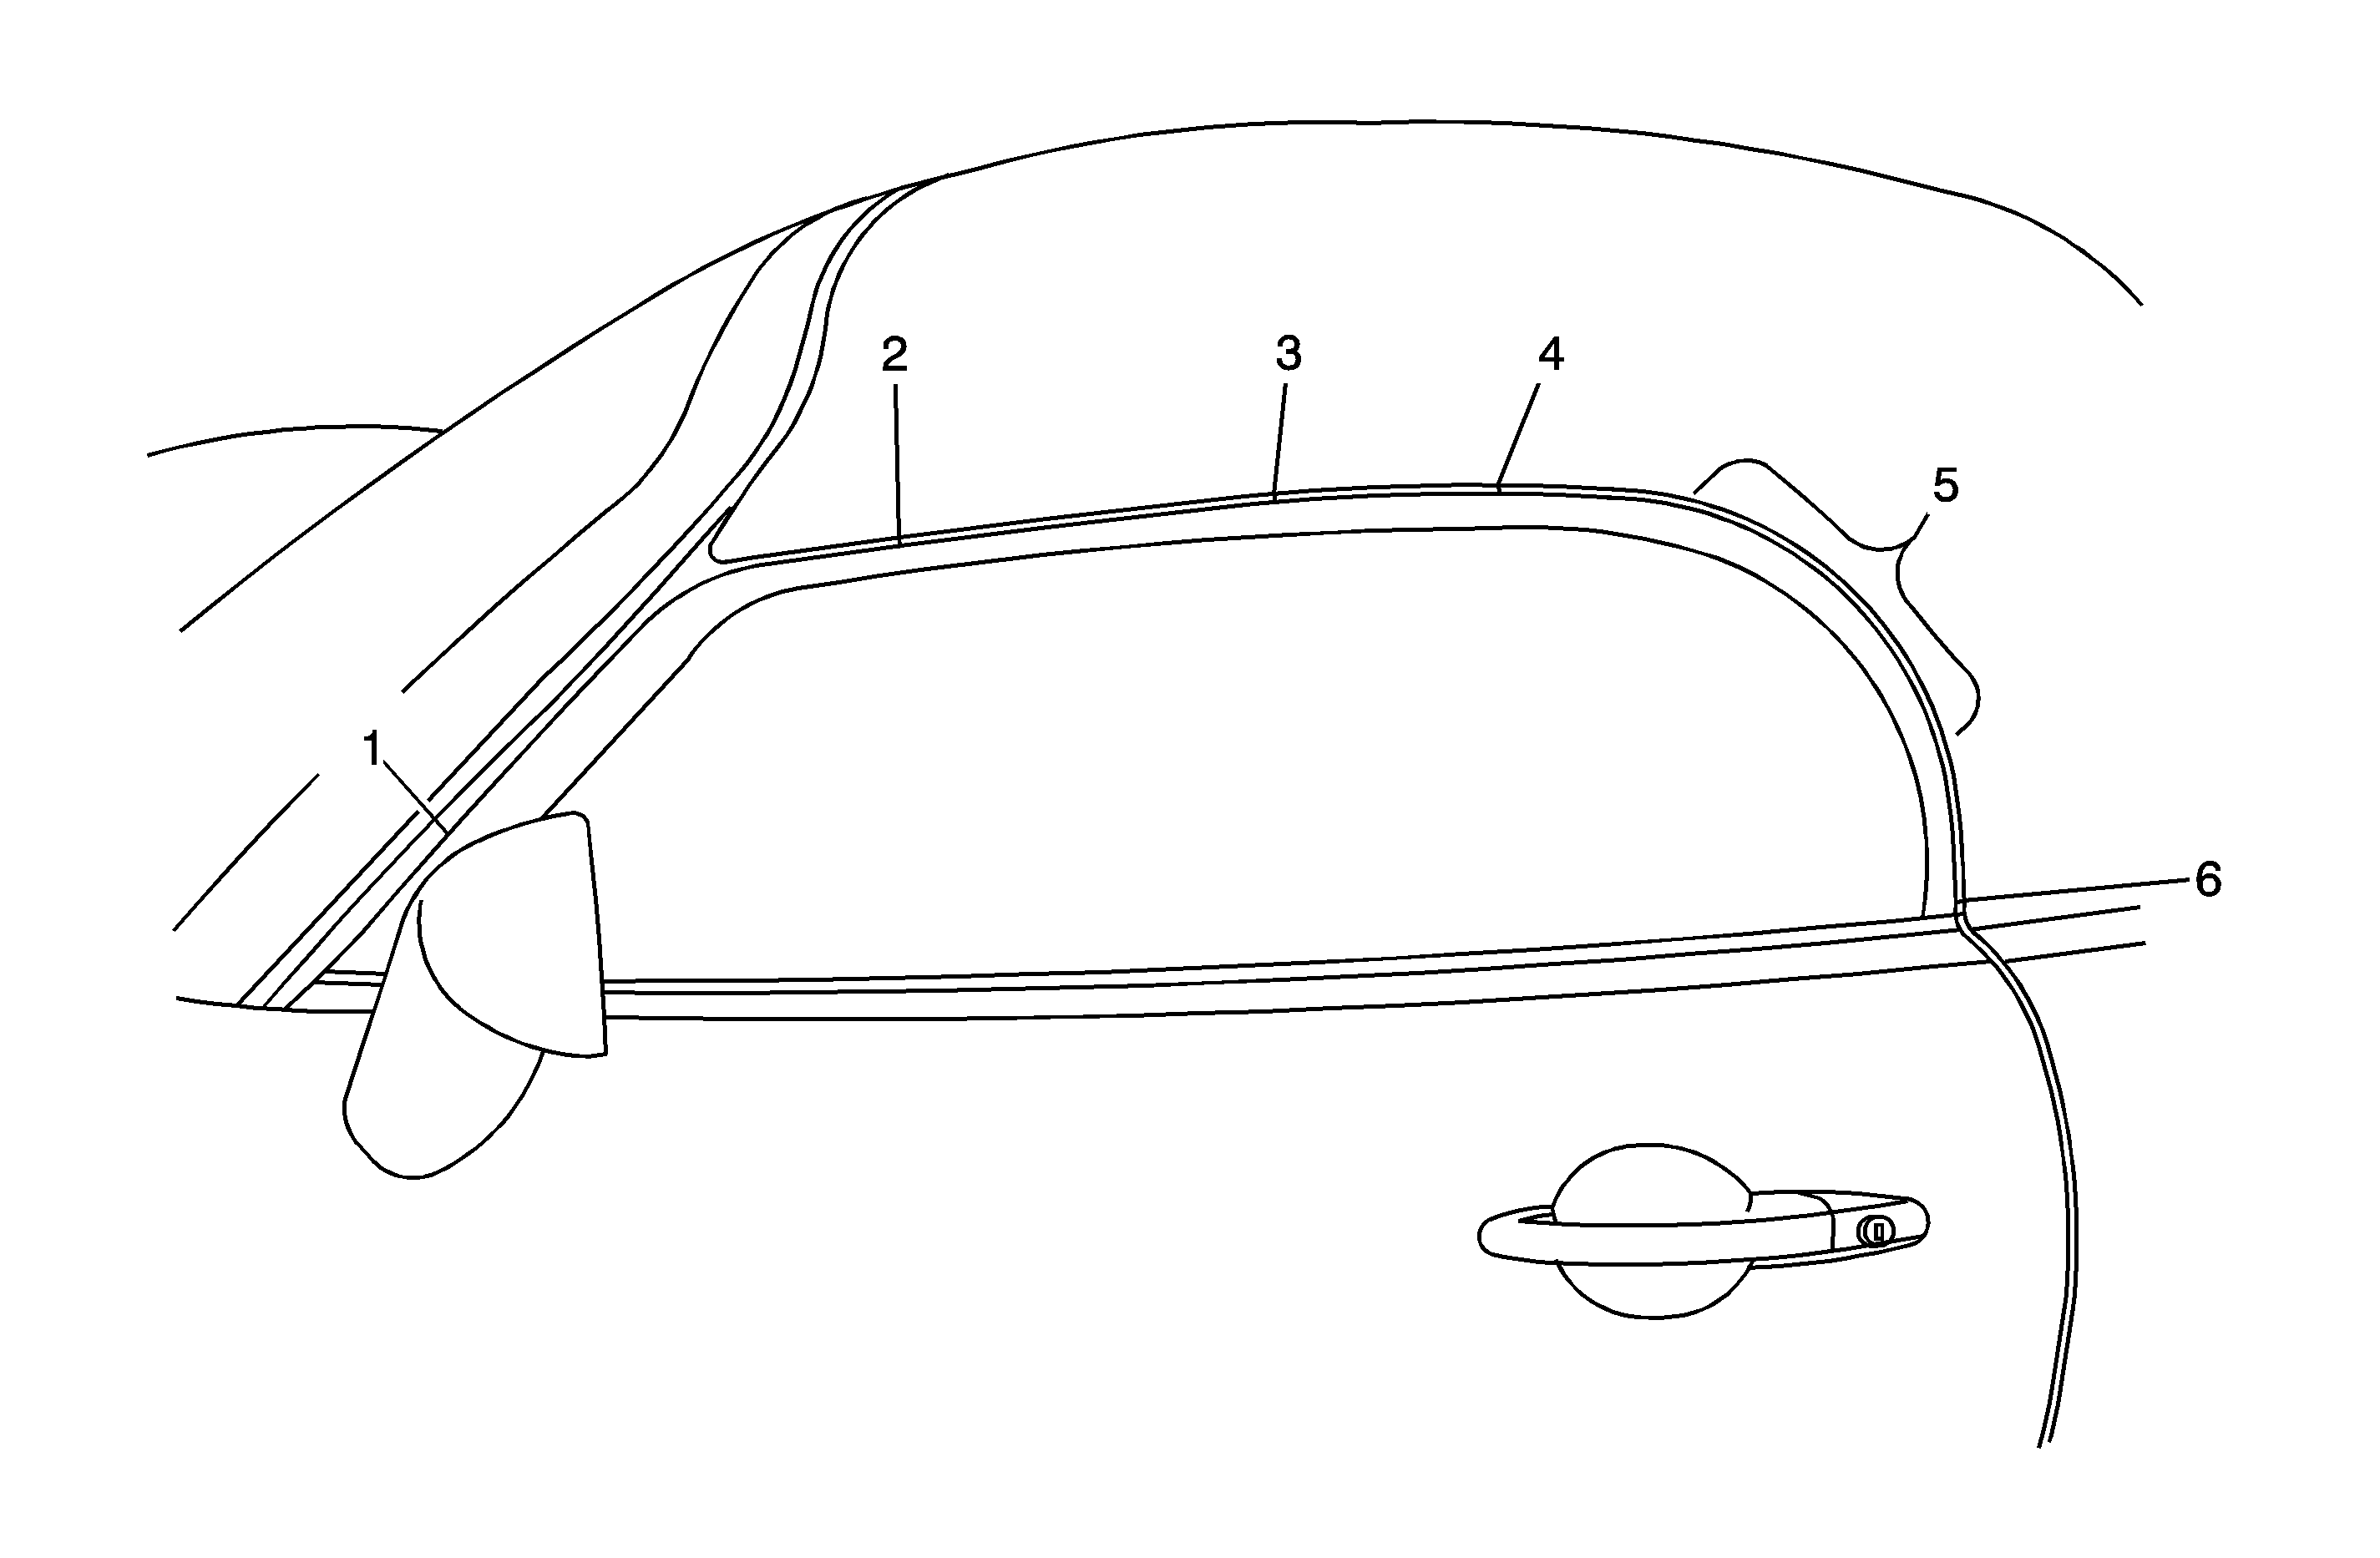
- Open the door and raise the glass to the full up position.
- Close the door.
- Loosen the door glass and, with the use of a helper, push the door glass in the opening to achieve the dimensions listed in the steps below.
- Set the door glass so there is 3 mm (0.16 in) seal wink over of the seal at location #1
- Set the door glass so there is 3 mm (0.20 in) seal wink over of the seal at locations #2 & 3.
- Ensure that the top edge of the glass fully contacts the primary bulb of the rear of the weatherstrip at locations #4 & 5.
- The rear edge of the door glass should cover the flap at a minimum along the radius at location #5.
- Make sure the front edge of the door glass does not trap the "A" pillar weatherstrip when the door is opened or closed.
