Odor from A/C at Vehicle Start Up

| Subject: | Odor from A/C at Vehicle Start-Up (Remove Debris from Evaporator Case, Disinfect Evaporator or Apply Cooling Coil Coating, and Install Delayed Blower Motor Control Module) This bulletin is being revised to include instructions for using cooling coil coating on A/C evaporators and a new part number for cooling coil coating. Depending on part availability, use A/C system disinfectant kit or cooling coil coating when performing the procedures in this bulletin. This bulletin supersedes bulletin 98-T-11, which should be discarded. |
| Models: | 1997 Saturns equipped with A/C built after and including the following vehicles: |
Model | Options | VIN No |
|---|---|---|
Sedan/Coupe | Manual Trans w/ABS | VZ270302 |
-- | All others | VZ271230 |
Wagon | Manual Trans w/o ABS | VZ267541 |
-- | Manual Trans w/ABS | VZ270132 |
-- | Automatic Trans | VZ276755 |
Condition:
A musty odor from A/C system, most noticeable at vehicle start-up.
Cause:
An unpleasant (musty) odor from A/C outlets at vehicle start-up can be the result of microbial growth on the evaporator core. This bacteria feeds on the organic matter and moisture that is present on the evaporator core.
Correction:
Remove any debris from evaporator case; clean evaporator with disinfectant or apply cooling coil coating, and install delayed blower motor control module according to the following procedures.
| Important: Before installing delayed blower motor control module, the following information must be explained to the customer. |
| • | The delayed blower motor control module will not affect normal A/C or blower motor operation. However, the delayed blower motor control module will activate the blower motor on high speed for approximately five minutes, if the A/C compressor clutch has been continuously engaged for five minutes, if the A/C compressor clutch has been engaged for four minutes or more. The delayed blower motor control module will wait approximately fifty minutes after the ignition is turned Off before activating the blower motor. It is during this run time that condensate, that causes microbial growth, is removed from the evaporator core. The blower motor will be turned On with NO driver input if the conditions as stated above are met. The air rush sound created by the blower motor is noticeable from outside of the vehicle. |
| • | The parasitic current draw of the delayed blower motor control module, combined with the blower motor load, will lower the state of charge of the vehicle's battery, and may negatively impact battery life depending on the driving habits of the customer. |
A/C Evaporator Disinfecting/Cooling Coil Coating Application
Depending on part availability, use A/C system disinfectant kit or cooling coil coating when performing this procedure.
Before starting procedures, obtain the following equipment and supplies:
| • | A/C system Disinfectant Kit P/N 21030784; P/N 10953505 for Canada or Cooling Coil Coating P/N 12346390 |
| • | Cleaning Gun, OTC Tool SA9216NE |
| Caution: When using Disinfectant Kit P/N 21030784, ordinary safety glasses are not sufficient. |
| • | If using Disinfectant Kit P/N 21030784; P/N 10953503 for Canada, safety goggles or face shield |
| • | If using Disinfectant Kit P/N 21030784; P/N 10953503 for Canada, National Institute of Occupational Safety and Health (NOISH) approved acid gas/organic vapor respirator with chlorine dioxide cartridges 3M® P/N 5103-small, 5203-medium, 5303-large, which are to be used with a pre-filter P/N 5010 and retainer P/N 501, or equivalents |
| • | If using Cooling Coil Coating P/N 12346390, safety glasses |
| • | Rubber gloves |
| • | Pedestal fan |
| • | Plug P/N 21121827 |
- Dry evaporator by:
- Raise vehicle on a hoist.
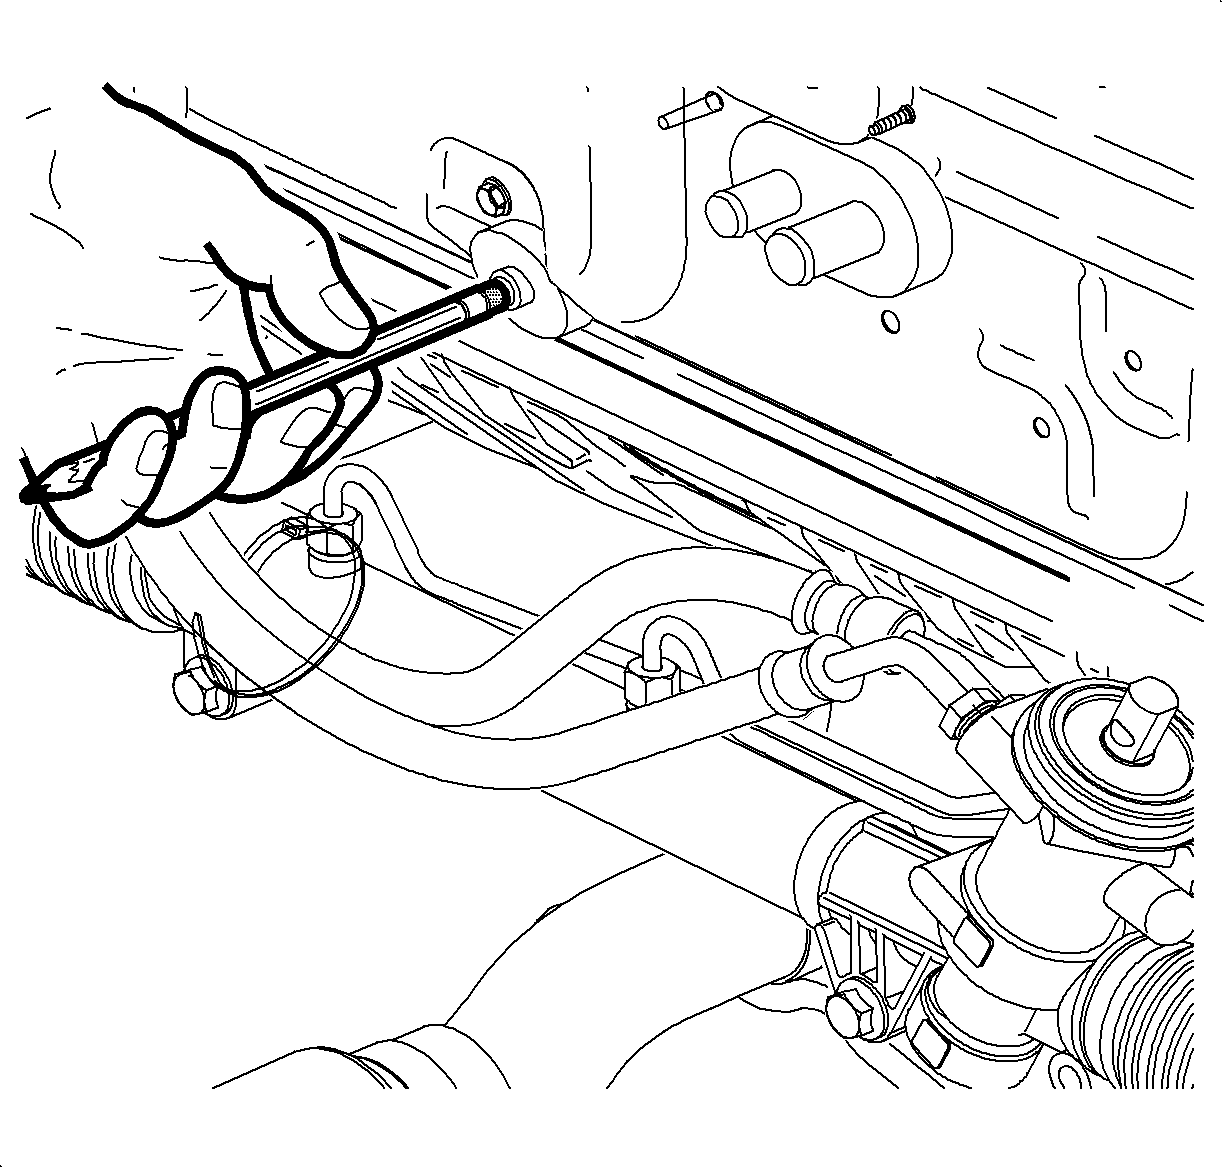
- Check the HVAC drain for blockage. If necessary, clear drain hole with a soft blunt tool such as the eraser end of a pencil.
- Lower vehicle from hoist.
- To reduce the risk of debris from entering the HVAC module, check for gaps between cowl panel foam and windshield, at base of windshield. Repair gaps by repositioning panels or by removing cowl panels and installing additional foam to panel. Use Kent Industries P/N 40115 Adhesive Back Shim Stock, or equivalent 5/16 x 3/8 inch foam.
- Place a drain pan directly below the HVAC drain to collect disinfectant or cooling coil coating and rinse water runoff.
- Open all doors and windows in the vehicle and position pedestal fan so that it provides cross ventilation through the vehicle during the cleaning/coating procedure.
- Cover interior of vehicle to protect it from spray.
- Disconnect blower motor connector.
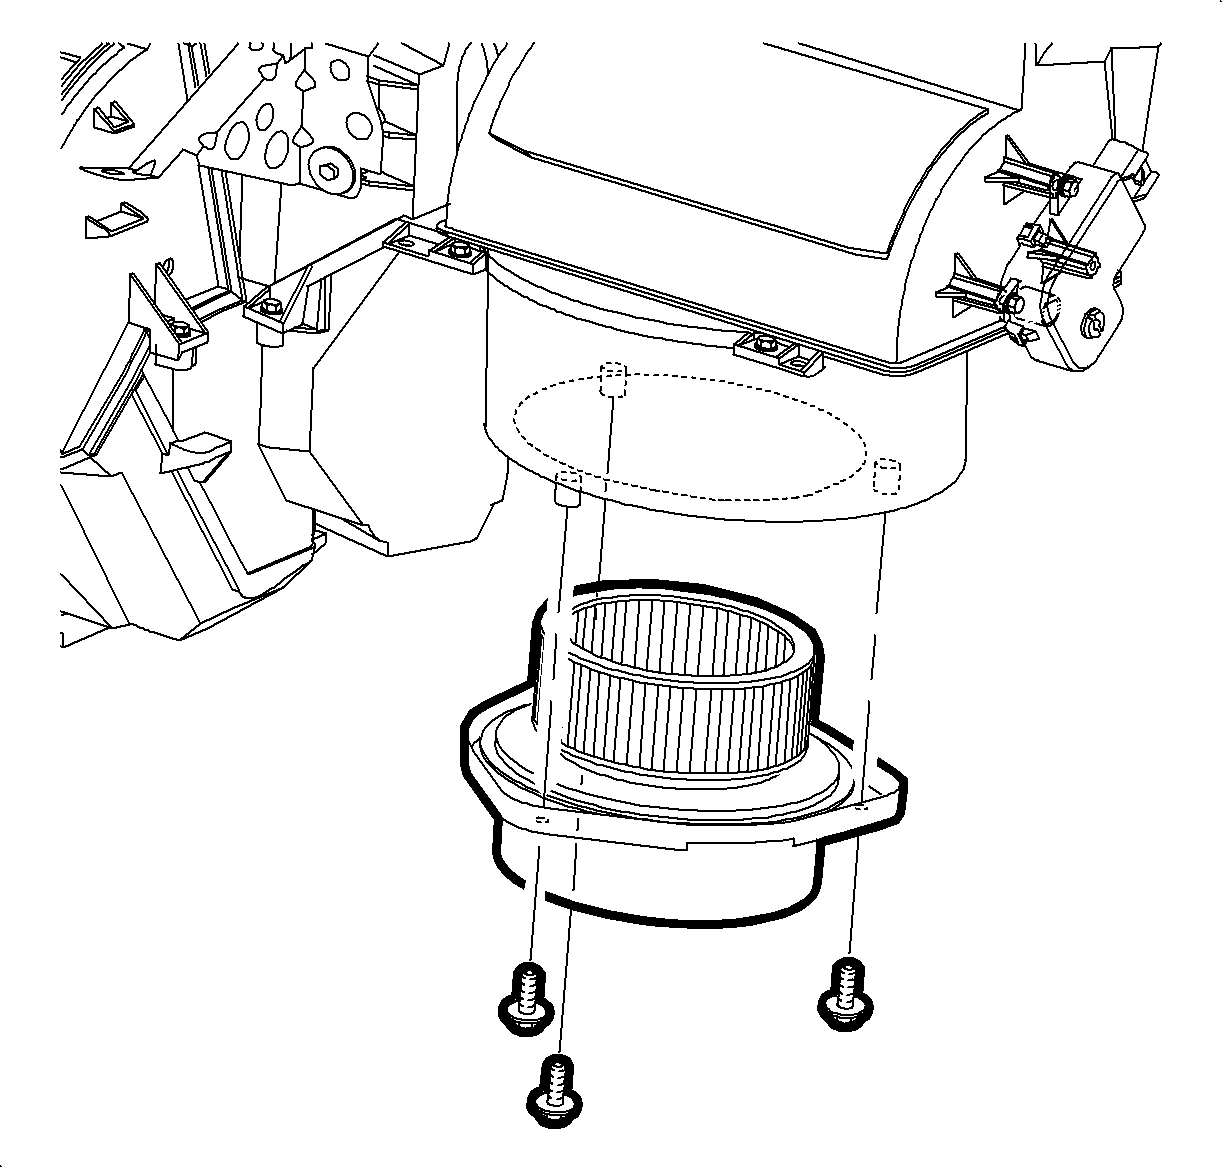
- Remove blower motor mounting screws and remove blower motor assembly.
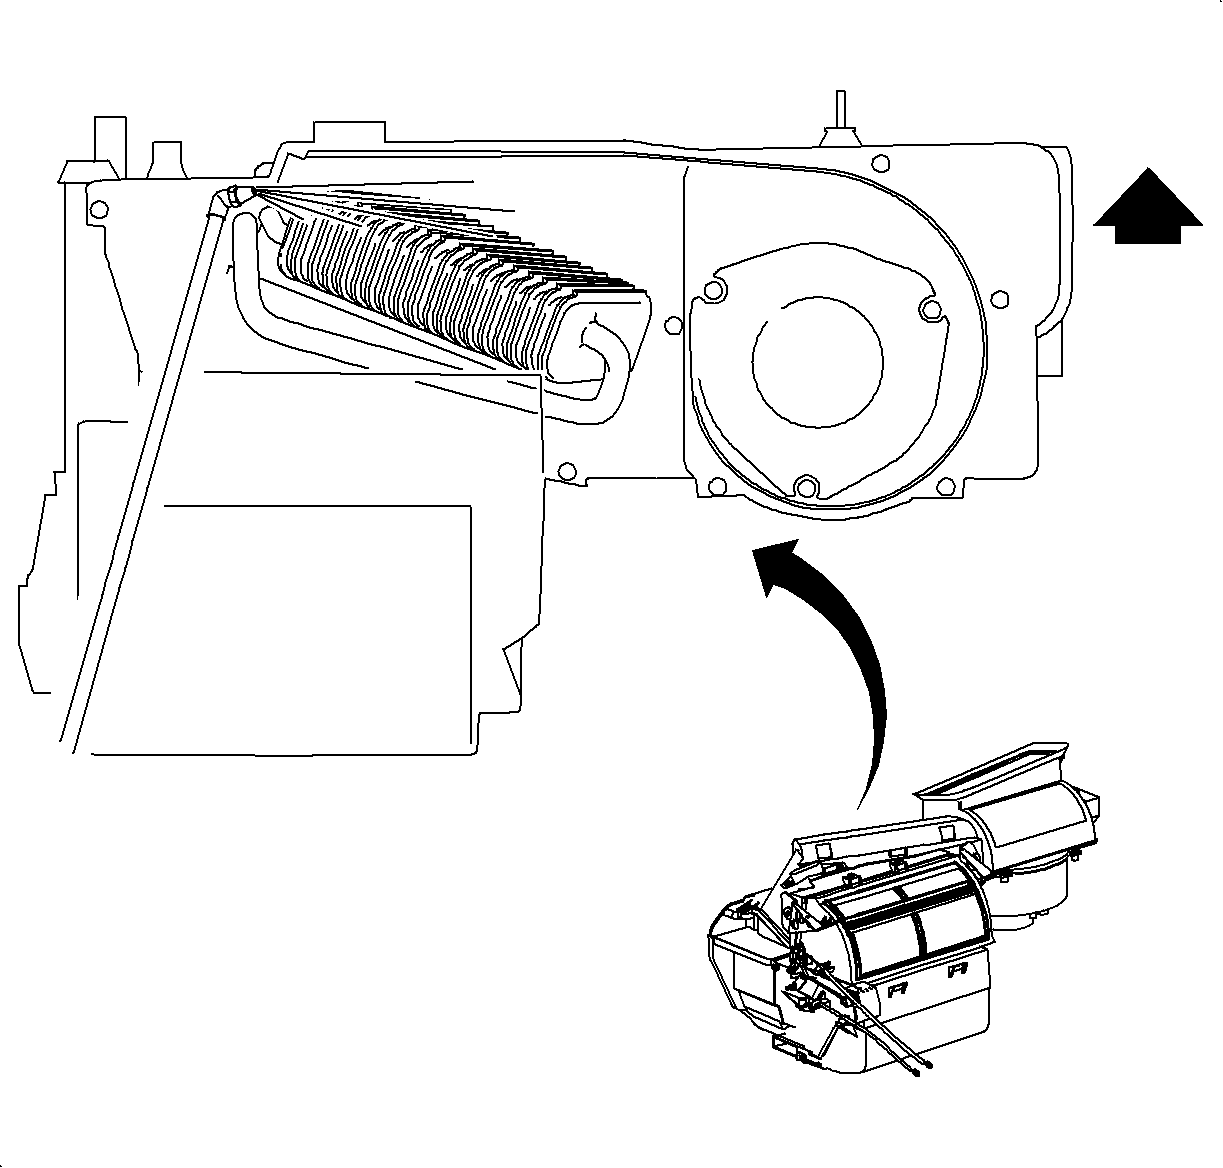
- Check the HVAC module for debris through the blower motor opening. Remove any debris from evaporator face.
- Install blower motor and connect electrical connector.
- Using a 15/32 inch drill bit, attach a drill stop or depth gage, or masking tape to allow for a 4 mm (5/32 in) depth.
- Locate the center of the triangle shaped portion of the plenum which slopes upward and to the right, next to the left-most blower motor fastener.
- Drill a 15/32 inch hole. Be careful not to let the drill bit penetrate beyond a 4 mm (5/32 in) depth.
| • | Adjusting temperature to full hot |
| • | Turning RECIRC On |
| • | Making sure A/C button is Off |
| • | Close all doors and windows |
| • | Start engine and allow to reach operating temperature |
| • | Allow blower motor to operate on HI blower for 5 minutes, once engine reaches operating temperature |
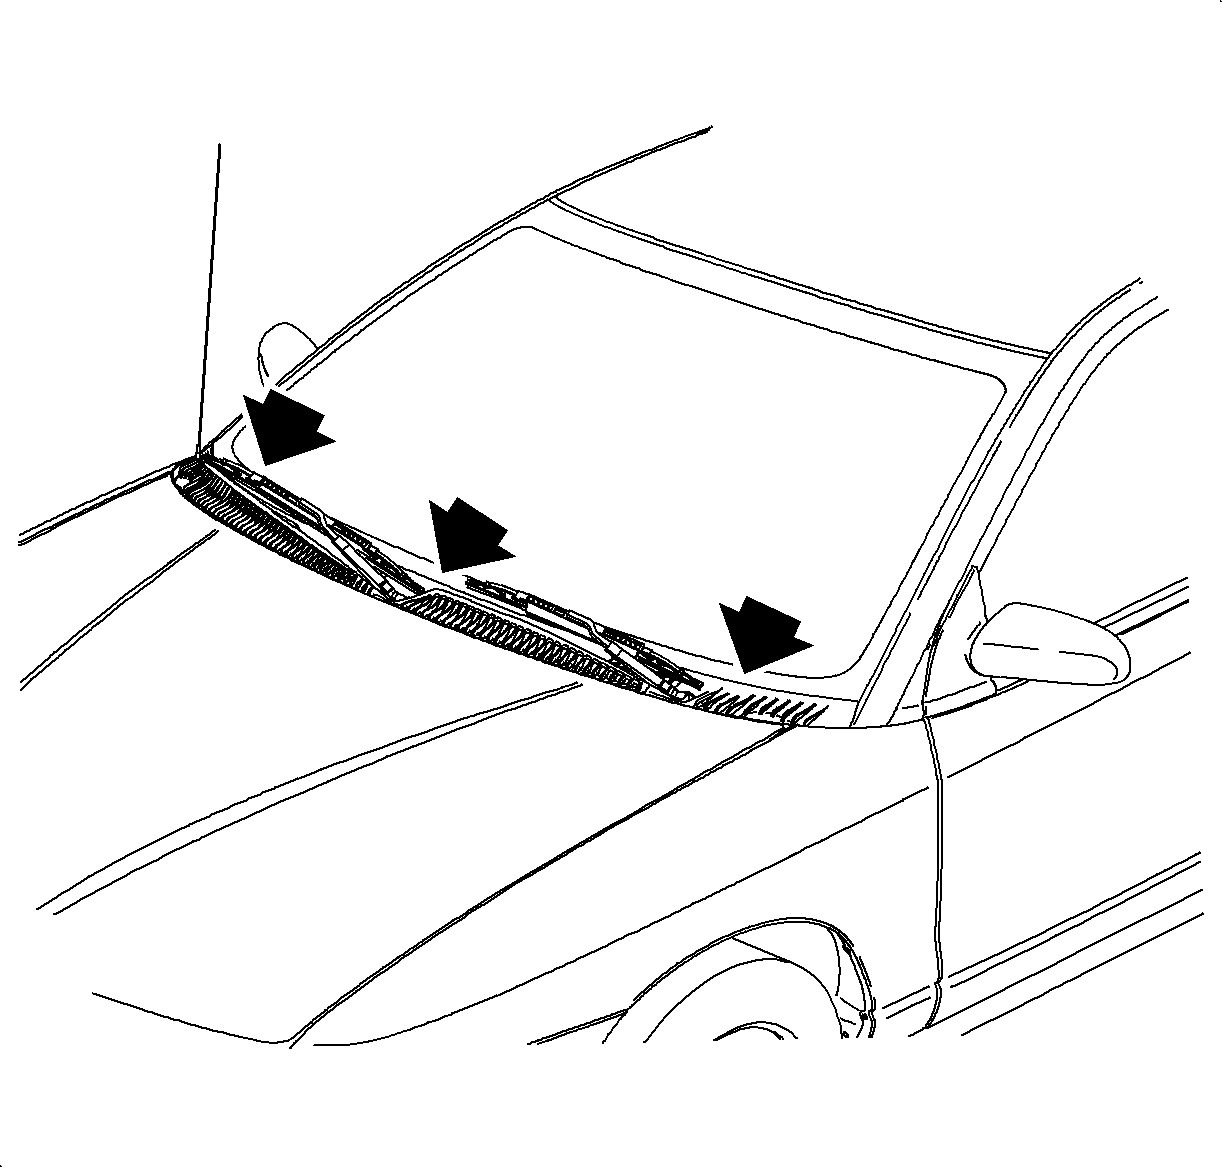
Notice: Use care when removing debris from front of evaporator so no damage is done to the fins.
Tighten
Tighten the blower motor mounting screws to 1.7 N·m (15 lb in).
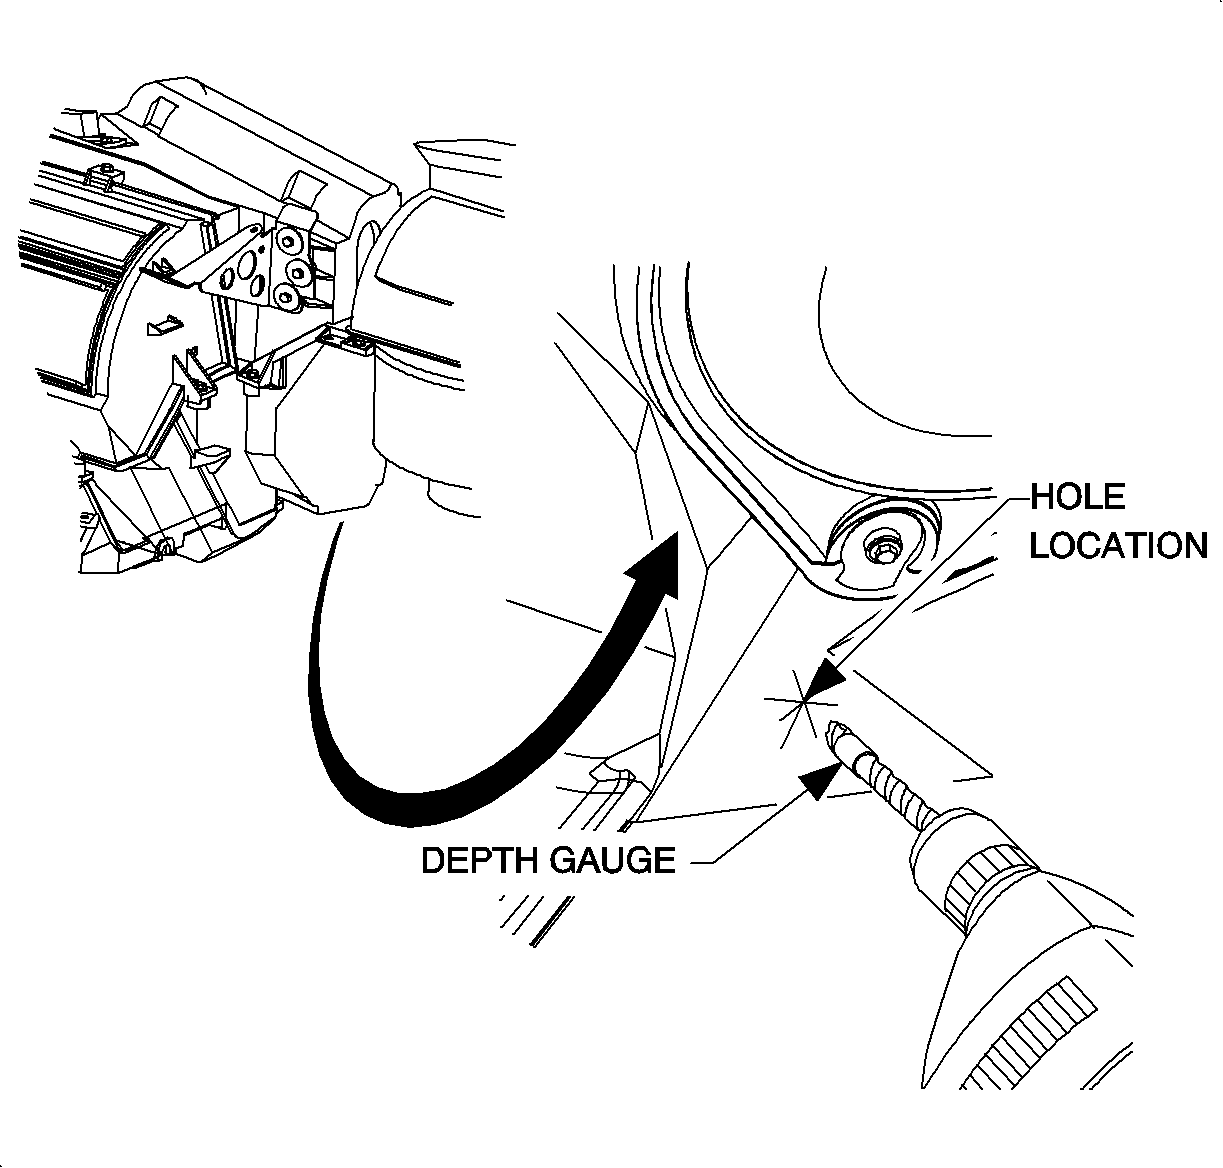
Notice: Running the drill bit in more than 4 mm (5/32 in) can damage the evaporator.
Important: Depending on part availability, two different products may be available for use on A/C evaporators. Select the appropriate procedure to follow based on the product you will be using:
| • | If using the Disinfectant Kit P/N 21030784; P/N 10953503 for Canada, continue to the "Evaporator Disinfecting Using Disinfectant Kit P/N 21030784; P/N 10953503 for Canada" procedure in this bulletin. |
| • | If using the Cooling Coil Coating P/N 12346390, continue to the "Applying Cooling Coil Coating P/N 12346390 to "Evaporator" procedure in this bulletin. |
Evaporator Disinfecting Using Disinfectant Kit P/N 21030784; P/N 10953503 for Canada
Perform this procedure only if you are using A/C System Disinfectant Kit P/N 21030784; P/N 10953503 for Canada.
- Allow vehicle to cool down before performing disinfectant procedure.
- Put on rubber gloves, safety goggles and NIOSH approved acid gas/organic vapor respirator.
- Pour the small bottle of the two part A/C System Disinfectant Kit P/N 21030784; P/N 10953503 for Canada into the large bottle. Put the cap back on the large bottle and invert bottle once or twice to mix the contents.
- Using cleaning gun OTC Tool SA9216NE, or equivalent siphon-type parts cleaning spray gun capable of delivering 2 ounces per minute of liquid with shop air at 552-620 kPa (80-90 psi), insert siphon hose into container of disinfectant. Take care to place the bottle in a secure upright position to avoid spilling contents.
- Insert nozzle tip of spray gun through the drilled hole and orient so spray pattern will be parallel to the evaporator face.
- With blower motor on HI and engine Off, spray the entire contents of the disinfectant mix. Rotate the nozzle tip up and down while spraying disinfectant to allow for an even distribution and to ensure full coverage of the evaporator.
- Turn blower motor Off.
- Allow evaporator core to soak for at least 5 minutes
- With blower motor on HI, thoroughly rinse the evaporator core, using the above procedure, with 1 quart of clean water to remove any disinfectant residue.
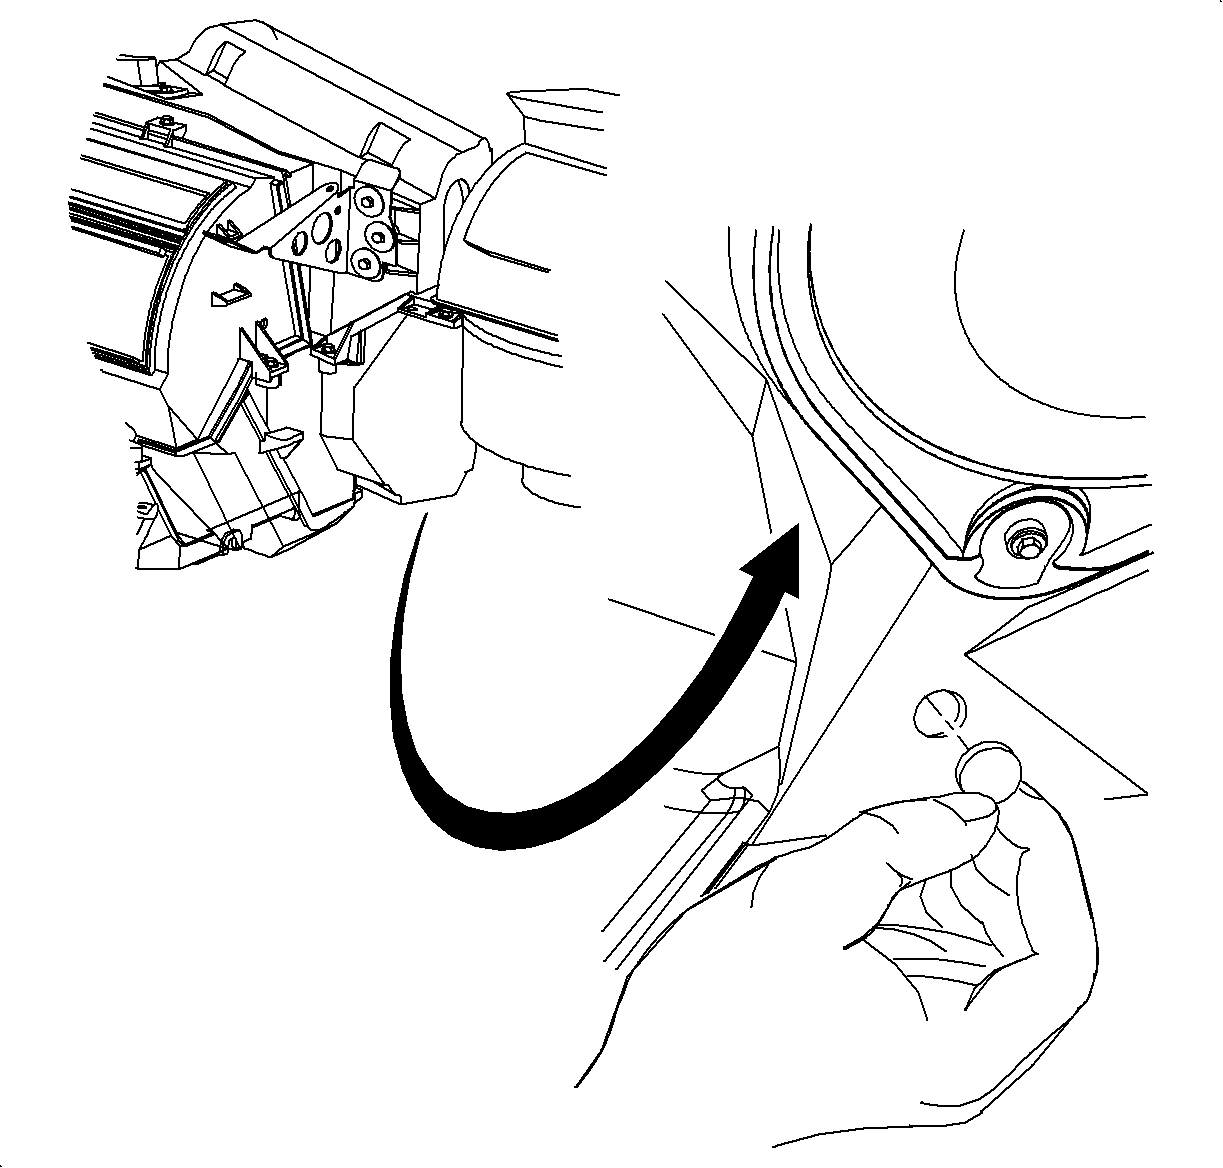
- Install hole plug P/N 21121827.
- Properly dispose of disinfectant and rinse water runoff collected in drain pan into a sanitary drain.
- Remove protective covering from interior of vehicle.
- If the delayed blower motor control module is to be installed, proceed to "Delayed Blower Motor Control Module Installation" in this bulletin.
Caution: This procedure should only be performed on a cool vehicle. It has been demonstrated that irritating vapors will be formed in the engine compartment if the disinfectant coming out of the drain outlet contacts hot engine components. Disinfectant can cause substantial, but temporary eye injury. Do not get disinfectant in eyes or on clothing. Wash thoroughly with soap and water after handling.
First Aid: If disinfectant gets into eyes, hold eyelids open and flush with a steady, gentle stream of water for 15 minutes. Obtain medical attention if irritation persists.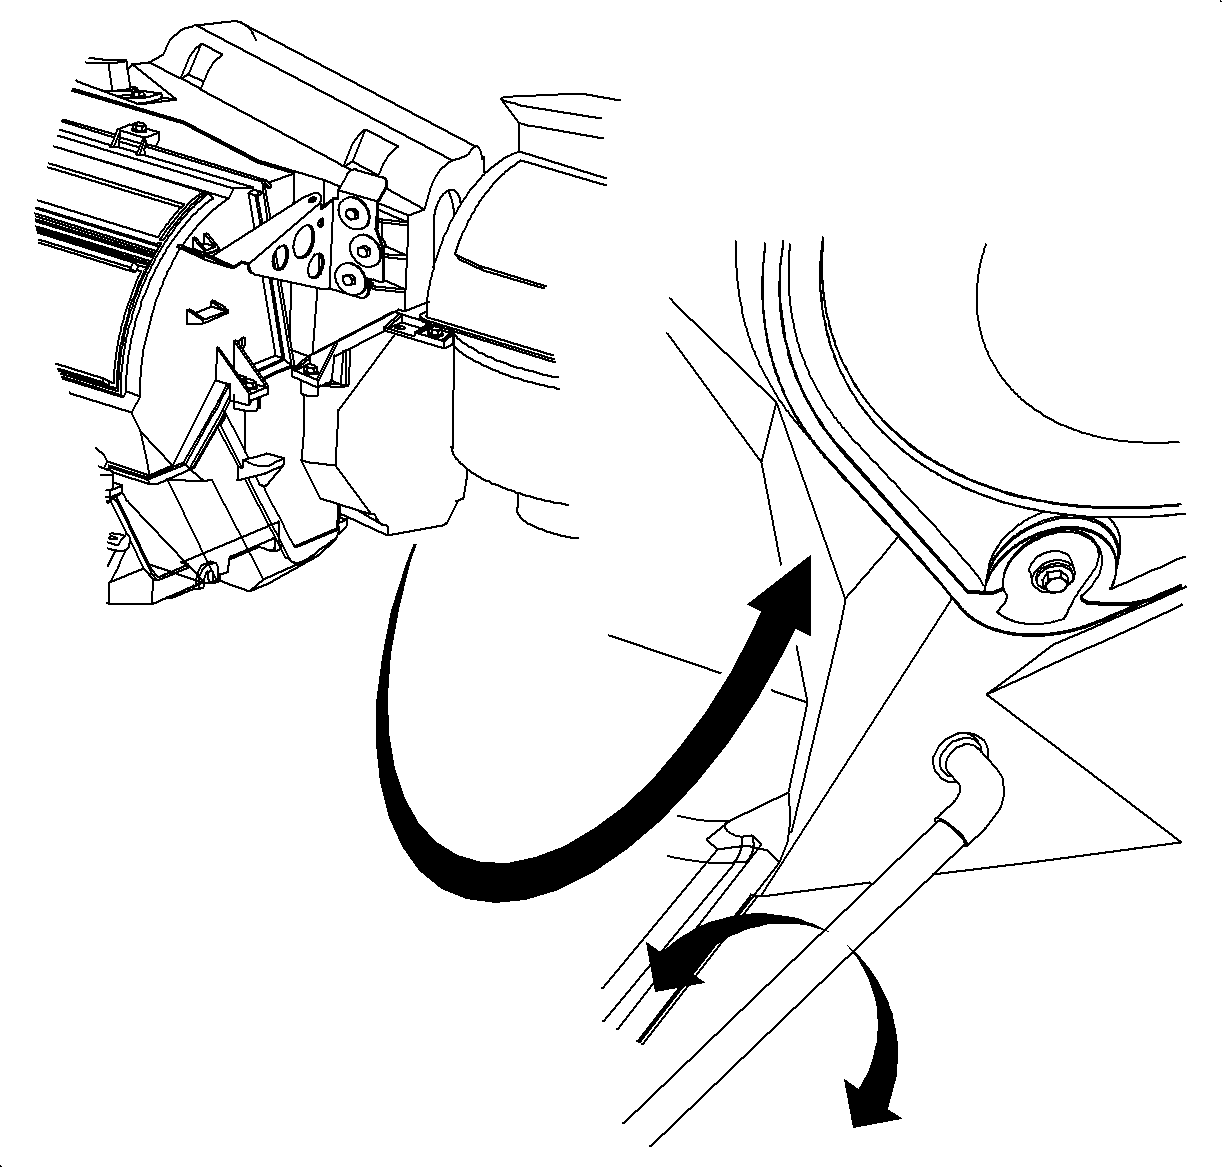
Important: Before enabling afterblow function, refer to "Customer Information" on page 2 of this bulletin and review operation of afterblow function with customer.
Applying Cooling Coil Coating P/N 12346390 to Evaporator
Perform this procedure only if you are using Cooling Coil Coating P/N 12346390.
- Allow vehicle to cool down before performing cooling coil coating procedure.
- Put on rubber gloves and safety glasses.
- Using cleaning gun, OTC Tool SA9216NE, or equivalent siphon-type parts cleaning spray gun capable of delivering 2 ounces per minute of liquid with shop air at 552-620 kPa (80-90 psi), insert siphon hose into container of cooling coil coating. Take care to place the bottle in a secure upright position to avoid spilling contents.
- Regulate shop air to 276-414 kPa (40-60 psi).
- Insert nozzle tip of spray gun through the drilled hole and orient so spray pattern will be parallel to the evaporator face.
- Apply cooling coil coating using short bursts and rotating the nozzle tip up and down. This will allow for an even distribution and to ensure full coverage of the evaporator.
- Allow evaporator core to soak for 30 minutes.
- Dry evaporator by:
- Install hole plug P/N 21121827.
- Properly dispose of cooling coil coating runoff collected in drain pan into a sanitary drain.
- Remove protective covering from interior of vehicle.
- If the delayed blower motor control module is to be installed, proceed to "Delayed Blower Control Module Installation" in this bulletin.
Caution: Cooling Coil Coating can cause temporary eye injury. Do not get Cooling Coil Coating in eyes or on clothing. Wash thoroughly with soap and water after handling.
First Aid: If cooling coil coating gets into eyes, hold eyelids open and flush with a steady stream of water for 15 minutes. Obtain medical attention if irritation persists.

| • | Adjusting temperature to full hot |
| • | Turning RECIRC On |
| • | Making sure A/C button is Off |
| • | Open windows 1/2 inch and close doors |
| • | Start the engine and allow to reach operating temperature |
| • | Allow blower motor to operate on HI blower for 5 minutes once engine reaches operating temperature |

Important: Before enabling afterblow function, refer to "Customer Information" on page 2 of this bulletin and review operation of afterblow function with customer.
Delayed Blower Motor Control Module Installation
Important: Before proceeding with the installation of the delayed blower motor control module, make sure the customer is fully aware of its function and operation.
The following parts are required to install the delayed blower motor control module:
Part Description | P/N |
|---|---|
Delayed Blower Motor Control Module Kit | 21031158 |
Ring Terminal | 12112245 |
- Disable the SIR system. Refer to "Disabling the SIR System" in the 1997 "SIR Service Manual."
- Record the preset stations and disconnect negative battery cable.
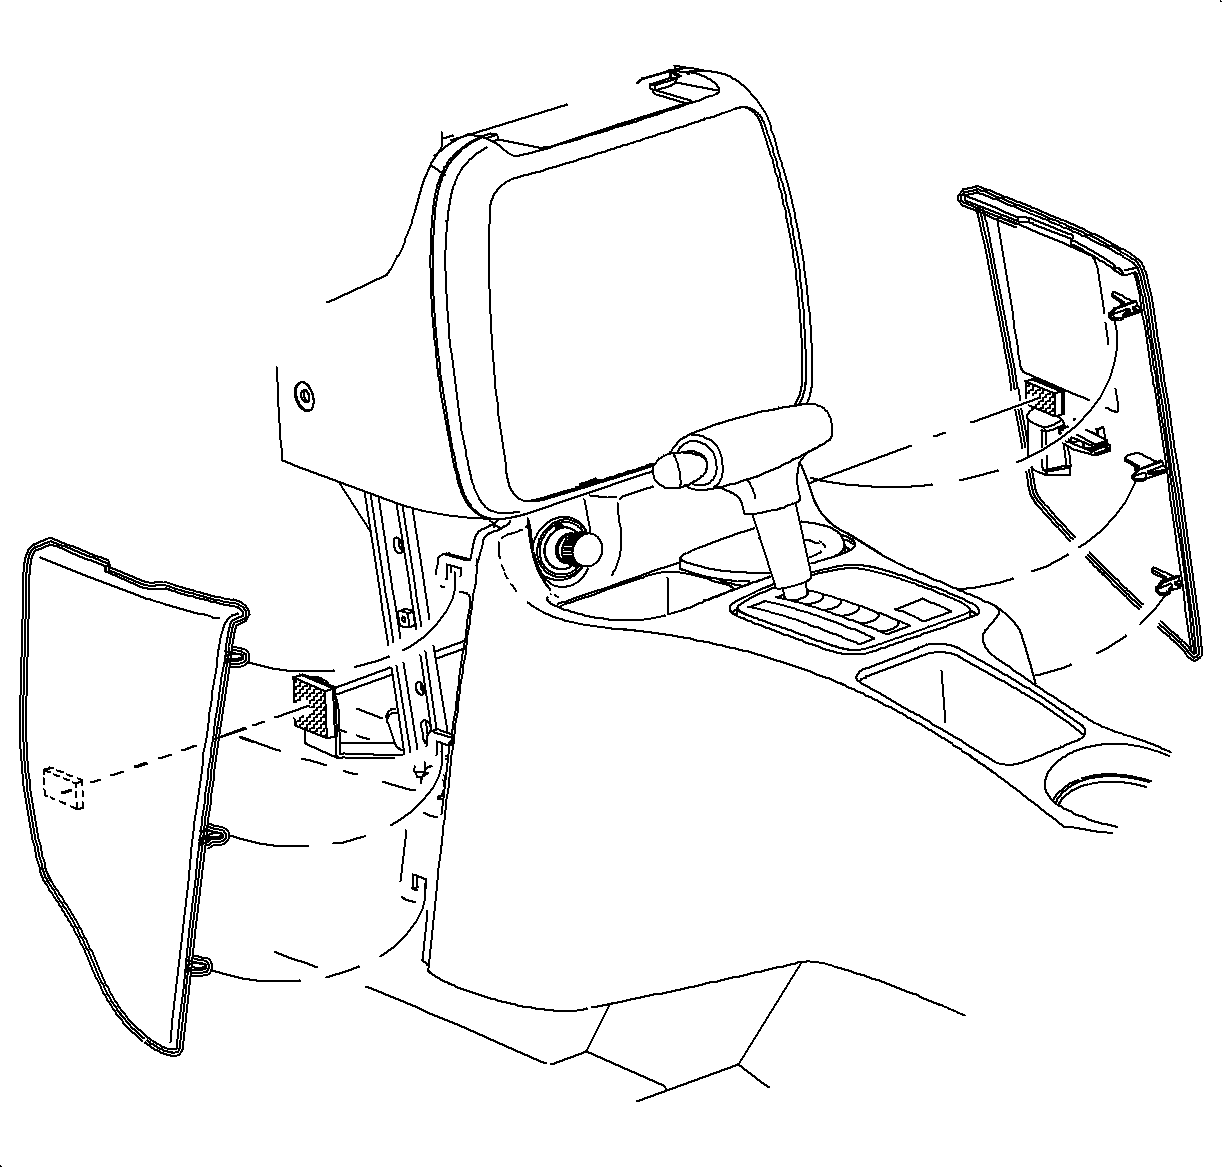
- Remove right and left console extension assemblies.
- Remove HVAC module lower trim panel.
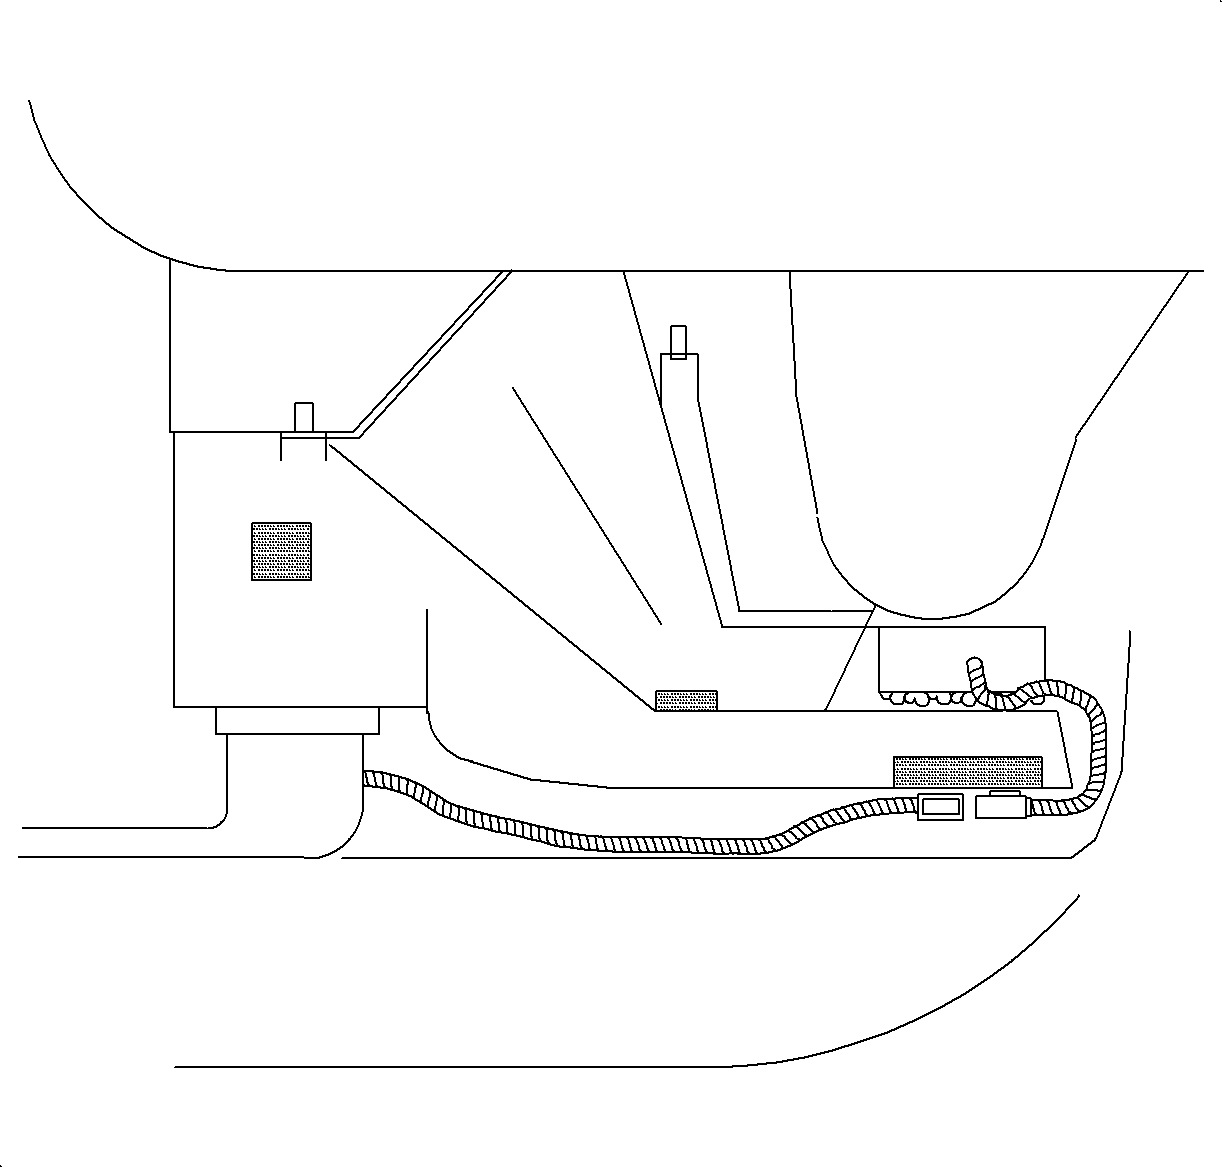
- From the passenger side of vehicle, wipe clean top center horizontal surface of heater duct.
- Remove hook side of hook and loop retainer that is attached to delayed blower motor control module.
- Peel backing off of hook side of hook and loop retainer and apply to top center horizontal surface of heater duct between two structure ribs. Press firmly to seat.
- Install edge clip on electrical connector of delayed blower motor control module.
- Using electrical tape, solid wrap delayed blower motor control module pigtail harness.
- Cut a piece of cardboard approximately the same size as the delayed blower motor control module and place it under the loop side of the hook and loop material attached to the module.
- From driver's side of vehicle:
- From passenger's side of vehicle:
- Using black electrical tape, solid wrap 381 mm (15 in) of the delayed blower motor control module jumper harness, starting at electrical connector end.
- Connect delayed blower motor control module jumper harness with delayed blower motor control module pigtail at the heater duct.
- Route delayed blower motor control module jumper harness under front heater duct, forward of rear heater duct, if equipped, to the I/P wiring harness on the driver's side of the vehicle.
- Disconnect black I/P harness connector and pull into driver's side footwell.
- Remove radio.
- Make the following splices at the instrument panel junction block (IPJB) black 68-way connector:
- Splice into the high blower relay coil ignition feed wire as follows:
- Attach ring terminal lead kit P/N 12112245 to the BLK/WHT wire from the delayed blower motor control module.
- Attach the ring terminal to ground location at H-brace. Make sure that new ring terminal is on top of existing ring terminal.
- Disconnect PCM Lt. Blue 32-way connector.
- Using a 1.5 m (5 ft) length of 0.50 mm² (20 gage) wire:
- The BLU wire from the delayed blower motor control module is unused. Tape end of BLU wire and tape back to jumper harness of delayed blower control module. The delayed blower motor control module GRN wire is used for testing.
- Attach top half of "Notice" label provided in kit to blower motor cover. Attach bottom half of "Notice" label to inside of right side console extension assembly.
- Connect black I/P harness connector.
- Connect negative battery cable.
- Proceed to "Testing the Delayed Blower Motor Control Module" and verify operation. After operation is verified, proceed to next step.
- Install radio.
- Install and tighten screws.
- Connect traction control/fog lamp/rear defog electrical connector, if equipped.
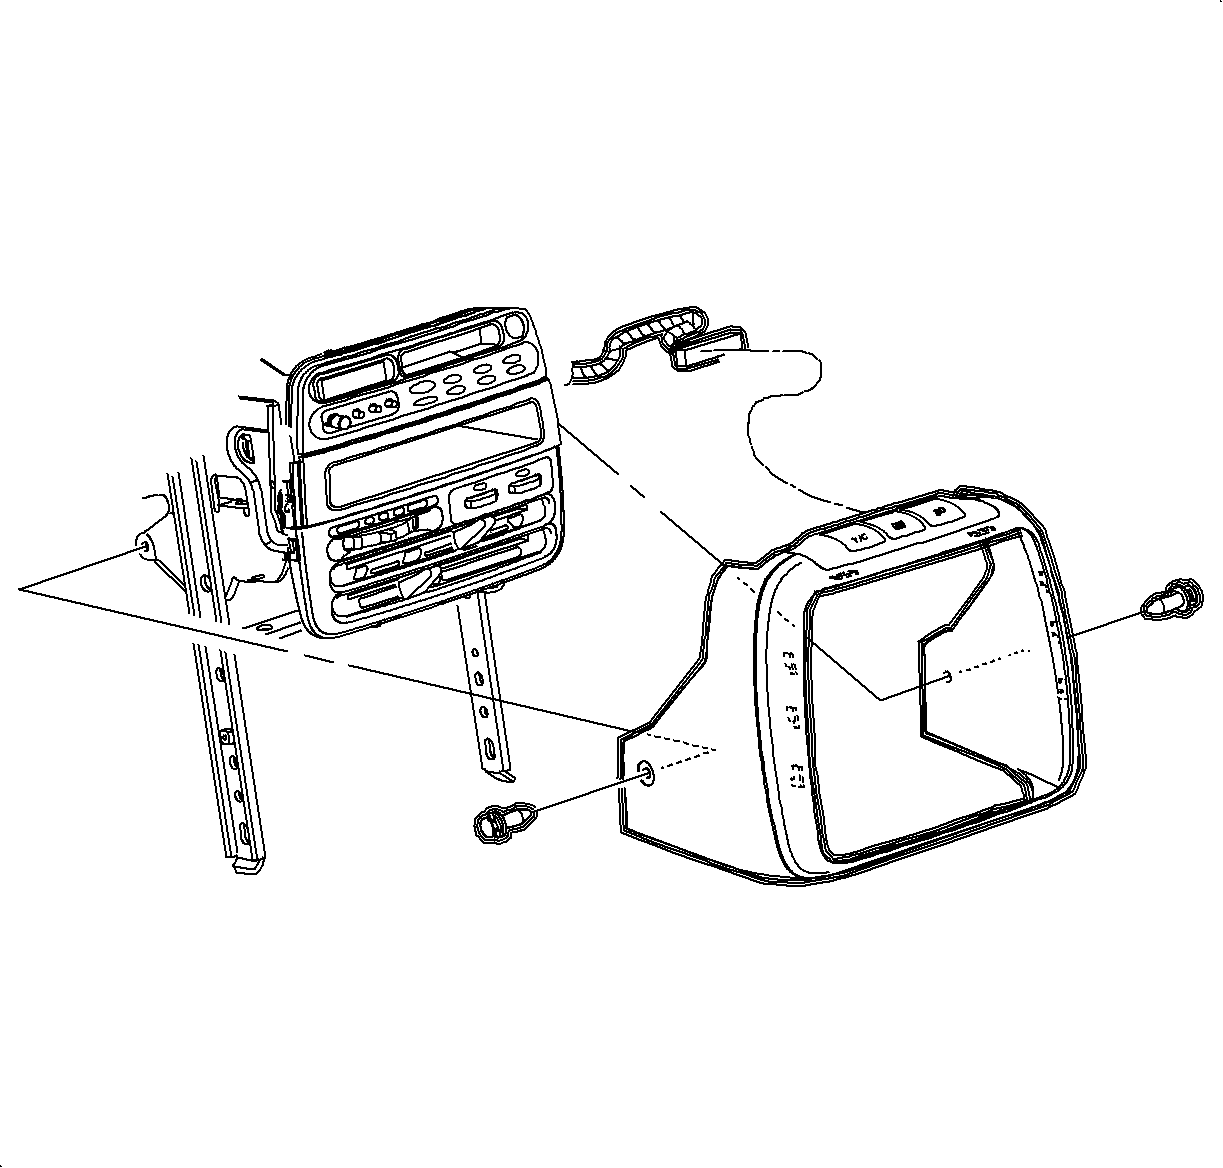
- Install radio/HVAC control cover. Push in at clip locations.
- Install push pins and lock.
- Install HVAC module lower trim panel.
- Install right and left console extension assemblies.
- Enable the SIR system. Refer to "Enabling the SIR System" in the 1997 "SIR Service Manual."
- Set radio station presets.
- Clear any SIR diagnostic trouble codes that may have set during delayed blower motor control module testing. Refer to the 1997 "SIR Service Manual."
Caution: When performing service on or around SIR components or SIR wiring, follow the cautions and procedures in the appropriate year SIR service manual to temporarily disable the SIR system. Failure to follow the disable procedures could result in possible air bag deployment, personal injury or otherwise unneeded SIR system repairs.
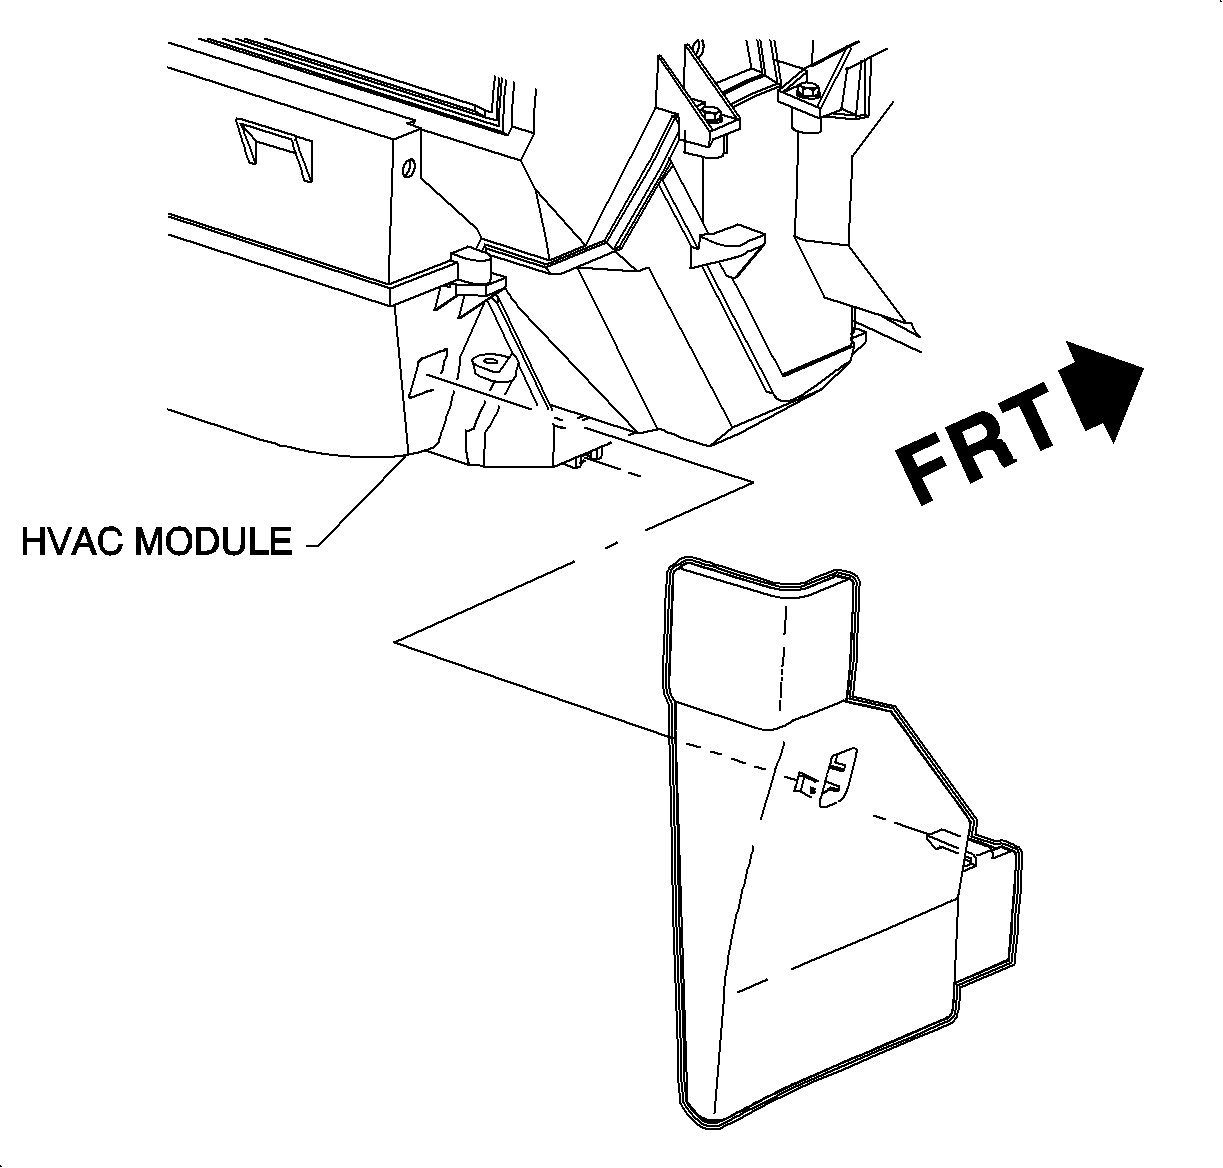
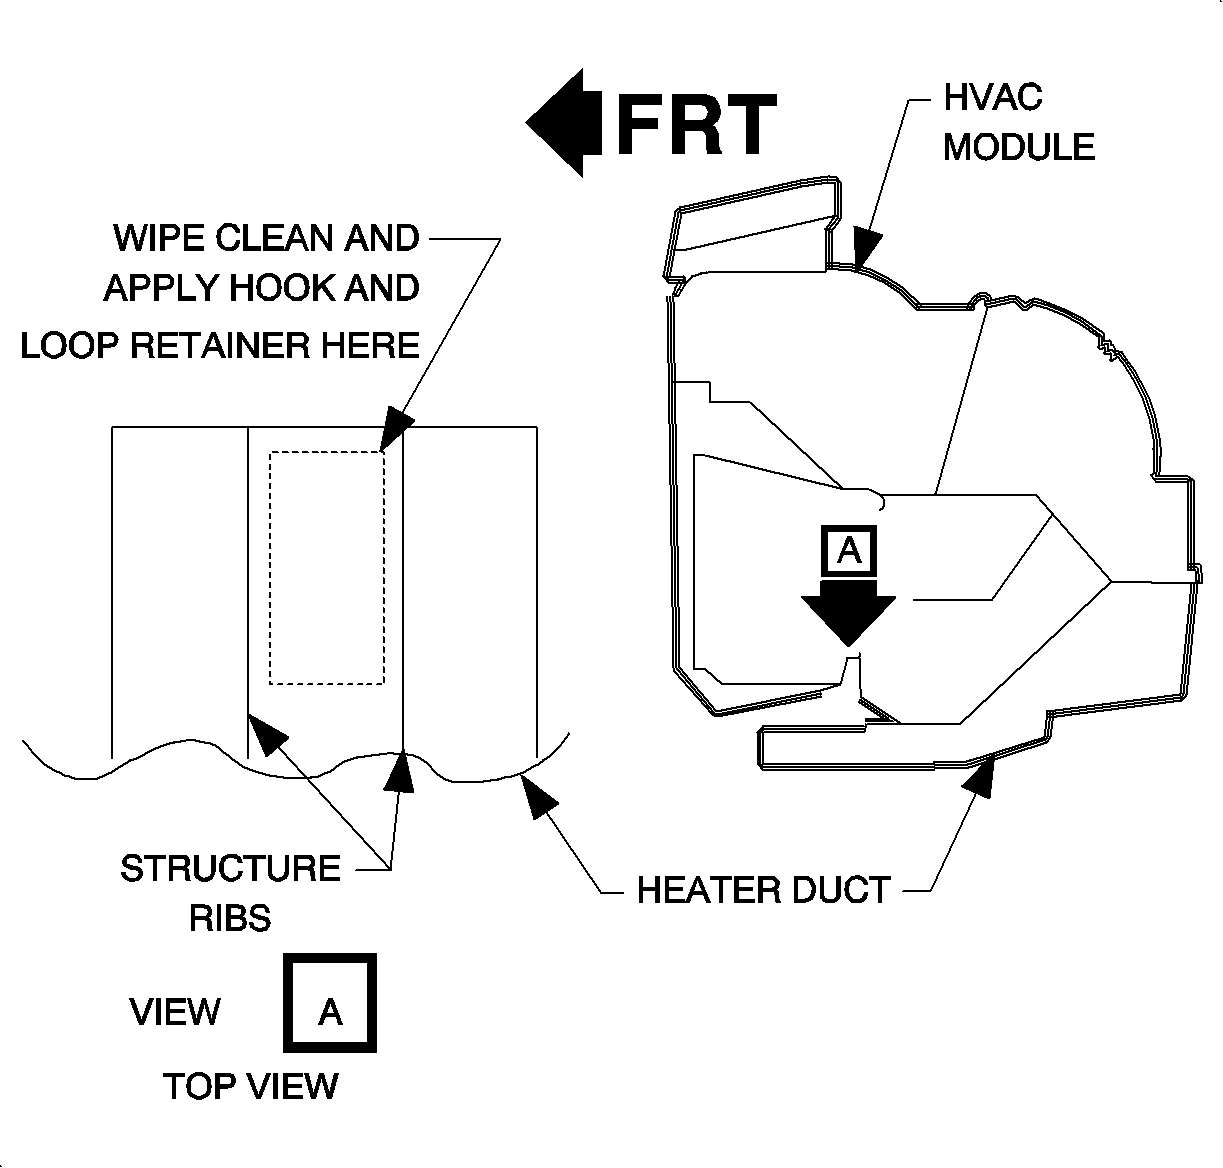
Important: Surface where the delayed blower motor control module is to be located is a horizontal flat space. It is close to the front of the dash, just above the carpet.
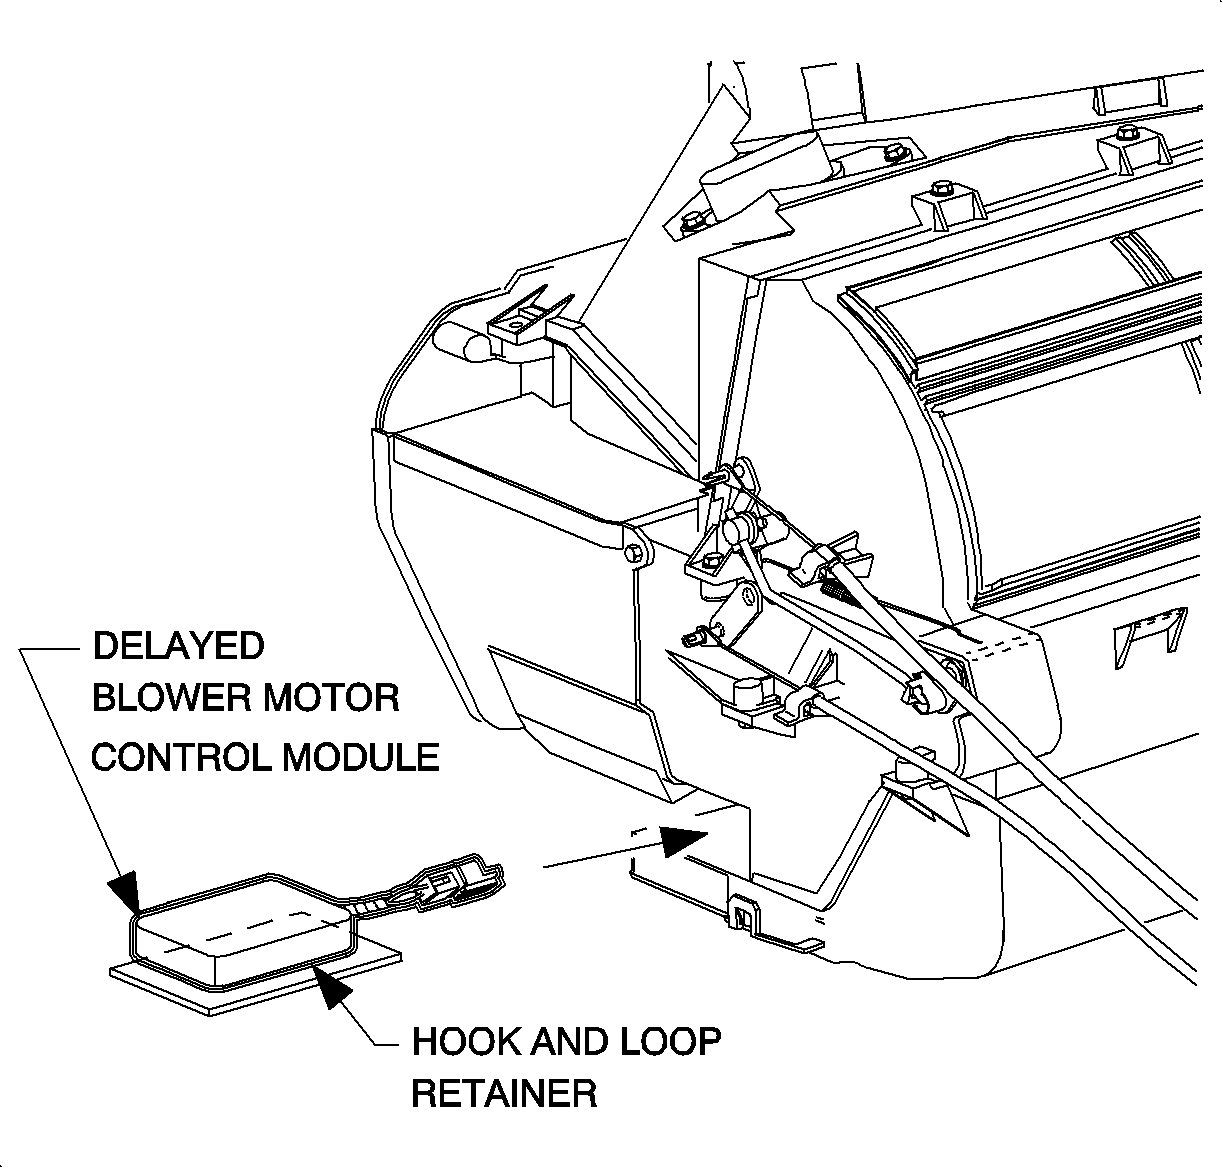
| 11.1. | Insert delayed blower motor control module, with pigtail harness end first and hook and loop retainer down, onto the top center horizontal surface of the heater duct. |
| 11.2. | Align delayed blower motor control module so that the rear edge is flush with heater duct edge on driver's side of vehicle. |
| 11.3. | Remove cardboard. |
| 11.4. | Press down on blower motor control module to engage hook and loop retainer. Delayed blower motor control m module should fit securely if engagement of hook and loop retainer has been achieved. |
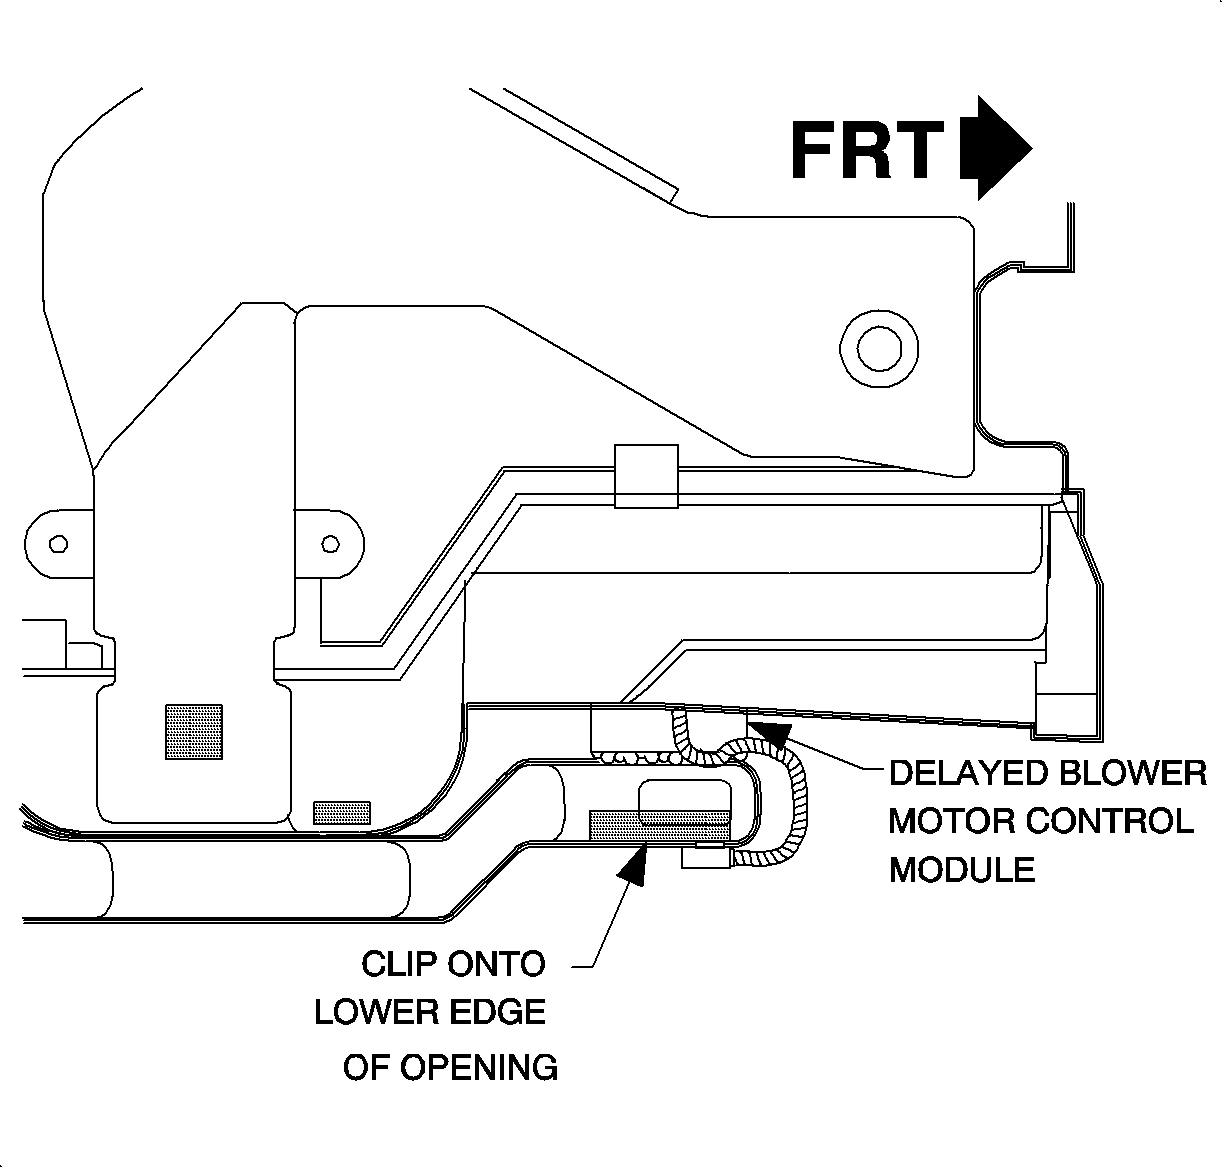
| 12.1. | Route delayed blower motor control module pigtail harness between forward edge of heater duct and carpet. |
| 12.2. | Attach delayed blower motor control module pigtail harness between forward edge of heater duct and carpet. |
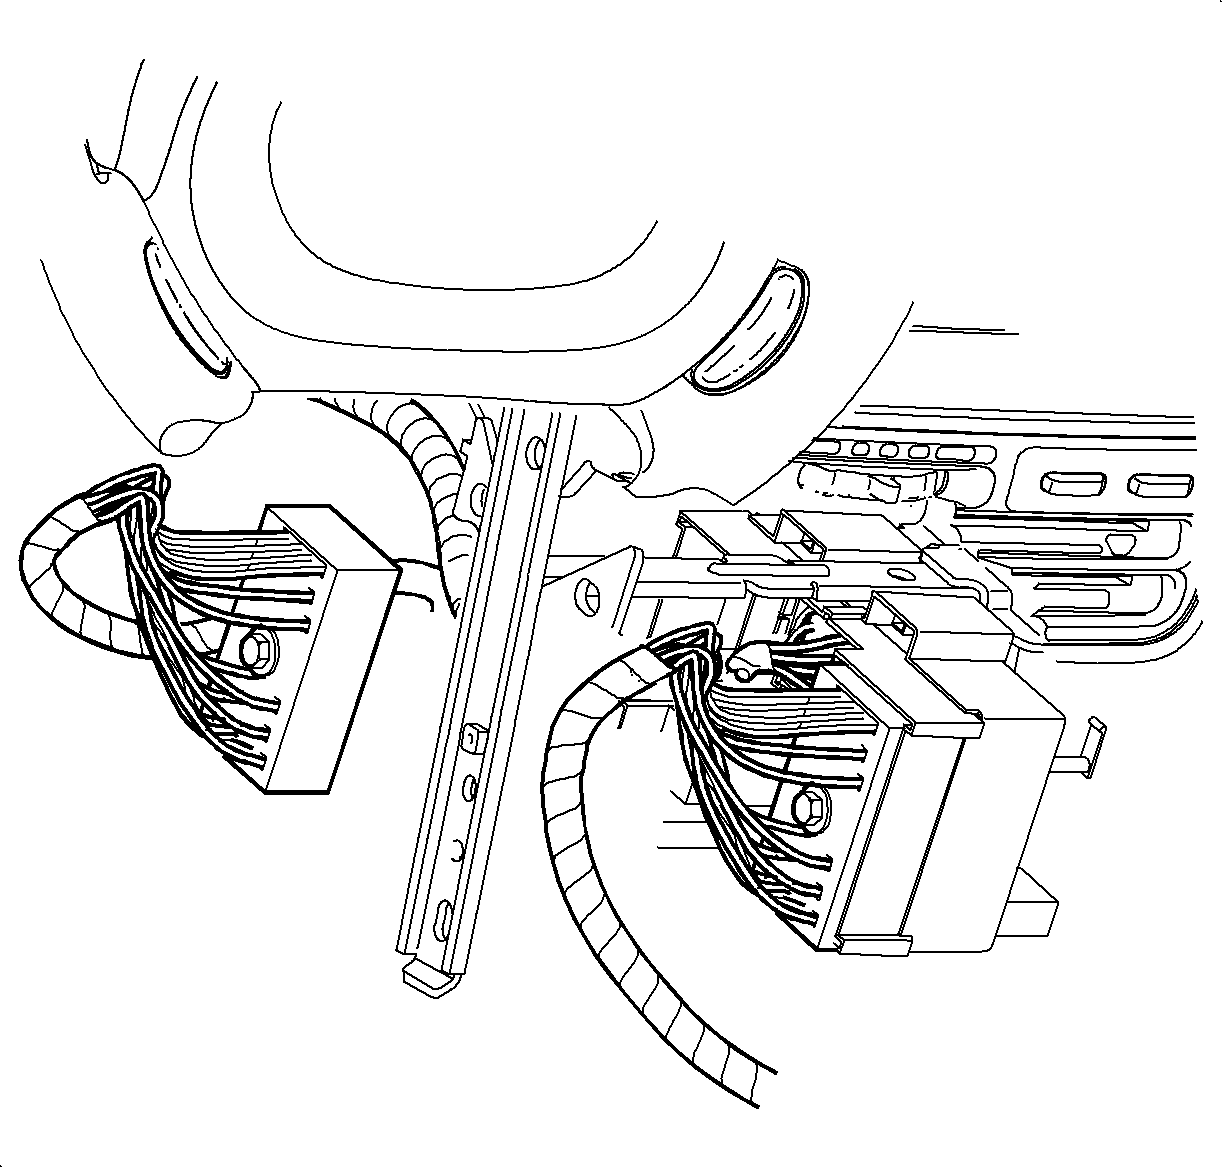
Notice: To prevent any possibility of a short circuit, replace any tape that is pushed back or removed from any wiring harness that is moved.

| Important: Do not push center pins through fasteners. |
| 17.1. | Press center pins inward to release radio/HVAC control cover push-pin fasteners. |
| 17.2. | Remove fasteners and pull radio/HVAC control cover rearward. |
| 17.3. | Disconnect traction control/fog lamp/rear defog electrical connector, if equipped. |
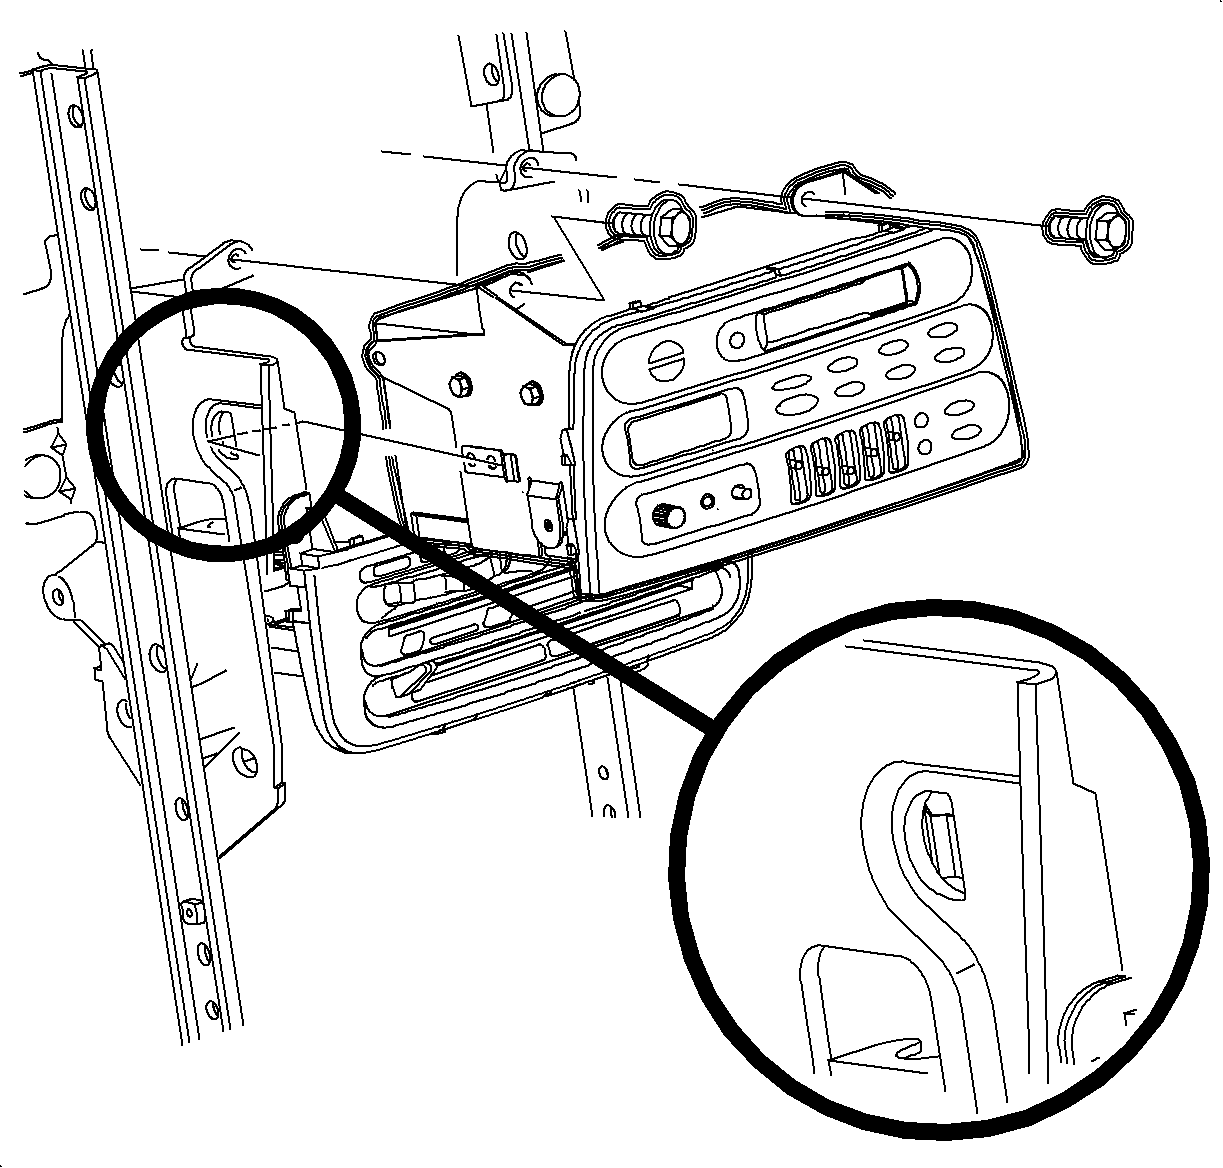
| 17.4. | Remove radio screws. |
| 17.5. | Push spring clips in through holes marked D located on both sides of radio brace. |
| 17.6. | Pull radio out slightly to access rear of radio. |
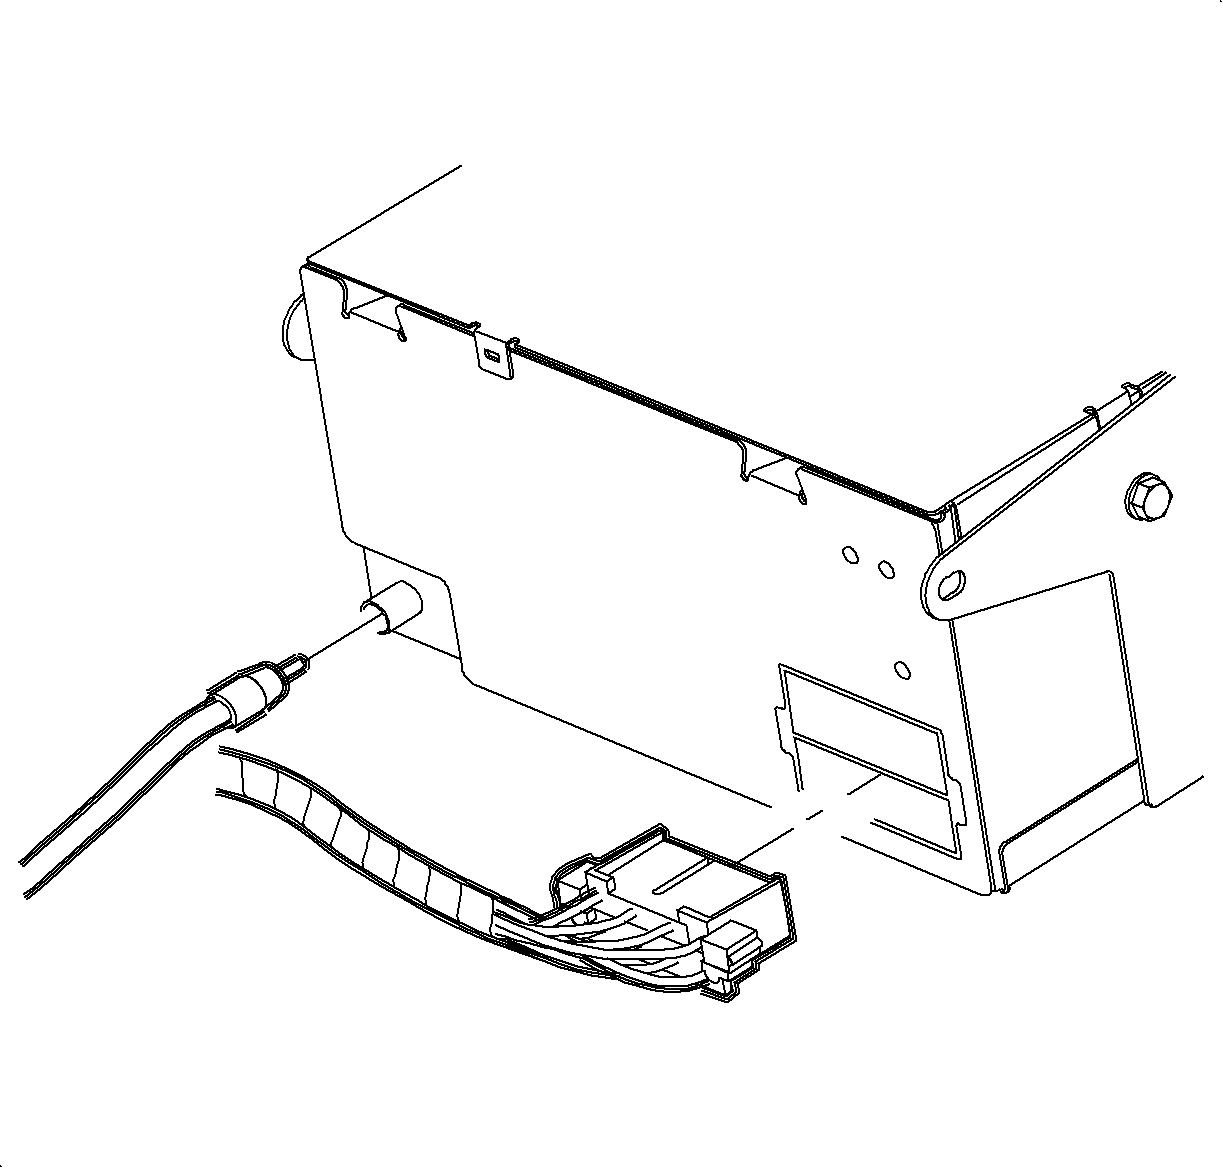
| 17.7. | Disconnect electrical connector and antenna. |
| 17.8. | Remove radio. |
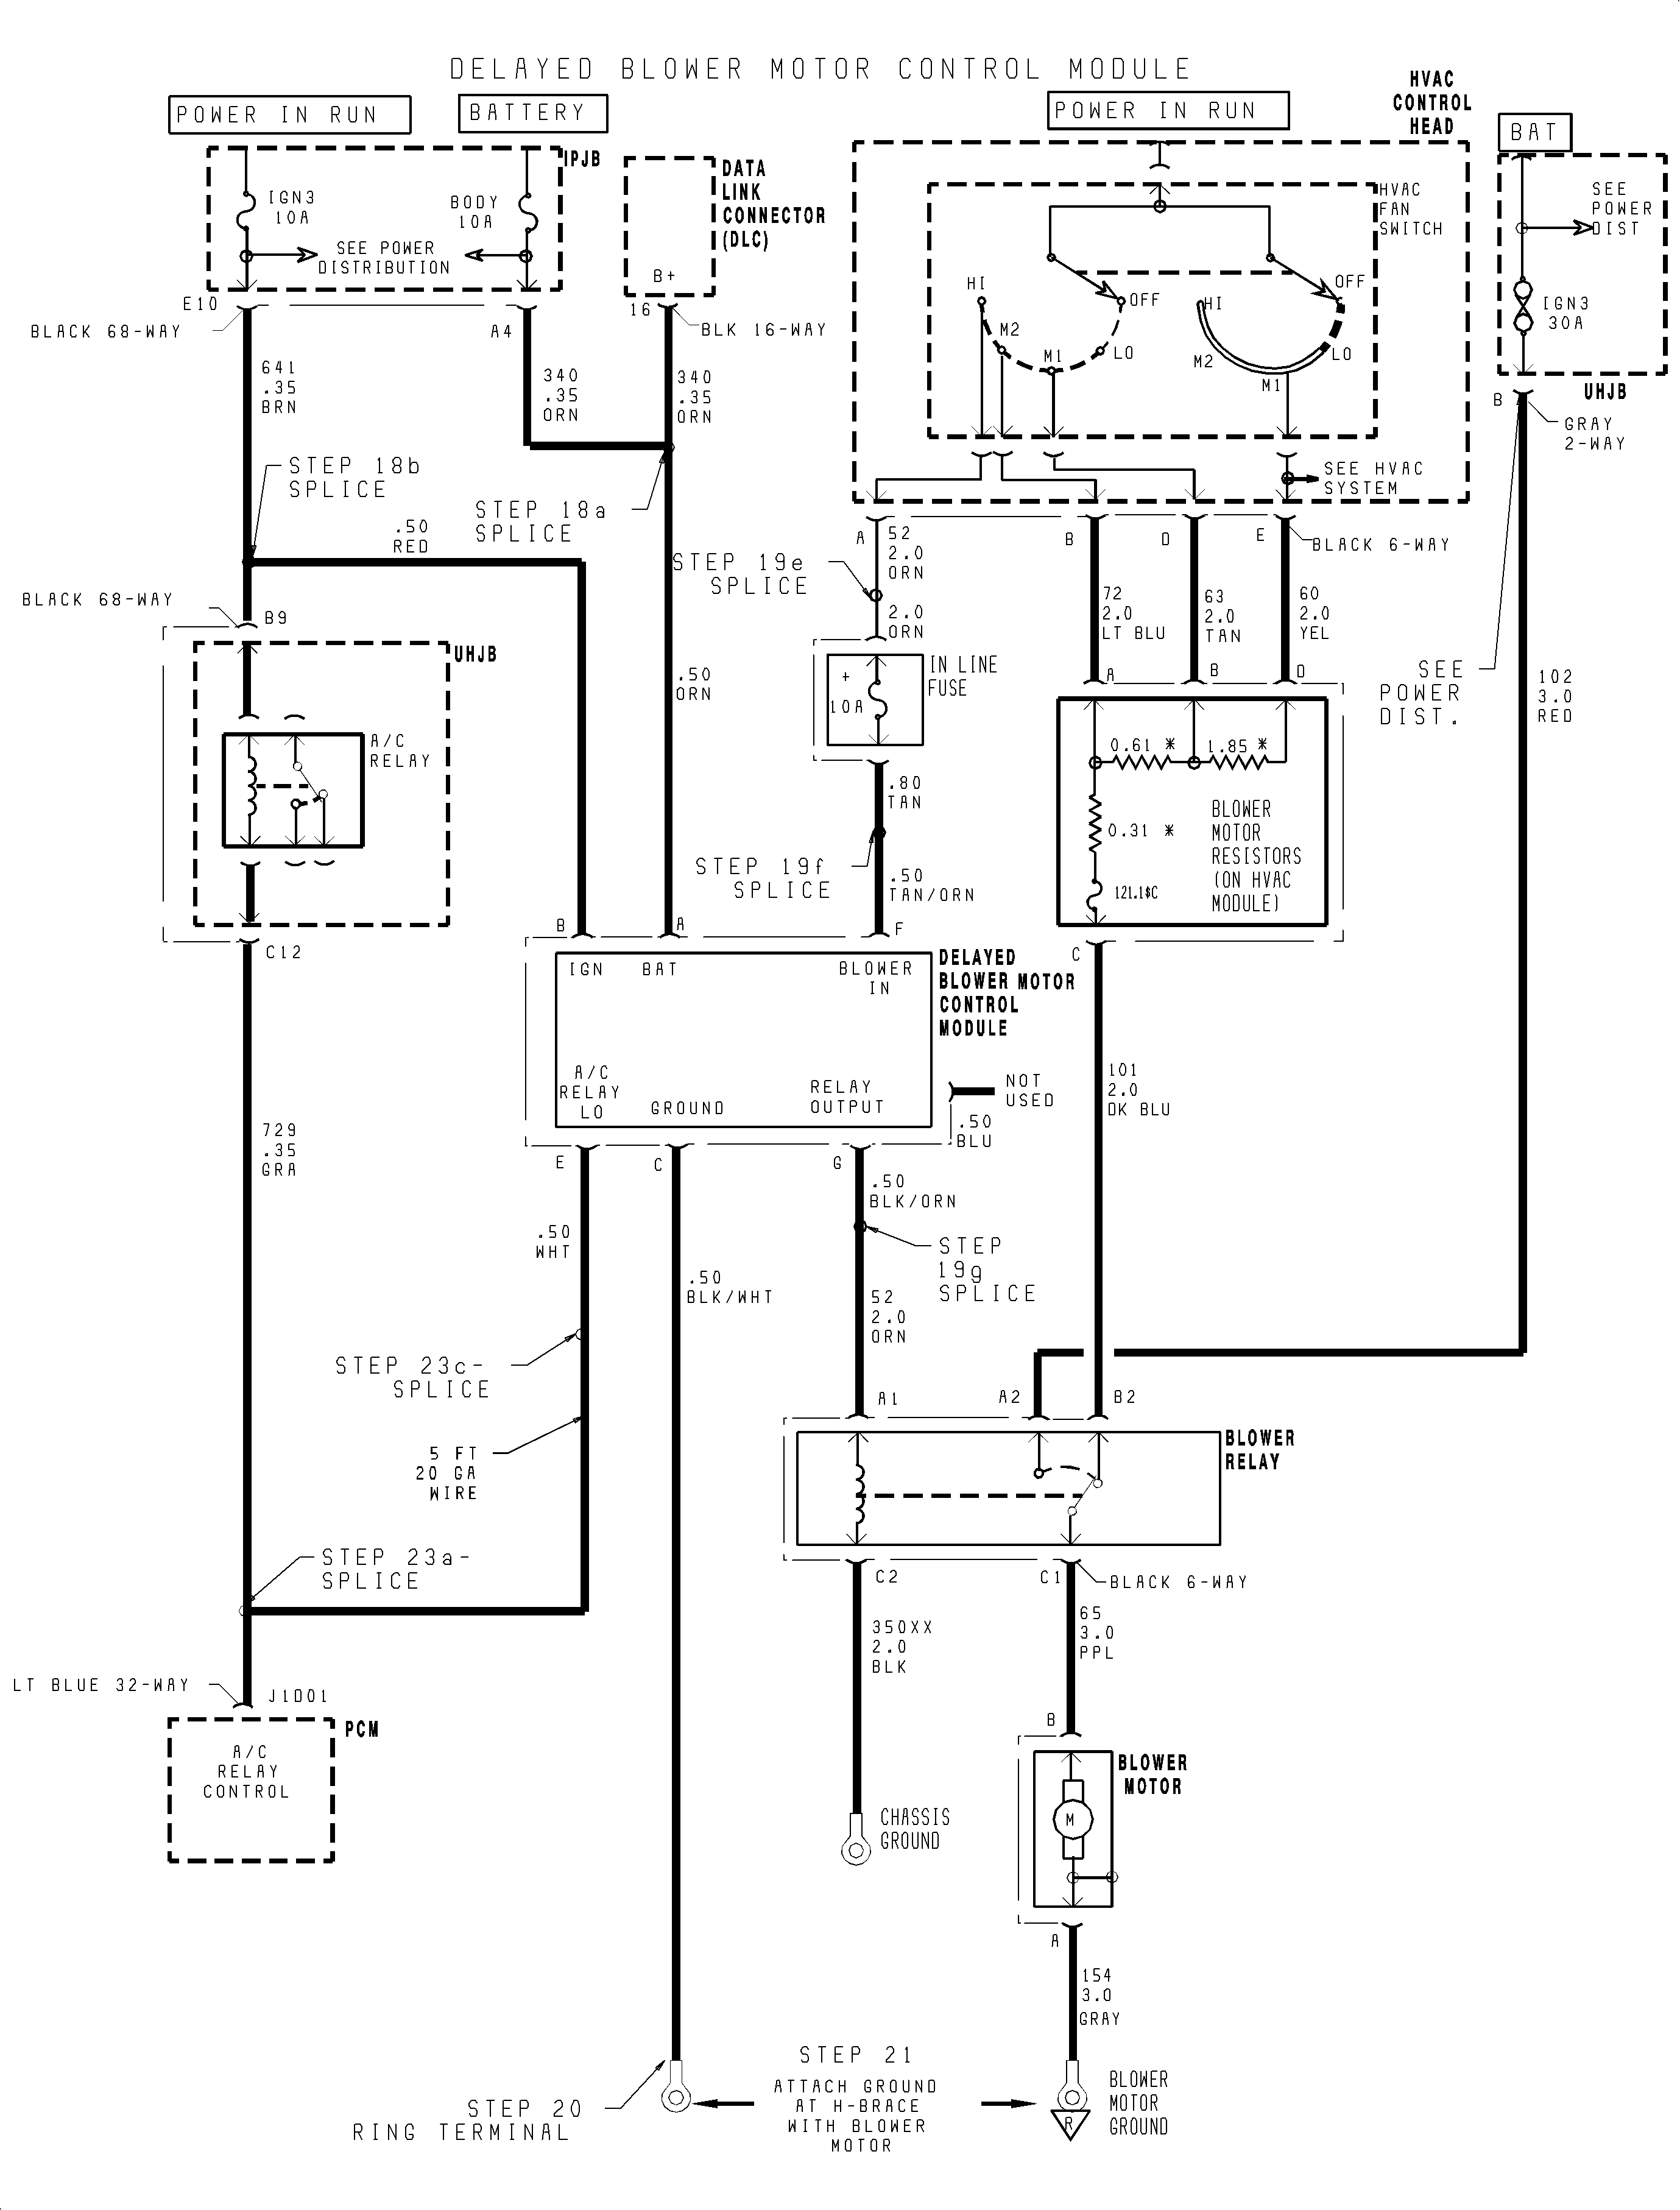
Important: For steps 18 through 23, refer to the electrical schematic on the facing page.
Important: For information on splicing wires, refer to "Wire Splicing" instructions in this bulletin.
| 18.1. | At terminal A4, splice using a salmon (pink) splice sleeve, the ORN 0.50 mm² (20 gage) wire from delayed blower motor control module into ORN 0.35 mm² (22 gage) wire (circuit 340L-battery feed) from 68-way connector. |
| 18.2. | At terminal E10, splice using a salmon (pink) splice sleeve, the RED 0.50 mm² (20 gage) wire from delayed blower motor control module into BRN 0.35² (22 gage) wire (circuit 641A-ignition) from 68-way connector. |
| 18.3. | Connect black I/P harness connector. |
Tighten
Tighten the I/P harness connector to 2.2 N·m (20 lb in).
| 19.1. | Disconnect HVAC fan switch (blower control switch) electrical connector from the HVAC control head. |
| 19.2. | Detach the wiring harness clip (found attached to the HVAC module) so that wiring harness can be pulled rearward to make it easier to work on the HVAC fan switch connector. |
| 19.3. | Route the TAN/ORN and BLK/ORN wires, from the delayed blower motor control module, up from the IPJB area, between the HVAC control head and the HVAC module, to the HVAC control head area. |
| 19.4. | Locate the ORN wire found in cavity A of the HVAC fan switch electrical connector that goes to the blower relay. Cut the wire approximately 51 mm (2 in) from the HVAC fan switch connector. |
| 19.5. | Splice the in-line fuse ORN 2.0 mm² (14 gage) wire P/N 21024696 to the HVAC fan switch connector side of the cut ORN 2.0 mm² (14 gage) wire by using a blue splice sleeve. |
| 19.6. | Splice the in-line fuse TAN 0.80 mm² (18 gage) wire P/N 21024696 to the TAN/ORN 0.50 mm² (20 gage) wire, one of the wires routed up from the delayed blower motor control module in step 19.3, by using a salmon (pink) splice sleeve. |
| Important: When performing the following splice, make sure to double the thickness of the BLK/ORN 0.50 mm² (20 gage) wire by bending the wire in half and twisting it before inserting the wire into the splice sleeve. |
| 19.7. | Splice the BLK/ORN 0.50 mm² (20 gage) wire, one of the wires is routed up from the delayed blower motor control module in step 19.3, to the harness end that goes to the blower relay of the ORN 2.0 mm² (14 gage) wire, which was cut in step 19.4, by using a blue splice sleeve. This splice sleeve should be performed in the HVAC control head area. |
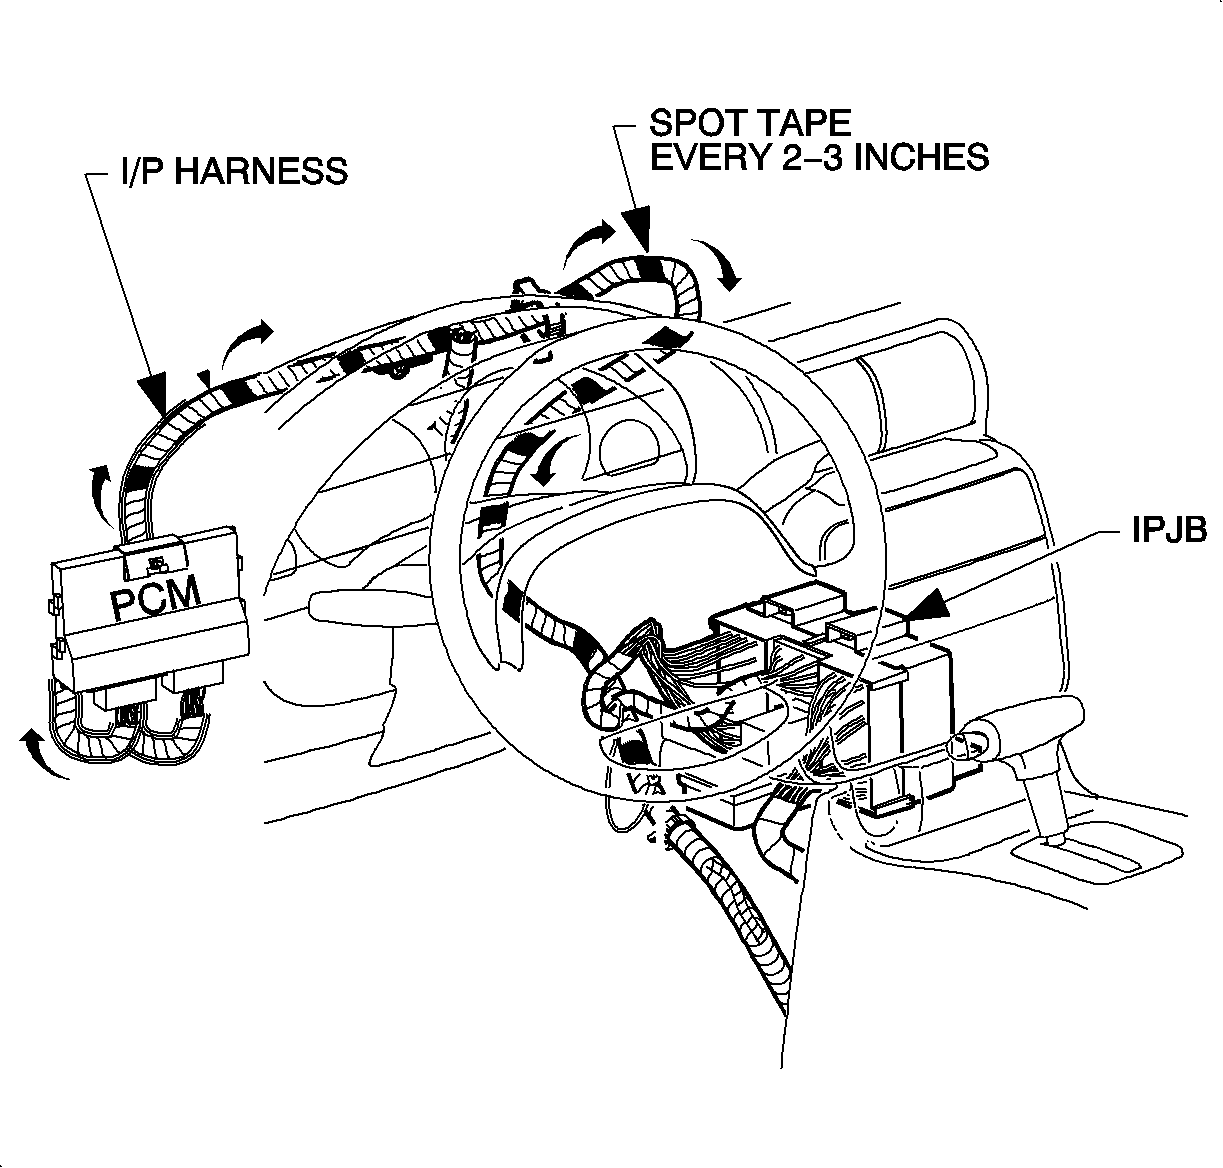
| 19.8. | The in-line fuse will be routed to the top cover area by attaching it to the I/P harness as follows: |
| 19.8.1. | Using electrical tape, spot tape the wires to the I/P harness approximately every 51-76 mm (2-3 in). |
| 19.8.2. | Starting at the HVAC fan switch area, the blower control switch, attach the in-line fuse wires to the HVAC branch with a piece of electrical tape. |
| 19.8.3. | Follow the HVAC branch to the main branch of the I/P harness. |
| 19.8.4. | Then following the main branch, continue to spot tape the in-line fuse wires to the I/P harness until the top cover area is reached. |
| 19.8.5. | In the top cover area, tape the in-line fuse to the harness to prevent rattles. |
| 19.8.6. | Tape the splice joints and the delayed blower motor control module wires to the harness to prevent rattles and interference with the temperature/mode lever movement. |
| 19.8.7. | Attach the harness clip, detached in step 19.2, to the HVAC module. |
| 19.8.8. | Connect the HVAC fan switch electrical connector, disconnected in step 19.1, to the HVAC control head. |
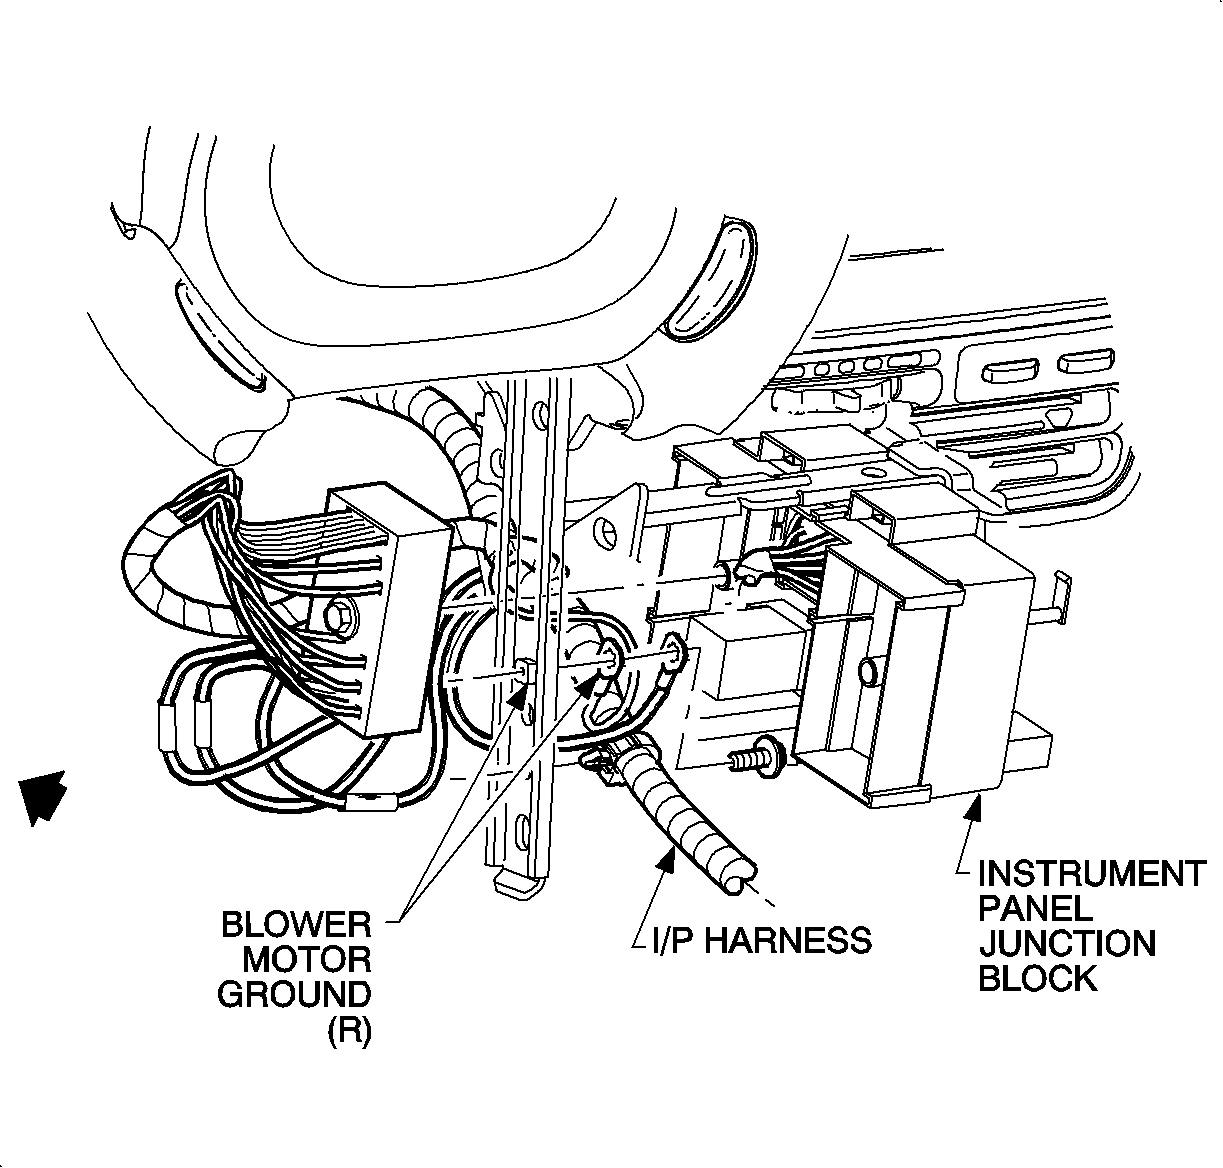
Tighten
Tighten the ring terminal-to-ground to 2.2 N·m (20 lb in).
| 23.1. | At terminal J1D01 of PCM Lt. Blue 32-way connector, splice one end of 0.50 mm² (20 gage) wire to GRA 0.35 mm² (22 gage), circuit 729-A/C relay control, using a salmon (pink) splice sleeve. |

| 23.2. | Route wire to the IPJB as follows, using electrical tape, spot tape wire to harnesses approximately every 51-76 mm (2-3 in). |
| 23.2.1. | Tape wire to PCM branch of I/P harness. |
| 23.2.2. | Follow harness up to I/P splice packs, forward of PCM. |
| 23.2.3. | From top of I/P, route wire along I/P harness, following the main branch across, forward of beam, and then down to IPJB. Route wire to the left of cruise control connector, if equipped. |
| 23.3. | Splice 0.50 mm² (20 gage) wire to WHT 0.50 mm² (20 gage) wire from delayed blower motor control module using a salmon (pink) splice sleeve. |
| 23.4. | Connect PCM Lt. Blue 32-way connector. |
Tighten
Tighten the battery cable to 17 N·m (13 lb ft).
Important: Do not install parts that have been removed, except for black I/P harness, until correct operation of the delayed blower motor control module has been verified.

| 29.1. | Connect electrical connector and antenna to radio. |

| Important: Make sure spring clips are seated in holes marked D located on both sides. |
| 29.2. | Install radio. |
Tighten
Tighten the radio mounting screws to 2.5 N·m (22 lb in).


Wire Splicing
With the wiring used in Saturn vehicles, it is recommended that approved Packard Electric Crimp and Seal Splice Sleeves, or equivalent, be used.
Before you begin, determine the proper sleeve for gage of wire.
| Salmon | Blue | Yellow |
|---|---|---|---|
Wire size | 0.35, 0.50, 0.80 | 1.0, 2.0 | 3.0, 5.0 |
Gage | 22, 20, 19 | 16, 14 | 12, 10 |
Packard P/N* | 12089189 | 12089190 | 12089191 |
Special Tool P/N** | 217670 | 217671 | 217672 |
Order through Packard at 1-800-PACKARD (1-800-722-5273
Order through Saturn Special Tool Catalog. Included with Terminal Repair Kit SA9138Z.
Important: When using the salmon splice sleeve with 0.35 mm² (22 gage) wire, remove 19 mm (3/4 in) of insulation. Bend the stripped portion in half to double the thickness of the wire going into the splice sleeve. Twist the stripped, doubled wire and insert into the splice sleeve.
- Remove insulation from both ends; recommended strip length is 9.5 mm (3/8 in). Caution must be used to prevent cutting the wire strands. Locate new splice a minimum of 40 mm (1 1/2 in) from an outlet or other splice.
- Position stripped ends in sleeve until wires hit stop.
- Hand crimp sleeve using the approved crimping tool. Gently tug on wires to make sure they are secure before applying heat to them.
- Apply heat using Ultratorch®, or equivalent, heating splice sleeve to 175°C (347°F). Heat until glue flows around edges of splice sleeve.
- Check for continuity in the wire.
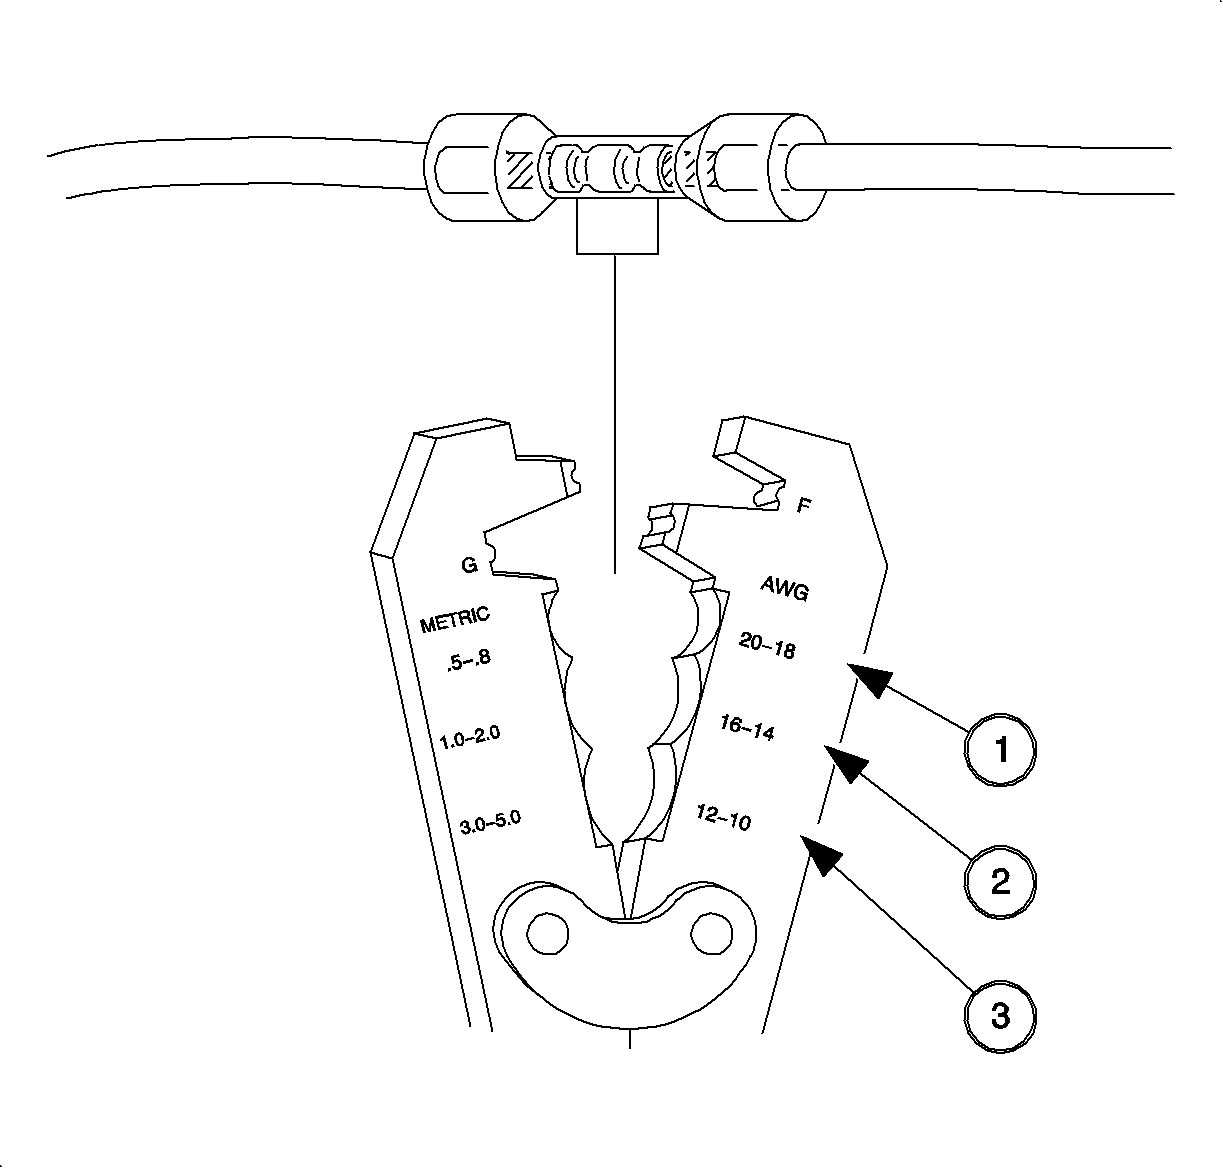
Important: When splicing three wires ends into one splice sleeve, insert one cut wire end from vehicle harness and new splice wire end into one side of the splice sleeve until wires hit stop. Hand crimp using approved crimping tool. Insert remaining cut wire end from vehicle harness into other side of splice sleeve and crimp.
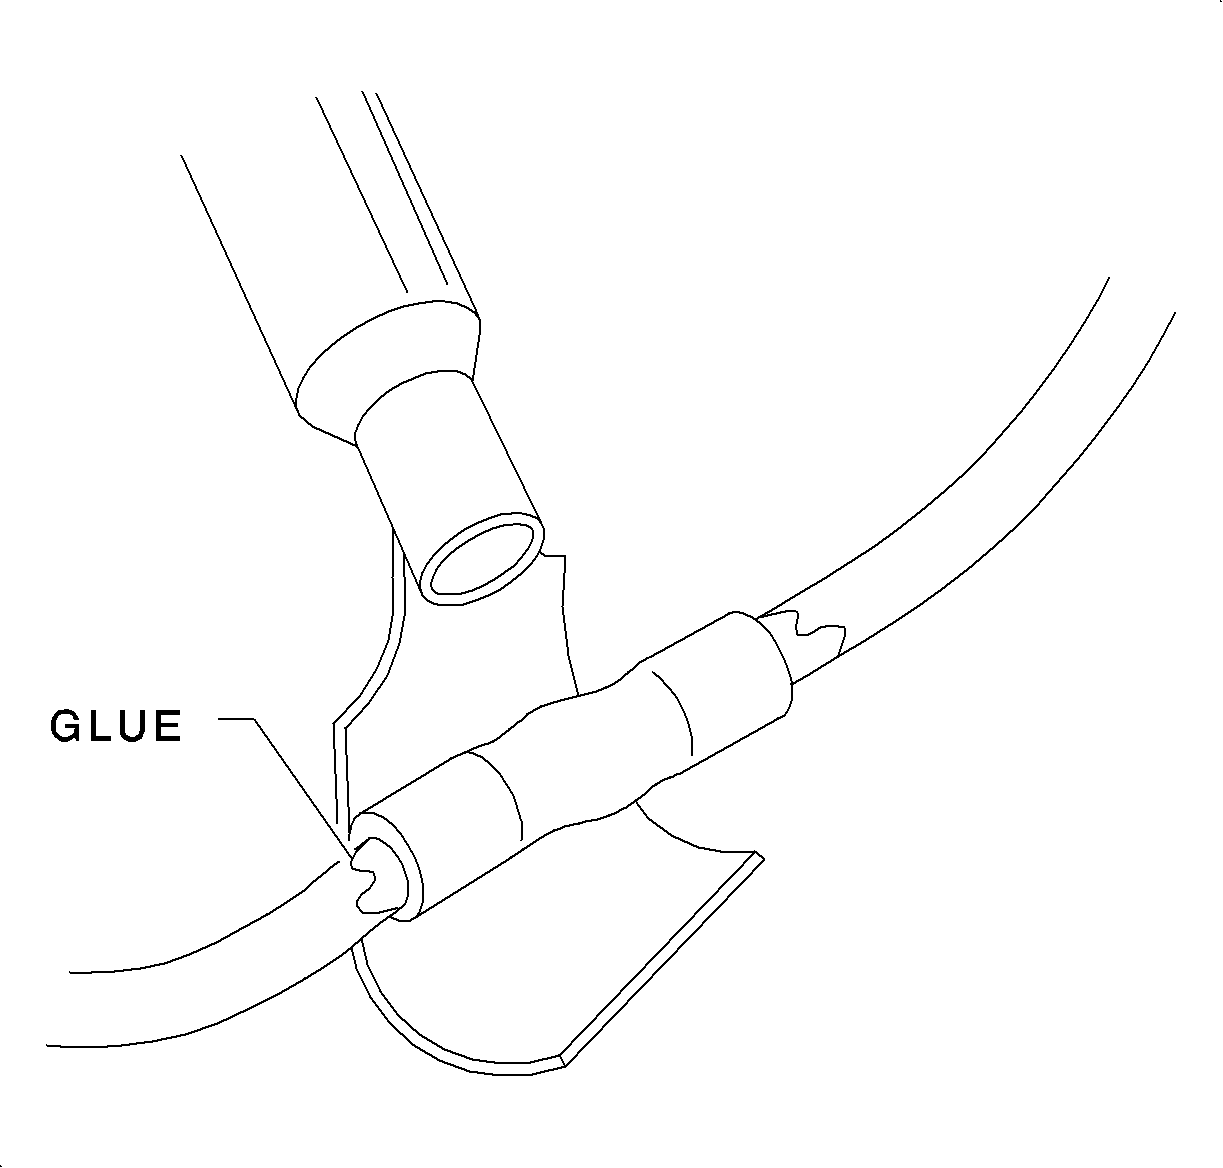
Caution: Do not use a match or open flame to apply heat to splice sleeve.
Testing the Delayed Blower Motor Control Module
A full functional check of the delayed blower motor control module is required to assure that all electrical connections are connected properly and it is functioning as designed.
- Locate the GRN wire at cavity H of the delayed blower motor control module and insert a Metri-Pack 280 series male test adapter into cavity H until contact is made with GRN wire terminal in the delayed blower motor control module pigtail connector.
- Start engine and turn On A/C and verify that compressor clutch engages. With clutch engaged, apply battery voltage to the test adapter installed in step 1 above.
- Disconnect voltage to the test adapter and remove adapter from connector.
- If the delayed blower motor control module runs for one second, go back to installation procedures and install parts removed from vehicle. If the delayed blower motor control module does not run for one second, go back to installation procedures and check all wiring connections. Refer to "Delayed Blower Motor Control Module Diagnosis" in this bulletin if functional check is not passed.
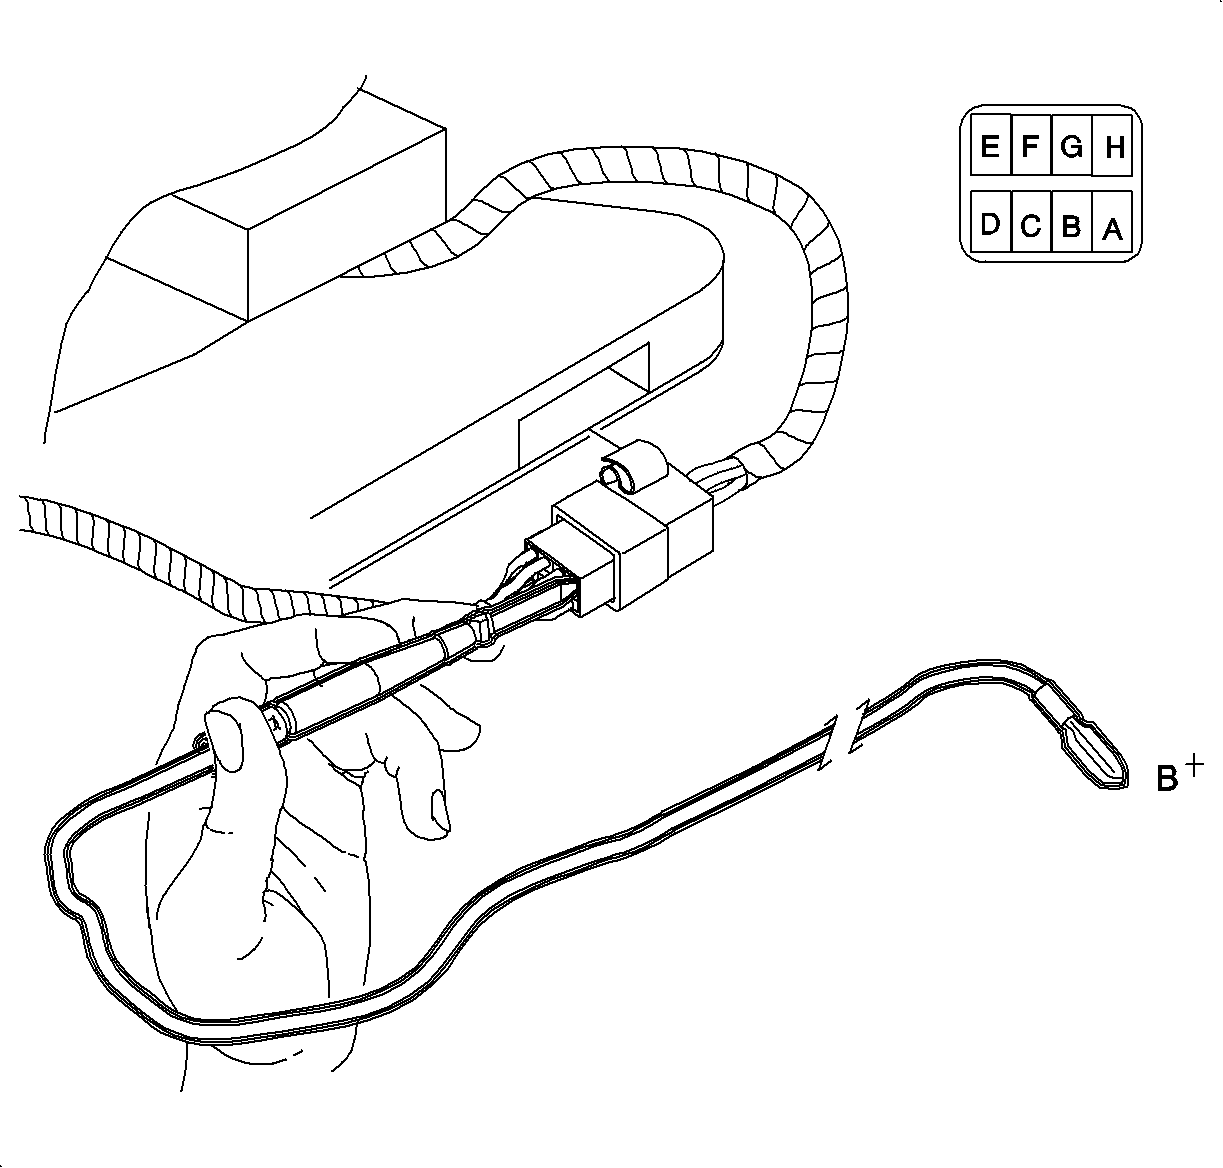
Important: Do not disconnect the jumper harness connector from the delayed blower motor control module pigtail connector or system test will not function.
After 30 seconds, turn the ignition Off with voltage still applied to the test adapter. Approximately 10 seconds after the ignition is turned Off, the blower motor will run for one second if the delayed blower motor control module is wired correctly.
Delayed Blower Motor Control Module Diagnosis
Vehicle Running High Blower Setting Does Not Operate | |||||||||
|---|---|---|---|---|---|---|---|---|---|
Cause | Solution | ||||||||
The blower in and blower out wires are not properly connected. |
| ||||||||
Enter Column Heading | |
|---|---|
Cause | Solution |
Test Mode Only. GRN test wire from delayed blower motor control module is not properly connected to vehicle battery source. | Connect or jumper GRN test wire (pin H) to the vehicle's battery (not ignition). |
Proper signal not received from A/C compressor | Make sure A/C compressor is connected electrically. Secondly, use a voltmeter to verify that A/C compressor low signal is zero volts when A/C is turned On. |
A/C compressor was not in operation long enough to trigger delayed blower motor control module. | Start engine and turn On A/C. Make sure A/C compressor clutch is continuously engaged for at least four minutes to trigger delayed blower motor control module. For test mode, run A/C for 30 seconds before turning Off engine. |
Parts Requirements:
21031158 | Module Kit -- Delayed Blower Motor Control |
12112245 | Terminal -- Ring |
12346390 | Coating -- A/V Evap Organic Growth Prev |
21030784 | Kit -- A/C Disinfectant P/N 10953503 for Canada |
21121827 | Plug |
21024696 | Fuse Asm -- A/C Cont |
12089189** (217670***) | Splice Sleeve -- Salmon (Pink) -- 5 required |
12089189** 217670***) | Splice Sleeve -- Salmon (Pink) -- 5 required |
-- | Electrical Wire -- 1.5 m (5 ft) length of 0.50 mm² (20 gage) |
**Order through Packard at 1-800-PACKARD (1-800-722-5273) ***Order through Saturn Special Tool Catalog. Included with Terminal Repair Kit SA9138Z. | |
Claim Information:
To receive credit for this repair during the warranty coverage period, submit a claim through the Saturn Dealer System as follows:
Case Type | Description | Labor Operation Code | Time |
|---|---|---|---|
VW | Disinfect A/C System | T9555 | 1.3 hrs |
VW | Disinfect A/C system and Install Delayed Blower Motor Control Module | T9709 | 3.5 hrs |
