
| Subject: | New Service Procedure for Replacement of Interior Door Panel Inserts |
| Models: | 1996-1998 Saturn Sedans and Wagons, and 1997-1998 Saturn Coupes |
Purpose:
The purpose of this bulletin is to communicate a new service procedure when
replacing the interior door panel. The door panel and insert will be serviced separately,
rather than one piece.
When replacing either the door panel or door panel insert, refer to the procedures
in this bulletin.
Procedures:
Sedan Wagon and Coupe Front Interior Door Trim Panel Removal
Caution: Do not disturb the energy absorbing foam at any time during the procedure. If
energy absorbing foam is removed from door or door trim panel, it must be replaced
with a new part. If omitted from the door or door trim panel, the vehicle will not
meet federal motor vehicle safety standards (FMVSS), subjecting the retailer to possible
civil penalties for making the vehicle inoperative to the FMVSS, and increasing the
risk of injury to the vehicle occupant.
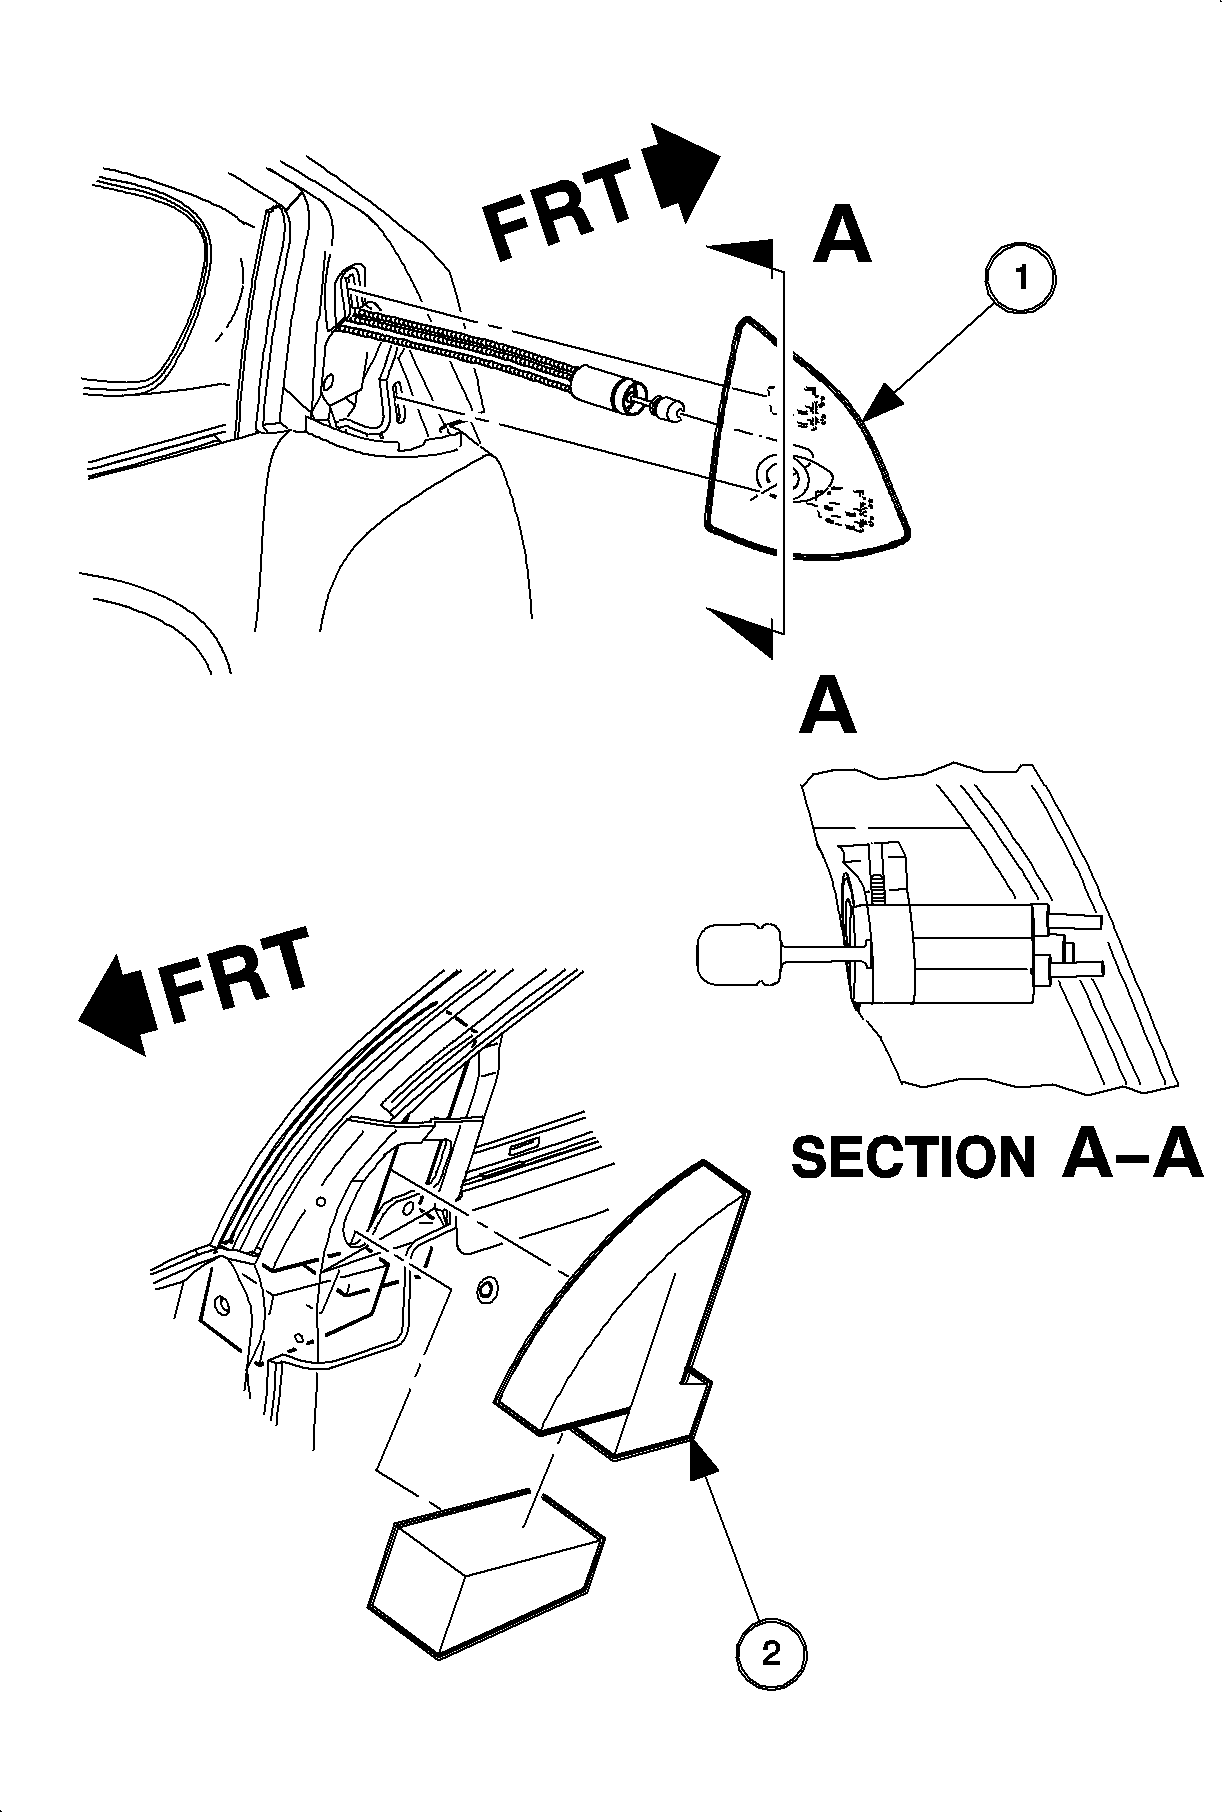
- Remove the door trim panel.
| 1.1. | Remove the mirror trim panel by firmly pulling on the panel to disengage
the attaching clips. If equipped with a manual remote mirror, allow the panel to hang
from the adjustment cable. |
| • | Mirror trim panel (left side only). |
| • | Mirror Insulator (right side shown, left typical) |
| 1.2. | Remove the fastener from the center of inside the door handle assembly. |
| 1.3. | Slide the door handle assembly forward while pulling outward from the
trim panel. |
| 1.4. | Using a thin screwdriver, disengage the lock and latch rod from the retainers.
Remove the inside door handle. |
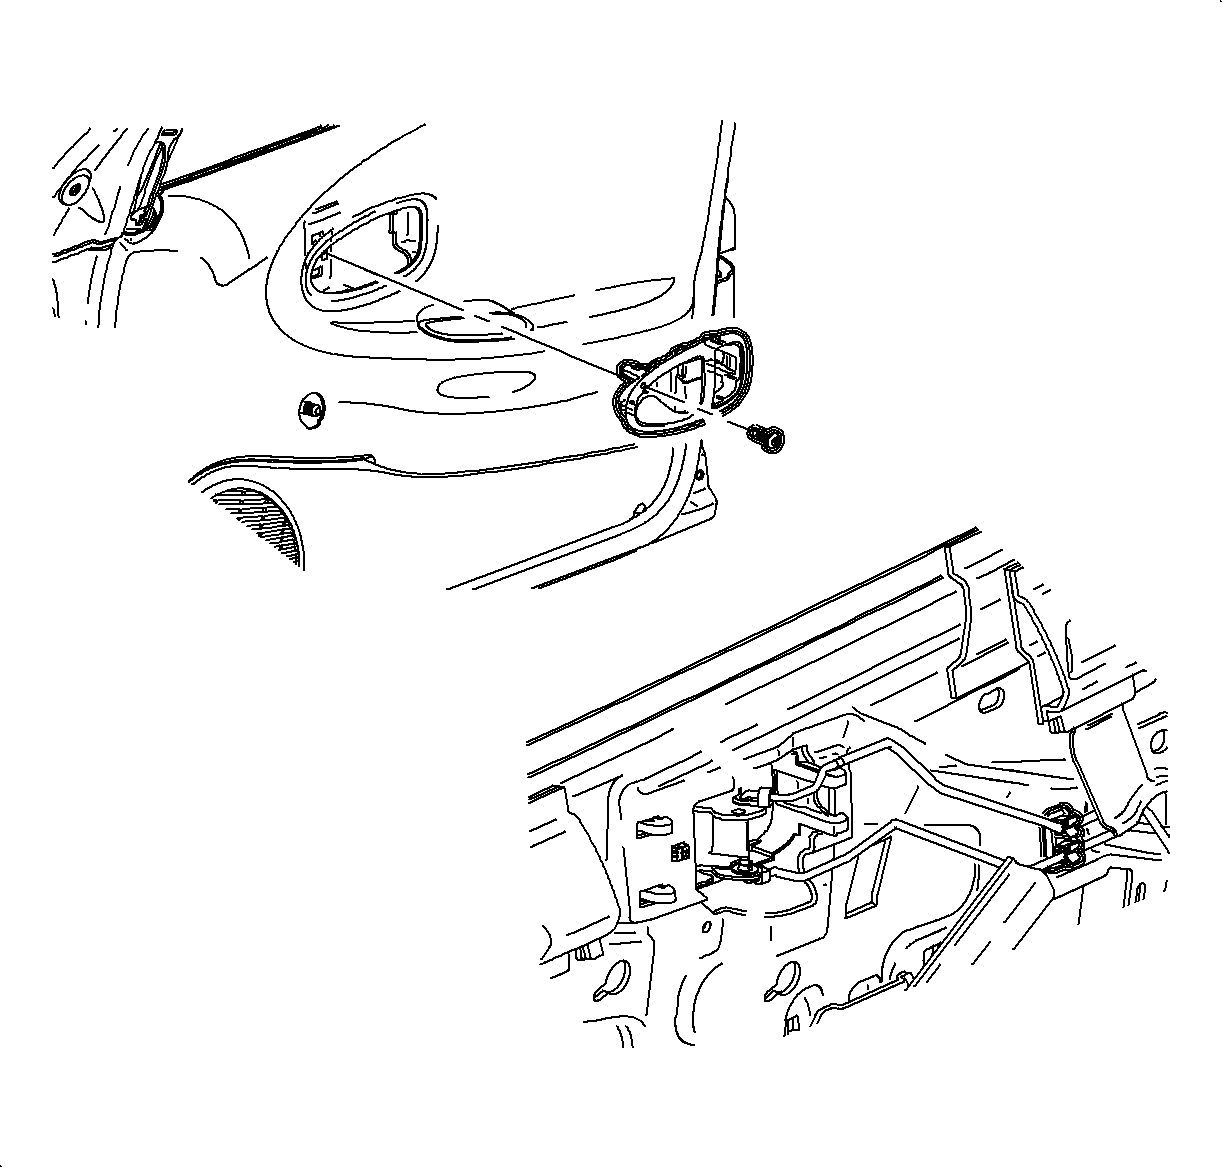
- If equipped with power door locks, disconnect
the power door lock switch wiring to remove the inside door handle.
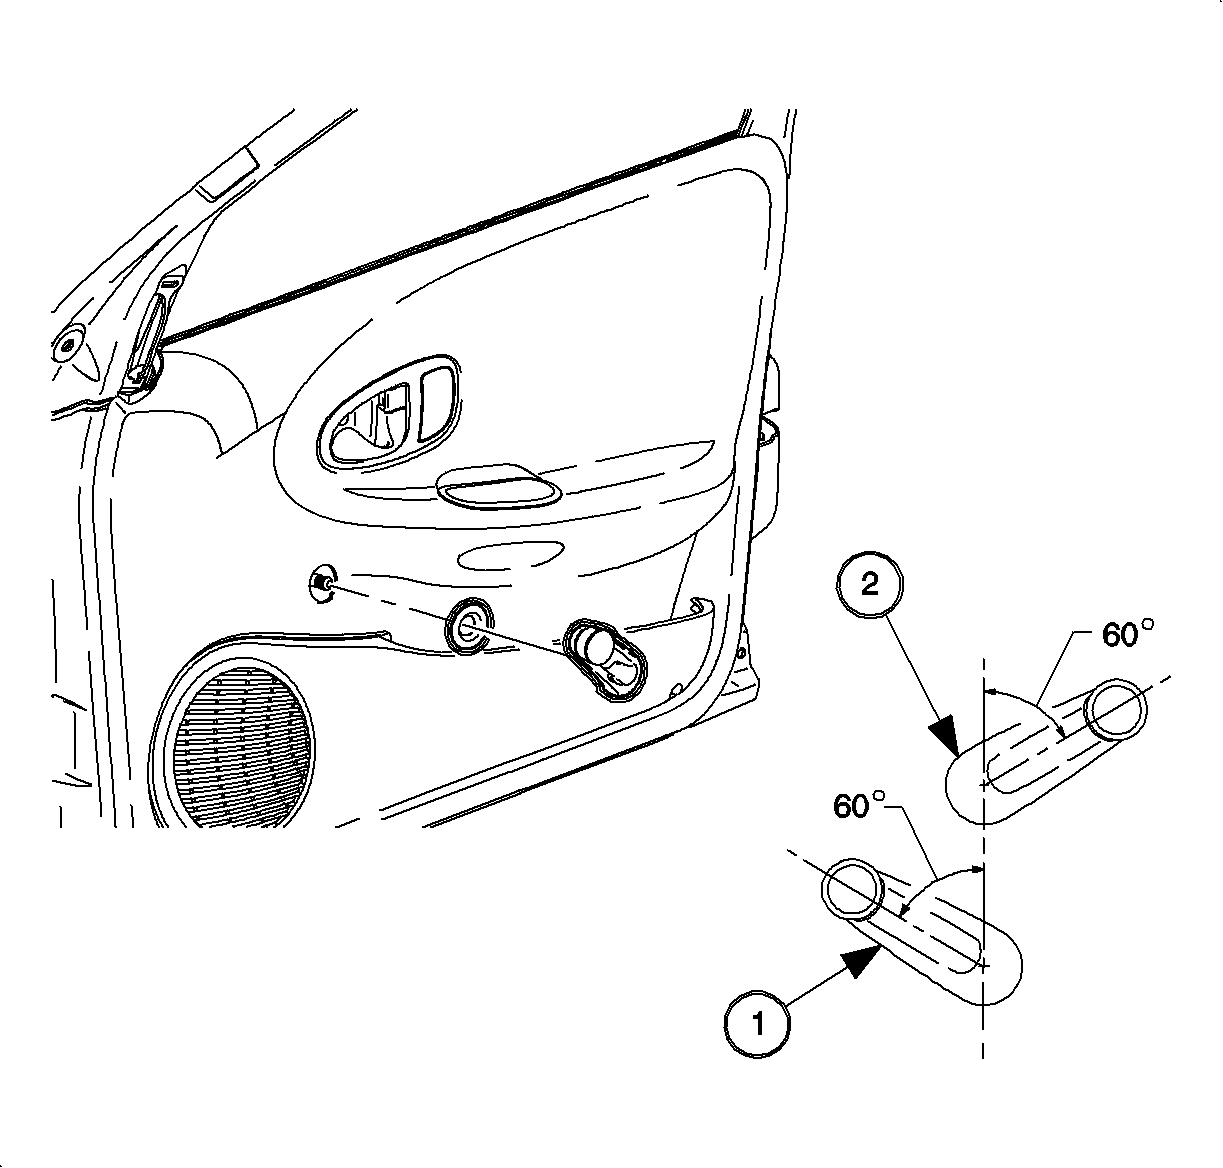
- On manual window vehicles: Using a standard handle
tool, disengage the manual window regulator handle clip and remove the window handle.
| • | (1) Proper angle for the right side manual window regulator handle. |
| • | (2) Proper angle for the left side manual window regulator handle. |
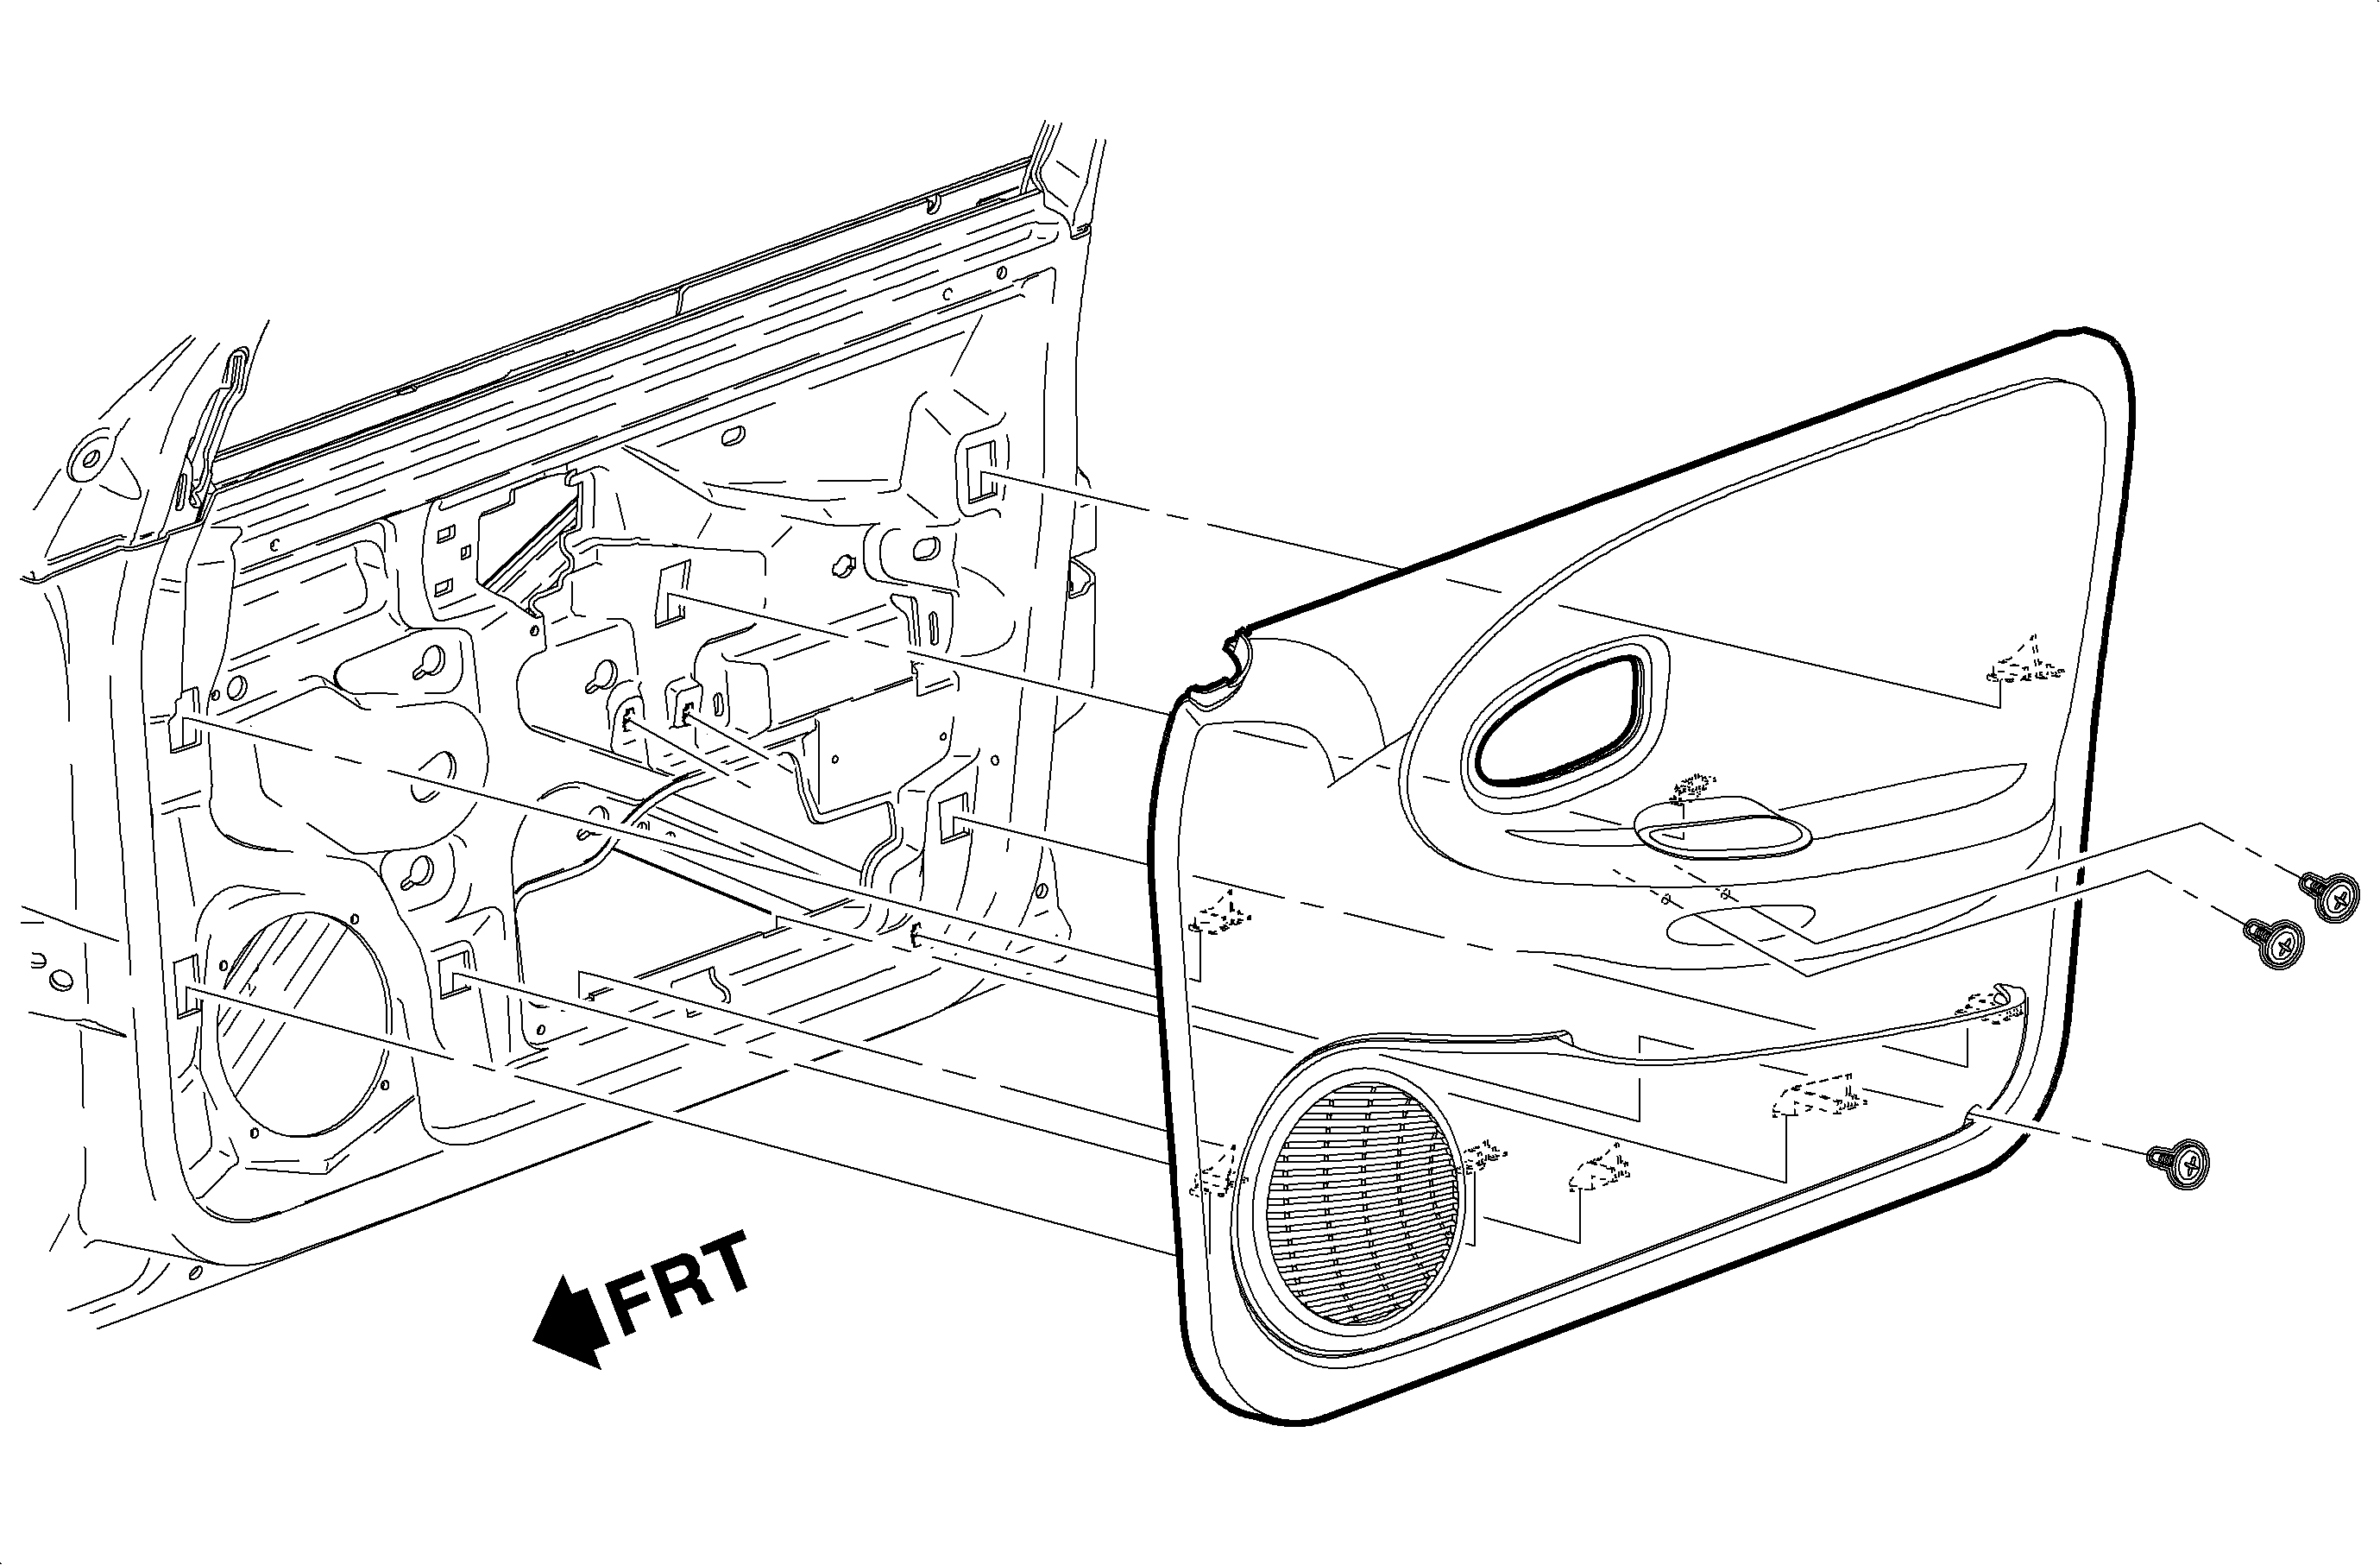
- Remove the trim panel fasteners at the pull cup
and the lower rear corner of the trim panel.
- Pull up on the door trim panel assembly to disengage the trim panel to
the door structure attaching hooks and remove the door trim panel.
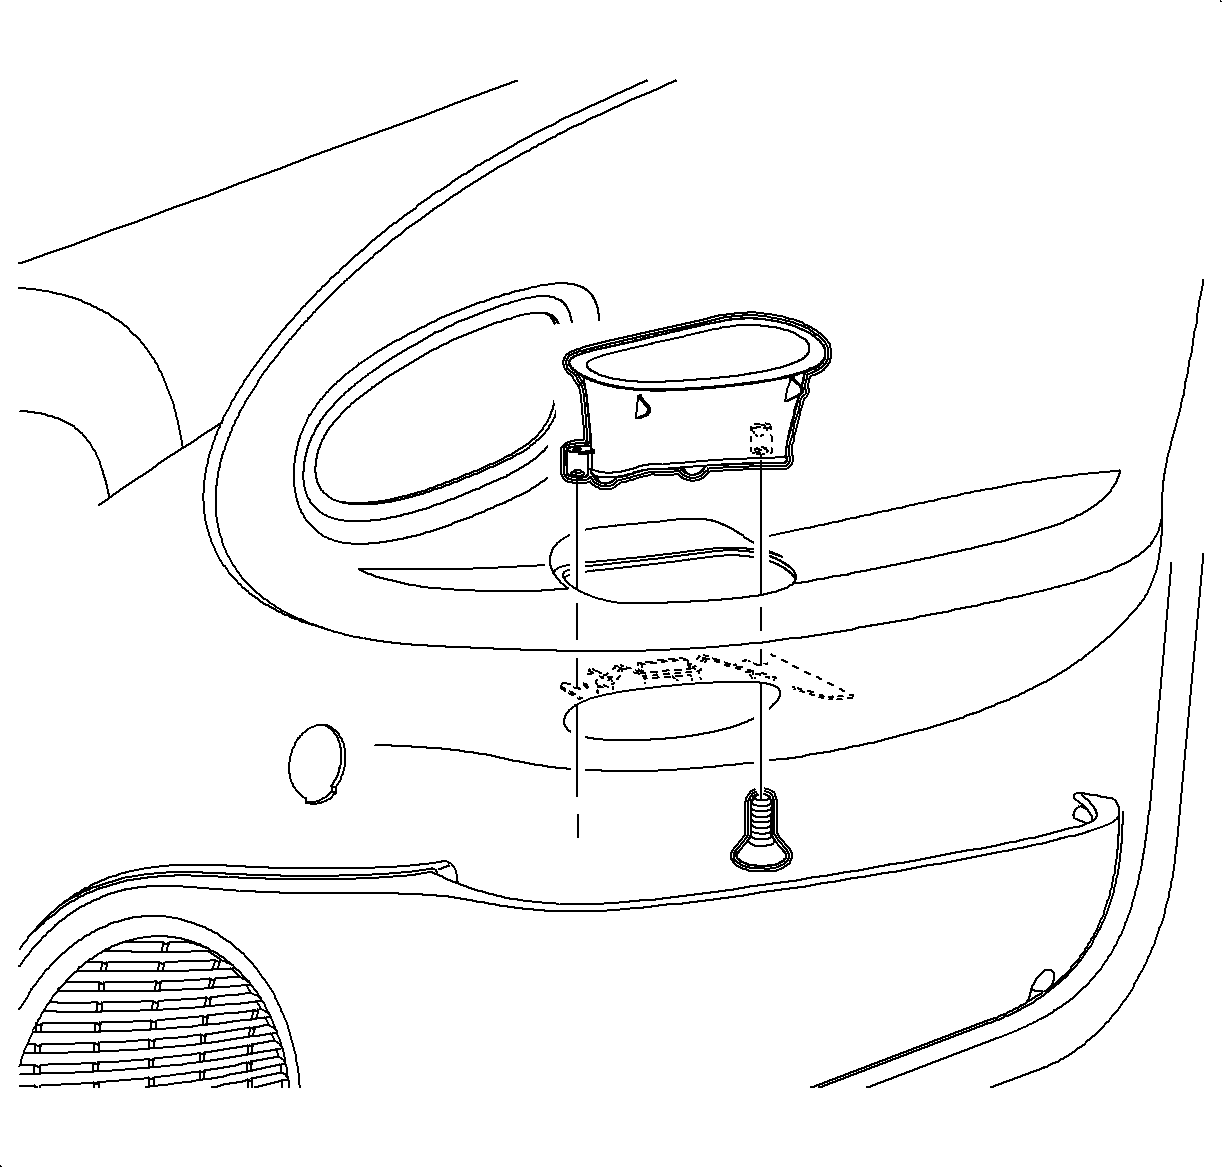
- Remove the door pull cup
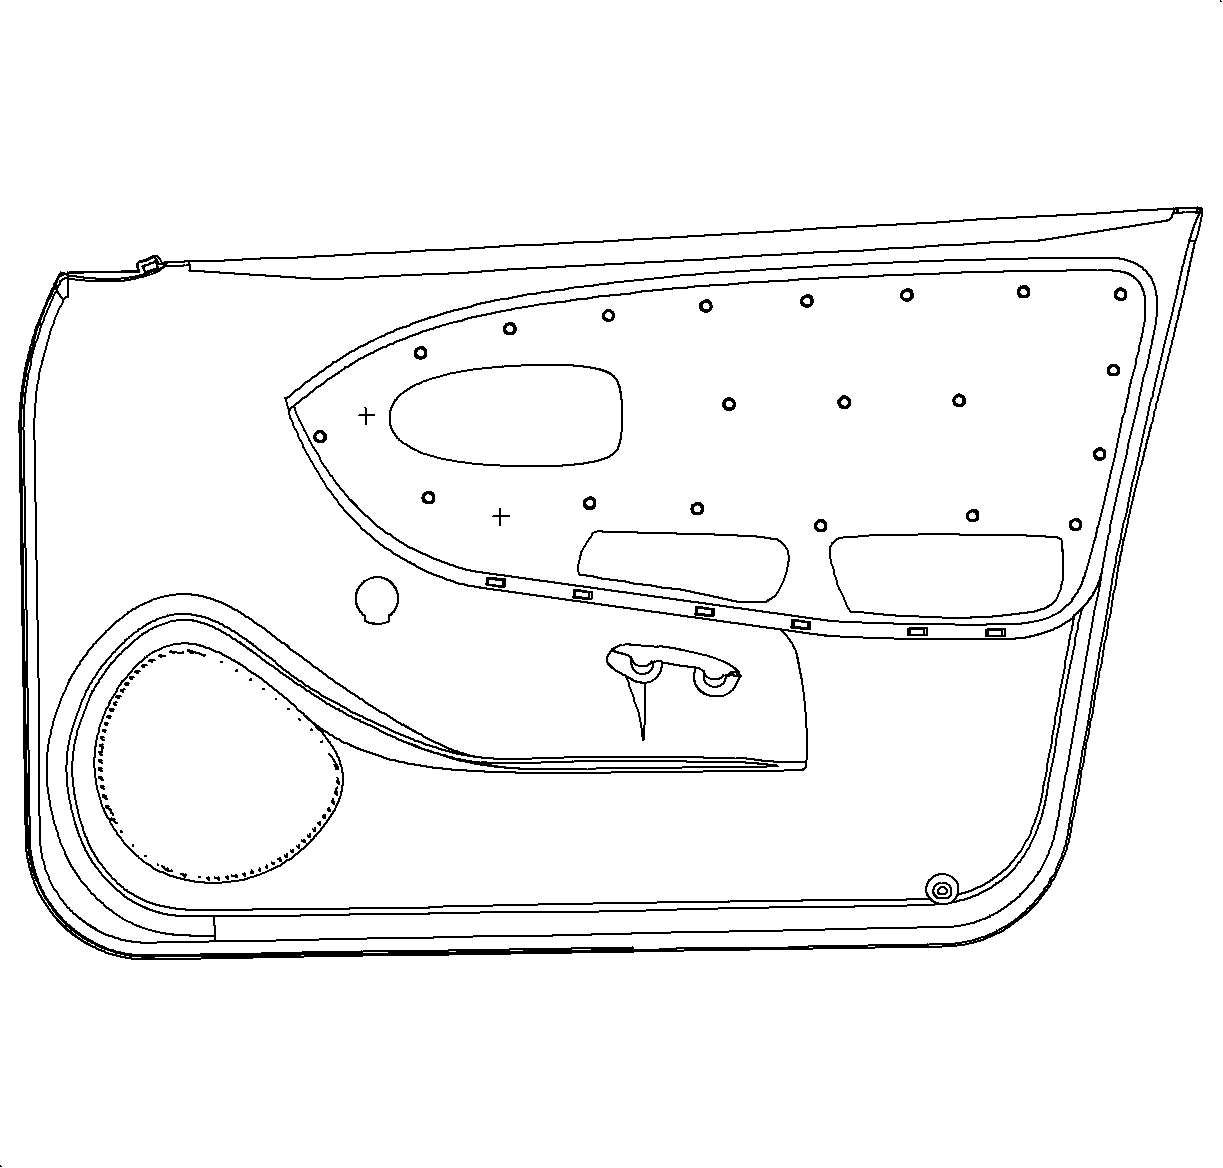
- Place the door trim panel (heat-staked side
up) on a work bench with a cloth-type material to protect the panel's finish. (Sedan
panel shown, Coupe panel similar).
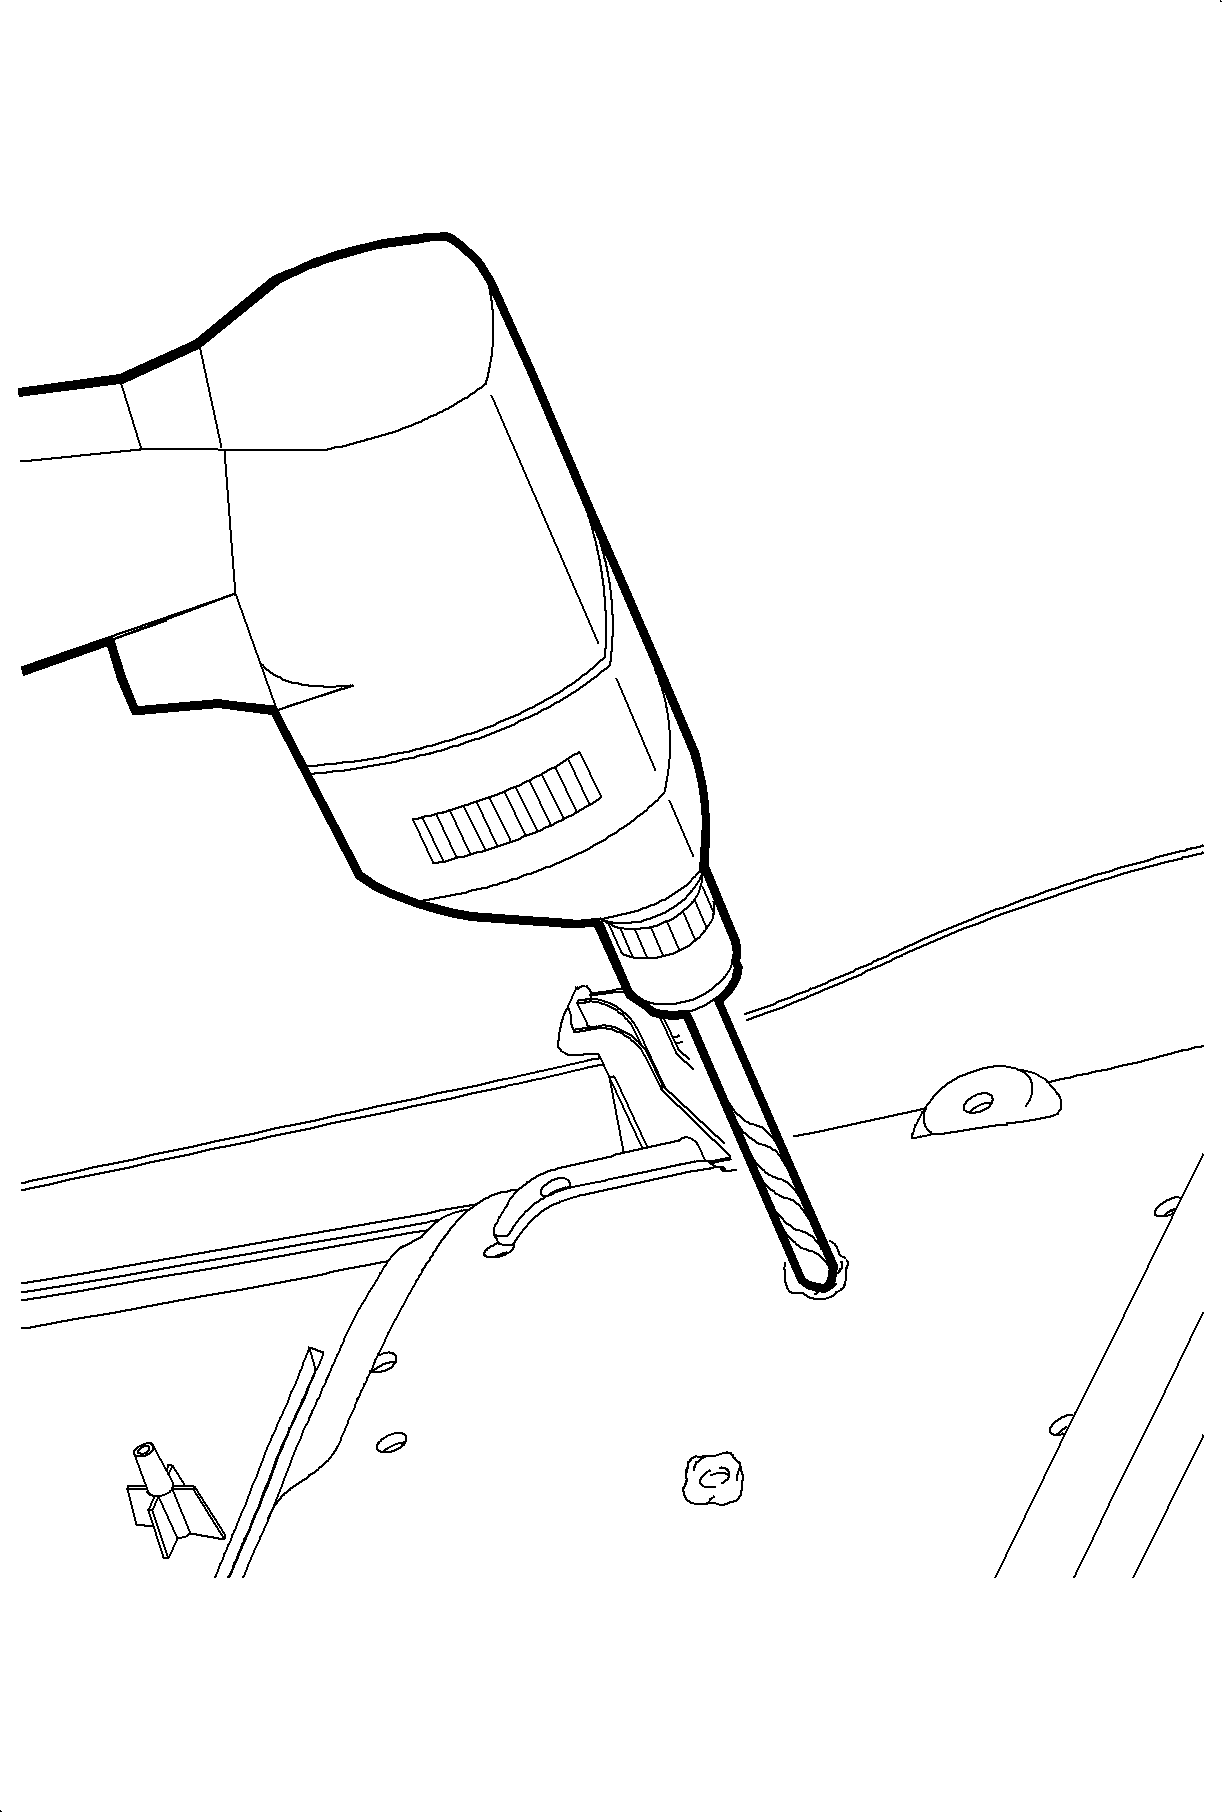
Important: Drill into the heat-staked stud just enough to cause the stud material to separate
from the substrate (door trim panel) material.
- Using a 7 mm (9/32 in) drill bit, drill out the round heat-staked
studs.
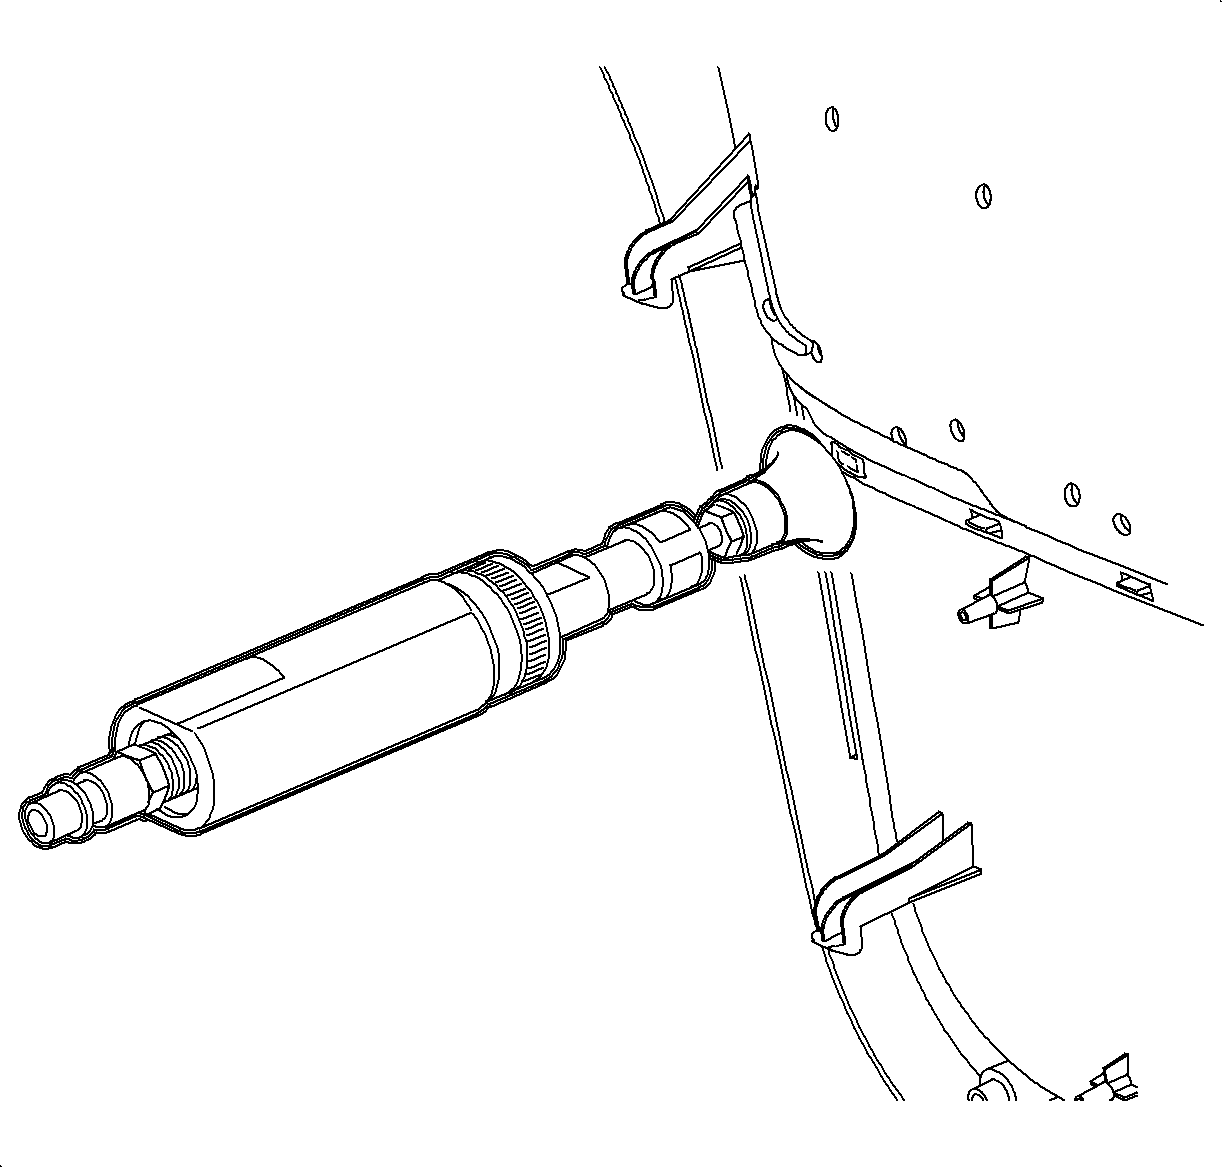
- For Sedans, remove the rectangle shaped heat
stakes with a hand grinder (die grinder) with a 38 mm (1¼ in)
diameter grinding disk, or the equivalent, by grinding the studs from the side.
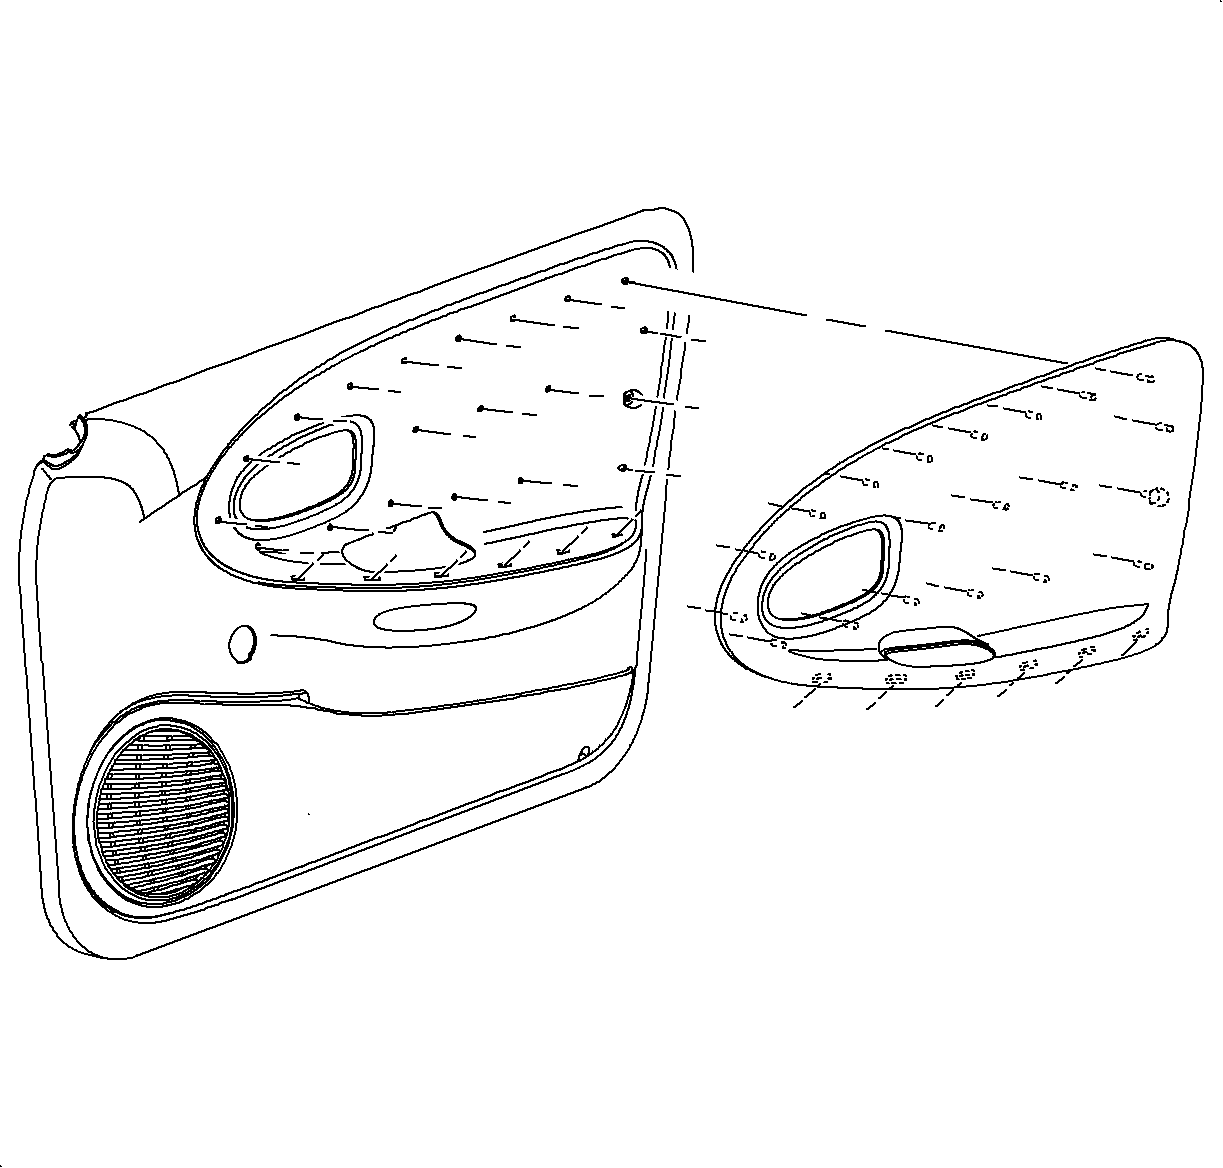
- Remove the old door insert from the door trim
panel. (Sedan panel shown, Coupe panel similar).
- Remove any heat stake material that may be left in the door trim panel
holes, or on the door trim panel substrate. (Sedan panel shown, Coupe panel similar).
Installation Procedure

- Center the new door insert on the door trim
panel.
- Place the door trim panel assembly back on the cloth-type protective material
with the heat-stake side up.
- Place one hand on the front side of the door trim panel (the side that
is on the work bench) at one of the door insert corners. Press and hold the door insert
heat stake against the door trim panel substrate.
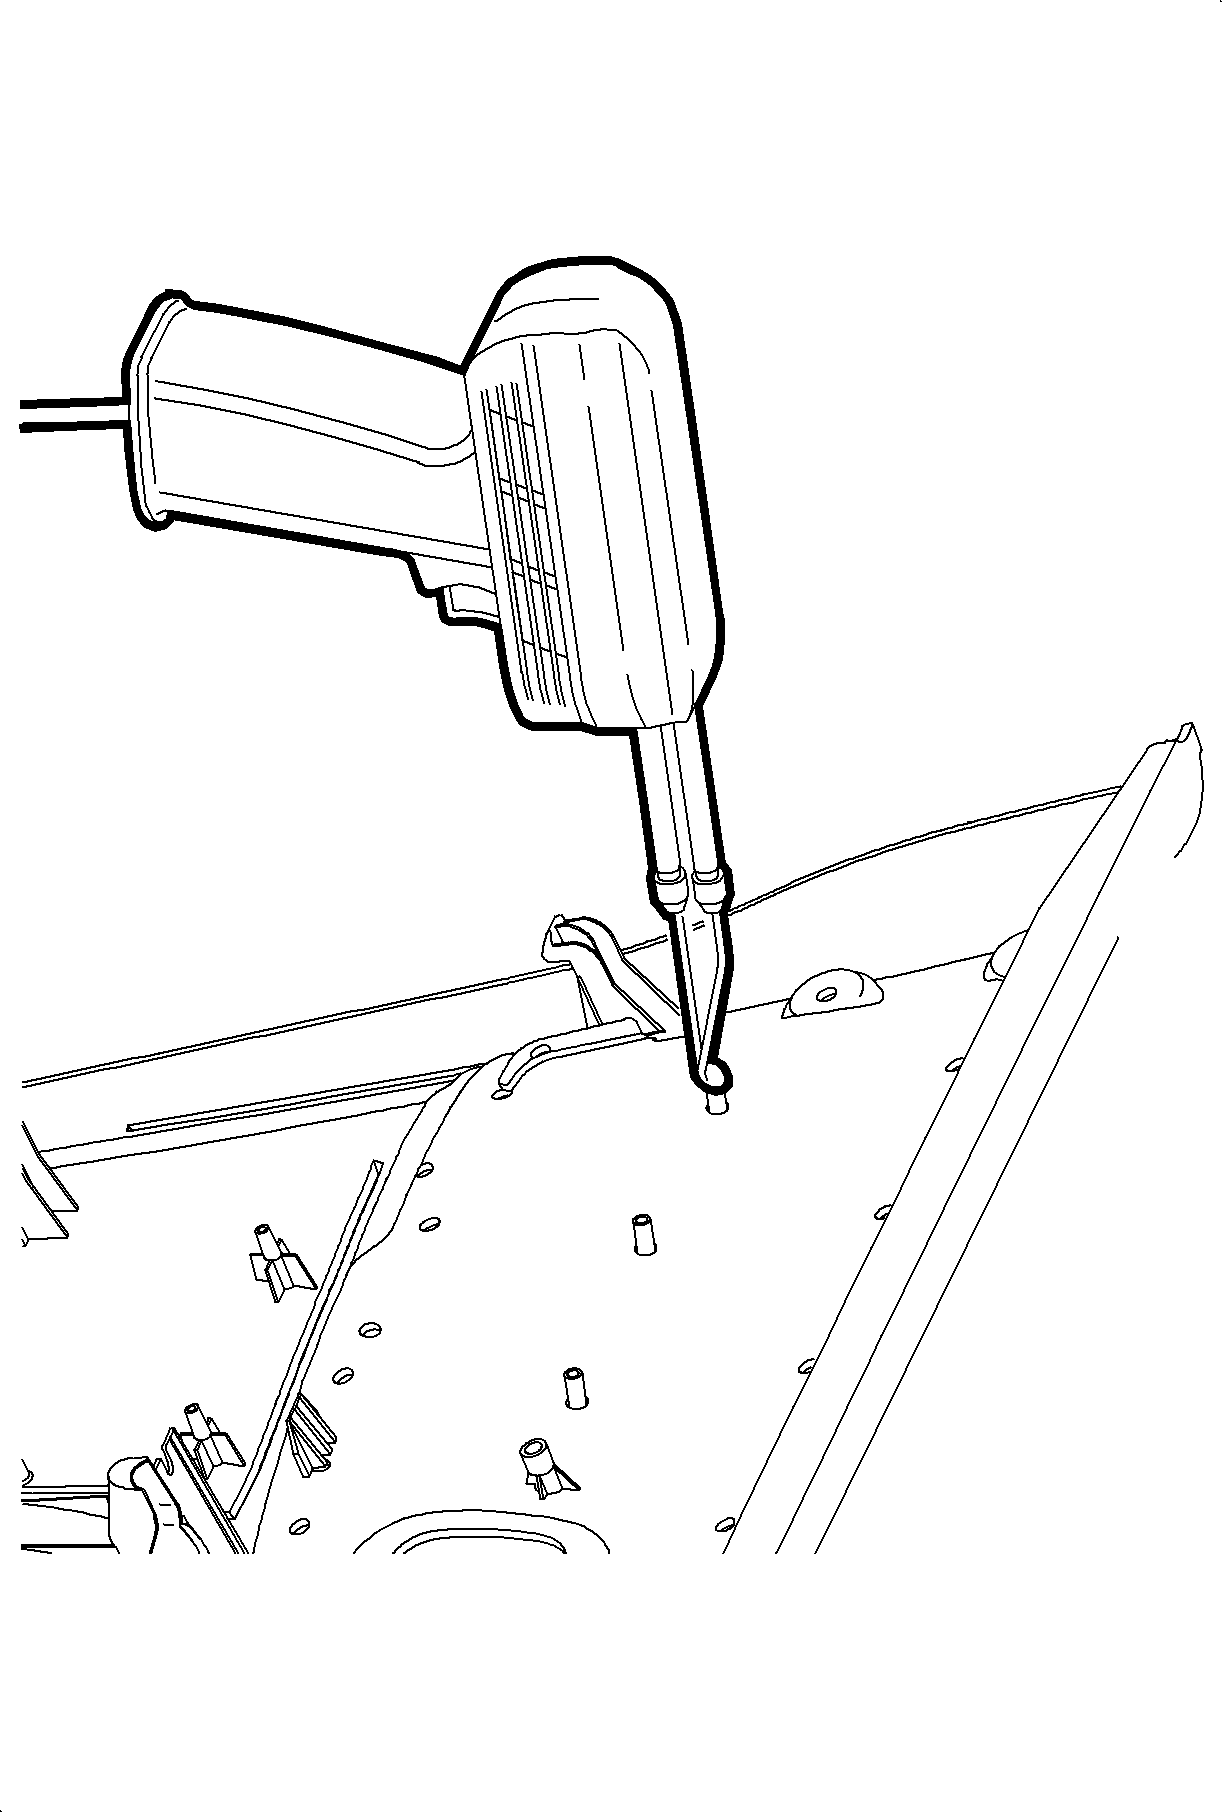
Important: A desirable round heat stake weld should have an approximate diameter of 10 mm
(13/32 in) and 2 mm (3/32 in) high. A desired rectangle heat
stake weld should be approximately 13 mm (½ in) long, 5 mm
(13/64 in) wide and 5 mm (13/64 in) high.
- Using a Weller™ model 8200 soldering gun or equivalent, equipped with
a flat tip, use a circular motion around the heat stake and apply firm steady pressure
to spread the heat stake material onto the door trim panel substrate to achieve a
proper weld. (Sedan panel shown, Coupe panel similar).
- After the heat stake has been melted, keep steady pressure on the door
insert with your hand for 30 seconds to allow the heat stake to harden.
- Repeat steps 3-5 for the remaining door insert corners.
- Continue to press and hold the door insert against the door trim panel
substrate and heat stake the remaining door insert studs.
- Verify that the door insert is securely heat staked to the door trim panel
substrate in all locations.

- Install the door pull cup. (Sedan panel shown,
Coupe panel similar).

- Install the door trim panel.
| 10.1. | Position the door trim panel to structure at the attaching hooks. Lock
in the door trim panel by pushing downward on the door trim panel. |
| 10.2. | Install the door trim fasteners at the pull cup and the rear lower corner
of the door trim panel. |
| 10.3. | Install the door trim push pin rivet at the rear edge or the trim panel
and install the screw fastener at the top front edge near the mirror. |

- On manual window vehicles, install the manual
window regulator handle clip on the handle. Install the door handle onto the vehicle
with the handle pointed in a forward and slightly up position with the window closed.
(1) Proper angle for the right side manual window regulator handle.
(2) Proper angle for the left side manual window regulator handle.
- If equipped with power locks, connect the harness to the power door lock
switch.
- Position the door lock handle assembly in the trim panel. Tip the handle
outward at the top. Using a thin hook style tool, lift the latch and lock rods into
the trim panel and slide rearward to engage the tabs. Install the screw into the handle.

- Install the mirror trim panel.
| • | Mirror trim panel (left side only). |
| • | Mirror insulator (right side shown, left typical). |
Sedan and Wagon Rear Interior Door Trim Panel
Caution: Do not disturb the energy absorbing foam at any time during the procedure. If
energy absorbing foam is removed from door or door trim panel, it must be replaced
with a new part. If omitted from the door or door trim panel, the vehicle will not
meet federal motor vehicle safety standards (FMVSS), subjecting the retailer to possible
civil penalties for making the vehicle inoperative to the FMVSS, and increasing the
risk of injury to the vehicle occupant.
Removal
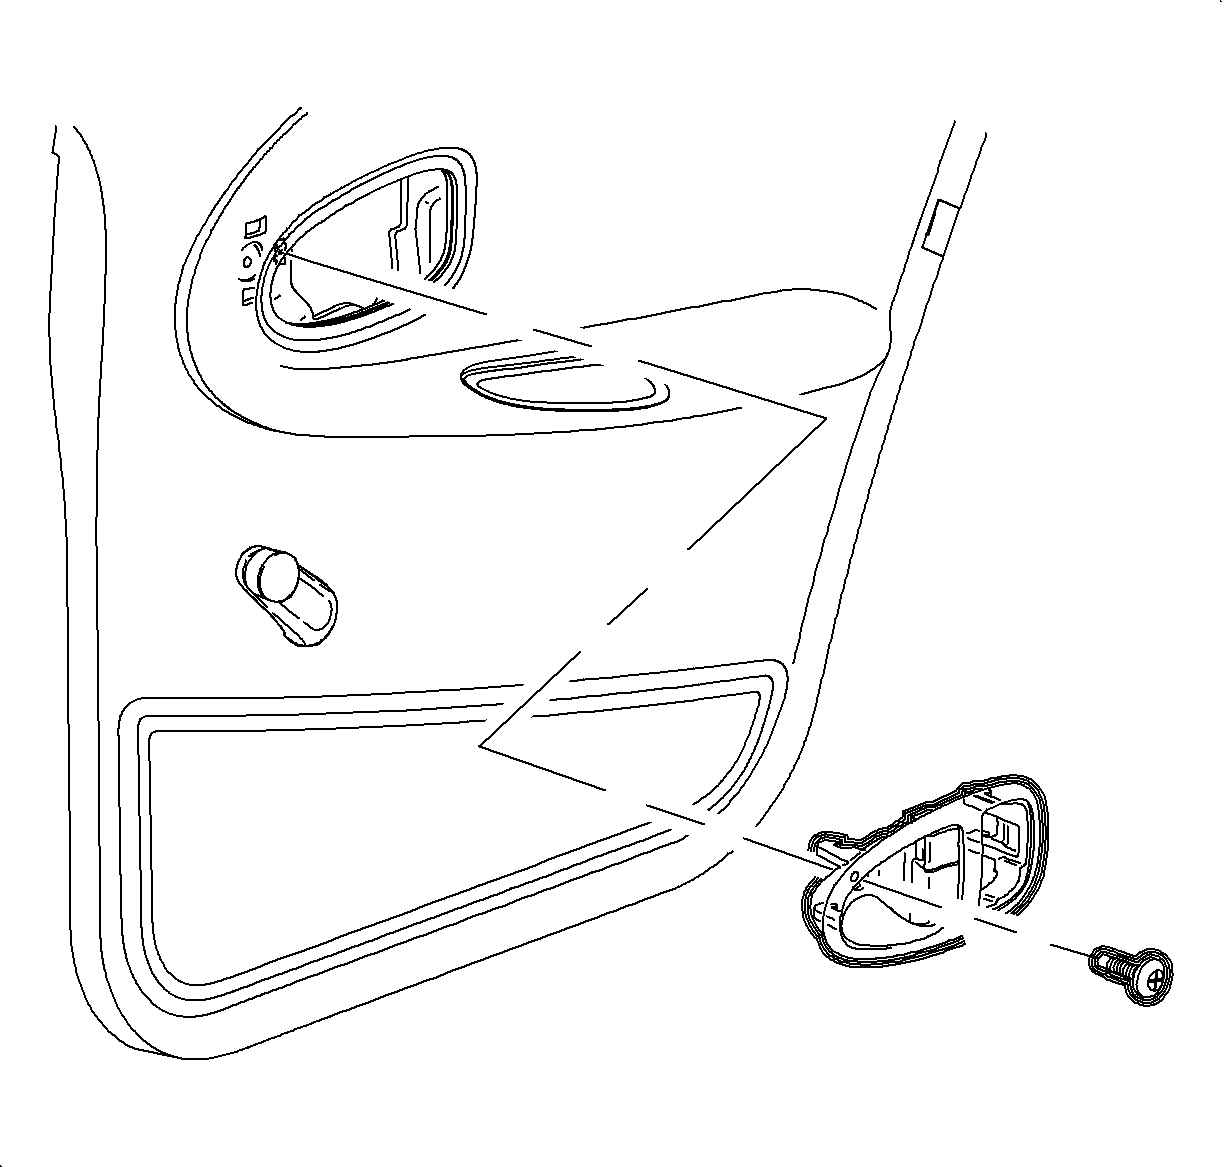
- Remove the rear door trim panel:
| 1.1. | Remove the fastener from the center of inside the door handle assembly. |
| 1.2. | If equipped, remove the power window switch from the door handle assembly. |
| 1.3. | If equipped, disconnect the power window electrical connection. |
| 1.4. | Slide the door handle assembly forward while pulling outward from the
trim panel. Using a thin screwdriver, disengage the lock and latch rod from the retainers. |
| 1.5. | If equipped, remove the power door lock rod. |
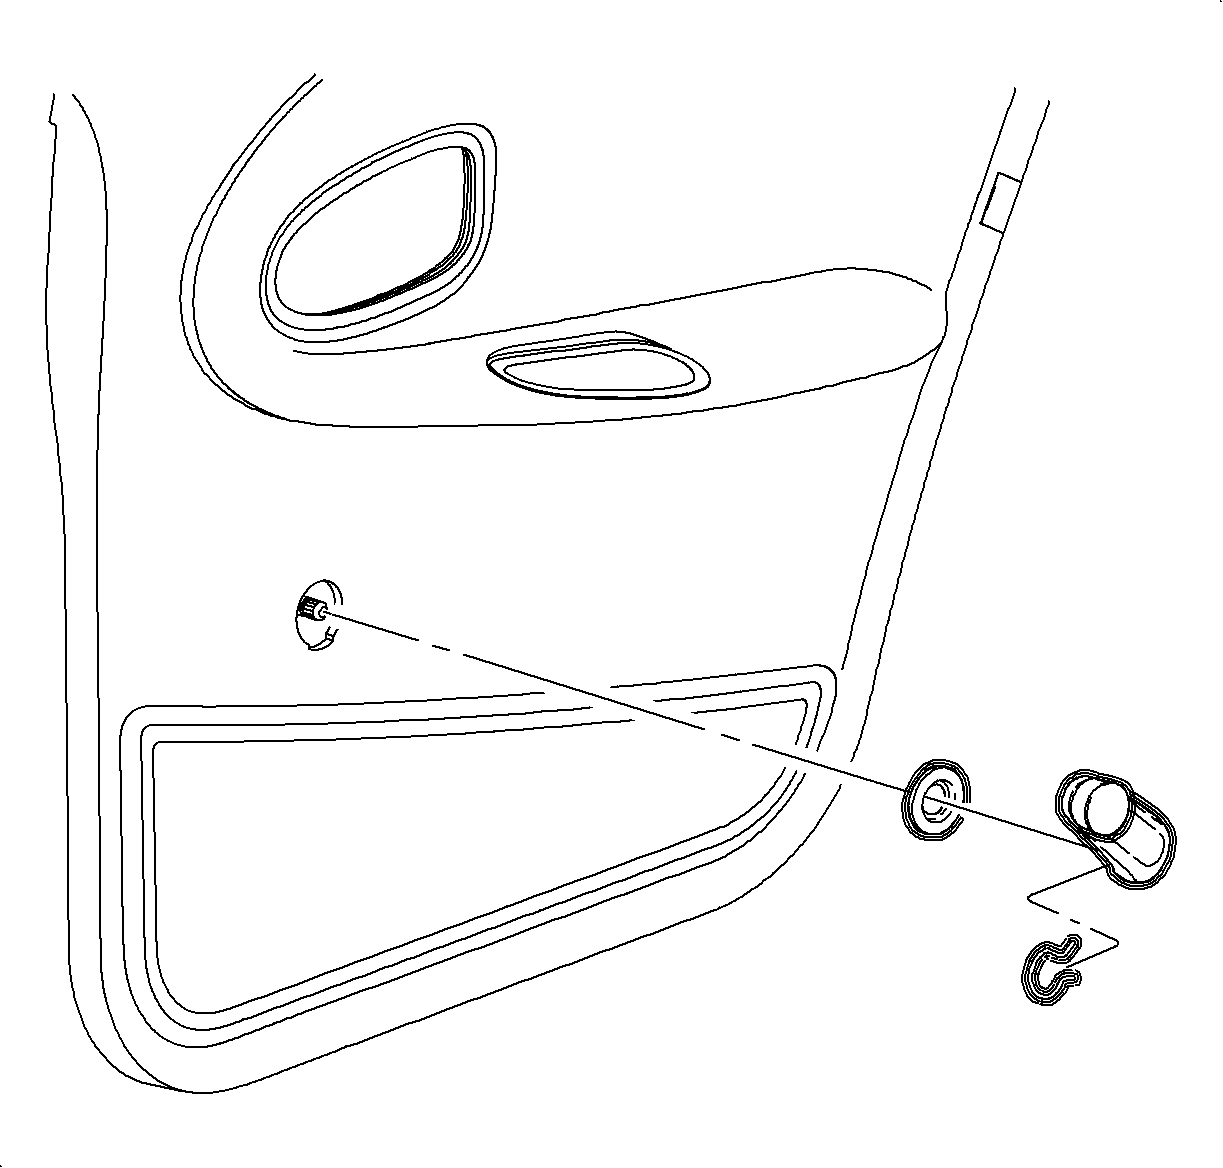
- On manual window vehicles, using a standard window
handle tool, disengage manual window regulator handle clip and remove the window handle.
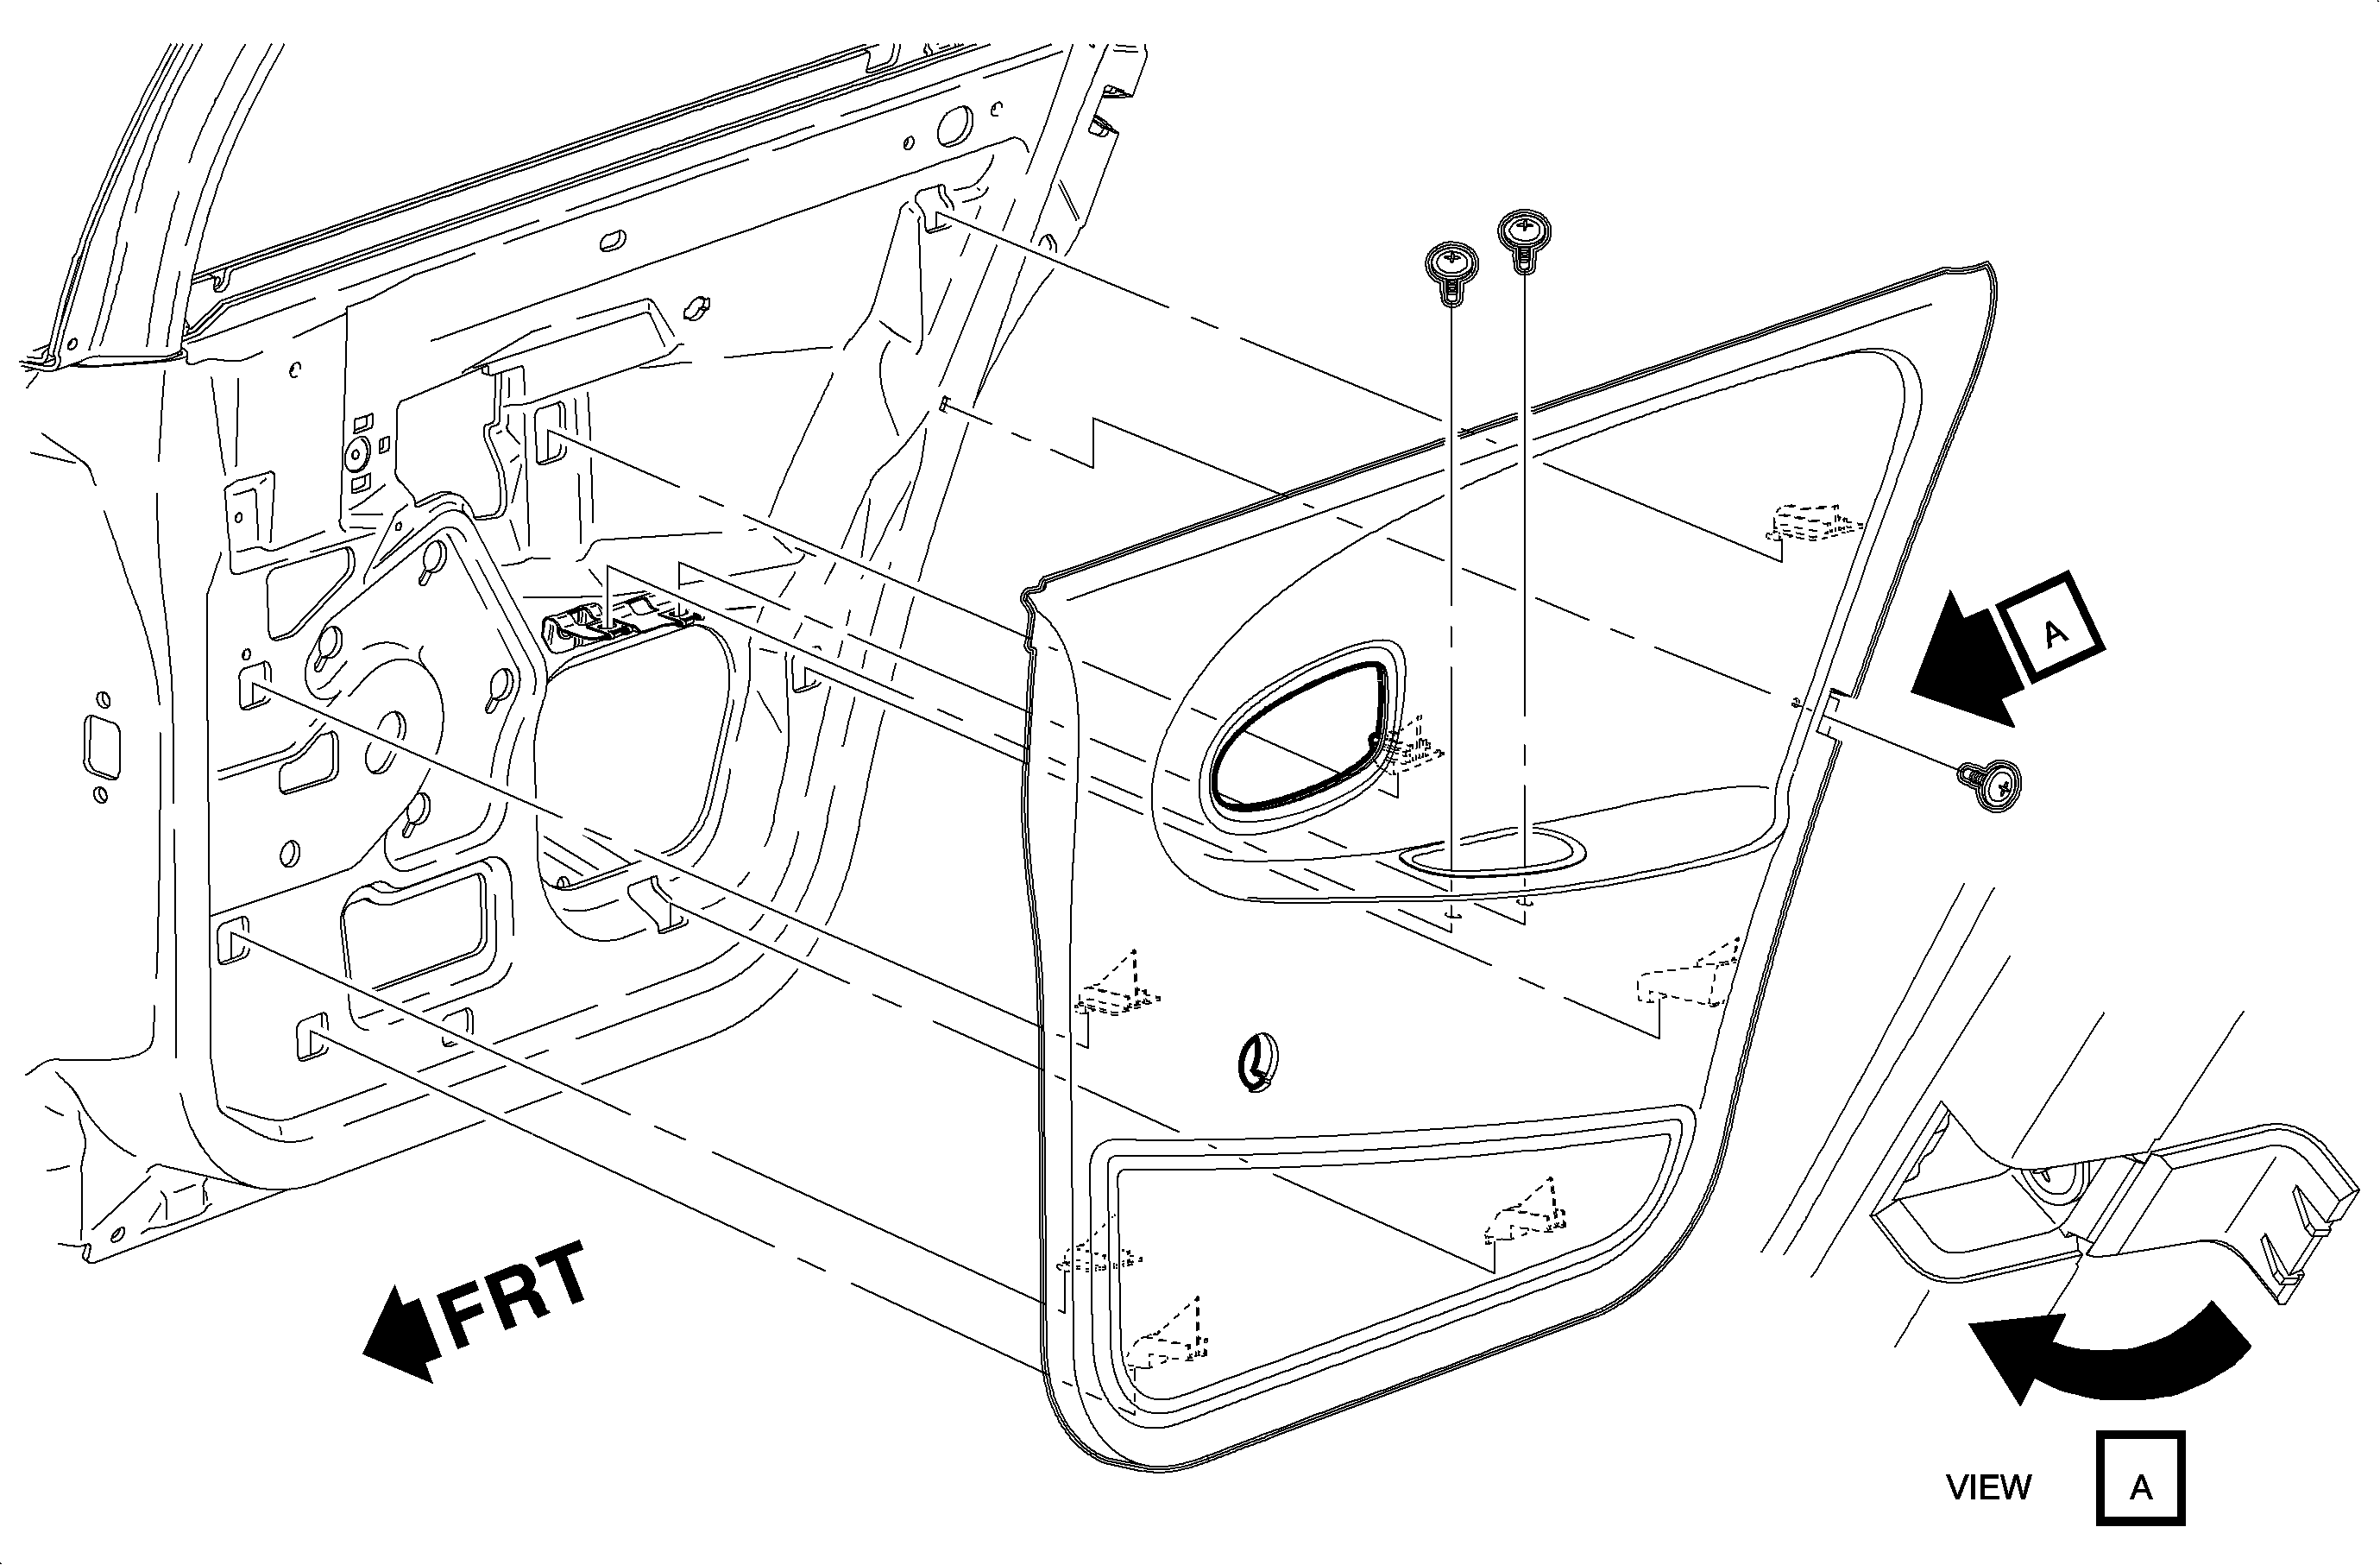
- Open the access door cover at the rear of the
door trim panel and remove the door trim panel fastener.
- Remove the door trim panel fasteners at the pull cup location.
- Pull up on the door trim panel assembly to disengage the trim panel to
door structure attaching hooks and remove the door trim panel.

- Place the door trim panel (heat-staked side
up) on a work bench with a cloth-type material to protect the panel's finish.
Important: Drill into the heat-staked stud just enough to cause the stud material to separate
from the substrate (door trim panel) material.

- Using a 7 mm (9/32 in) drill bit,
drill out the round heat-staked studs.

- Remove the rectangle-shaped heat-stakes with
a hand grinder (die grinder) using a 38 mm (1.25 in) diameter grinding
disk, or the equivalent, by grinding the studs from the side.
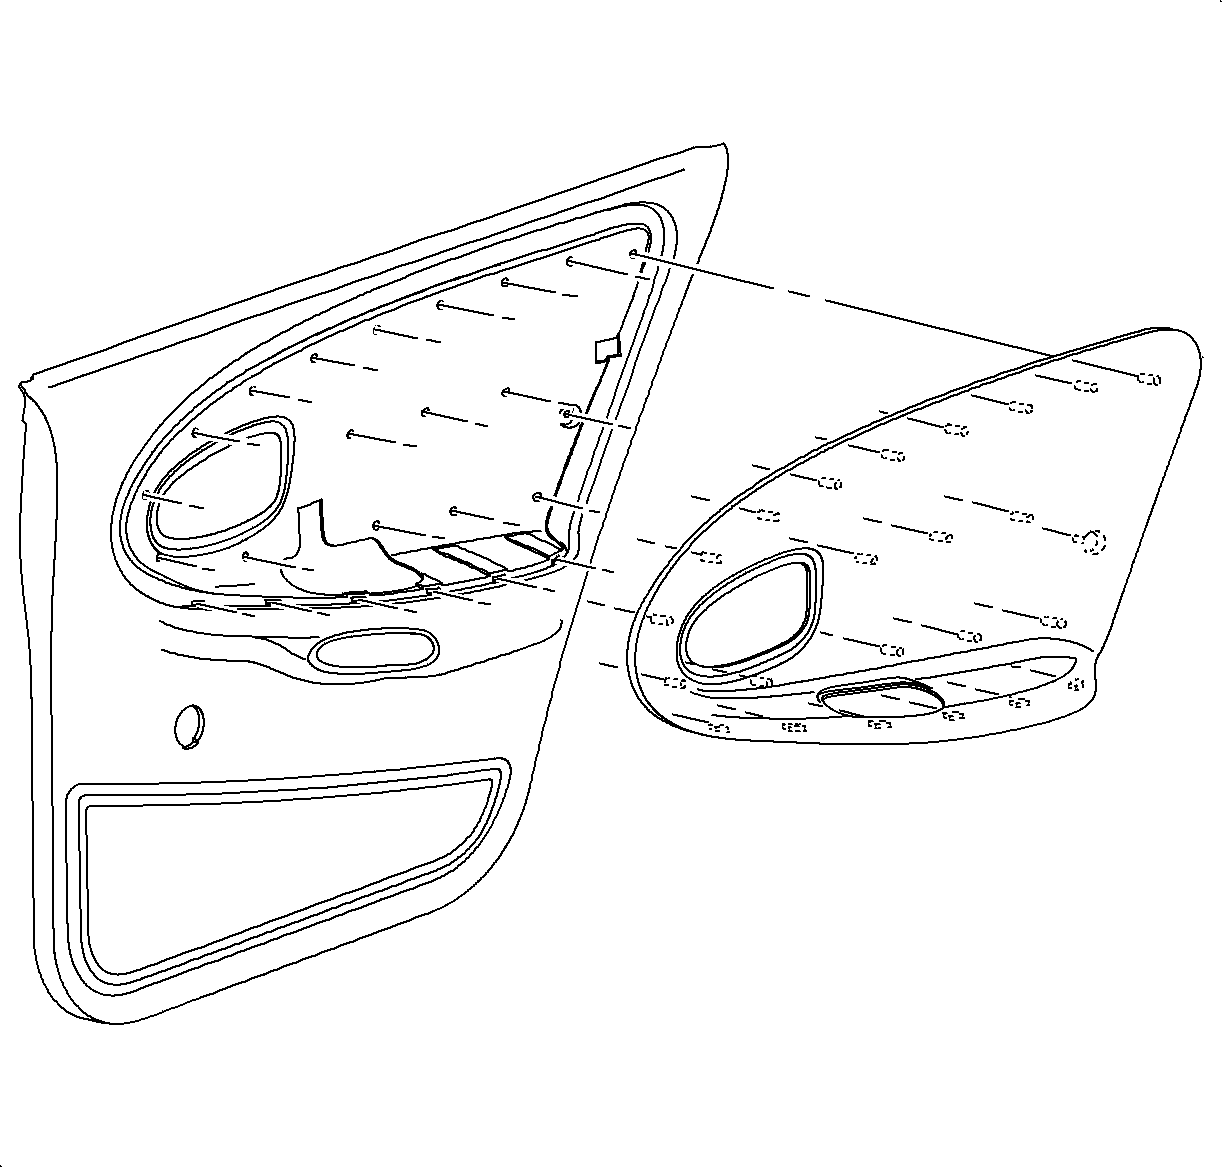
- Remove the old door insert from the door trim
panel.
- Remove any heat-stake material that may be left in the door trim panel
holes, or on the door trim panel substrate.
Installation Procedure

- Center the new door insert on the
door trim panel.
- Place the door trim panel assembly back on the cloth-type protective material
with the heat-stake side up.
- Place one hand on the front side of the door trim panel (the side that
is on the work bench) at one of the door insert corners. Press and hold the door insert
heat stake against the door trim panel substrate.

Important: A desirable round heat stake weld should have an approximate diameter of 10 mm
(13/32 in) and 2 mm (3/32 in) high. A desired rectangle heat
stake weld should be approximately 13 mm (½ in) long, 5 mm
(13/64 in) wide and 5 mm (13/64 in) high.
- Using a Weller™ model 8200 soldering gun or equivalent, equipped with
a flat tip, use a circular motion around the heat stake and apply firm steady pressure
to spread the heat stake material onto the door trim panel substrate to achieve a
proper weld. (Sedan panel shown, Coupe panel similar).
- After the heat stake has been melted, keep steady pressure on the door
insert with your hand for 30 seconds to allow the heat stake to harden.
- Repeat steps 3-5 for the remaining door insert corners.
- Continue to press and hold the door insert against the door trim panel
substrate and heat stake the remaining door insert studs.
- Verify that the door insert is securely heat staked to the door trim panel
substrate in all locations.
- Install the door trim panel:
| 9.1. | Position the door trim panel to the door structure at the attaching hooks.
Lock in the door trim panel by pushing downward on the door trim panel. |
| 9.2. | Position the door handle assembly in the trim panel. Tip the handle outward
at the top. Using a thin hook style tool, lift the latch and lock rods into the trim
panel and slide rearward to engage the tabs. |
| 9.3. | If equipped, install the power door lock rod to the retainer. |
| 9.4. | If equipped, connect the power window electrical connection. |
| 9.5. | If equipped, install the power window switch to the door handle assembly. |
| 9.6. | Install the pull cup. |
| 9.7. | Install the door trim fasteners at the pull cup and the rear lower corner
of the door trim panel. Close the access cover. |

- On manual window vehicles, install the manual
window regulator handle clip on the handle. Install the door handle onto the vehicle
with the handle pointed in a forward and slightly up position with the window closed.
(1) Proper angle for the right side manual window regulator handle.
(2) Proper angle for the left side manual window regulator handle.


