Caution: In order to avoid deploying the air bag when troubleshooting the SIR system, use only the equipment specified in this manual and the instructions given in this manual. Failure to use the specified equipment as instructed could cause air bag deployment, personal injury to you or someone else, or unnecessary SIR system repairs.
The diagnostic procedures used in this section are designed to find and repair SIR system malfunctions. To get the best results, it is important to use the diagnostic charts and follow the sequence listed below.
Important: Bypassing these procedures may result in extended diagnostic time, incorrect diagnosis and incorrect parts replacement.
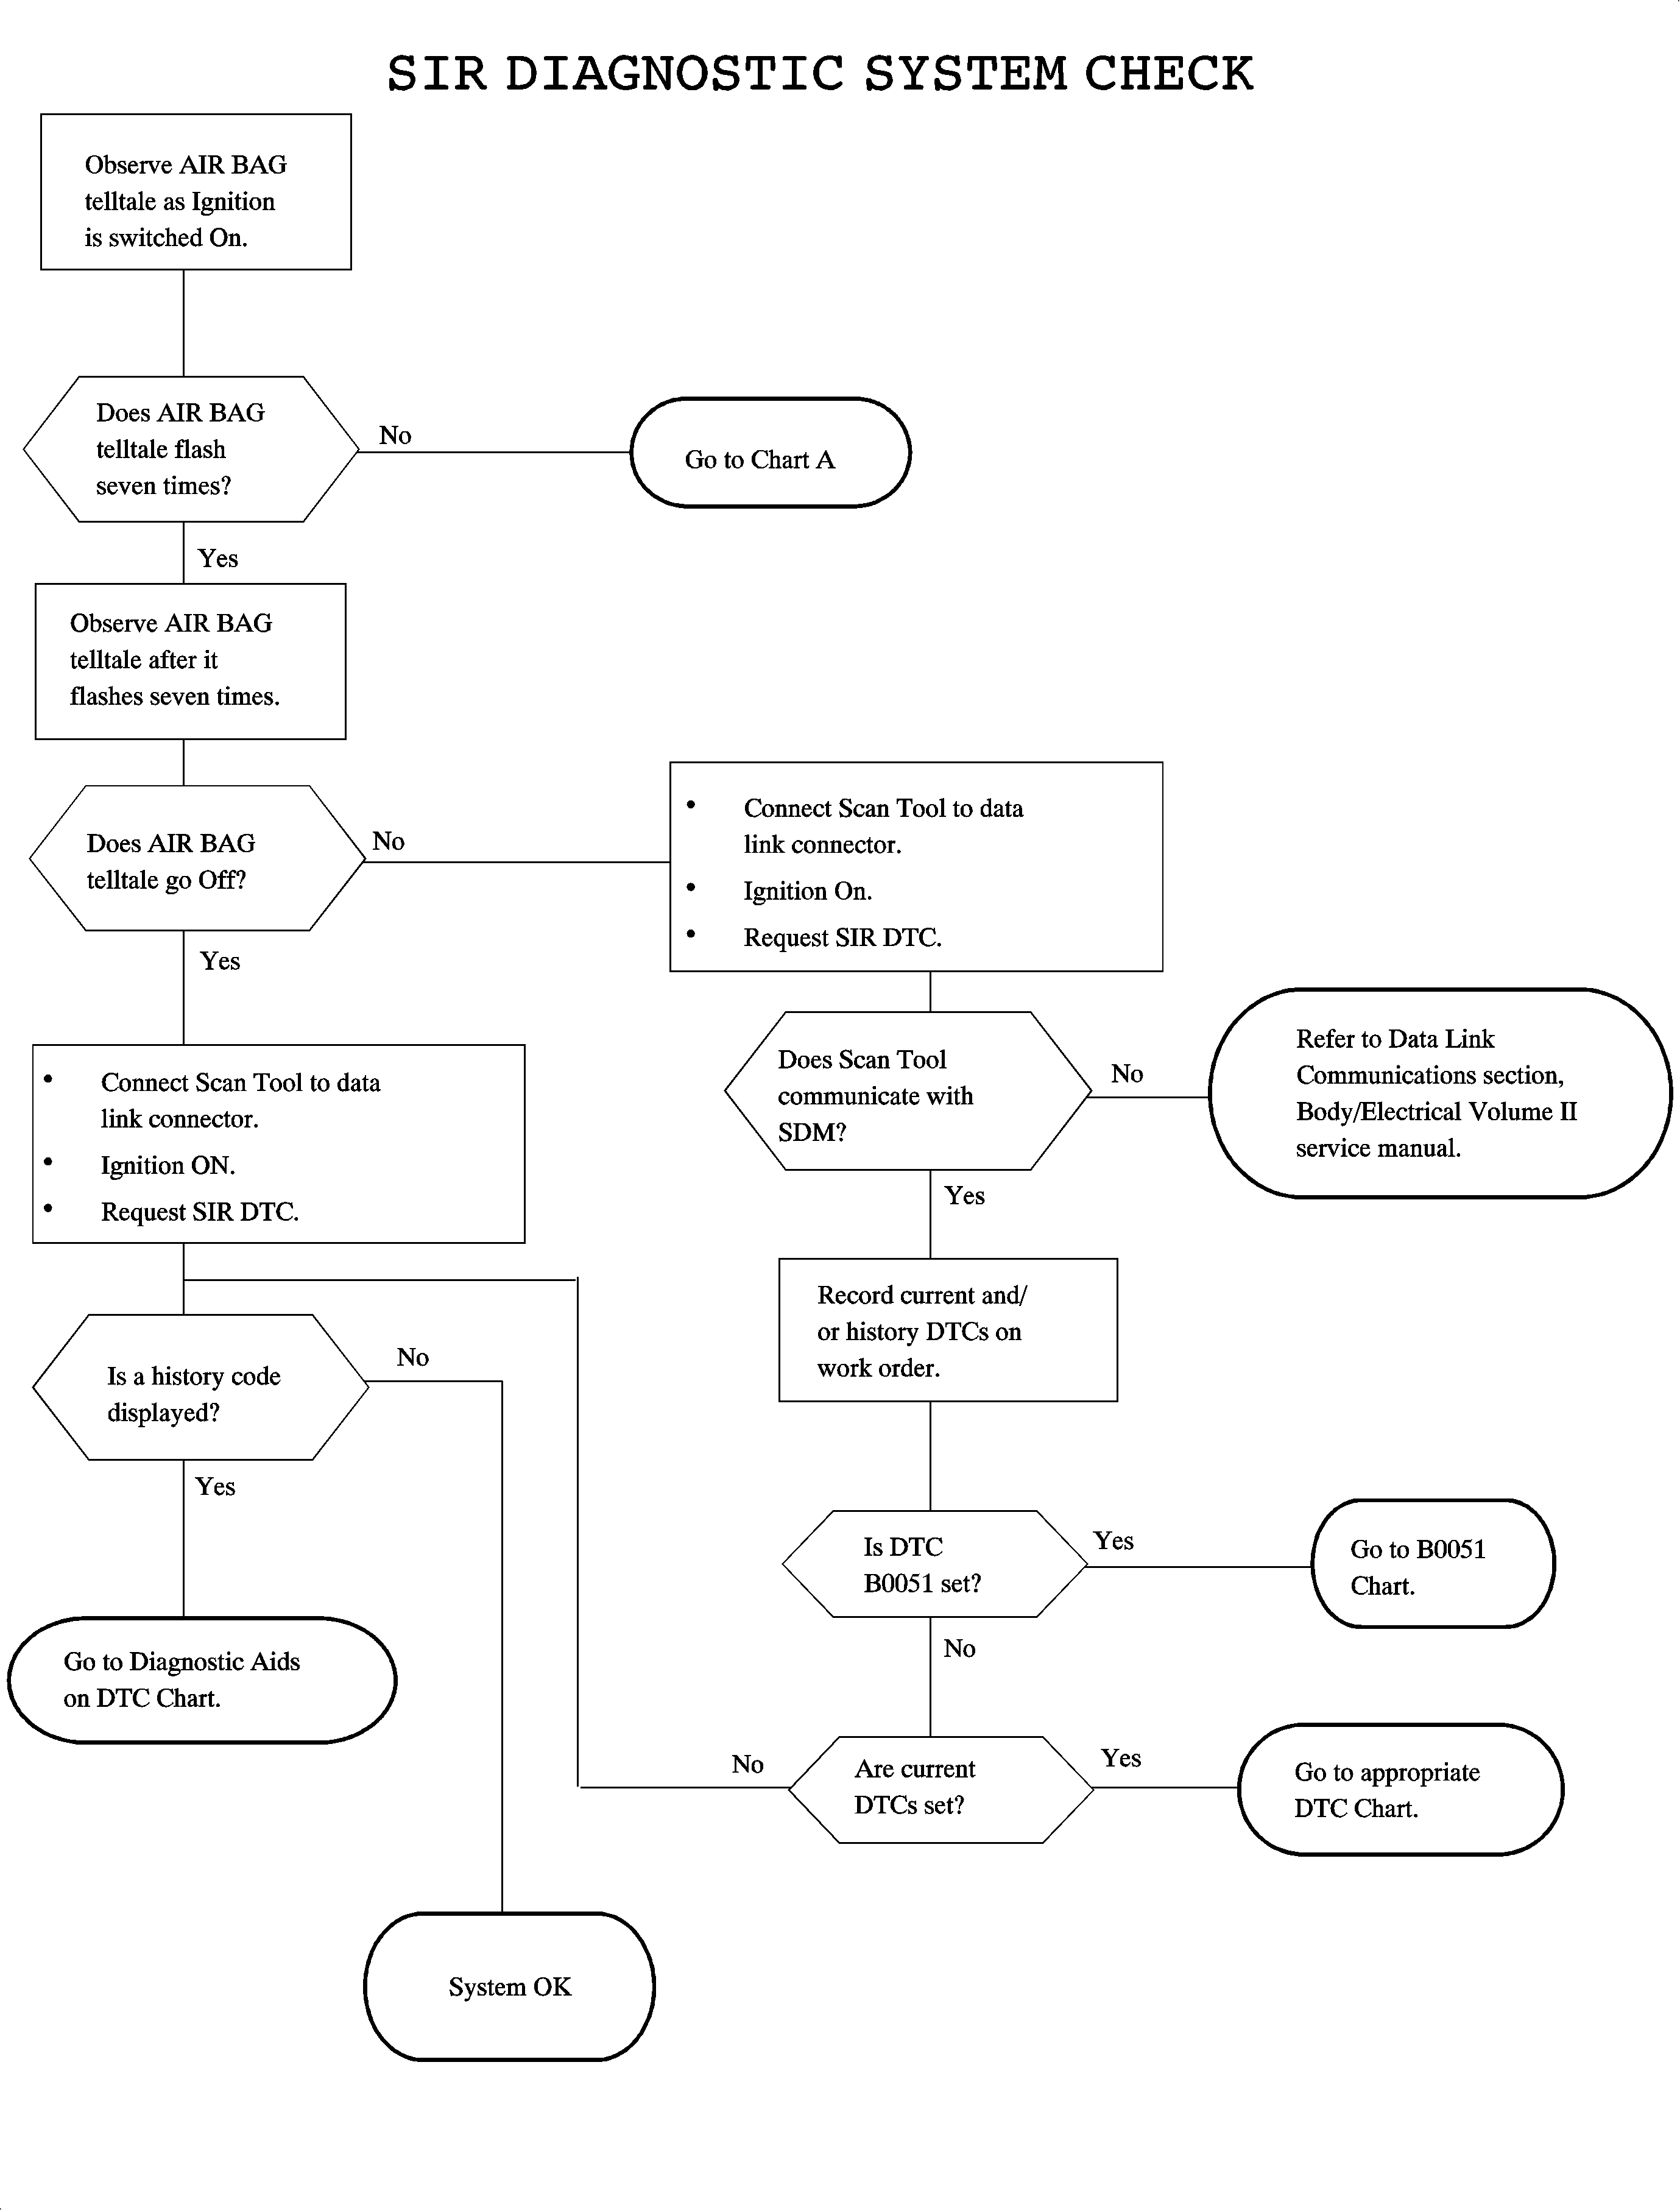
- The SIR Diagnostic System Check must be the starting point of any SIR diagnostics. The SIR Diagnostic System Check checks for the proper Air Bag telltale operation, the ability of the SDM to communicate through the serial data line, and whether any SIR diagnostic trouble codes exist.
- Refer to the proper diagnostic chart as directed by the SIR Diagnostic System Check. The SIR Diagnostic System Check will lead you to the correct chart to diagnose any SIR faults.
- Repeat the SIR Diagnostic System Check after any repair or diagnostic procedures has been performed to ensure that the repair has been made correctly and that no other malfunctions exist.
Circuit Description
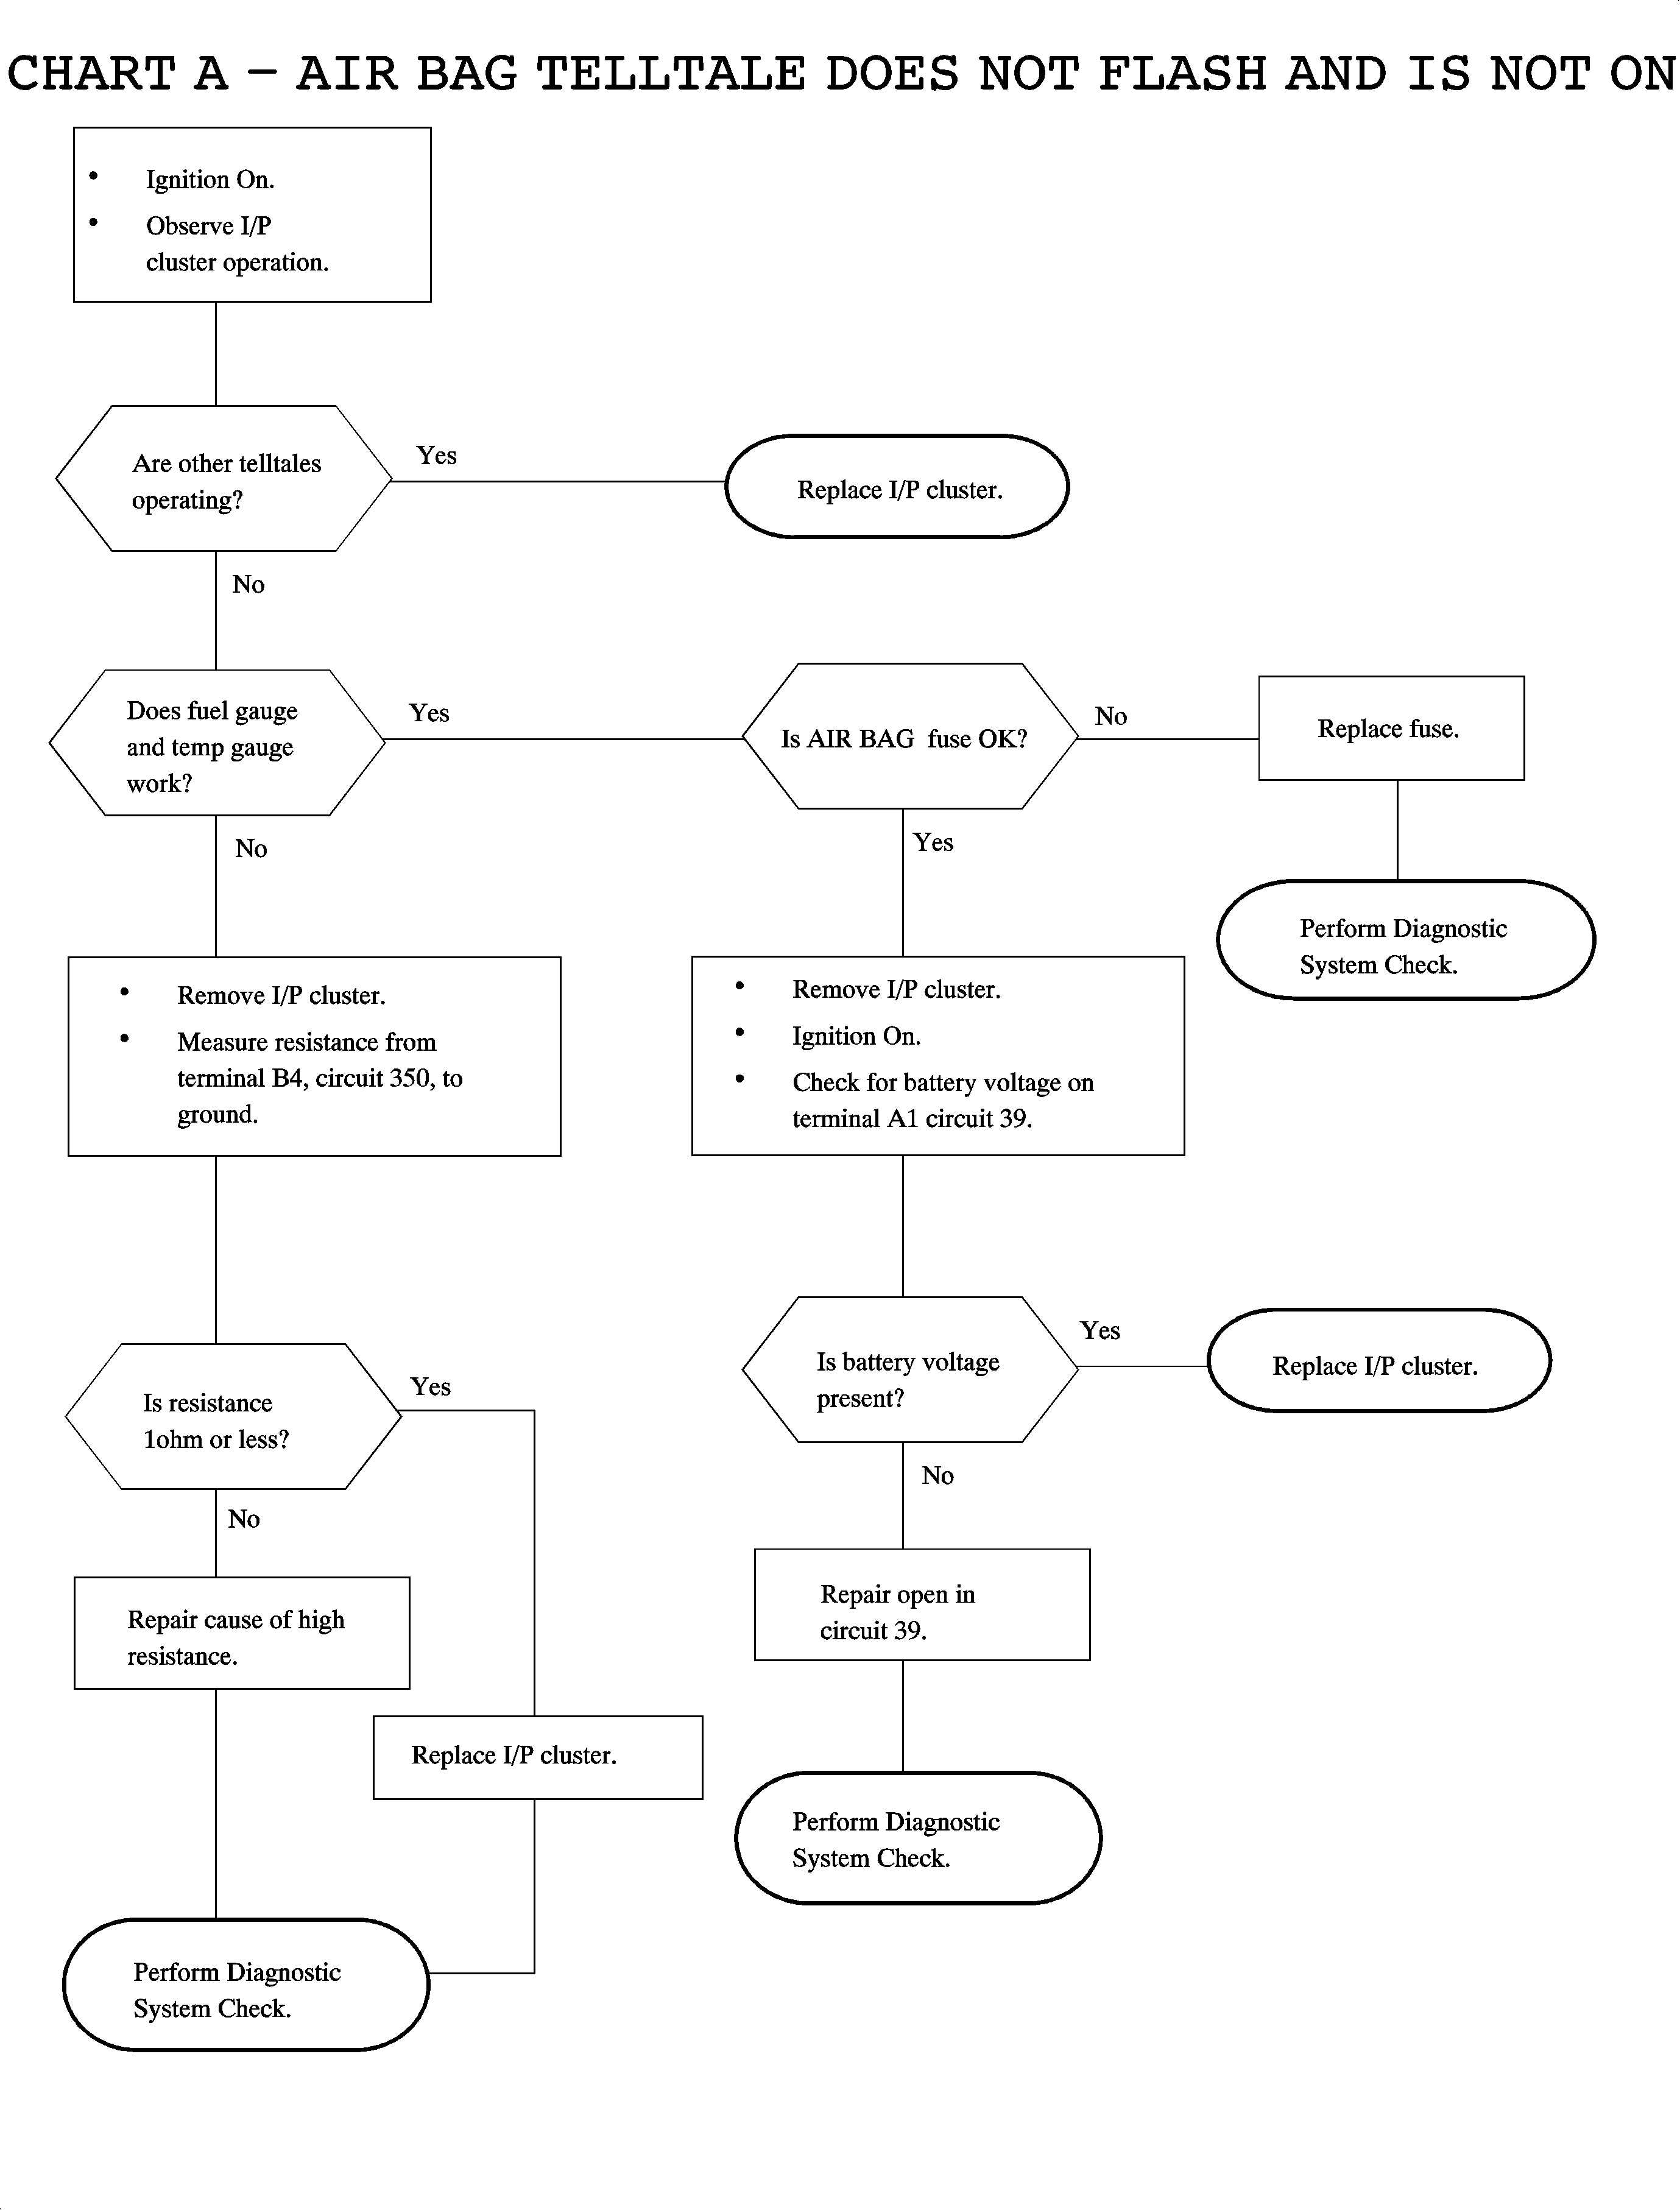
When ignition is switched ON, system voltage is applied to terminal A1 of the SDM from the AIR BAG fuse in the IPFB. The SDM self-checks the system while the I/P cluster performs a bulb check by flashing the AIR BAG telltale seven times. If a diagnostic trouble code is detected, the SDM will command the I/P cluster to light the AIR BAG telltale when the bulb check is complete. If no DTC is detected, the telltale will not light. The SDM communicates with the I/P cluster on circuit 1807.
Scan Tool Diagnostic
Notice: The order in which diagnostic trouble codes (DTCs) are diagnosed is very important. Failure to diagnose the DTCs in the order specified may result in extended diagnostic time, incorrect diagnosis, and incorrect parts replacement.
A scan tool is used to read current and history diagnostic trouble codes (DTCs) and to clear all diagnostic trouble codes after a repair is completed. The scan tool must be updated to communicate with the SIR system. To use a scan tool, connect it to the data link connector and turn the ignition switch ON. The scan tool reads SDM serial data from the data link connector (DLC).
Current DTCs indicate faults that were present since the last ignition cycle. Current codes can be viewed on the scan tool.
History DTCs indicate faults that may not be currently detected, but have been present in past ignition cycles. History codes can be viewed on the scan tool in the history diagnostic trouble code table. History Codes B0051, B0053, or B1000, cannot be cleared from the SDM.
If a fault occurs intermittently, the first occurrence will result in a stored history DTC. If the same fault occurs twice within 125 ignition cycles, the AIR BAG telltale will be turned on and will remain on until the vehicle is serviced. The second occurrence fault will be stored as a current DTC.
Poor Connections
Some items to check are:
| • | Poor mating of connector halves, or terminals not fully seated in the connector body (backed out). |
| • | Dirt or corrosion on the terminals. The terminals must be clean and free of any foreign material which could impede proper terminal contact. |
| • | Improperly formed or damaged terminals. All connector terminals in problem circuits should be checked carefully to ensure good contact tension. Use a corresponding mating terminal from SA9206Z connector test adapter kit to check for proper tension. Refer to "Checking Terminal Contact". |
Notice: Connector test adapter kit SA9206Z must be used whenever a diagnostic procedure requests checking or probing a terminal. This will ensure that no damage to the terminal will occur.
| • | Poor terminal-to-wire connection. Checking this requires removing the terminal from the connector. Some conditions which fall under this description are poor crimps, joints, crimping over the wire insulation rather than the wire itself, corrosion in the wire-to-terminal contact area, etc. |
| • | Wire insulation which is rubbed through, causing an intermittent short as the bare area touches other wiring or other parts of the vehicle. |
| • | Wiring broken inside the insulation. This condition would cause a resistance to show continuity, but it only one or two strands of wire are intact, resistance would be too high. |
| • | When measurements are requested, use J 39200 digital multimeter with connector test adapter terminal from J-35616 . When repairing a wire, connector, or terminal, use the proper repair parts and refer to Wiring Repairs or Connector Repairs in Wiring Systems. |