Odor from A/C at Vehicle Start-Up (Remove Debris from Evaporator Case, Disinfect Evaporator or Apply Cooling Coil Coating and/or Enable Afterblow Function)

| Subject: | Odor from A/C at Vehicle Start-Up (Remove Debris from Evaporator Case, Disinfect Evaporator or Apply Cooling Coil Coating, and/or Enable Afterblow Function) |
| Models: | 2000-2002 Saturn S-Series Vehicles with A/C (RPO C60) |
| Attention: | Parts Manager and Technician |
This bulletin is being revised to include 2002 model year. Please discard Saturn Bulletin Number 99-T-44A, Corporate Bulletin Number 99-01-37-009A (Section 01 -- HVAC).
Condition
Some customers may comment on a musty odor from A/C system, most noticeable at vehicle start-up.
Cause
An unpleasant (musty) odor from A/C outlets at vehicle start-up may be the result of microbial growth on the evaporator core. This bacteria feeds on the organic matter and moisture that is present on the evaporator core.
Correction
Remove any debris from evaporator case, clean evaporator with disinfectant or apply cooling coil coating, and/or enable afterblow function according to the procedures in this bulletin.
Important: Before enabling afterblow function, the following informationmust be explained to the customer.
Customer Information
The current draw of the blower motor will lower the state of charge of the vehicle’s battery, and may negatively impact battery life depending on the driving habits of the customer. The delayed blower motor control function will not affect normal A/C or blower motor operation. However, the body control module (BCM) will activate the blower motor on high speed for 32 or 176 seconds, depending on the ambient temperature, vehicle speed, and if the A/C compressor clutch has been engaged during the same ignition cycle. The BCM will wait approximately 50 minutes after the ignition is turned off before activating the blower motor. It is during this blower run time that condensate, which causes microbial growth, is removed from the evaporator core. The blower motor will be turned on with no driver input if the conditions as stated above are met. The air rush sound created by the blower motor is noticeable from outside of the vehicle.
Procedures
A/C EVAPORATOR DISINFECTING/COOLING COIL COATING APPLICATION
Depending on part availability, use A/C system disinfectant kit or cooling coil coating when performing this procedure.
Before starting procedures, obtain the following equipment and supplies:
| • | A/C System Disinfectant Kit, P/N 21030784 (P/N 10953503 for Canada), or Cooling Coil Coating, P/N 12346390. |
| • | Cleaning Spray Gun, Special Tool SA9216NE, or equivalent. |
| Caution: WHEN USING DISINFECTANT KIT, P/N 21030784, ORDINARY SAFETY GLASSES ARE NOT SUFFICIENT. |
| • | For Disinfectant Kit, P/N 21030784 (P/N 10953503 for Canada), use safety goggles or face shield. |
| • | For Disinfectant Kit, P/N 21030784 (P/N 10953503 for Canada), use a National Institute of Occupational Safety and Health (NIOSH) approved acid gas/organic vapor respirator with chlorine dioxide cartridges (3M® P/N 5103-small, 5203-medium, 5303-large), which are to be used with a pre-filter (P/N 5010) and retainer (P/N 501), or equivalents. |
| • | When applying Cooling Coil Coating, P/N 12346390, use safety glasses. |
| • | Rubber gloves |
| • | Pedestal fan |
| • | Plug, P/N 21121827 |
- Dry evaporator by:
- Raise vehicle on a hoist.
- Check the HVAC module drain for blockage. If necessary, clear drain hole with a soft blunt tool such as the eraser end of a pencil.
- Lower vehicle from hoist.
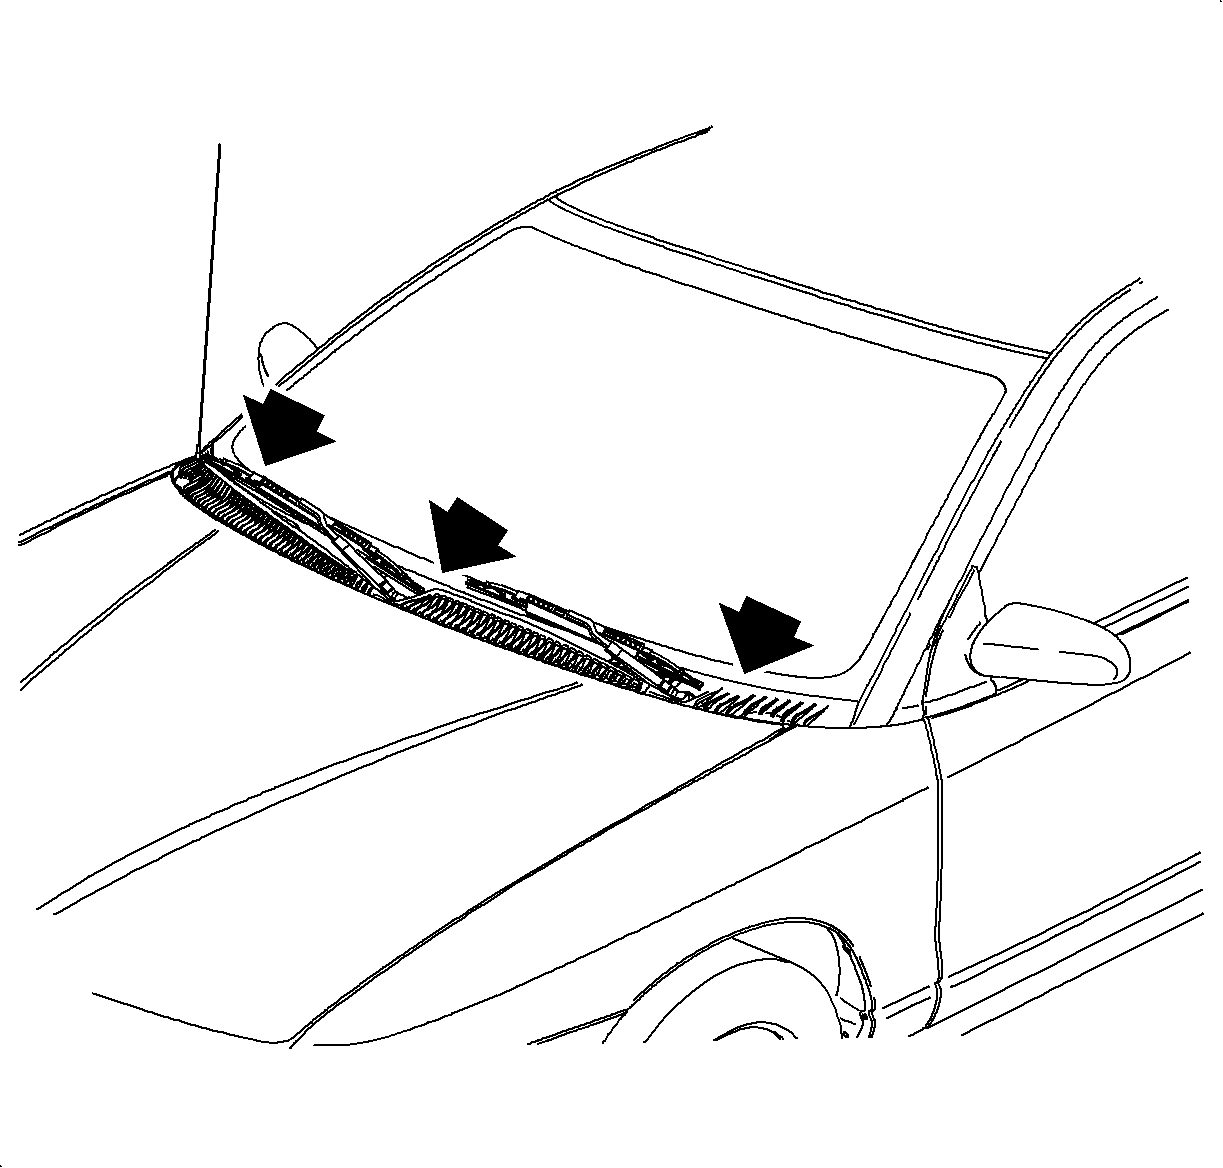
- To reduce the risk of debris from entering the HVAC module, check for gaps between cowl panel foam and windshield, at base of windshield. Repair gaps by repositioning panels or by removing cowl panels and installing additional foam to panel. Use Kent Industries P/N 40115 Adhesive Back Shim Stock, or equivalent, 5/16 x 3/8 inch foam.
- Place a drain pan directly below the HVAC drain to collect disinfectant or cooling coil coating and rinse water runoff.
- Open all doors and windows in the vehicle and position pedestal fan so that it provides cross ventilation through the vehicle during the cleaning/coating procedure.
- Cover interior of vehicle to protect it from spray.
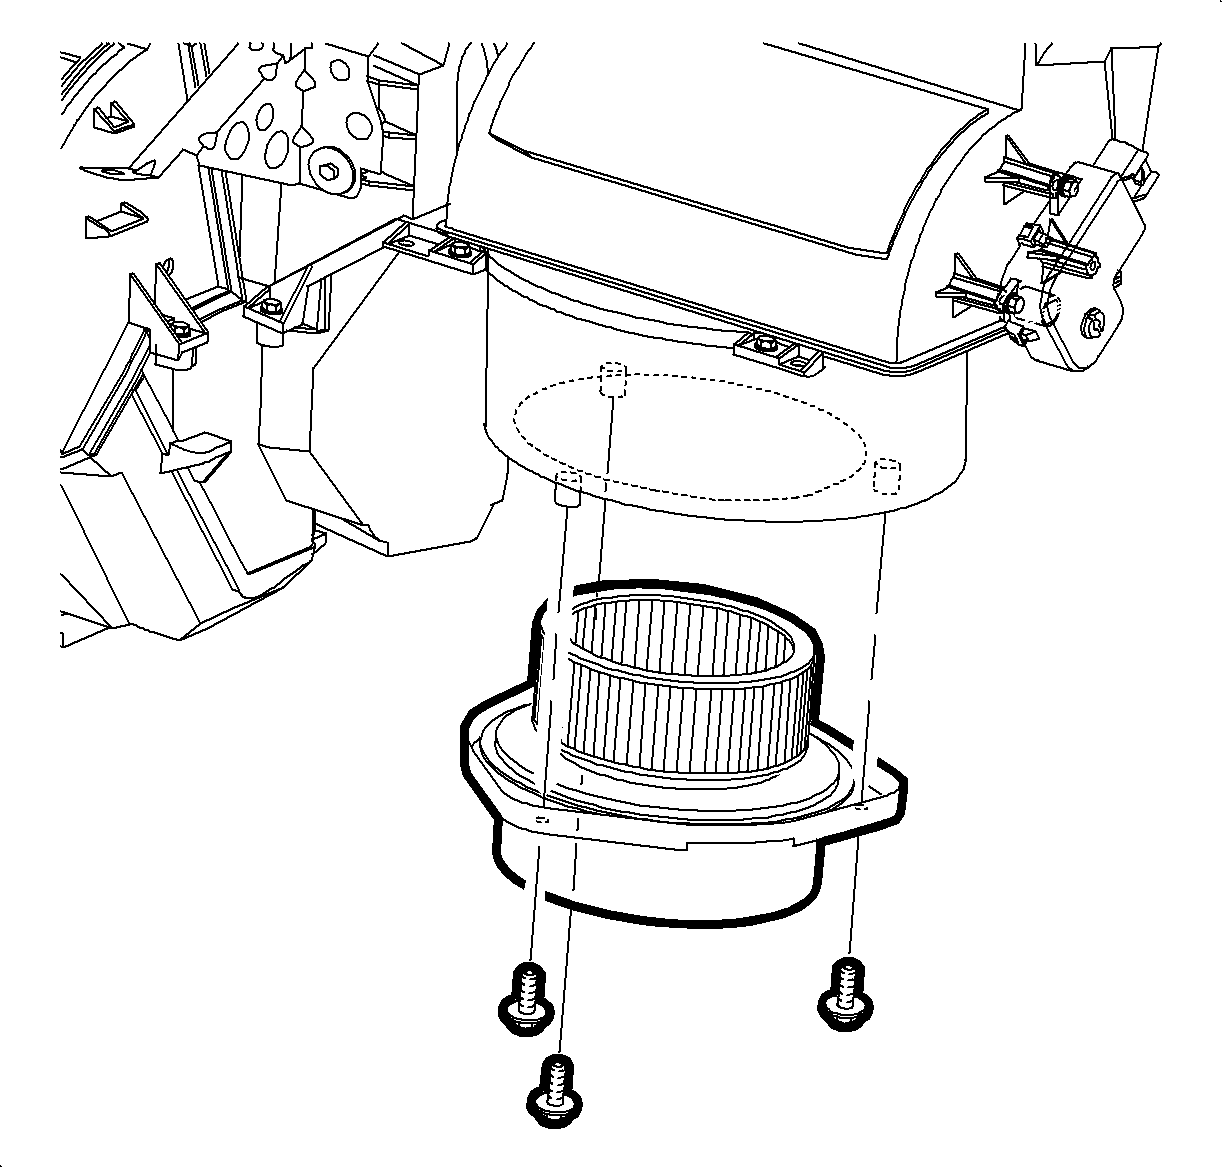
- Disconnect blower motor connector.
- Remove blower motor mounting screws and remove blower motor assembly.
- Check the HVAC module for debris through the blower motor opening. Remove any debris from evaporator face.
- Install blower motor and connect electrical connector.
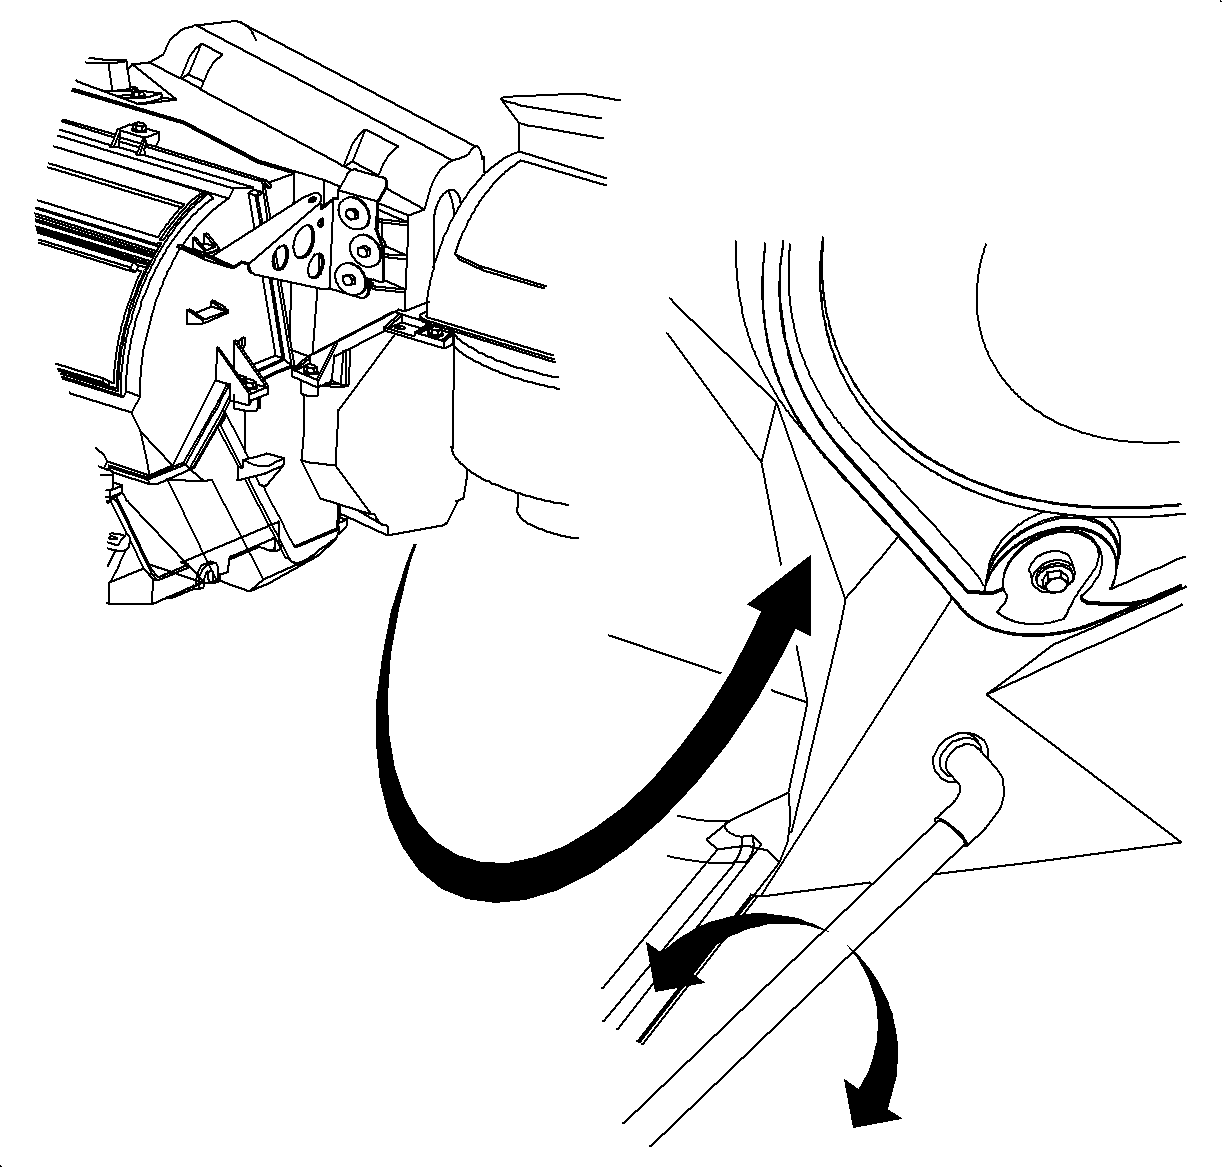
- Using a 15/32 in. drill bit, attach a drill stop or depth gauge, or masking tape to allow for a 4 mm (5/32 in.) depth.
- Locate the center of the triangle shaped portion of the plenum which slopes upward and to the right, next to the left-most blower motor fastener.
- Drill a 15/32 in. hole. Be careful not to let the drill bit penetrate beyond a 4 mm (5/32 in.) depth.
| • | Adjusting temperature to full hot |
| • | Adjusting mode to heater only |
| • | Turning RECIRC On |
| • | Making sure A/C button is Off |
| • | Close all doors and windows |
| • | Start engine and allow to reach operating temperature |
| • | Allow blower motor to operate on HI blower for 5 minutes, once engine reaches operating temperature |
Caution: MAKE SURE VEHICLE IS PROPERLY SUPPORTED AND SQUARELY POSITIONED ON HOIST. TO HELP AVOID PERSONAL INJURY, PROVIDE ADDITIONAL SUPPORT TO OPPOSITE END OF VEHICLE THAT COMPONENTS ARE REMOVED FROM.
Notice: Use care when removing debris from front of evaporator so no damage is done to the fins.
Tighten
Tighten the Blower Motor Mounting Screws to 1.7N·m(15
in-lbs).
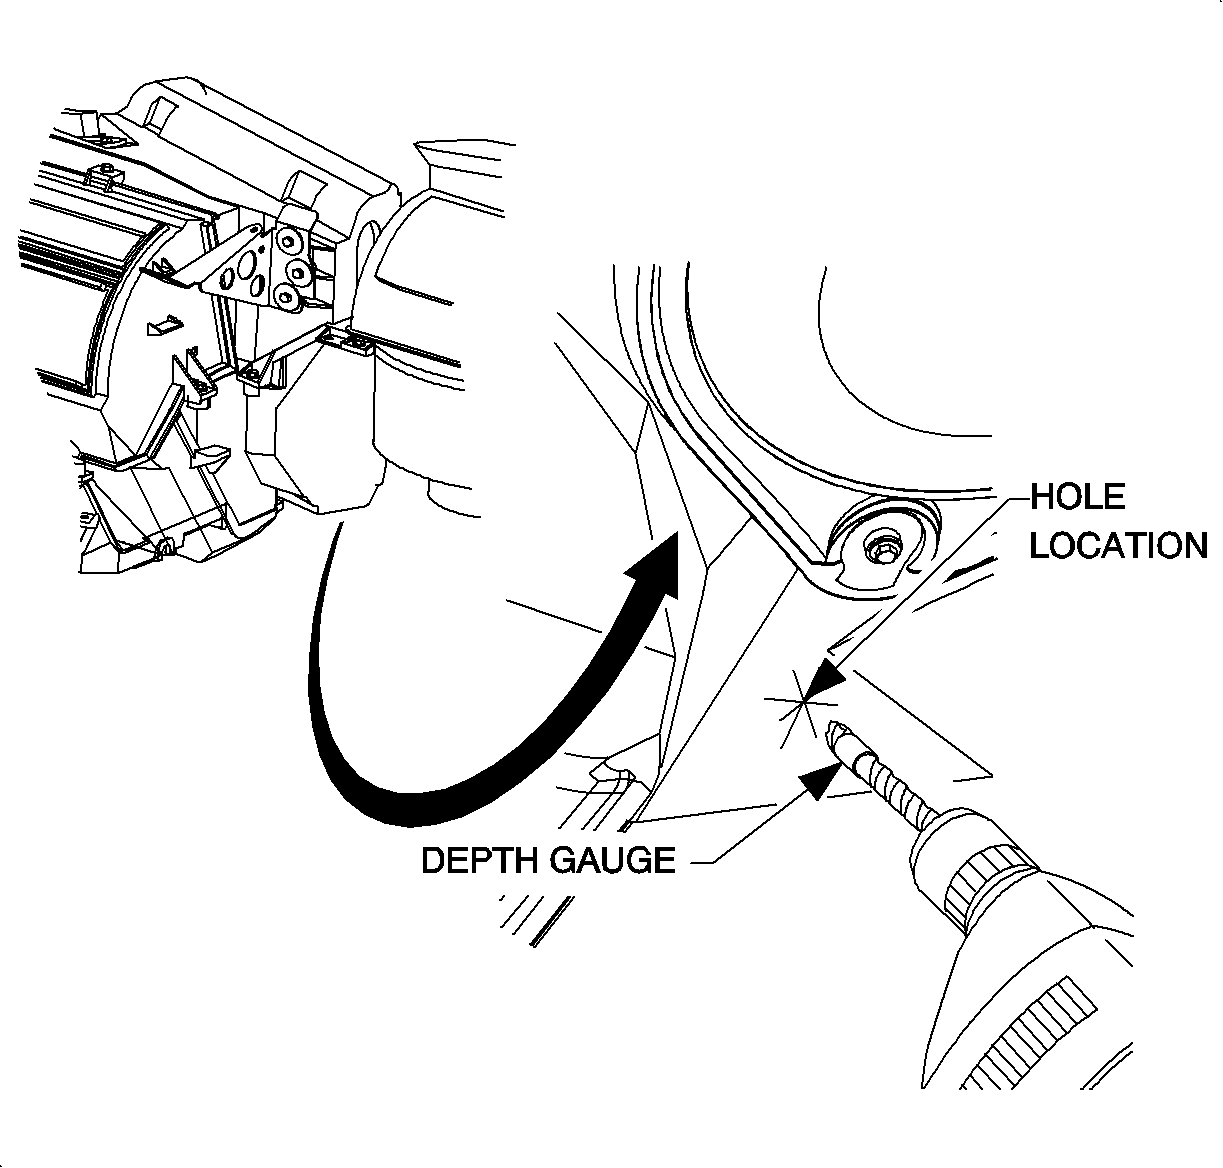
Notice: Running the drill bit in more than 4 mm (5/32 in.) can damage the evaporator.
| Important: Depending on part availability, two different products may be available for use on A/C evaporators. Select the appropriate procedure to follow based on the product you will be using: |
| • | If using the Disinfectant Kit, P/N 21030784 (P/N 10953503 for Canada), continue to the "Evaporator Disinfecting Using Disinfectant Kit, P/N 21030784" procedure in this bulletin. |
| • | If using the Cooling Coil Coating, P/N 12346390, continue to the "Applying Cooling Coil Coating, P/N 12346390, to Evaporator" procedure in this bulletin. |
EVAPORATOR DISINFECTING USING DISINFECTANT KIT
Perform this procedure only if you are using A/C System Disinfectant Kit, P/N 21030784.
Caution: THIS PROCEDURE SHOULD ONLY BE PERFORMED ON A COLD CAR. IT HAS BEEN DEMONSTRATED THAT IRRITATING VAPORS WILL BE FORMED IN THE ENGINE COMPARTMENT IF THE DISINFECTANT COMING OUT OF THE DRAIN OUTLET CONTACTS HOT ENGINE COMPONENTS. DISINFECTANT CAN CAUSE SUBSTANTIAL, BUT TEMPORARY EYE INJURY. DO NOT GET DISINFECTANT IN EYES OR ON CLOTHING. WASH THOROUGHLY WITH SOAP AND WATER AFTER HANDLING.
FIRST AID: IF DISINFECTANT GETS INTO EYES, HOLD EYELIDS OPEN AND FLUSH WITH A STEADY, GENTLE STREAM OF WATER FOR 15 MINUTES. OBTAIN MEDICAL ATTENTION IF IRRITATION PERSISTS.
- Allow vehicle to cool down before performing disinfectant procedure.
- Put on rubber gloves, safety goggles and NIOSH approved acid gas/organic vapor respirator.
- Pour the small bottle of the two part A/C System Disinfectant Kit, P/N 21030784 (P/N 10953503 for Canada), into the large bottle. Put the cap back on the large bottle and invert bottle once or twice to mix the contents.
- Using cleaning gun, Special Tool SA9216NE (or equivalent siphon-type parts cleaning spray gun capable of delivering 2 ounces per minute of liquid with shop air at 552-620 kPa [80-90 psi]), insert siphon hose into container of disinfectant. Take care to place the bottle in a secure upright position to avoid spilling contents.
- Insert nozzle tip of spray gun through the drilled hole and orient so spray pattern will be parallel to the evaporator face.
- With blower motor on HI and engine Off, spray the entire contents of the disinfectant mix. Rotate the nozzle tip up and down while spraying disinfectant to allow for an even distribution and to ensure full coverage of the evaporator.
- Turn blower motor Off.
- Allow evaporator core to soak for at least 5 minutes.
- With blower motor on HI, thoroughly rinse the evaporator core (using the above procedure) with 1 quart of clean water to remove any disinfectant residue.
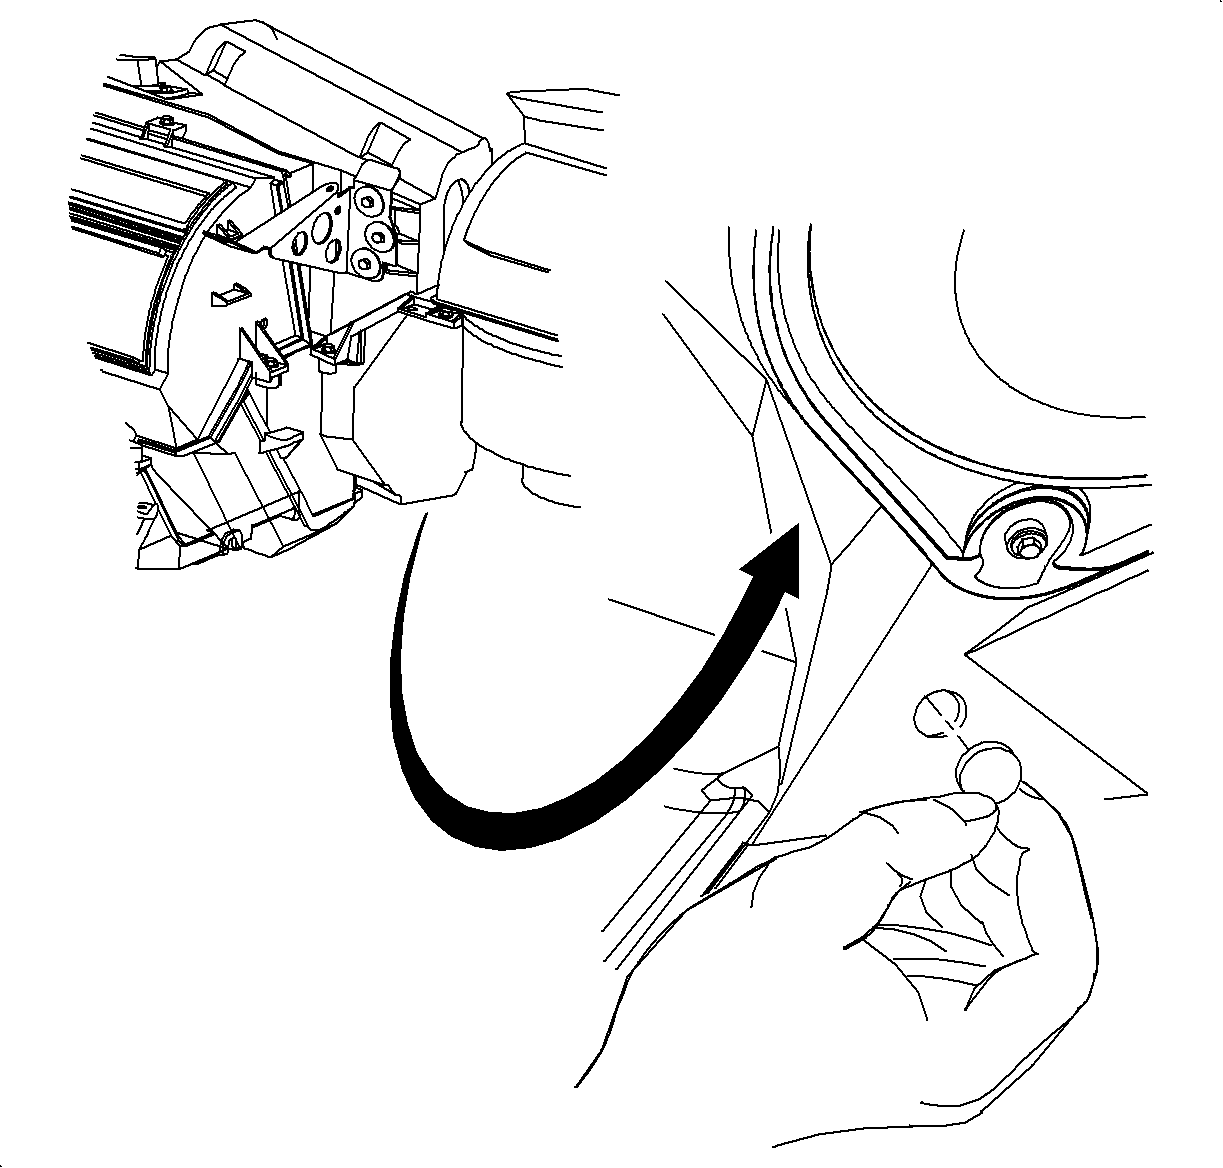
- Install hole plug, P/N 21121827.
- Properly dispose of disinfectant and rinse water runoff collected in drain pan into a sanitary drain.
- Remove protective covering from interior of vehicle.
- If the afterblow function is to be enabled (based on customer input), proceed to "BCM Afterblow Function Enabling" in this bulletin.

Important: Before enabling afterblow function, refer to Customer Information in this bulletin and review operation of afterblow function with customer.
APPLYING COOLING COIL COATING, P/N 12346390, TO EVAPORATOR
Perform this procedure only if you are using Cooling Coil Coating, P/N 12346390.
Caution: COOLING COIL COATING CAN CAUSE TEMPORARY EYE INJURY. DO NOT GET COOLING COIL COATING IN EYES OR ON CLOTHING. WASH THOROUGHLY WITH SOAP AND WATER AFTER HANDLING.
FIRST AID: IF COOLING COIL COATING GETS INTO EYES, HOLD EYELIDS OPEN AND FLUSH WITH A STEADY, GENTLE STREAM OF WATER FOR 15 MINUTES. OBTAIN MEDICAL ATTENTION IF IRRITATION PERSISTS.
- Allow vehicle to cool down before performing cooling coil coating procedure.
- Put on rubber gloves and safety glasses.
- Using cleaning gun, Special Tool SA9216NE (or equivalent siphon-type parts cleaning spray gun capable of delivering 2 ounces per minute of liquid with shop air at 552-620 kPa [80-90 psi]), insert siphon hose into container of cooling coil coating. Take care to place the bottle in a secure upright position to avoid spilling contents.
- Regulate shop air to 276-414 kPa (40-60 psi).
- Insert nozzle tip of spray gun through the drilled hole and orient so spray pattern will be parallel to the evaporator face.
- Apply cooling coil coating using short bursts and rotating the nozzle tip up and down. This will allow for an even distribution and to ensure full coverage of the evaporator.
- Allow evaporator core to soak for 30 minutes.
- Dry evaporator by:
- Install hole plug, P/N 21121827.
- Properly dispose of cooling coil coating runoff collected in drain pan into a sanitary drain.
- Remove protective covering from interior of vehicle.
- If the afterblow function is to be enabled (based on customer input), proceed to "BCM Afterblow Function Enabling" in this bulletin.
| • | Adjusting temperature to full hot |
| • | Turning RECIRC On |
| • | Making sure A/C button is Off |
| • | Open windows 1/2 in. and close doors |
| • | Start engine and allow to reach operating temperature |
| • | Allow blower motor to operate on HI blower for 5 minutes once engine reaches operating temperature |
Important: Before enabling afterblow function, refer to Customer Information in this bulletin and review operation of afterblow function with customer.
BCM AFTERBLOW FUNCTION ENABLE
Using a Tech 2, enable BCM Afterblow Function by performing the following:
- Navigate to BODY CONTROL MODULE menu.
- Select SPECIAL FUNCTIONS menu.
- Select PERSONALIZATION.
- Select HVAC AFTERBLOW and press ENTER to enable afterblow function.
- Select SAVE OPTIONS.
Parts Information
Part Number | Description |
|---|---|
12346390 | Coating - A/C Evap Organic Matl Growth Prev |
21030784 (P/N 10953503 for Canada) | A/C System Disinfectant Kit |
21121827 | Hole Plug |
Claim Information
To receive credit for this repair during the warranty coverage period, submit a claim through the Saturn Dealer System as follows:
Case Type | Description | Labor Operation Code | Labor Time |
|---|---|---|---|
VW | Reprogram Afterblow Function | D3317 | 0.2 hr |
VW | Disinfect A/C System and Reprogram Afterblow Function | Z4046 | 1.4 hrs |
