Oil Consumption Concern

| Subject: | Oil Consumption Concern (Diagnosis/Service Procedure) |
| Models: | All 1991 - 1997 Saturn S-Series Vehicles |
Condition
Some customers may comment that the engine is using 1 quart (0.951 liter) or more of oil every 3000 mi. (4827 km).
Cause
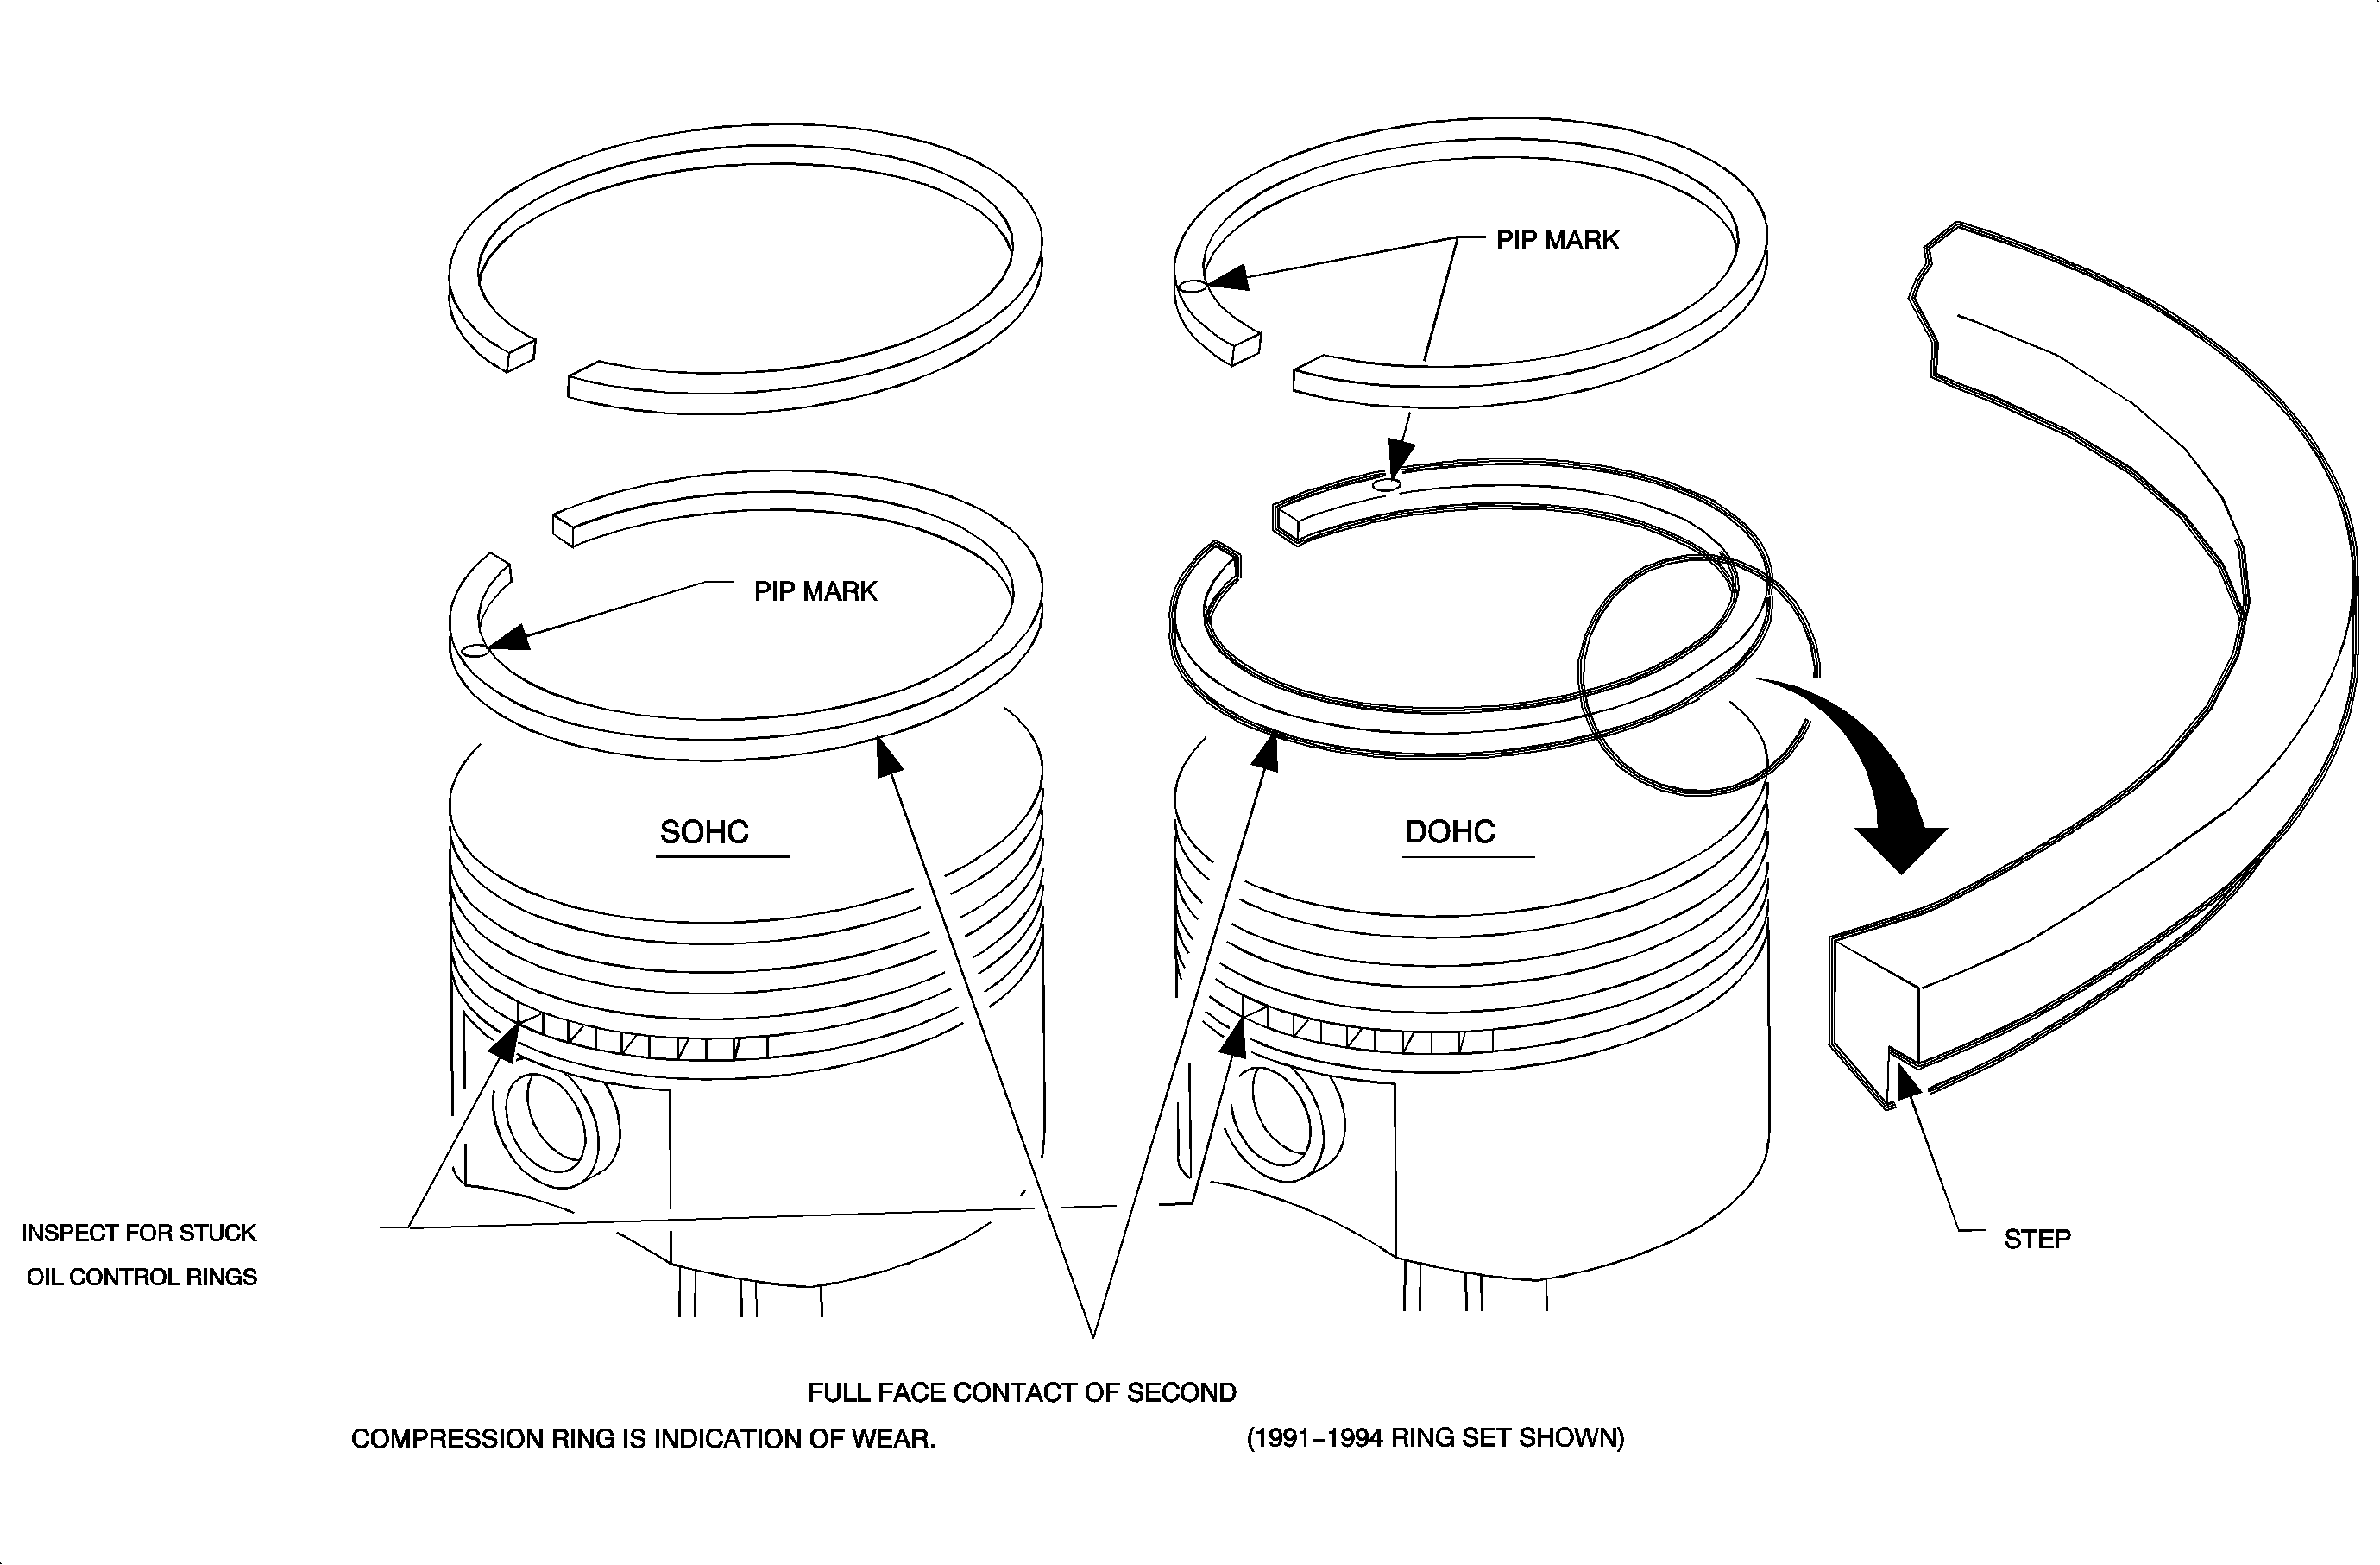
Engine oil consumption greater than 1 quart (0.951 liter) in 3000 mi. (4827 km) may be caused by stuck/sticking oil control and/or compression rings. Engine deposits may build up on and around the oil control ring(s), compression ring(s) and piston ring land(s) causing the ring(s) to stick and become less effective.
Correction
Perform internal engine cleaning procedure or engine repair procedure depending on amount of oil consumption.
IF engine uses 1 quart (0.951 liter) of oil in:
1500 mi. - 3000 mi. (2414 km -4827 km), perform Procedure 1: Internal Engine Cleaning
1499 mi. (2414 km) or less, perform Procedure 2: Engine Repair
While Saturn still considers oil consumption of 1 quart (0.951 liter) in 2000 mi. (3218 km) to be an acceptable level, the engine cleaning procedure contained in this bulletin may improve oil consumption performance to an even more acceptable level.
Engine Inspection and Oil Consumption Test:
1. Inspect engine for external oil leaks and repair as necessary.
2. Verify that the correct crankcase ventilation (PCV) valve is installed. Some aftermarket PCV valves do not meet Saturn specification and can cause oil consumption. (Refer to the following chart for correct application.)
Model Year | Engine | PCV Valve Type | Saturn P/N |
|---|---|---|---|
1991 - 1997 | DOHC (LLO) | CV947 | 25147308 |
1991 - 1994 | SOHC (LKO) | CV900 | 25097213 |
1995 - 1997 | SOHC (L24) | CV947 | 25147308 |
3. Change engine oil and filter (3.8 liters [4 quarts] of oil are required to properly fill the crankcase).
4. Start engine and bring up to normal operating temperature of 197°-212° ;F (97°-100°C).
5. Park vehicle on level ground and wait a minimum of five minutes after engine is shut off. Check engine oil level to make sure it's at the FULL mark on the dipstick.
6. Mark the oil level on the dipstick with a scribe, if it is not exactly at FULL mark.
7. Record the vehicle's mileage, date of oil change and exact location of oil level on the Customer Service Order.
8. Return vehicle to customer and have customer check the engine oil level at each fuel fill and return the vehicle if oil level is at the ADD mark. If the oil level remains in the "cross-hatch" area, have the customer continue operating the vehicle for a minimum of 2000 miles (3218 km) before returning the vehicle for final oil consumption verification.
If engine uses 1 quart (0.951 liter) of oil in:
| • | 3000 mi. (4827 km) or more, return vehicle to customer - this is acceptable oil consumption. |
| • | 1500 mi. -3000 mi. (2414 km - 4827 km) proceed to Procedure 1 in this bulletin. |
| • | 1499 mi. (2414 km) or less proceed to Procedure 2 in this bulletin. |
Procedure - 1 Internal Engine Cleaning
- Warm up to normal operating temperature.
- Disconnect negative battery cable.
- Remove spark plugs.
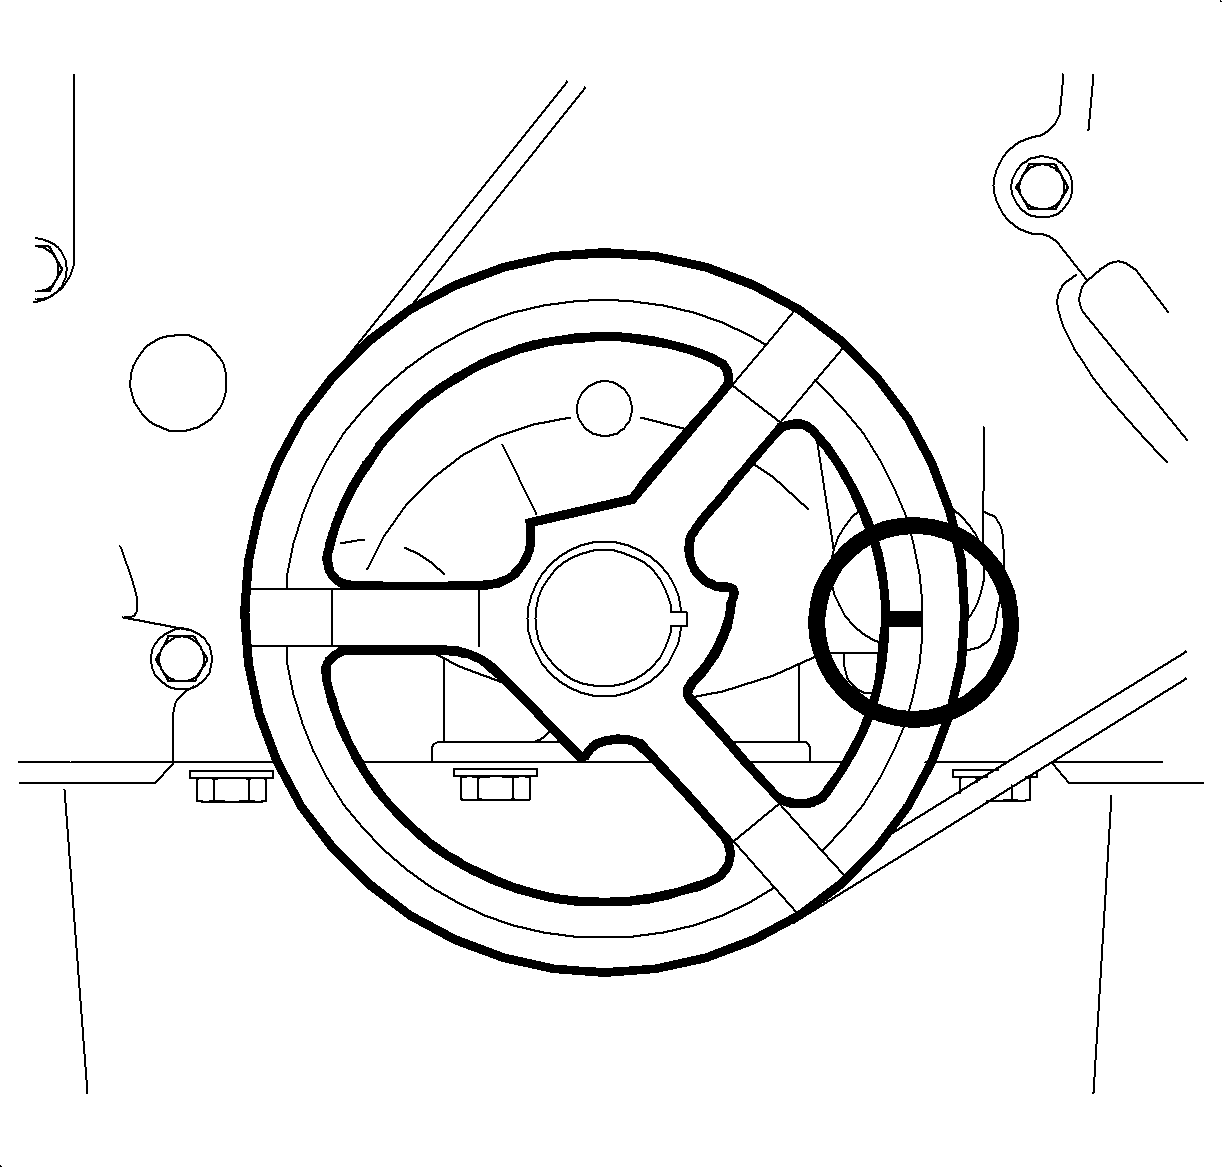
- Rotate engine crankshaft until notch in crank pulley is at 3 o'clock (90° after top dead center) position. This will position all of the pistons midway in their bores.
- Pour 3 ounces of GM Piston and Ring Cleaner (P/N 12378549 12 ounce bottle) into each cylinder through the spark plug hole.
- Cover the cylinder head and spark plug holes to prevent debris from getting into the combustion chamber and to prevent excess evaporation of the cleaner.
- Allow the engine cleaner to soak for a minimum of 2 hours.
- After the minimum 2-hour soak, remove the remaining cleaner from the combustion chambers by placing shop towels over all of the spark plug holes and cranking the engine through a few revolutions.
- Install the spark plugs and spark plug wires.
- Start the engine and run only enough to reach normal operating temperature.
- Drain the engine oil and remove oil filter.
- Install new oil filter (P/N 21000872).
- Install 4 quarts (3.8 L) of Mobil® 1 Synthetic 5W-30 or 10W-30 engine oil.
- Return vehicle to customer.
- After 1500-3000 miles of operation, have the customer return for next oil change.
- Drain engine oil and remove oil filter.
- Install new oil filter (P/N 21000872)
- Install 4 quarts (3.8 L) of engine oil meeting Saturn specifications.
- Refer to Oil Consumption Test and perform steps 4 through 8.
Important: In order for the cleaner to be effective, the engine must be warm.

Notice: After the minimum 2-hour soak, there may be some cleaner left in the combustion chambers. Do not start the engine until all of the cleaner has been removed from the combustion chamber or severe engine damage may occur.
Important: *Mobil® 1 Synthetic 5W-30 or 10W-30 engine oil is to be used during the initial oil change interval following this procedure. Mobil® 1 Synthetic oil has excellent engine cleaning properties that will aid in removing deposits that were loosened and softened during this procedure.
*We believe this source and their products to be reliable. There may be additional manufacturers of such products. General Motors does not endorse, indicate any preference for or assume any responsibility for the products from this firm or for any such items which may be available from other sources.Procedure - 2 Engine Repair
Important: Before proceeding with engine repair, consideration should be given to engine assembly replacement. Saturn may have warranted remanufactured engine assemblies available for this vehicle.
One or more of the following conditions may also cause oil consumption:| • | Engine oil level not being properly checked |
| • | External oil leakage |
| • | Incorrect positive crankcase ventilation (PCV) valve installed |
| • | Oil control ring(s) worn |
| • | Compression ring(s) worn |
| • | Cylinder bores worn and/or poor surface finish |
| • | Cylinder bores tapered, scored or out-of-round |
| • | Oil leakage between the valve guide and cylinder head |
| • | Piston ring(s) not installed correctly |
| • | Oil leakage past the valve stem seal(s) |
| • | Poor surface finish on the valve stem(s), (scuffs, scores and burrs) |
The compression check will identify damaged pistons and/or rings, valves, head gasket and carbon build-up on pistons or in the combustion chamber, etc.
A cylinder leakage test will identify location of compression loss (damaged intake or exhaust valve, piston or rings, cylinder head or gasket, etc.).
- Remove and inspect spark plugs. Oil fouling or oil residue on a spark plug electrode may indicate the cylinder that may have damaged valve stem guides, cylinder bores and/or piston rings.
- Check cylinder compression. Refer to "Compression Check" procedures in appropriate year Engine Mechanical or Engine/Fuel/Air Intake/Exhaust Service Manual, for vehicle being worked on.
- Check cylinder leakage. Refer to "Cylinder Leakage Test" procedure in appropriate year Engine Mechanical or Engine/Fuel/Air Intake/Exhaust Service Manual, for vehicle being worked on.
- If compression and cylinder leakage are not within specification, refer to the appropriate year Engine Mechanical or Engine/Fuel/Air Intake/Exhaust Service Manual for further diagnosis.
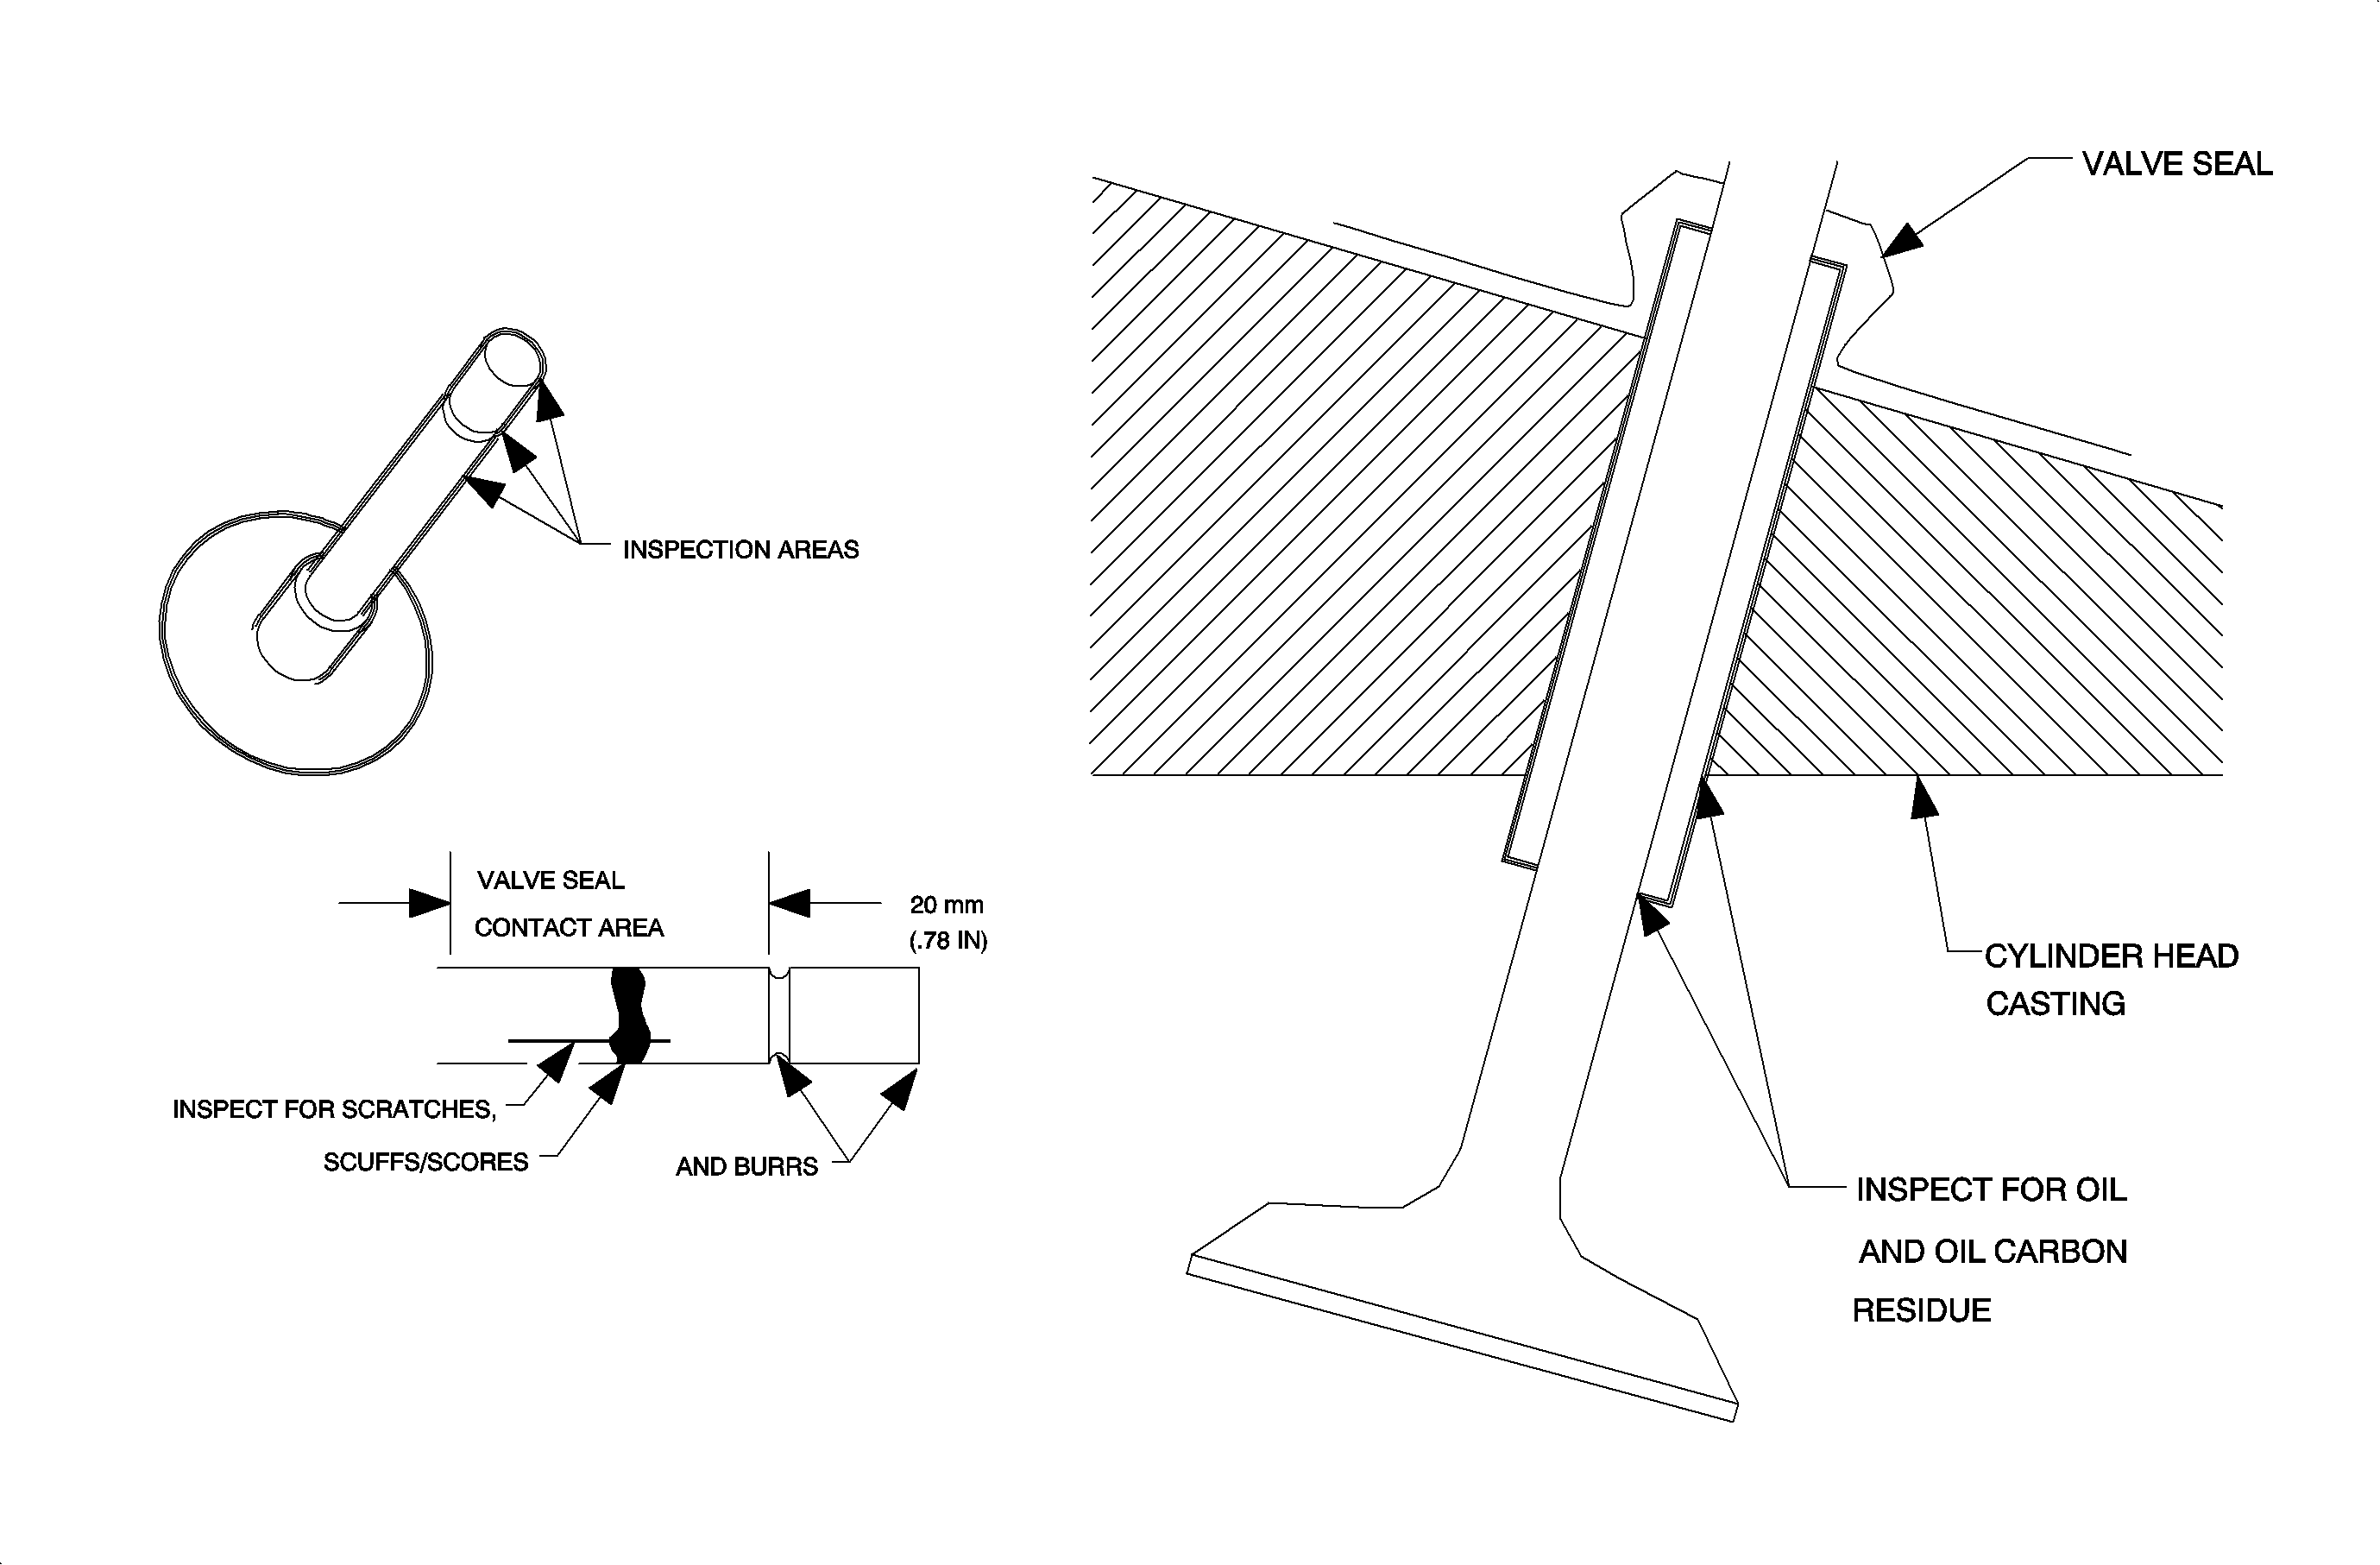
- If compression and cylinder leakage are within specification, remove, disassemble and inspect cylinder head for oil leakage at the bottom of valve guides and between the valve guide outside diameter and cylinder head casting. If oil or carbon residue is present at the:
- Remove the connecting rod and piston assemblies from the engine and inspect the rings for correct installation, sticking and wear. The oil control rings must rotate freely on the piston. Aligned piston rings end gaps will not cause oil consumption. (Refer to appropriate year Engine Mechanical or Engine/Fuel/Air Intake/Exhaust Service Manual.)
- If the pistons are to be reused:
- Refer to the procedures in the appropriate year Engine Mechanical or Engine/Fuel/Air Intake/Exhaust Service Manual, and check for cylinder bore scoring, wear, taper and out-of-round (use Dial Bore Gauge SA9178NE-A or equivalent). The specific procedures must be followed to determine if the cylinder can be flex honed. If the cylinder bores are not within specification, oversize pistons or a new cylinder block will be required to repair the engine.
- If all cylinder bore checks are within specification, hone the cylinder bores using the Saturn recommended Flex Hone SA9171E, 83 mm (3.25 inches) bore and 320 grit, silicone carbide hone.
- - Hone the cylinder bores using a 10W-30 or 5W-30 weight motor oil and the Flex Hone (SA9171E).
- - Use 60 strokes per minute. Honing time should be approximately 20 seconds or 20 strokes per cylinder to develop a 40-50 degree (included angle) honing crosshatch. One "stroke" consists of a full downward and upward motion of the flex hone in the cylinder bore.
- Dry the cylinder bores and wipe them with a clean white towel saturated with engine oil. Dark residual grit on the towel after wiping the cylinder bore indicates the bores are not clean. The cylinder bore cleaning process described previously must be repeated until the towel is free of all dark residual grit.
- 10. Install pistons with new rings and re-assemble engine. Refer to appropriate year Engine Mechanical or Engine/Fuel/Air Intake/Exhaust Service Manual.
Important: The air pressure shut off valve must be closed when adjusting regulator to 689 kPa (100 psi). Then, open shut off valve and allow air pressure to stabilize before recording air pressure/cylinder leakage to obtain accurate readings.

| • | Bottom of the valve guide , oil is leaking past the valve stem seal. If oil is leaking past the valve stem seal, inspect the valve stem for scratches, scuffs, scores and burrs. Carbon deposits should be similar in appearance when comparing intake or exhaust valves to each other. A difference in appearance may indicate oil is leaking between the valve guide and cylinder head, or past the valve stem seal. Measure the valve to guide oil clearance using the appropriate year Engine Mechanical or Engine/Fuel/Air Intake/Exhaust Service Manual. Replace intake and/or exhaust valves, guides and all stem seals as required. |
| Notice: Only Saturn recommended essential tools must be used to remove valve spring retainers. Use of other tools can cause valve stem and seal damage resulting in oil consumption. |
| • | Valve guide outside diameter next to the cylinder head casting, the oil is leaking between the outside diameter of the valve guide and the cylinder head casting. (To help identify an oil leak between the outside diameter of the guide and the cylinder head casting, apply several drops of engine oil dye SA9176NE around the outside diameter of the valve guide and allow to sit for a minimum of three minutes. Use Black Light Kit SA9175NE to identify oil leak location.) |
| • | Oil leaking between the outside diameter of the valve guide and the cylinder head casting can be caused by a damaged cylinder head casting valve guide bore. If oil is leaking between the outside diameter of the valve guide and the cylinder head casting, refer to the appropriate year Engine Mechanical or Engine/Fuel/Air Intake/Exhaust Service Manual, and install an oversize valve guide. |

| • | Remove and discard the piston rings, and soak the piston in GM Piston and Ring Cleaner (P/N 12378549), or equivalent, to remove the carbon deposits in the ring land and piston tops. |
| • | After soaking the pistons, carefully remove any remaining carbon deposits from the ring grooves by using a piece of ring from the old piston ring set. |
Notice: Make sure crankshaft pulley/damper keyway is at 3 or 9 o'clock position to prevent damage of crankshaft connecting rod journals during honing.
- Make sure the flex hone is rotating upon entry and removal from the cylinder bore.
Important: The recommended speed of the flex hone is 150-200 rpm. Do not use air pressure driven or high-speed tools.
- Thoroughly scrub all cylinder bores after honing with a scrub brush, a strong solution of hot water and Tide® powder laundry detergent or equivalent. Thoroughly rinse with hot clean water (high-pressure, if available).
Notice: If the cylinder bores are not thoroughly cleaned, the residual grit from the honing stones will wear out the piston rings and cylinder bores extremely fast, resulting in oil consumption. Never use solvent to clean cylinder bores; it only redistributes the grit on the cylinder walls; detergent and hot water will carry the grit away.
Notice: Do not use abrasive pads to clean cylinder head and block surfaces that are sealed with the cylinder head gasket. Bristles or particles from abrasive pads can cause cylinder bore scoring and/or piston ring damage. Gasket material on cylinder head and block surfaces that are sealed with the cylinder head gasket should be removed with a plastic or wood scraper.
Parts Information
Part Number | Description |
|---|---|
12378549 | GM Piston and Ring Cleaner |
21000872 | Filter ASM-Oil |
For any other parts, refer to the Saturn Parts and Illustrations Catalog for the correct part numbers.
Warranty Information
To receive credit for this repair during the warranty coverage period, submit a claim through the Saturn Retailer System as follows:
Case Type | Description | Labor Operation Code | Time |
|---|---|---|---|
VW | Engine Inspection and Oil Consumption Test | T9676 | 0.6 hr |
VW | Filter, Oil - Replace Cleaning | J0950 | 0.4 hr |
Important: An add time of 0.3 hr will be added to J0950 for Internal Engine Cleaning. This add time can only be charged to the first oil change per Procedure 1 in this bulletin. For the second oil change, claim J0950 without the additional engine cleaning time.
Important: If Technical Bulletin 92-T-14B is performed, refer to that bulletin for labor operation code and time.
For any other required repairs, refer to the appropriate Electronic Saturn Labor Time Guide for the correct labor operation code(s) and time(s).
