No Line Pressure Reading from Automatic Transaxle Liner Pressure Port

| Subject: | No line Pressure Reading from Automatic Transaxle Line Pressure Port (Modify Automatic Transaxle Pressure Port) |
| Models: | 2001 Saturn S-Series vehicles equipped with automatic transaxles (RPO MP6/MP7) built between and including VINs IZ225726 through IZ232295 |
Condition
Technicians may be unable to obtain a line pressure reading during diagnosis of automatic transaxle concerns.
Cause
Shallow line pressure port in the automatic transaxle case assembly.
Correction
Refer to the procedure in this bulletin to repair this condition.
Special tools are required to perform the procedure outlined in this bulletin. The special tools required are contained in special tool kit part number J-45216. This kit consists of the following tools:
| • | Special Drill Bushing J-45216-1 |
| • | Special Drill Bit J-45216-2 |
| • | Special Punch J45216-3 |
These special tools will be sent to Saturn retailers during the week of December 18, 2000. Should additional tools be required, Saturn Retailers can contact Kent-Moore Customer Service at 1-800-435-2233. The cost for these tools is covered by Saturn Service Engineering. So, no expenses will be billed to your open account.
PROCEDURE OVERVIEW
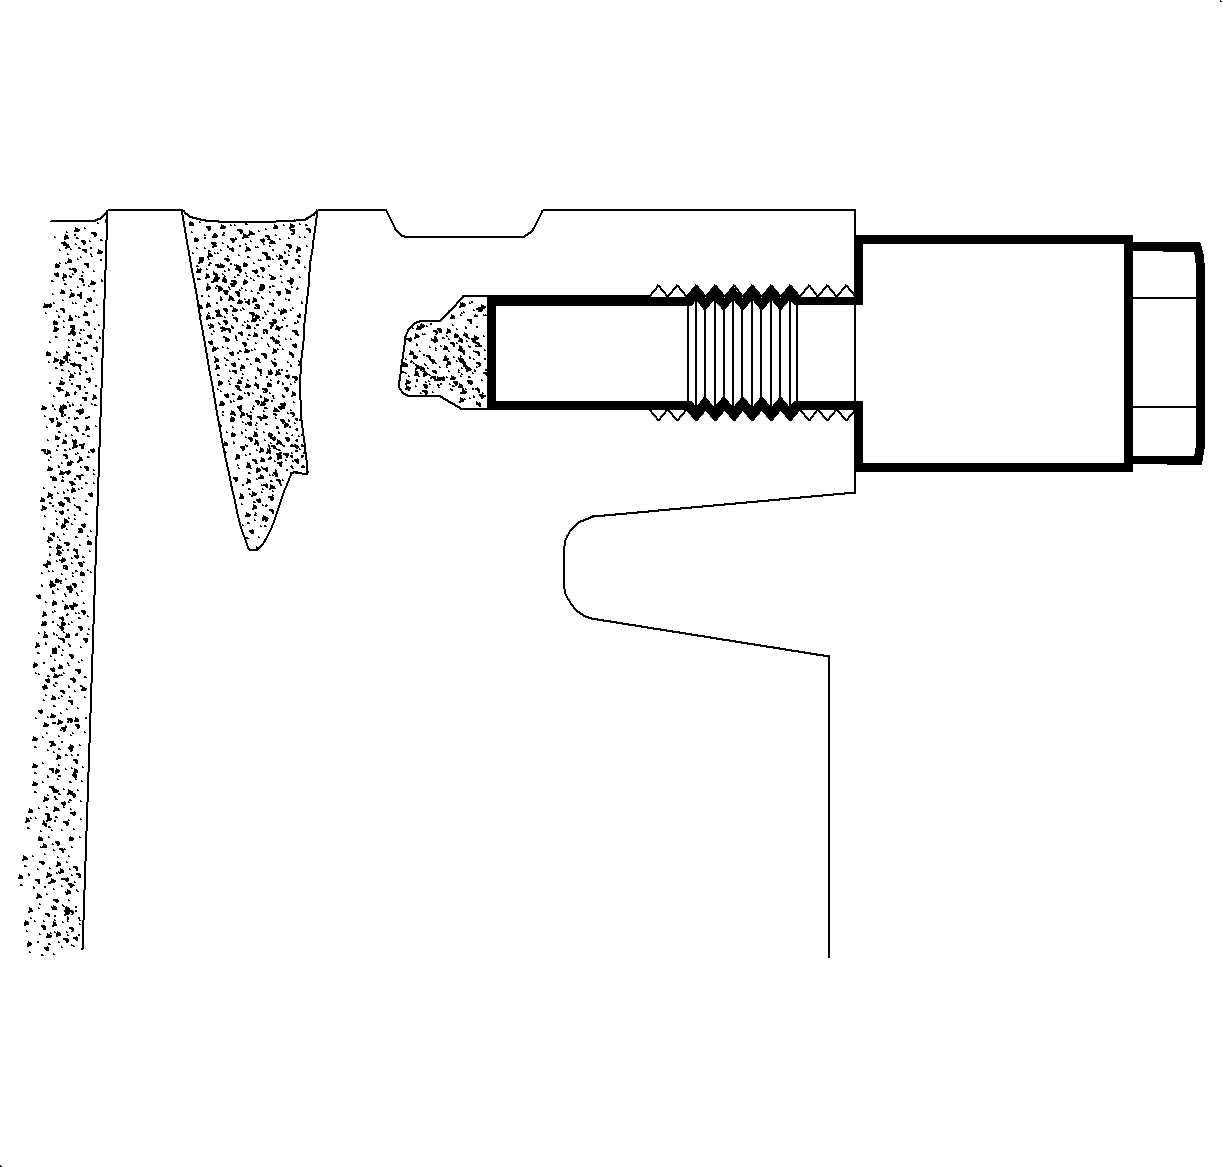
Special Drill Bushing (J-45216-1) Is installed in Transaxle Fluid Temperature (TFT) Sensor Hole Hand Tight Until Tool is Fully Seated and Tight Against Transaxle Case
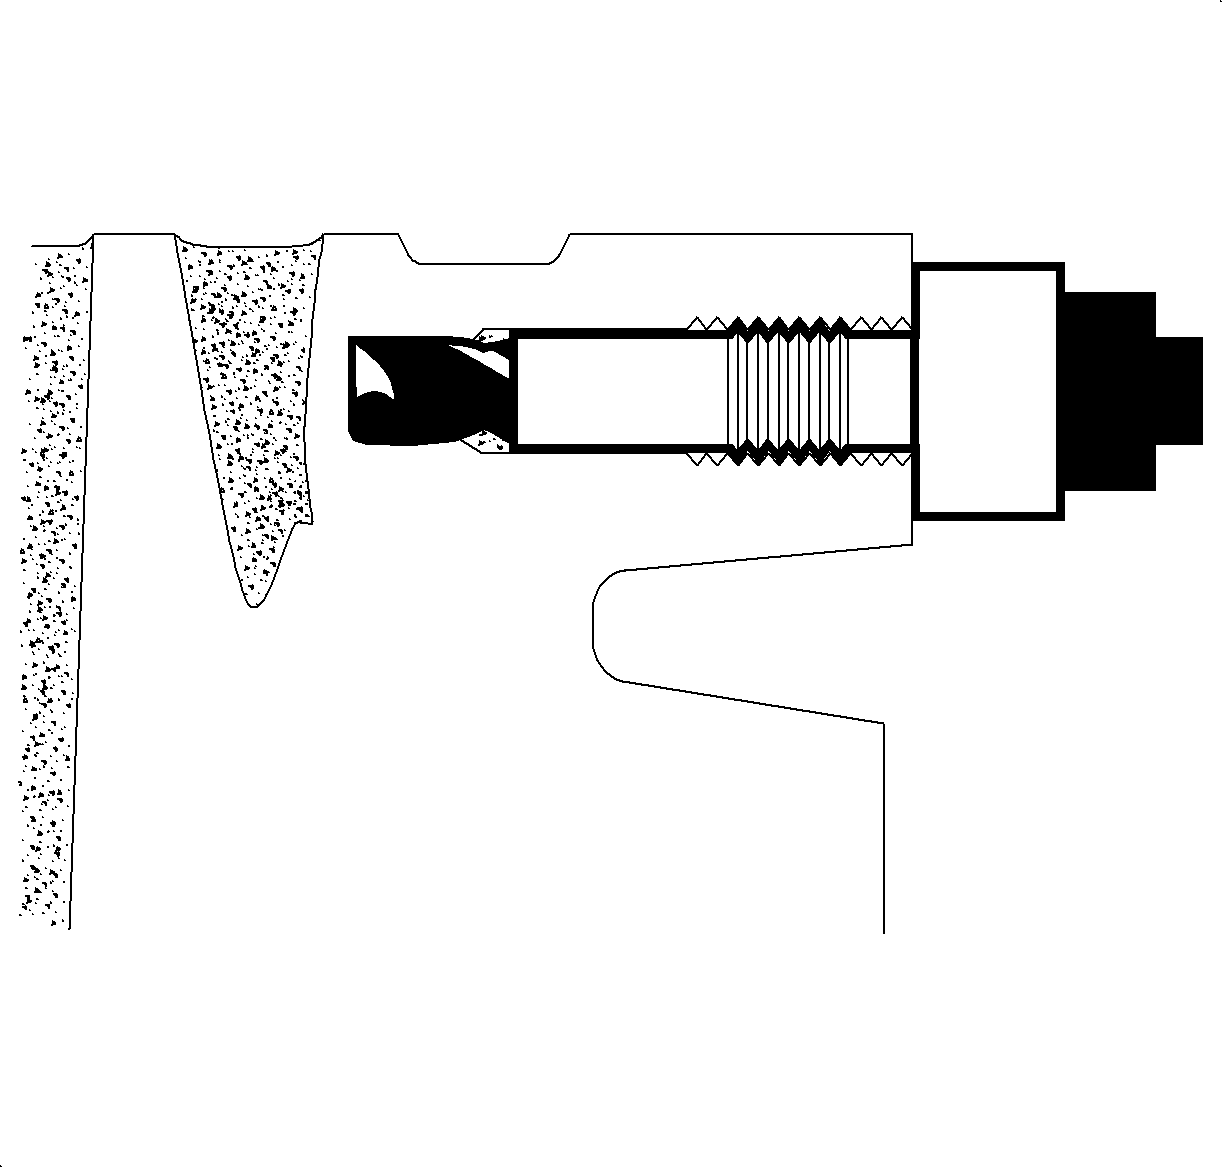
Special Drill Bit (J-45216-2) Is Used to Drill TFT Sensor Hole to Controlled Depth of Drill Bit. This is done only to reduce the transaxle wall thickness and is not intended to drill all the way through. This ensures no foreign debris is introduced into transaxle.
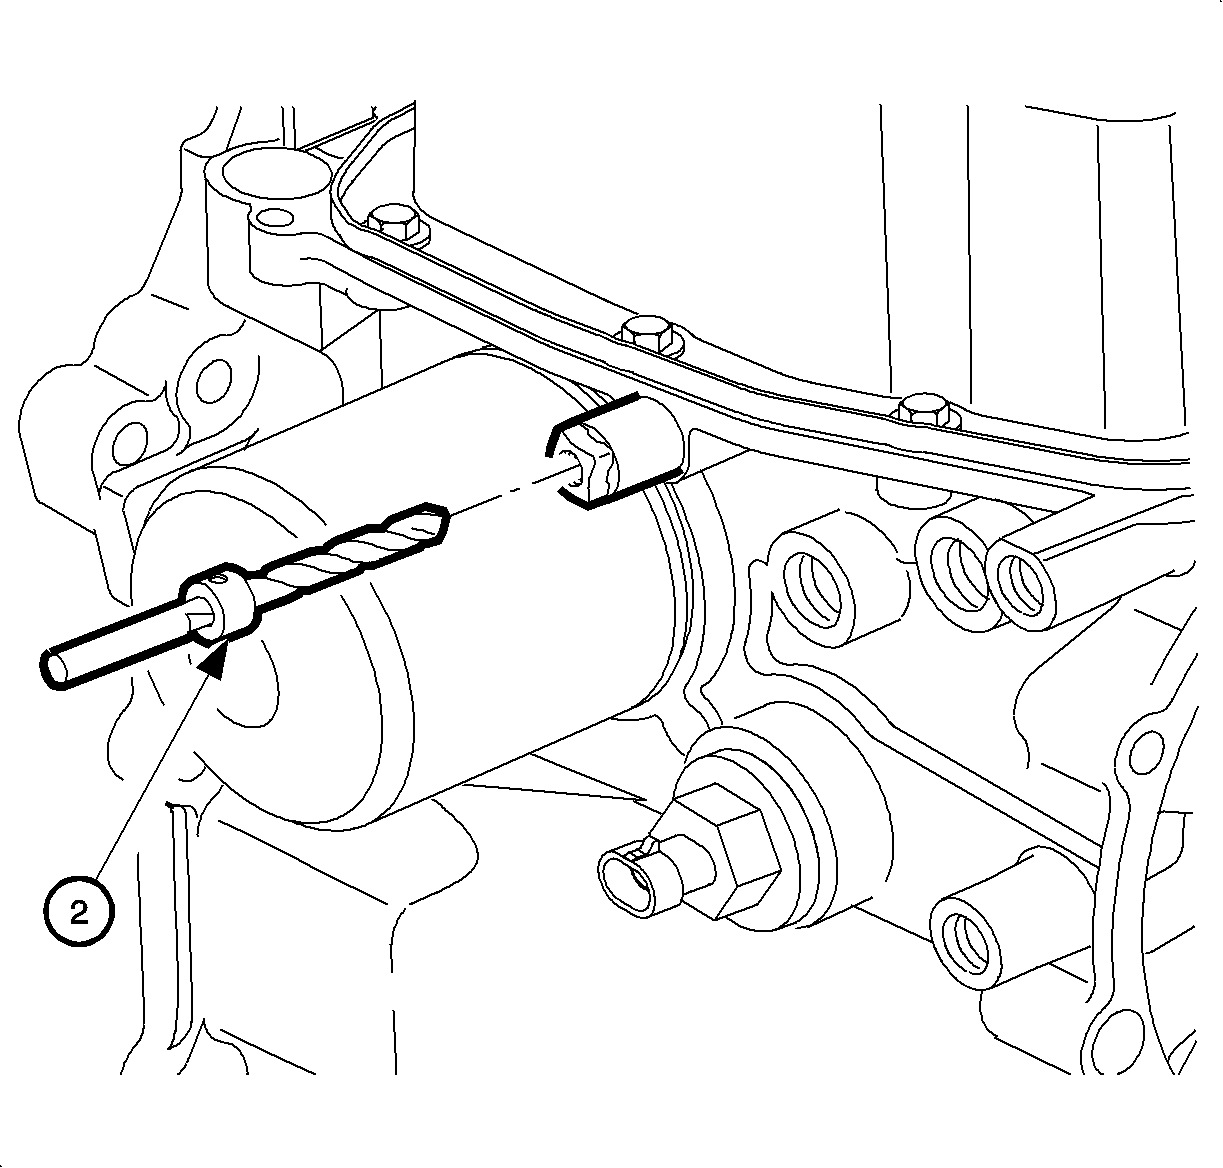
The special drill bit has a drill stop collar pre-installed to maintain a preset drilling depth of 50.8 mm (2 in.) +/- 0.08 mm (0.003 in.). This measurement is measured from the tip of the drill bit to the lower shoulder of the drill stop collar.
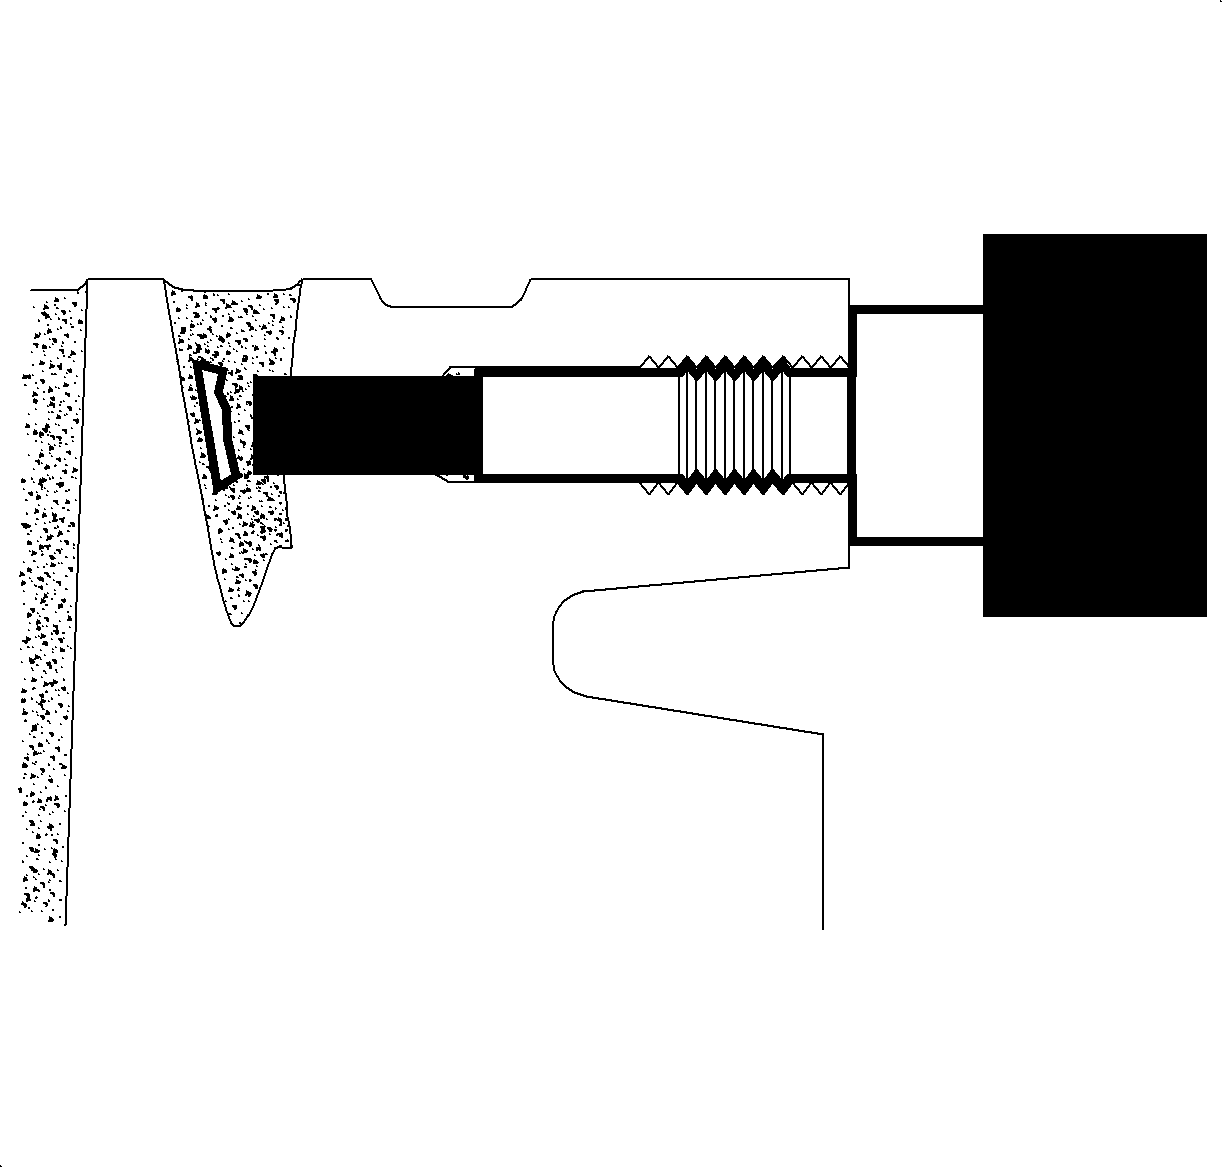
Special Punch (J-45216-3) Is Used to Punch Out Aluminum Slug from Transaxle Case Area in TFT Sensor Hole.
Procedure
- Turn ignition Off and remove key from ignition switch.
- Open hood.
- Disconnect negative battery cable.
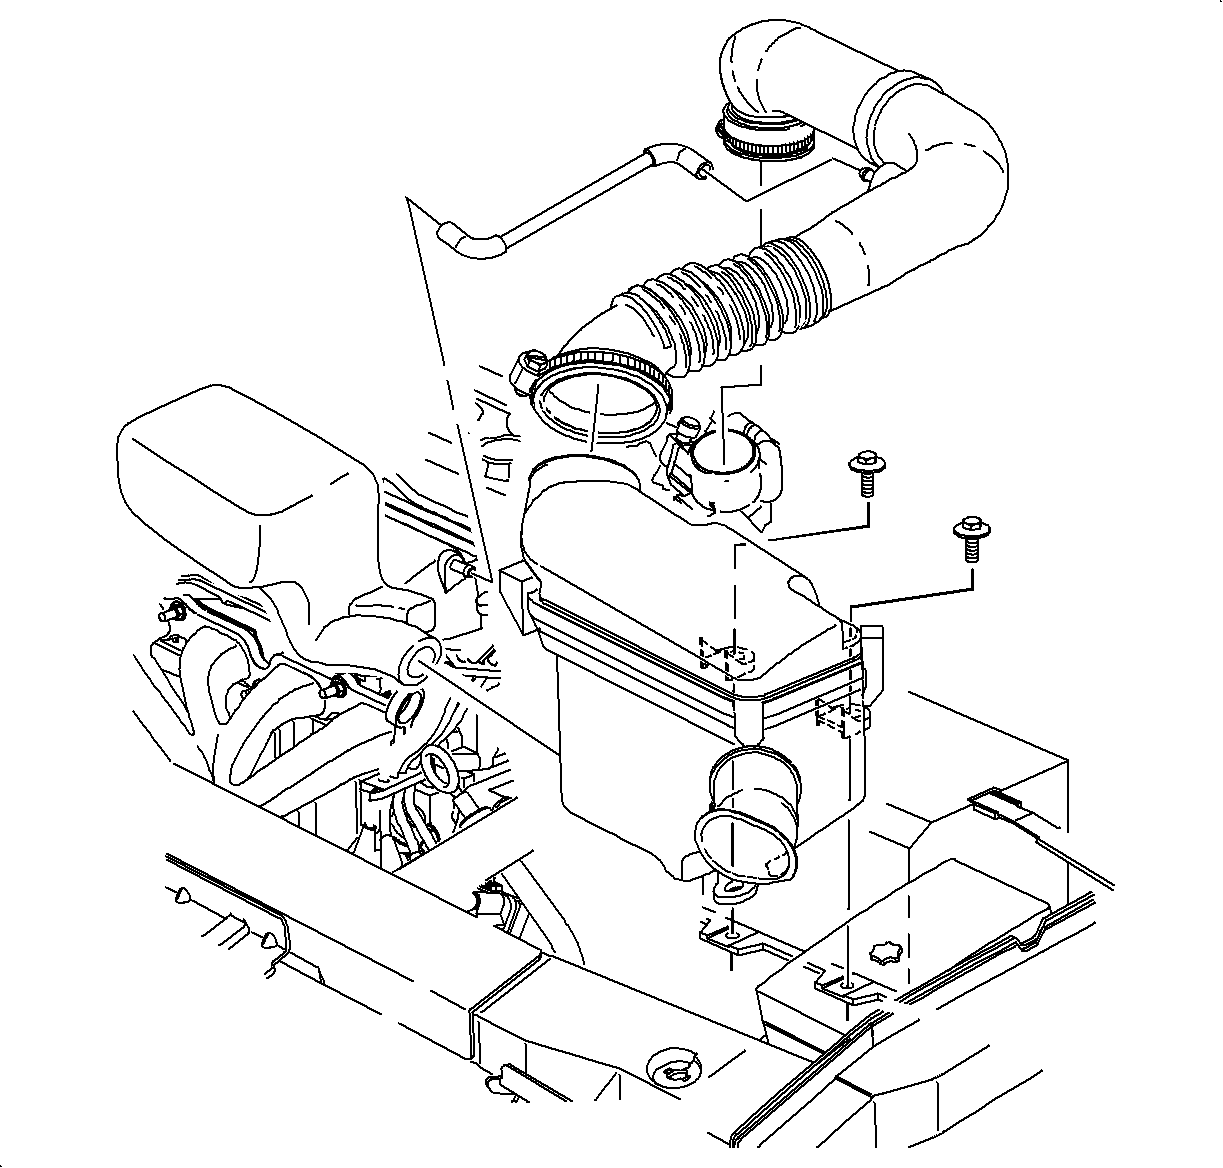
- Remove air induction snorkel and air box.
- Disconnect input speed sensor (ISS) electrical connector and cover connector and sensor with shop rag to prevent foreign debris from containing connector or sensor.
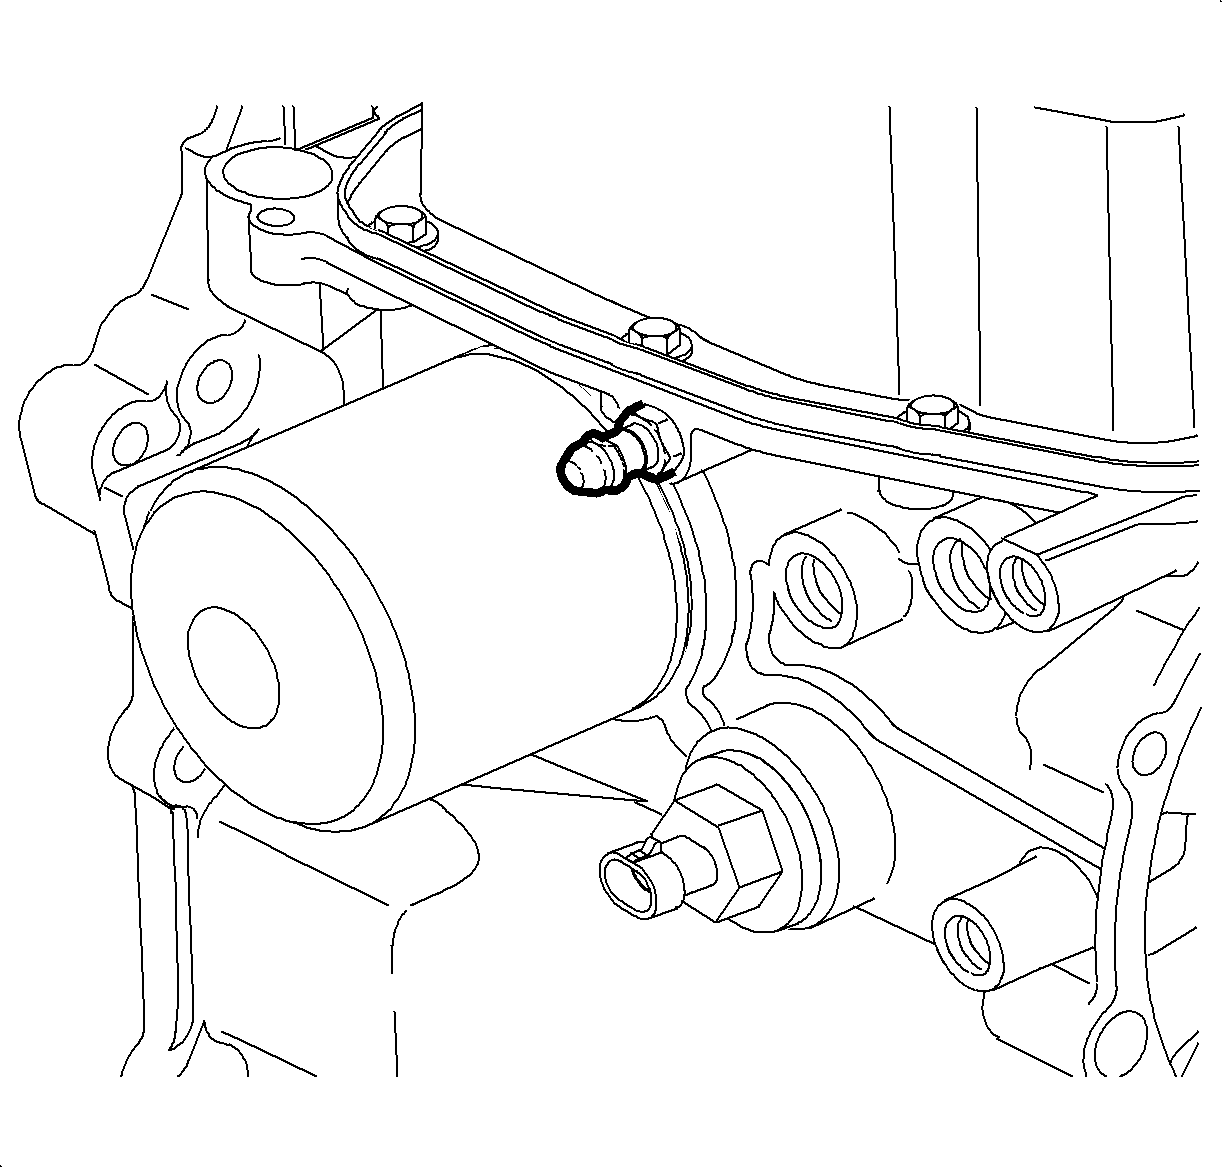
- Disconnect transaxle fluid temperature (TFT) sensor electrical connector.
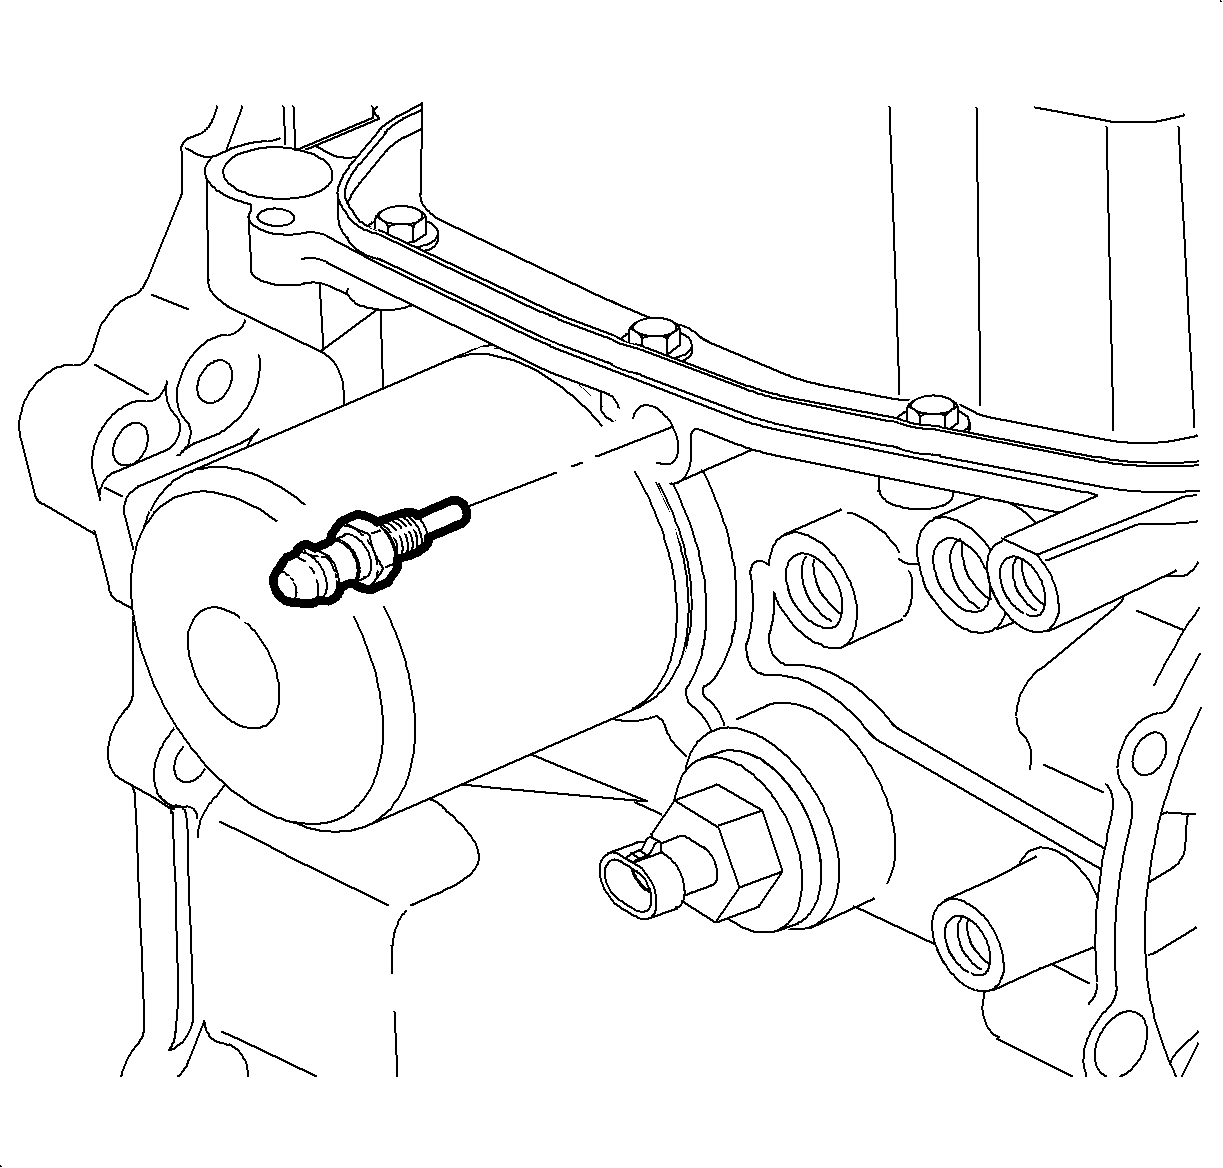
- Remove TFT sensor from transaxle.
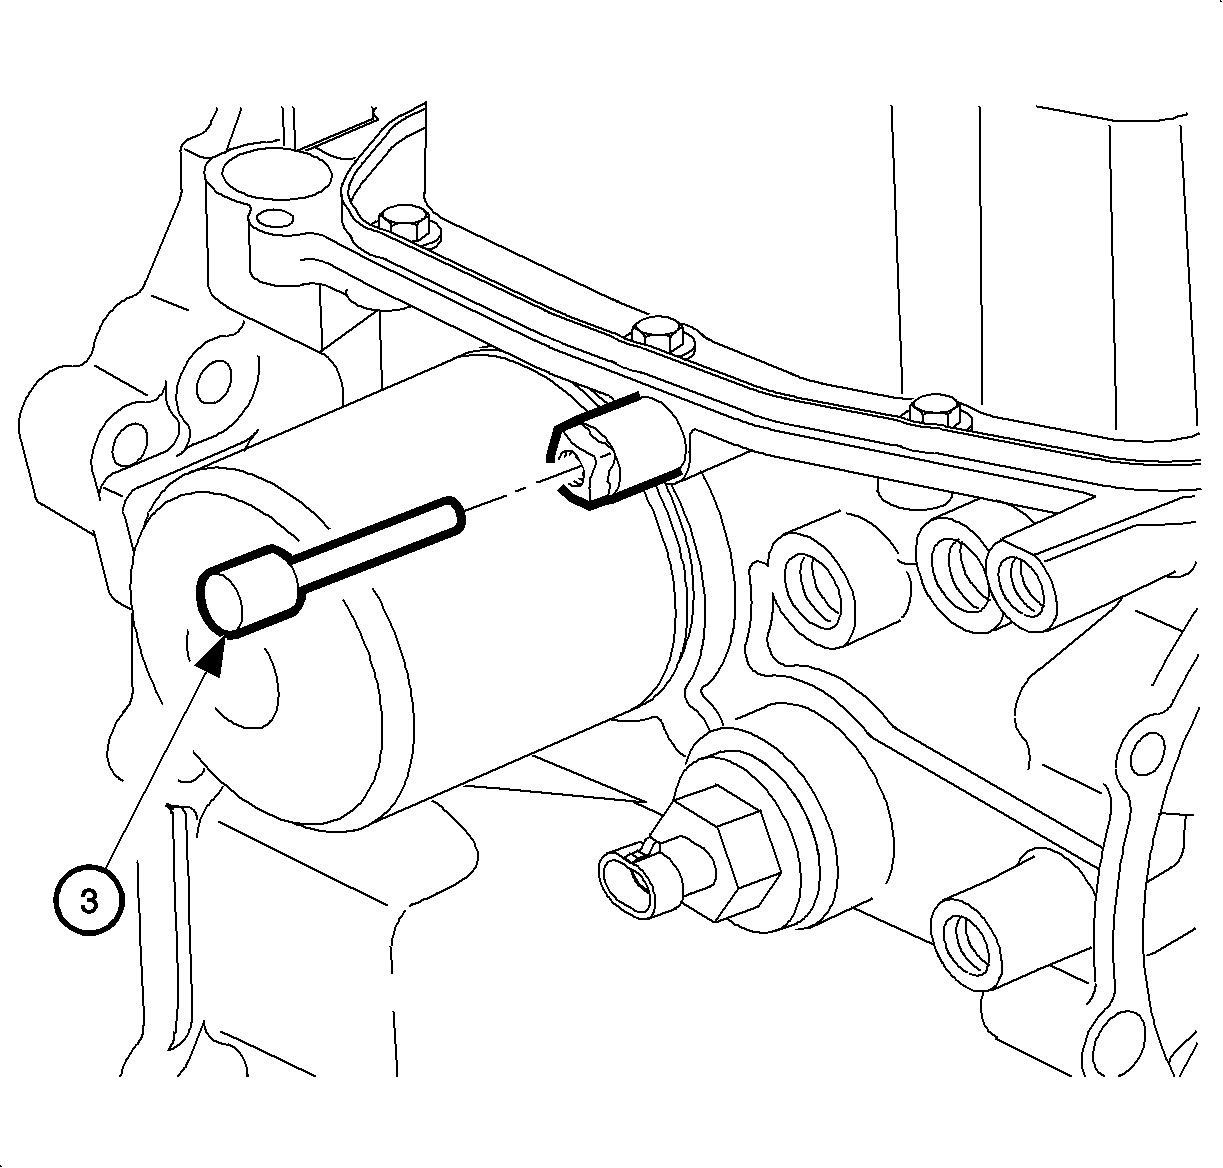
- Thread special drill bushing (J-45216-1) into TFT sensor hole hand tight until tool is fully seated and tight against transaxle case.
- Insert special punch (J-45216-3) into drill bushing installed above.
- Determine whether punch seats down fully against drill bushing.
- Use a large pair of channel lock pliers or a hammer to indent transaxle oil filter on the outer edge of filter. This indention is needed so that right angle drill clears filter.
- Ensure special drill bushing (J45216-1) is installed hand tight until tool is fully seated and tight against transaxle case.
- Measure special drill bit form tip of drill hit to lower shoulder of drill stop collar to ensure collar has not slipped on drill bit. Measurement should be 50.8 mm (2 in.) +/- 0.08 mm (0.03 in.) Adjust if necessary.
- Use a right angle drill and special drill bit (J-45216-2) to drill TFT sensor hole to controlled depth of drill bit.
- Remove special drill bit from bushing and vacuum out metal chips.
- Remove drill bushing with transaxle case.
- Blow out drill bushing with compressed air.
- Vacuum out drilled TFT sensor hole.
- Flush drilled TFT sensor hole with mineral spirits or Brake Clean Solvent (P/N 21007432).
- Blow out drilled TFT sensor hole with compressed air.
- Place suitable drain pan underneath transaxle oil filter.
- Remove transaxle oil filter. Remove and retain magnet from filter for reuse. Discard filter.
- Remove transaxle filter fitting from transaxle case.
- Thread special drill bushing (J-45216-1) into TFT sensor hole hand tight until tool is fully seated and tight against transaxle case.
- Insert special punch (J-45216-3) into drill bushing.
- Use a hammer to punch out the remaining transaxle case wall area at bottom of TFT sensor hole.
- Remove punch from drill bushing and remove drill bushing from TFT sensor hole.
- Place a small container (approximately the size of transaxle oil filter) firmly against transaxle oil filter sealing surface to catch fluids.
- Flush out TFT sensor hole with mineral spirits or Brake Clean Solvent (P/N 21007432).
- Continue using the container at transaxle oil filter area. Using compressed air, lightly blow through TFT sensor hole to retrieve the aluminum slug from transaxle oil filter fitting area that was punched through.
- Flush out TFT sensor hole with mineral spirits or Brake Clean Solvent (P/N 21007432)
- Blow out TFT sensor hole with compressed air.
- Visually inspect removed aluminum slug to verify it is a whole circle and has no evidence of the drill breaking through the aluminum slug during drilling (refer to illustration). If the aluminum slug is not retrievable, blow compressed air back through transaxle oil filter fitting hole to dislodge aluminum slug and repeat above steps as necessary until entire aluminum slug is removed.
- Install transaxle oil filter fitting (P/N 2100231).
- Apply a thin film of transaxle fluid on seal of new transaxle oil filter (P/N 21003361).
- Clean and install transaxle oil filter magnet on new transaxle oil filter.
- Install new transaxle oil filter and tighten to "One Turn Past Contact of the Oil Filter Seal to the Transaxle Case Oil Filter Face".
- Apply sealant with Teflon (P/N 21485278), or equivalent, on threads of TFT sensor and install sensor.
- Remove shop rag from input speed sensor (ISS) and electrical connector.
- Connect electrical connectors at ISS sensor and TFT sensor.
- Install air induction snorkel and air box.
- Connect negative battery cable.
- Start vehicle and warm transaxle to normal operating temperature of 70° C (158° F).
- Top off transaxle fluid level. This repair usually requires about 15 - 34 ounces of transaxle fluid be added to the transaxle in order to ensure transaxle fluid level is correct.
- Raise vehicle and check for leaks.
- Clean off exterior of transaxle, lower corner of front end sway bar, and frame rail as necessary.
- Using a Scan tool, ensure that no history DTCs are present.

| • | If punch does seat down fully against drill bushing, no additional modifications are needed. Refer to diagnostic information in the 2000/2001 S-Series Automatic Transaxle Service Manual for a no line pressure condition. |
| • | If punch does not seat down fully against drill bushing, continue to next step. |
| Important: Do not remove transaxle oil filter at this time. |
Important: Metal chips and debris created during drilling must be removed to prevent transaxle contamination. Use a shop vac at drill bit to capture as many metal chips as possible while drilling TFT sensor hole.
Notice: Use care to ensure hammer clears transaxle cooler lines and fittings to prevent damage while striking punch.
Important: A 90° flex hose adapter is recommended to ensure air nozzle can tightly seal against TFT sensor boss.
Tighten
Transaxle Oil Filter Adapter-to-Transaxle Case: 31 N·m (23 lb ft)
Tighten
Transaxle Fluid Temperature Sensor: 8 N·m (71 ln lb)
Tighten
Battery Terminal Bolts: 17 N·m (13 lb ft)
PARTS REQUIREMENT
21003361 -- Filter -- Trans Oil
CLAIM INFORMATION:
Case Type | Description | Labor Operation Code | Time |
|---|---|---|---|
VW | Modify Automatic Transaxle Pressure Port | Z4138 | 1.0 |
