Squeak Noise From Front of Vehicle While Turning

| Subject: | Squeak Noise From Front of Vehicle While Turning (Modify the Rosebud Fastener and Install Second Design Pilot Rings) |
| Models: | 2002 Saturn VUE vehicles built up to and including VIN XXXXXXXX |
Condition
Some customers may comment about a squeak or creak noise coming from the front of the vehicle when turning.
Cause
This condition may be caused by a rosebud fastener contacting the left front coil spring or by a metallic contact in the strut mount assembly.
Correction
To correct this condition, modify the rosebud fastener and install second design pilot rings P/N 22706316. Refer to service procedure in this bulletin.
Service Procedure
TOOLS REQUIRED
J 45400 Strut Spring Compressor
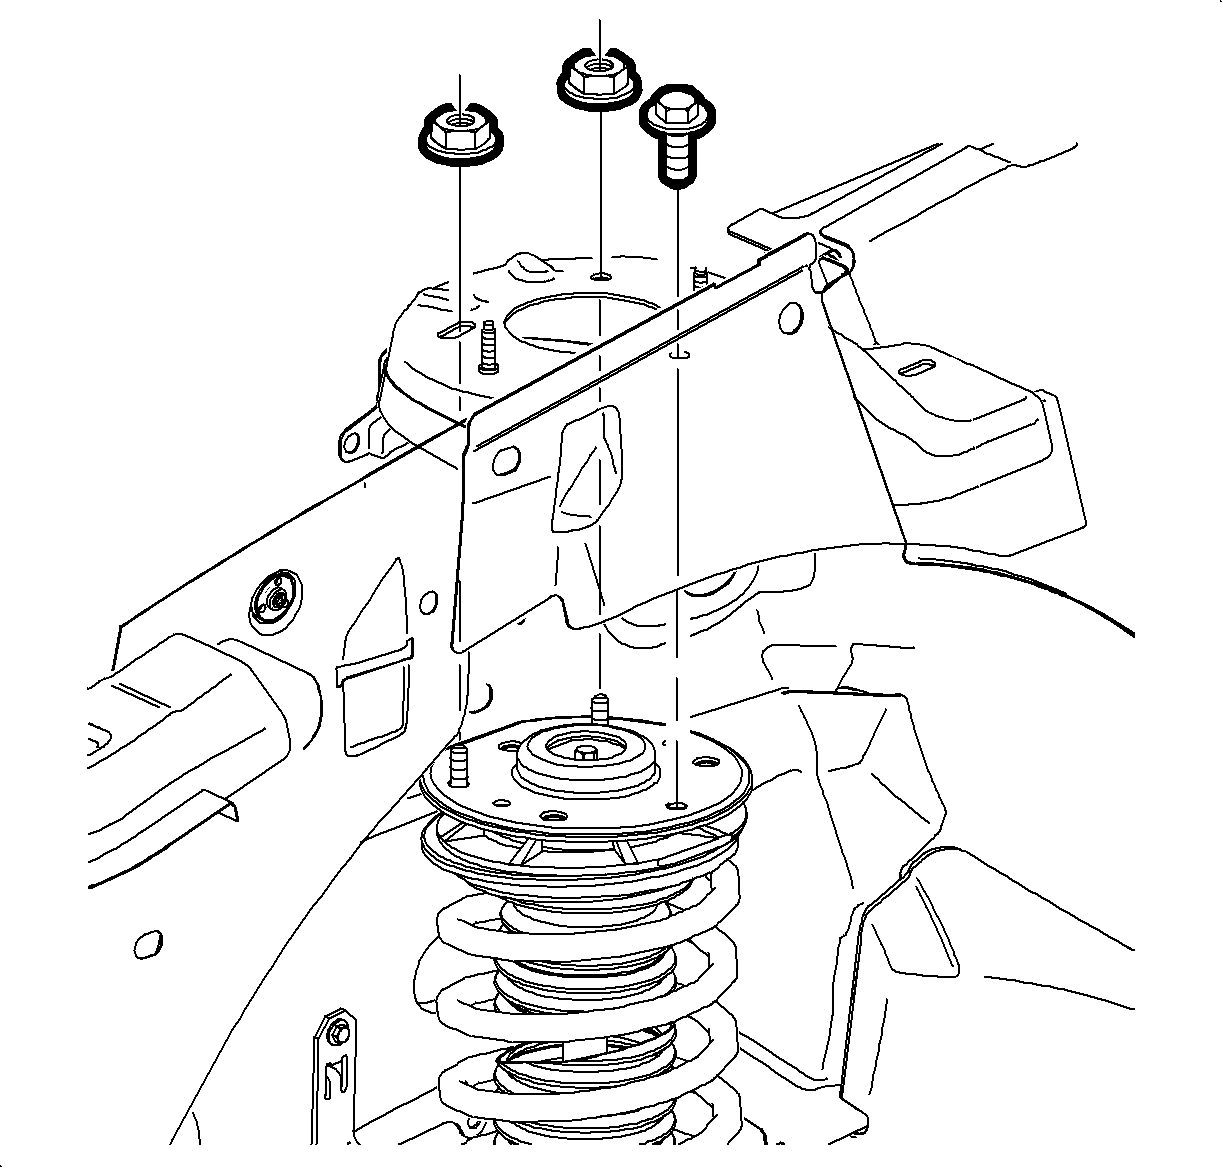
- Remove strut assembly-to-body fasteners.
- Raise vehicle on hoist.
- Remove wheel and tire assemblies.
- Remove brake hose bracket from strut assembly.
- Loosen steering knuckle to strut fasteners.
- Remove stabilizer bar link-to-strut assembly attachment nut, and move link toward rear of vehicle.
- Remove steering knuckle-to-strut fasteners and discard nuts and bolts.
- Remove strut assembly from vehicle.
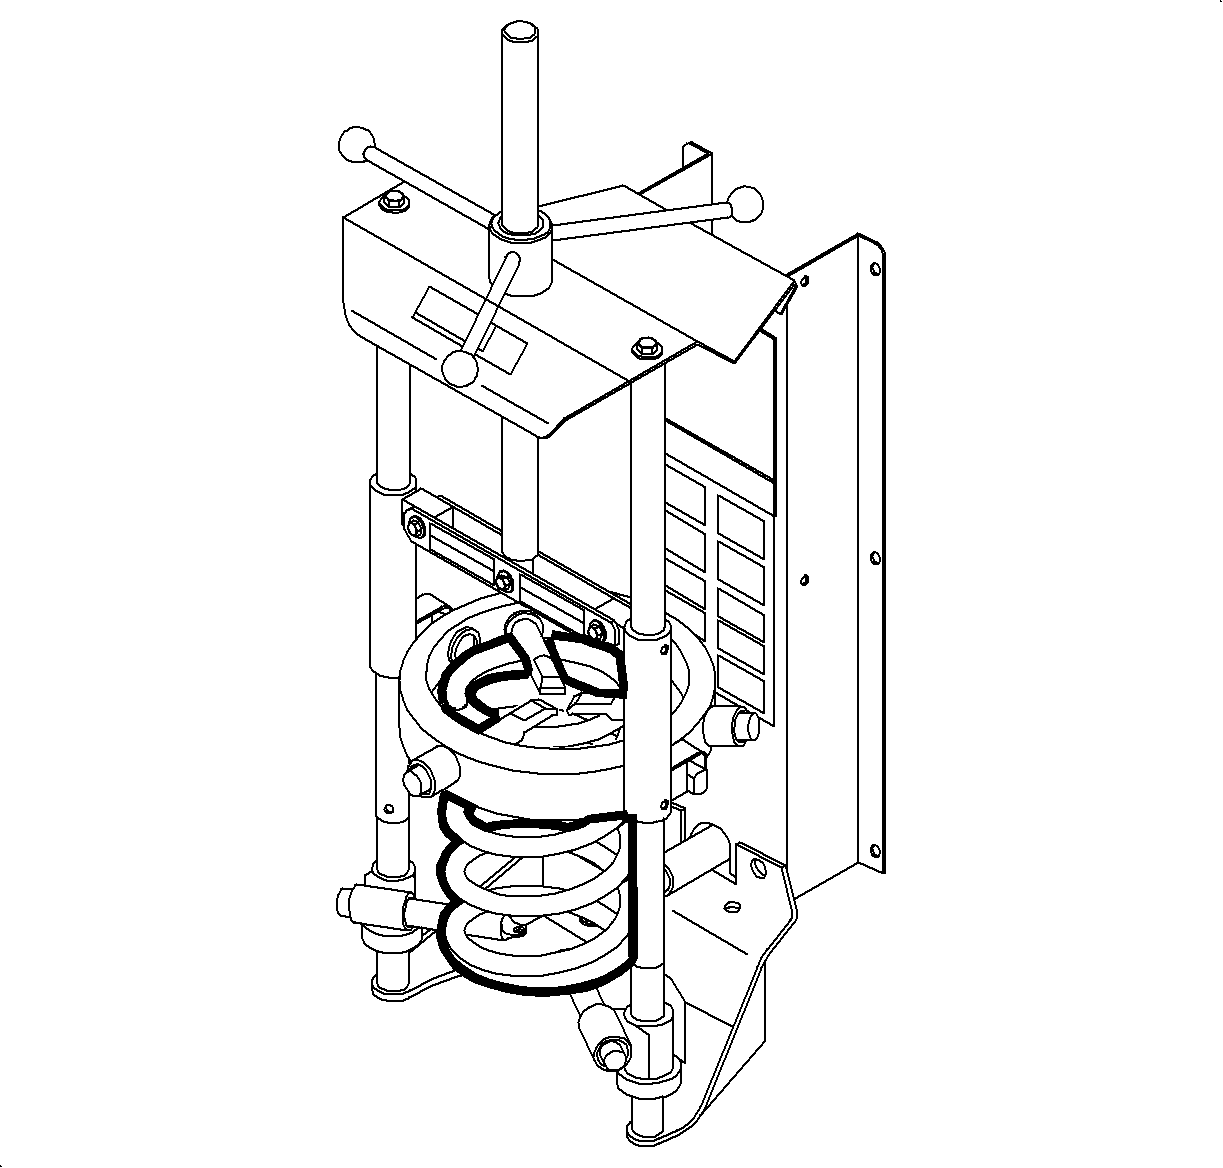
- Using Special Tool J45400 Strut Spring Compressor or equivalent, mount strut assembly in spring compressor
- Compress spring enough to partially unload strut mount assembly.
- Loosen but do not remove strut shaft nut.
- Compress spring to completely unload strut mount assembly.
- Remove strut shaft nut.
- Do not remove the spring from spring compressor assembly.
- Remove strut mount assembly. Rotate bearing in upper spring seat by hand and check for smooth operation. Replace if necessary.
- Remove dust shield and inspect for cracks, rips, and deterioration. Replace if necessary.
- Remove bumper from strut shaft. Inspect for cracks or deterioration. Replace if necessary.
- Assemble strut:
- Release spring compressor tool.
- Remove strut from strut compressor.
- Measure and clip the rosebud fastener.
- Attach strut to vehicle body with strut-to-body nuts and bolt.
- Attach strut-to-steering knuckle with new fasteners.
- Hold ball stud from turning when installing nut. The boot can become torn and damaged if the ball stud turns. Install stabilizer bar link-to-strut assembly.
- Inspect boots for damage and replace link assembly if damaged.
- Reattach brake hose assembly bracket-to-strut.
- Position wheel onto hub.
- Install wheel nuts and tighten in a crisscross pattern. Repeat tightening pattern to be sure torque is correct.
- Lower vehicle from hoist.
- Perform vehicle alignment. (Refer to Wheel Alignment procedure in the Alignment, Wheels and Tires section of the 2002 VUE Chassis Service Manual.)
Caution: MAKE SURE VEHICLE IS PROPERLY SUPPORTED AND SQUARELY POSITIONED ON THE HOIST. TO HELP AVOID PERSONAL INJURY WHEN A VEHICLE IS ON A HOIST, PROVIDE ADDITIONAL SUPPORT FOR THE VEHICLE ON THE OPPOSITE END FROM WHICH COMPONENTS ARE BEING REMOVED.
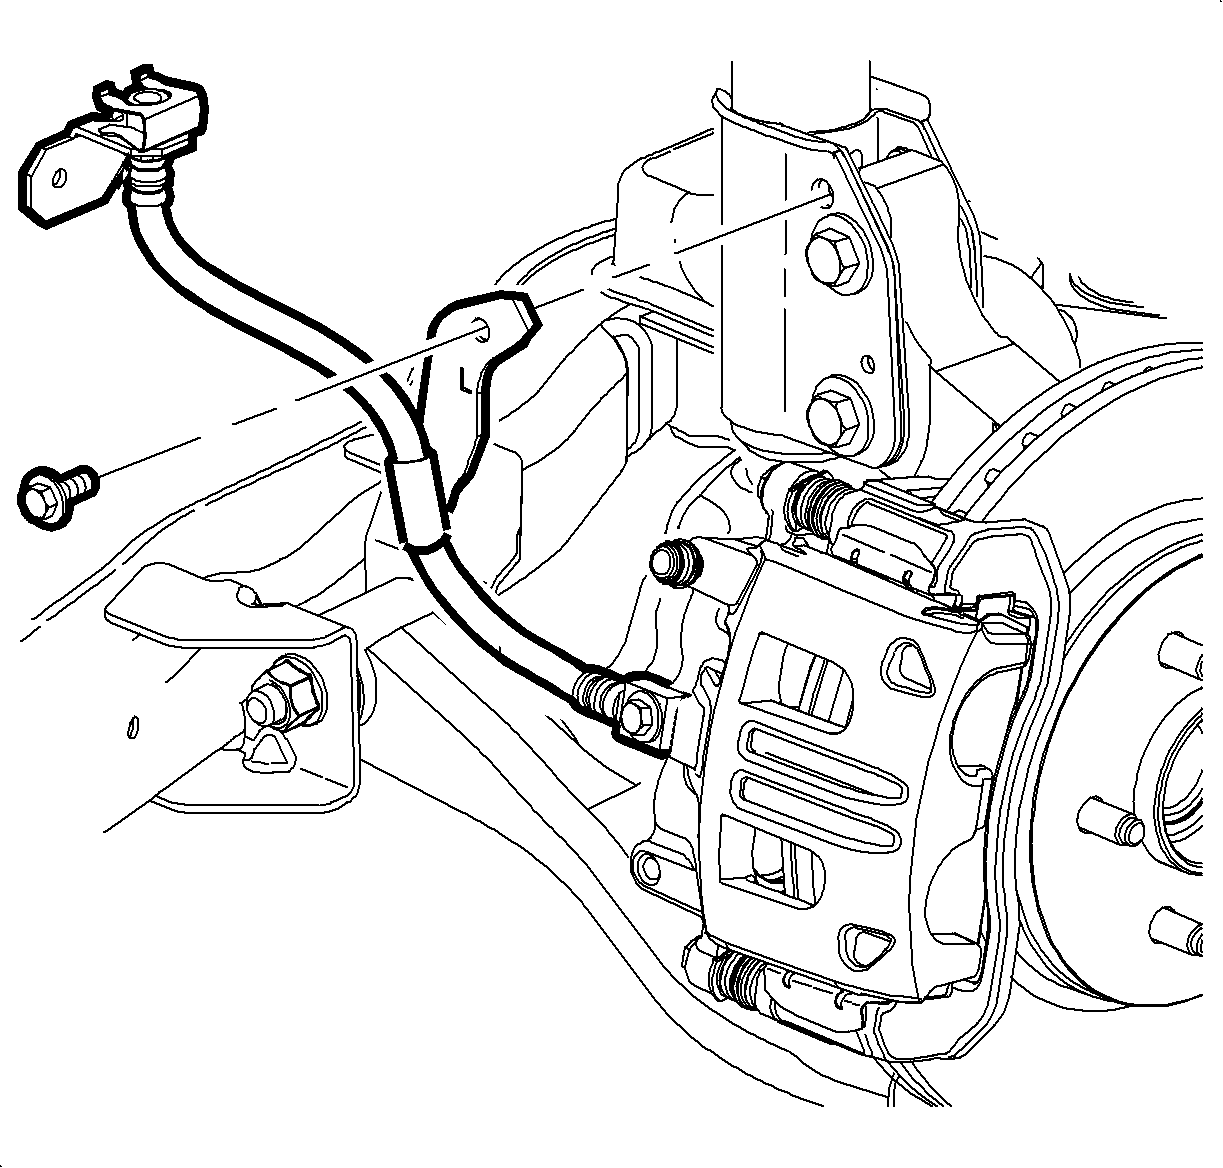
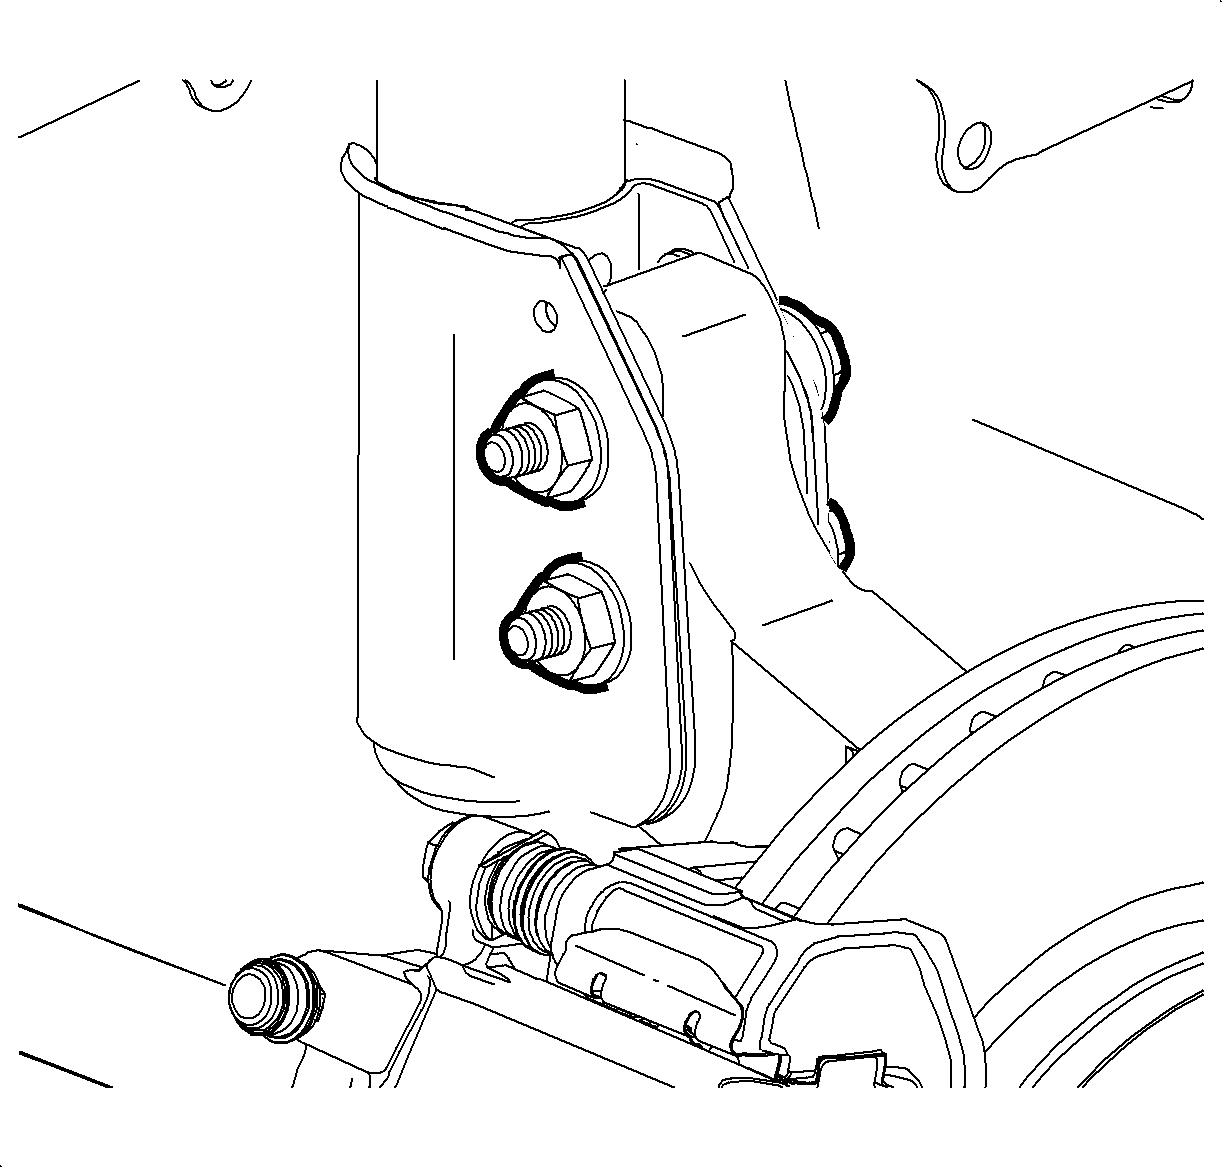
Important: Do not remove fasteners at this time.
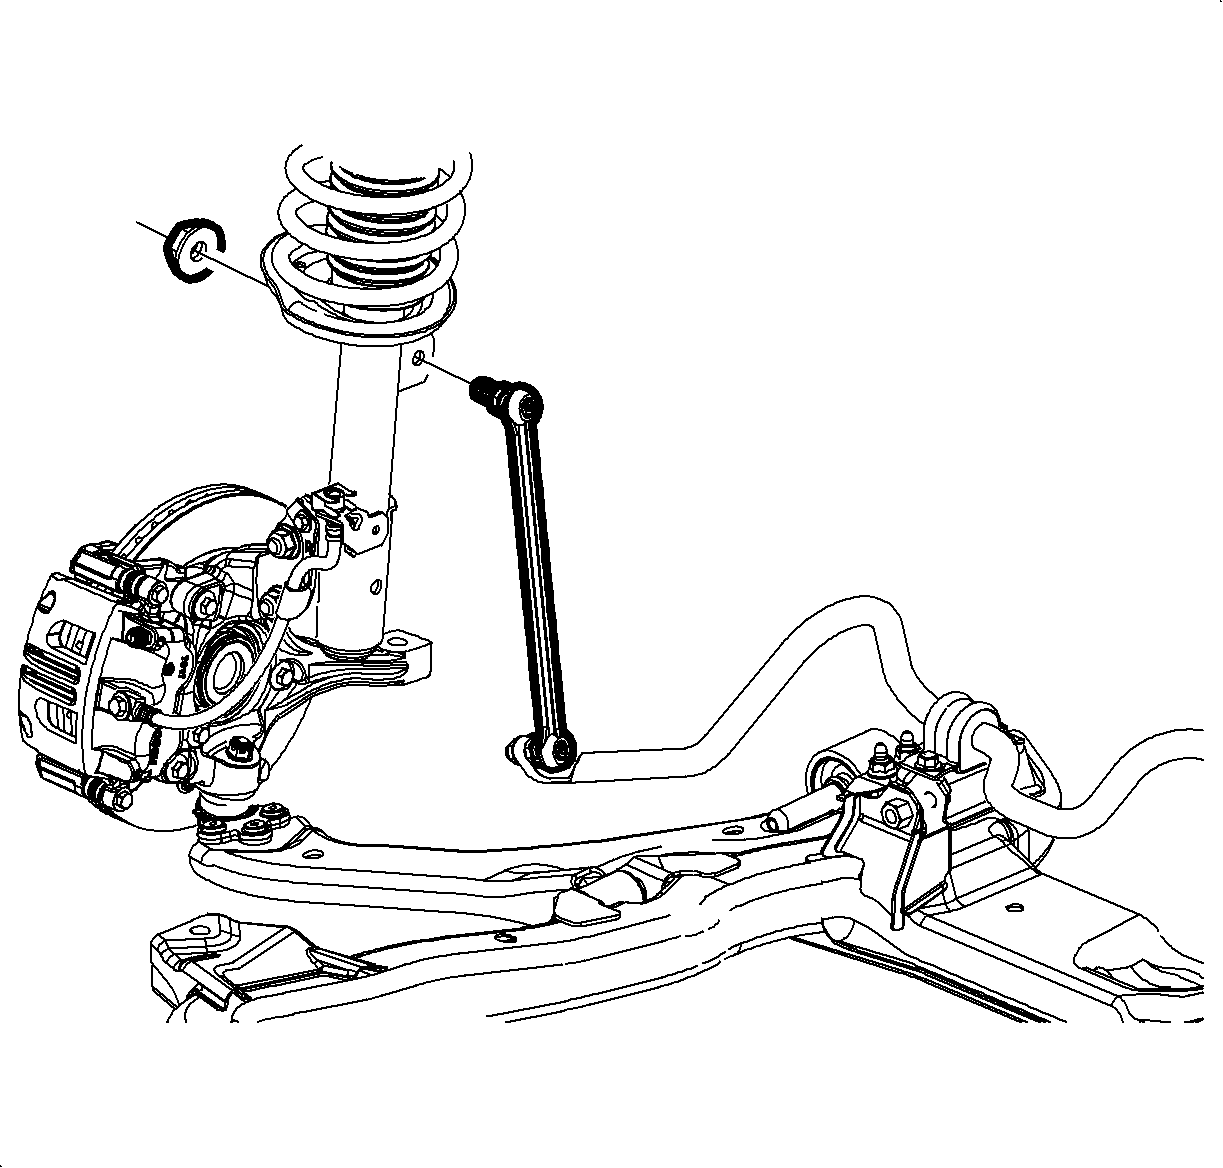
Notice: Hold ball stud from turning when removing nut. The boot can become torn and damaged if the ball stud turns.
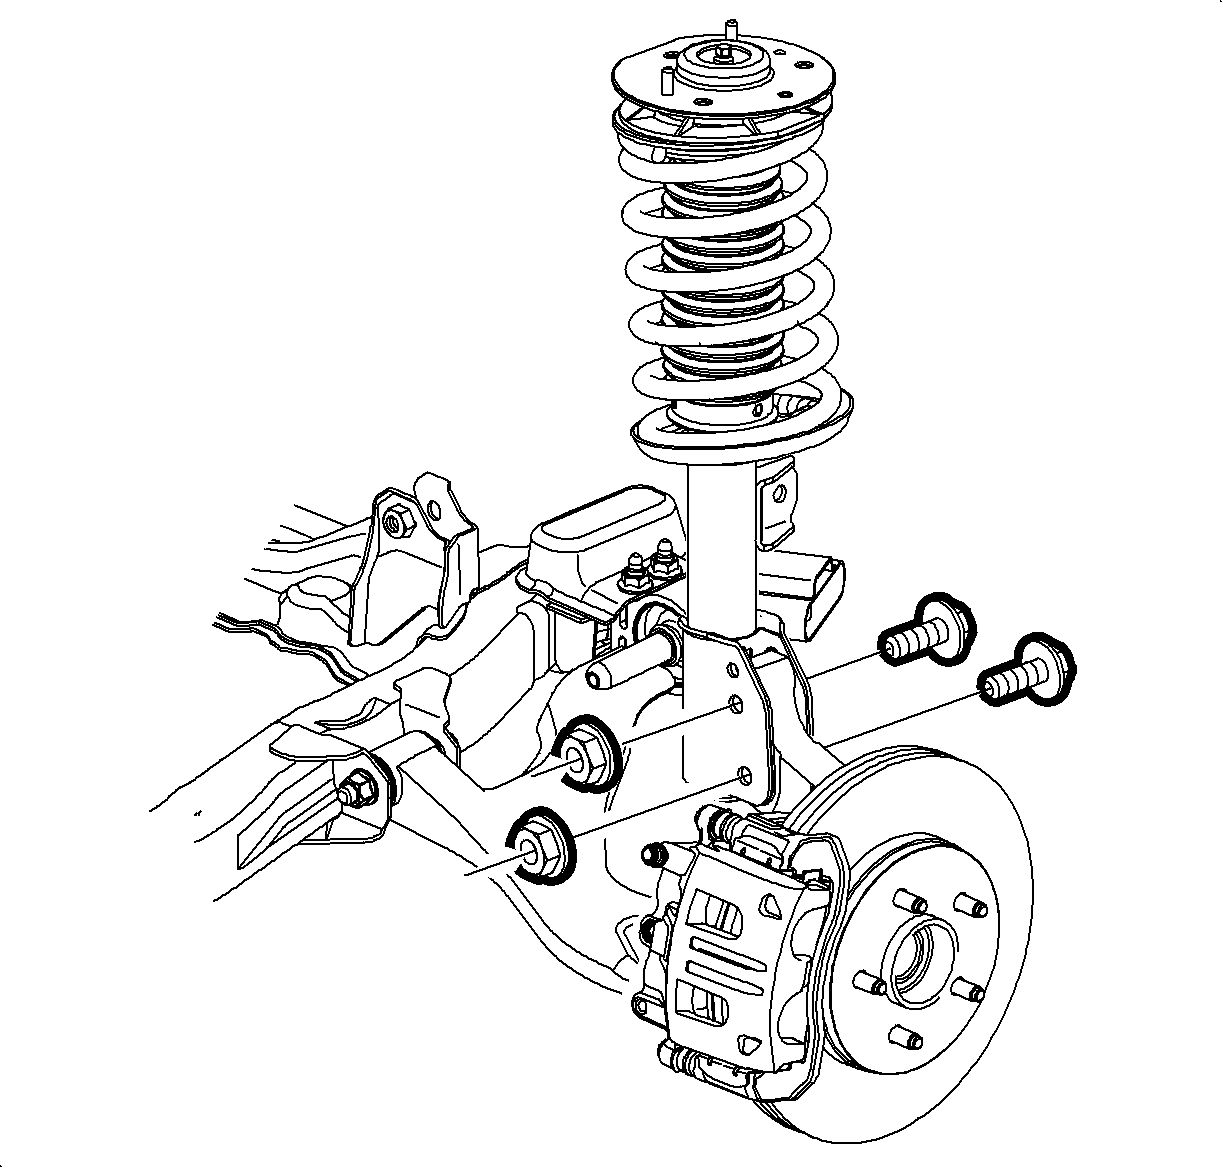
Notice: Before removing strut assembly, place a rag over CV joint boot to protect it from damage.
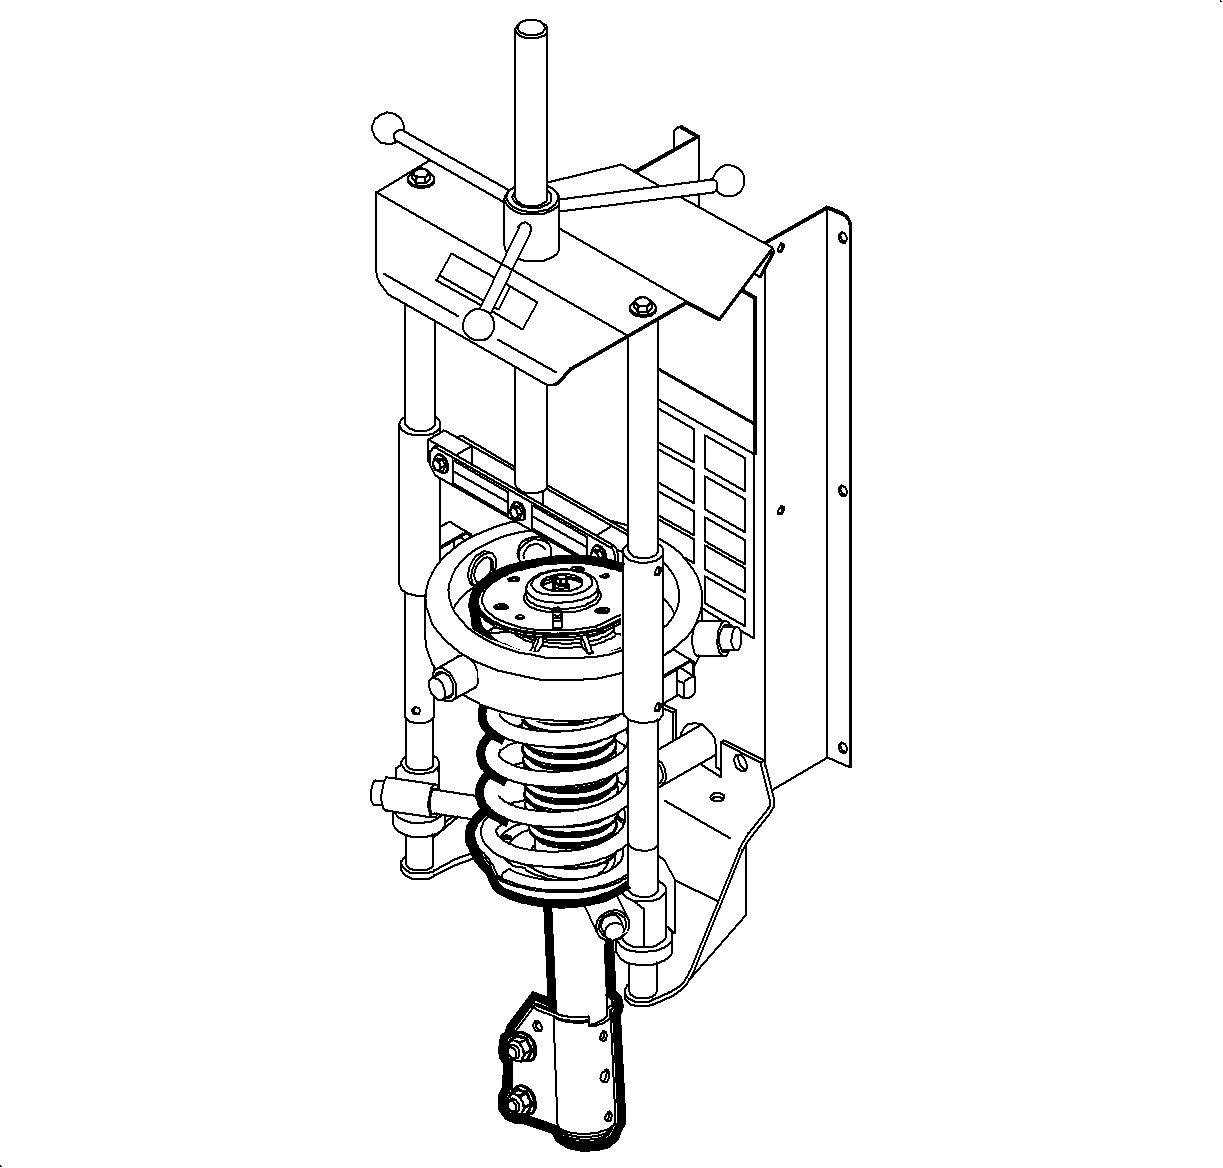
Important: Follow instructions of tool manufacturer for correct disassembly.
| 9.1. | Adjust lower legs of spring compressor to lowest possible coil of spring assembly. |
| 9.2. | Adjust upper legs of spring compressor to highest possible coil of spring assembly. |
| 9.3. | Inspect strut assembly to ensure hooks on strut compressor legs are properly installed on spring coils. |
| 9.4. | Inspect strut assembly to ensure that strut assembly is completely parallel with strut compressor. |
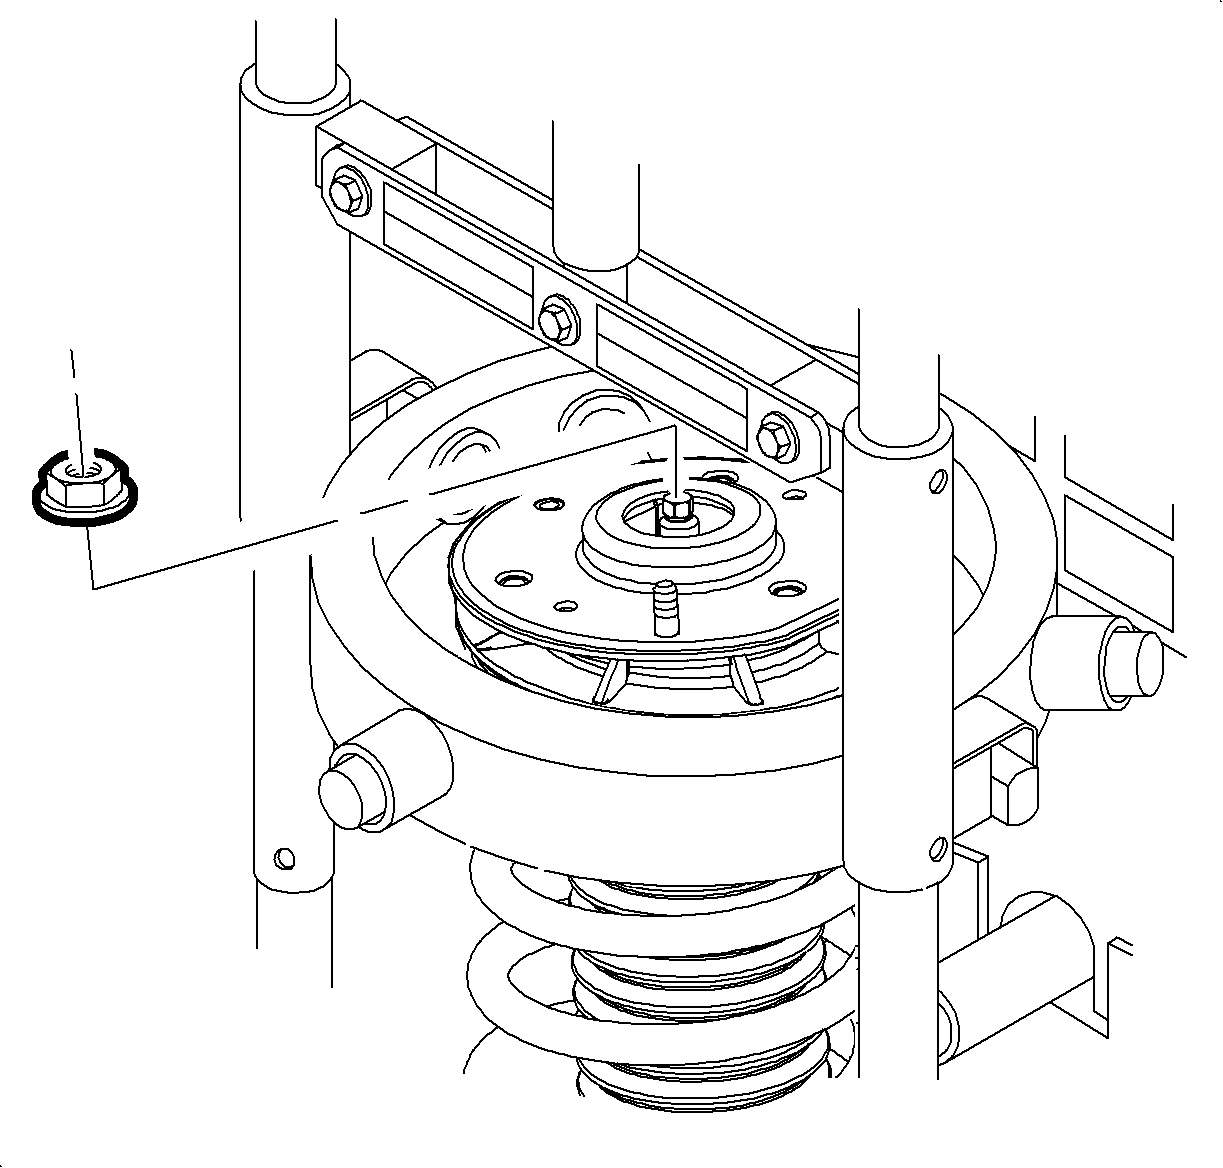
Important: Remove strut from spring assembly.
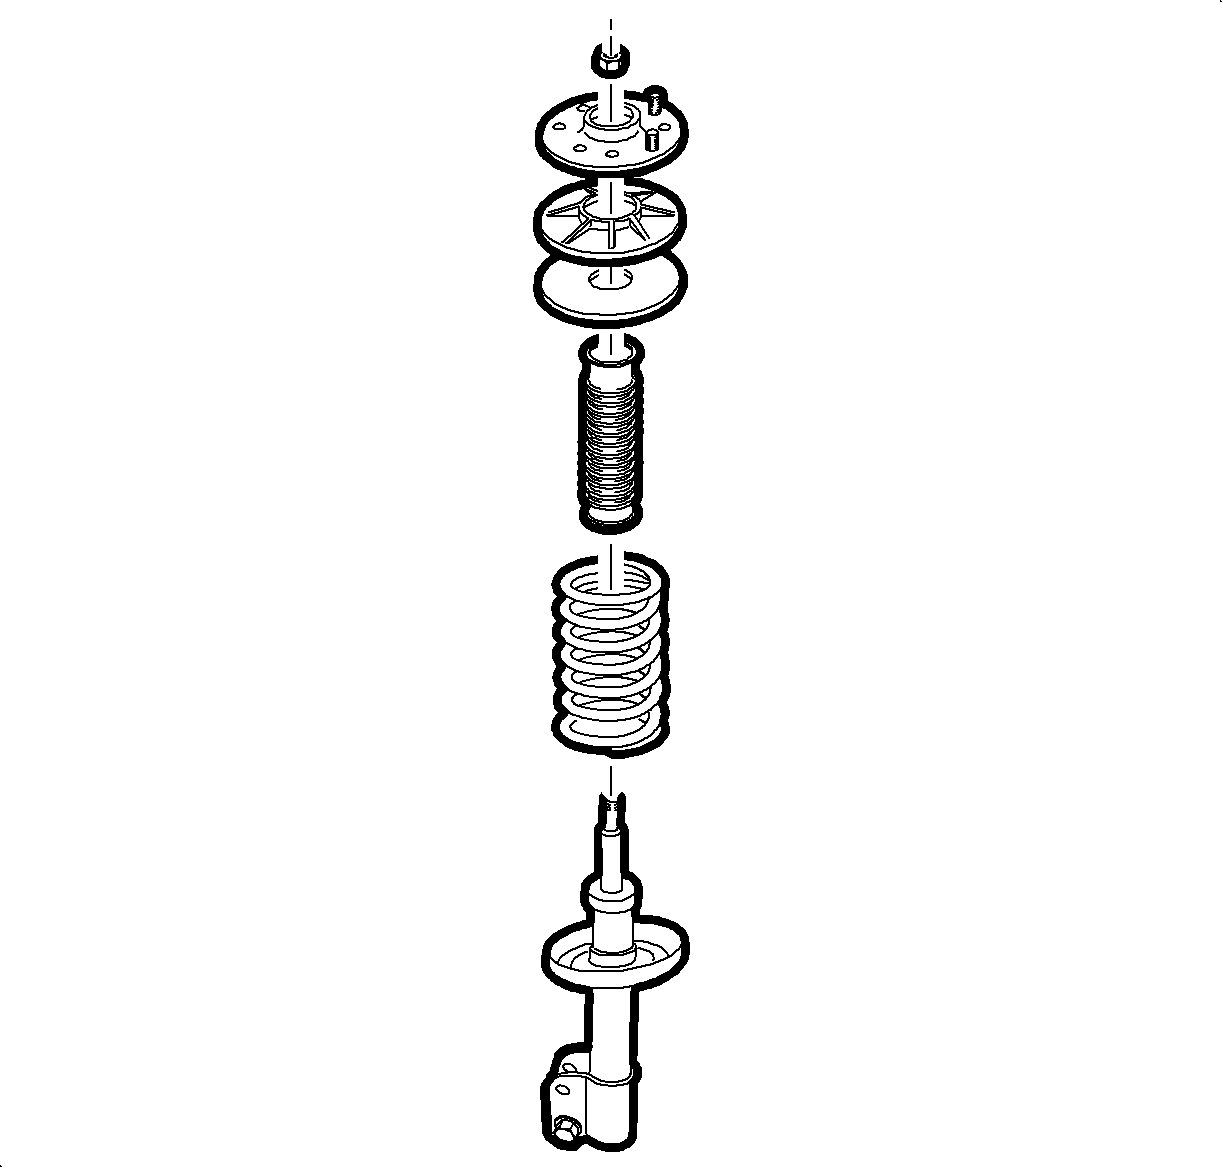
Notice: Follow assembly instruction carefully. Failure to assemble strut properly may create noise and result in premature upper spring seat failure.
| 18.1. | Extend strut to limit of travel. |
| 18.2. | Assemble hollow bumper and dust shield onto strut shaft. |
| 18.3. | With spring still in compressor, install strut into spring. |
| 18.4. | If equipped, remove the first design pilot ring from the upper spring seat and discard. |
| 18.5. | Inspect upper spring seat to top mount contact area for excessive wear. Replace top mount if necessary. |
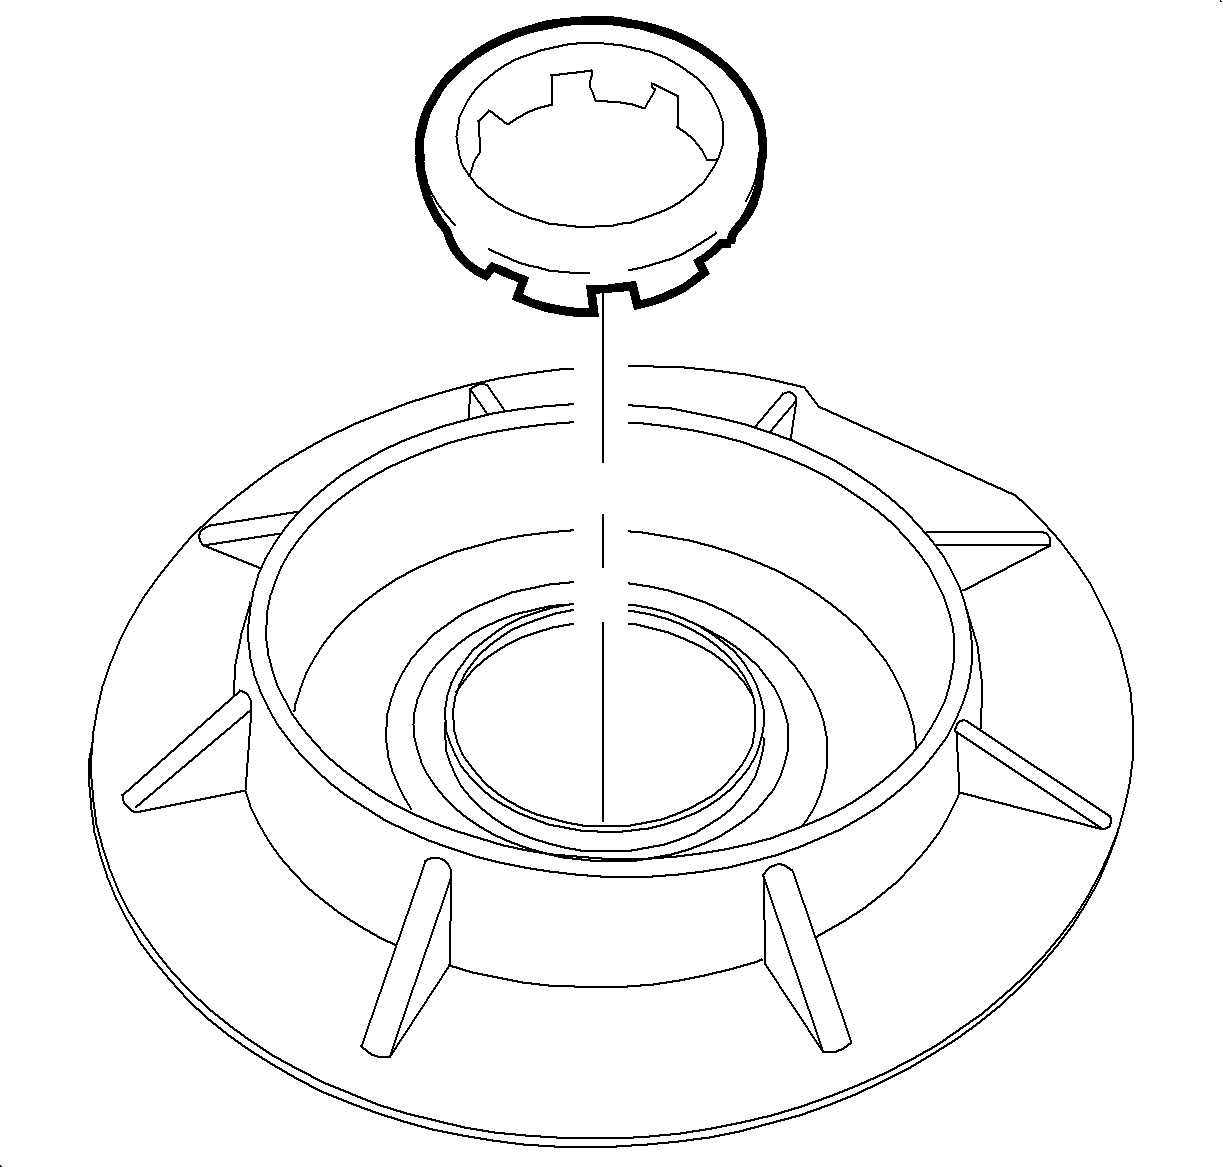
| Important: Top mount kit P/N 22677007 was created and released prior to the (second design) pilot ring P/N 22706316. This top mount kit should be used with the addition of the (second design) pilot ring P/N 22706316. A new top mount kit P/N 22706185 which includes the (second design) pilot ring will be released and will supersede P/N 22677007. |
| 18.6. | Push new second design pilot ring P/N 22706316 into upper spring seat. Ensure pilot ring is fully seated |
| 18.7. | Assemble upper spring seat onto strut shaft and align flat with strut-to-knuckle mounting bracket. |
| 18.8. | Assemble top mount onto strut shaft and align flat 180° from flat on upper spring seat. |
| 18.9. | Install strut shaft nut. |
| Important: It may be necessary to partially load the strut mount assembly with spring tension (or pressure) to torque the strut shaft nut. |
| 18.10. | Tighten strut shaft nut. |
Tighten
Tighten the strut shaft nut to 75 N·m (55 lb ft).
| 18.11. | Verify that flats on upper spring seat and top mount are aligned 180 degrees apart. |

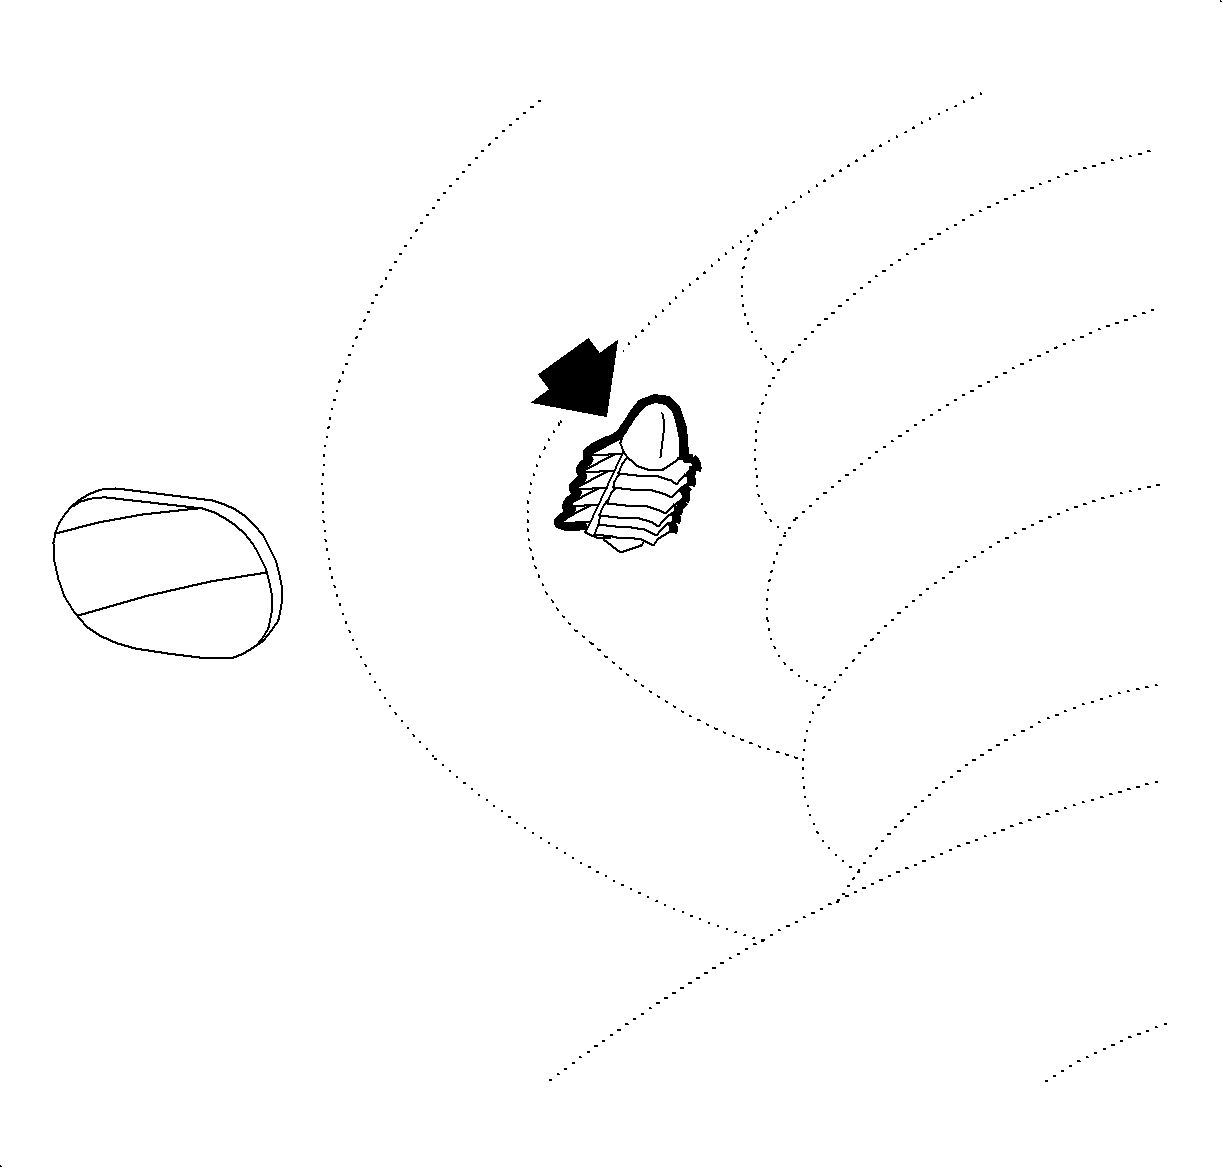
| 21.1. | Locate the rosebud fastener in the left front wheelhouse. |
| 21.2. | Measure the length of the rosebud that protrudes from the wheelhouse. |
| 21.3. | Clip the rosebud fastener so that only 6 mm (1/4 in.) protrudes from the wheelhouse. |
Notice: Use new nuts. Torque retention of old nuts may not be sufficient.
Tighten
Tighten the front strut-to-body nuts to 25 N·m (18 lb ft).
Tighten
Tighten the front strut-to-body bolt to 25 N·m (18 lb ft).

Tighten
Tighten the steering knuckle-to-strut 180 N·m (133 lb ft).

Tighten
Tighten the stabilizer link-to-strut nut to 65 N·m (48 lb ft).
Tighten
Tighten the brake hose bracket-to-strut to 15 N·m (11 lb ft).
Notice: Before installing wheel, remove rust or corrosion from wheel mounting surfaces and brake rotors. Failure to do so can cause wheel nuts to loosen in service.
Tighten
Tighten the wheel nuts 125 N·m (92 lb ft).
Parts Requirements
Use the following parts list when installing 2nd design pilot rings only.
Part Number | Description | Quantity Required Per Vehicle |
|---|---|---|
22706316 | Strut Mount Pilot Ring | 2 |
22600725 | Bolt/Screw-FRT SUSP STRUT (Strut-to-knuckle bolt) | 4 |
11514599 | Nut-FRT SUSP STRUT (Strut-to-knuckle nuts) | 4 |
11515754 | Bolt/Screw-FRT SUSP STRUT (Top mount bolts) | 2 |
11514518 | Nut-FRT SUSP STRUT (Top mount nuts) | 4 |
11518989 | Nut-FRT SUSP STRUT (Strut nuts) | 2 |
Use the following parts list when replacing the Top Mount Kit with P/N 22677007. (Top Mount Kit P/N 22677007 does not include strut mount pilot ring. Strut mount pilot ring must be ordered separately.)
Part Number | Description | Quantity Required Per Vehicle |
|---|---|---|
22706316 | Strut Mount Pilot Ring | 2 |
22677007 | Mount Kit-FRT SUSP Strut | 2 |
22600725 | Bolt/Scre-FRT SUSP STRUT (Strut-to-knuckle bolt) | 4 |
11514599 | Nut-FRT SUSP STRUT (Strut-to-knuckle nuts) | 4 |
Claim Information
To receive credit for this repair during the warranty coverage period, submit a claim through the Saturn Dealer System for E3927 (Mount Assembly, Front Strut Upper Bearing - Replace Both), or if another procedure is performed, refer to the appropriate Electronic Labor Time Guide for the correct Labor Operation Code and Time.
