| Table 1: | Radio Features |
| Table 2: | Cassette Player Features |
| Table 3: | CD Player Features |
| Table 4: | Diagnostic Trouble Codes |
Contents
| • | RPO Options |
| • | Features |
| • | Circuit Description |
| • | Component Description |
| • | Customer Tips |
| • | On Board Diagnostics |
| • | Theft Deterrent Feature |
RPO Options
The entertainment system on this vehicle is configured with either a base or uplevel audio system. Both the base and uplevel audio systems contain a radio, antenna, and speakers.
The following shows the Enteratinment RPO's that are available for this vehicle:
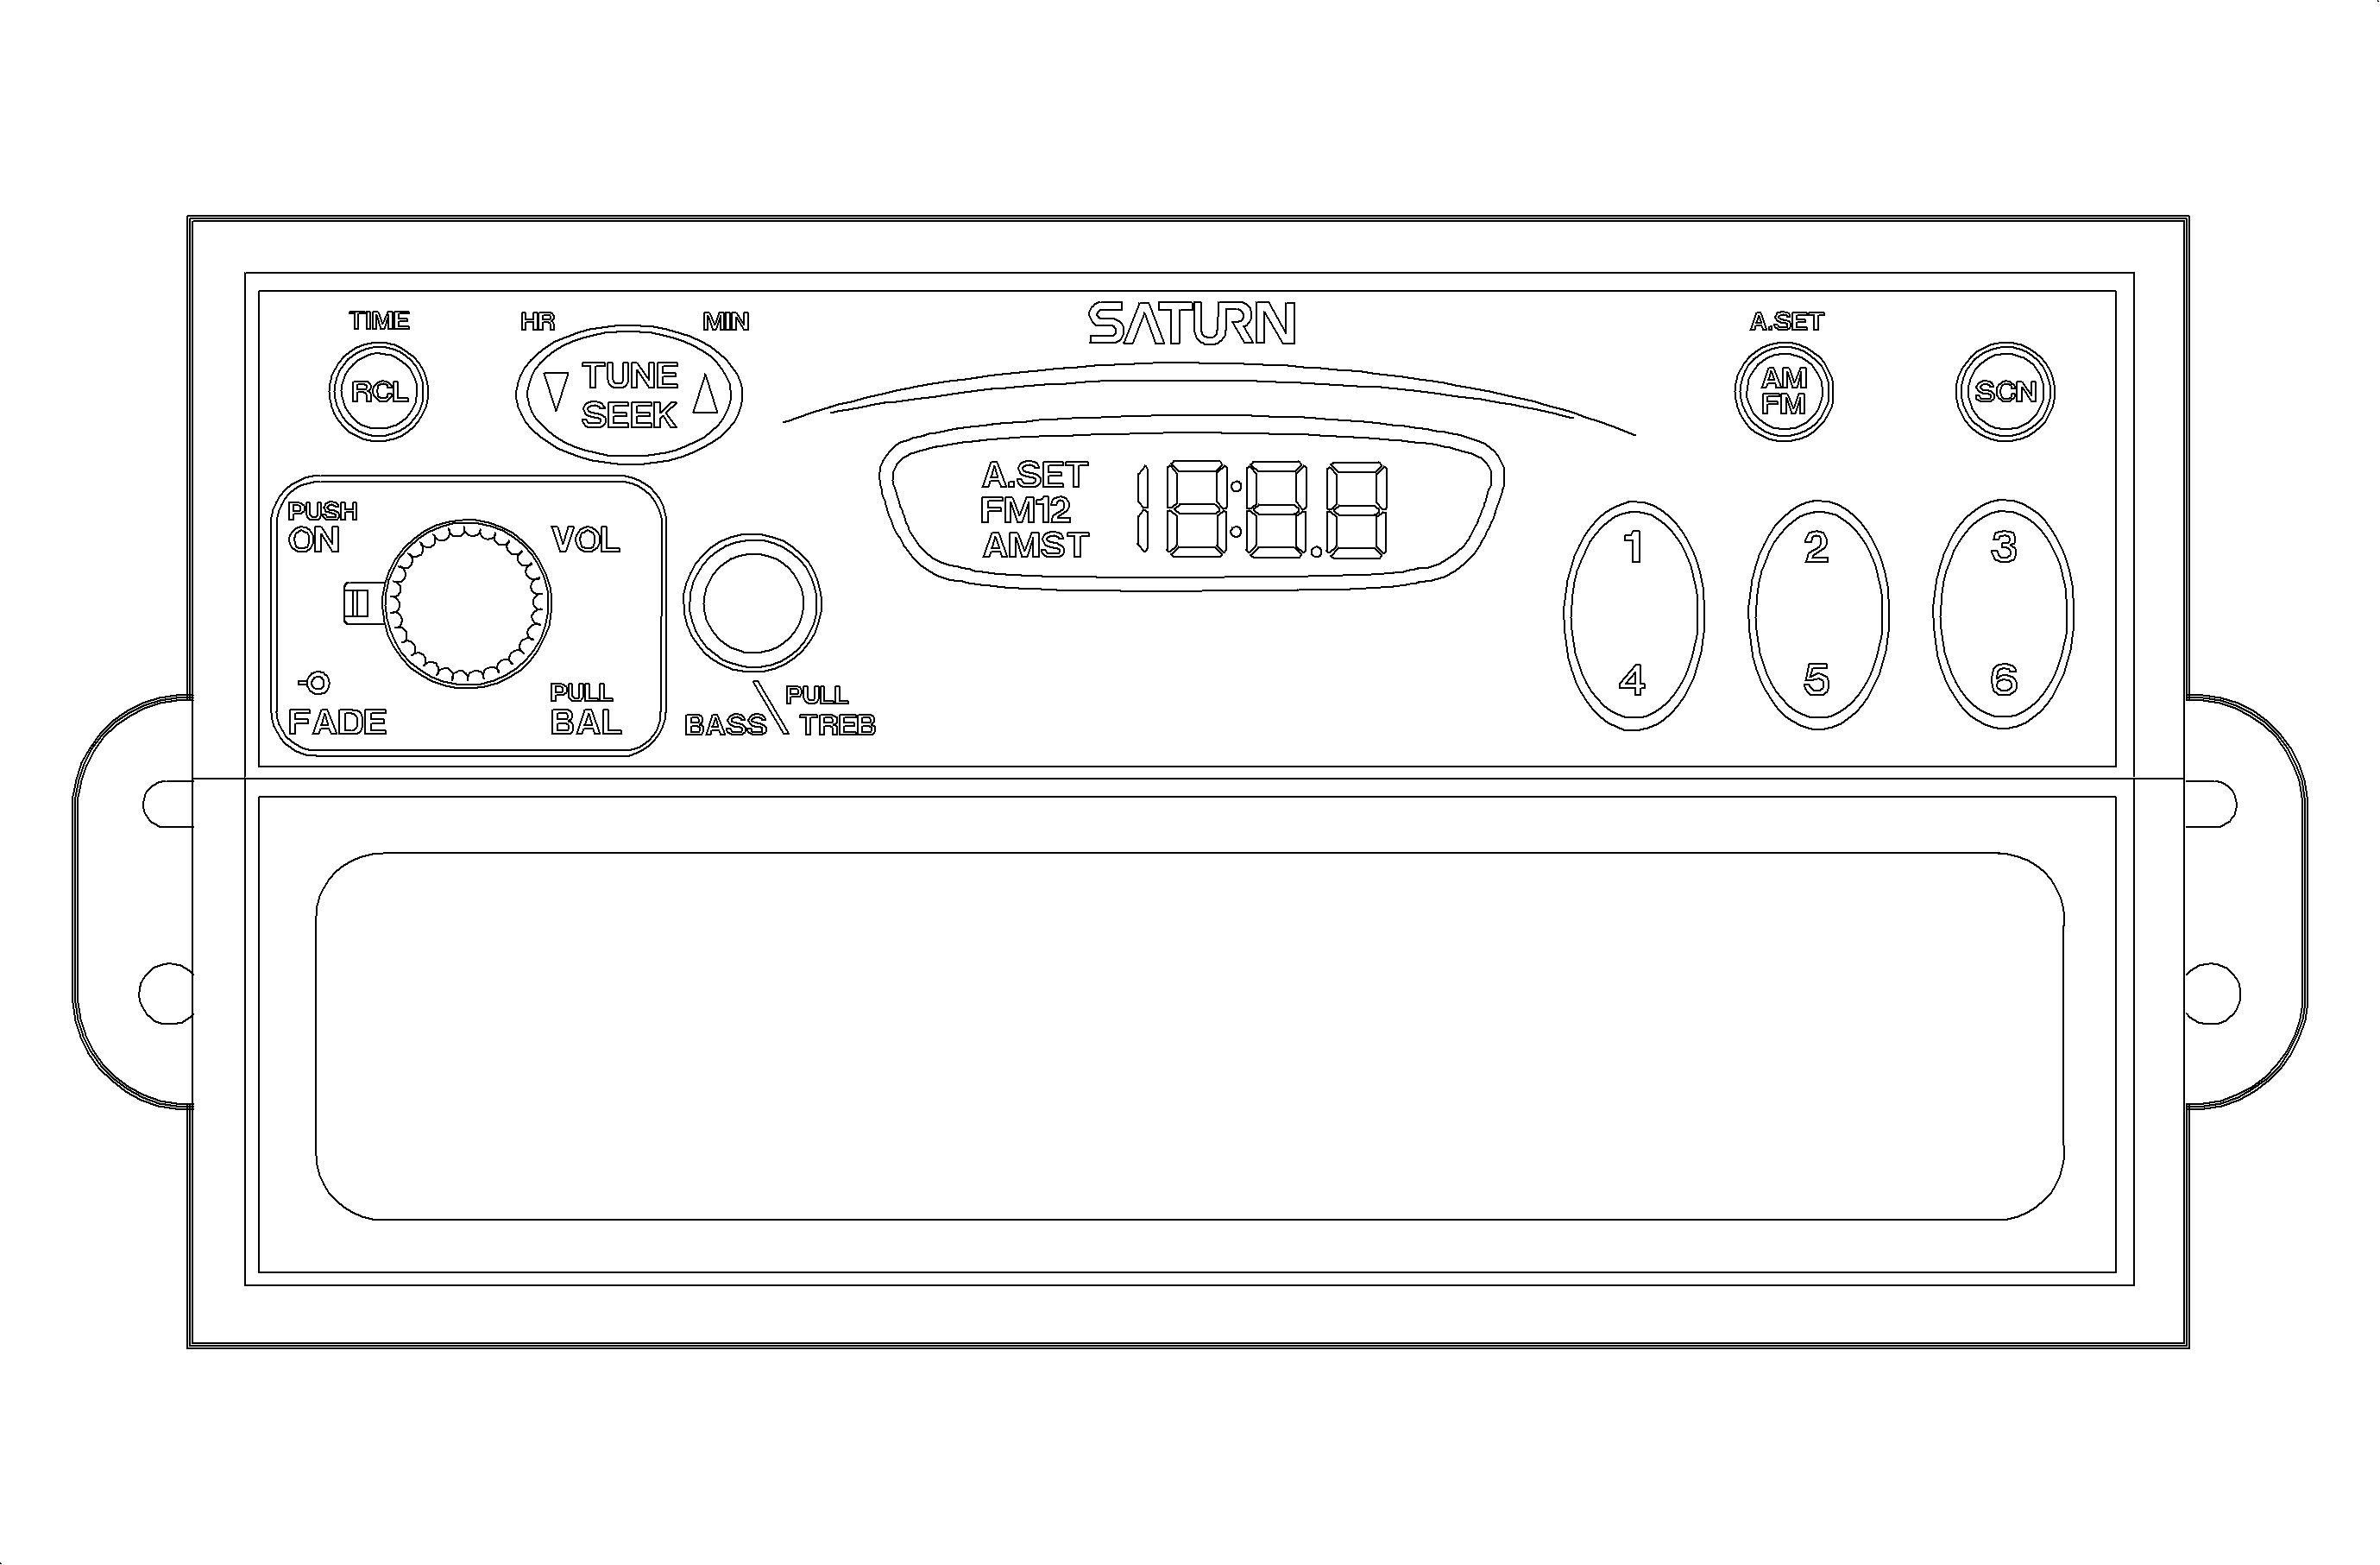
(UM7) AM/FM Radio
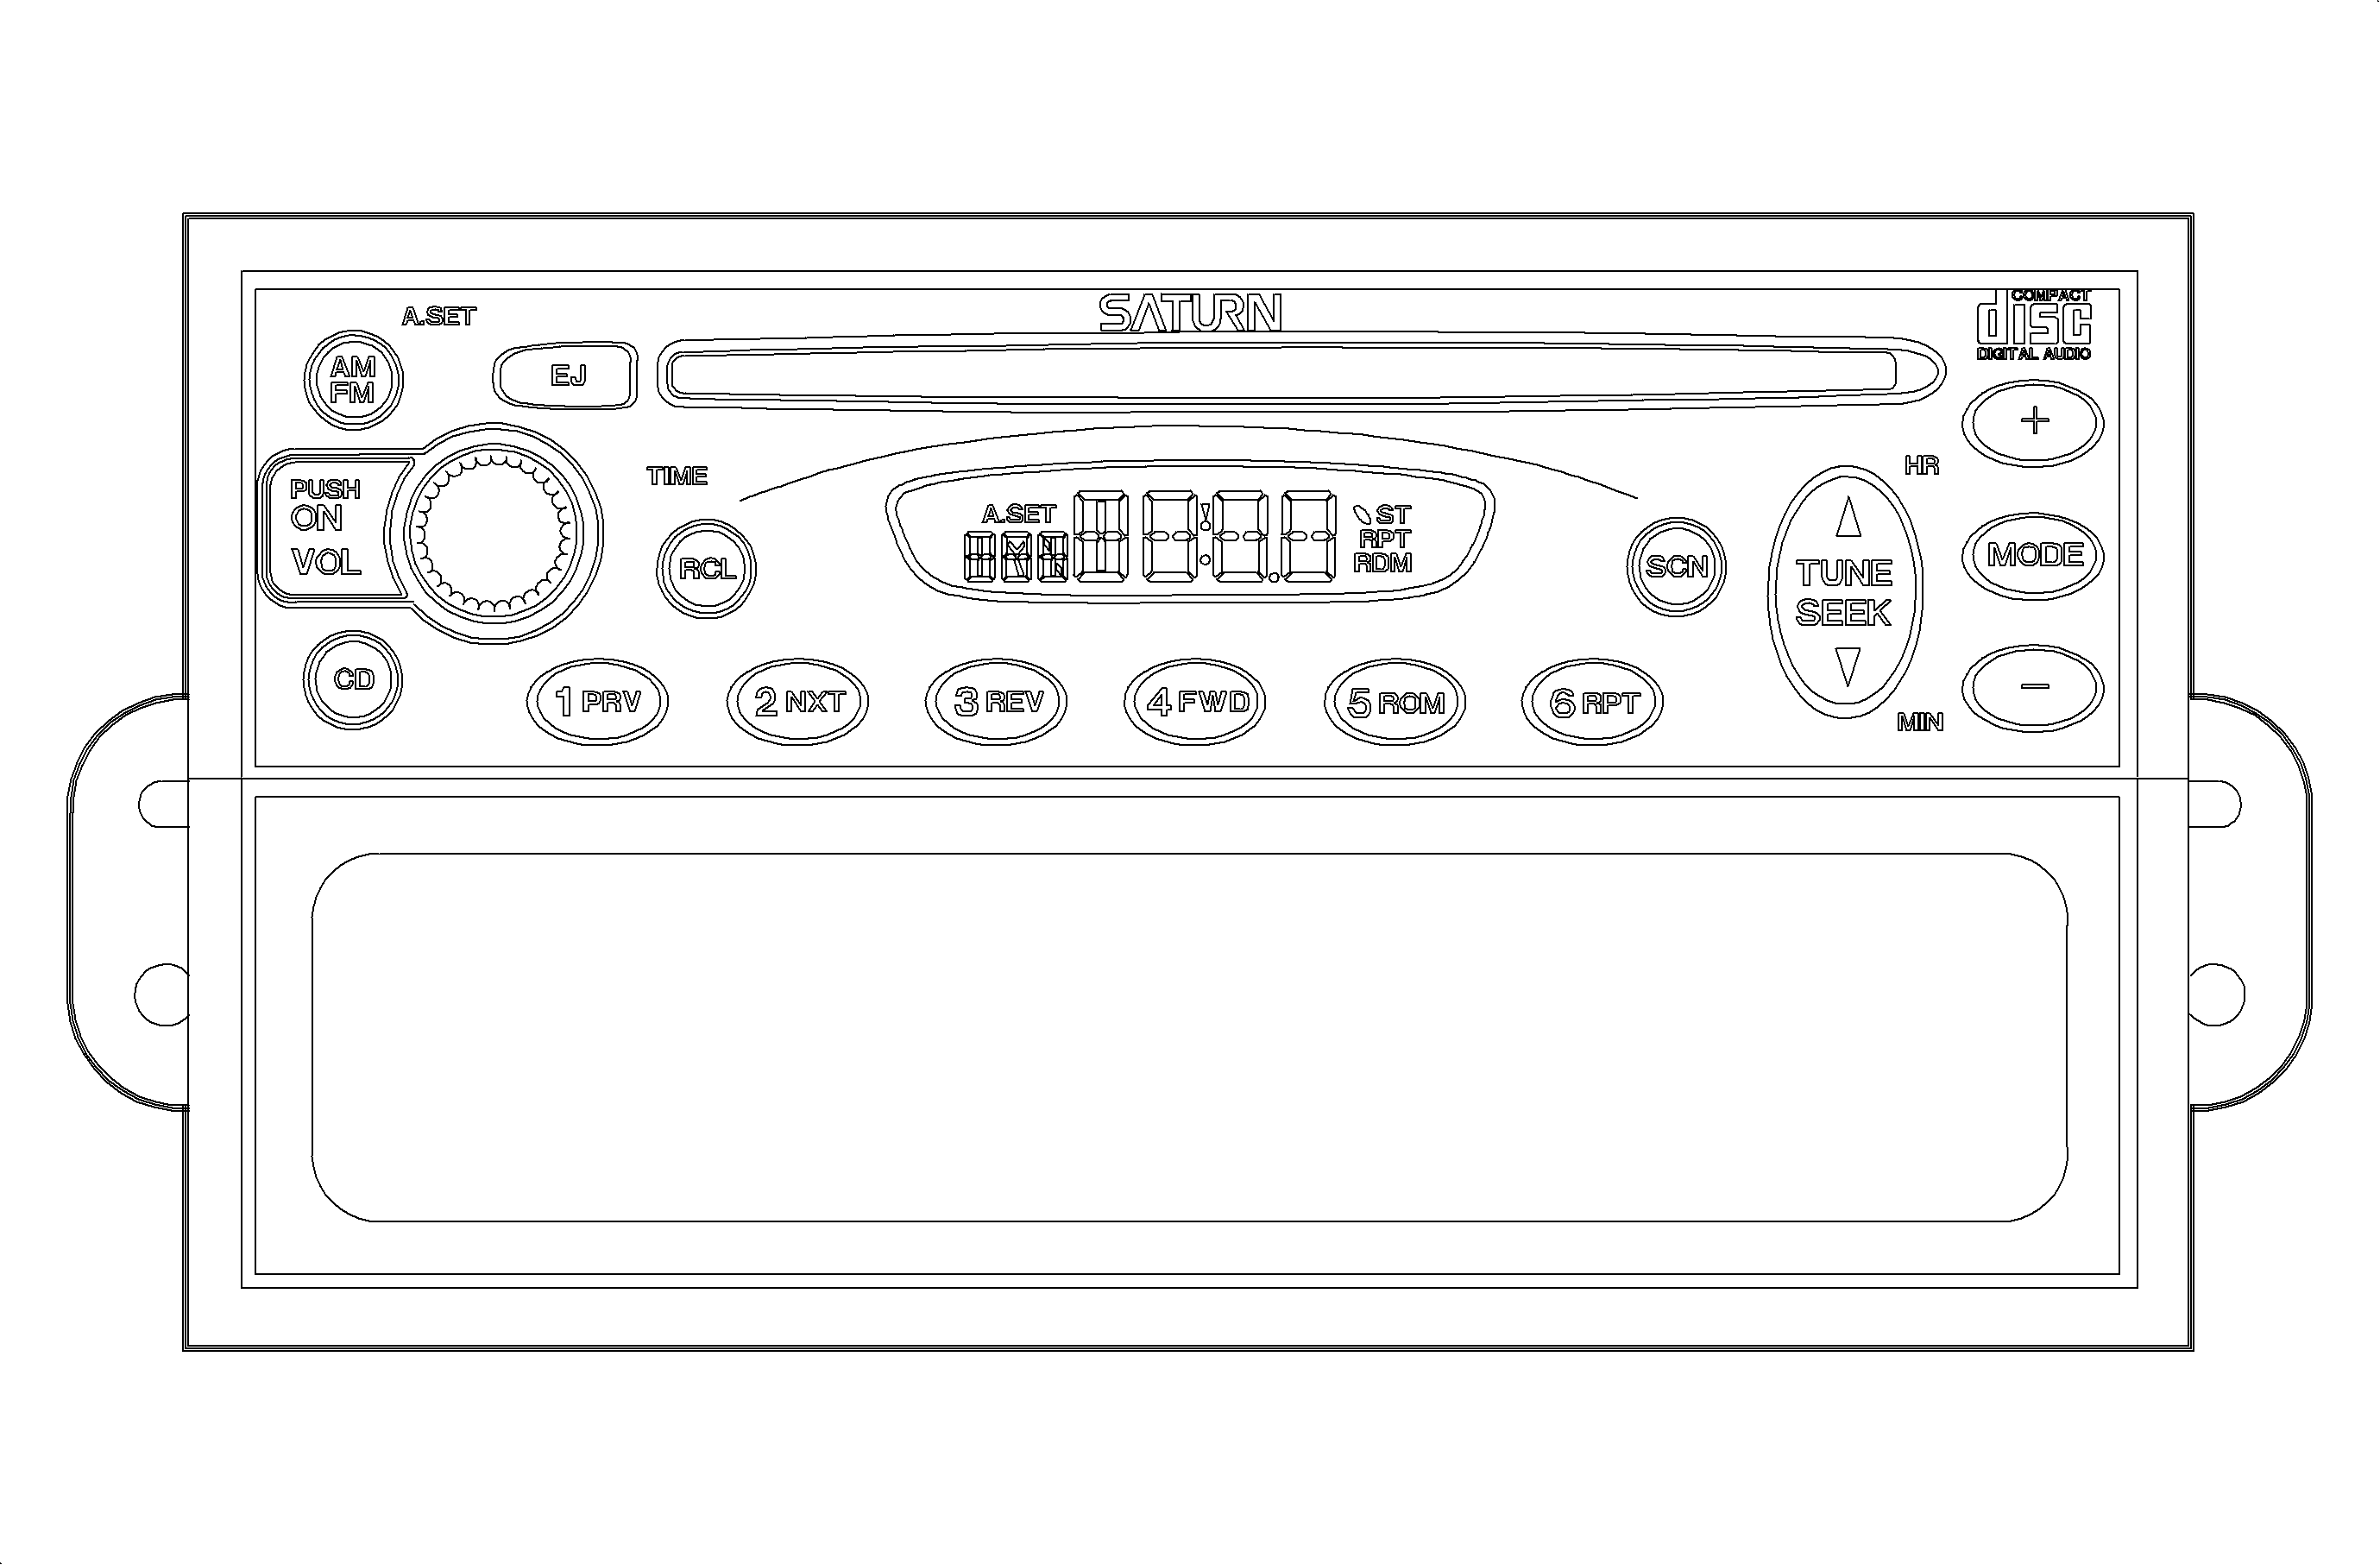
(U1C) AM/FM CD Radio
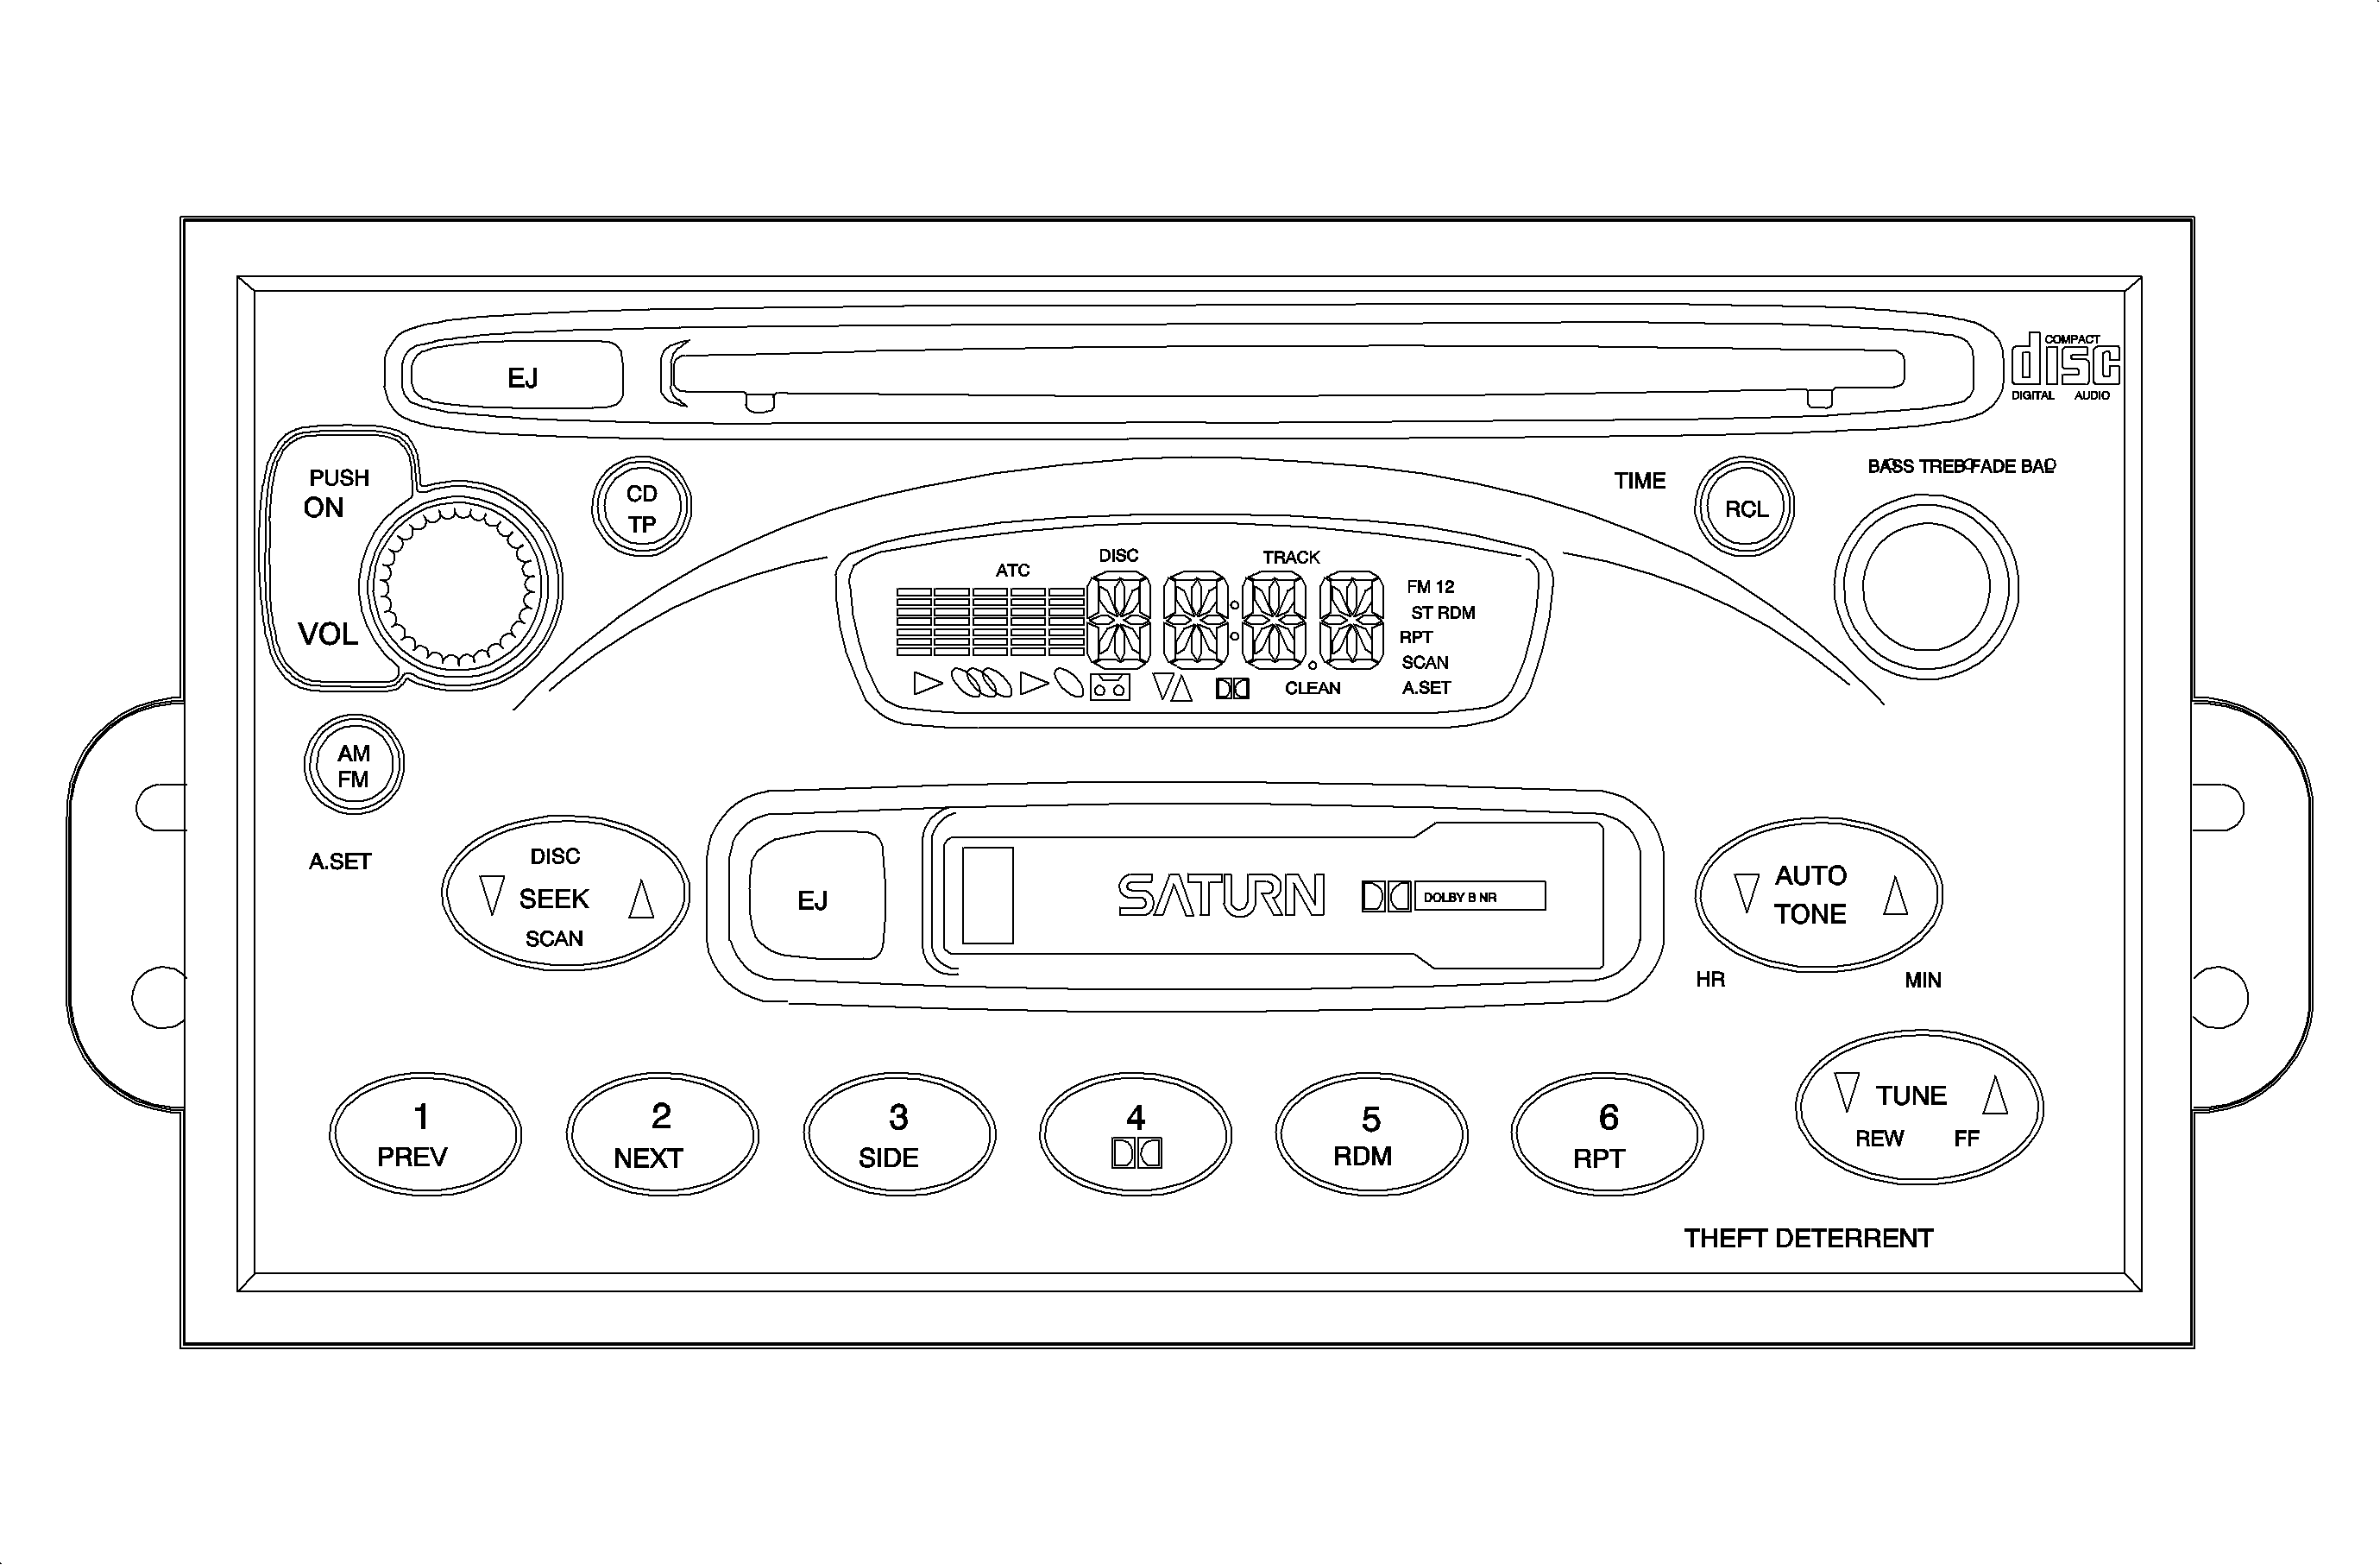
(UP0) AM/FM Cassette/CD Radio
(UR9) AM/FM Cassette/6 Disc CD Radio
| • | (UQ4) Base Four Speaker |
| • | (UW6) Uplevel Six Speaker |
| • | (WBM) Premium Audio |
| (Includes amplifier and subwoofer for VUE; or amplifier and subwoofer rear speakers for ION) |
Controls | AM/FM Radio (UM7) | AM/FM CD Radio (U1C) | AM/FM Cassette/CD Radio (UP0) | AM/FM Cassette/6 Disc CD Radio (UR9) |
|---|---|---|---|---|
Power | Push the VOL Knob | |||
Volume | Rotate the VOL knob | |||
Recall | Push the RCL button | |||
Preset | Push station preset rocker buttons 1-6 | Push station present buttons 1-6 | ||
Band | Press AM/FM | Press AM/FM. If listening to CD, will change function from CD to radio. | Press AM/FM. If listening to CD or tape, will change function from CD to radio. | |
A. Set | Press and hold AM/FM button until tone is generated. The radio will automatically scan and preset the strongest stations. Press and hold until tone is generated to cancel. | |||
Balance | Lightly pull out on VOL knob. Detent signifies center of balance. | Press MODE button until BAL is displayed, then use + or - button to adjust. | Press BASS/TREB/FAD/BAL knob until BAL is displayed. Rotate knob to desired setting. | |
Fade | Rotate the FADE ring. Detent signifies center of balance. | Press MODE button until FAD is displayed, then use + or - button to adjust. | Press BASS/TREB/FAD/BAL knob until FAD is displayed. Rotate knob to desired setting. | |
Bass | Press BASS/TREB knob to release. Rotate to change amount of bass in audio. | Press MODE button until BAS is displayed, then use + or - button to adjust. | Press BASS/TREB/FAD/BAL knob until BASS is displayed. Rotate knob to desired setting. | |
Treble | Press BASS/TREB knob to release. Lightly pull outward. Rotate to change amount of treble in audio. | Press MODE button until TREB is displayed, then use + or - button to adjust. | Press BASS/TREB/FAD/BAL knob until TREB is displayed. Rotate knob to desired setting. | |
Tune | TUNE/SEEK rocker manually increases or decreases frequency. | TUNE/SEEK rocker manually increases or decreases frequency. | TUNE/SEEK rocker manually increases or decreases frequency until the button is released. | |
Seek | Hold TUNE/SEEK rocker until tone sounds. Radio will automatically increase or decrease frequency to next receivable station. | Momentarily press the TUNE/SEEK rocker to automatically increase or decrease frequency to next receivable station. | ||
Scan | Press SCN button to automatically scan through all stations sequentially, pausing at each one for five seconds. | Press SCAN rocker button until tone is generated to automatically scan through, in either ascending or descending order, pausing at each receivable station. | ||
Tone Control | -- | -- | Use either side of the AUTO TONE rocker to scroll through the preset tone options. | |
Setting Clock |
|
| ||
Controls | AM/FM Radio (UM7) | AM/FM CD Radio (U1C) | AM/FM Cassette/CD Radio (UP0) | AM/FM Cassette/6 Disc CD Radio (UR9) |
|---|---|---|---|---|
Change Modes | -- | -- | Press CD/TP button to change between CD and tape player. Operation only available if media is already loaded. | Press AUX button to change between CD and tape player. Operation only available if media is already loaded. |
Play | -- | -- | Tape begins to automatically play when inserted, or when CD/TP button is used to select tape function. | Tape begins to automatically play when inserted, or when AUX button is used to select tape function. |
Fast Forward | -- | -- | Press FF rocker button. Press again to stop fast forward and resume normal play. | |
Rewind | -- | -- | Press REW rocker button. Press again to stop rewind and resume normal play. | |
Eject | -- | -- | Press the EJ button. | |
Repeat | -- | -- | Press the RPT button. | |
Previous Song | -- | -- | Press PREV button once to rewind to beginning of current song. Press again to rewind to beginning of previous song. | |
Next Song | -- | -- | Press the NEXT button to advance to beginning of next song on tape. | |
Switch Sides | -- | -- | Press SIDE button. Display will also reflect change in direction. | |
Dolby Noise Reduction | -- | -- | Press Dolby B Noise Reduction button to reduce tape hiss. | |
Controls | AM/FM Radio (UM7) | AM/FM CD Radio (U1C) | AM/FM Cassette/CD Radio (UP0) | AM/FM Cassette/6 Disc CD Radio (UR9) |
|---|---|---|---|---|
Change Modes | -- | Press CD button to change function from radio to CD. CD begins to play automatically. | Press CD/TP button to change between CD and tape player. Operation only available if media is already loaded. | Press AUX button to change between CD and tape player. Operation only available if media is already loaded. |
Play CD | -- | CD will automatically begin to play when one is inserted. | CD will automatically begin to play when one is loaded. | |
Eject SINGLE CD | -- | Press the EJ button. | Press the LD/EJ button. Then press the preset button when prompted to indicate which CD should ejected, or which slot should be loaded. | |
Eject ALL CDs | -- | -- | -- | Press and hold the LD/EJ button and all discs are ejected in order. "LOAD" is then displayed. |
Previous Track | -- | Press the PRV button. | Press the PRV button or DISC/SEEK/SCAN rocker button | Press PRV button |
Next Track | -- | Press the NXT button. | Press the NXT button or DISC/SEEK/SCAN rocker button | Press NXT button |
Rewind | -- | Press and hold REV button. | Press and hold REW button. | |
Fast Forward | -- | Press and hold FWD button. | Press and hold FF button. | |
Random Track Order | -- | Press the RDM button. Press again to cancel. | Press the RDM button. Press again to cancel. | Press the RDM button. Press again to cancel. Note that 3 modes are available: Random play on current disc, Random play on all discs, Random play cancelled. |
Repeat | -- | Press the RPT button to repeat the current track. Press again to cancel. | Press the RPT button to repeat the current disc. Press again to cancel. | |
Load ALL CDs | -- | -- | -- | Used when NO CDs are currently in radio. Discs are loaded one at a time, and the radio will display "WAIT" between each disc. |
Previous Disc | -- | -- | -- | Press left side of DISC/SEEK/SCAN button |
Next Disc | -- | -- | -- | Press right side of DISC/SEEK/SCAN button |
Circuit Operation
Radio Power: The main radio power is supplied by the 10A RADIO (BATT1) fuse in the Body Control Module (BCM). Radio switch-on power, 12 volts in ACC, RUN or RAP, is supplied by the 10A RADIO (ACC.) in the BCM.Radio Grounds: The main radio ground provides a ground for the radio circuits. An additional braided ground strap provides a shielding radio case ground to reduce EMI noise. Both grounds are connected together inside the radio.
Radio Speaker Outputs: At zero volume, the plus (+) and minus (-) speaker outputs are both approximately 5-6 volts, measured to vehicle ground. If a plus or minus for any speaker output is shorted to ground or voltage, the radio circuitry will turn off all four speaker outputs for component protection. Above zero volume, the plus and minus change to create a voltage difference between each other, to drive the voice coil of the speaker.
Radio Park Lamp Input: The radio park lamp input allows the radio to sense when the vehicle parking lamps are on. When the parking lamps are on, this circuit goes to battery voltage, and the radio display back-lighting switches from full bright to the brightness level determined by the I/P illumination input.
Radio I/P Illumination Input: A pulse width modulated (PWM) voltage for instrument panel (I/P) illumination is provided to the radio I/P illumination input. The Radio uses this input to directly illuminate the radio buttons and adjust the radio display back-lighting when the park lamp input is on.
Amplifier Power: The main amplifier power is provided by the 20A PREM AUDIO fuse in the Under-Hood Fuse Block (UHFB).
Amplifier Radio Speaker Inputs (WBM only): The radio speaker outputs, at a reduced output level for amplified systems, are the amplifier inputs. The amplifier boosts these inputs and outputs them to the vehicle speakers. Speaker plus and minus circuits from the radio change to create a voltage difference between each other. If one speaker plus or minus is open between the radio and the amplifier, the input to the amplifier is approximately half because only one of the circuits is changing. The speaker for that channel then operates at approximately only half the normal volume.
Amplifier Speaker Outputs (WBM only): At zero volume, the plus (+) and minus (-) speaker outputs are both approximately 5-6 volts, measured to vehicle ground. If a plus or minus for any speaker output is shorted to ground or voltage, the amplifier circuitry will turn OFF either the front outputs or rear outputs for component protection. Above zero volume, the plus and minus change to create a voltage difference between each other, to drive the voice coil of the speaker.
Amplifier Present (WBM only): The amplifier grounds this circuit so the radio can detect an amplified speaker system. When this circuit is grounded, the radio sets the internal equalization to match the amplified speaker system and lowers the radio speaker output level for amplifier input use. If an amplifier is being sensed, the radio OBD equalization setting function will show EQ:00.
Amplifier Radio-On (WBM only): When the radio is ON, this circuit is pulled to 12 volts by the radio. The amplifier switches ON when this circuit is 12 volts and switches OFF when this signal is 0 volts.
Remote Radio Audio Signal Inputs (UE1 only): Audio output from the OnStar® communications module connects to the remote audio signal inputs of the radio. When the cellular telephone mute signal goes to 0 volts, the radio over-rides any other audio signal and uses these inputs as the source for output to the speakers.
Cellular Telephone Mute (UE1 only): The OnStar® communications module uses the cellular telephone mute signal circuit to over-ride the radio for OnStar® communication. When cellular telephone mute is not active, this circuit is held at 2 volts by the radio. When the cellular telephone mute signal is pulled to ground, the radio over-rides any other audio signal and uses the remote audio signals as the source for output to the speakers. If the radio was OFF when this circuit is pulled low, the radio will turn ON. Additionally, the radio fades the speakers to full front, adjusts the volume to an initial audible level, and sets an AutoTone designed for optimal use with OnStar®. When the mute signal is no longer pulled to ground, the radio returns to the mode it was in previously.
Component Description
Antenna System
The antenna system receives broadcast AM or FM stereo signals from free space and sends the signals to the radio receiver for processing via a coaxial antenna cable. Good antenna grounding is important for good radio reception.
The antenna base and mast should be installed to the torque specifications provided in the Antenna -- Removal and Installation procedures.
The antenna mast is a single ¼ wave design located at the right front fender.
Ground Strap
The braided ground strap, which is connected between the radio case and the instrument panel fuse block (IPFB), is provided to improve reception and deter noise from entering the audio system.
Radio
The operator interfaces with the radio system through the radio display and controls. Through these controls the operator is able to control system power, volume, fade, balance, bass, and treble equalizations. Control on the integrated tape, single CD or 6 disc CD playback systems is also available when equipped with those options. An LCD (liquid crystal display) provides system feedback to the operator.
The radio processes the AM and FM signals from the antenna system of the information from the cassette tape or CD media sections, amplifies that information and sends the output to the speaker system.
The radio is located in the instrument panel center stack area and is fastened to the instrument panel by two fasteners. Guide pins are provided to aid in aligning the radio. Electrical connections to the radio are a 24-way connector from the I/P harness, antenna lead connector and braided ground strap. An additional 12-way harness connector is present on OnStar® equipped vehicles. Additional service length is provided in the radio harnesses to allow connection prior to radio installation.
Clock time is displayed continuously on all radio models even then the ignition is OFF. Temporary backlighting is provided if the RCL button is pressed with the ignition OFF. Backlighting is ON whenever the ignition is ON and dims with the instrument panel illumination when the vehicle park lamps are ON.
Radio amplifier outputs to the speakers are protected from damage should speaker leads become shorted to ground or shorted to vehicle power. The radio will sense these conditions and shut down the amplifier outputs in a non-destructive manner. After the short condition is removed, the radio will return to normal operation.
Speakers
The speaker system consists of four 6 inch high sensitivity speakers (HSS). The optional speaker system (RPO UW6) includes an additional tweeter speaker mounted in the front driver and passenger door mirror trim panel. The premium audio package (RPO WBM) uses the UW6 speakers in the front doors and replaces the rear HSS speakers with subwoofer speakers on the ION. The VUE premium audio package (RPO WBM) adds a subwoofer.
OnStar®
OnStar equipped (RPO UE1) vehicles use the radio amplifier and speaker system for voice communication from the OnStar operator to the vehicle. Voice communication from the vehicle to the OnStar operator is through the OnStar microphone and module, which is not a part of the radio system.
When OnStar begins operation, the radio volume is set to a preset level, autotone preset for OnStar becomes active and the fade control is adjusted to the full front speakers. The radio volume control can then be used to adjust the volume to a desired level.
The radio system and OnStar system are connected through the 12-way connector at the back of the radio. Left and right channel OnStar audio, mute control of radio functions by OnStar, and the audio signal ground are the circuits provided in the 12-way connector.
Disconnecting the 12-way connector from the radio will isolate the radio system from the OnStar system. Voice communication from the vehicle to the OnStar operator could be possible under this condition. However, the vehicle occupant will not be able to hear the OnStar operator.
Amplifier
Vehicles equipped with Premium Audio (RPO WBM) include an amplifier. The amplifier has low level inputs from the radio for the four speaker channels and amplifies the sound. The amplifier receives a radio on signal from the radio. This signal is delayed momentarily at initial key on to prevent any speaker pops during startup.
Customer Tips
Radio Reception - FM
Select Stations Within Range: The best FM fidelity will be obtained from stations within a 16-64 km (10-40 mile) range. Noise or distortion may become apparent when attempting to receive stations at distances greater than this range.
Suggestion: Reduce treble response when attempting to receive fringe stations.
Tall Structures: Tall buildings or hills may cause degrading or loss of signal. FM stations tend to travel "line of sight." Buildings or hills can interrupt the FM signal.
Suggestion: Reduce treble response.
Interference from another station: Although receiver circuits are among the most advanced type available, there are instances where a radio station can be interfered with by another station.
Suggestion: Select another station or switch to a cassette or CD.
Radio Reception - AM
Static Interference During Weather Disturbances: AM reception is sensitive to storm disturbances such as lightning.
Suggestion: Reduce treble response or select an FM station for weather related information.
Care of Compact Discs
| • | Handle compact discs (CDs) carefully. Touch only the outer edges of the CD or the edge of the hole in the center of the CD. Never touch the glossy side of the CD. Fingerprints and scratches will interrupt the "reading" of the information on the disc. |
| • | Store CDs in their protective cases. Store CDs away from sunlight, dirt, dust, and debris. |
| • | Do not attach a label or tape to a CD. |
| • | Always check for scratches and signs of wear on both sides of the CD. |
| • | Never place any marks on the CD with a marker. |
| • | If a CD becomes contaminated, clean it with a clean, damp, soft, lint-free cloth and mild detergent. Wipe the CD in a straight line from the center hole outward. Do not use cleaning solutions which may damage the CD, such as chemically treated cleaning cloths, benzene, or paint thinners. |
Compact Discs Not Appropriate to Use
These CD players were designed to be compatible with round digital audio CDs with the "Compact Disc Digital Audio" label. Other CDs may be incompatible, causing a no-play condition, excessive skips, "ERR" shown on the radio display or a jam in the loading mechanism. Some incompatible CD types are:
| • | Special-shaped CDs (any that are not round) |
| • | Re-Writeable CDs (CD-RW type are incompatible) |
| • | Recordable CDs (CD-R type are incompatible) |
| • | Library CDs (with thick bar code labels) |
| • | CD with User-applied labels |
On Board Diagnostic Mode
Follow the instructions below to enter and properly utilize the On Board Diagnostics:
To Enter On Board Diagnostic Mode
- Key ON, engine OFF, radio in AM/FM mode.
- Press and hold RCL button, preset 1 button, and preset 6 button.
- While holding these buttons, press the VOL knob.
- A beep sounds when the radio enters On Board Diagnostic Mode.
Use the Seek button to advance to the desired mode, menu options vary according to the radio:
| • | AM/FM CD Radio (U1C) |
| - | (T-01) Diagnostic Trouble Code Mode |
| - | (T-02) Test Tone Mode |
| - | (T-03) LCD Display Segment Mode |
| - | (T-04) Key Test Mode |
| - | (T-05) Antenna Signal Meter Mode |
| - | (T-06) Clear Diagnostic Trouble Code Mode |
| • | AM/FM Cassette/CD Radio (UP0) and AM/FM Cassette/6 Disc CD Radio (UR9) |
| - | (DTC) Diagnostic Trouble Code Mode |
| - | (TT) Test Tone Mode |
| - | (LCD) LCD Display Segment Test Mode |
| - | (KEY) Key Test Mode |
| - | (EQ) Equalization Settings |
| - | (ANT) Antenna Signal Meter Mode |
| - | (CDCH) Remote CD Player Communications Test |
| - | (CC) Clear Diagnostic Code Mode |
Press the RCL button to select the desired mode. Refer to the Diagnostic Mode descriptions.
Press the RCL button (U1C), or the AM/FM button (UP0 and UR9) to return to OBD menu or press VOL knob to exit OBD Mode.
Diagnostic Trouble Code Mode
The diagnostic trouble code mode is available to provide DTCs and the number of times each code has set. Refer to Enter On Board Diagnostic Mode procedure prior to referencing this information.
To use the DTC Mode:
| • | AM/FM CD Radio - Diagnostic trouble code E04 and the number of times it has set will be displayed first. Codes E01 through E03 do not apply to this radio. Use SEEK rocker button to tab through error codes E04, E05, and E06. Press the RCL button to return to the OBD menu. Press VOL knob to exit OBD. |
| • | UP0 and UR9 - Diagnostic trouble code E01 is displayed first. Press the RCL button to see the number of times the DTC has set. Press AM/FM button to return to DTC codes. Use SEEK rocker button to scroll through error codes E01 through E06. Use the RCL button for each code to check the number of times the code has set. Press the AM/FM button again to return to the OBD menu. |
Diagnostic Trouble Code | Possible Causes | Procedure |
|---|---|---|
E01- Cassette Eject Error | Cassette is tangled in radio. | This could be caused by a dirty cassette or a dirty cassette radio unit. Clean the radio cassette player and discard the damaged cassette. Refer to Cassette Tape Player Cleaning procedure in Audio Distortion - One or More Speakers |
Cassette label is caught in radio. | Remove foreign material. If material cannot be removed, replace the radio. Refer to Radio Replacement . | |
Cassette tape player failure. | Refer to Radio Replacement . | |
E02- Cassette Play Error | Cassette is tangled in radio. | This could be caused by a dirty cassette or a dirty cassette radio unit. Clean the radio cassette player and discard the damaged cassette. Refer to Cassette Tape Player Cleaning procedure in Audio Distortion - One or More Speakers |
Cassette is too long for radio. | Ensure that the tape is not longer than 90 minutes total. | |
Cassette is damaged or dirty. | This could be caused by a dirty cassette or a dirty cassette radio unit. Clean the radio cassette player and discard the damaged cassette. Refer to Cassette Tape Player Cleaning procedure in Audio Distortion - One or More Speakers | |
Cassette tape player failure. | Refer to Radio Replacement . | |
E03- Cassette Insertion Error | Cassette is damaged or dirty. | This could be caused by a dirty cassette or a dirty cassette radio unit. Clean the radio cassette player and discard the damaged cassette. Refer to Cassette Tape Player Cleaning procedure in Audio Distortion - One or More Speakers |
Cassette is tangled in radio. | This could be caused by a dirty cassette or a dirty cassette radio unit. Clean the radio cassette player and discard the damaged cassette. Refer to Cassette Tape Player Cleaning procedure in Audio Distortion - One or More Speakers | |
Cassette is too long for radio. | Ensure that the tape is not longer than 90 minutes total. | |
Cassette player failure. | Refer to Radio Replacement . | |
E04- CD Eject Error | CD is warped or cracked. | Inspect the CD. Remove any burrs. Avoid using cracked or deformed CDs. If using an 8 cm (3-in) disc, check for correct installation of adapter. Do not use adapters with broken hooks. |
CD player opening is blocked by foreign material. | Remove foreign material. If material cannot be removed, replace the radio. Refer to Radio Replacement . | |
CD Player failure. | Refer to Radio Replacement . | |
E05- CD Play Error | CD is upside down. | CD will eject after loading. Insert CD label side up. |
CD is scratched. | The CD will skip, eject unexpectedly, eject after loading, or mute intermittently. Inspect CD for dirt, scratches, or pinholes. Clean CD, refer to Handling CDs in this section. Do not use any chemicals and avoid touching the CD surface. | |
CD is dirty. | Clean CD. Refer to Handling CDs in this section. | |
CD optics obscured by condensation. | Use car air conditioning system or car heater blower motor to help evaporate any condensation. | |
CD Player failure. | Refer to Radio Replacement . | |
E06- CD Insertion Error | CD is scratched. | The CD will skip, eject unexpectedly, eject after loading, or mute intermittently. Inspect CD for dirt, scratches, or pinholes. Clean CD, refer to Handling CDs in this service manual. Do not use any chemicals and avoid touching the CD surface. |
CD is warped or cracked. | Inspect the CD. Remove any burrs. Avoid using cracked or deformed CDs. If using an 8 cm (3 in) disc, check for correct installation of adapter. Do not use adapters with broken hooks. | |
CD is upside down. | CD will eject after loading. Insert CD label side up. | |
CD Player failure. | Refer to Radio Replacement . |
Test Tone Mode
The Test Tone Mode is available to check for proper speaker function. Once Test Tone mode has been selected, a tone alternating between 100 Hz and 3 kHz will automatically begin to sound. Refer to Enter On Board Diagnostic Mode procedure prior to referencing this information.
To use the Test Tone Mode:
| • | U1C |
| - | The display with show "1" indicating the left front speaker is selected. |
| - | Use the SEEK rocker button to move between speakers, "2" indicates right front, "3" indicates left rear, and "4" indicates right rear. |
| - | Press RCL button to return to OBD menu. |
| • | UP0 and UR9 |
| - | The radio will start alternating tones on the left front. |
| - | Use the TUNE rocker button to move between speakers. |
| - | Press AM/FM to return to OBD menu. |
If no test tone is heard audibly, increase the volume using the VOL knob. If any of the test tones are not heard from one or more speakers, refer to Speakers Inoperative - One or More
LCD Display Segment Mode
The LCD Display Segment Mode is available to verify that all display segments are operating properly. Refer to Enter On Board Diagnostic Mode procedure prior to referencing this information. If any display segments are not displayed, replace the radio. Refer to Radio Replacement . Press the appropriate button to return to the OBD menu.
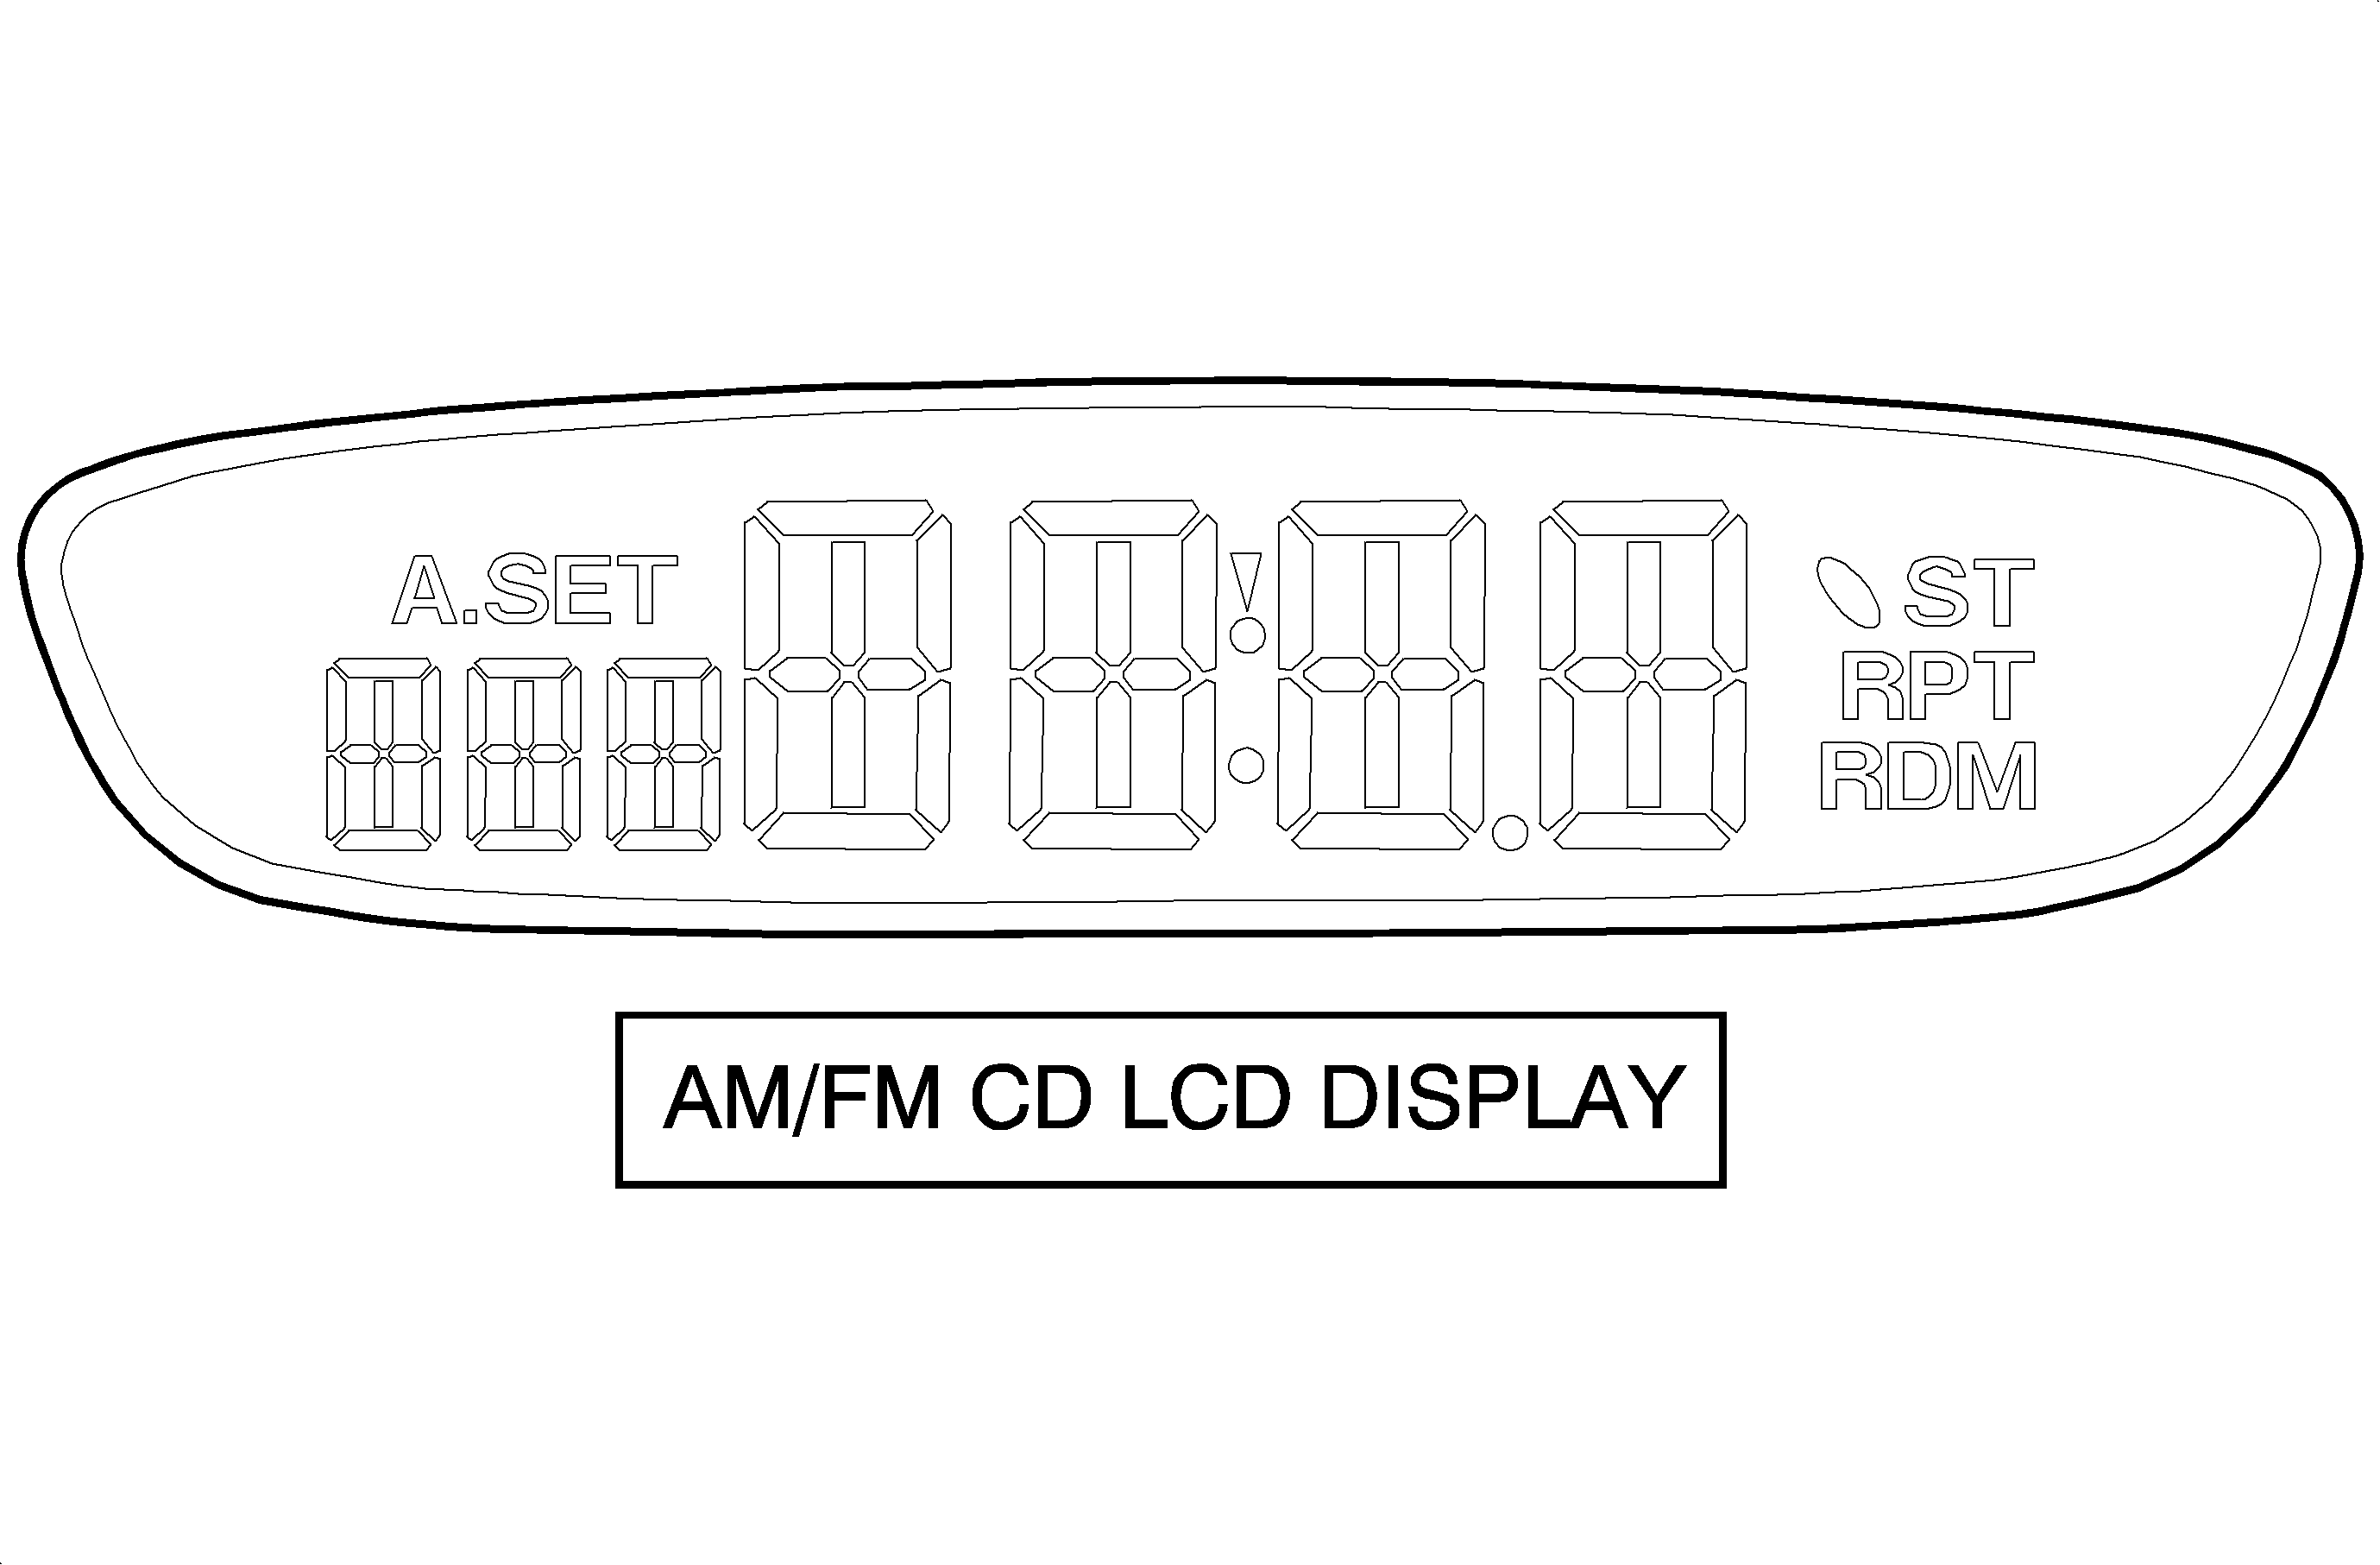
AM/FM CD LCD Display Segment
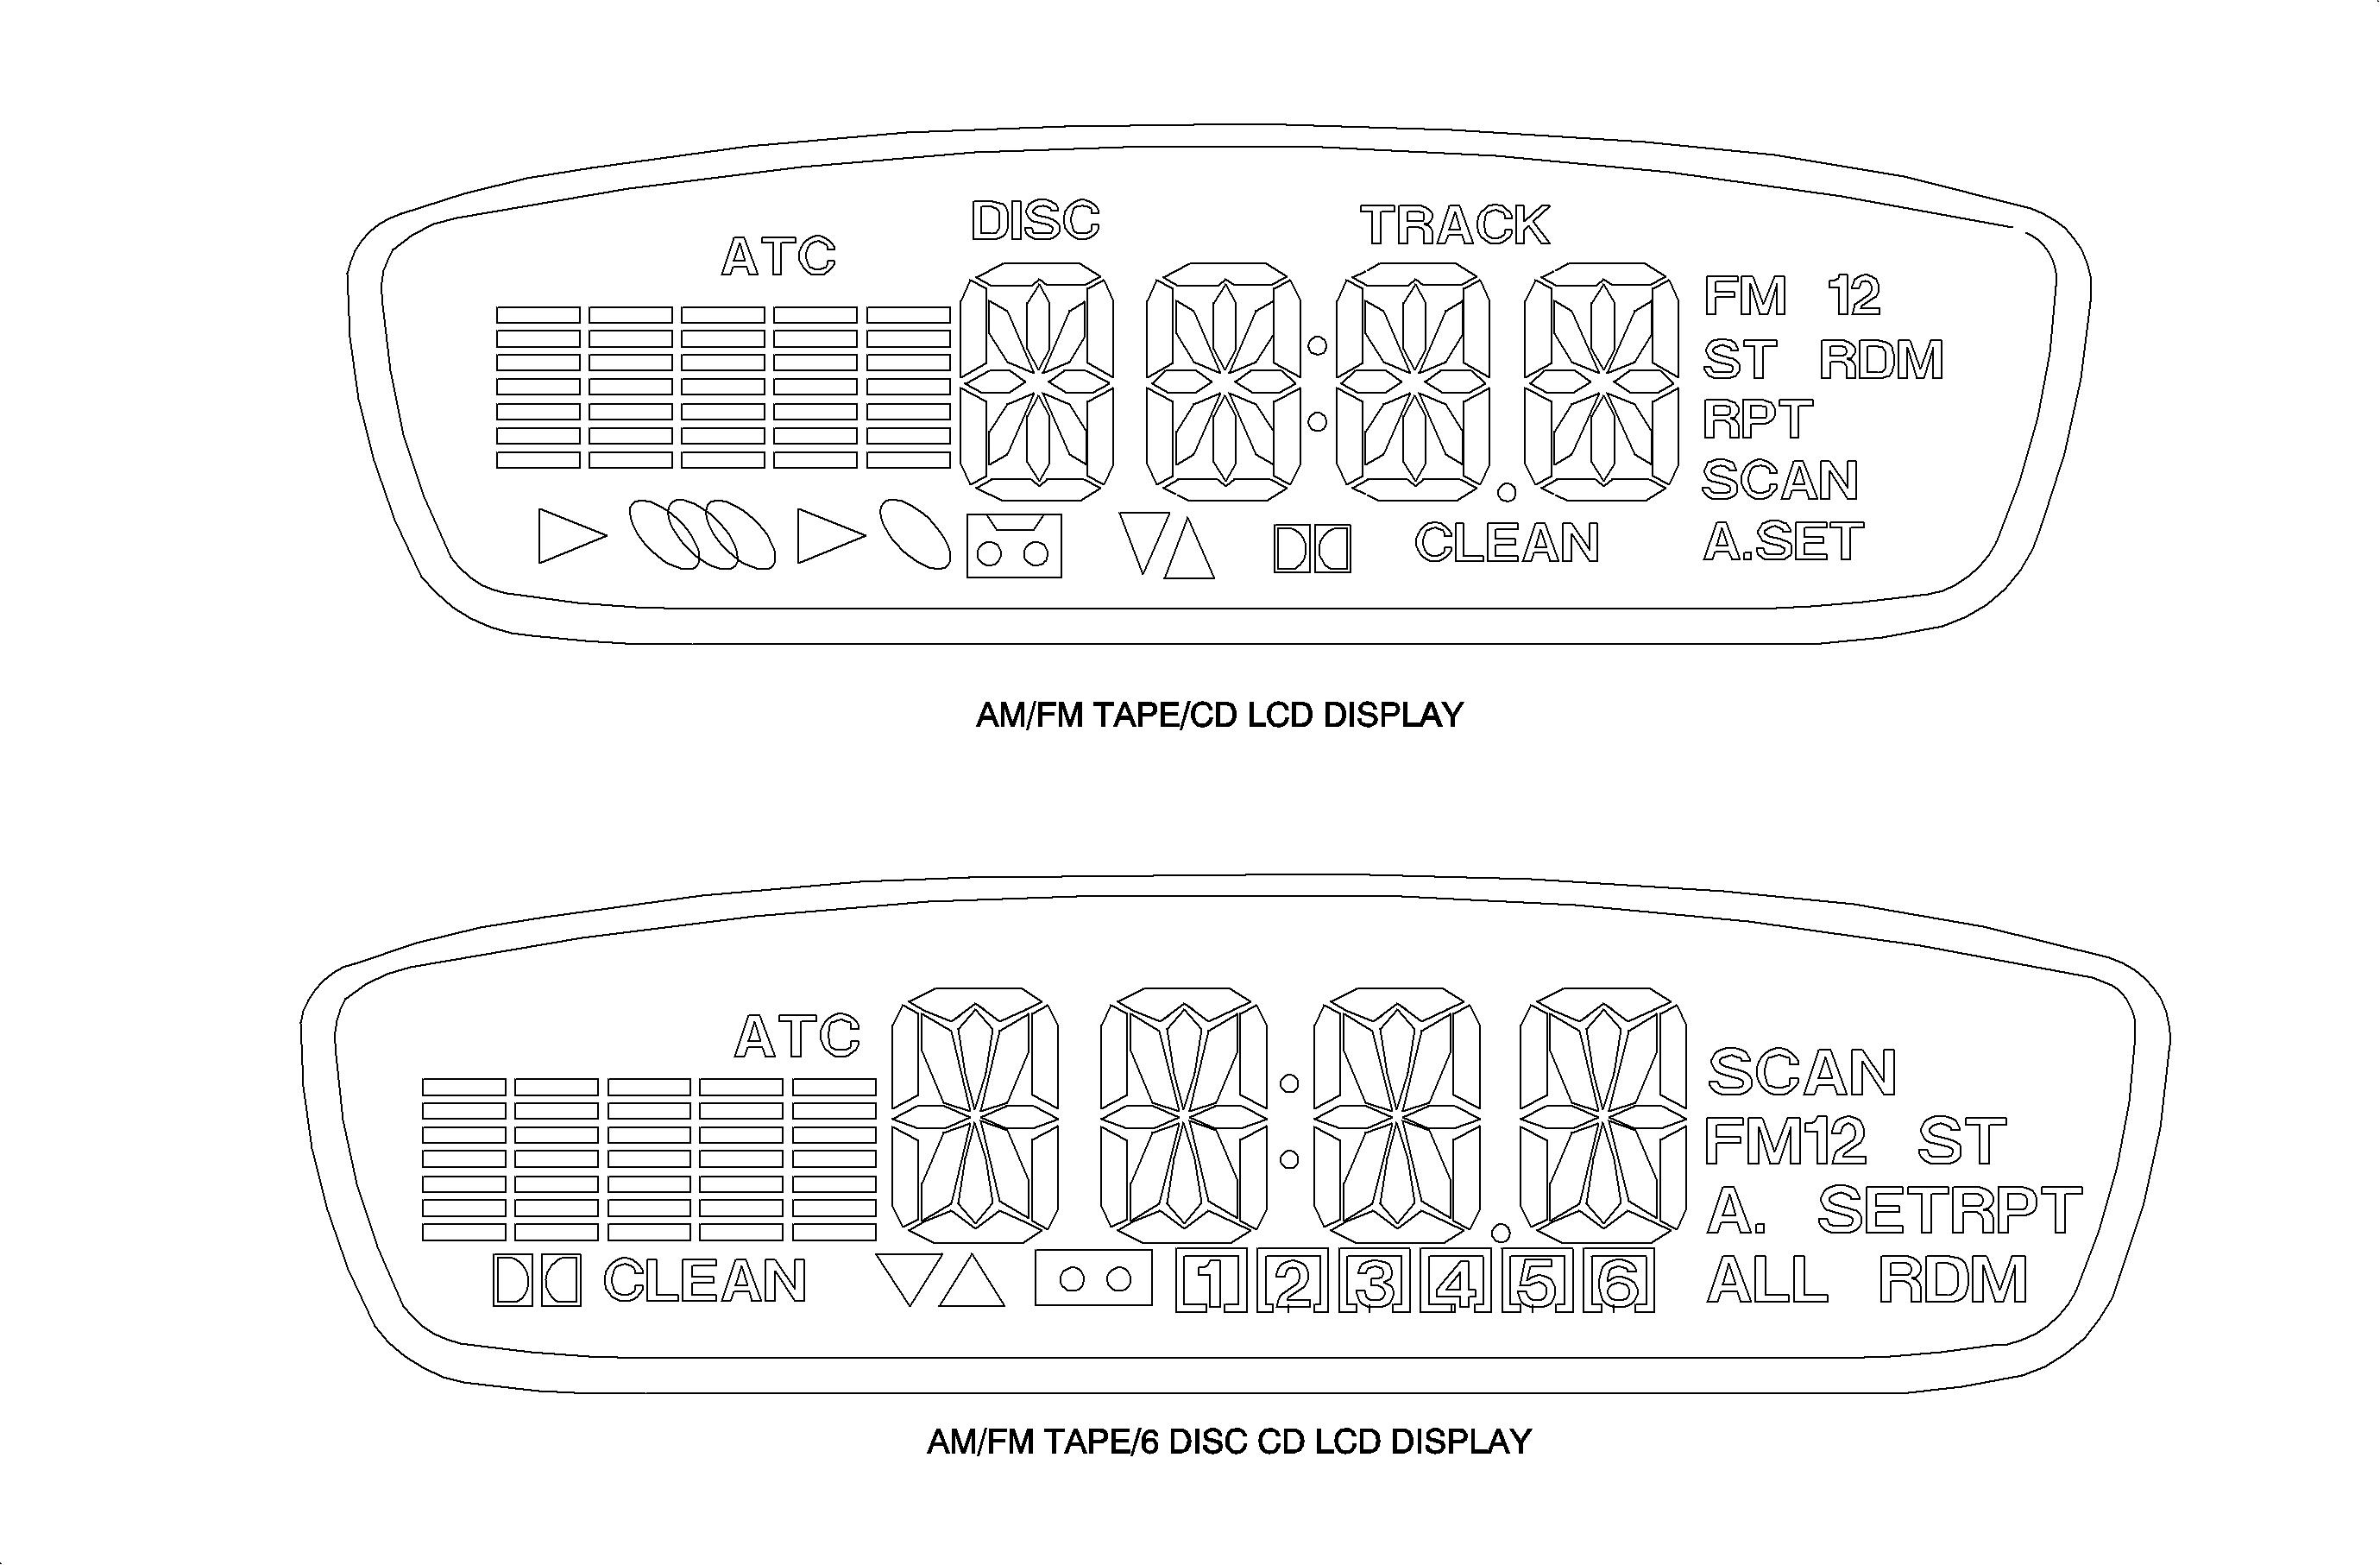
AM/FM Tape/CD and AM/FM Tape/6 CD Display Segments
Key Test Mode
The Key Test Mode is available to verify that each button will function. Refer to Enter On Board Diagnostic Mode procedure prior to referencing this information. A tone is generated each time a button is pressed, to confirm button operation. If a button is pressed and a tone is not generated, replace the radio. Refer to Radio Replacement .
Important: The RCL button and VOL knob will not produce a tone in this test, as performance of their function is known once the On Board Diagnostic Mode and Key Test Mode have been entered. When the key test is complete, press the appropriate button to return to the OBD menu.
Equalization Setting Mode (UP0 and UR9 ONLY)
Radio equalization settings are customized for each vehicle design. The vehicle wiring to the radio determines proper equalization settings. If the "EQ" setting does not reflect the setting listed here, check for proper terminal connection of circuit 43 (IGN) at the 24-way radio connector. Refer to Enter On Board Diagnostic Mode procedure prior to referencing this information. The EQ settings are:
| • | EQ:00 -- Any Saturn with amplifier (RPO WBM) |
| • | EQ:02 -- Saturn ION without amplifier |
| • | EQ:03 -- Saturn VUE without amplifier |
Antenna Signal Meter Mode
The antenna signal meter mode is available to evaluate signal strength. Refer to Enter On Board Diagnostic Mode procedure prior to referencing this information. Once this mode is entered, the audio of the last tuned station is played while the signal strength is displayed. This function may be useful for performing a side-by-side, vehicle-to-vehicle comparison, for evaluating audio system reception complaints. Press the appropriate button to return to the OBD menu.
Clear Diagnostic Trouble Code Mode
The Clear Diagnostic Trouble Code Mode is available to clear the diagnostic trouble code counters. Refer to Enter On Board Diagnostic Mode procedure prior to referencing this information. Once this mode is selected, press and hold RCL for 2 seconds, a tone will be generated and the DTC counters will reset. Press the appropriate button to return to the OBD menu.
Theft Deterrent Feature
The U1C, UR9, and UP0 are equipped with a programmable theft deterrent feature. When the radio has the SEC (armed) mode activated, the radio will enter the LOCK (locked) mode if the power between the battery and the radio is interrupted for more than 20 seconds. While in the locked mode, "LOCK" appears on the radio display and all radio functions are disabled.
When the vehicle is first purchased or the radio is new or remanufactured, the theft deterrent feature is unarmed. If desired, the customer must program a four-digit code into the radio to activate the theft deterrent feature.
Operating Modes
The theft deterrent feature causes 3 operating modes:
| • | VULNERABLE (UNARMED) MODE -The radio does not have a 4-digit code stored. If stolen, the radio will operate normally when power is applied. |
| • | SECURE (ARMED) MODE - The radio has a 4-digit code stored. The radio will enter the LOCK (locked) mode if the power between the battery and the radio is interrupted for more than 20 seconds. |
| • | LOCK (LOCKED) MODE - The radio has been removed from power for more than 20 seconds or the wrong four-digit code has been entered while in the SEC (armed) mode. |
Important: Before performing service on a vehicle, verify the theft deterrent feature is
in the VULNERABLE (unarmed) mode. This check is made by the following steps:
Activating Theft Deterrent
To arm the theft deterrent feature, perform the following:
- Turn the ignition ON. Radio OFF.
- Press and hold preset buttons 5 and 6, at the same time, for 5 seconds. The radio will display "- - - -".
- Have the customer select a 4-digit code. (Suggest to use a number that is familiar to them.)
- Enter the 4-digit code by using the SEEK/SCAN and TUNE rocker buttons. The numbers will start at 0000 and will increase on the display each time the corresponding side of the rocker button is pushed.
- Push the AM/FM button. The display will show "REP" (repeat), requesting the 4-digit code to be entered again to verify correct entry.
- Again, enter the same four-digit code, using the SEEK/SCAN and TUNE rocker buttons.
- Push the AM/FM button to store the code.
- The display will show "SEC" indicating the radio is armed and the radio will return to normal operation.
| 4.1. | Press the down arrow side of the SEEK/SCAN rocker button to change the left digit. |
| 4.2. | Press the up arrow side of the SEEK/SCAN rocker button to change the second to left digit. |
| 4.3. | Press the down arrow side of the TUNE rocker button to change the third to left digit. |
| 4.4. | Press the up arrow side of the TUNE rocker button to change the fourth to left digit. |
| 6.1. | Press the down arrow side of the SEEK/SCAN rocker button to change the left digit. |
| 6.2. | Press the up arrow side of the SEEK/SCAN rocker button to change the second to left digit. |
| 6.3. | Press the down arrow side of the TUNE rocker button to change the third to left digit. |
| 6.4. | Press the up arrow side of the TUNE rocker button to change the fourth to left digit. |
If the radio displays "Err1", "Err2", or "LOCK", then the radio was already in the secure state and is armed with a different code than the one that was entered. Proceed to the appropriate part of this Theft Deterrent section to deactivate the system if deactivation is desired.
Deactivating the Theft Deterrent Feature -- Radio in "SEC" (ARMED) MODE
To deactivate the theft deterrent feature, enter the customer's code or the factory unlock code using steps 1-7 of the "Activating Theft Deterrent" procedure in this section. After completing those steps, the display will show no number. This indicates the theft deterrent feature is in the VULNERABLE (unarmed) mode and service may be performed.
When the vehicle is returned to the customer, remind the customer to reactivate the theft deterrent feature using the procedure given in the owner's manual.
Deactivating Theft Deterrent -- Radio in "LOCK" or "- - - -" MODE (CODE KNOWN)
When the theft deterrent feature is in the SEC (armed) mode, the radio can enter the locked state if the power is removed for greater than 20 seconds or an incorrect code entry is attempted three times. An error message is displayed after every wrong entry.
When the radio is in the LOCK (locked) mode, "LOCK" is displayed and all radio functions are disabled.
Before another attempt at the correct code can be made, the radio must be ON and the display must show "LOCK" for and hour. After an hour, "- - - -" will be displayed and the correct code may be entered using the following steps.
- Turn the ignition ON.
- Press the power button on the radio. The display will show "- - - -".
- Enter the 4-digit code by using the SEEK/SCAN and TUNE rocker buttons. The numbers will start at 0000 and will increase on the display each time the corresponding side of the rocker button is pushed.
- Press the AM/FM button after entering the 4-digit code. If the incorrect code has been entered, the radio will return to the SEC (armed) mode and normal operation will return. If the wrong code is entered, the display will show an error message and display "- - - -" indicating another attempt at the correct code can be made.
| 3.1. | Press the down arrow side of the SEEK/SCAN rocker button to change the left digit. |
| 3.2. | Press the up arrow side of the SEEK/SCAN rocker button to change the second to left digit. |
| 3.3. | Press the down arrow side of the TUNE rocker button to change the third to left digit. |
| 3.4. | Press the up arrow side of the TUNE rocker button to change the fourth to left digit. |
Deactivating Theft Deterrent - Radio in "LOCK" or "- - - -" Mode (Code Unknown)
When the theft deterrent feature is armed or secure (SEC), the radio can enter the locked state if the power is removed from the radio for greater than 20 seconds or an incorrect code is attempted 3 times. An error message is displayed after every wrong entry.
When the radio is in the LOCK (locked) mode, "LOCK" is displayed and all radio functions are disabled.
Before another attempt at the correct code can be made, the radio must be ON and the display must show "LOCK" for an hour. After an hour, "- - - -" will be displayed and the correct code may be entered using the following steps:
If the customer code is unknown, perform the following steps to retrieve the customer code:
- Turn ignition ON.
- Turn radio power OFF.
- Press and hold preset buttons "1" and "2" for 5-seconds. A 4-digit code will be displayed. This number is not the customer's code. Record this number as it is needed before technical support is called.
- Using a touch tone phone only, call the technical support system at 1-888-225-2306 (USA & Canada). When advised, give the following information:
- Turn ignition ON.
- Press the radio power button. The display will show "- - - -".
- Enter the four-digit code by using the SEEK/SCAN and TUNE rocker buttons. The numbers will start at 0000 and will increase on the display each time the corresponding side of the rocker button is pushed.
- Press the AM/FM button after entering the 4-digit code. If the correct code has been entered, the radio will return to the SEC (armed) mode and normal operation will return. If the wrong code has been entered, the display will show an error message and display "- - - -" indicating another attempt at the correct code can be made.
| 4.1. | Your retailer code. |
| 4.2. | The 4-digit radio display code obtained in step 3. |
| 4.3. | In response, you will receive the factory unlock code; record this number. |
NOTE: The factory unlock code received is the same as the code that was entered by the customer.
| 7.1. | Press the down arrow side of the SEEK/SCAN rocker button to change the left digit. |
| 7.2. | Press the up arrow side of the SEEK/SCAN rocker button to change the second to left digit. |
| 7.3. | Press the down arrow side of the TUNE rocker button to change the third to left digit. |
| 7.4. | Press the up arrow side of the TUNE rocker button to change the fourth to left digit. |
