2003 Saturn VUE Vehicles Equipped with VTi Transaxles

| Subject: | VTi TRANSAXLE SOFTWARE UPGRADE AND WIRING MODIFICATION |
| Models: | 2003 SATURN VUE VEHICLES EQUIPPED WITH VTi TRANSAXLES |
All Saturn Retailers and Service Providers
Saturn has decided that some 2003 Model Year Saturn VUE vehicles equipped with VTi transaxles exhibit a condition where momentary excessive pressure within the transaxle may damage the internal filter. This condition can cause a transaxle noise and, if not corrected, internal transaxle damage and premature failure.
To prevent this condition from occurring, Saturn will perform a transaxle software upgrade and wiring modification.
Vehicles Involved
Only selected 2003 model year Saturn VUE vehicles within the following VIN range will require this service:
3S800001-3S823122
You must verify vehicle involvement through your AS400 system. It is important to note that claims for reimbursement will only be paid on involved vehicles.
Owner Notification
Owners of all involved vehicles will be notified of this customer satisfaction program by Saturn. Refer to the owner letter included in this bulletin.
Facility VIN Listing
A list of vehicles assigned to you (Facility VIN Listing), which our records indicate were sold by or shipped to you, or are located in close proximity to your facility, is enclosed. This listing contains:
| • | Complete vehicle identification number (VIN); and |
| • | VINs of vehicles, which according to Saturn records are in retail stock. |
The Facility VIN Listing is furnished to involved Retailers with the customer satisfaction program bulletin.
Those Retailers not involved initially in this program will receive a message at the top of a blank Facility VIN Listing that states: NO VEHICLES ASSIGNED AT THIS TIME .
Retailer Responsibility
All unsold vehicles in Retailers' possession and subject to this bulletin must be held at the retail facility and repaired per the service procedure of this bulletin before owners take possession of these vehicles.
In summary, whenever a vehicle subject to this bulletin enters your vehicle inventory, or is in your retail facility for service in the future, please take the steps necessary to be sure the bulletin correction has been made before selling or releasing the vehicle.
Transfer of Customer Satisfaction Program Responsibility
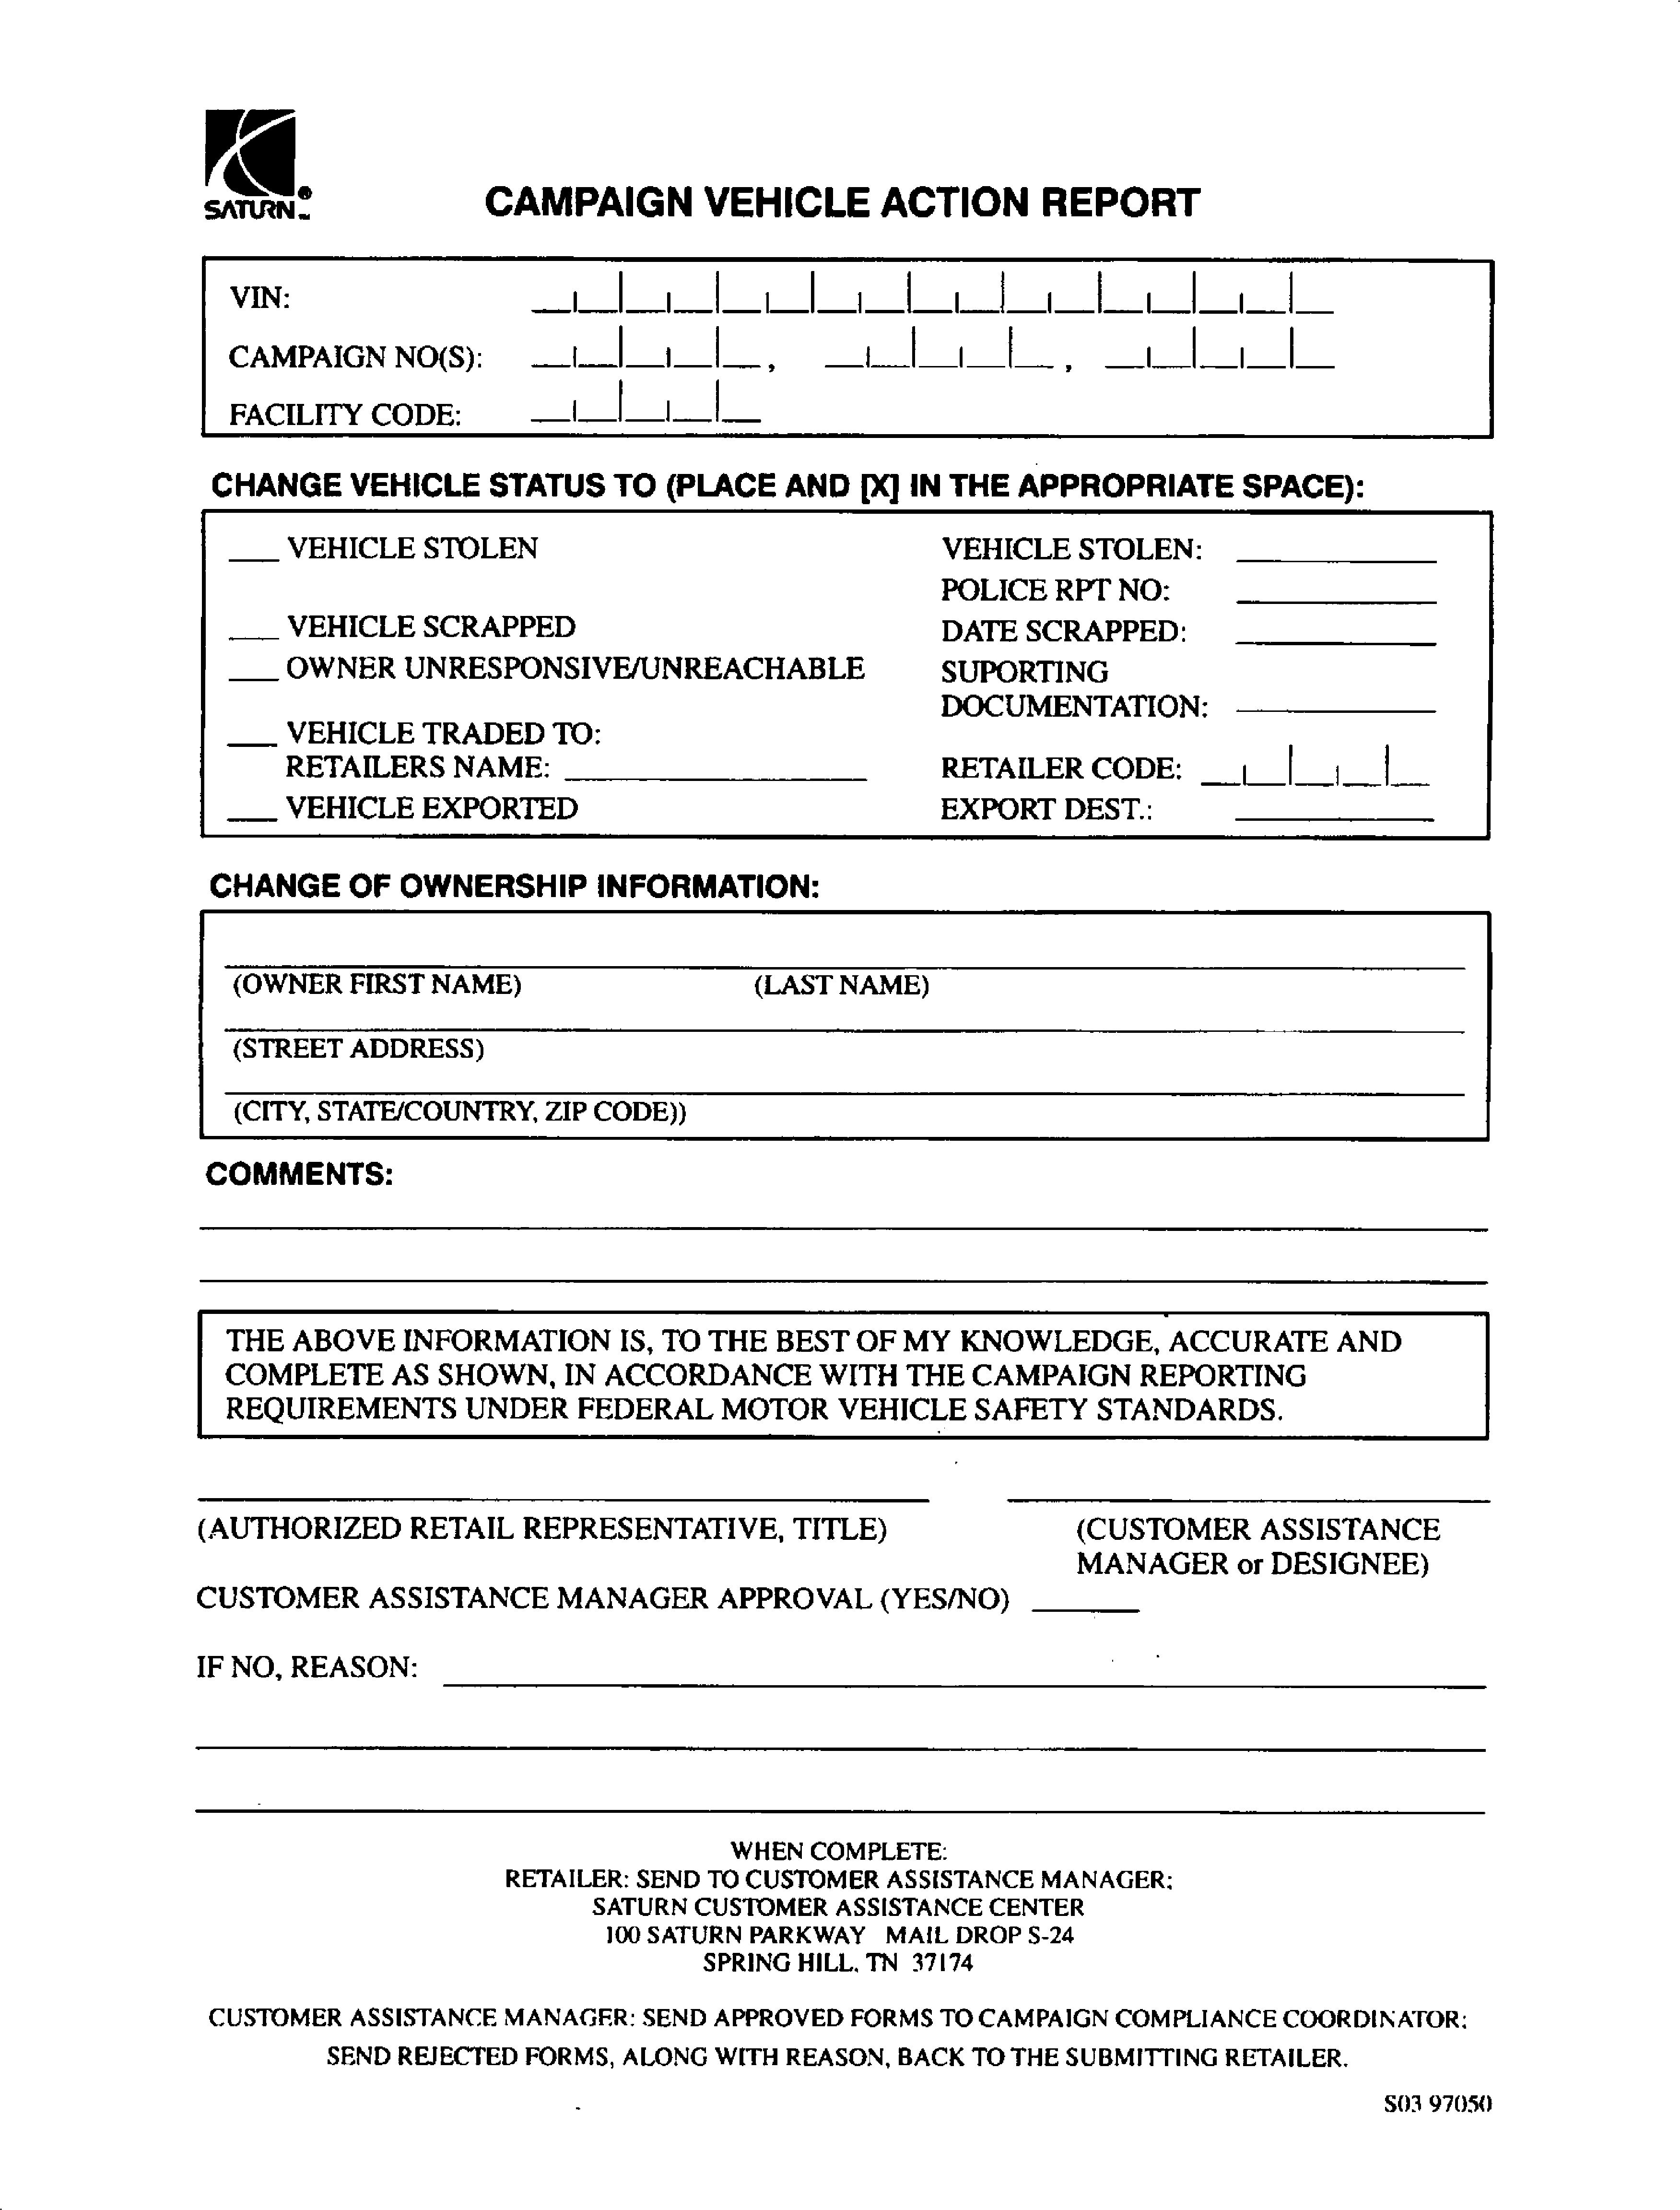
Saturn vehicles that have been sold by you, which may be closer in proximity to another Saturn Retailer, may still appear on your Facility VIN Listing. If you determine that it is more desirable for a vehicle on your Facility VIN Listing to be serviced by another Saturn Retailer, responsibility may be transferred by completing a Campaign Vehicle Action Report and submitting it to your Customer Assistance Manager (CAM) at the Saturn Customer Assistance Center.
A copy of the Campaign Vehicle Action Report is included for your reference. Additional copies can be ordered from Saturn Publications (1-800-828-2112, prompt 3, Item # S0397050). All changes in responsibility will be reflected in your next Unfixed VIN Report.
All other changes in vehicle status, e.g., scrapped, stolen, etc., are to be made in accordance with section 4.4.3 of the Retailer Service Reference Guide, Notifying Saturn of Vehicle Status Change.
Parts Information
A pre-shipment of splice sleeves (splice - wire) required to perform this bulletin has been automatically sent to involved Retailers from Saturn Service Parts (SSPO). These initial parts shipments are to aid the Retailers in bulletin preparation and will ensure minimal customer inconvenience.
Should additional parts be required, please order as needed
Part Number | Description | Quantity Required Per Vehicle |
|---|---|---|
12089189 | Splice-Wire | 1 |
Service Procedure
- Inspect vehicle VIN and verify customer satisfaction program involvement through your AS400 system.
- If the vehicle is involved, it will be necessary to reprogram the transaxle control module (TCM).
- Reprogram the TCM with new TCM calibration. Refer to Reprogramming in the Service Programming System section of the SSS/Tech 2 User Guide for programming procedures.
- Remove the battery box cover.
- Disconnect the negative battery cable.
- Disconnect the positive battery cable.
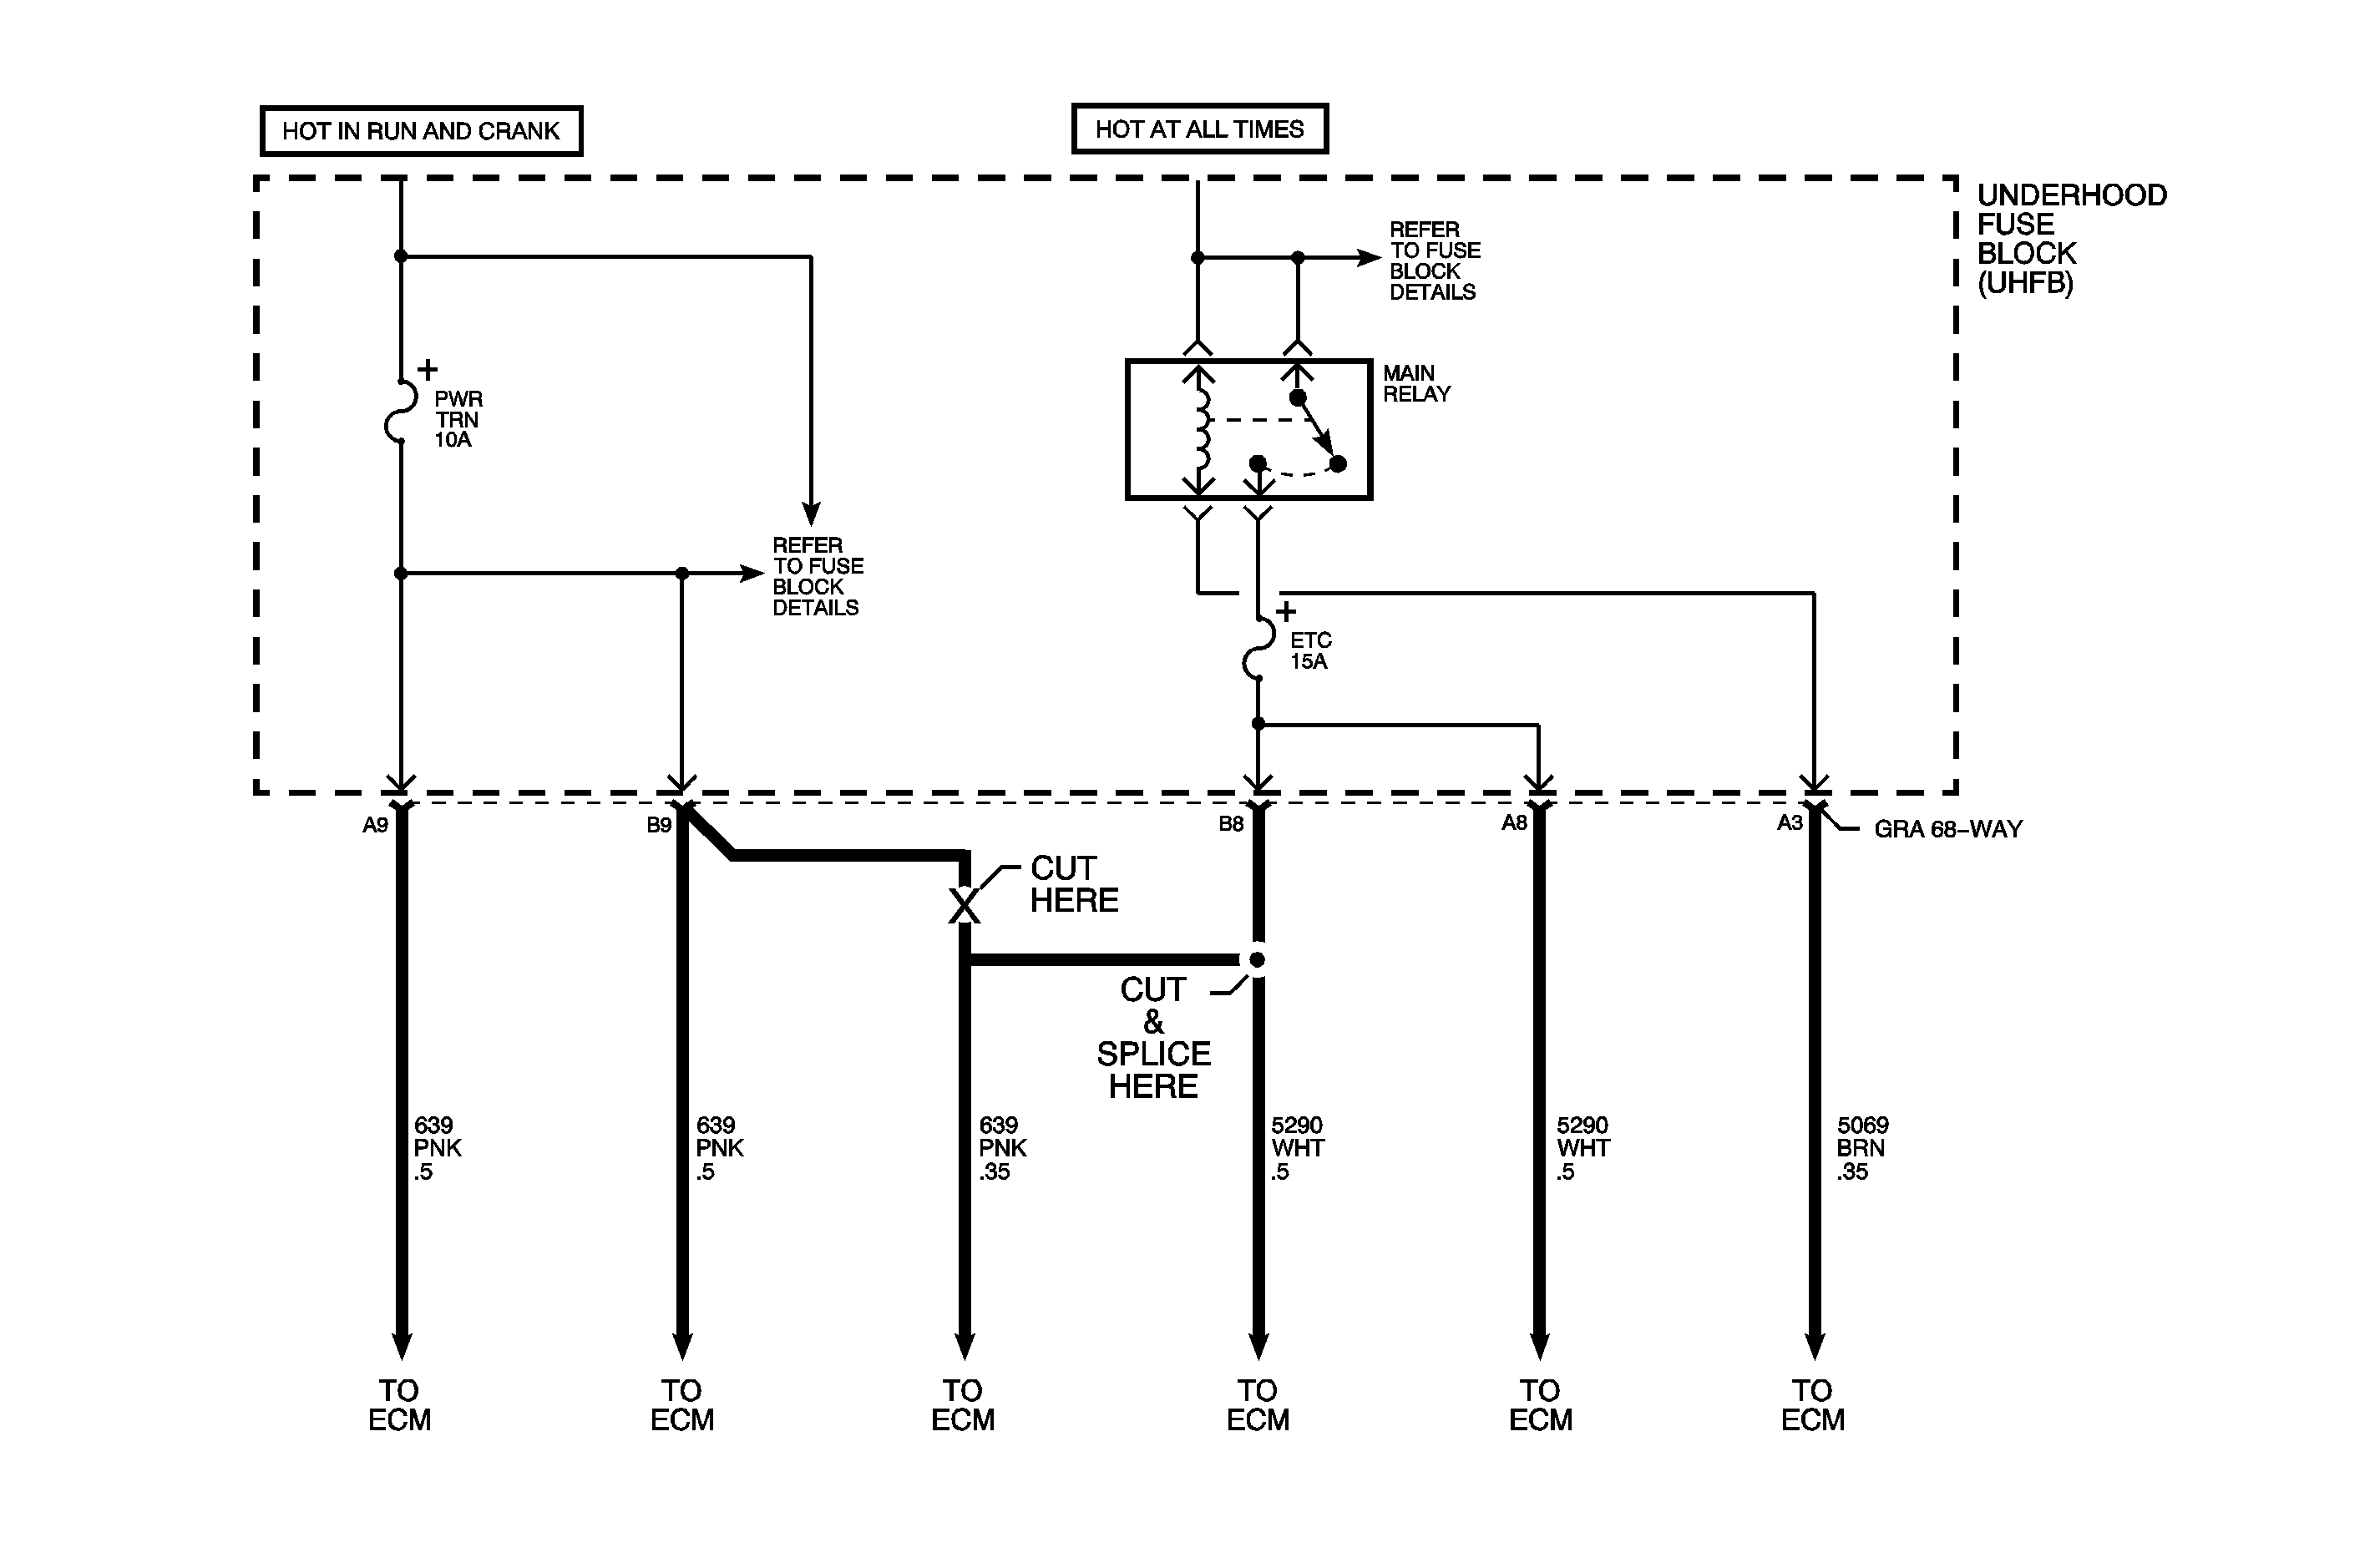
- Remove the underhood fuse block (UHFB) cover.
- Remove the positive battery cable and electric power steering (EPS) wire from the B+ terminal at the UHFB.
- Release the fuse block retaining clips from the battery box.
- Release the engine harness clips from the battery box.
- Loosen the retaining bolts at the J-2 engine harness connector from the UHFB (purple cover).
- Unfasten the UHFB J-2 engine harness connector from the battery box and disconnect the UHFB.
- Remove the purple cover from the J-2 engine harness connector.
- Remove the black electrical tape from the engine wire harness, near the J-2 engine harness connector.
- Remove the terminal position assurance (TPA) from the J-2 engine harness connector.
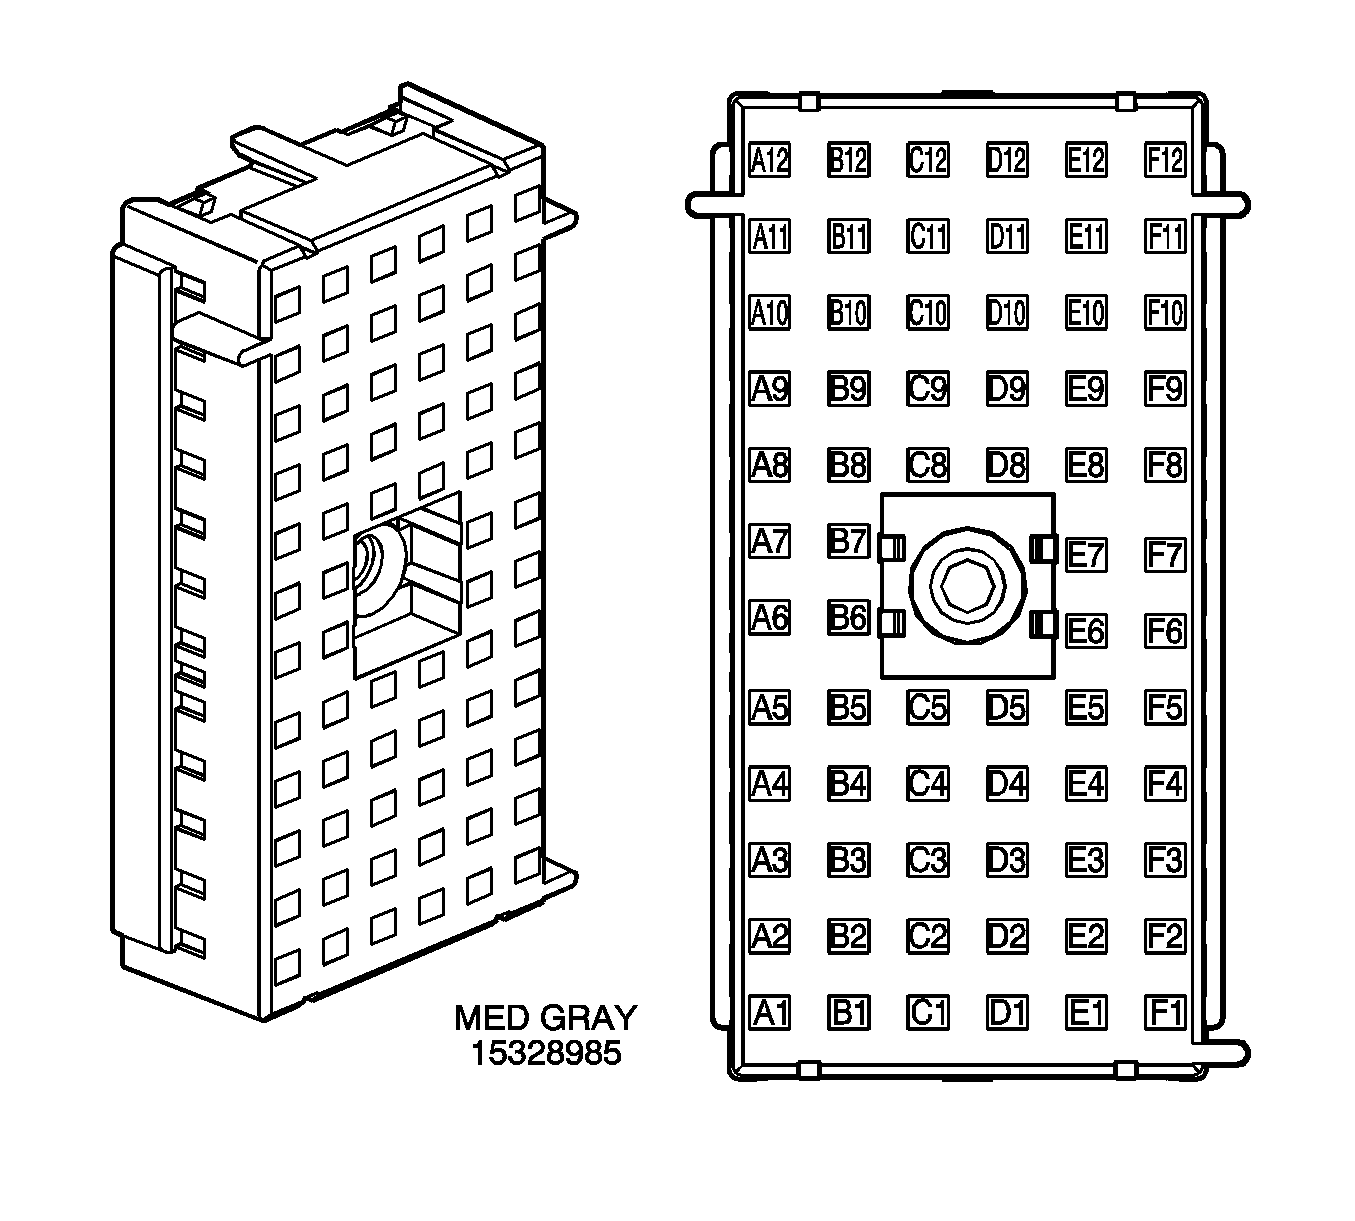
- Insert the terminal lock release tool, tool number 12094430, into cavity B-8 circuit 5290A, to release 0.5 mm white wire and pull the wire out of the back of the connector.
- Insert terminal lock release tool, tool number 12094430, into cavity B-9 circuit 639 A and B, to release 0.35 mm and 0.5 mm pink wires and pull the wires out of the back of the connector.
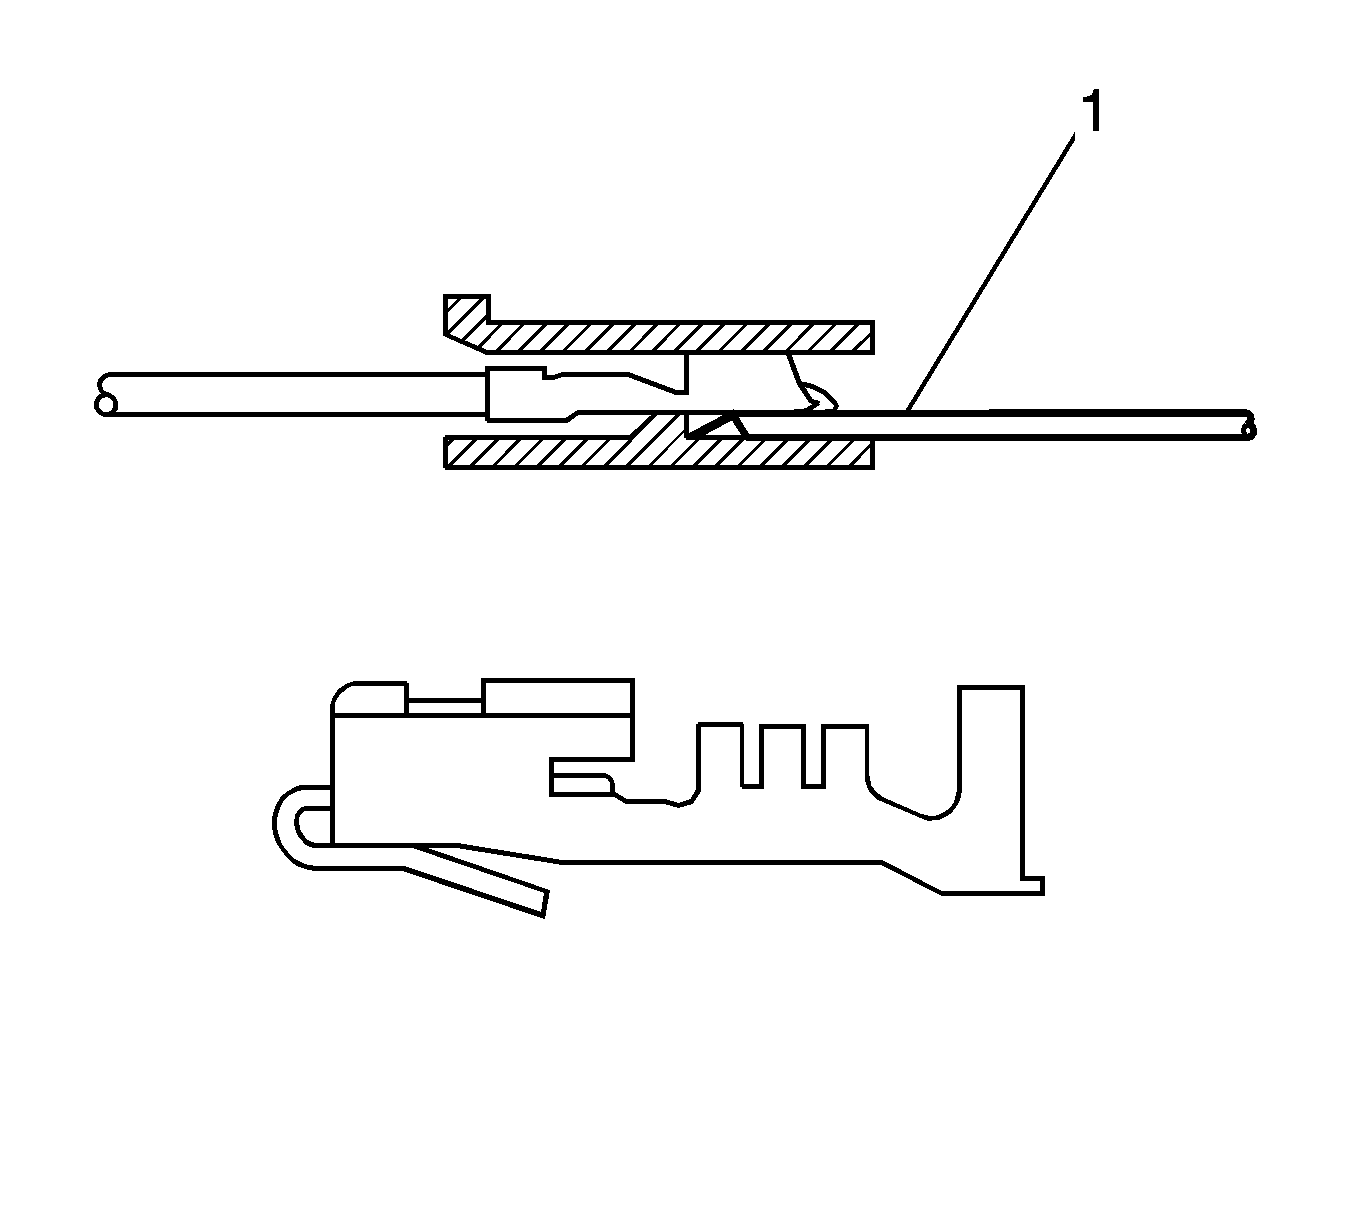
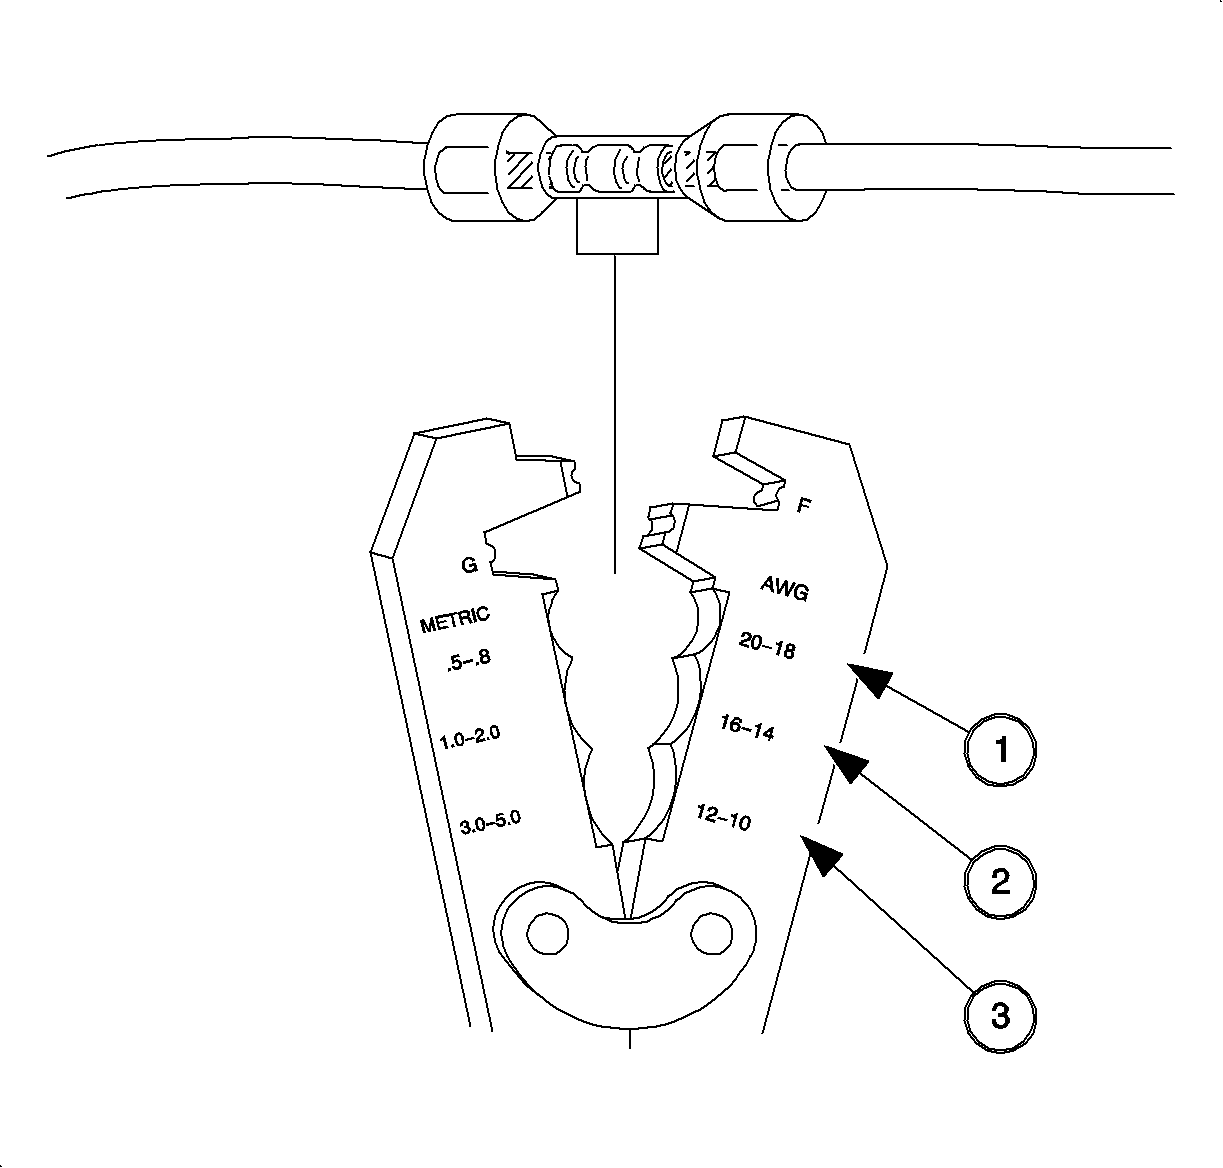
- From the B-9 terminal, select the larger of the two pink wires that are spliced together and cut the larger (0.5 mm) (1) of the two pink wires as close to the terminal as possible.
- Cut off 25.4 mm (1 in) (2) from the larger 0.5 mm pink wire that was in cavity B-9 and discard it.
- Strip 6.35 mm (1/4 in) (2) of insulation from the larger 0.5 mm pink wire that was removed from cavity B-9. Caution must be used to prevent cutting the wire strands.
- From the B-8 terminal, select the white wire and cut it approximately 2 inches from the terminal end. Do not discard the 2 inch section of wire and terminal end.
- Strip 6.35 mm (1/4 in) of insulation from the 0.5 mm white wire that was removed from cavity B-8. Caution must be used to prevent cutting the wire strands.
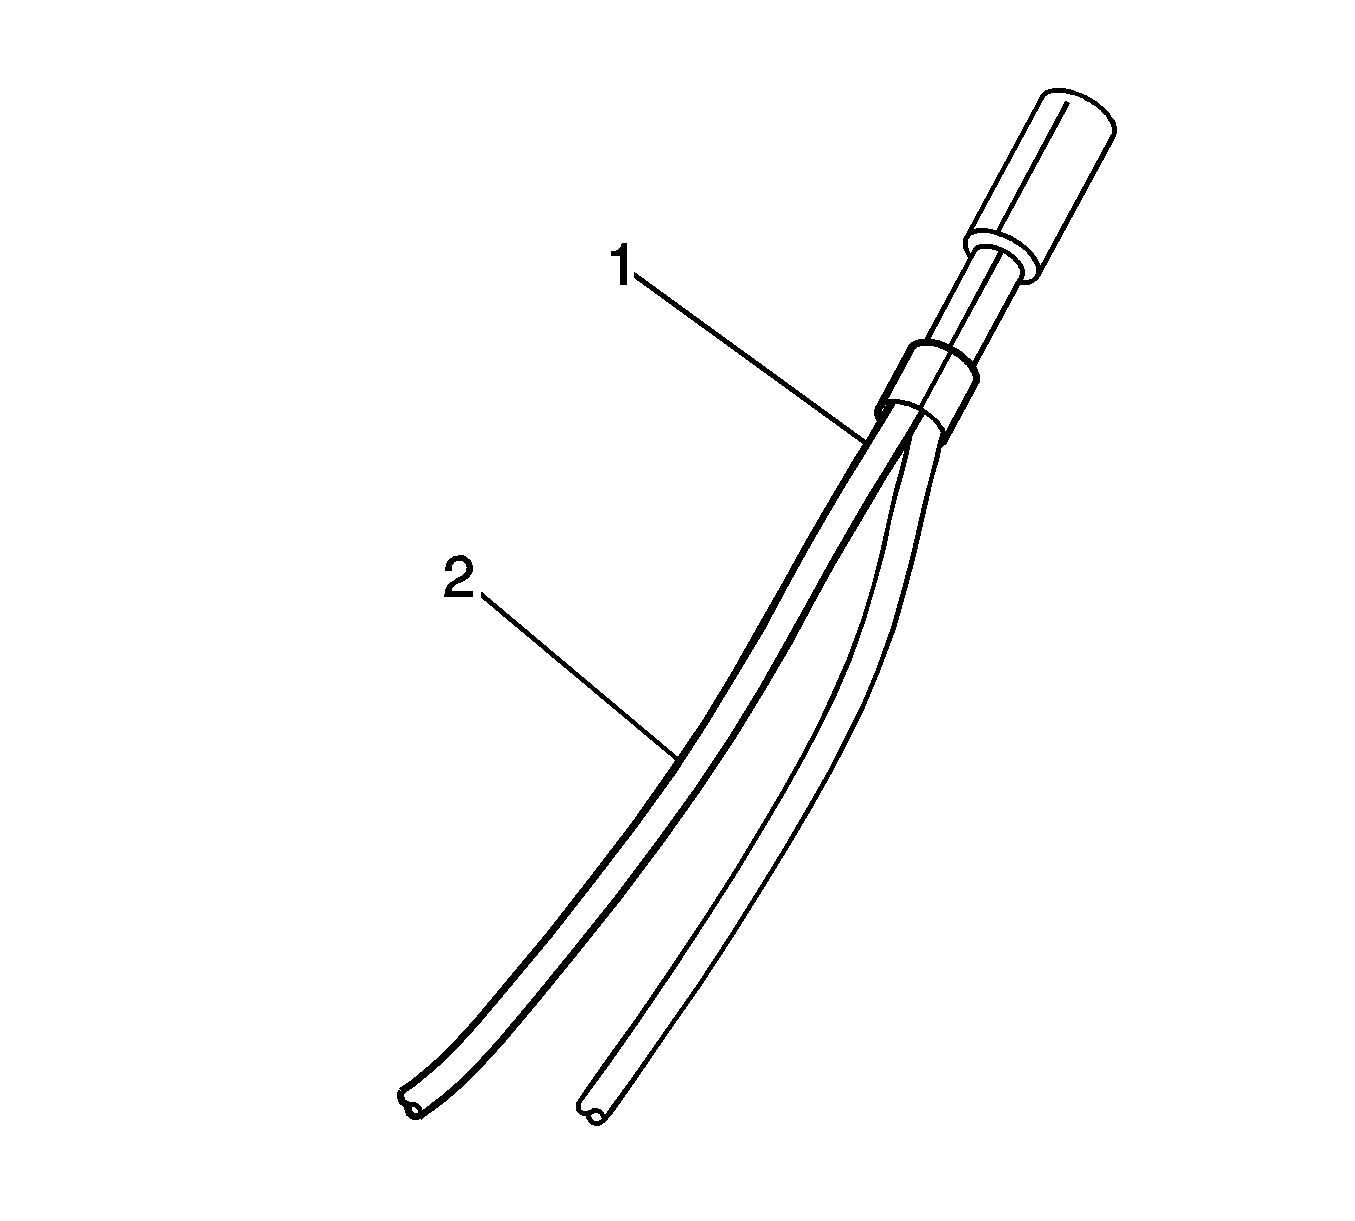
- Twist together the 0.5 mm white wire circuit 5290A and 0.5 mm pink wire circuit 639A.
- Insert the twisted pair of wires into one side of the splice sleeve, P/N 12089189, until the wires hit the stop in the center of splice sleeve.
- Using an appropriate crimping tool, hand crimp the one side of the splice sleeve that houses the twisted pair of wires. Gently tug on wires after crimping to ensure they are secure.
- Strip 6.35 mm (1/4 in) of insulation from the 2 inch section of 0.5 mm white wire circuit 5290A and insert it into the other end of the splice sleeve.
- Using an appropriate crimping tool, hand crimp the other side of the splice sleeve that houses the 0.5 mm white wire circuit 5290A. Gently tug on wires after crimping to ensure they are secure.
- Apply heat using Ultratorch®, heat gun or equivalent device, heating to 175° C (347° F) until glue flows around edges of the sleeve.
- Insert the terminal with the single 0.35 mm pink wire into cavity B-9. Ensure the terminal locking tab is engaged by tugging on the wire.
- Insert the terminal with the twisted pair of wires, 0.5 mm pink and 0.5 mm white, into cavity B-8. Ensure the terminal locking tab is engaged by gently tugging on the wire.
- Reinstall the TPA into the J-2 engine harness connector.
- Using electrical tape, re-tape the J-2 wire harness close to the fuse block connector.
- Re-install the purple fuse block connector cover on to the J-2 engine harness connector.
- Connect the J-2 engine harness connector and attach it into UHFB housing.
- Install UHFB connector retaining bolt.
- Install the UHFB into the battery box.
- Secure the engine harness into the battery box retaining clips.
- Attach the positive battery cable and electric power steering wire to the B+ terminal at the UHFB.
- Connect the positive battery cable.
- Connect the negative battery cable.
- Install the UHFB cover.
- Install the battery box cover.
- Affix the Identification Label on a clean and dry surface of the radiator core support, in an area clearly visible when the hood is raised. For more information, refer to IDENTIFICATION LABEL in this bulletin.
Important: Saturn Service Stall System software version titled Saturn SPS Update (October 2002), mailed to retail facilities on October 15, 2002, is required to reprogram the TCM. Subsequent releases of the Saturn Service Stall System will have a different numbering convention that follows the month of release, e.g., data CD11 will be released in November and data CD12 will be released in December. Any CD release greater than or equal to data CD 11 will also have the necessary files required to program the TCM. To verify current software version from within TIS2000, select "help," and then "about TIS 2000."
Underhood Fuse Block Removal (UHFB)
Terminal Removal
Wire Splicing
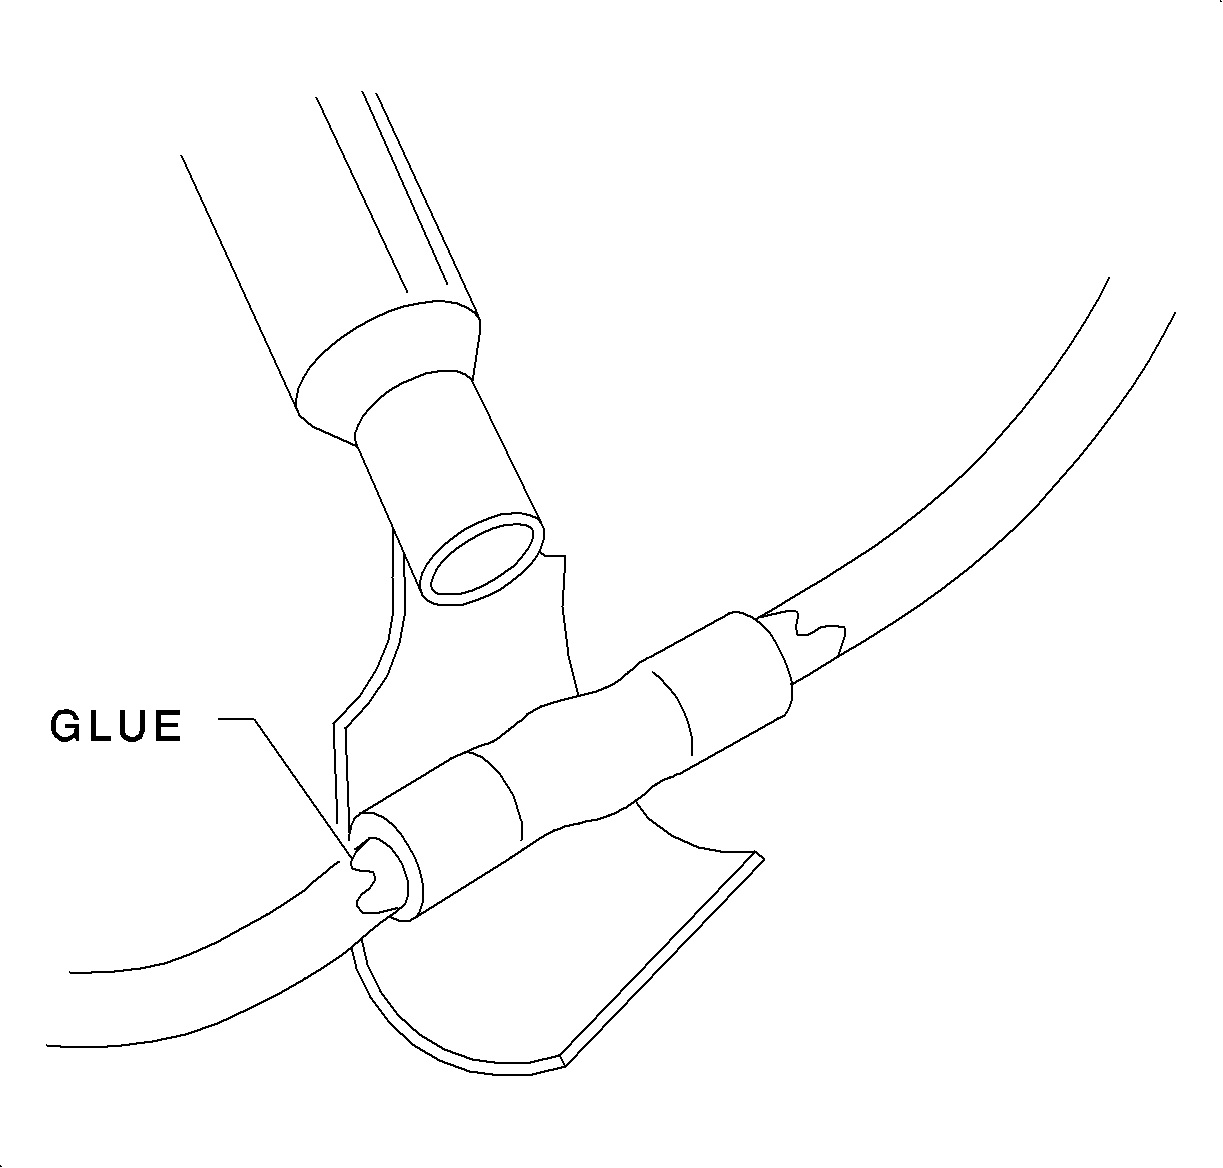
Caution: DO NOT USE A MATCH OR OPEN FLAME TO APPLY HEAT TO SPLICE SLEEVE.
Underhood Fuse Block Installation
Tighten
Tighten the harness connector retainer to 4 N·m
(35 lbs in).
Tighten
Tighten the UHFB B+ terminal nut to 10 N·m
(89 lbs in).
Tighten
Tighten the battery terminal bolt to 17 N·m
(11 lbs ft).
Tighten
Tighten the battery terminal bolt to 17 N·m
(11 lbs ft).
Identification Label
Upon completion of this customer satisfaction program, an Identification Label and Clear Protective Cover should be affixed on a clean, dry surface of the radiator core support in an area clearly visible when the hood is raised. Each label provides a space to print in ink, or type, the bulletin number (03C01) and the five (5) digit facility code of the Retailer performing the bulletin service.
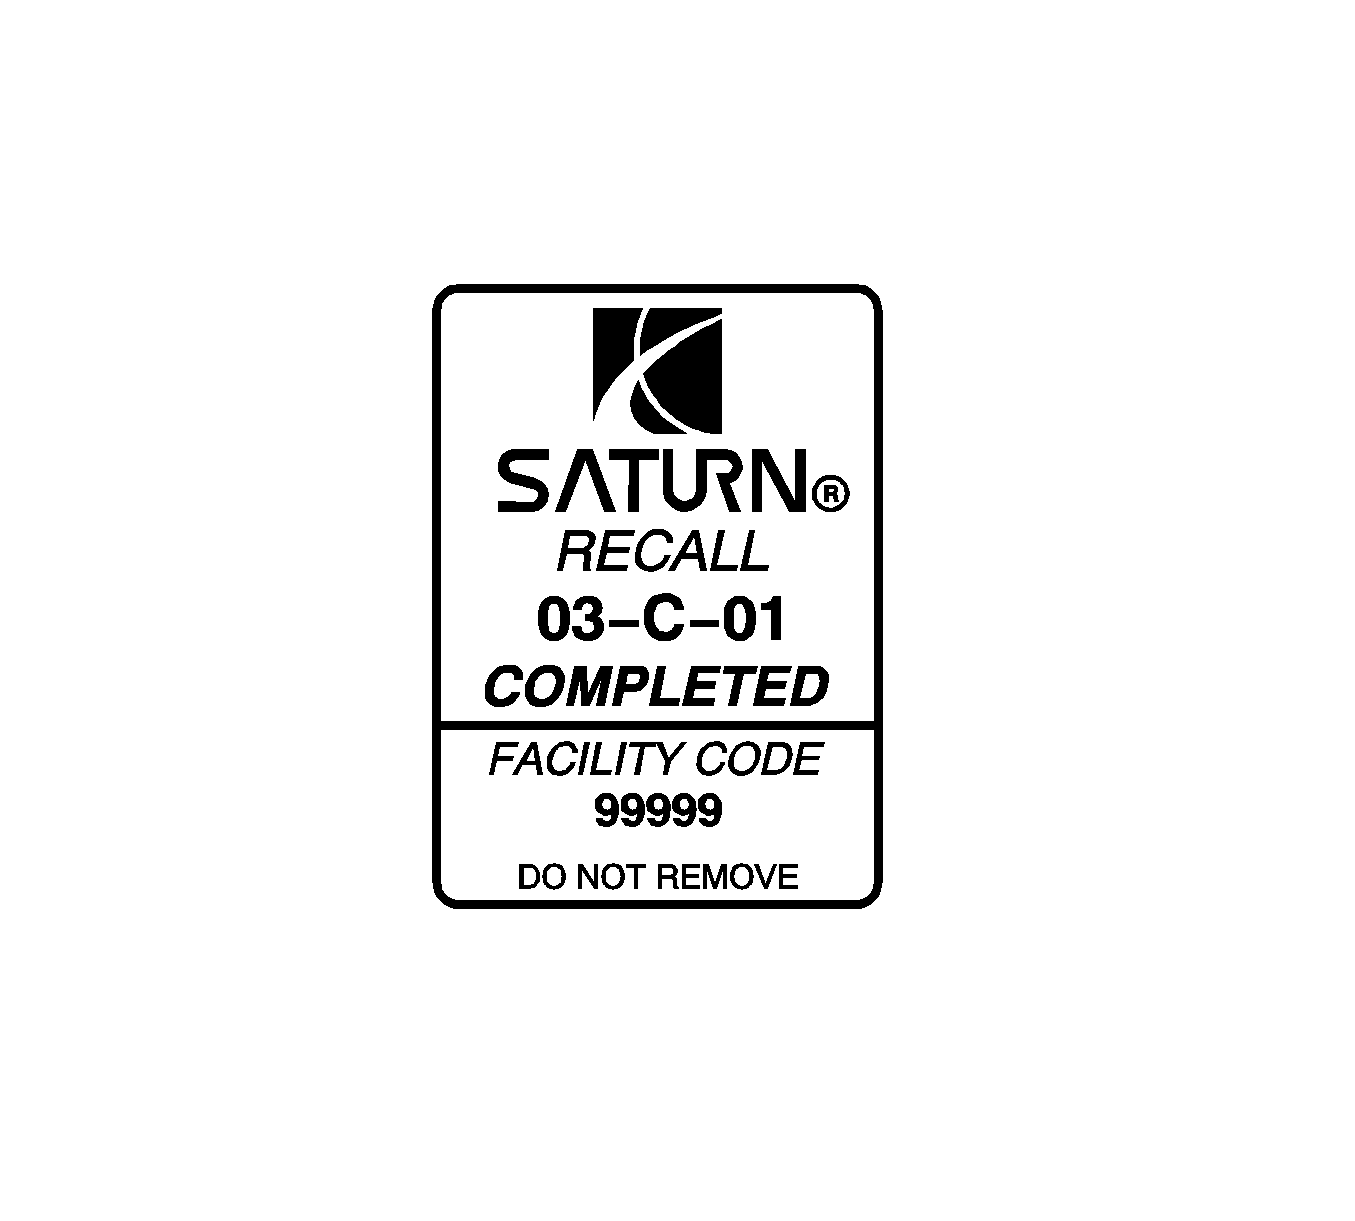
As a reminder, additional labels may be ordered from Saturn Publications (1-800-828-2112, prompt 3, Item # S03 00013A for the Identification Label, and item # S03 00013B for the Clear Protective Cover).
Credit
1. To receive credit, submit a claim with the information below:
Repair Performed | Parts Allowed | Sale Type | Case Type | Labor Op. | Labor Hrs. | Admin. Hrs. **** |
|---|---|---|---|---|---|---|
Reprogram TCM and Modify Wire Harness | * | WC | VC | V0915 | 0.9 | 0.1 |
2. To receive credit for loaner/rental vehicle costs incurred while the owner awaits program repair or other goodwill expenses, submit a claim with the information below:
Repair Performed | Sale Type | Case Type | Labor Op. | Net Item Amount | Net Item Code | # Days Rental |
|---|---|---|---|---|---|---|
Loaner Reimbursement | WC | VC | V0916 | ** | C | *** |
Other Goodwill | WC | VC | V0917 | ** | R | N/A |
3. Retailers are empowered to use good judgement regarding loaner/rental vehicles or any other goodwill expenses deemed necessary. It will not be necessary to call the Saturn Customer Assistance Center for authorization of goodwill. The Goodwill Worksheet, printed towards the back of this bulletin, must be used to document goodwill expenses. The completed Goodwill Worksheet must be attached to the hard copy of the CSO. Retailers are to make sufficient copies of the blank Goodwill Worksheet to document goodwill expenses.
4. Check your Saturn SERVICELINE.XL Claim Memorandum daily. Remember to code the claim as a WC sale type, and VC case type. Contact your field representative if you need assistance.
5. All labor operations claimed in this bulletin must be submitted on individual (unrelated) CSO lines. Refer to the Customer Service Order Preparation Manual for details on Bulletin Claim Submission.
* The parts allowance should be the sum total of the current SSPO Retailer net price plus 40% of all parts required for the repair.
** Net amount must be submitted as a miscellaneous sale, loaner reimbursement not to exceed $30/day.
*** Enter number of days vehicle was rented, not to exceed 1 day
**** Administrative allowance
03-C-01 GOODWILL WORKSHEET
As stated in the "Credit" section of this bulletin, Retailers are empowered to use good judgement regarding loaner/rental cars or other goodwill expenses that might become necessary for customer satisfaction.
Complete this worksheet and attach it to the hard copy of the Customer Service Order (CSO) to document all campaign goodwill claims submitted to Saturn.
VIN #
A. Vehicle Loaner/Rental Allowance Explanation: | $ | ||||
| |||||
| |||||
| |||||
Repair Performed | Sale Type | Case Type | Labor OP | Net Item Code | # Days Rental |
Loaner Reimbursement | WC | VC | V0916 | C | * |
* Not to exceed $30/day for 1 day | |||||
| |||||
| |||||
| |||||
B. Other/Goodwill Allowance Explanation (Specify what was done and why): | $ | ||||
| |||||
| |||||
| |||||
Repair Performed | Sale Type | Case Type | Labor OP | Net Item Code | # Days Rental |
Other Goodwill | WC | VC | V0917 | R | N/A |
| |||||
| |||||
| |||||
Authorized Retailer Signature | |||||
(Please copy this form as necessary) | |||||
Dear Saturn Owner:
This notice is sent to inform you that Saturn is conducting a voluntary customer satisfaction program that affects certain 2003 Saturn VUE vehicles equipped with VTi transaxles.
Saturn has decided that some 2003 Model Year Saturn VUE vehicles equipped with VTi transaxles exhibit a condition where momentary excessive pressure within the transaxle may damage the internal filter. This condition can cause a transaxle noise and, if not corrected, internal transaxle damage and premature failure.
What Saturn Will Do:
To prevent this condition from occurring, Saturn will perform a transaxle software upgrade and wiring modification at no charge to you. This service will take about 1 hour, although some additional time may be required for paperwork and processing.
What You Should Do:
Contact your Saturn Retailer as soon as possible to arrange for the repairs. The enclosed reply card identifies your vehicle, and will facilitate completion of the repairs when presented to your Saturn retail facility. If your address has changed, please provide the new information in the space provided. This will assist us in ensuring that all affected vehicles are corrected.
Your Retailer is prepared to perform this service promptly and with minimal inconvenience to you. However, if your car is provided to the Retailer on the agreed service date and the condition is not remedied within a reasonable amount of time, please contact the Saturn Customer Assistance Center at 1-800-553-6000 prompt 3, or for the hearing impaired, 1-800-833-6000. We will assist you and the Retailer in getting your vehicle serviced.
Again, we sincerely regret any inconvenience or concern this situation may cause you. We want you to know that we will do our best, throughout your ownership experience, to ensure that your Saturn provides you many miles of enjoyable driving.
Sincerely,
Saturn Corporation
03-C-01
