Crank/No Start or Extended Crank Prior to Start or Inoperative/intermittent Components with DTCs P0112, P0629, P0646 and/or P0693 Set (Replace PCM Terminals or Secure Connector to Coupler Body)

| Subject: | Crank/No Start or Extended Crank Prior to Start or Inoperative/Intermittent Components with DTCs P0112, P0571, P0629, P0646, and/or P0693 Set (Replace PCM Terminals or Secure Connector to Coupler Body) |
| Models: | 2004 Saturn VUE Vehicles with 3.5L V-6 Engine (VIN 4 -- RPO L66) |
| Attention: | Fixed Operations Manager and Technician |
This bulletin is being revised with new special tool and special tool kit numbers and a new labor operation code. Please discard Corporate Bulletin Number 04-06-04-059 (Section 06 - Engine/Propulsion System).
Condition
Some customers may comment on a crank, no start condition or extended crank prior to vehicle starting and/or inoperative cruise control. One or more of the following diagnostic trouble codes (DTCs) may also be set:
| • | DTC P0112 - Inlet Air Temperature (IAT) Sensor Low Voltage |
| • | DTC P0571 - Cruise/Brake Switch Invalid |
| • | DTC P0629 - Fuel Pump Relay Control Circuit High |
| • | DTC P0646 - A/C Control Circuit for A/C Compressor Clutch |
| • | DTC P0693 - Cooling Fan Control Unit |
| • | DTCs U1088, U1096, U2105, U2108 - No communication with PCM/TCM and other modules |
Cause
Specific terminals on the powertrain control module (PCM) may not be seated securely in the connectors.
| • | Terminal 11 may cause DTC P0112 to set if not seated securely. |
| • | Terminals 22 and 23 may cause an inoperative cruise control condition if not seated securely. |
| • | Terminals 54 and 55 may cause a crank, no start condition or extended crank prior to vehicle starting if not seated securely. |
Correction
Make sure the 56-way (C2) terminal is seated properly in the PCM body/chassis connector. Replace damaged PCM connector terminals using wire lead kit, P/N 22692904, or secure circuit connector properly to connector coupler body.
Service Procedure
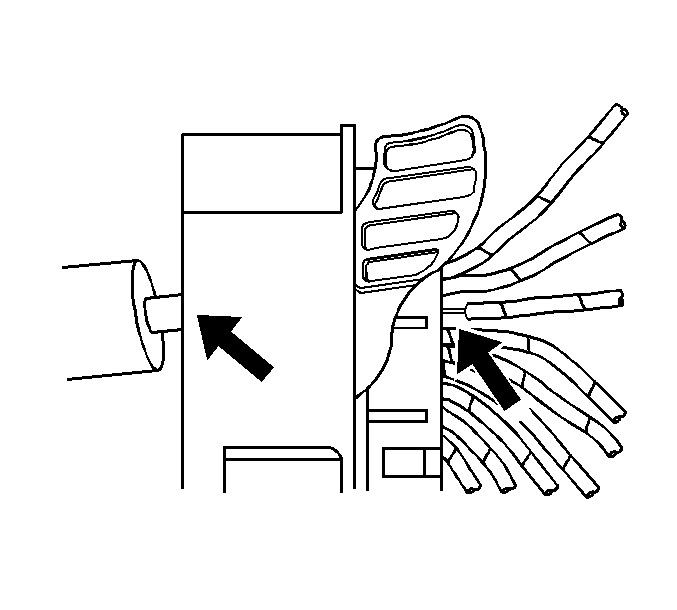
- Remove the PCM C2 connector.
- Inspect terminals in connector for being backed out. All terminals should be at the same depth. Using probe tool J 35616-64A (0.64 mm) from kit J 35616-C, carefully check terminal retention on suspect circuits.
Important: For intermittent conditions, attempt to duplicate DTC or symptoms while performing a wiring harness PCM connector tug test. Securely grasp the wiring harness (wires) nearest the coupler connector and pull/tug on the wiring harness while attempting to duplicate symptom.
Notice: If any terminal is identified as being damaged, it will need to be removed and replaced. If terminal is backed out (not seated), try to reseat terminal and again check terminal tightness.
Terminal Removal/Replacement Repair Procedure
Tools Required
J 38125-800 Terminal Repair Kit
Removal
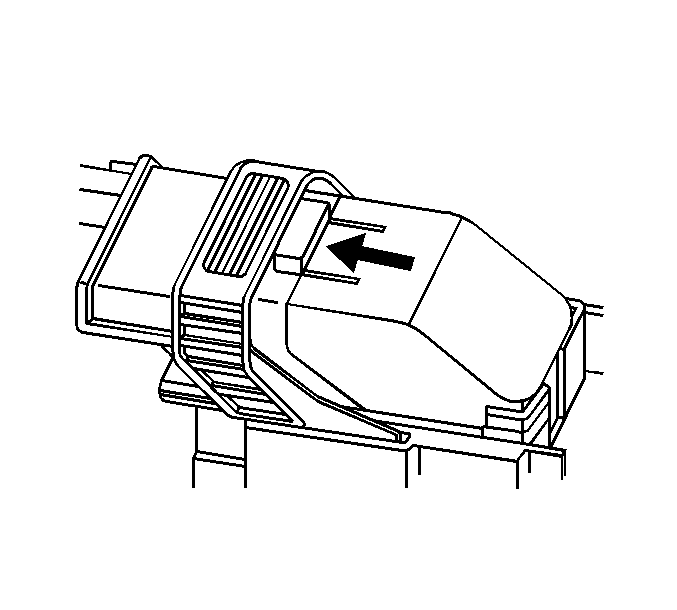
- Locate the lever lock on the wire dress cover. While depressing the lock, pull the lever over and past the lock.
- Disconnect the connector from the component.
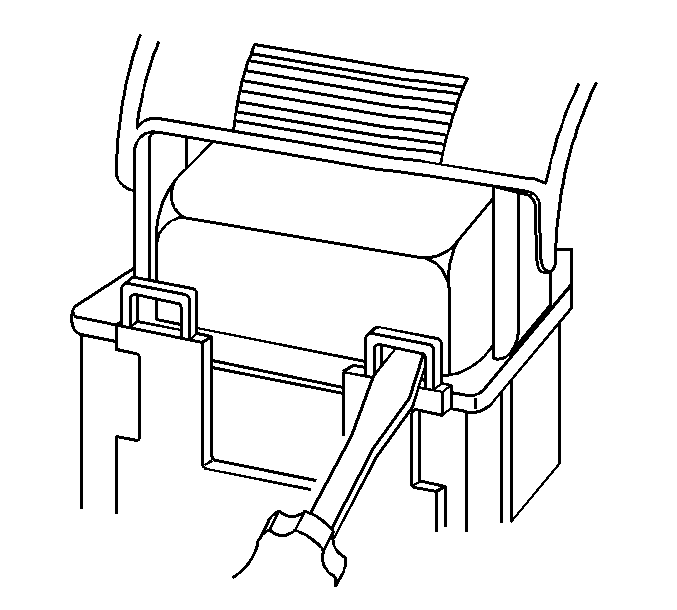
- Locate the dress cover locking tabs at the front of the connector. Using a small flat-blade tool, push down on one of the locking tabs and pull the cover up until the dress cover releases. Repeat this procedure for the other locking tab.
- Once the two front locks are unlocked, lift the front of the dress cover and pull it forward.
- If the connector has a nosepiece, use a small flat-blade tool to remove the nosepiece by inserting the blade into the slot on the front of the connector and prying up on the nosepiece.
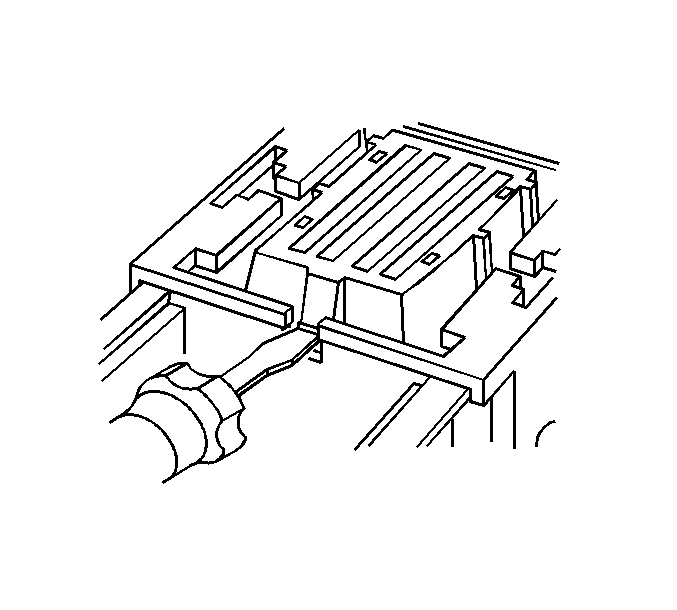
- Remove the TPA retainer by inserting a small flat-blade tool into the small slot on the TPA retainer and pushing down until the TPA retainer releases. Gently pry the TPA retainer out of the connector.
- If the concern is due to a backed out terminal, try to reseat the terminal by pushing wire from the back of the connector. Listen for an audible click when seating terminal. Inspect connector face to verify it is at same height as other terminals. Pull on wire to verify it is seated. If the wire is seated properly, proceed to Step 11. If it is necessary to replace terminal, continue to Step 8.
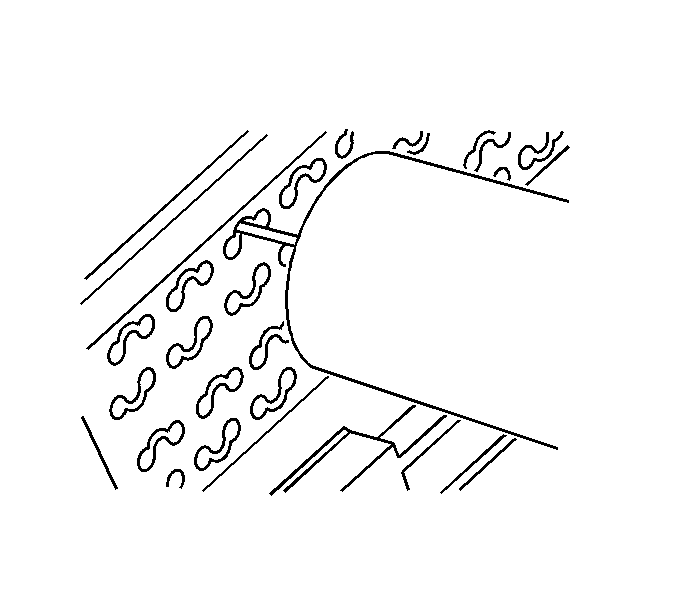
- Insert the J 38125-21 terminal tool (Delphi 15381651-2) into the round canal between the terminals cavities at the front of the connector.
- While holding the removal tool in place, gently pull the wire out of the back of the connector. Never use force when pulling a terminal out of a connector.
- Perform the "Terminal Repair" procedure in this bulletin for each terminal that needs to be replaced.
- Prior to inserting TPA retainer and after inserting TPA retainer, verify that all terminals are flush with the connector face.
- Reinstall nose piece to connector.
- Reinstall dress lock cover.
- If electrical tape was removed to perform wire harnesses inspection or repair, tape wires and harness to original condition.
- Reinstall connector to PCM and verify condition(s) are corrected.

Notice: Always use care when removing a terminal position assurance (TPA) retainer in order to avoid damaging it.
Important: Be careful not to angle or rock terminal tool J 38125-21 tool when inserting it into the connector or the tool may break.
Important: Verify TPA retainer is completely seated prior to connector installation to the PCM.
Terminal Replacement
Installing New Electrical Lead Kit
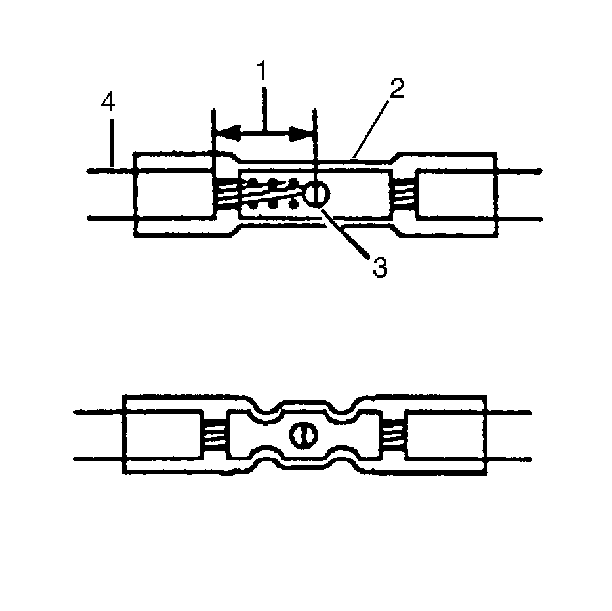
Important: Use only Saturn/GM splice sleeves. Other splice sleeves may not protect the splice from moisture or provide a good electrical connection.
- Open the harness.
- Cut the wire.
- Strip the insulation approximately 7.5 mm (5/16 in) from each wire to be spliced (1).
- Place the provided splice sleeve in the 12085115 crimp tool nest (or equivalent) so that the crimp falls at point 1 on the splice.
- Close handles of 12085115 crimp tool, or equivalent, slightly to hold the splice sleeve firmly in the proper crimp tool nest.
- Insert the wires into the splice sleeve until the wire hits the barrel stop. The splice sleeve has a stop in the middle of the barrel to prevent the wire from passing through the splice (3).
- Close the handles of the 12085115 crimp tool, or equivalent, until the crimper handles open when released. The crimper handles will not open until the proper amount of pressure is applied to the splice sleeve. (Repeat for other half of splice sleeve.)
- Shrink the insulation around the splice.
- Seal splice sleeve by applying heat using Ultra Torch J 38125-5A, or equivalent, heating to 175°C (347°F) until glue flows around edges of splice sleeve.
- Reinstall new cut lead(s) into correct connector cavity. Verify that when the new terminal is installed, there is an audible click. Perform a tug test on the newly installed wire.
- Proceed to Step 11 in the "Terminal Removal/Replacement" procedure in this bulletin.
| • | If the harness is taped, remove the tape. |
| • | To avoid wiring insulation damage, use a sewing ripper (or equivalent) to cut open the harness. |
| • | If the harness has a black plastic conduit, pull out the desired wire. |
| • | Cut as little wire off the harness as possible. |
| • | Ensure that each splice is at least 40 mm (1.5 in) away from other splices, harness branches and connectors. This helps prevent moisture from bridging adjacent splices and causing damage. |
| • | Trim new cut lead wire, P/N 22692904, to same length as damaged wire removed from connector. |
Caution: Follow manufacturer's instructions to avoid personal injury. Do not use match or open flame to apply heat.
Parts Information
Part Number | Description |
|---|---|
22692904 | WIRE LEAD KIT (Pink splice sleeve included) |
Claim Information
To receive credit for this repair during the warranty coverage period, submit a claim through the Saturn Dealer System for N9530 (Wiring and/or Connector - Emissions System, PCM/ECM - Repair or Replace).
