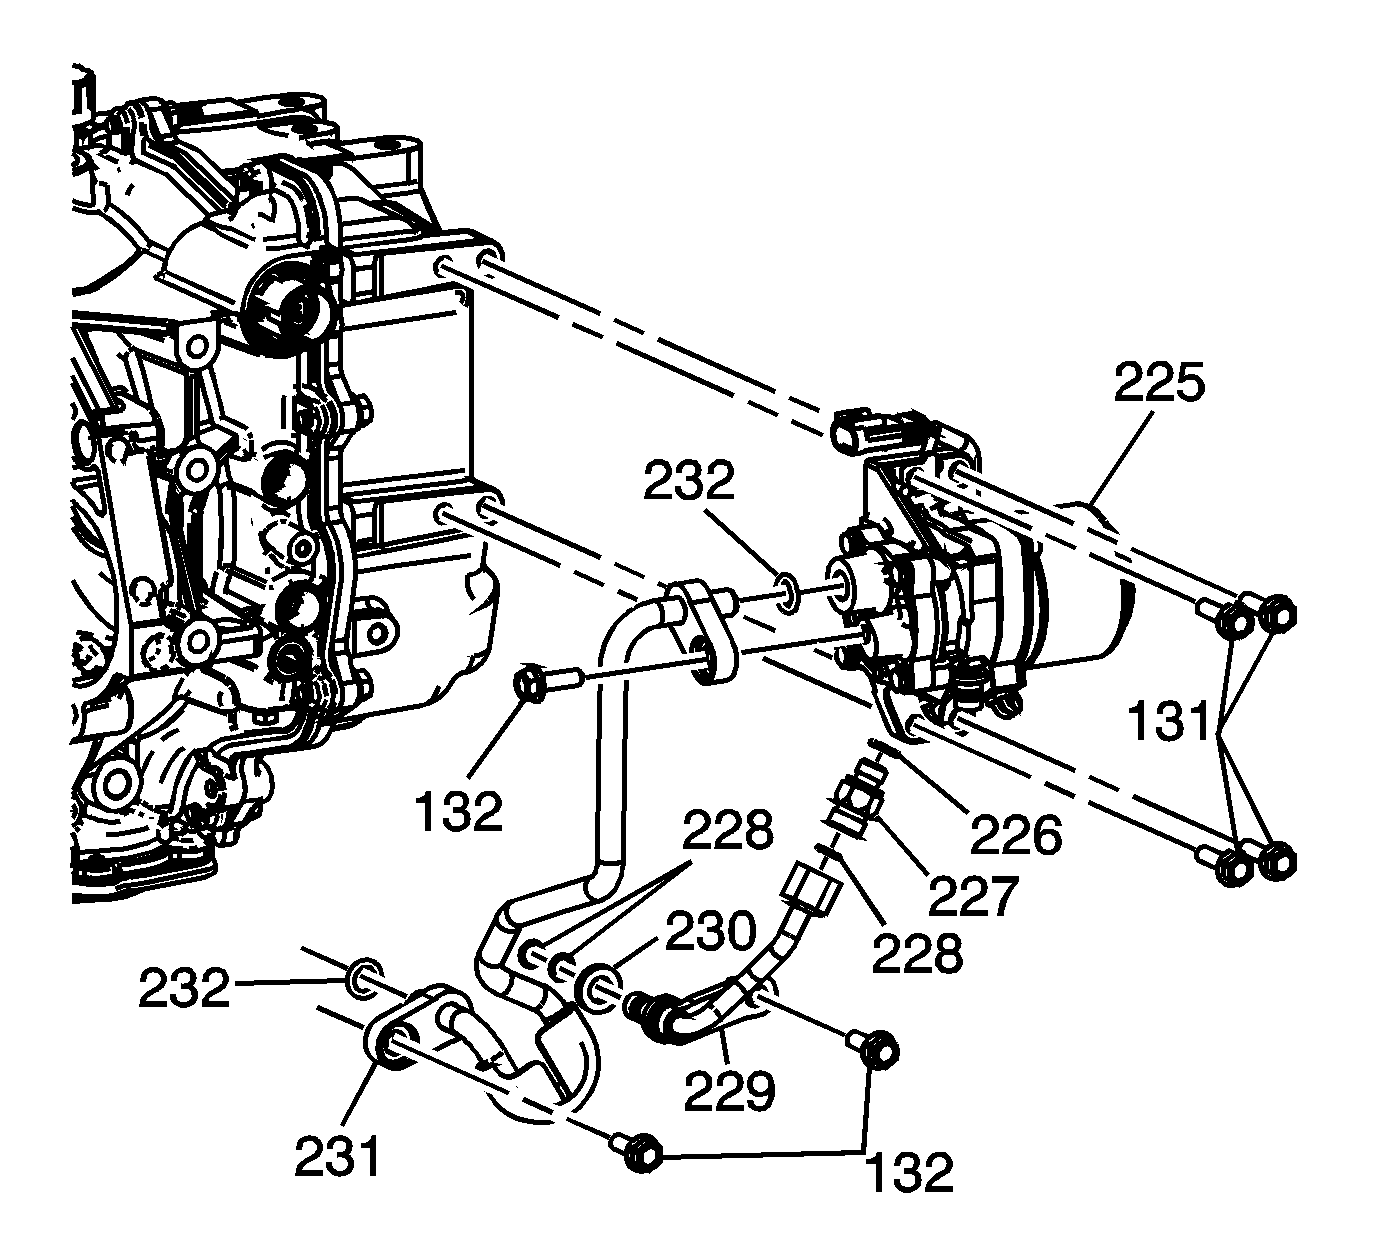
Auxiliary Fluid Pump Installation L4 Hybrid Only
- Install NEW O-ring seals (226 to the pump side and 228 to the outlet pipe side) onto the check valve (227).
- Install the check valve (227) onto the auxiliary pump (225).
- Install NEW foam spacer (230) and 2 NEW O-ring seals (228) onto the outlet pipe (229).
- Install the outlet pipe (229) and M8 x 1.25 x 25 mm bolt (132) into the case assembly.
- Install NEW O-ring seals (232) onto each end of the suction pipe (231).
- Install the suction pipe (231) and lower M8 x 1.25 x 25 mm bolt (132) to the case assembly.
- Install the auxiliary pump (225) and check valve (227) assembly onto the suction pipe (231) end and align with the outlet pipe (229) end.
- Align the outlet pipe (229) nut to the check valve (227) and tighten by hand. Do not torque.
- Install 3 auxiliary pump M8 x 1.25 x 30 mm bolts (131) - 2 at bottom, and 1 at the top-right, to the case cover.
- Install the suction pipe (231) and top M8 x 1.25 x 25 mm bolt (132) to the pump (225).
- Route the auxiliary pump (225) wire behind the auxiliary pump motor housing.
- Position the auxiliary pump (225) connector and clip with the top-left mount hole and install auxiliary pump M8 x 1.25 x 30 mm bolt (131), to the case cover.
- Tighten the outlet pipe (229) nut.
- After the auxiliary pump assembly has been installed onto the transaxle, it must be primed. Refer to Auxiliary Fluid Pump Priming .

Notice: Use care when installing the O-rings (226 and 228). The 2 O-rings are different sizes. The larger O-ring (226) installs onto the fluid pump check valve (227), on the pump side. Be careful not to split or damage the O-rings when installing.
Important:
• Discard all seals. Seals are not reusable. • Inspect pipes for damage. Clean pipes inside and out, using compressed air to ensure no debris is on the inside of the pipes. • Clean and inspect all O-ring sealing surfaces, on the pipes, check valve and the pump assembly. • Remove the fluid pump check valve (227) from the auxilliary pump asssembly and inspect for debris or blockage.
Notice: Refer to Fastener Notice in the Preface section.
Tighten
Tighten to 25 N·m (18 lb ft).
Important: It's important to notice the size of bolts (131) verses bolts (132). Bolts (132) are shorter - M8 x 1.25 x 25 mm.
Tighten
Tighten the bolt to 25 N·m (18 lb ft).
Important: It's important to notice the size of bolts (131) verses bolts (132). Bolts (132) are shorter - M8 x 1.25 x 25 mm.
Tighten
Tighten the bolt to 25 N·m (18 lb ft).
Important: It's important to notice the size of bolts (131) verses bolts (132). Bolts (131) are longer - M8 x 1.25 x 30 mm.
Tighten
Tighten the bolt to 25 N·m (18 lb ft).
Important: It's important to notice the size of bolts (131) verses bolts (132). Bolts (132) are shorter - M8 x 1.25 x 25 mm.
Tighten
Tighten the bolt to 25 N·m (18 lb ft).
Notice: Do not bend the electrical connector or clip or damage may occur. The electrical connector and clip are one piece.
Notice: Be sure to restrain the fluid pump check valve (227) when tightening the fluid pump outlet pipe (229). Failure to keep the check valve (227) from tightening further may result in damage to the O-ring seal (228) on the fluid pump check valve (227).
Tighten
Tighten the bolt to 25.5 N·m (18.8 lb ft).
Tighten
Tighten the nut to 22.5 N·m (16.6 lb ft).
Important: Refer to the Tech II for auxiliary pump priming procedure under special functions after transaxle installation.
