Circuit Description
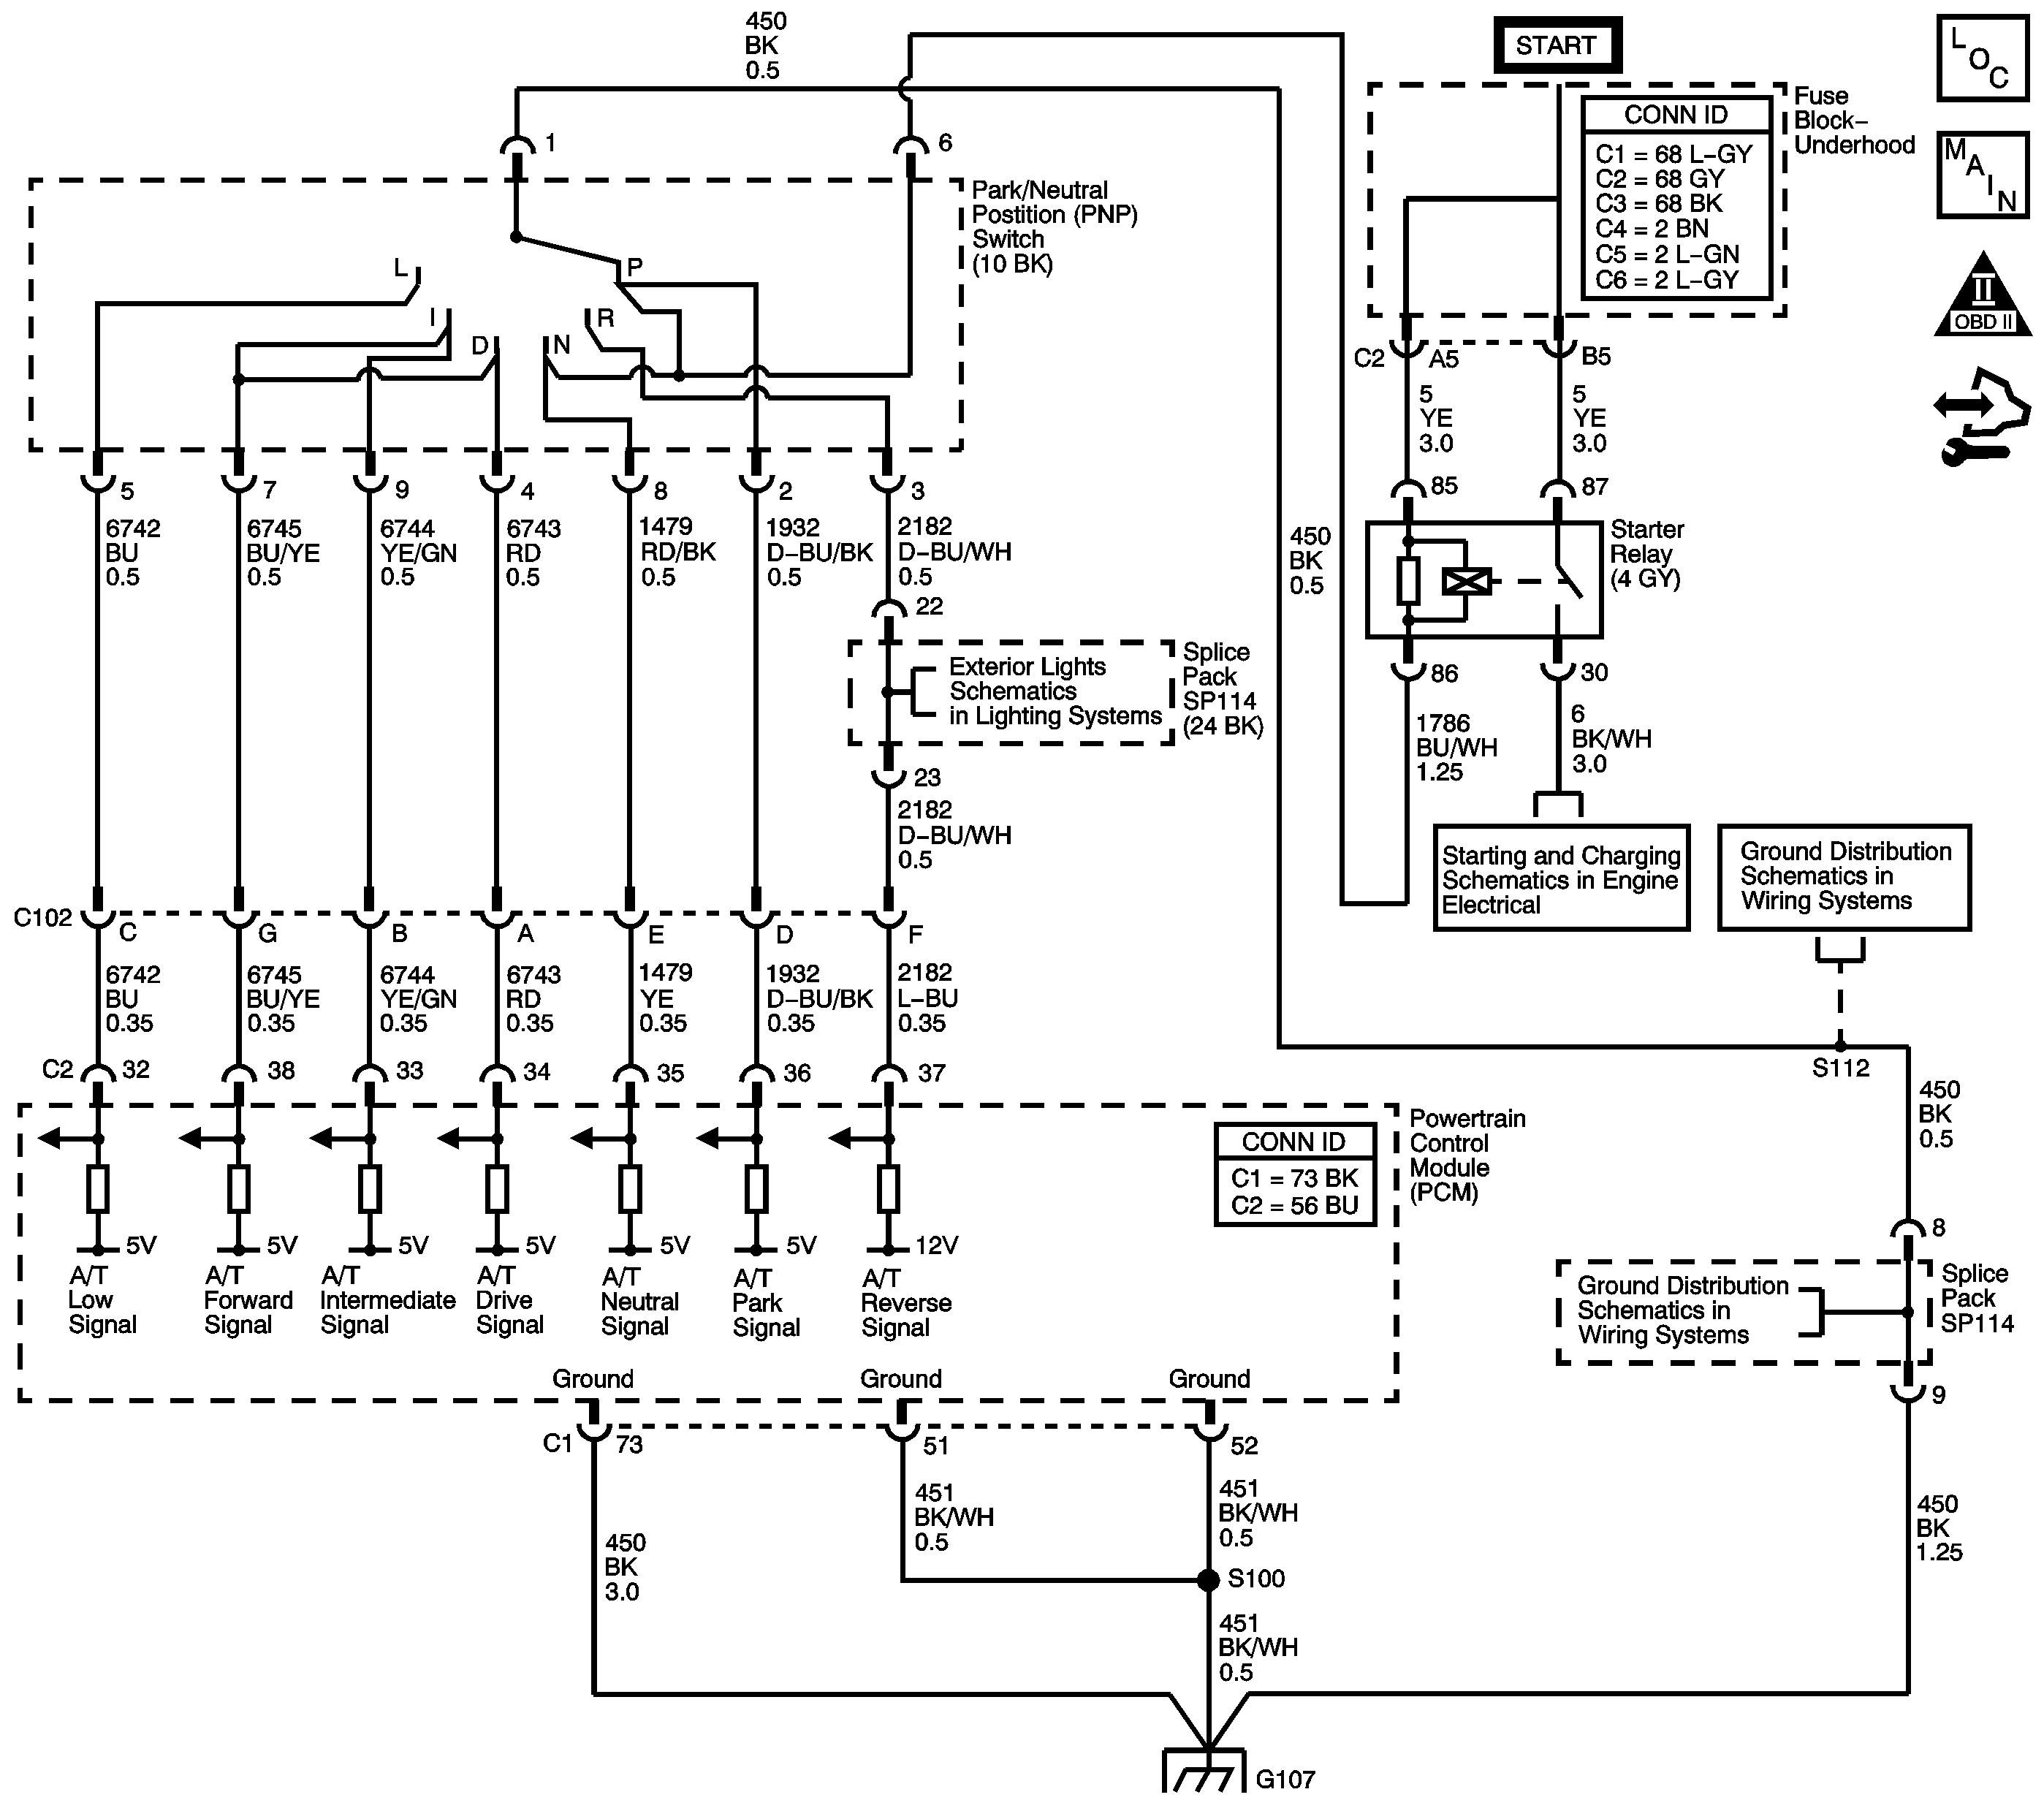
The transmission range (TR) switch is part of the park/neutral position switch assembly and is mounted on the transmission manual shaft. The TR switch is a multi-signal switch. The powertrain control module (PCM) supplies voltage to the TR switch on 7 signal circuits, P, R, N, D, I, L, and Forward Range. Each gear selector lever position grounds one or more of the signal circuits in a unique pattern. In order to determine the gear range selected by the driver, the PCM compares the voltage combination on the signal circuits to a TR switch combination table stored in memory. Refer to Transmission Range Switch Logic . The TR forward signal is grounded when the transmission range selector is in the D or I position.
When the PCM detects that the TR forward signal is open or shorted to voltage while driving, with the transmission range selector in the D or I position, DTC P0706 sets. DTC P0706 is a type B DTC.
Refer to Range Reference .
DTC Descriptor
This diagnostic procedure supports the following DTC:
DTC P0706 Transmission Range (TR) Switch Performance
Conditions for Running the DTC
| • | No VSS DTCs P0501 or P0502. |
| • | No TR Switch Circuit DTC P0705. |
| • | System voltage is greater than 11 volts. |
Conditions for Setting the DTC
The forward signal circuit is high during a driving cycle. The vehicle, during this driving cycle, accelerates from less than 9 km/h (6 mph) to more than 48 km/h (30 mph) and then decelerates to less than 9 km/h (6 mph) while the range selector is in the D or I position.
Action Taken When the DTC Sets
| • | The PCM illuminates the malfunction indicator lamp (MIL) during the second consecutive trip in which the Conditions for Setting the DTC are met. |
| • | The PCM records the operating conditions when the Conditions for Setting the DTC are met. The PCM stores this information as Freeze Frame and Failure Records. |
| • | The PCM stores DTC P0706 in PCM history. |
Conditions for Clearing the MIL/DTC
| • | The PCM turns OFF the MIL during the third consecutive trip in which the diagnostic test runs and passes. |
| • | A scan tool can clear the MIL/DTC. |
| • | The PCM clears the DTC from PCM history if the vehicle completes 40 warm-up cycles without an emission related diagnostic fault occurring. |
| • | The PCM cancels the DTC default actions when the ignition switch is OFF long enough in order to power down the PCM. |
Diagnostic Aids
| • | Inspect the connectors at the PCM, the output speed sensor, and all other circuit connecting points for an intermittent condition. Refer to Testing for Intermittent Conditions and Poor Connections . |
| • | Inspect the circuit wiring for an intermittent condition. Refer to Testing for Electrical Intermittents . |
| • | Inspect for a disconnected TR switch connector. |
| • | Inspect for an open FWD switch wire. |
| • | Inspect for a faulty TR switch. |
| • | Inspect for a shift linkage incorrectly adjusted. |
| • | Inspect for an internal fault of the PCM. |
Test Description
The numbers below refer to the step numbers on the diagnostic table.
Step | Action | Yes | No | ||||||||||||
|---|---|---|---|---|---|---|---|---|---|---|---|---|---|---|---|
1 | Did you perform the Diagnostic System Check - Vehicle? | Go to Step 2 | |||||||||||||
2 |
Does the TR Sw. Forward Range parameter remain LOW in D and I ranges? | Go to Testing for Intermittent Conditions and Poor Connections | Go to Step 3 | ||||||||||||
3 |
Did you find and correct a condition? | Go to Step 9 | Go to Step 4 | ||||||||||||
When the TR switch forward signal circuit is grounded, does the TR Sw. Forward Range parameter indicate LOW? | Go to Step 6 | Go to Step 5 | |||||||||||||
5 | Test the TR switch forward signal circuit for an open or short to voltage. Refer to Testing for Continuity and Wiring Repairs . Did you find and correct the condition? | Go to Step 9 | Go to Step 8 | ||||||||||||
6 | Test the TR switch ground circuit for an open. Refer to Testing for Continuity and Wiring Repairs . Did you find and correct the condition? | Go to Step 9 | Go to Step 7 | ||||||||||||
7 | Replace the TR switch. The TR switch is part of the park/neutral position switch. Refer to Park/Neutral Position Switch Replacement . Did you complete the replacement? | Go to Step 9 | -- | ||||||||||||
8 |
Important: Always perform the PCM set up procedure.
Did you complete the replacement? | Go to Step 9 | -- | ||||||||||||
9 | Perform the following procedure in order to verify the repair:
Has the test run and passed? | Go to Step 10 | Go to Step 2 | ||||||||||||
10 | With the scan tool, observe the stored information, capture info and DTC info. Does the scan tool display any DTCs that you have not diagnosed? | System OK |
