Tools Required
| • | J 36346 Fascia Retainer Remover |
| • | J 39914 Serpentine Belt Tension Unloader |
| • | J 43828 Ball Joint Separator |
| • | J 44811 Accessory Belt Tensioner Unloader |
| • | J 45341 Rear Wheel Drive Shaft Removal Tool |
| • | SA91100C Tie Rod Separator |
| • | SA9127E Gage Bar Set |
| • | SA9805E Fuel Line Separator |
Removal Procedure
- Disconnect the negative battery cable. Refer to Battery Negative Cable Disconnection and Connection in Engine Electrical.
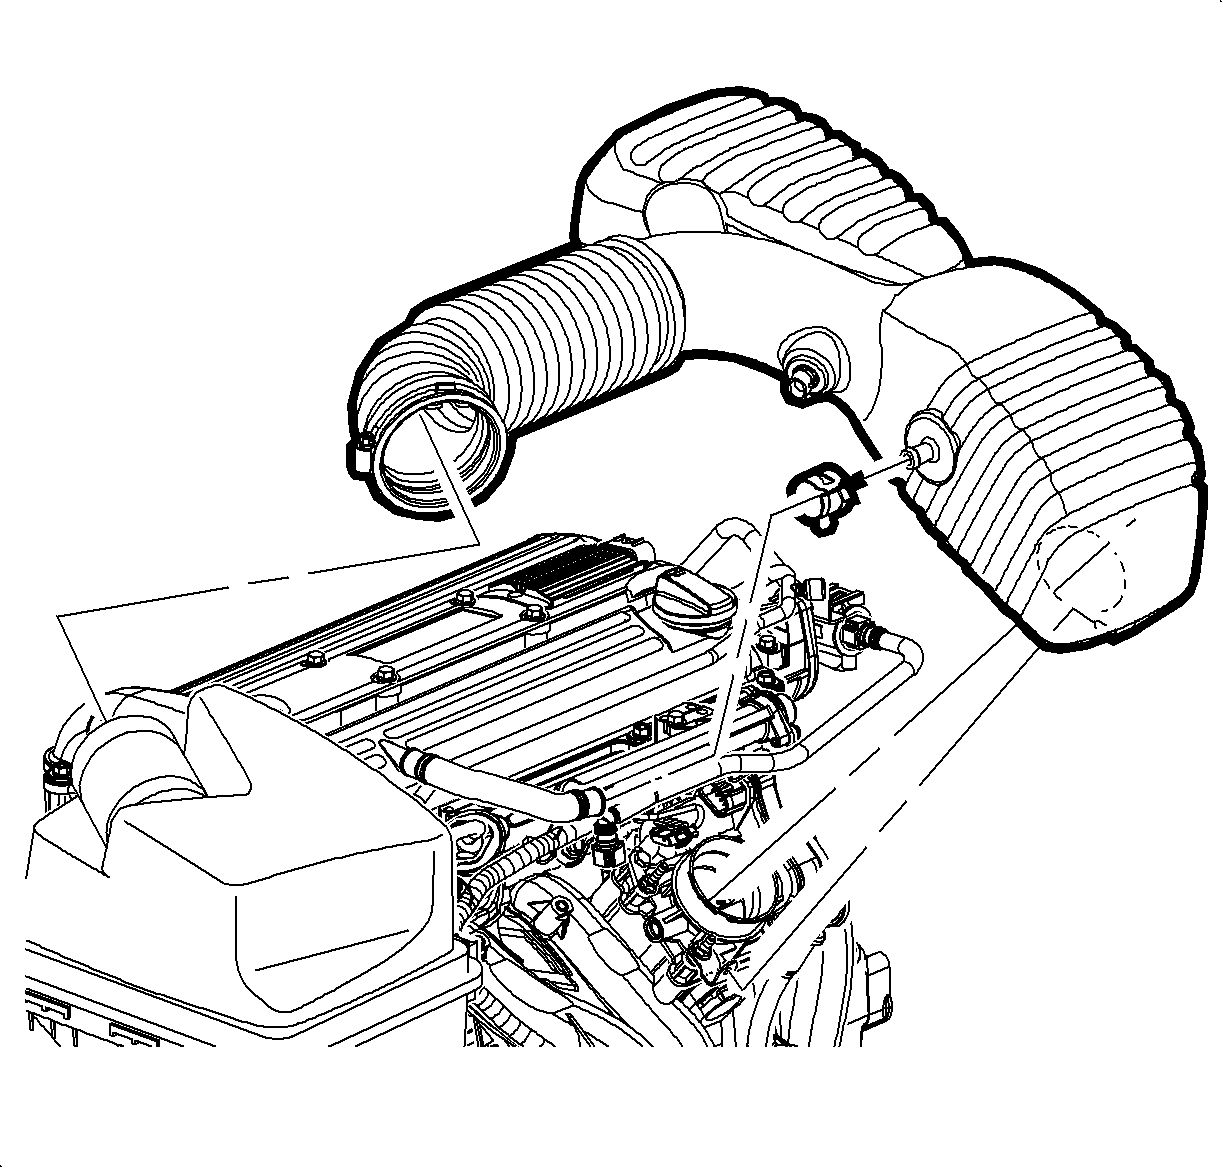
- Disconnect the air intake temperature (IAT) sensor connector.
- Loosen the clamp air cleaner assembly.
- Remove the pushpin attachment from the outlet resonator/duct assembly to the support bracket.
- Loosen the clamp at the throttle body assembly.
- Disconnect the positive crankcase ventilation (PCV) fresh air vent hose at the cam cover.
- Remove the outlet resonator/duct assembly.
- Cover the throttle body opening with a shop towel. Use shop air to remove any dirt around the throttle body and intake manifold to cylinder head.
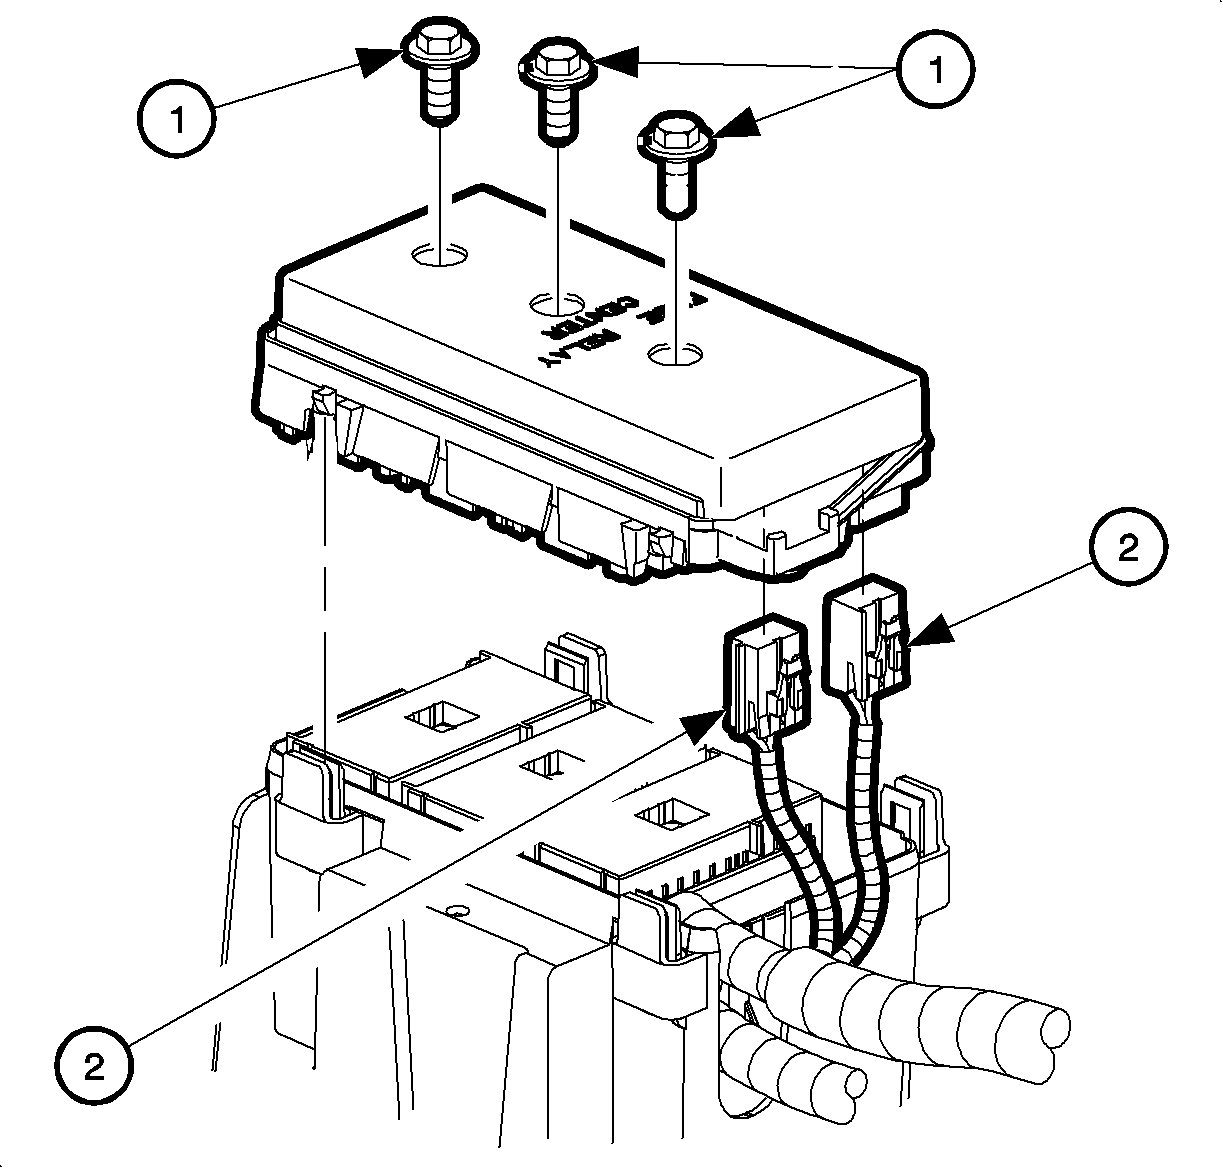
- Remove the underhood fuse block (UHFB) fuse cover by separating the clips on each side.
- Remove the UHFB fuse cover.
- Remove the inner UHFB fuse cover.
- Loosen the three connectors through bolts (1) at the top of the UHFB.
- Remove the battery and the electronic power steering feed wire connection nut and remove the wire from the UHFB stud.
- Release the tabs on each side of the UHFB with a screwdriver.
- Raise the UHFB from the connectors. Disconnect the electrical connectors on each side of UHFB.
- Remove the UHFB from the vehicle.
- Remove the battery cable and the harness attachment clips the on side of battery tray/UHFB bracket assembly.
- Remove the main connectors from the UHFB housing.
- Lay the battery positive cable wire over the engine. The battery cables will be removed with powertrain assembly.
- Remove the electrical harness clips to battery tray.
- Remove the UHFB and the battery tray bolts.
- Remove the UHFB and the battery tray.
- Disconnect the electrical connectors at the transaxle control module (TCM), if equipped.
- Remove the engine-to-body ground bolt.
- Disconnect the connector for the rear O2 sensor.
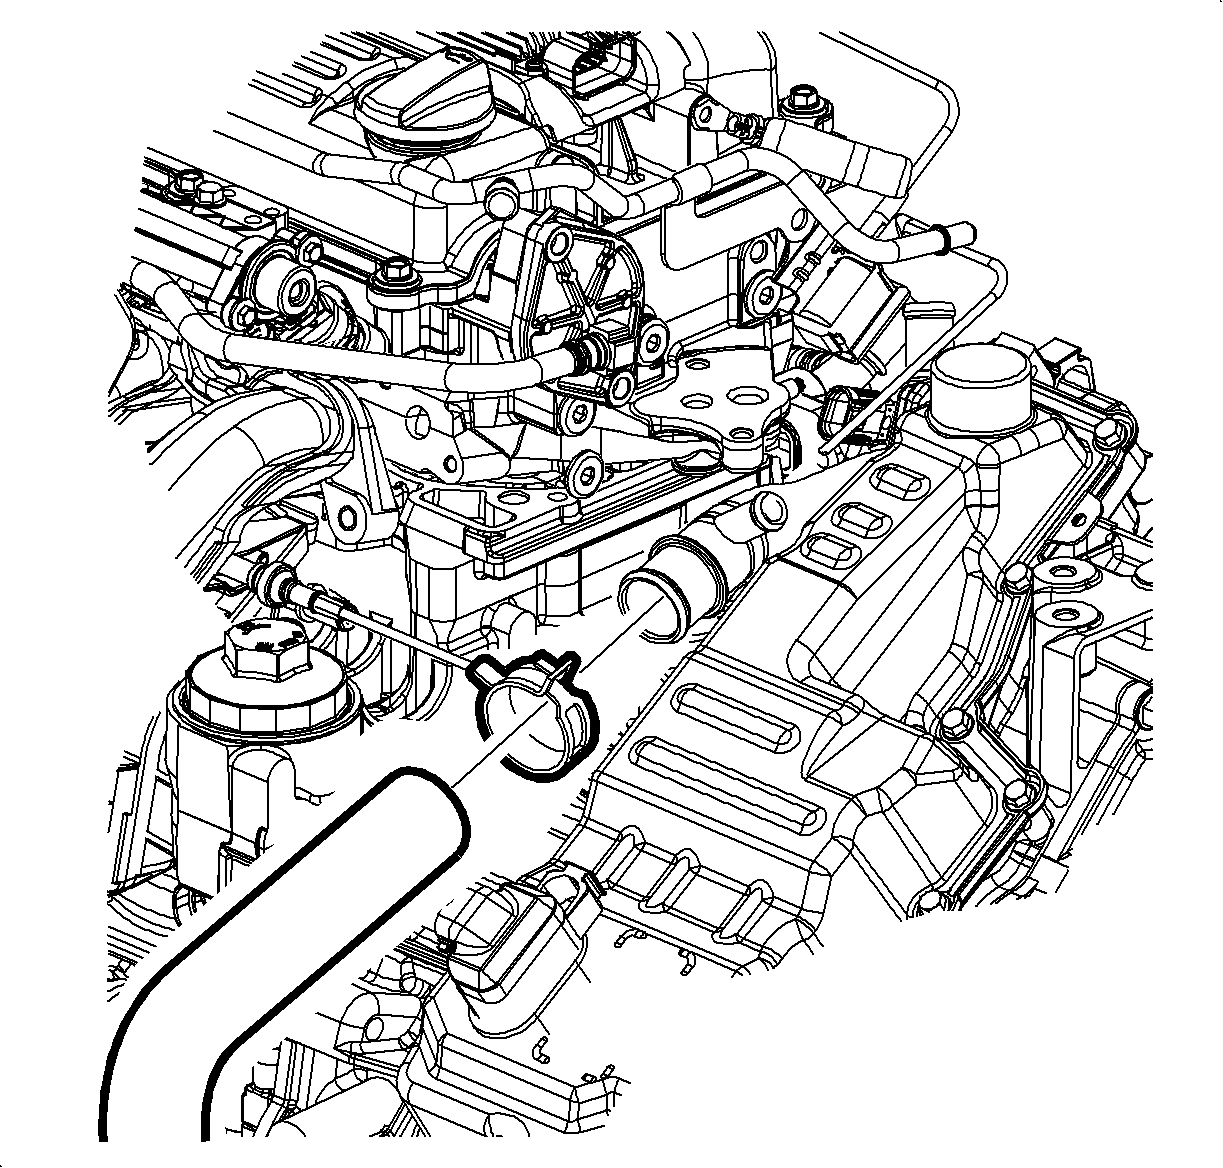
- Remove the vacuum hose with the check valve from the booster and lay across the engine.
- Disconnect the 8-way electrical connector.
- Remove the main engine harness gray connector and lay over the engine assembly. This will allow the engine harness to be removed the with powertrain.
- If equipped with the automatic range transaxle, disconnect the shifter cable plastic retainer by using a screwdriver. Slightly pry between the shifter cable plastic retainer and the transaxle range switch.
- Disconnect the shift lever cables from the shift control housing by prying with even pressure using a J 36346 or equivalent manual transmission only.
- Disconnect the shift lever cables from the shift lever cable bracket manual transmission only.
- Disconnect the pressure line from the clutch actuator cylinder by removing the C-clip then pulling the line away from the clutch actuator cylinder manual transmission only.
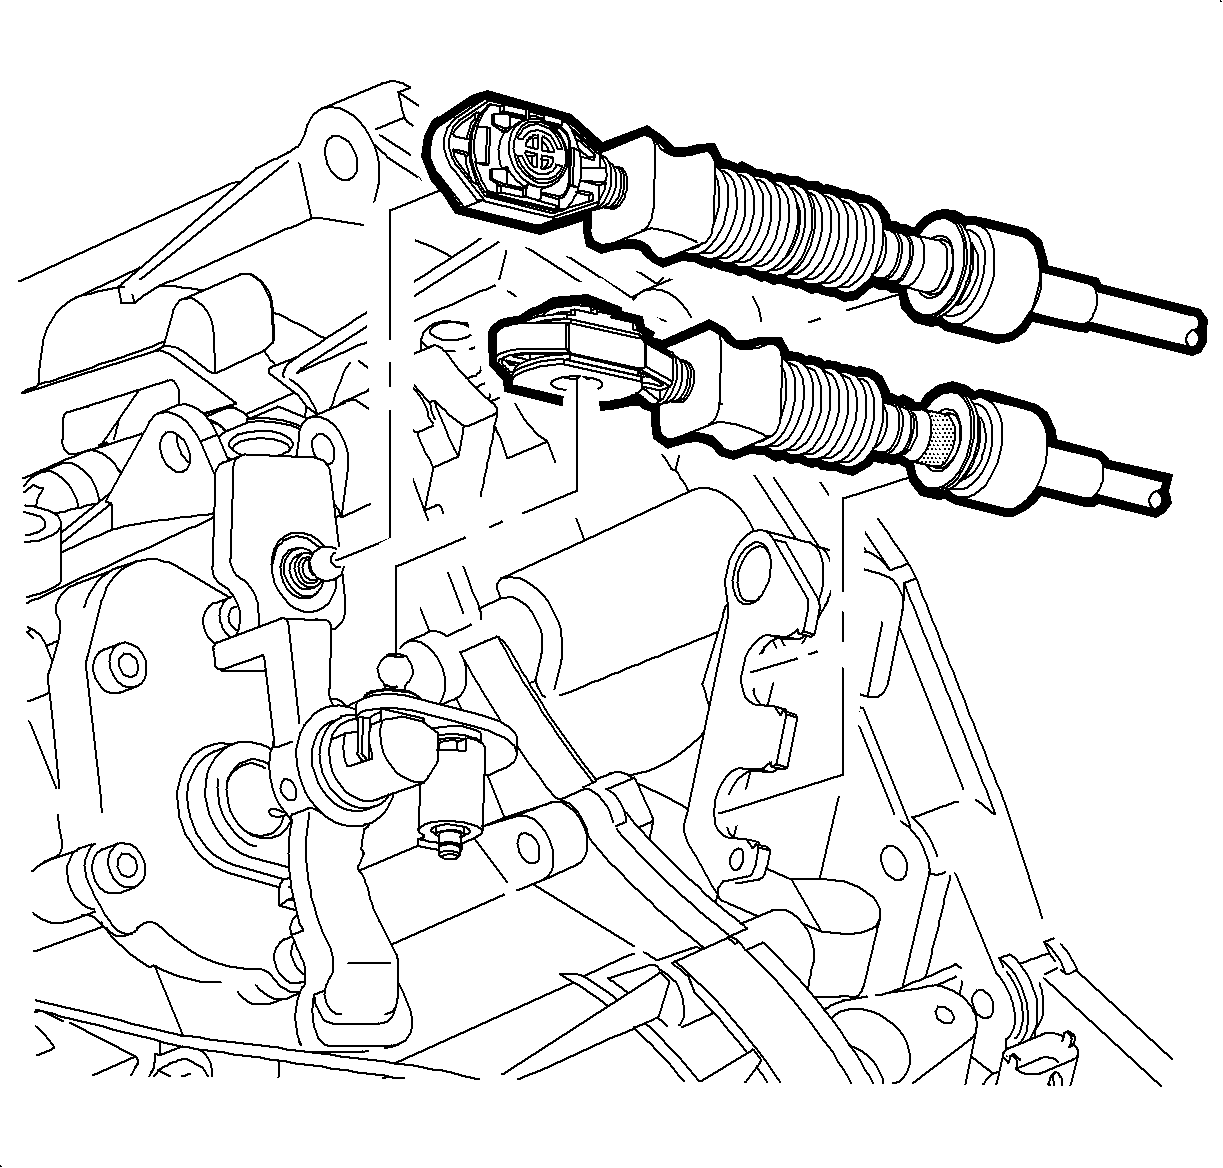
- Disconnect the back-up lamp switch (1) and the front wheel speed sensor (WSS) (2) manual transmission only.
- Drain the coolant. Refer to Cooling System Draining and Filling in Engine Cooling.
- Disconnect the upper radiator hose at the engine cylinder head.
- Disconnect the lower radiator hose at the coolant pipe.
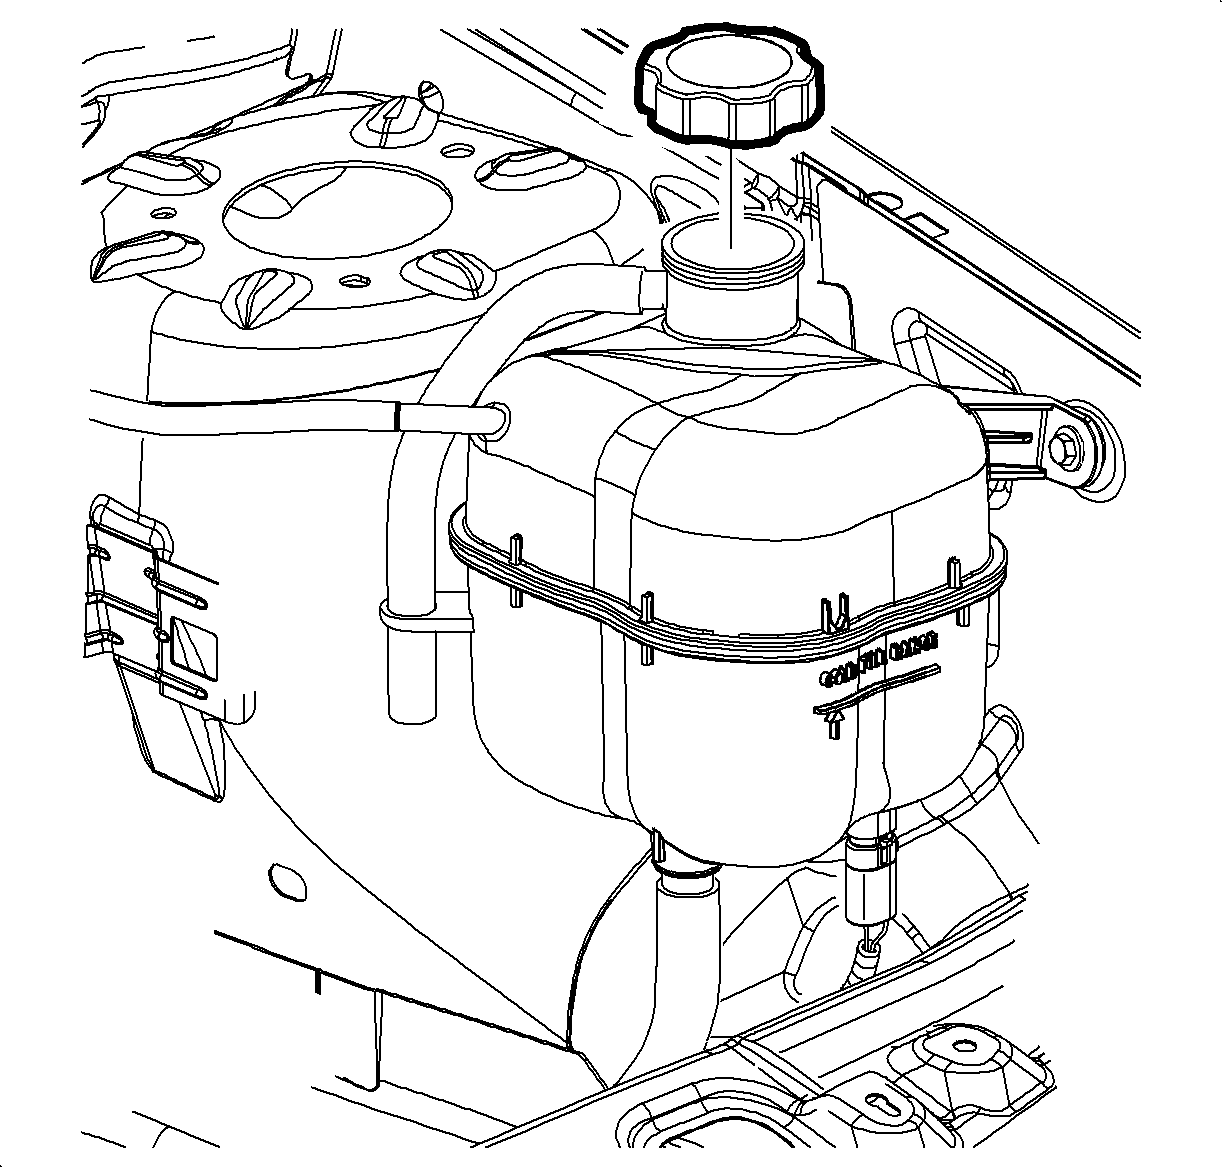
- Disconnect the degas hose at surge tank.
- Disconnect the surge hose at the bottom of the surge tank.
- Disconnect the heater hoses from the heater core at the front of the dash.
- Relieve the fuel system pressure using the Fuel Pressure Relief in Engine Controls - 2.2L (L61).
- Disconnect the SA9127E after the pressure has been relieved.
- Remove the safety clip and disconnect the fuel line transfer line at the quick connect from the fuel line using the SA9805E .
- Disconnect the purge hoses at the rear of the purge solenoid.
- Remove the headlamp assemblies.
- Using long tie straps, secure the radiator/condenser fan assembly to the radiator support assembly.
- Raise the vehicle.
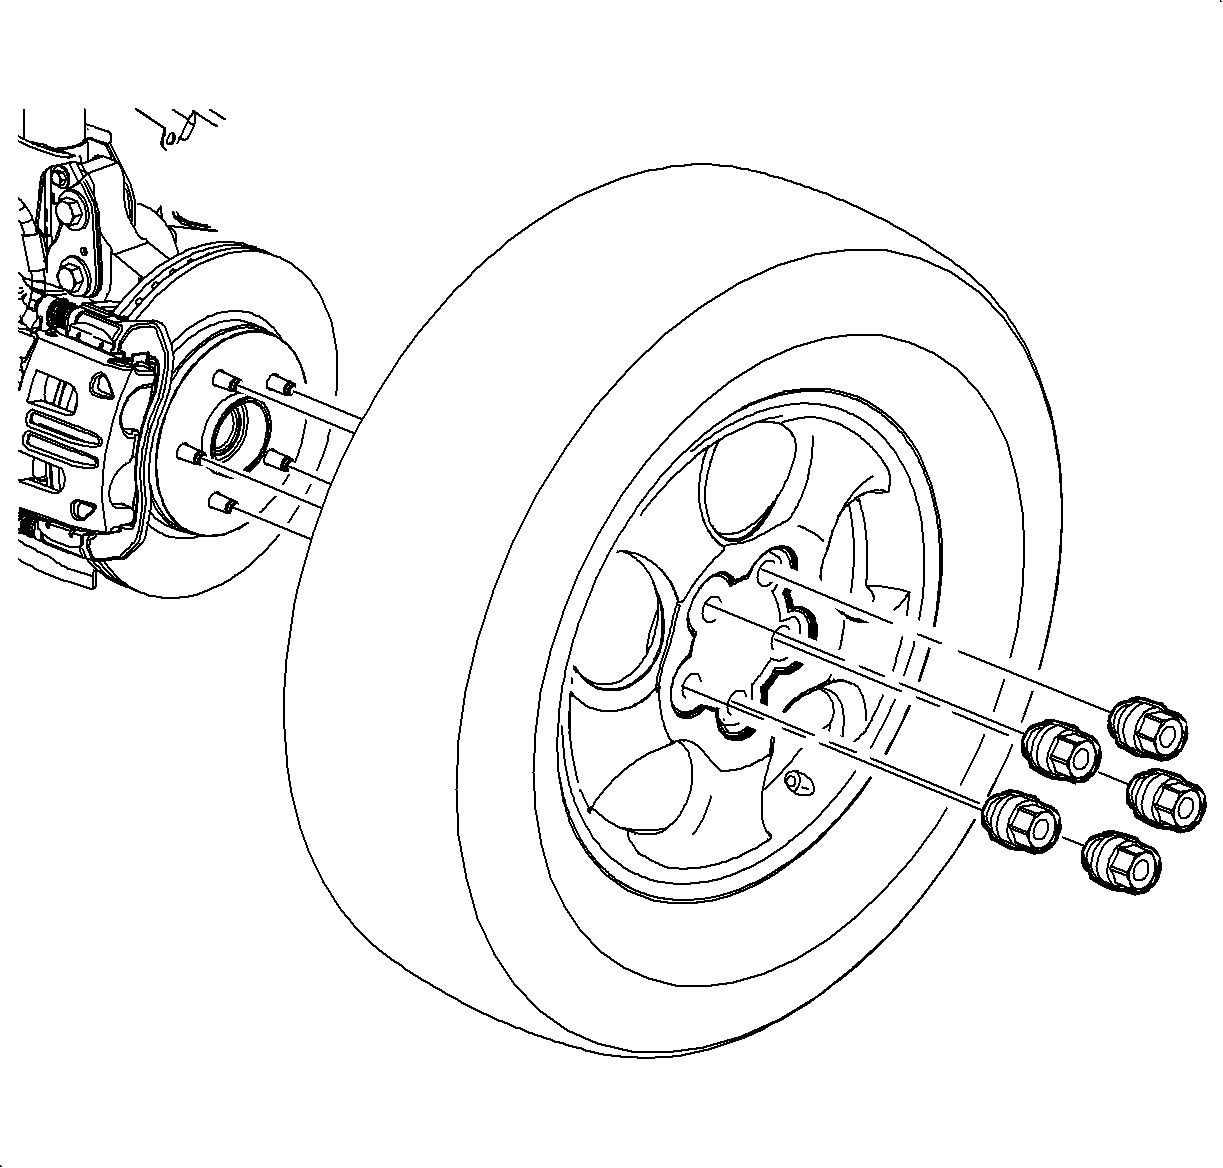
- Remove the front left-hand (LH) wheel.
- Remove the front LH wheel inner splash shield.
- Install a piece of hardwood 1 x 2 x 4 between the transaxle case and the engine cradle assembly.
- Remove the front right-hand (RH) wheel.
- Remove the wheel inner splash shield.
- Install a piece of hardwood 1 x 2 x 4 between the engine oil pan and engine cradle assembly near the crankshaft.
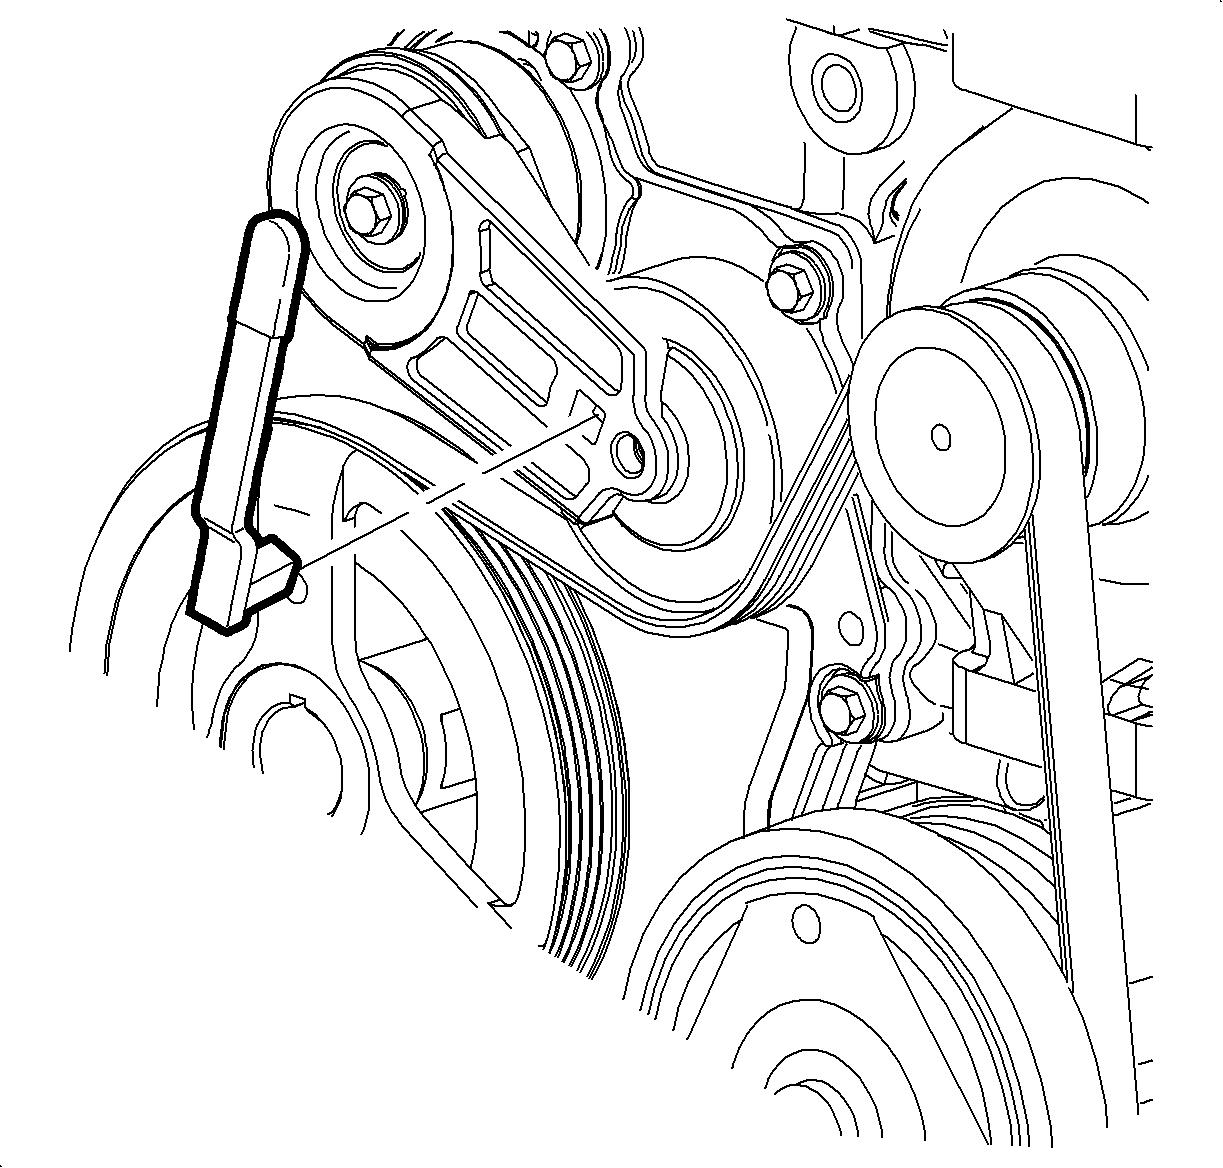
- Install the accessory J 44811 tool onto the tensioner.
- Remove the accessory drive belt.
- Disconnect the electrical connector at the A/C compressor.
- Disconnect the electrical connector at the A/C pressure transducer on-line.
- Remove the A/C compressor bolts.
- Support the compressor and the line assembly to the body with support straps.
- Remove the pushpins that retain the air deflector assembly to the cradle.
- Drain the transaxle fluid.
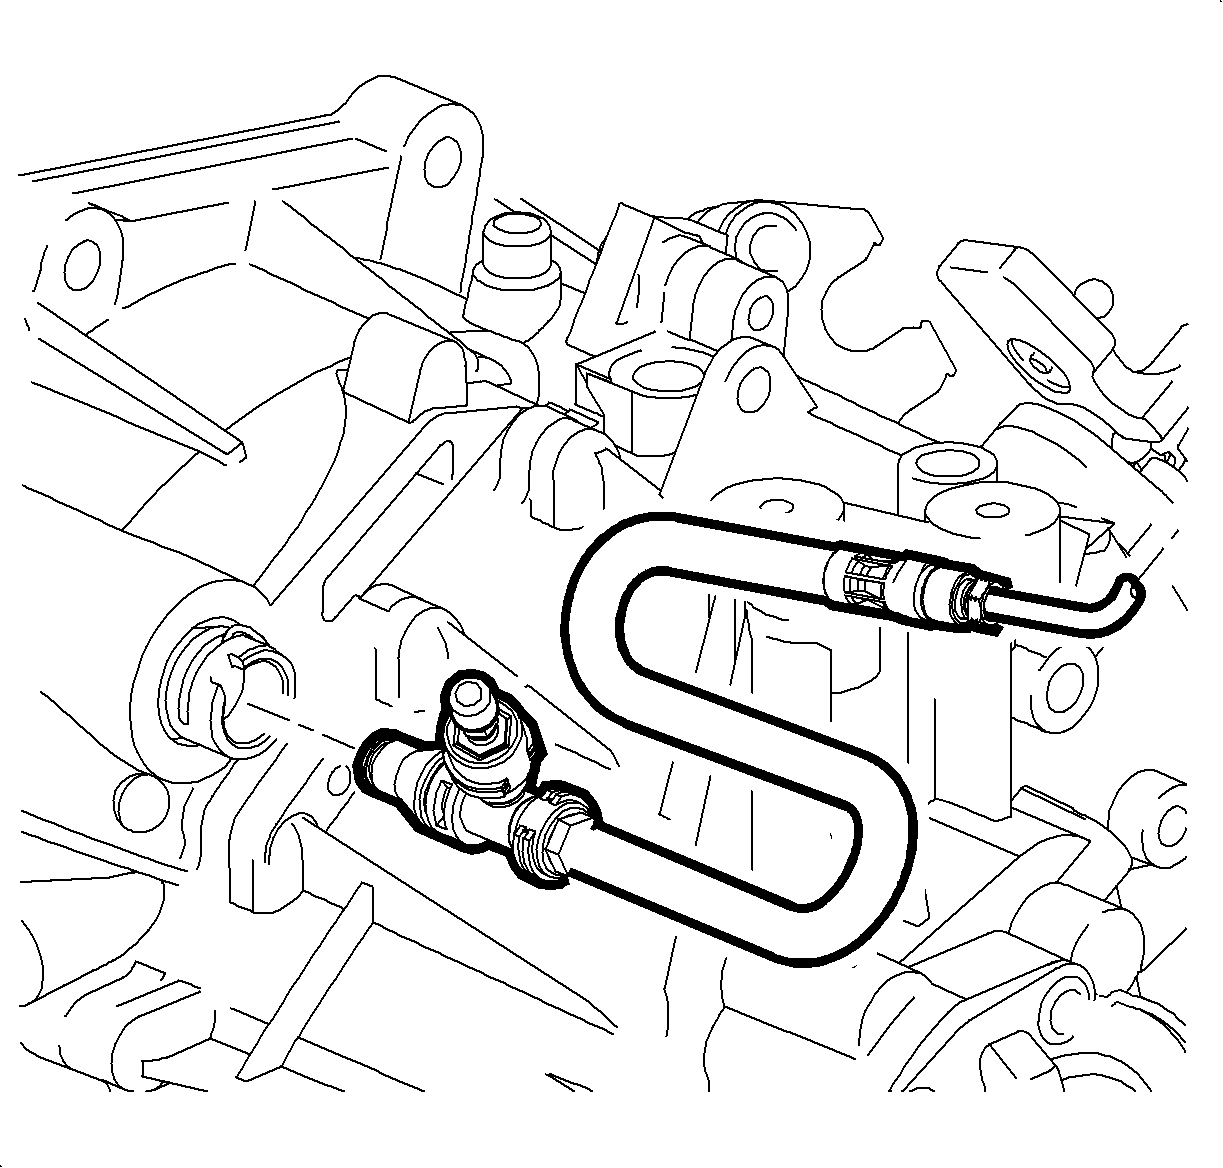
- If equipped with automatic, disconnect the transaxle lines from the transaxle.
- Disconnect the rear O2 sensor.
- Remove the exhaust pipe-to-manifold flange bolts.
- Remove the exhaust pipe to intermediate pipe nuts.
- Remove the converter pipe assembly and the support intermediate pipe assembly.
- Remove the propshaft bolts to the power take-off unit (PTU) - AWD Only.
- Remove the propshaft bolts at the rear axle assembly - AWD Only.
- Remove the propshaft support bracket-to-body bolts - AWD Only.
- Remove the propshaft assembly - AWD Only.
- If equipped with automatic, remove the shifter cable from the bracket assembly.
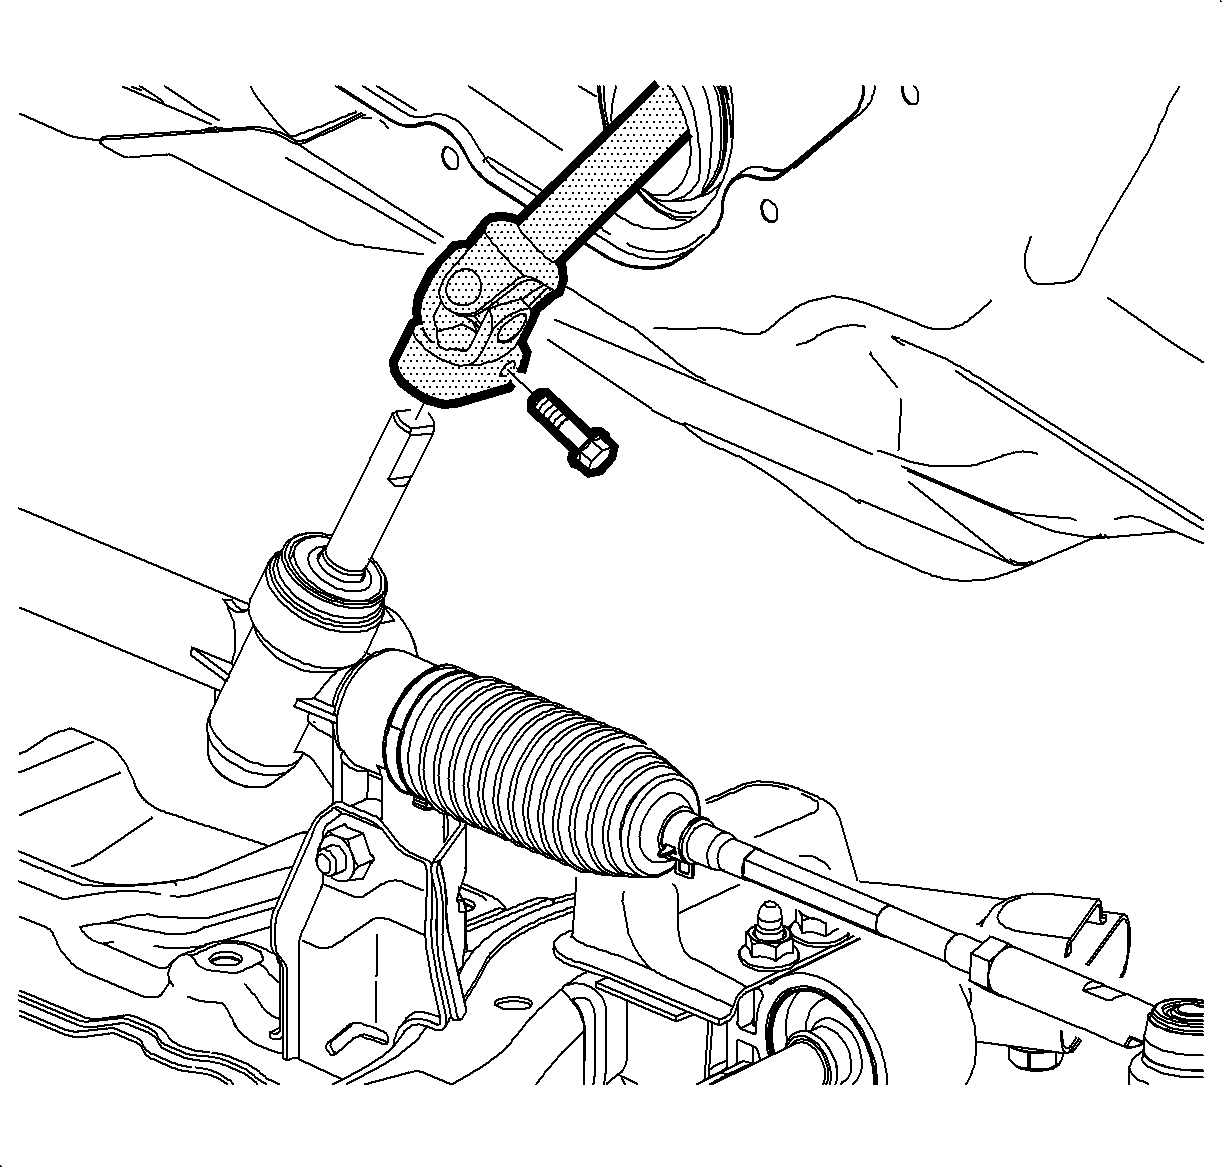
- Remove the steering gear to the intermediate shaft bolt.
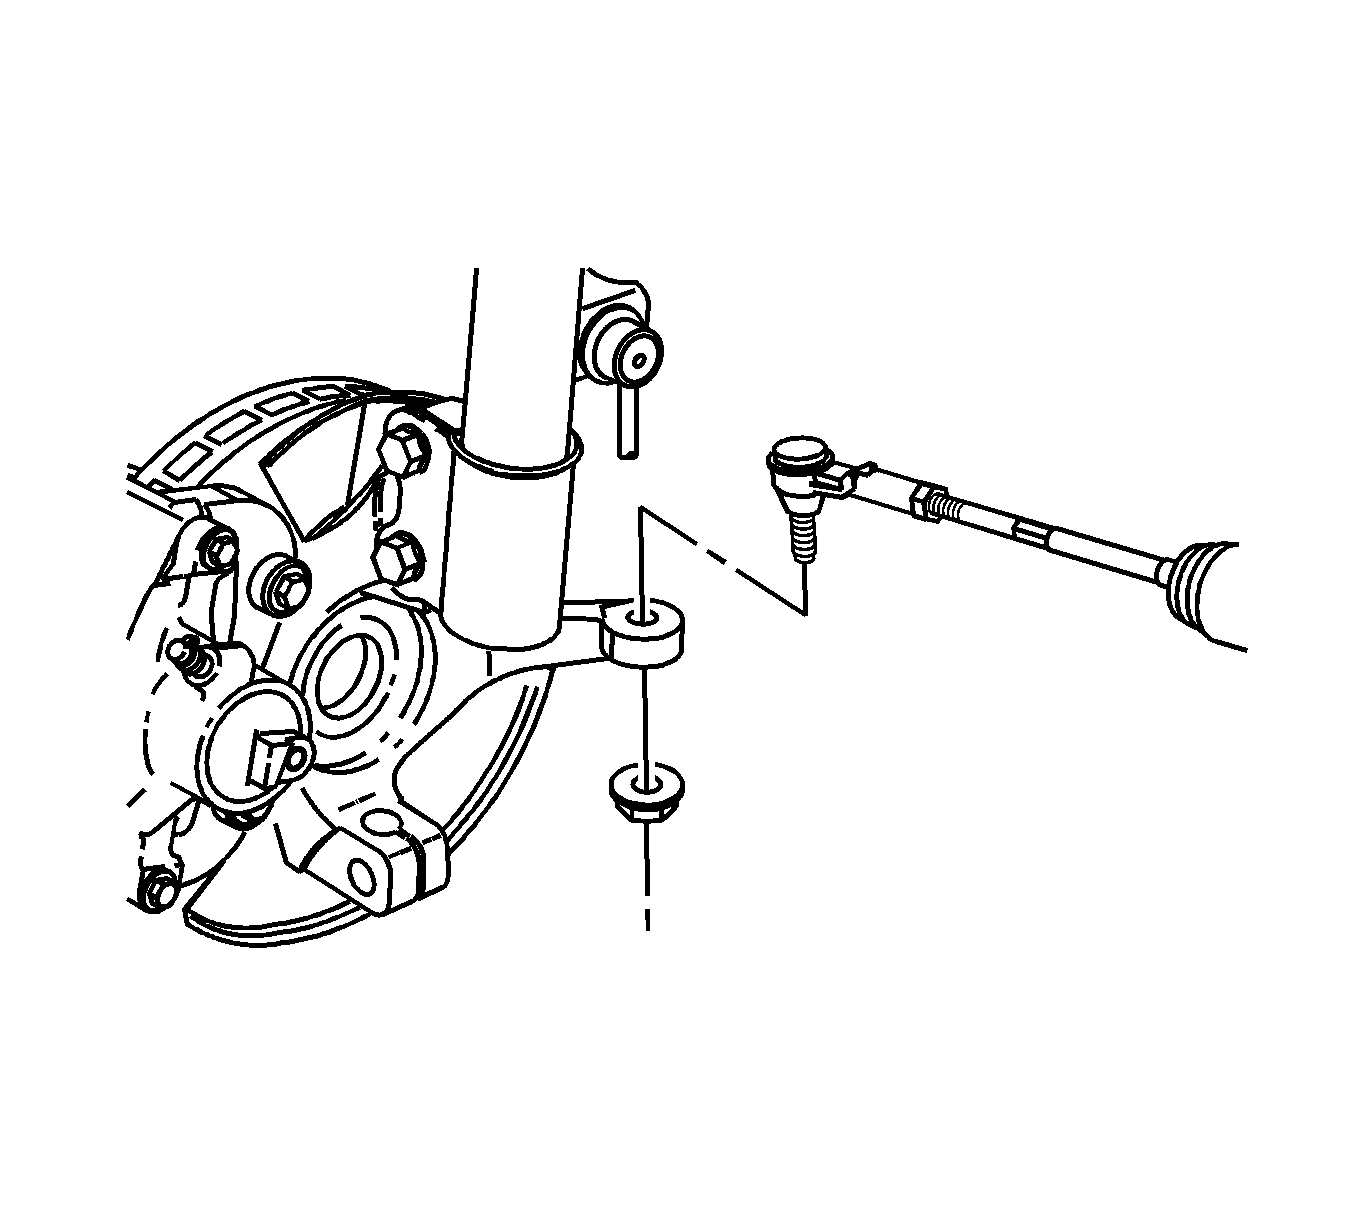
- Remove the tie rod to knuckle nuts.
- Separate the tie rod assemblies from the knuckle assemblies using the SA91100C .
- Remove the lower control arm cotter pins and the nuts to knuckle assembly.
- Separate the J 43828 .
- Remove the lower stabilizer link nuts to the stabilizer bar.
- Remove the LH axle shaft assembly from the transaxle.
- Disconnect the RH shaft assembly from the intermediate drive shaft using the J 45341 tool with the appropriate slide tool.
- Lower the vehicle.
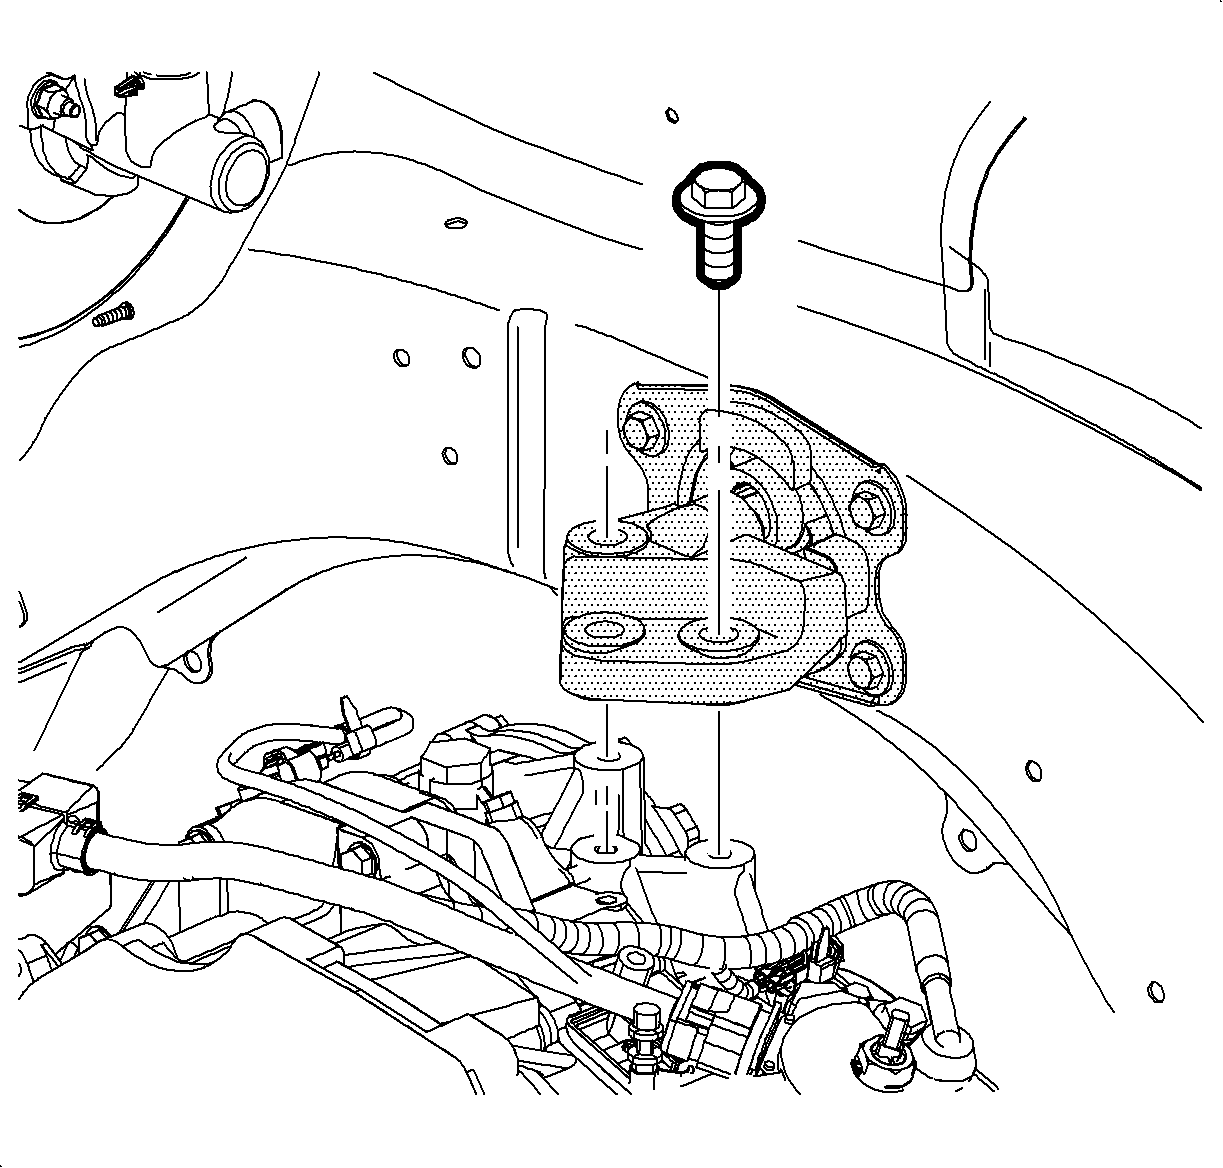
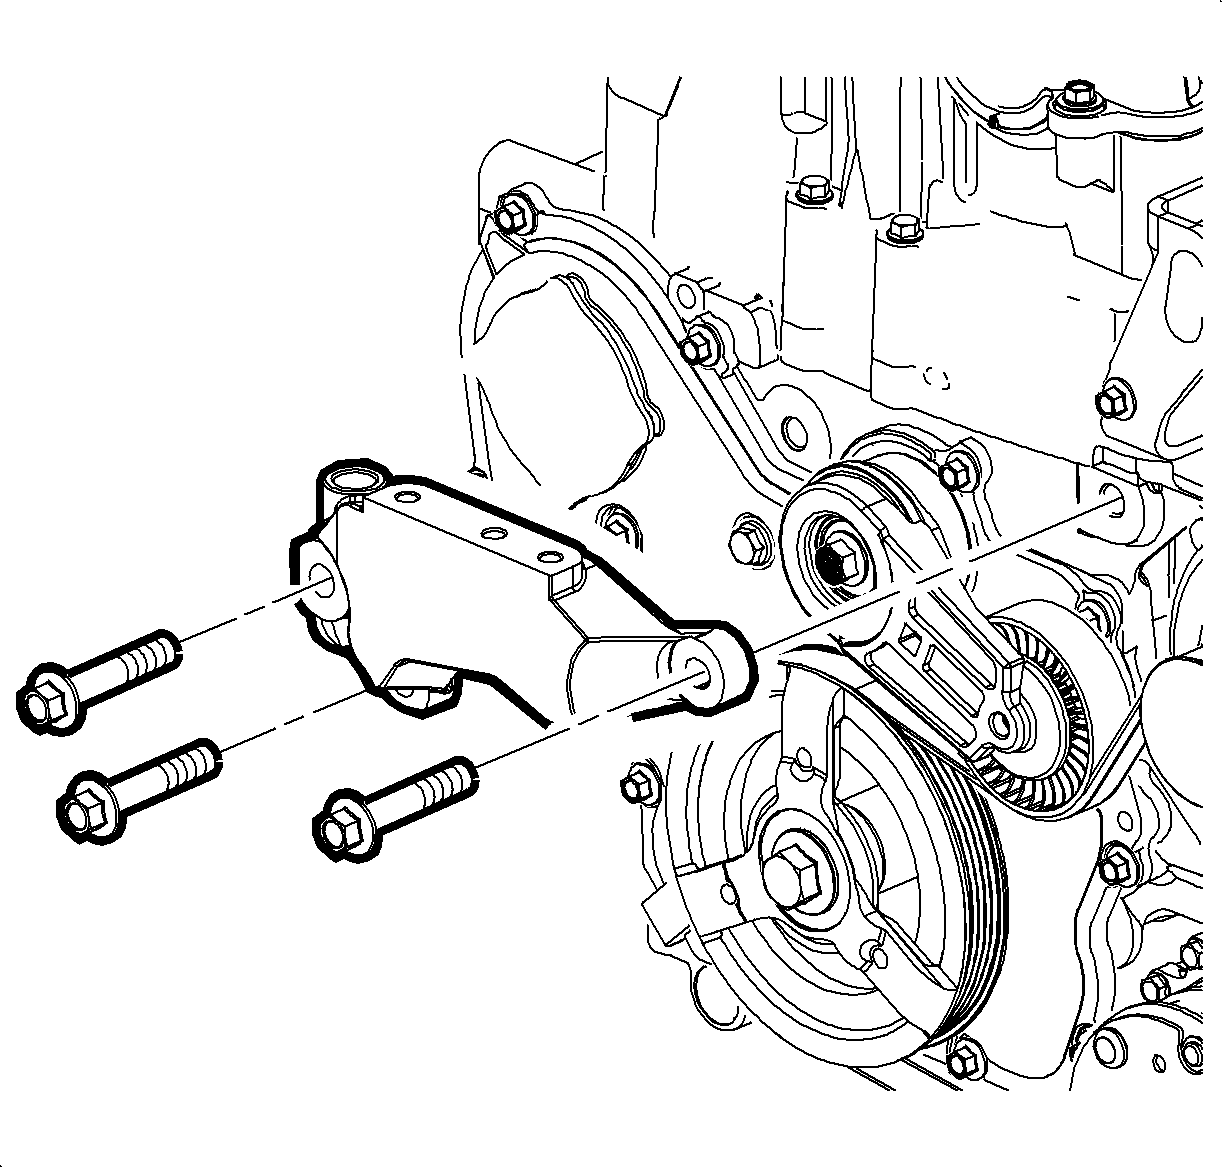
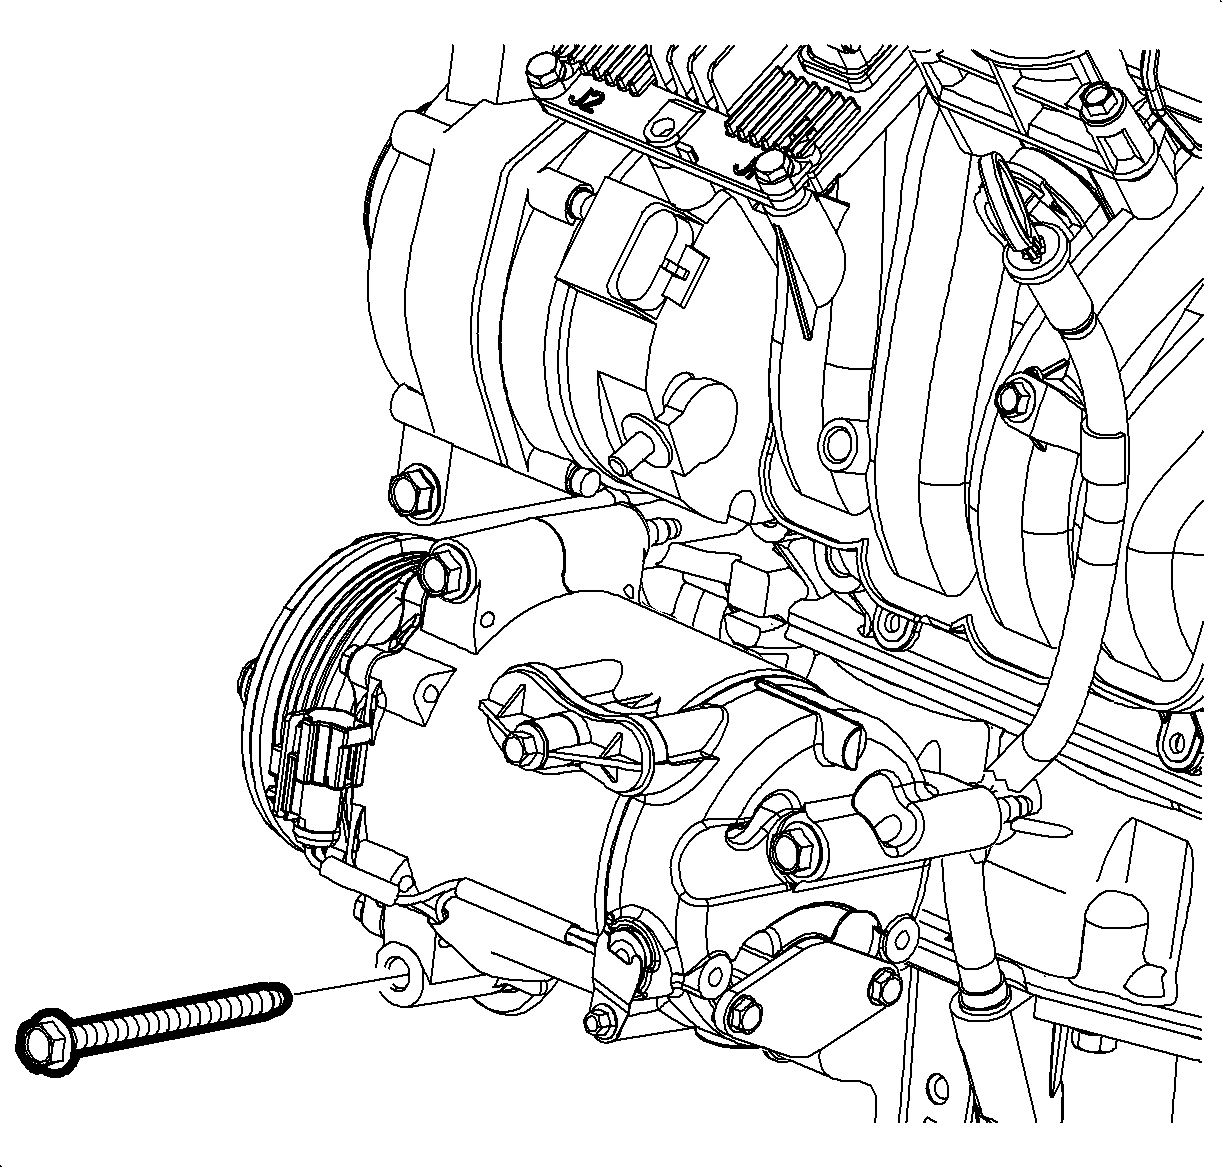
- Remove the RH engine mount to the engine bracket bolts. The engine should rest on the wood blocks.
- Remove the LH transaxle mount to the transaxle bolts, the transaxle should rest on the wood blocks.
- Raise the vehicle on the hoist.
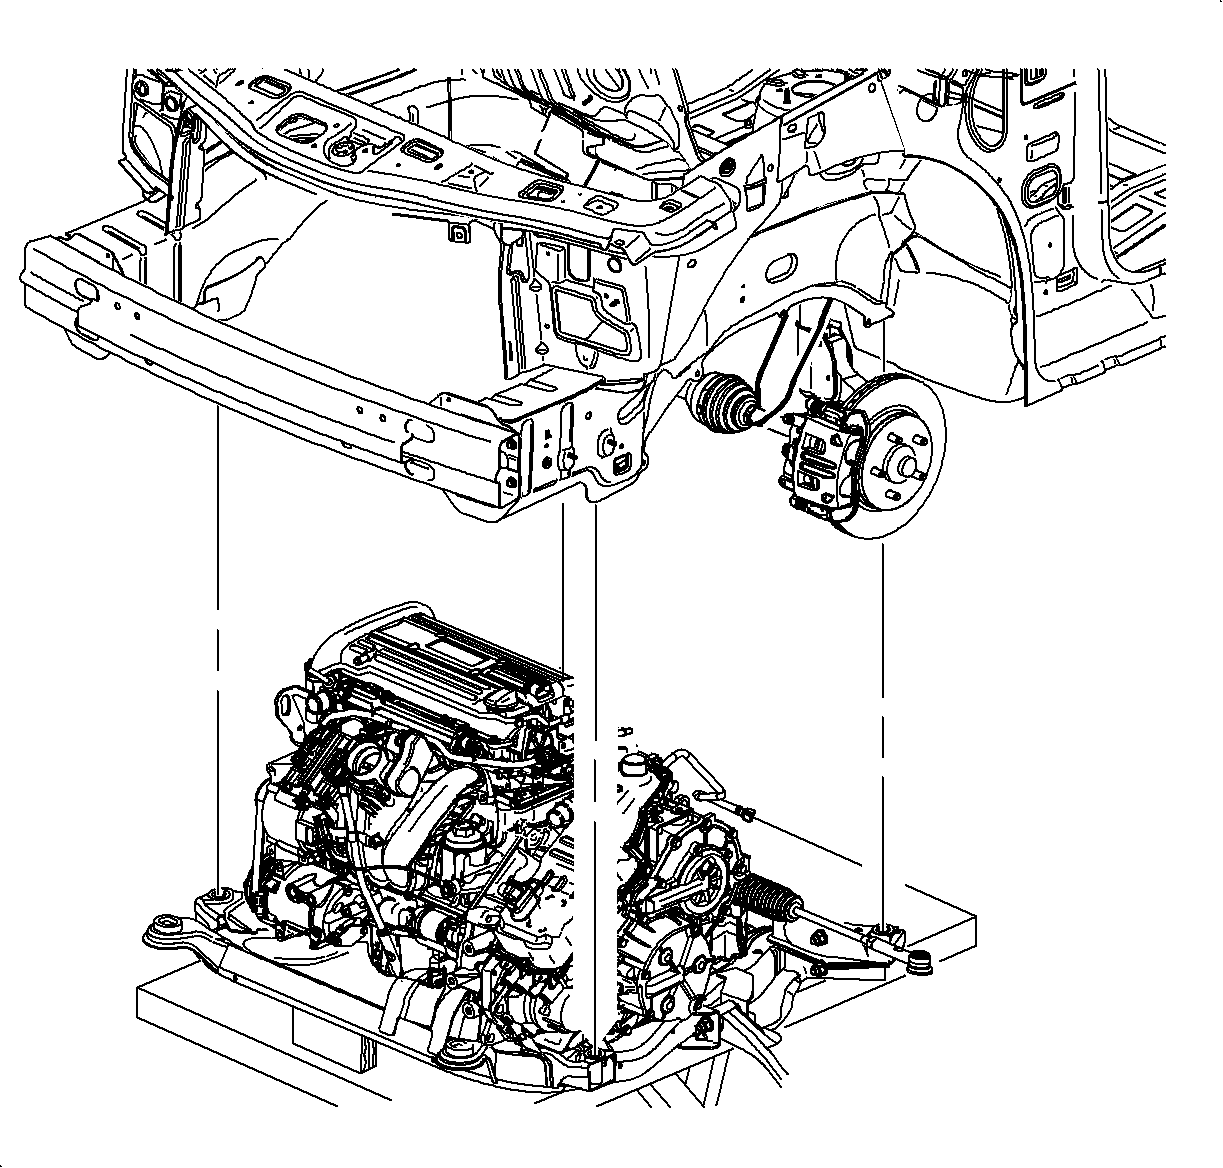
- Position the engine support table under the powertrain assembly.
- With the table positioned, fully raise the table to contact with powertrain assembly.
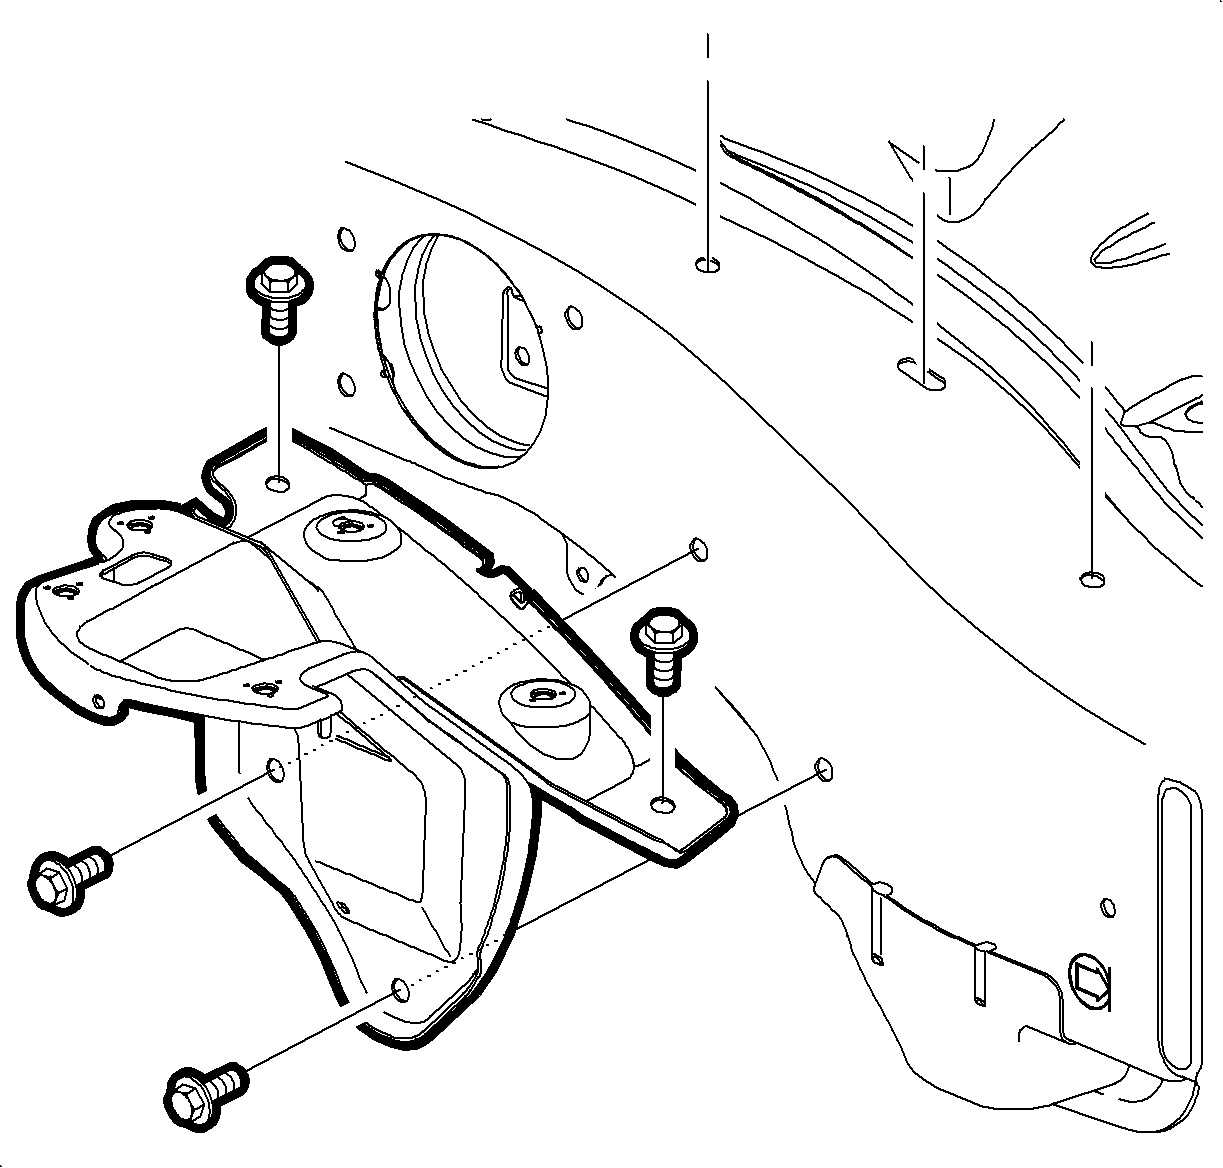
- Remove the cradle to body bolts.
- Lower the engine table and raise the body on the hoist until the engine/transaxle and the cradle assembly is free from the vehicle.
Notice: Do not remove the shifter cable from the bracket before removing the cable from the transaxle range switch. Damage to the manual shift linkage may occur.
Notice: Do not use too much force when disconnecting the shift cables or damage may result.
Important: Place a shop towel on the generator to prevent coolant from entering the generator assembly.

Important: The radiator/condenser/fan assembly will stay in the vehicle during engine removal.
Caution: Ensure that the vehicle is properly supported and squarely positioned. To help avoid personal injury when a vehicle is on a hoist, provide additional support for the vehicle on the opposite end from which the components are being removed.
Important: A piece of hardwood should be used between the transaxle case and cradle assembly. This wood will support the transaxle when the LH mount bolts are removed.
Notice: Do not install wood under the oil pan plug boss. Damage to the oil pan may occur.
Important: A piece of hardwood should be used between the oil pan assembly and the engine cradle. This wood will support the engine when the RH mount bolts are removed.
Important: When the transaxle lines are disconnected, new seals must be installed into the transaxle to prevent the potential for leak.
Important: Fluid will leak when the lines are disconnected. Place a drip pan to collect the transaxle oil.
Notice: Do not remove the shifter cable from the bracket before removing the cable from the transaxle range switch. Damage to the manual shift linkage may occur.
Important: The stabilizer links will stay in the vehicle connected to the strut assembly on the engine removal.
Important: During the powertrain removal support the vehicle body by placing a jack at the rear of the vehicle.
Important: Blocks of wood can be used between the front of cradle and the oil pan to table to level powertrain during the removal.
Important: When lowering the engine/transaxle assembly, verify all brake lines, shifter cable and other components are free during the removal.
Installation Procedure
- With the powertrain supported on the jacking table, raise the powertrain into position.
- Raise the powertrain assembly into position. Align the lower radiator alignment pins with the cradle assembly. Be sure all the hoses and the electrical harnesses are correctly routed and free from the loading path of the powertrain assembly.
- Raise the transaxle into the vehicle to align the input shaft to the center of clutch. Guide the transaxle into position, rotate back and forth to align the input shaft splines to the clutch disc manual transmission only.
- Position the cradle guide pins into the location and install the new cradle-to-body bolts.
- Lower the vehicle.
- Install the RH engine mount-to-engine bracket bolts.
- Install the RH engine mount assembly and the nuts.
- Install the LH transaxle mount-to-transaxle bolts.
- Raise the vehicle. Refer to Lifting and Jacking the Vehicle in General Information.
- Remove the wood blocks between the cradle and the powertrain.
- Swing the axle shafts into position and fully seat the axles into the transaxle.
- Position the strut assemblies onto the lower control arms.
- Install the lower control arm nut.
- Verify the axles are fully seated.
- Position the stabilizer link into position and install the nut.
- Install the stabilizer nut.
- Install tie rod end into strut knuckle assembly.
- Install the steering shaft to the intermediate shaft.
- Install the steering shaft-to-intermediate shaft bolt.
- Install the propshaft into position. Hand-tighten the center bearing nuts - AWD Only.
- Install the propshaft into position - AWD Only.
- Install the propshaft-to-PTU bolts - AWD Only.
- Install the propshaft into the rear axle assembly - AWD Only.
- Install the propshaft to rear module bolts - AWD Only.
- Tighten the propshaft support bearing bolts - AWD Only.
- Install the propshaft support strap - AWD Only.
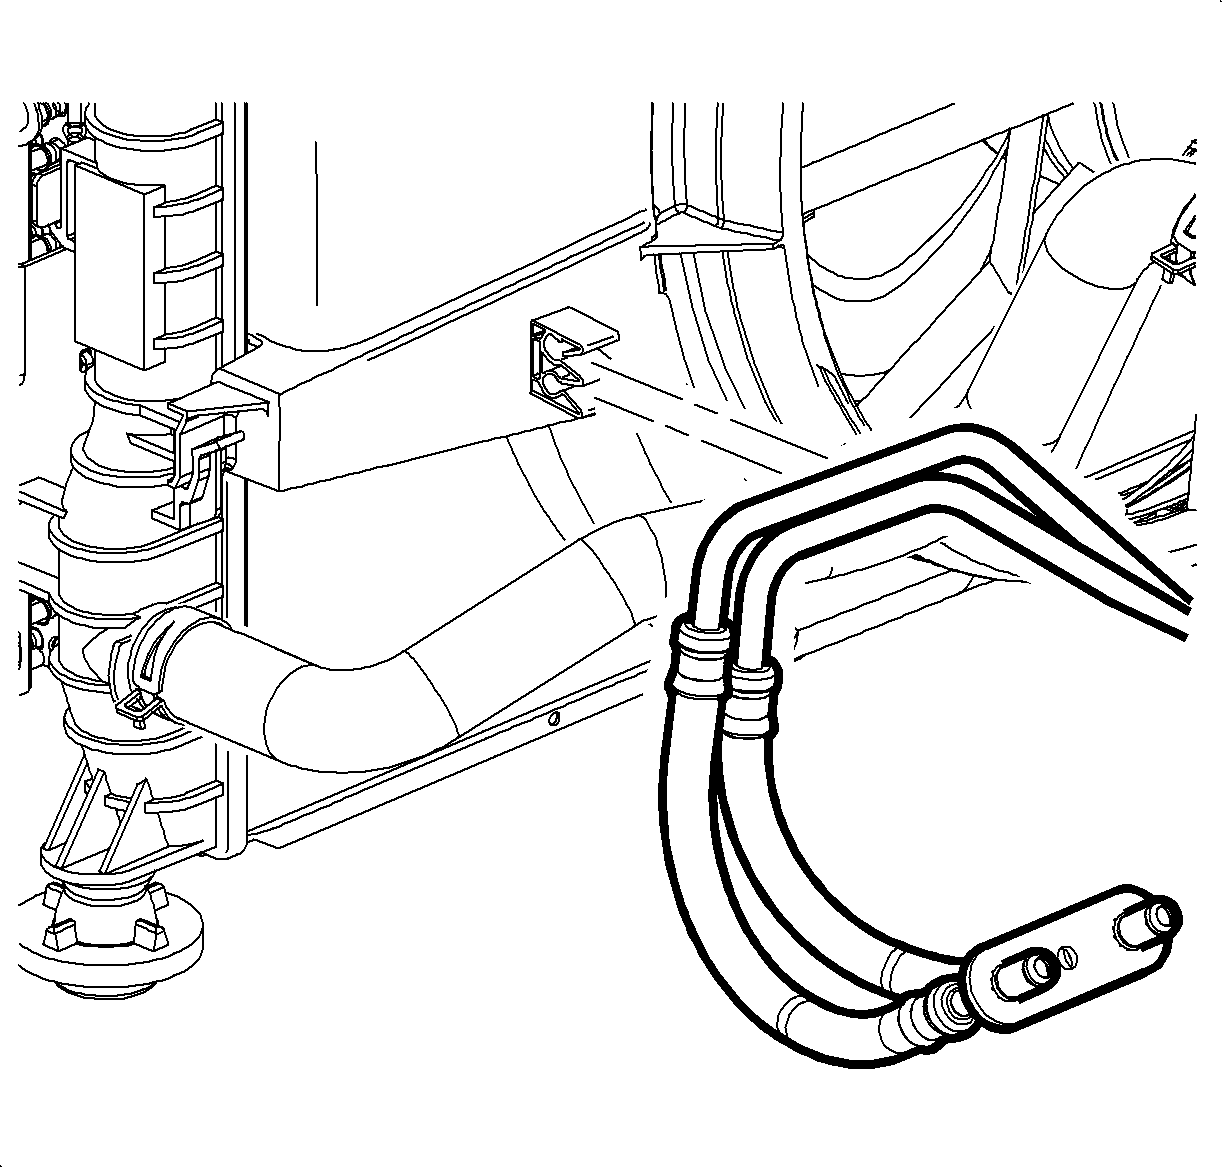
- Connect the transaxle lines-to-transaxle.
- Install the gasket and down pipe-to-intermediate pipe assembly.
- Hand tighten the nuts.
- Install the gasket and down pipe-to-exhaust manifold.
- Route the O2 harness into position at heat shield.
- Install the A/C compressor to the engine block.
- Connect the A/C compressor harness-to-compressor.
- Connect the A/C pressure transducer-to-sensor.
- Install the route belt around alternator and the A/C compressor.
- Install the J 39914 onto the tensioner and unload the spring tension from the tensioner while positioning the belt.
- Release the tensioner and remove the tool.
- Attach the front air deflector to the cradle assembly.
- Route and install the shifter cable onto the bracket.
- Install the right engine inner splash shield.
- Install the right wheel and hand tighten the wheel nuts.
- Install the LH inner splash shield.
- Install the left wheel and hand tighten the wheel nuts.
- Lower the vehicle.
- Connect the shifter cable to the transaxle range switch. Adjustment is required. Refer to Shift Cable Adjustment in Automatic Transmission - VT25-E.
- Connect the clutch hydraulic line to the actuator cylinder by inserting and pushing in the C-clip until it stops manual transmission only.
- Connect the shift cables into the shift cable bracket manual transmission only.
- Connect the shift cable ends to the transaxle manual transmission only.
- Connect the heater hoses to the heater core at the front of the dash.
- Connect the purge hose at the purge solenoid.
- Connect the fuel transfer line to the quick connect to the fuel line.
- Connect the surge hose at the bottom of the surge tank.
- Connect the degas hose at the surge tank.
- Connect the lower radiator hose at the coolant pipe.
- Connect the upper radiator hose at the engine cylinder head.
- Cut the radiator support straps and remove.
- Install the headlamp assemblies and the torque bolts.
- Route the engine ground under the A/C line.
- Install the engine ground-to-body bolt.
- Install the UHFB and the battery tray.
- Install the UHFB and the battery tray bolts.
- Route the engine harness into position and install the main engine and the body harness connectors into the UHFB housing.
- Snap the connectors into position in the UHFB.
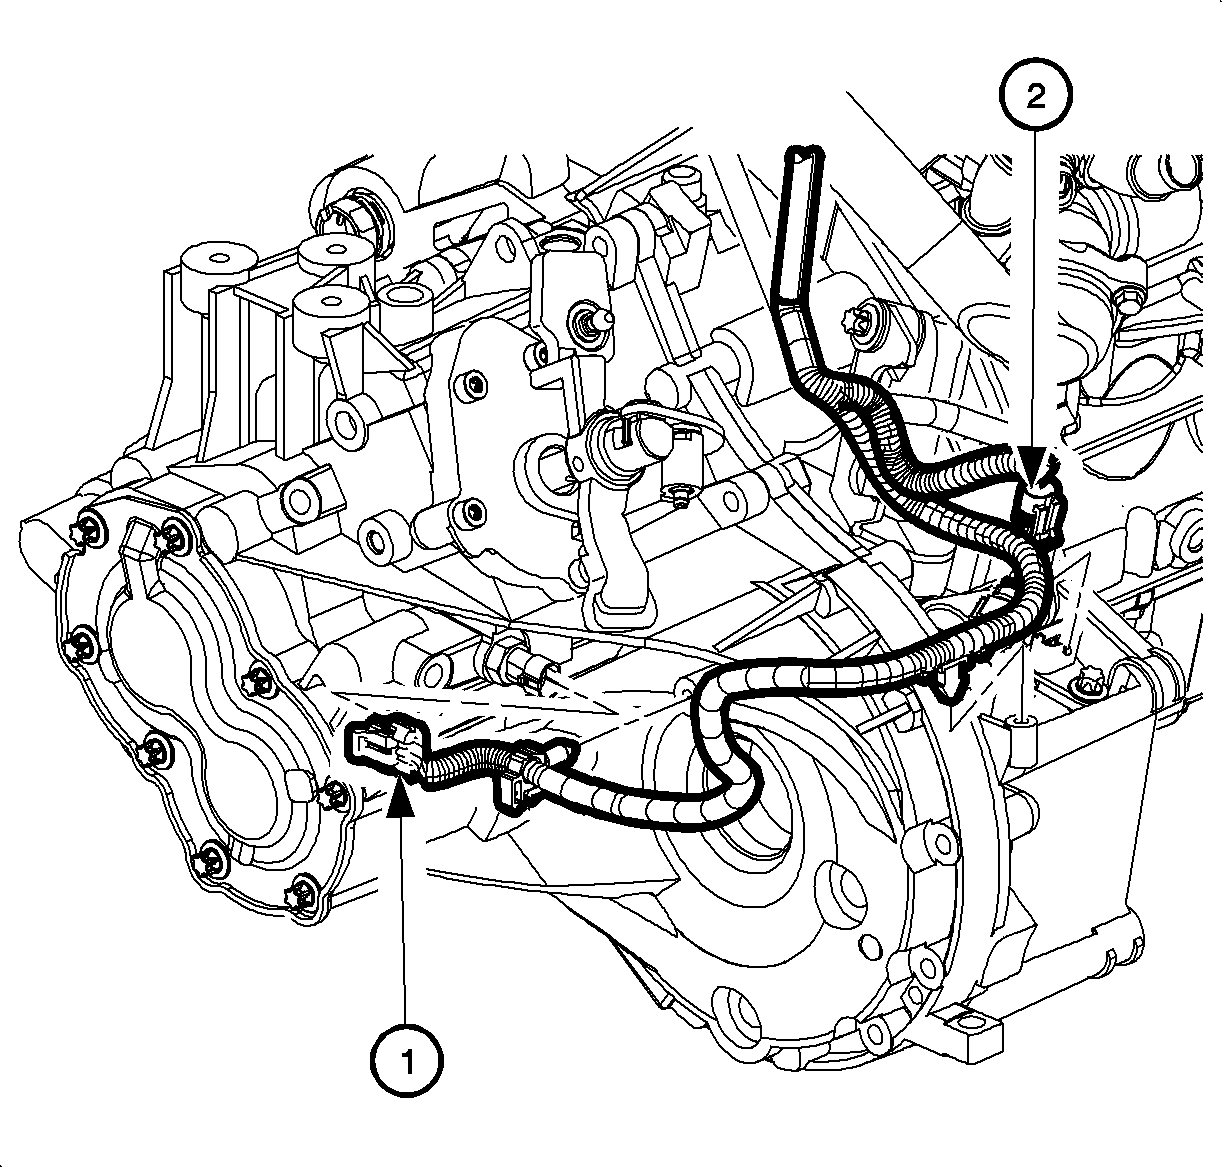
- Connect both electrical connectors (2) underneath the UHFB.
- Install the UHFB while aligning the UHFB with the connectors.
- Snap the UHFB into position.
- Tighten the UHFB connector bolts (1).
- Install the battery and electronic power steering (EPS) feed wire to the UHFB stud and tighten the nut.
- Install the UHFB fuse cover into position.
- Connect the electrical connectors to the TCM, if equipped.
- Install the battery cable and the harness attachment clips on the side of the battery tray/UHFB bracket assembly.
- Install the battery and the cover.
- Install the brake vacuum hose into the booster.
- Connect the rear O2 sensor connector.
- Secure the rear O2 sensor to the body clips, near air cleaner assembly.
- Remove the shop towel from the throttle body opening.
- Position the outlet resonator/duct assembly into position.
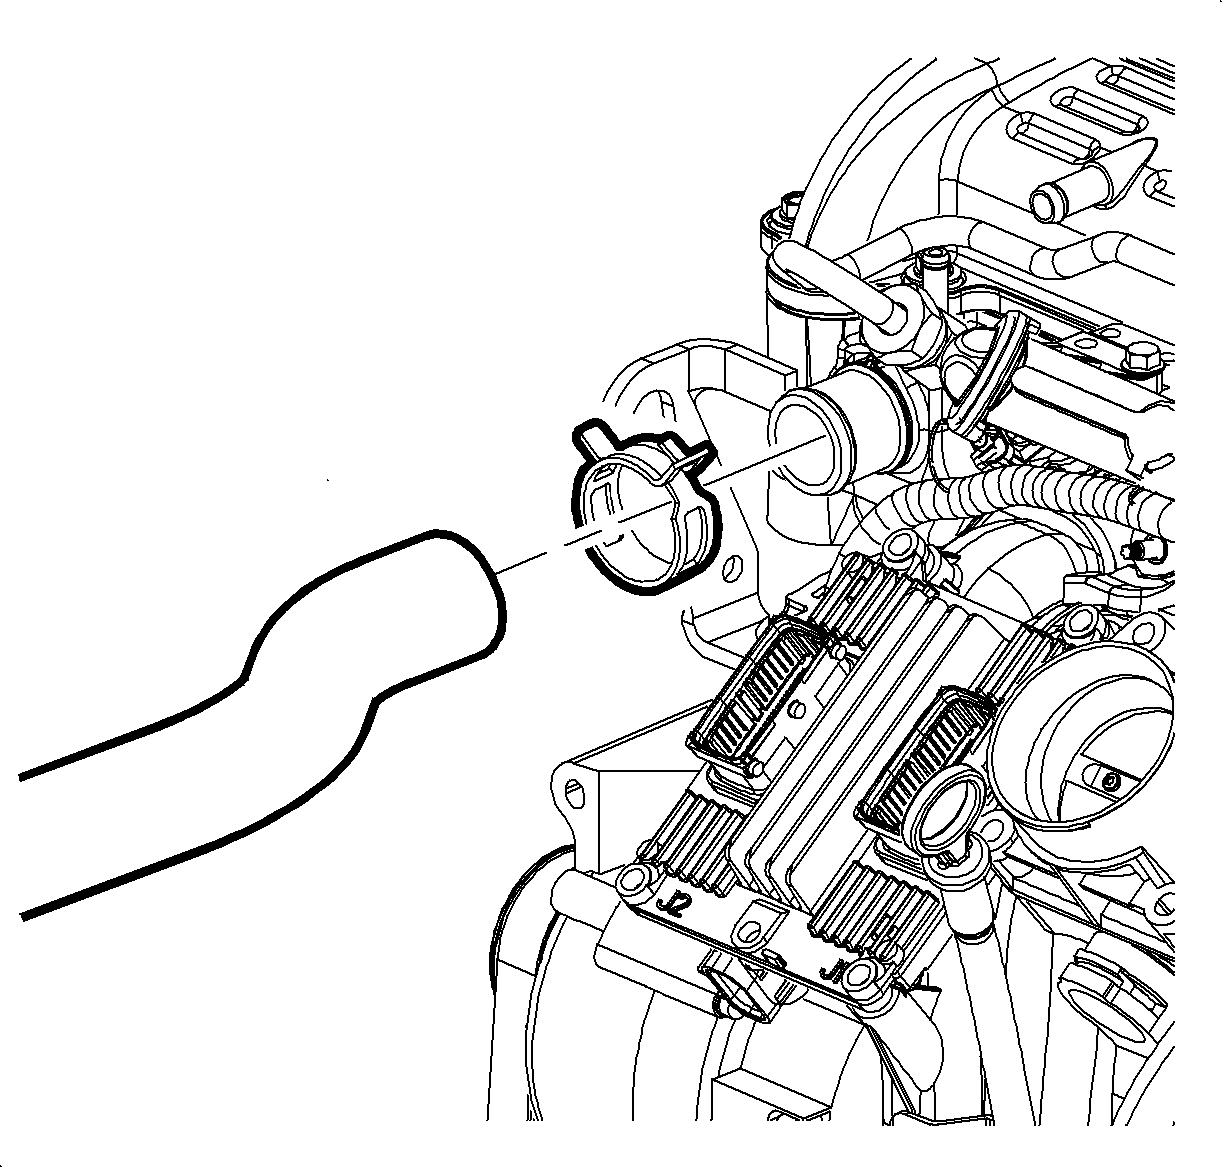
- Connect the PCV fresh air vent hose assembly.
- Tighten the clamp at the throttle body assembly.
- Position the outlet resonator/duct assembly up with the support bracket and install the pushpin.
- Tighten the clamp at air the cleaner assembly.
- Connect the intake air temperature (IAT) sensor connector.
- Connect the negative battery cable.
- Fill the coolant system. Refer to Cooling System Draining and Filling in Engine Cooling.
- Start the engine and fill the transaxle fluid. Refer to Transmission Fluid Replacement .
- Check for leaks.
- If excessive engine idle vibration is noticed, mount adjustment procedure can be performed. Refer to Engine and Transmission Mount Balancing - All Mounts .
- Verify the wheel alignment is within specifications.
Notice: If the radiator assembly is not properly positioned to the cradle, damage could occur.
Notice: Refer to Fastener Notice in the Preface section.
Important: The body to cradle bolts are a one time use fastener and should be discarded after removal.
Tighten
Tighten the frame-to-body bolts to 155 N·m
(114 lb ft).
Tighten
Tighten the engine mount-to-engine bracket bolts
to 50 N·m (37 lb ft).
Tighten
Tighten the wheel nuts to 125 N·m (92 lb ft).
Tighten
Tighten the LH transaxle mount-to-engine bracket
bolts to 50 N·m (37 lb ft).
Important: Do not damage the transaxle and the bearing races when the axles are seated.
Tighten
Tighten the lower control arm-to-knuckle nut to
10 N·m (89 lb in) +150 degrees.
Tighten
Tighten the stabilizer link to strut to 65 N·m
(48 lb ft).
Tighten
Tighten the tie rod knuckle assembly to 50 N·m
(37 lb ft).
Tighten
Tighten the steering shaft-to-rack bolt to 34 N·m
(25 lb ft).
Tighten
Tighten the propshaft-to-PTU bolts to 25 N·m
(19 lb ft).
Tighten
Tighten the propshaft-to-rear module bolts to 50 N·m
(37 lb ft).
Tighten
Tighten the propshaft support bearing bolts to 25 N·m
(19 lb ft).
Tighten
Tighten the propshaft guard strap to 25 N·m
(19 lb ft).
Tighten
| • | Tighten the transaxle cooler lines-to-transaxle stud 20 N·m (15 lb ft) - Automatic Only. |
| • | Tighten the transaxle cooler lines-to-transaxle nut 10 N·m (89 lb in) - Automatic Only. |
Tighten
Tighten the down pipe-to-intermediate pipe nuts
to 50 N·m (37 lb ft).
Tighten
Tighten the A/C compressor-to-block bolt to 25 N·m
(18 lb ft).
Tighten
Tighten the wheel nuts to 125 N·m (92 lb ft).
Tighten
Tighten the engine ground-to-body bolt to 20 N·m
(15 lb ft).
Tighten
Tighten the battery tray bolts to 16 N·m
(11 lb ft).
Important: Make sure the engine and body harnesses are properly positioned to avoid damage to the harness.
Tighten
Tighten the UHFB connector bolts to 4 N·m
(35 lb in).
Tighten
Tighten the battery positive-to-UHFB stud to 10 N·m
(89 lb in).
Tighten
Tighten the battery terminal bolt to 17 N·m
(13 lb ft).
Notice: All entrapped air must be purged from the powertrain cooling system before the final coolant level can be determined. Proper coolant level is critical to avoid engine damage.
