| Subject: | Inside Rear View Mirror Compass Will Not Display All 8 Compass
Directions (Re-calibrate Compass and Set Compass Variance for Local Zone) |
| Models: | 2002-2003 Saturn VUE Vehicles (RPO DF5 or DH3) |
| 2003
ION Sedans or Coupes (RPO DF5) |
| Attention: | General Manager, Fixed Operations Manager, Technician |
This bulletin is being revised to include additional information regarding compass
variances. Please discard Bulletin 03-T-08 (Corporate Bulletin Number 03-08-126-001,
Section 08 -- Body and Accessories).
Condition:
Some customers may comment that the compass reading on the inside rear view
mirror will not display in all directions. It sometimes will only display in one direction.
Cause:
The internal compass of the inside rear view mirror may have lost its calibration.
This may occur due to the compass receiving other external magnetic signals.
Correction:
Use the following procedure to re-calibrate the inside rear view mirror compass.
Set compass variance for local zone and verify all mirror functions.
Service Procedure
Important: Check to see if vehicle has any aftermarket
electrical accessories. Some accessories have been known to cause interference with
inside rear view mirror functions.
- Start engine.
- Press and hold the "COMP" button down until the word "CAL"
is displayed. If vehicle is equipped with OnStar®, press and hold the "ON/OFF"
button until the word "CAL" is displayed.
- Drive vehicle in a circle (either direction) at 8 km/h (5 mph)
or less until the word "CAL" disappears.
- Drive vehicle to verify that all eight points of the compass will be displayed:
N, NE, E, SE, S, SW, W, NW.
| • | If compass displays all eight points, proceed to step 6. |
| • | If compass does not display all points, repeat steps 1-3. |
| • | If compass will not calibrate after two attempts, proceed to step 5. |
- Replace inside rear view mirror and calibrate new compass if original
unit will not calibrate after two attempts.

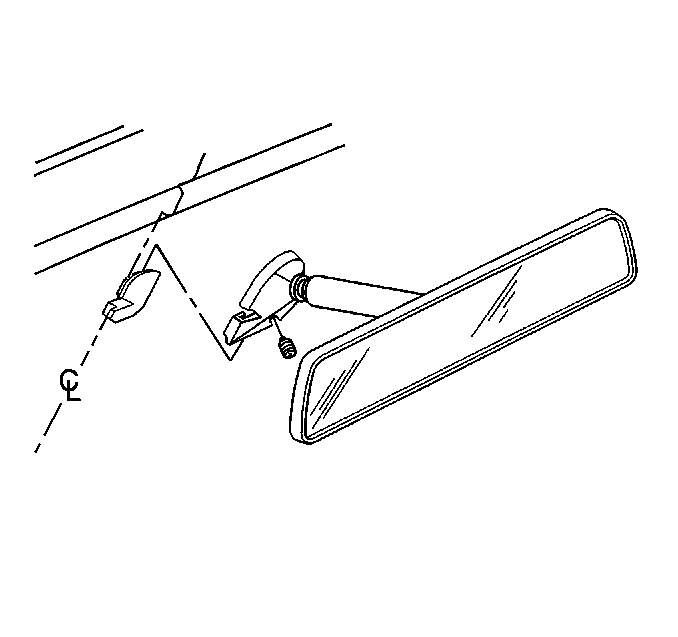
| 5.1. | Loosen the set screw in the base of the mirror. |
| 5.2. | Remove the old inside rear view mirror from the mounting pad. |
| 5.3. | Disconnect the inside rearview mirror wiring harness. |
| 5.4. | Install the new inside rear view mirror to the mounting pad. |
| | Notice: Use the correct fastener in the correct location.
Replacement fasteners must be the correct part number for that application. Fasteners
requiring replacement or fasteners requiring the use of thread locking compound or
sealant are identified in the service procedure. Do not use paints, lubricants, or
corrosion inhibitors on fasteners or fastener joint surfaces unless specified. These
coatings affect fastener torque and joint clamping force and may damage the fastener.
Use the correct tightening sequence and specifications when installing fasteners in
order to avoid damage to parts and systems.
|
| 5.5. | Tighten the set screw
that retains the mirror base to the mounting pad. |
Tighten
Tighten the mirror set screw to 2 N·m
(18 in-lbs)
| 5.6. | Install the inside rear view mirror wiring harness. |
| 5.7. | Calibrate new inside rear view mirror (see steps 1-3). |

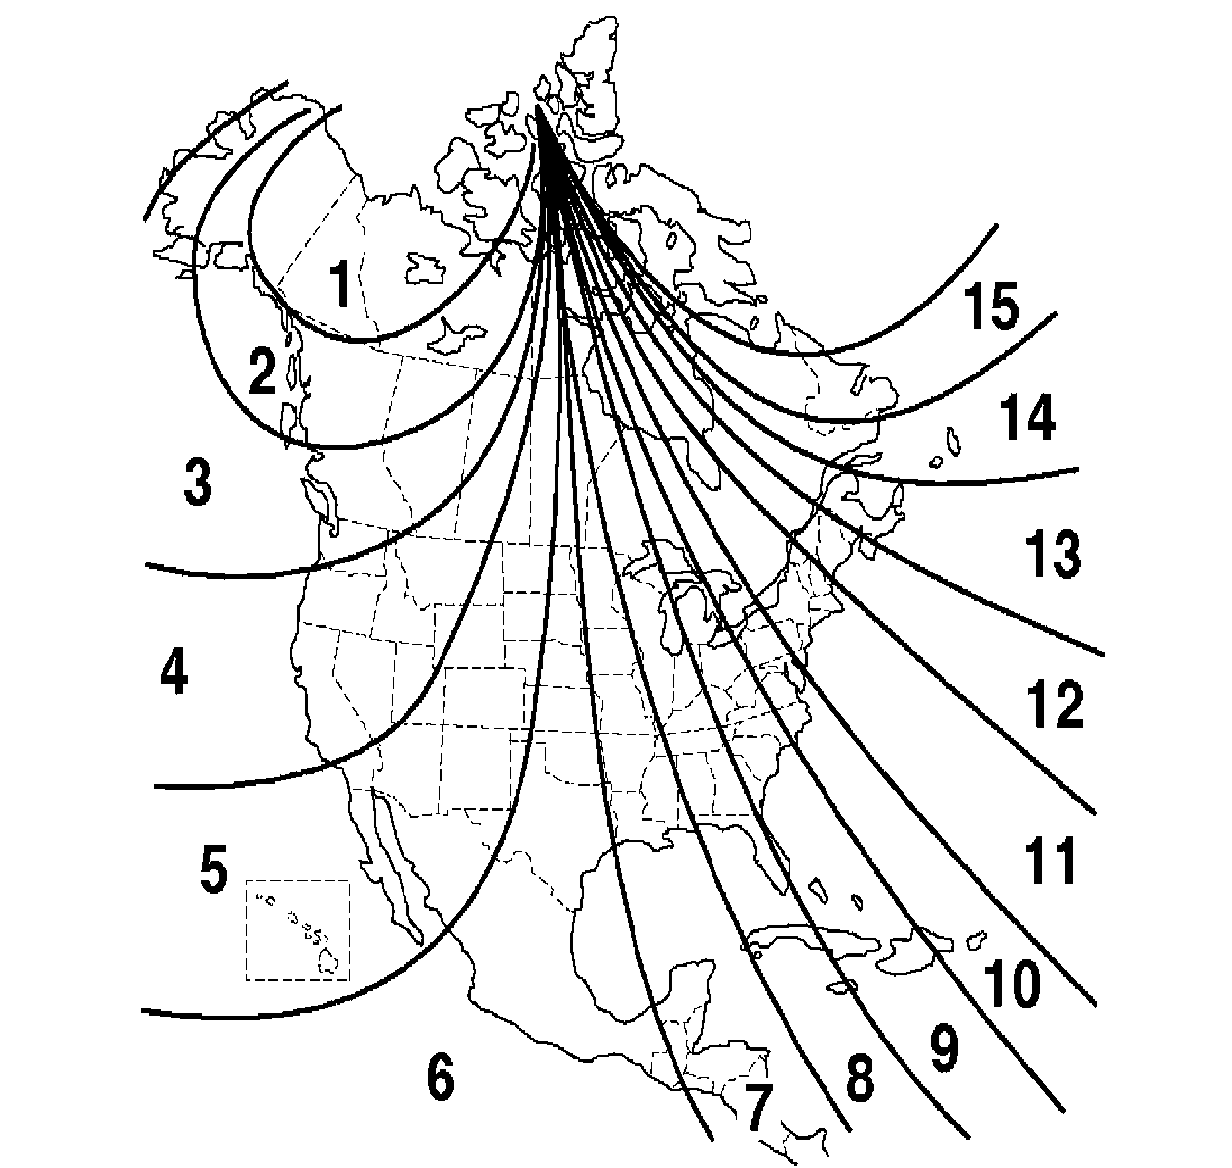
- After compass has been calibrated, set the Compass
Variance to the correct zone indicated on map.
| 6.1. | Press and hold the COMP button for 3 seconds. If your vehicle is equipped
with OnStar®, press the ON/OFF button for 6 seconds. Release the button when the "Zone"
is displayed. The number shown is the current zone number. |
| 6.2. | Scroll through the zone numbers that appear in the compass/temperature
window on the mirror by pressing the COMP button or the ON/OFF button. Once your find
your zone number, release the button. After about 4 seconds, the mirror will return
to the compass and temperature display, and the new zone number will be set. |
Important: Compass can be calibrated during normal driving
cycle when put in "CAL" mode, but it may take longer.
Claim Information
To receive credit for this repair during the warranty coverage period, submit
a claim through the Saturn Dealer System for C0045 (Mirror/Compass -- Replace).
A "Note" will be added for recalibration of the mirror compass, if the
compass is not replaced.


