Tools Required
| • | J 38122-A Crankshaft Pulley Holder |
| • | J 43405 Engine Support Fixture Adaptor |
| • | J 44811 Accessory Belt Tensioner Unloader |
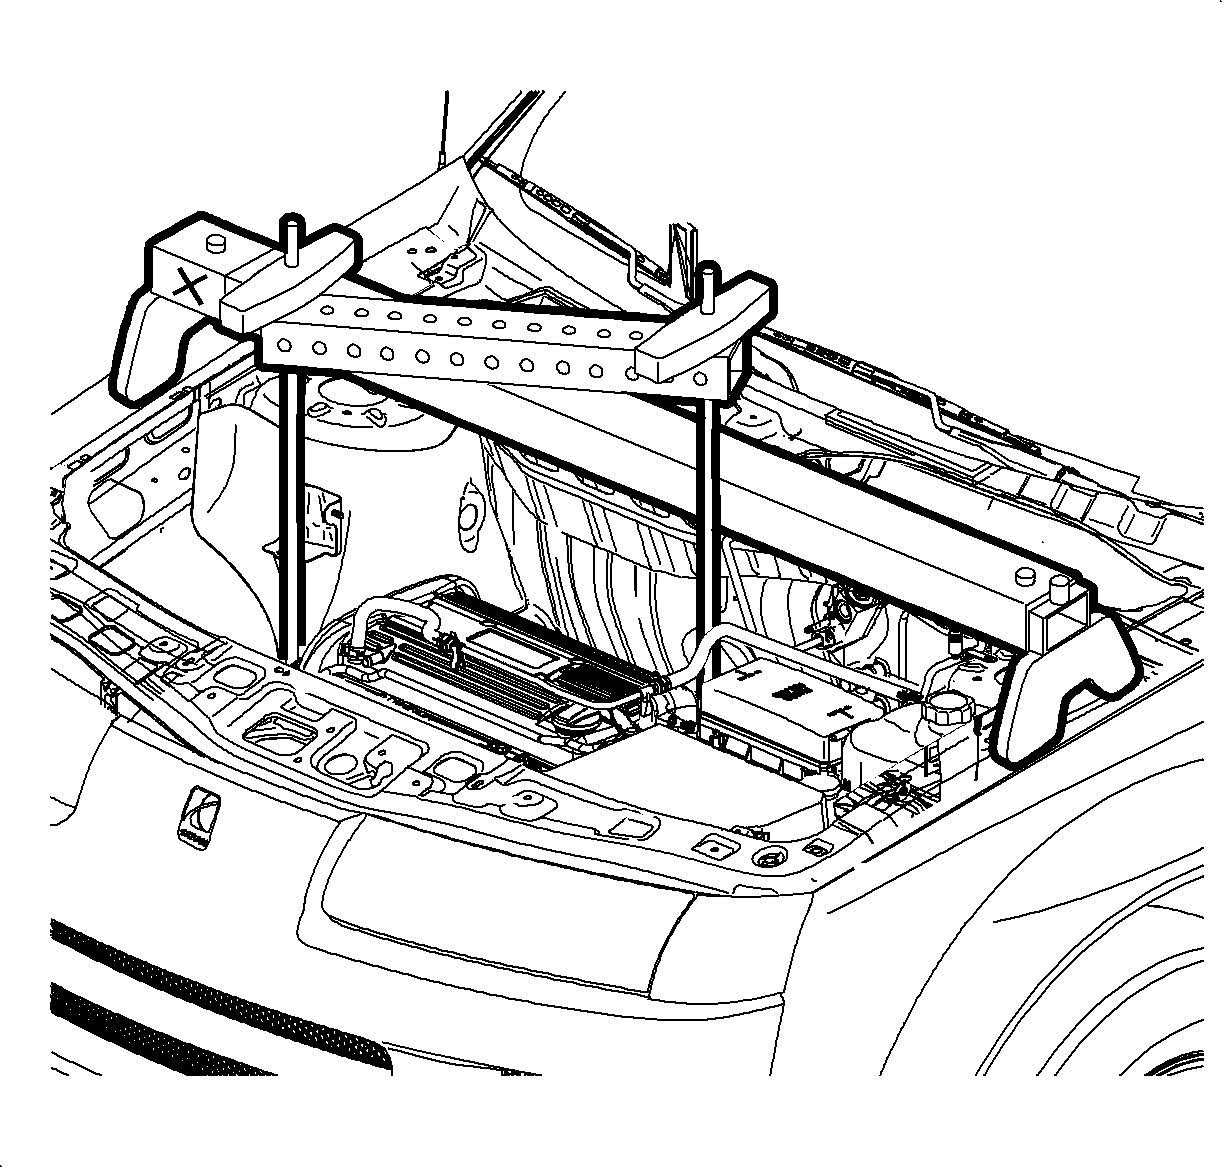
| • | SA9105E 3-Bar Engine Support Fixture |
| • | SA9127E Gage Bar Set |
| • | J 39914 Serpentine Belt Tension Unloader |
| • | J 45027 Tensioner Tool |
Removal Procedure
- Disconnect the negative battery cable. Refer to Battery Negative Cable Disconnection and Connection .
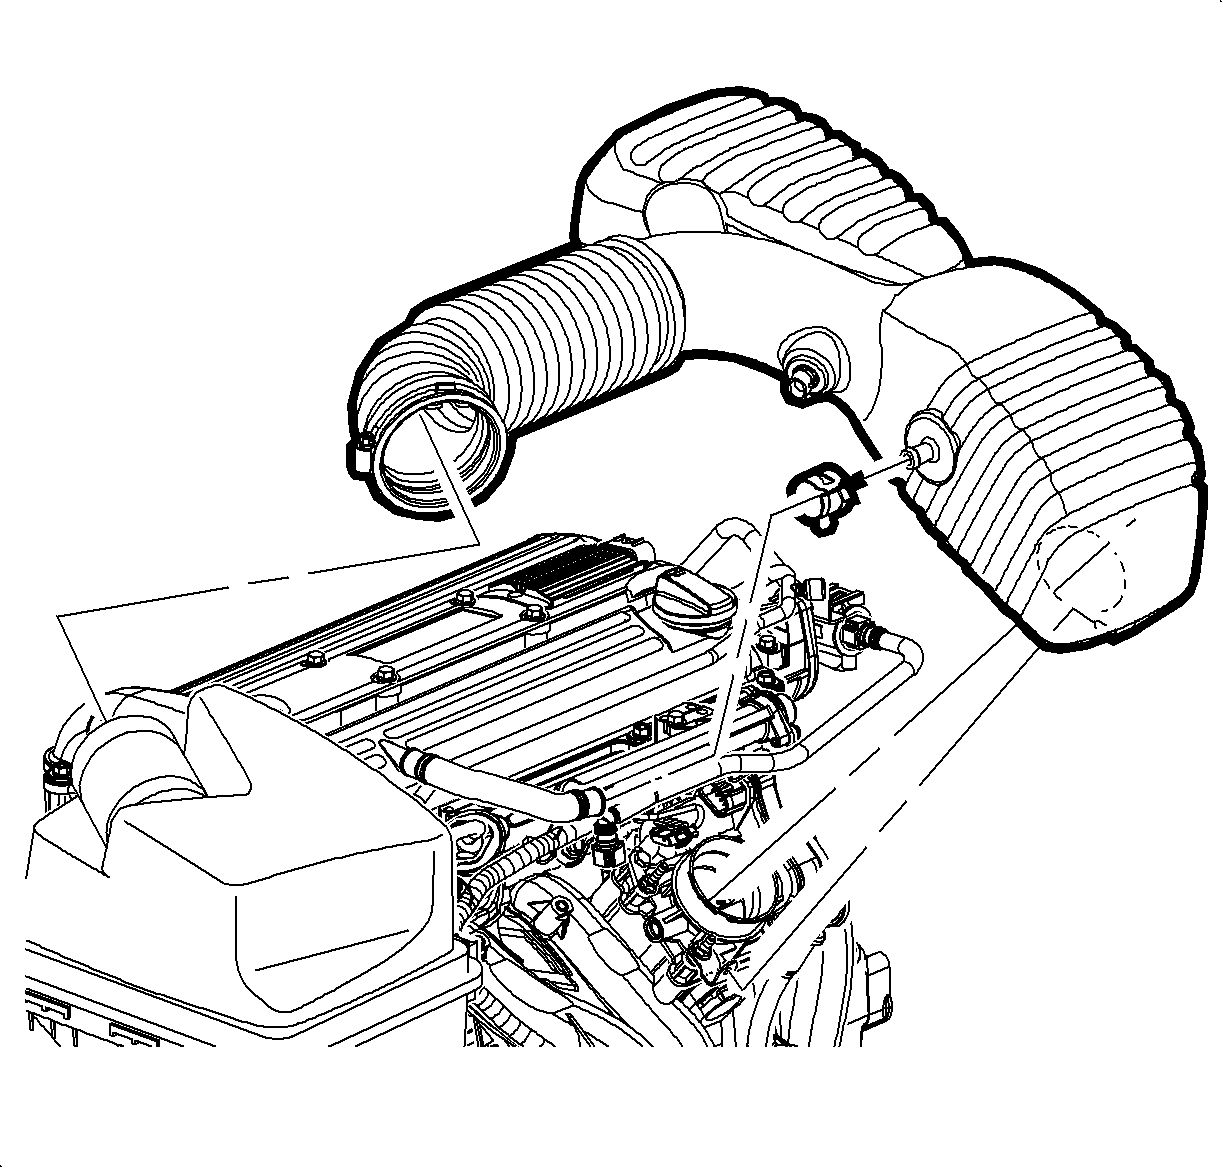
- Disconnect the intake air temperature (IAT) sensor connector.
- Loosen the clamp at the air cleaner assembly.
- Remove the push pin attachment from the outlet resonator/duct assembly to the support bracket.
- Loosen the clamp at the throttle body assembly.
- Disconnect the positive crankcase ventilation (PCV) fresh air vent hose at the cam cover.
- Remove the outlet resonator/duct assembly.
- Remove the air cleaner assembly hold-down bolt.
- Remove the air cleaner assembly.
- Remove the ignition module bolts.
- Remove the ignition module assembly.
- Disconnect the de-gas hose at the clamp at the cylinder head and unclip from the fuel rail. Position away from the cam cover assembly.
- Disconnect the ground strap at the rear of the cam cover assembly.
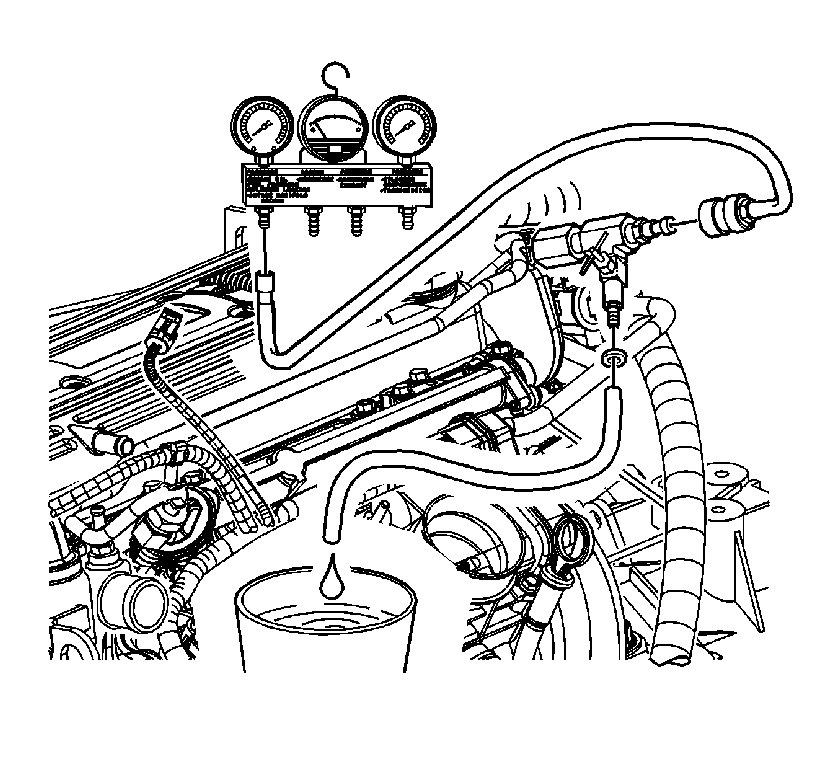
- Relieve the fuel system pressure.
- Disconnect the after the pressure has been relieved.
- Disconnect the fuel rail bracket and bolt at the rear of the cam cover.
- While supporting the fuel rail assembly with an open end wrench, loosen the transfer line fitting at the fuel rail.
- Position the fuel line away from the cam cover assembly.
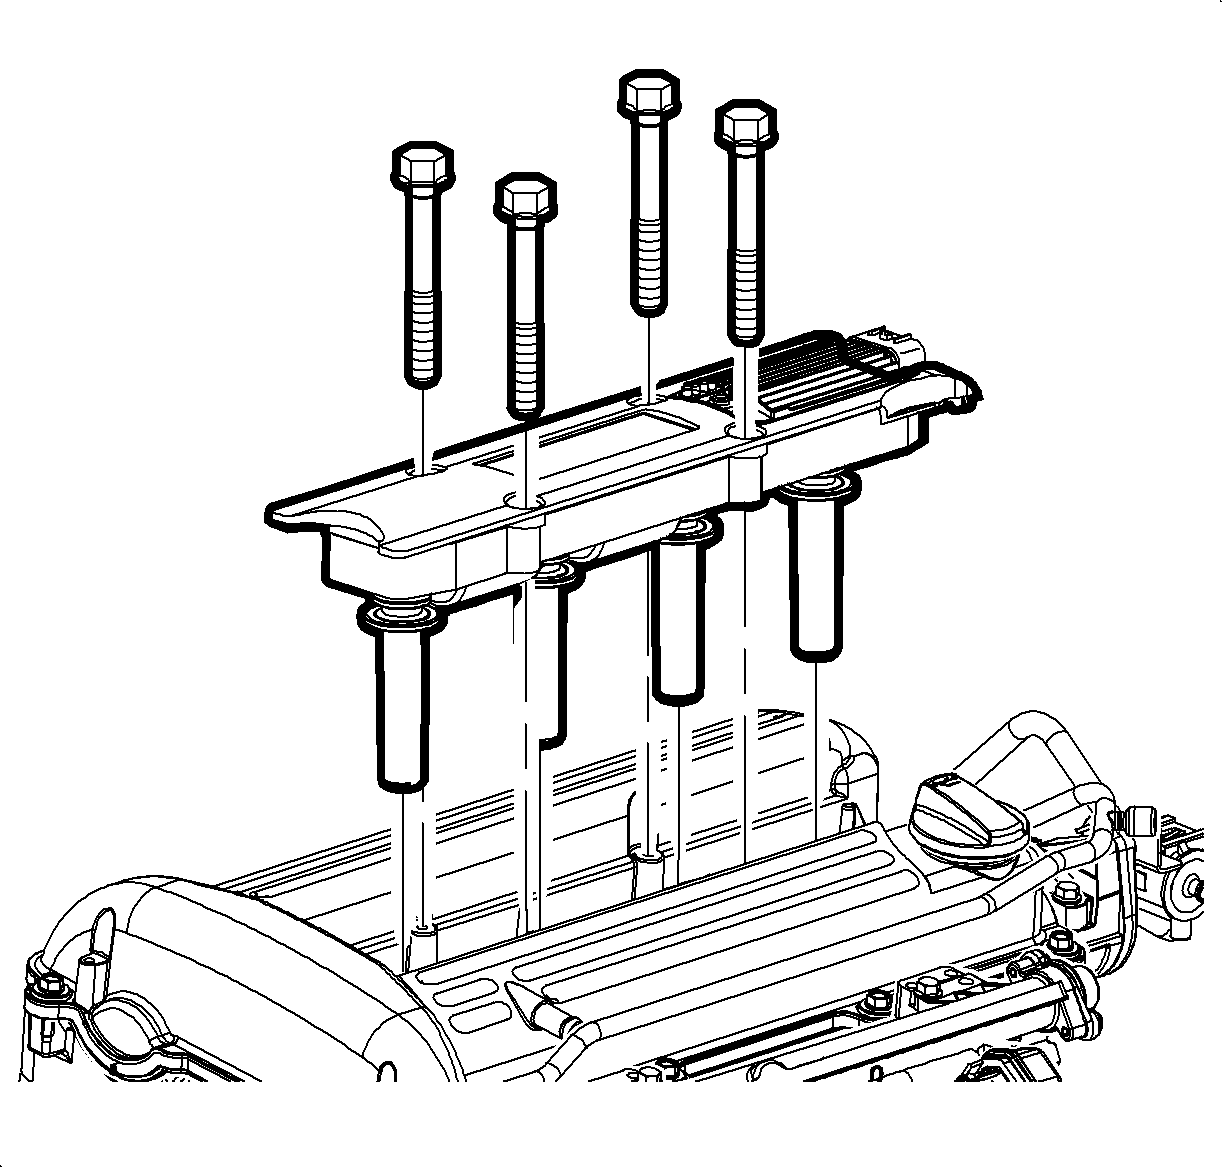
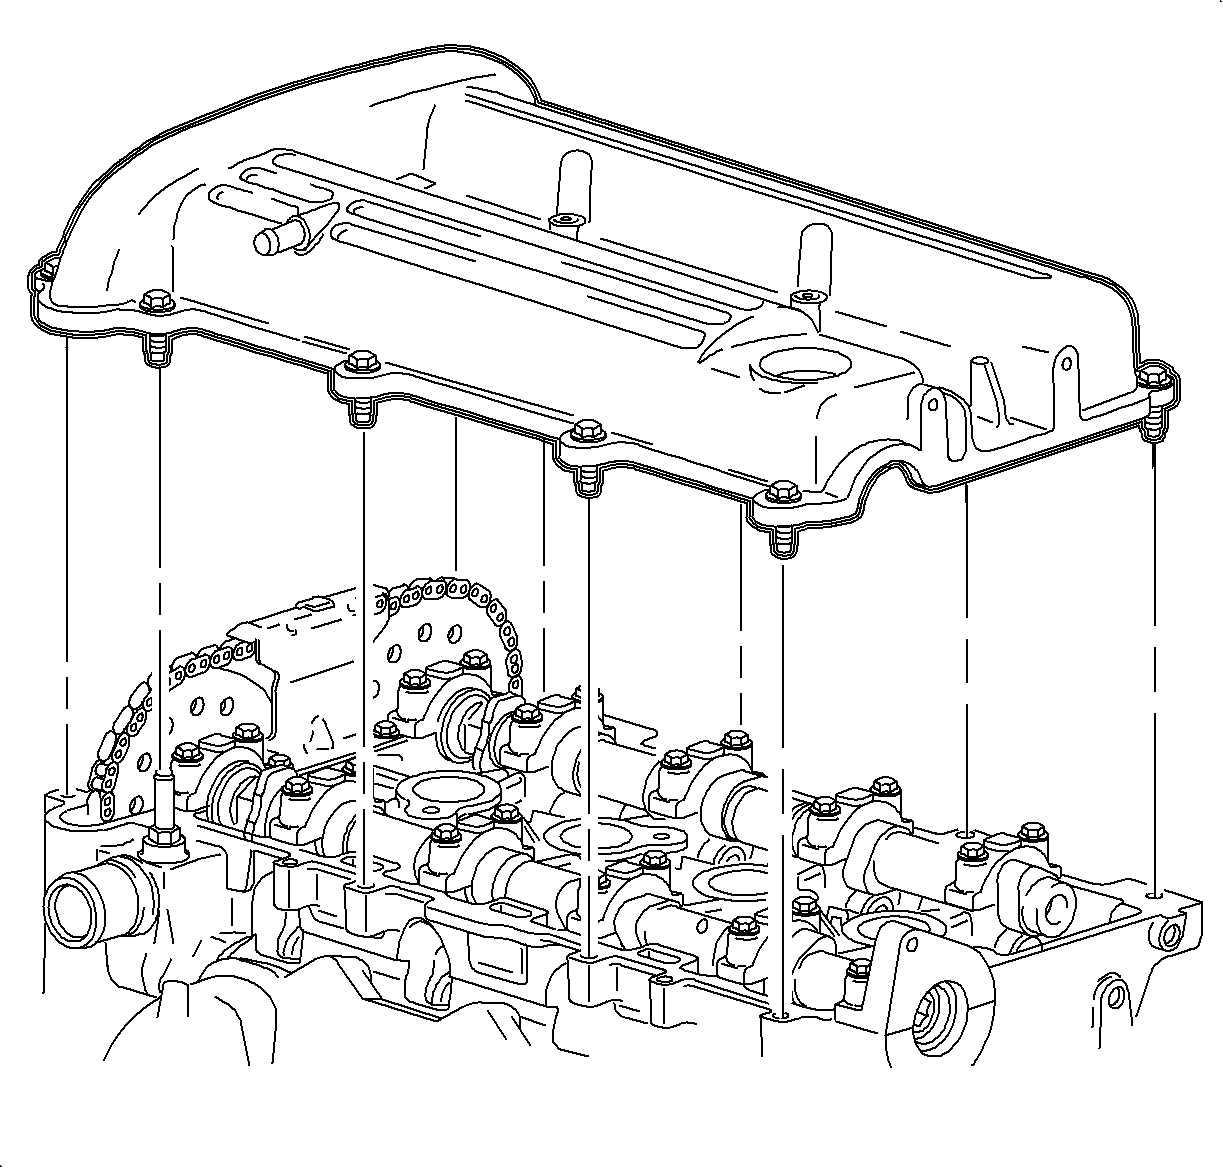
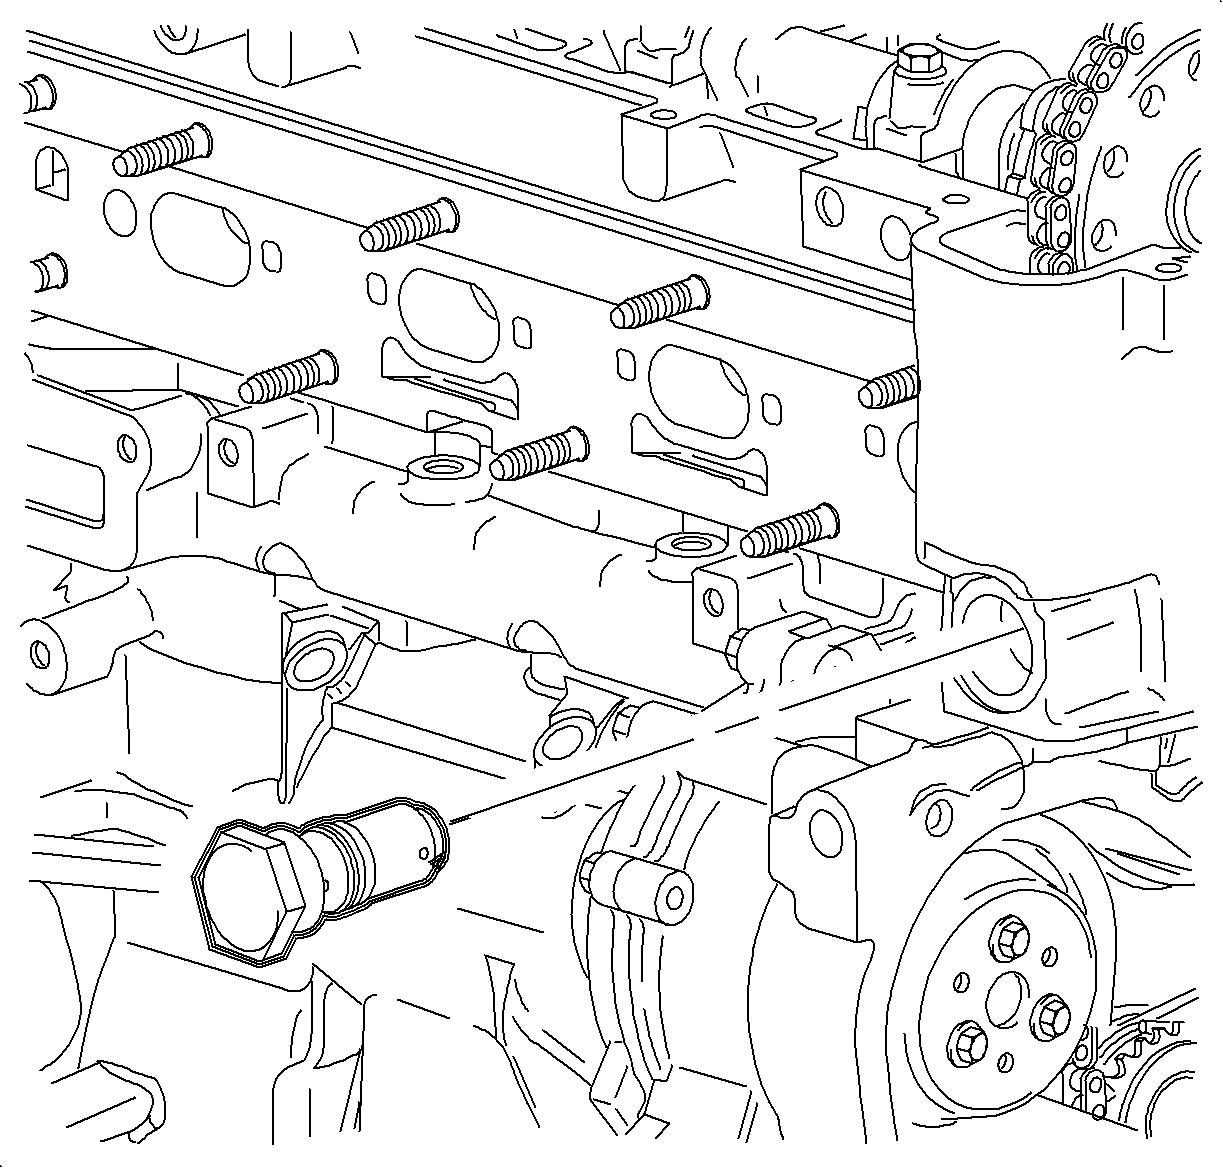
- Remove the cam cover assembly bolts.
- Remove the cam cover assembly.
- Remove the No. 1 cylinder spark plug. Refer to Spark Plug Replacement .
- Rotate the crankshaft in the engine rotational direction clockwise, until the No. 1 piston is at top dead center (TDC) on the compression stroke.
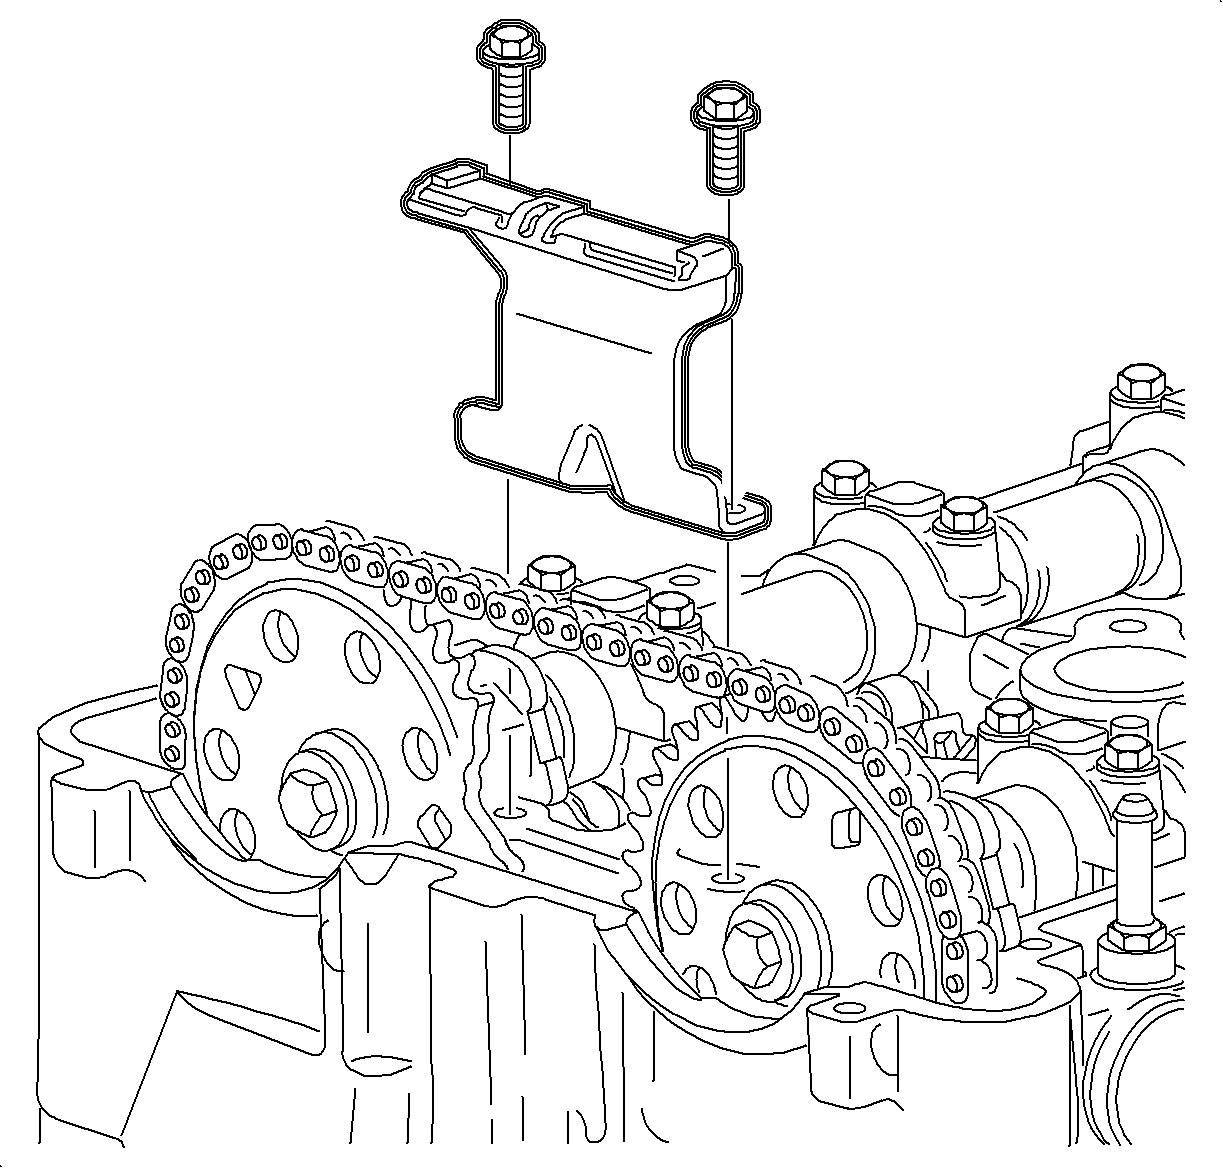
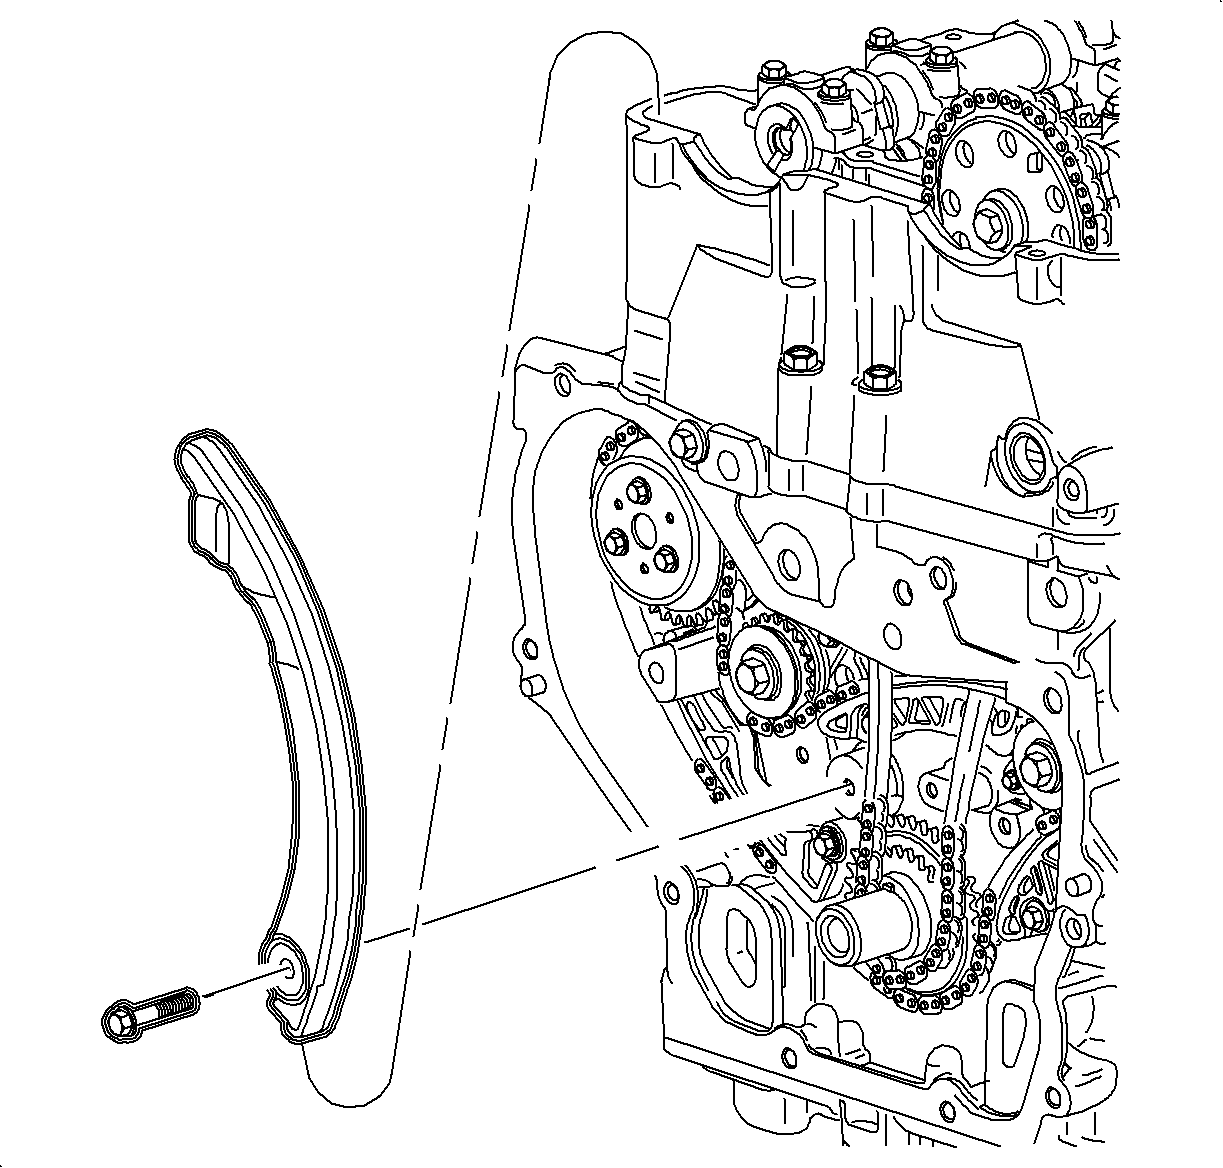
- Remove the upper timing chain guide.
- Remove the timing chain tensioner.
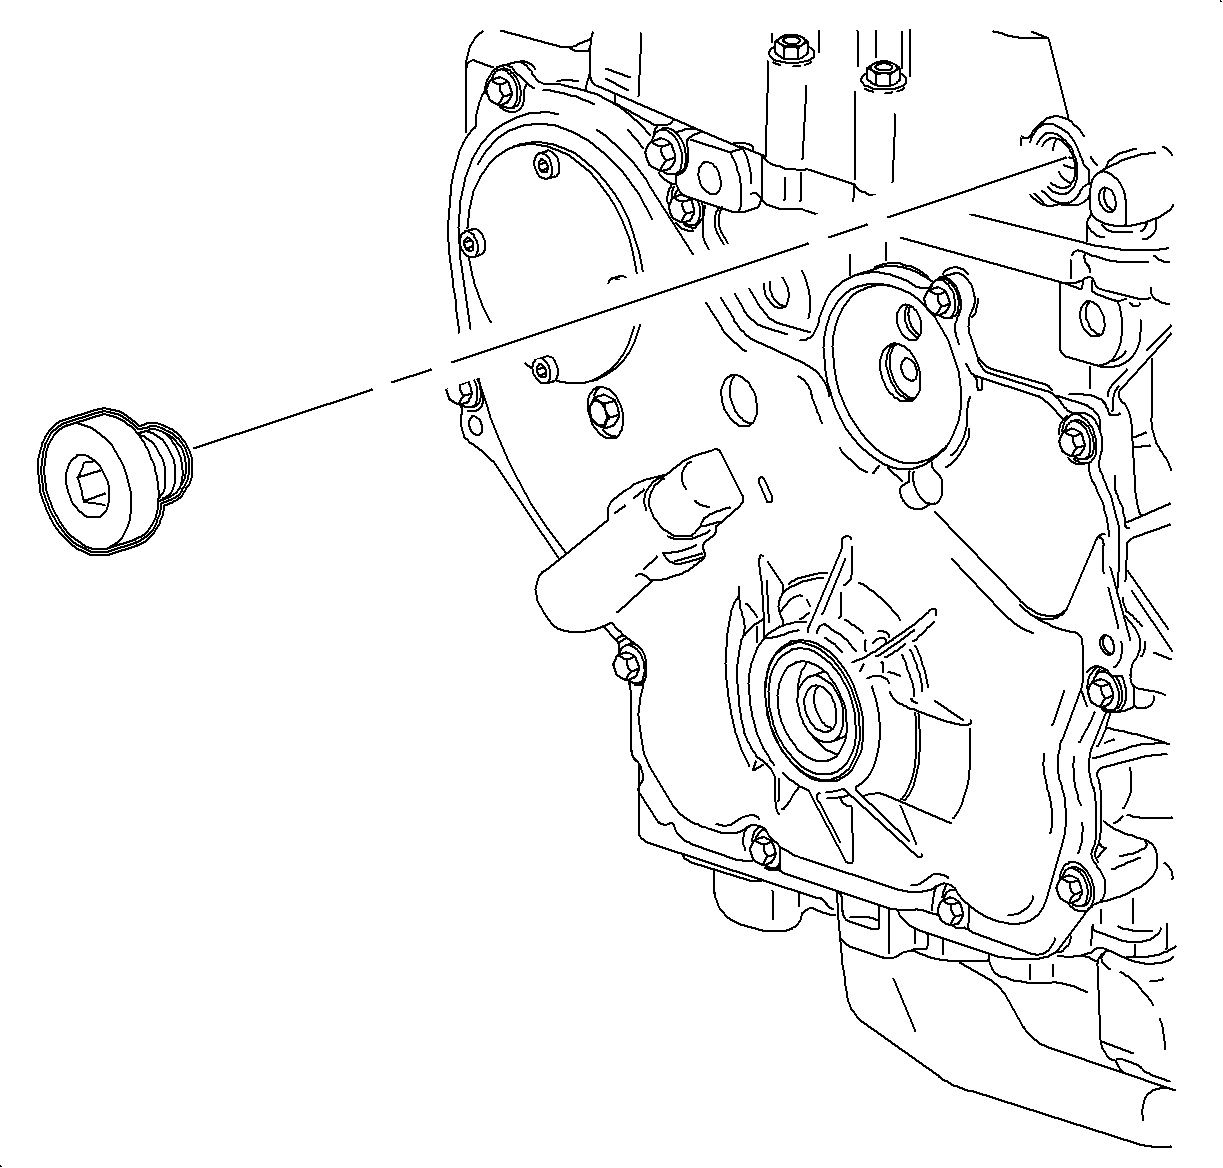
- Remove the fixed timing chain guide access plug.
- Using a magnetic socket, remove the upper fixed guide bolt.
- Install the set up for SUV application.
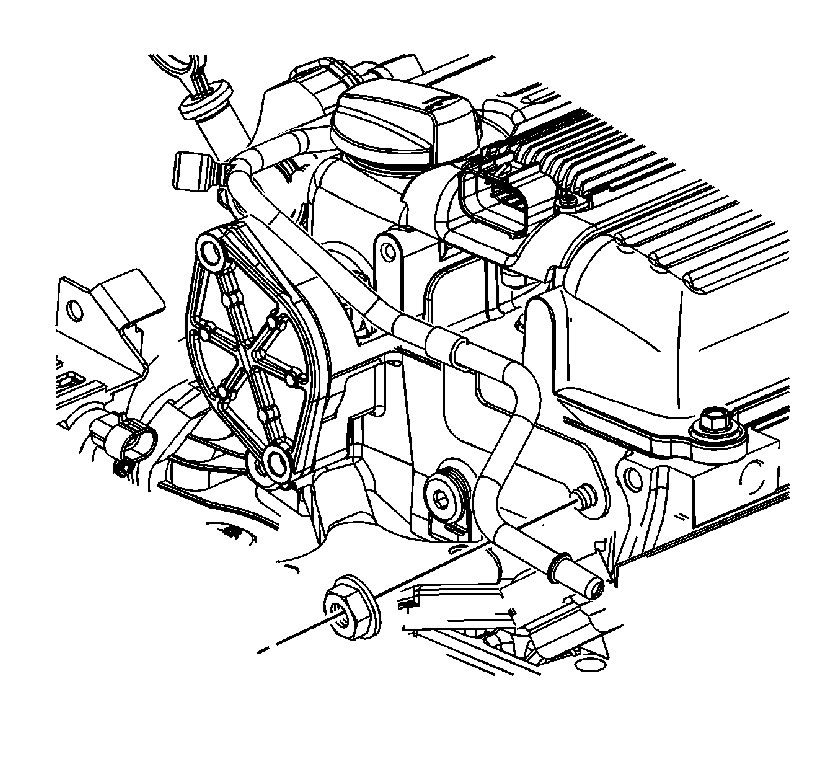
- Remove the right-hand engine mount-to-bracket bolts.
- Remove the right-hand mount assembly nuts.
- Remove the right-hand engine mount assembly.
- Remove the right-hand mount bracket.
- Remove the right-hand engine mount bracket.
- Raise the vehicle on a hoist.
- Remove the right wheel and splash shield.
- Install the block of wood 1 x 2 x 4 between the oil pan and the cradle.
- Install the J 44811 .
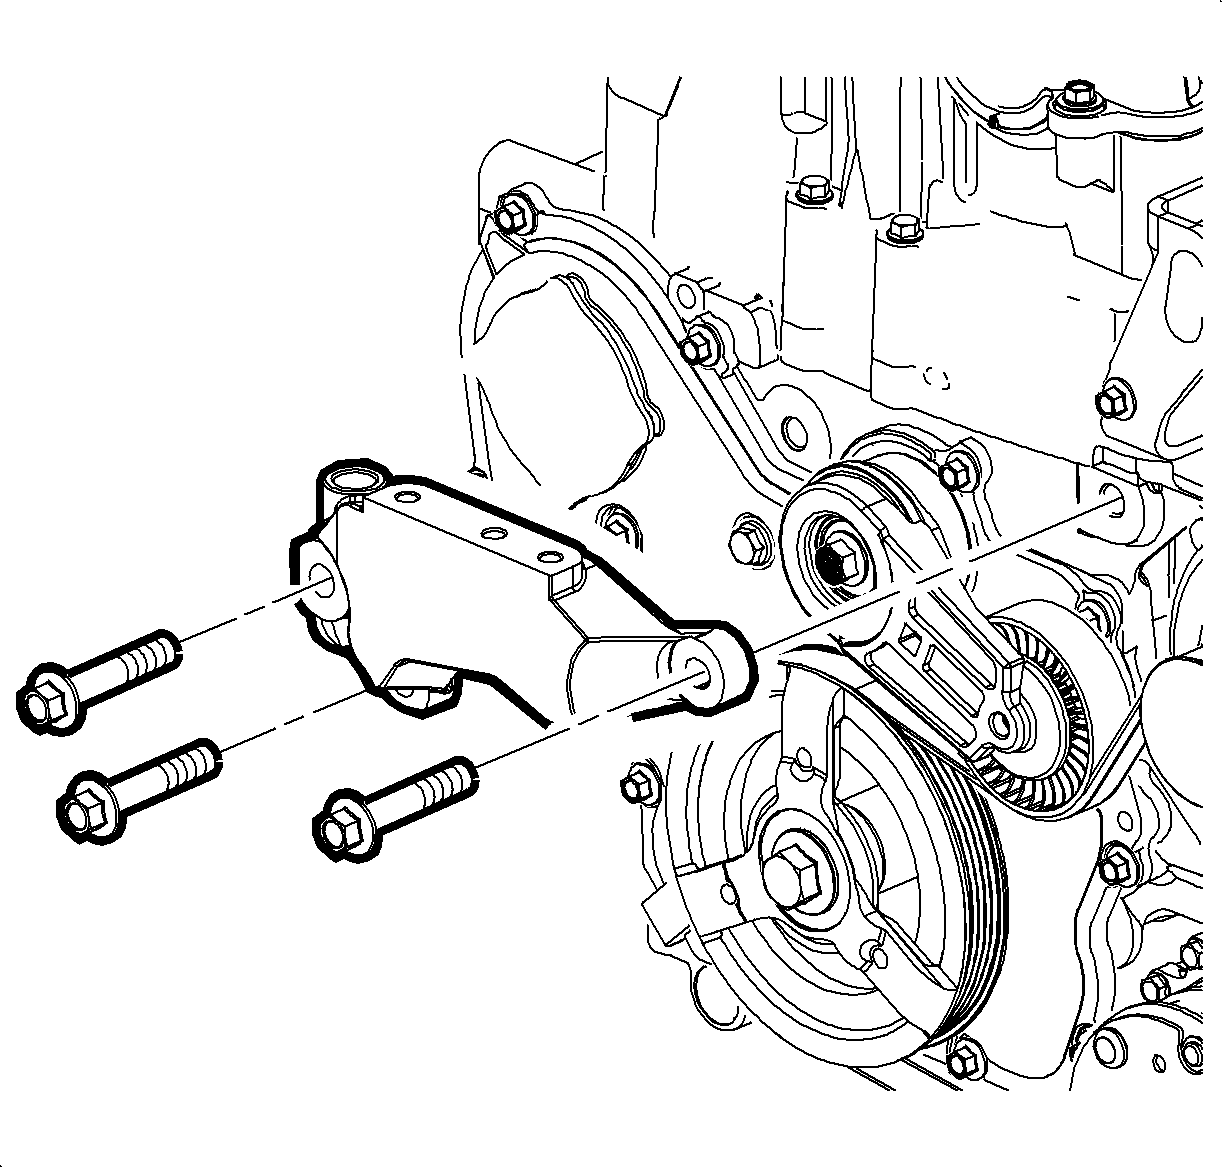
- Remove the accessory drive belt.
- Remove the tensioner bolt. To remove the bolt, an access hole has been provided through the inner and outer engine rail.
- Remove the tensioner assembly.
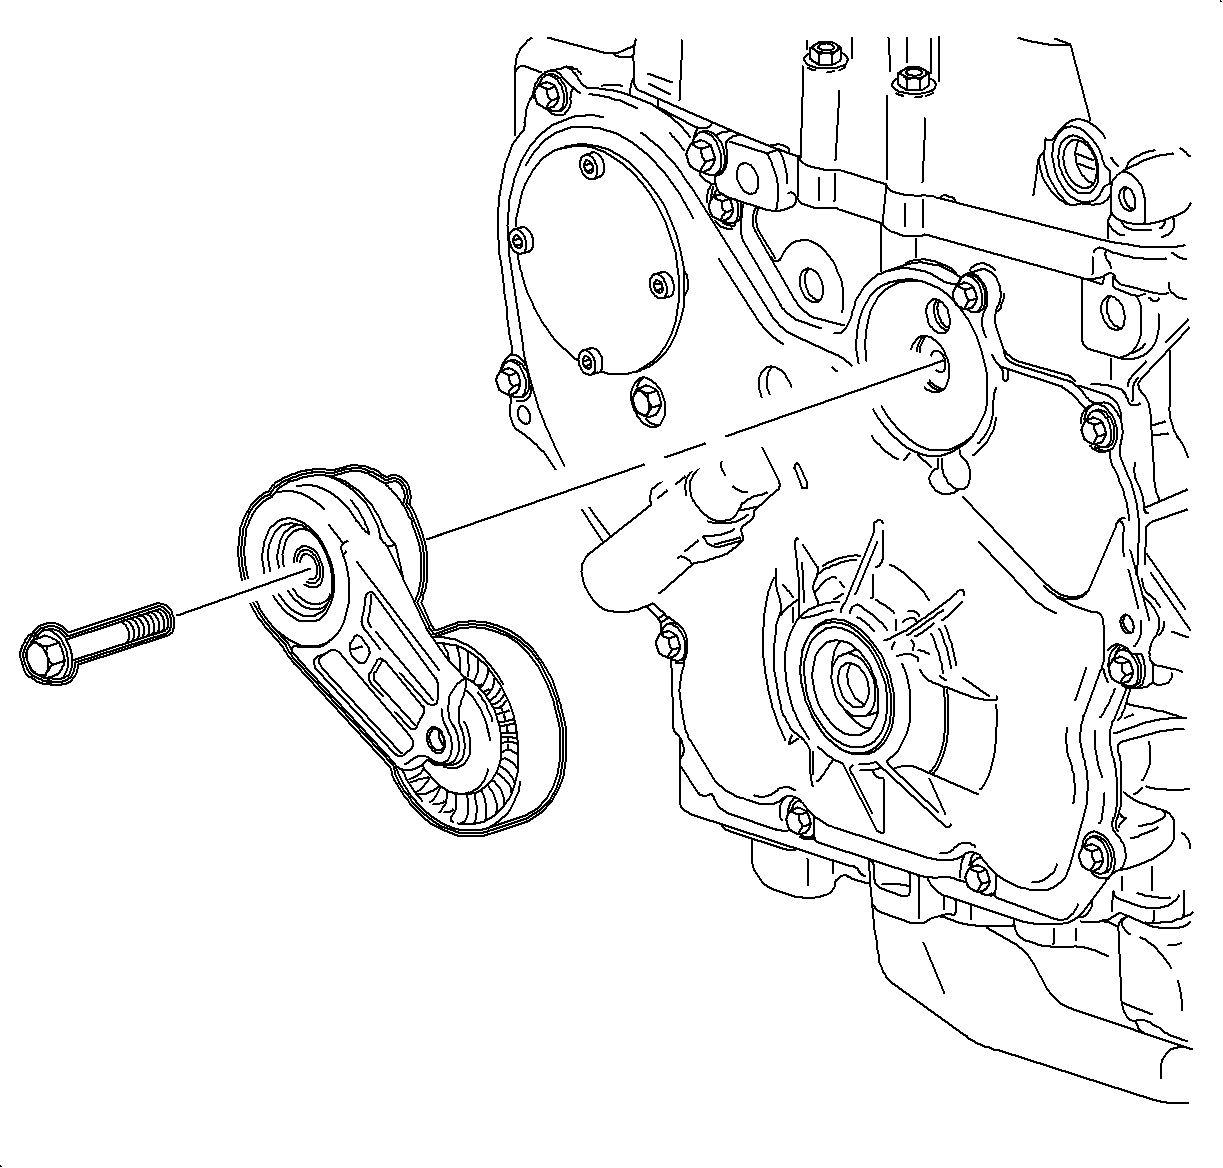
- Install the J 38122-A .
- Remove the crankshaft balancer pulley bolt and pulley.
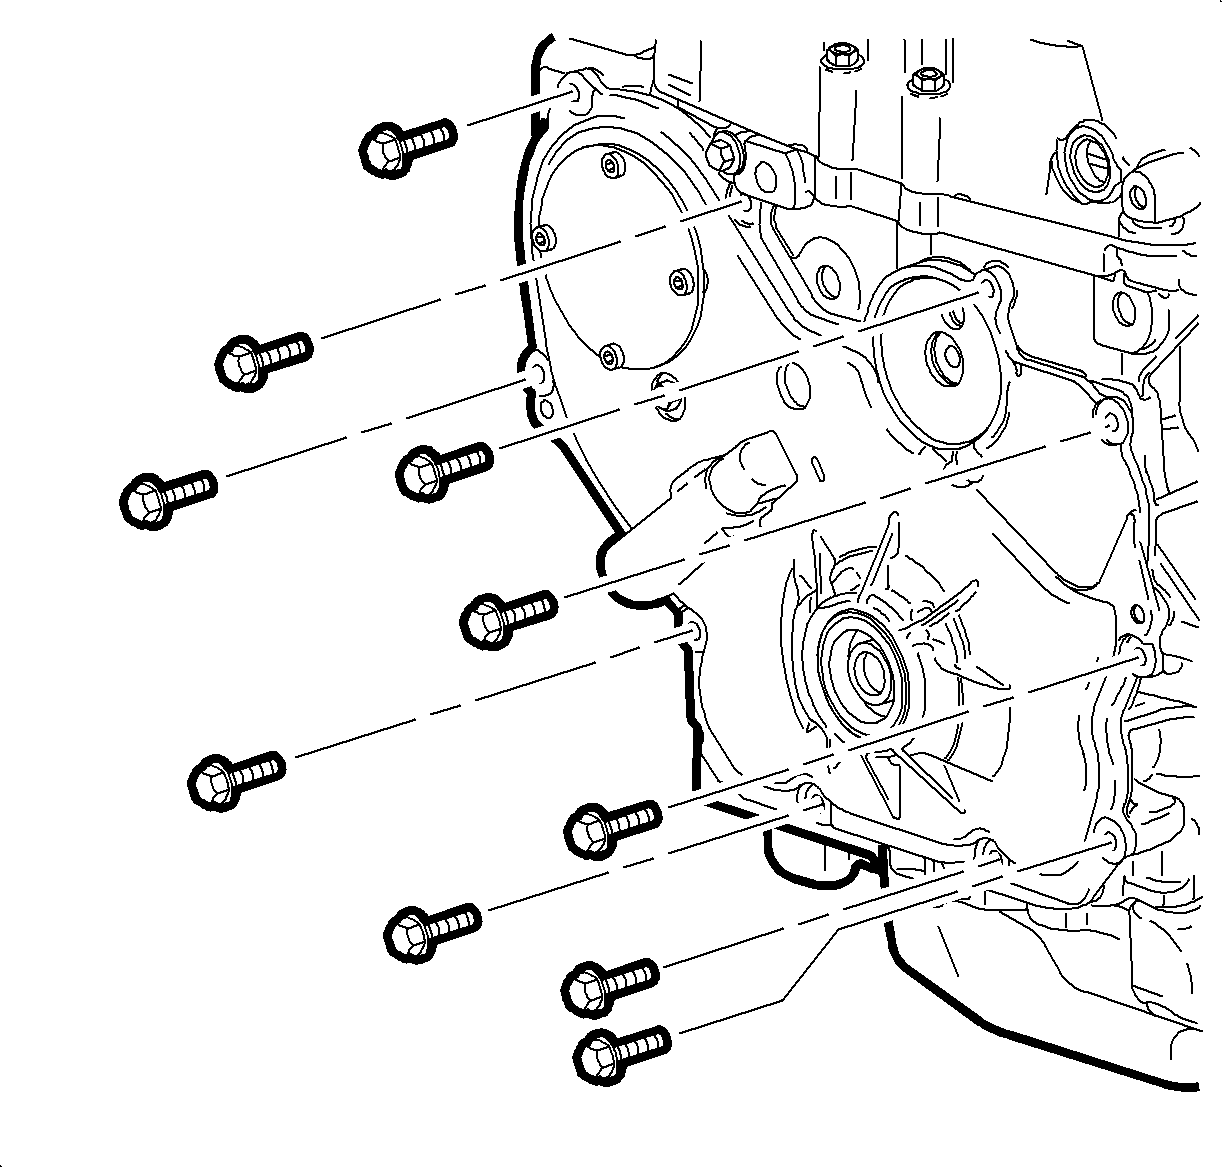
- Remove the front cover assembly bolts.
- Remove the lower water pump assembly bolt.
- Remove the front cover assembly and gasket.
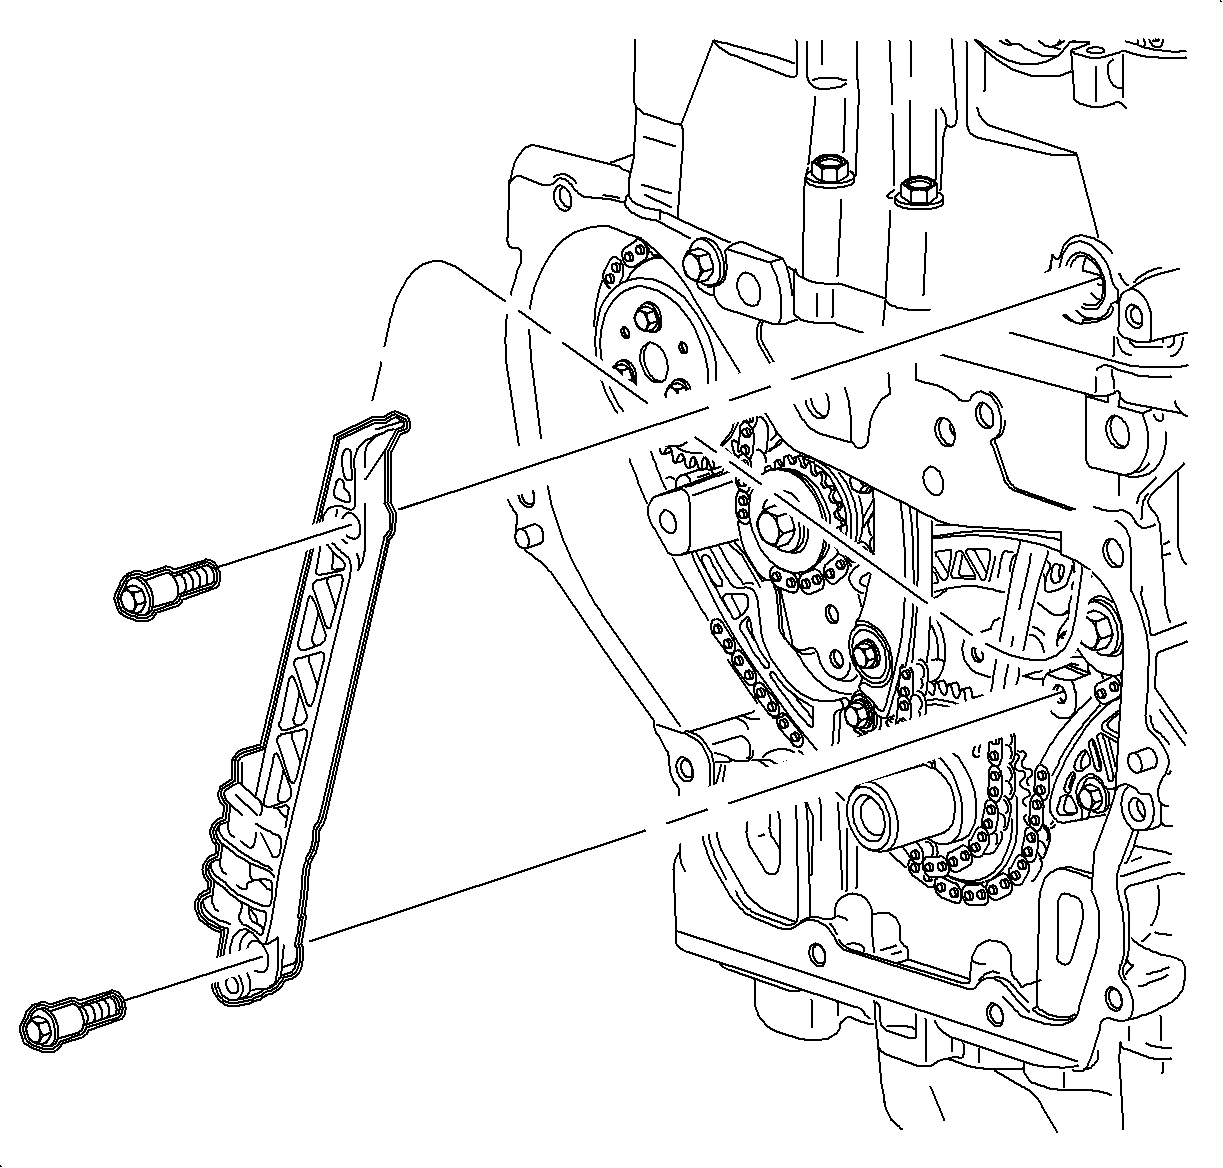
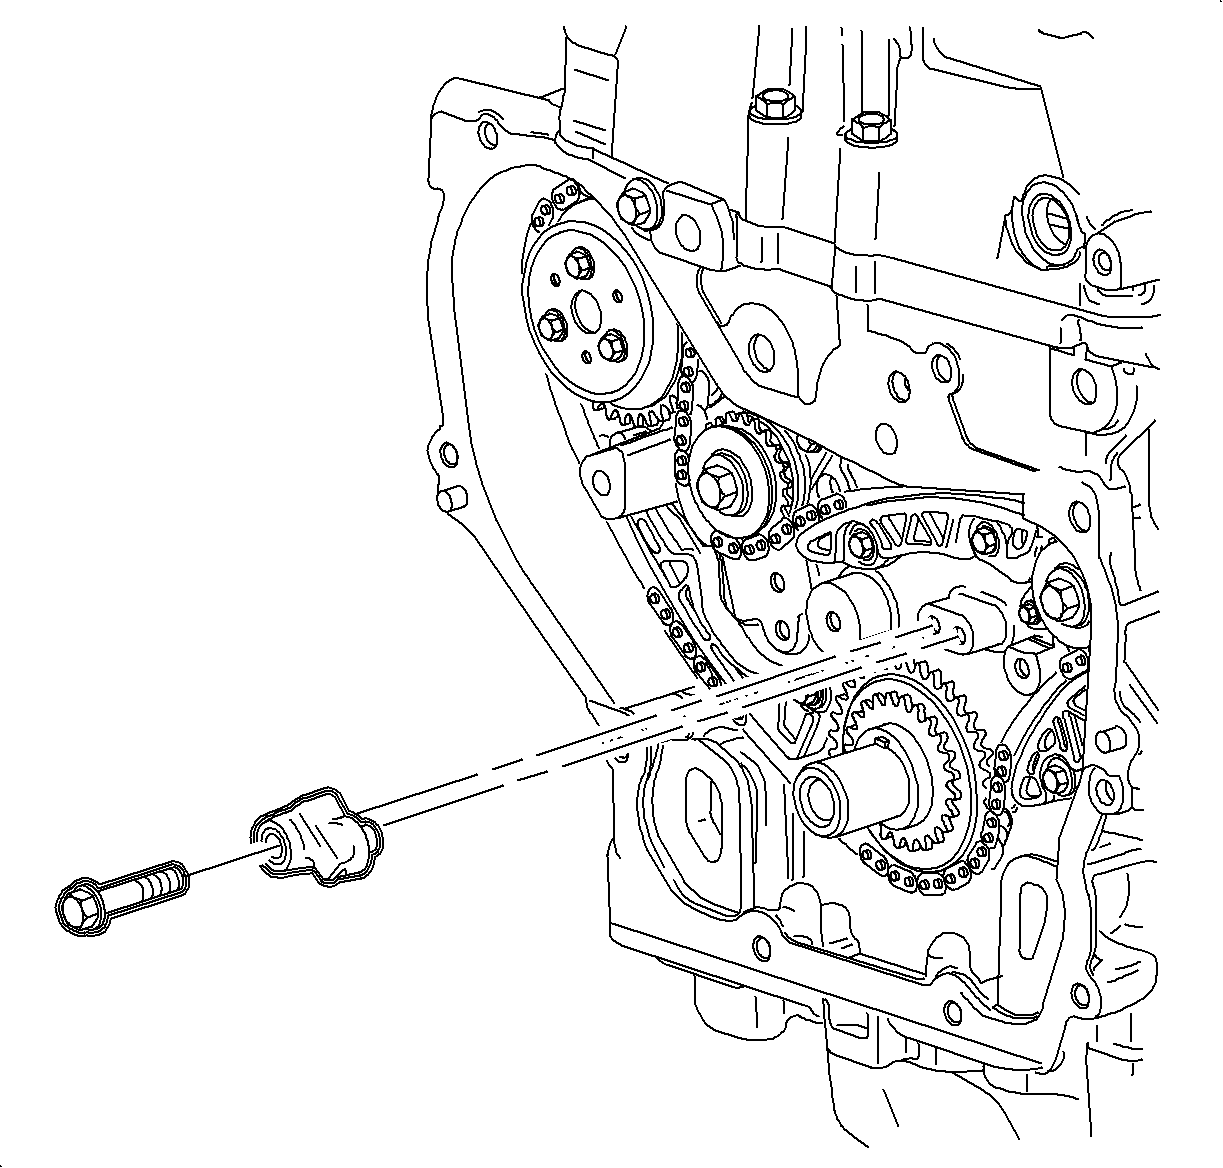
- Remove the adjustable guide bolt.
- Remove the lower fixed guide bolt.
- Remove the fixed guide.
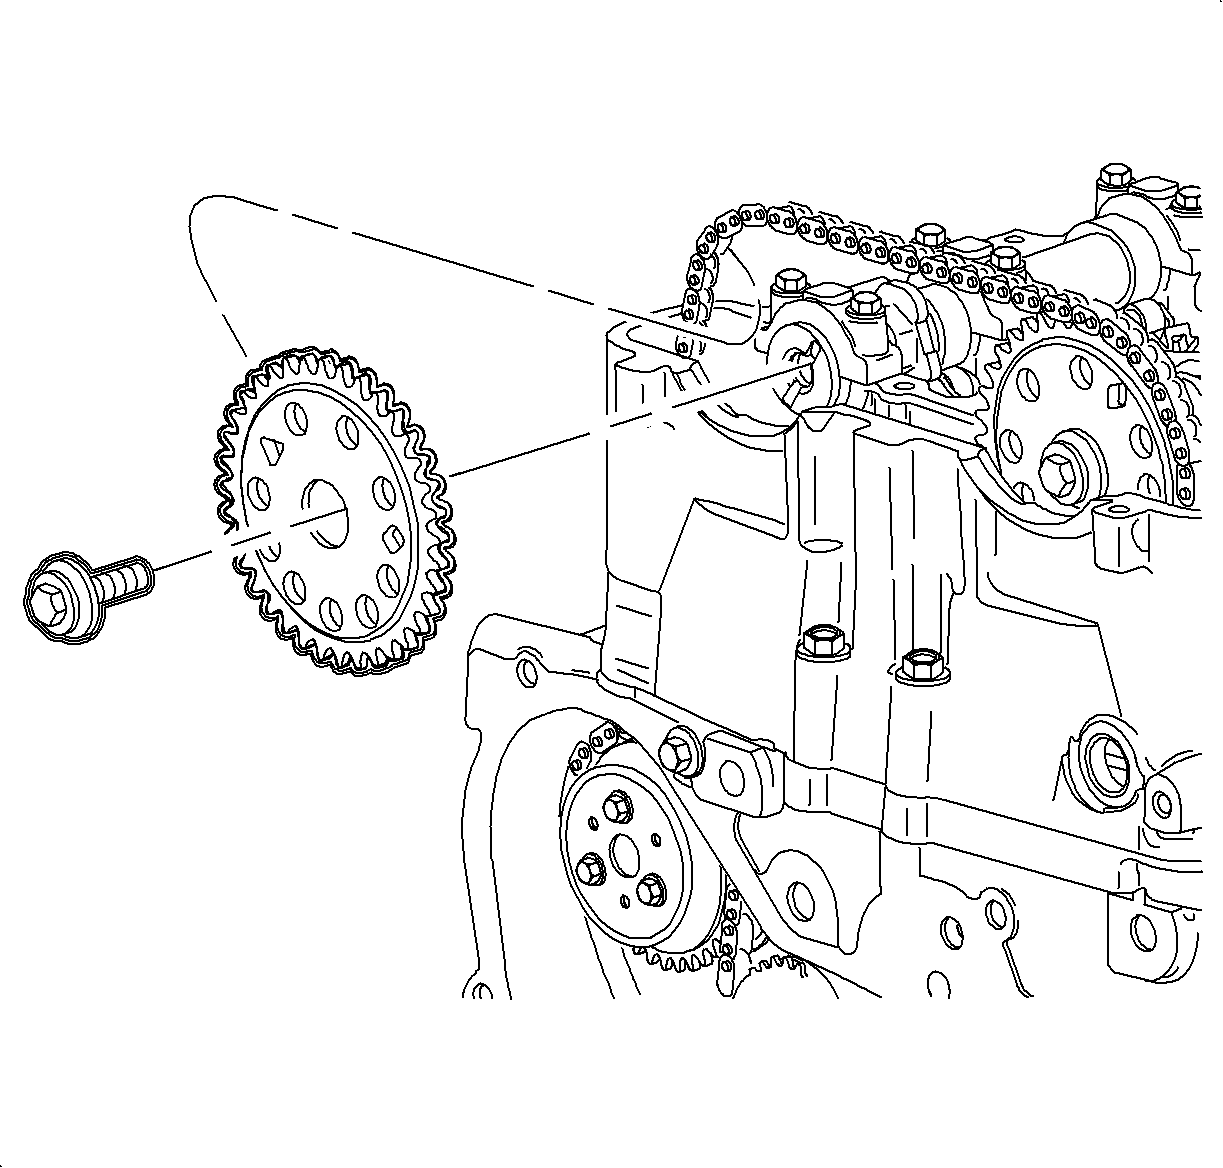
- Use a 24 mm wrench to hold the camshaft assembly while removing the exhaust sprocket bolt. Discard the bolt.
- Remove the exhaust sprocket.
- Remove the adjustable guide through the top of the cylinder head.
- Use a 24 mm wrench to hold the camshaft assembly while removing the intake sprocket bolt. Discard the bolt.
- Remove the intake sprocket.
- Remove the timing chain assembly through the top of the cylinder head.
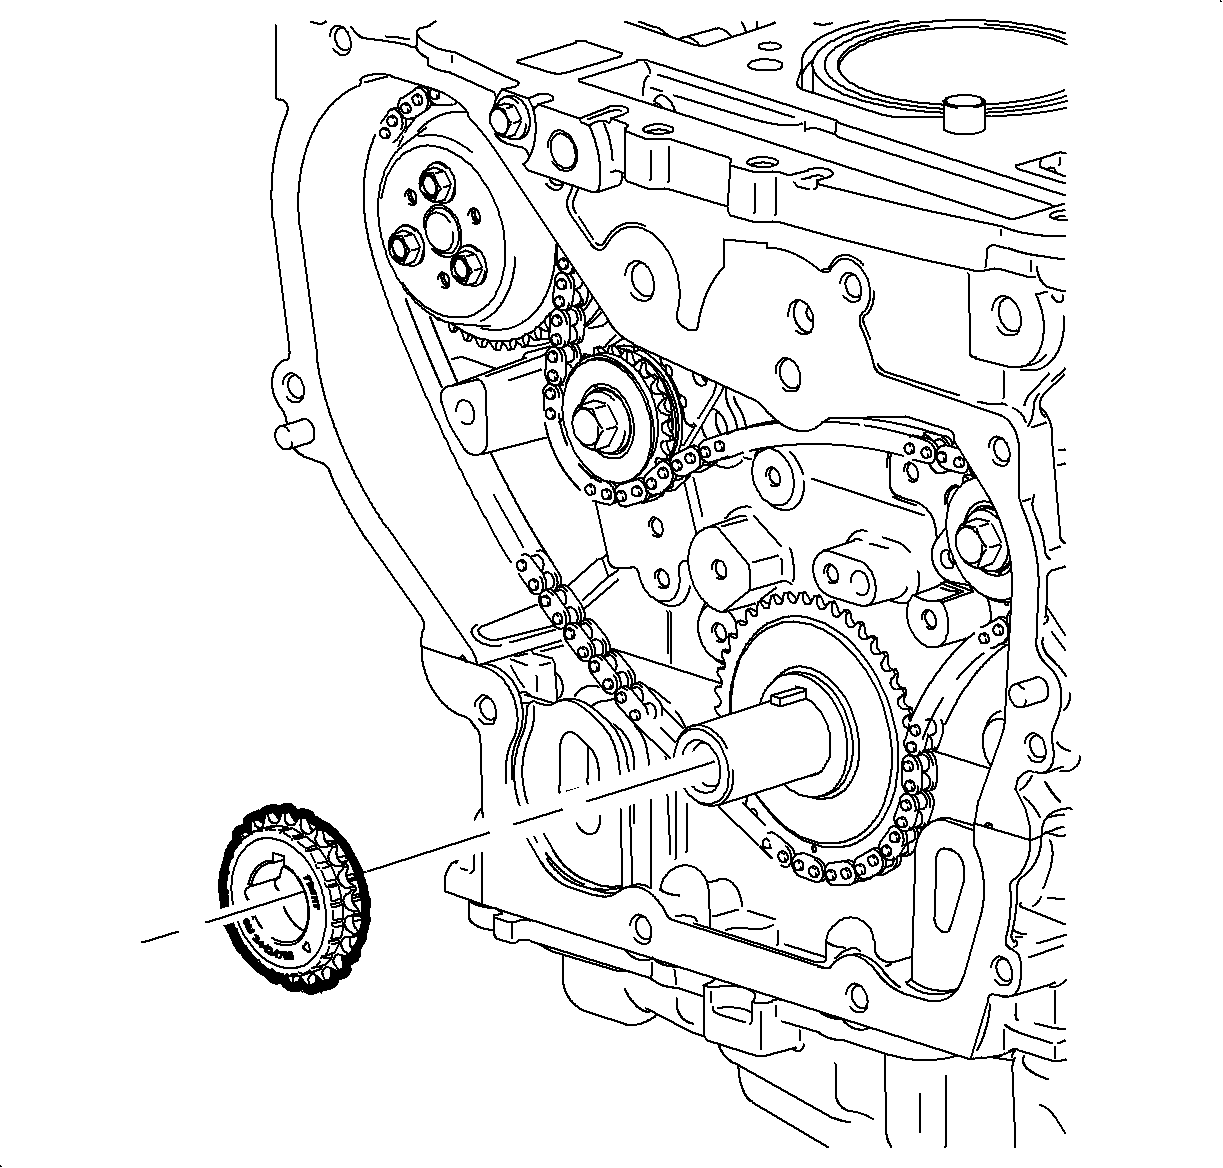
- Remove the timing chain drive sprocket from the crankshaft.
- Remove the timing chain oiler nozzle and bolt.
- Clean the oil nozzle orifice on the block to remove any debris.
- Inspect the timing chain guide for wear.
- Inspect the timing chain and the sprockets for signs of excessive wear, chipping, or seizure to links on the chain.

Important: The timing chain tensioner must be removed to unload the chain tension before the timing chain is removed. If not removed, the timing chain will become cocked and it will be difficult to remove.
Important: Do not rest the engine assembly on the oil pan plug outside of the oil pan near the crankshaft or an oil leak may result.
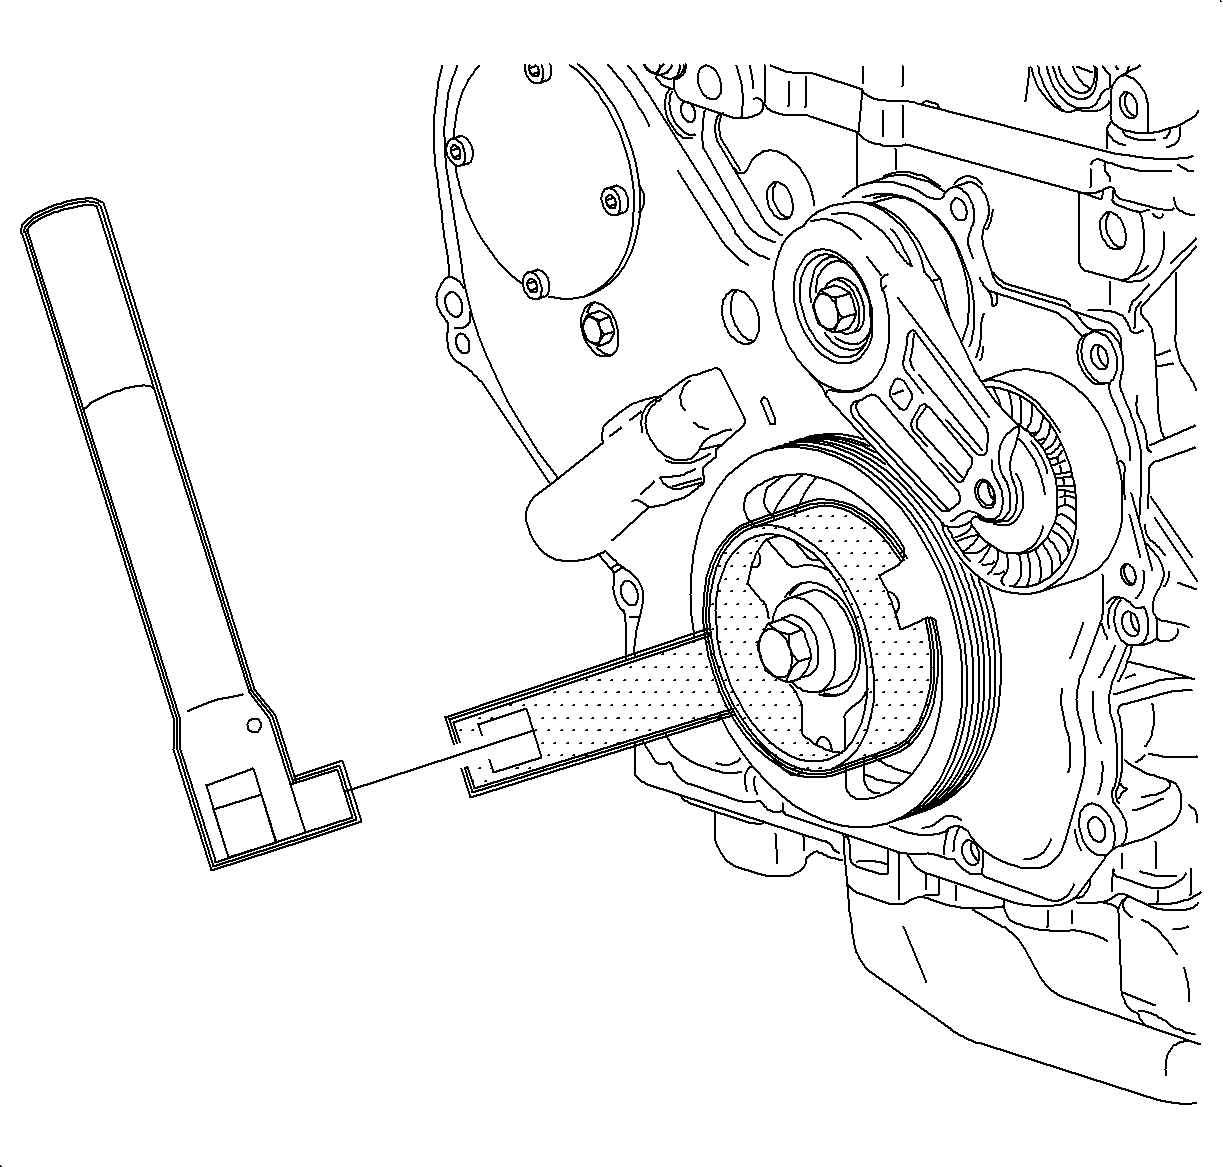
Important: The crankshaft balancer pulley bolt head and washer assembly prevents oil leakage at the center of the pulley. Do not damage the sealing surfaces. If the pulley cannot be removed by pulling with the hand, use a three-jaw puller.
Discard the pulley bolt.
Important: To avoid damage to the front cover assembly, do not pry against the cover.

Important: Replace the timing chain guides if the wear exceeds 1.12 mm (0.045 in).
Installation Procedure
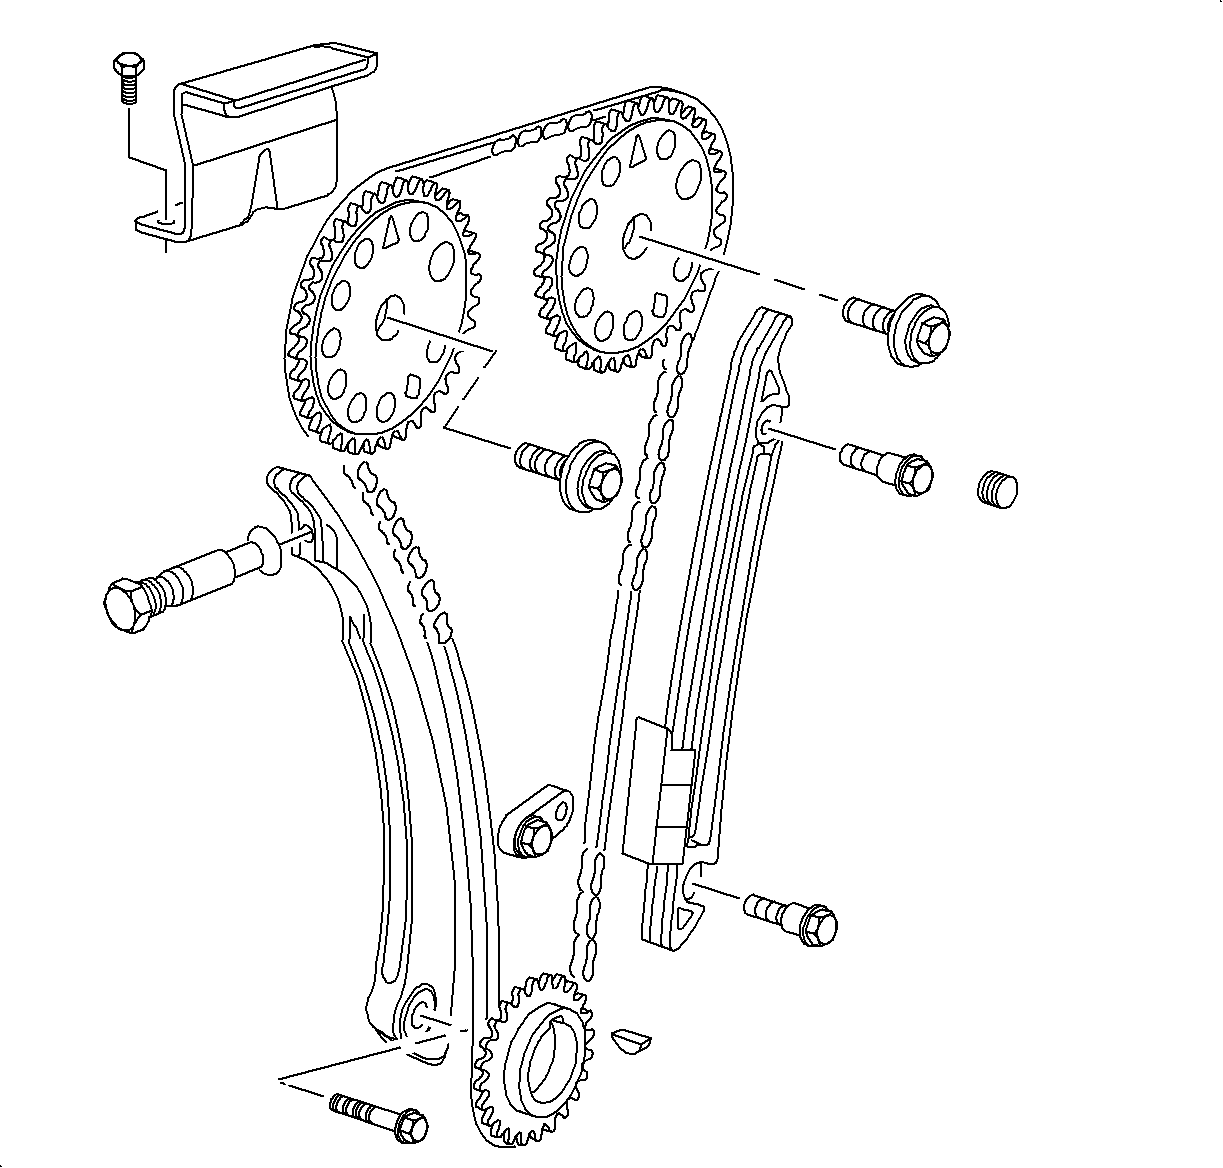
- Install the timing chain oiler nozzle and the bolt, then tighten.
- Install the timing chain drive sprocket to the crankshaft.
- Using the dampener, rotate the crank so that the mark on the timing chain drive sprocket is at 5 o'clock position.
- Set the crankshaft to 60 degrees before the top dead center.
- Position the exhaust camshaft with the offset slot to 2 o'clock position.
- Position intake camshaft with offset slot to 11 o'clock position.
- Assemble the chain to the intake camshaft sprocket aligning the upper link to the INT diamond timing mark on the camshaft sprocket.
- Lower the assembly through chain housing opening on top of the cylinder head. Use care to make sure that the chain goes around both sides of the cylinder block bosses.
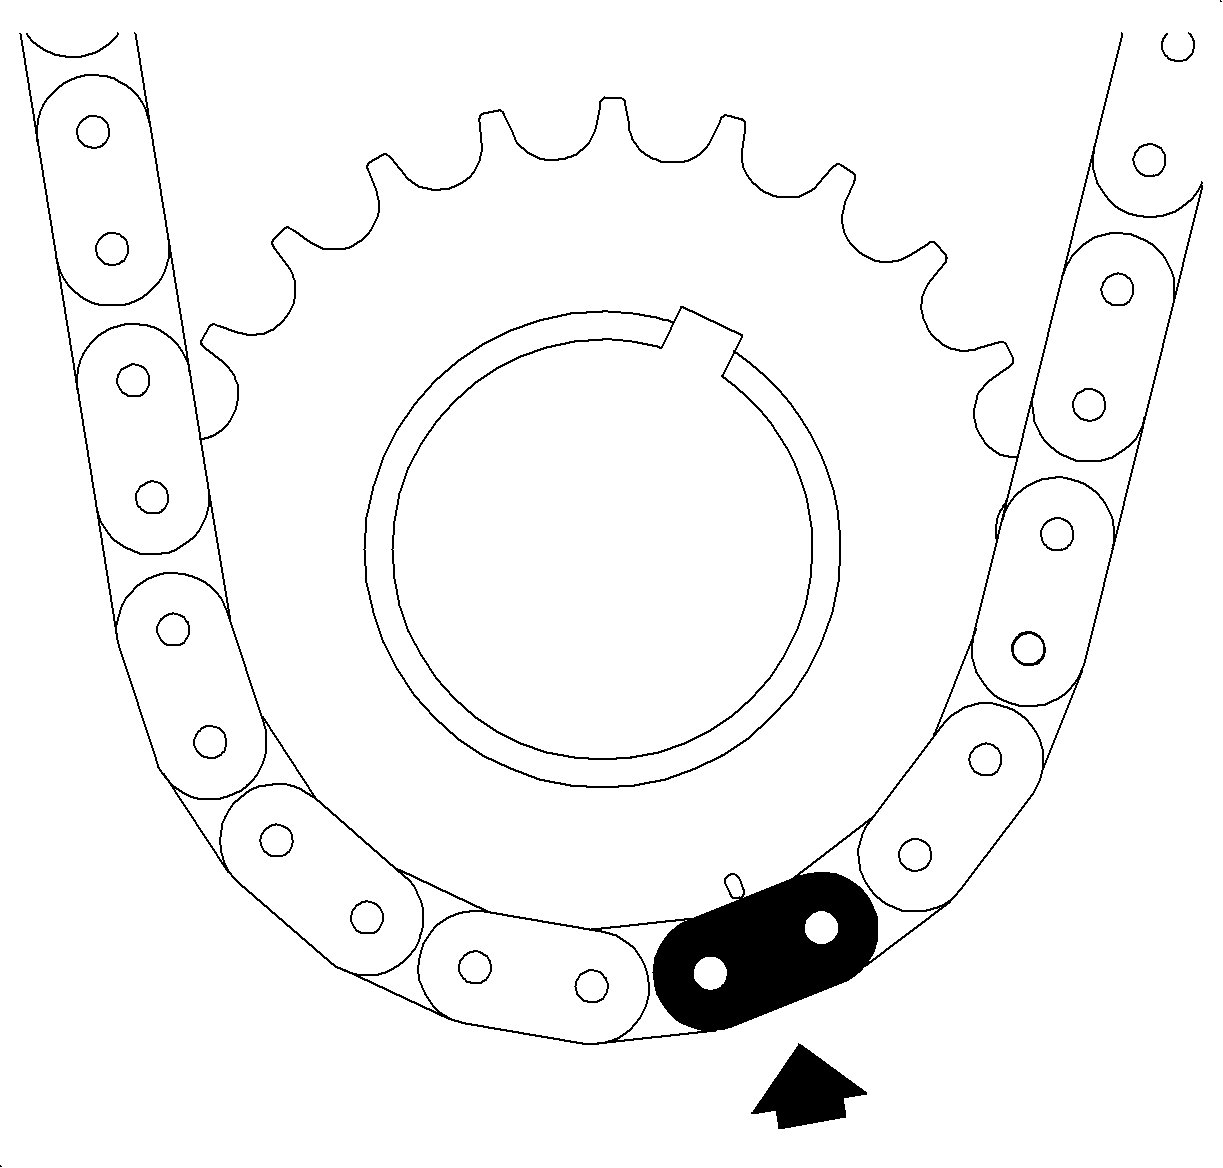
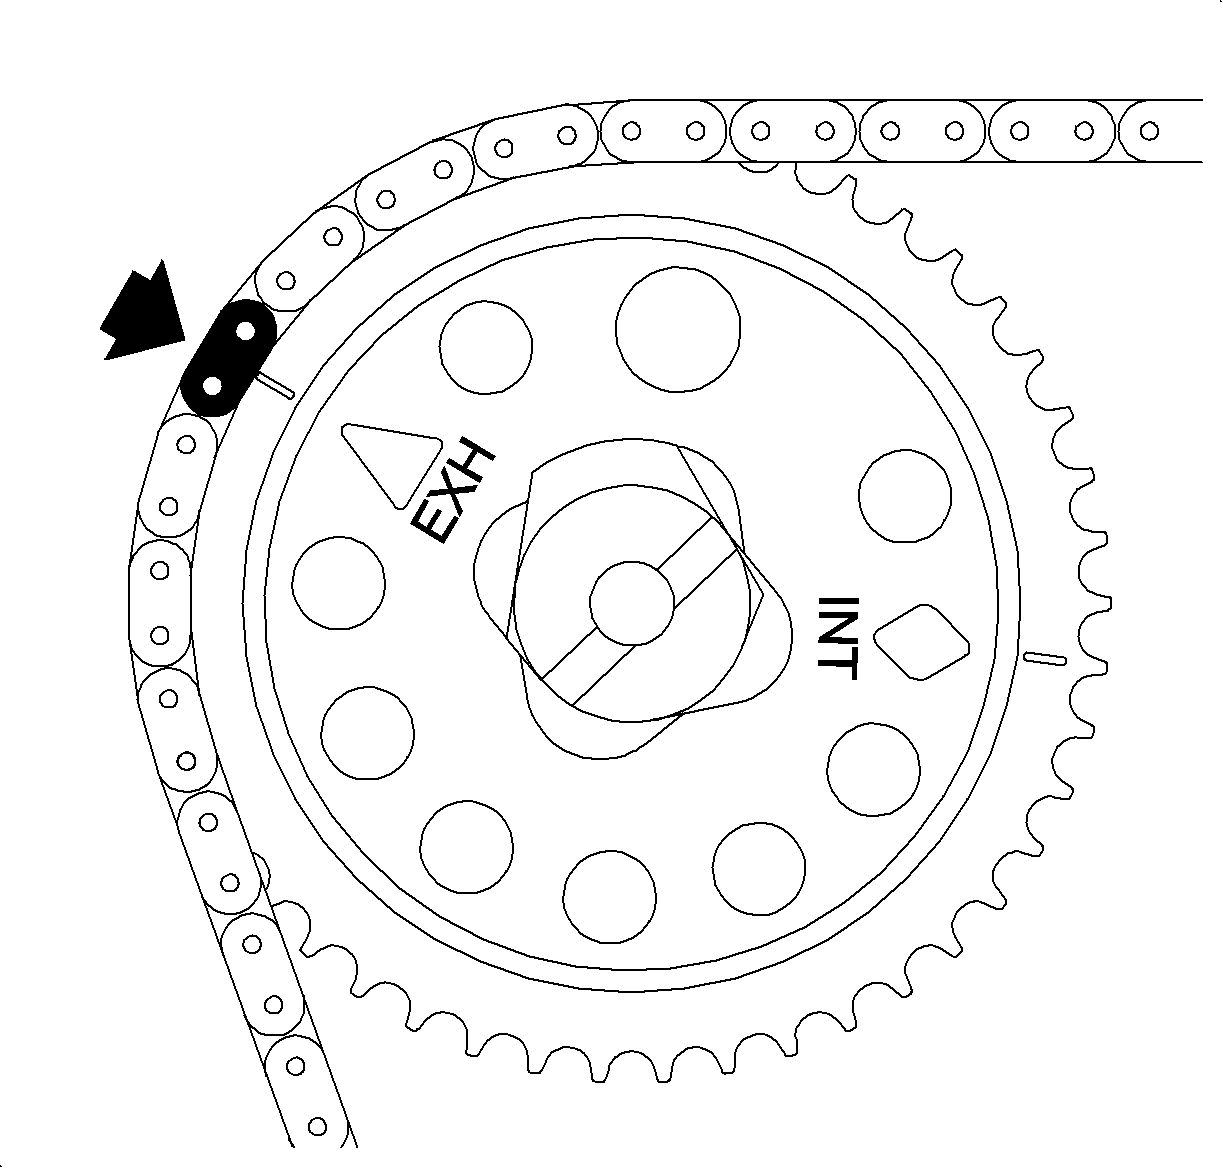
- Route the chain around the crankshaft sprocket and align the silver link to the timing mark.
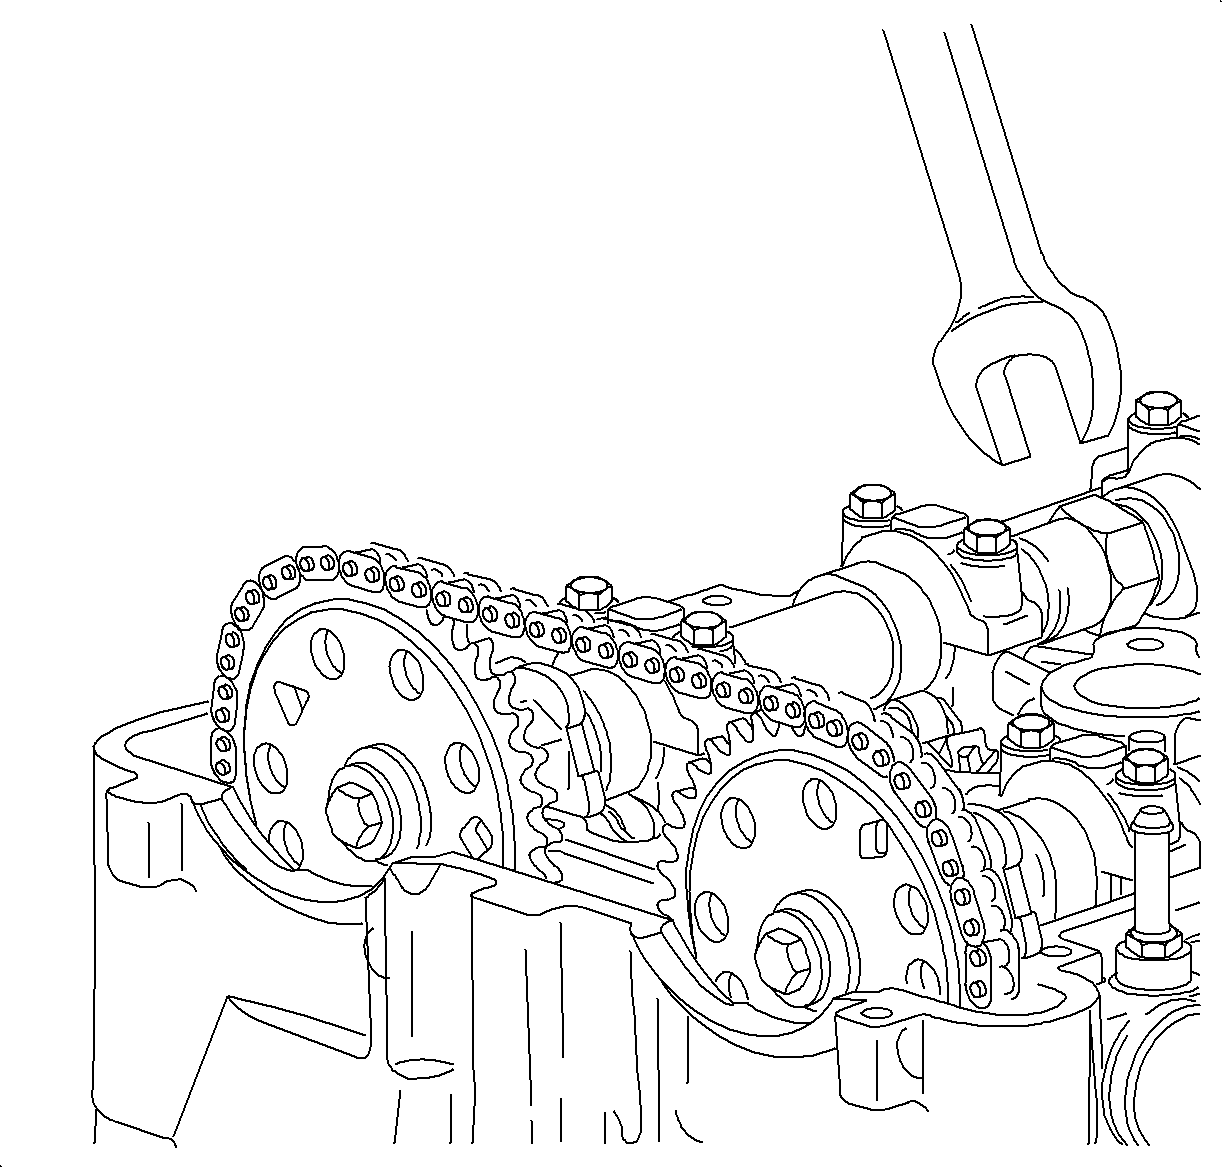
- Install the intake camshaft sprocket with the chain in proper position to the camshaft. Rotate the intake camshaft using a 24 mm wrench on the flats on the camshaft until the camshaft aligns with the sprocket.
- Install the new intake camshaft sprocket bolt and finger tighten.
- Install the adjustable timing chain guide through the opening at the top of the cylinder head and install the chain guide bolt.
- Install the exhaust camshaft sprocket loosely on the exhaust camshaft with the timing mark on the sprocket aligned with the silver link.
- Install new camshaft sprocket bolt loosely.
- Align the camshaft sprocket with the chain in proper position to the camshaft. Rotate the exhaust clockwise using a 24 mm wrench on the flats on the camshaft until the camshaft aligns with the sprocket.
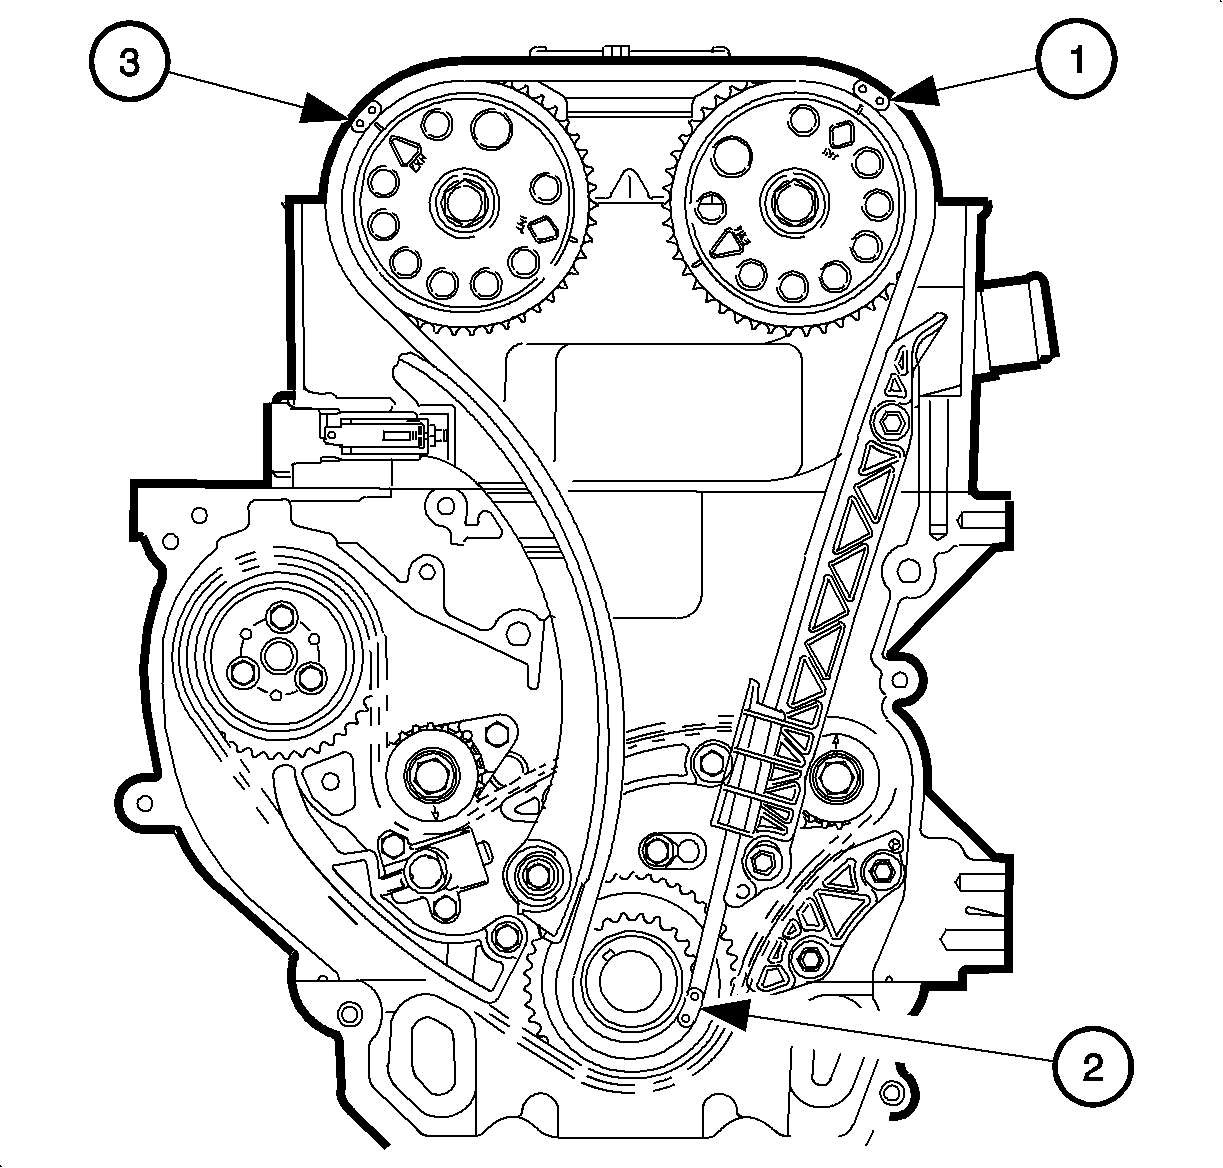
- Verify that all the colored links are aligned with the appropriate intake (1), crankshaft sprocket (2), and (3) exhaust marks.
- Verify the crankshaft sprocket timing mark is at 5 o'clock.
- If marks are not correct, you must repeat the timing procedure.
- Install the fixed timing chain guide and bolts.
- Apply the thread sealant to the thread. Refer to Adhesives, Fluids, Lubricants, and Sealers for the correct part number. Install fixed guide bolt access hole plug.
- Tighten intake and exhaust camshaft sprocket bolts while holding camshaft with 24 mm wrench.
- Inspect the timing chain tensioner. If the timing chain tensioner, O-ring seal, or washer is damaged, replace the timing chain tensioner.
- Measure the timing chain tensioner assembly from end-to-end.
- If the timing chain tensioner is not in the compressed state perform the following steps;
- Using J45027-1 (1), turn the ratchet cylinder into the piston.
- Inspect the bore of the tensioner body for dirt, debris and damage. If any damage appears, replace the tensioner. Clean dirt of debris out with a lint free cloth.
- Install the compressed piston assembly back into the timing chain tensioner body until it stops at the bottom of the bore. Do not compress the piston assembly against the bottom of the bore. If the piston assembly is compressed against the bottom of the bore, it will activate the tensioner, which will then need to be reset again.
- At this point, the tensioner should measure approximately 72 mm (2.83 in) (1) from end-to-end. If the tensioner does not read 72 mm (2.83 in) (1) from end to end repeat step 24
- Ensure all dirt and debris is removed from the timing chain tensioner threaded hole in the cylinder head.
- Install the new timing chain tensioner assembly bolt and tighten.
- The timing chain tensioner is released by compressing it 2 mm (0.079 in) which will release the locking mechanism in the ratchet. To release the timing chain tensioner, use a suitable tool with a rubber tip on the end. Feed the tool down through the cam drive chest to rest on the cam chain. Then give a sharp jolt diagonally downwards to release the tensioner.
- Install the upper timing chain guide and bolts.
- Raise the vehicle if necessary.
- Install the new front cover gasket.
- Install the front cover assembly.
- Install the front cover assembly bolts.
- Install the front cover water pump bolt.
- Lubricate the front seal and the sealing surface of the pulley with the clean motor oil.
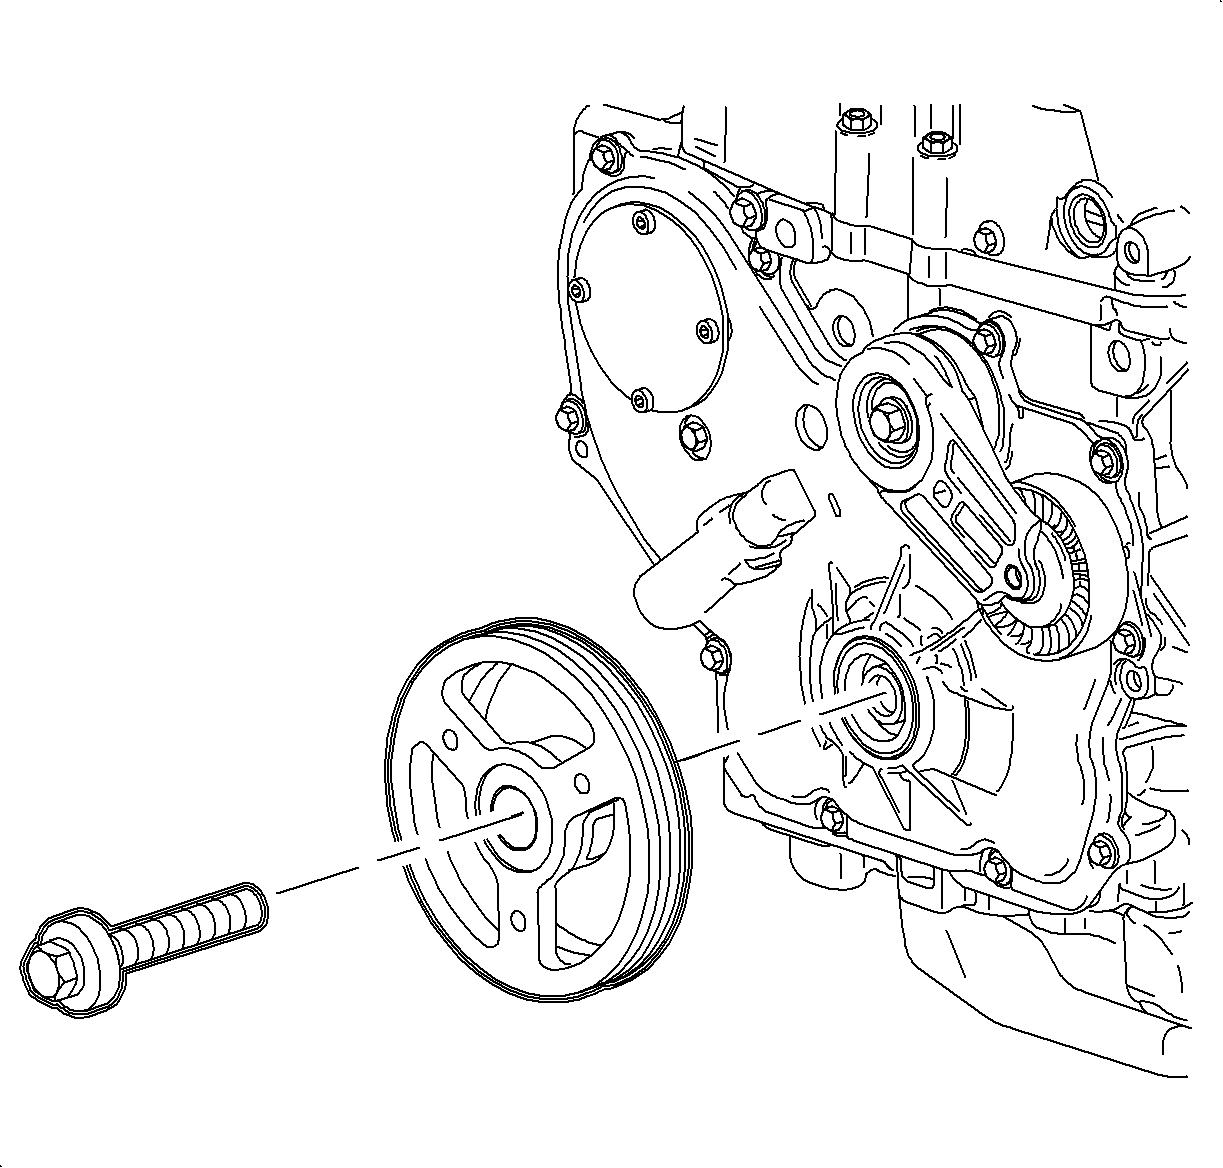
- Install the balancer pulley onto the crankshaft indexing keyway. Use care to properly align the flats on the balancer pulley with the flats on the oil pump drive in the front cover assembly.
- Install the crankshaft damper pulley.
- Install the new crankshaft balancer pulley bolt with the washer assembly.
- Install the J 38122-A .
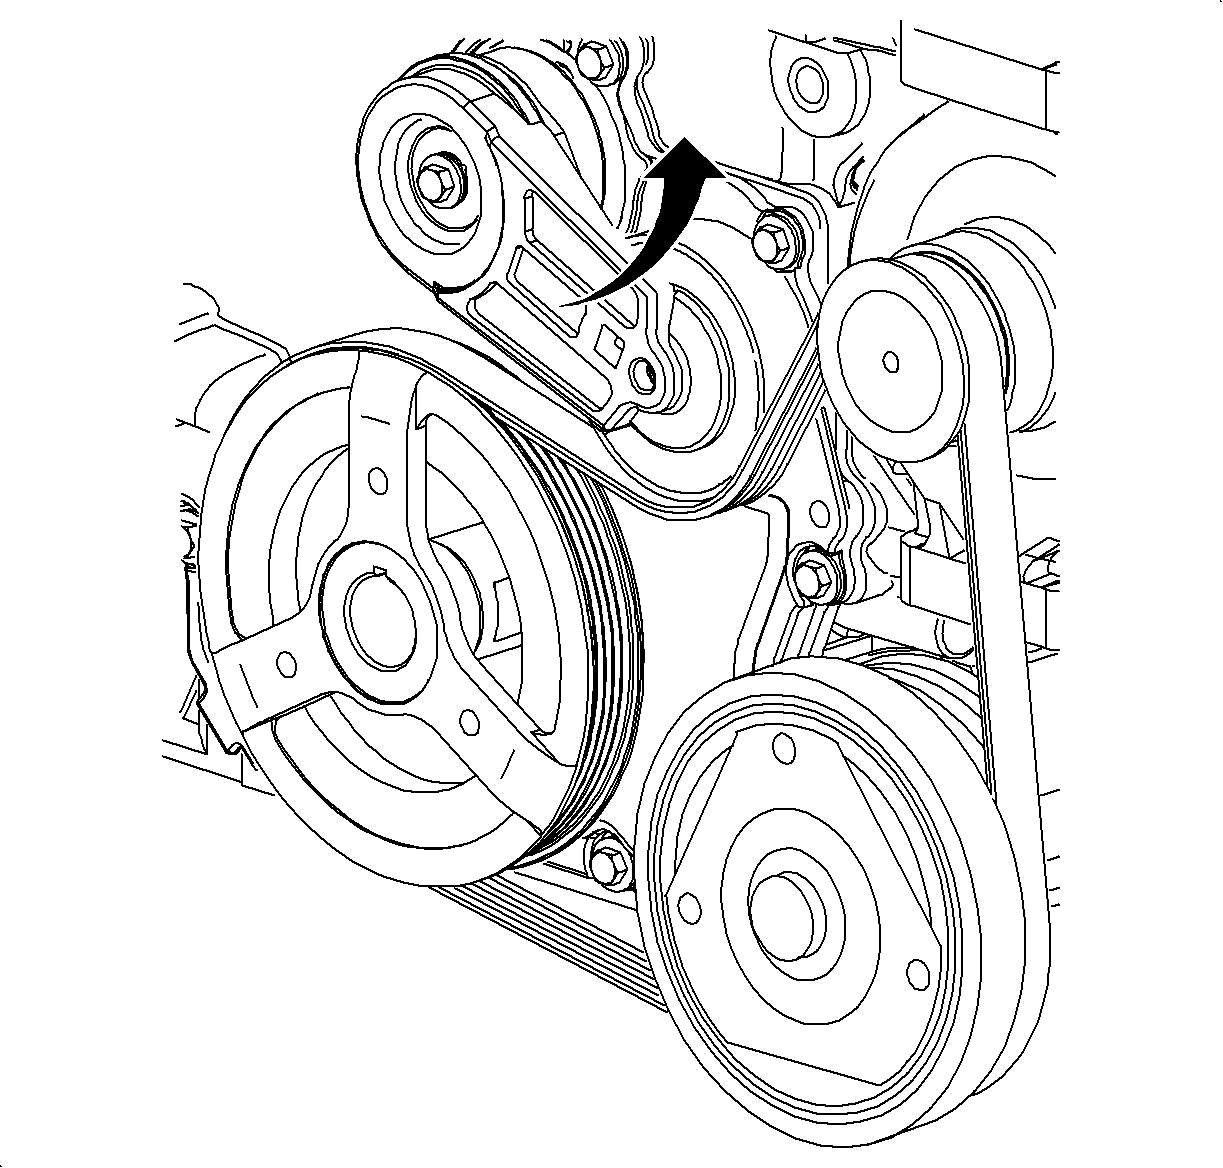
- Install the accessory drive belt tensioner.
- Route belt around the alternator and the A/C compressor.
- Install the J 39914 onto the tensioner and unload spring tension from the tensioner while positioning the belt.
- Release the tensioner and remove the tool.
- Install the right hand engine bracket and bolts.
- Install the right hand engine mount shims.
- Install the right hand engine mount onto the body side rail studs.
- Install the right hand engine mount-to-body nuts.
- Install the right-hand engine mount-to-engine mount bracket bolts.
- Remove the SA9105E .
- Install the right engine inner splash shield.
- Install the right wheel and hand-tighten the wheel nuts.
- Tighten the wheel nuts.
- Visually inspect the camshaft cover gasket for signs of leakage. The camshaft cover gasket is reusable if not damaged.
- Assemble the camshaft cover and gasket using care to make sure that gasket is located in retaining groove on camshaft cover.
- Install the cover on cylinder head and hand-tighten the bolts.
- Reposition fuel line assembly.
- Install the transfer line fitting at fuel to fuel rail.
- Connect the fuel rail bracket and bolt to the cylinder head.
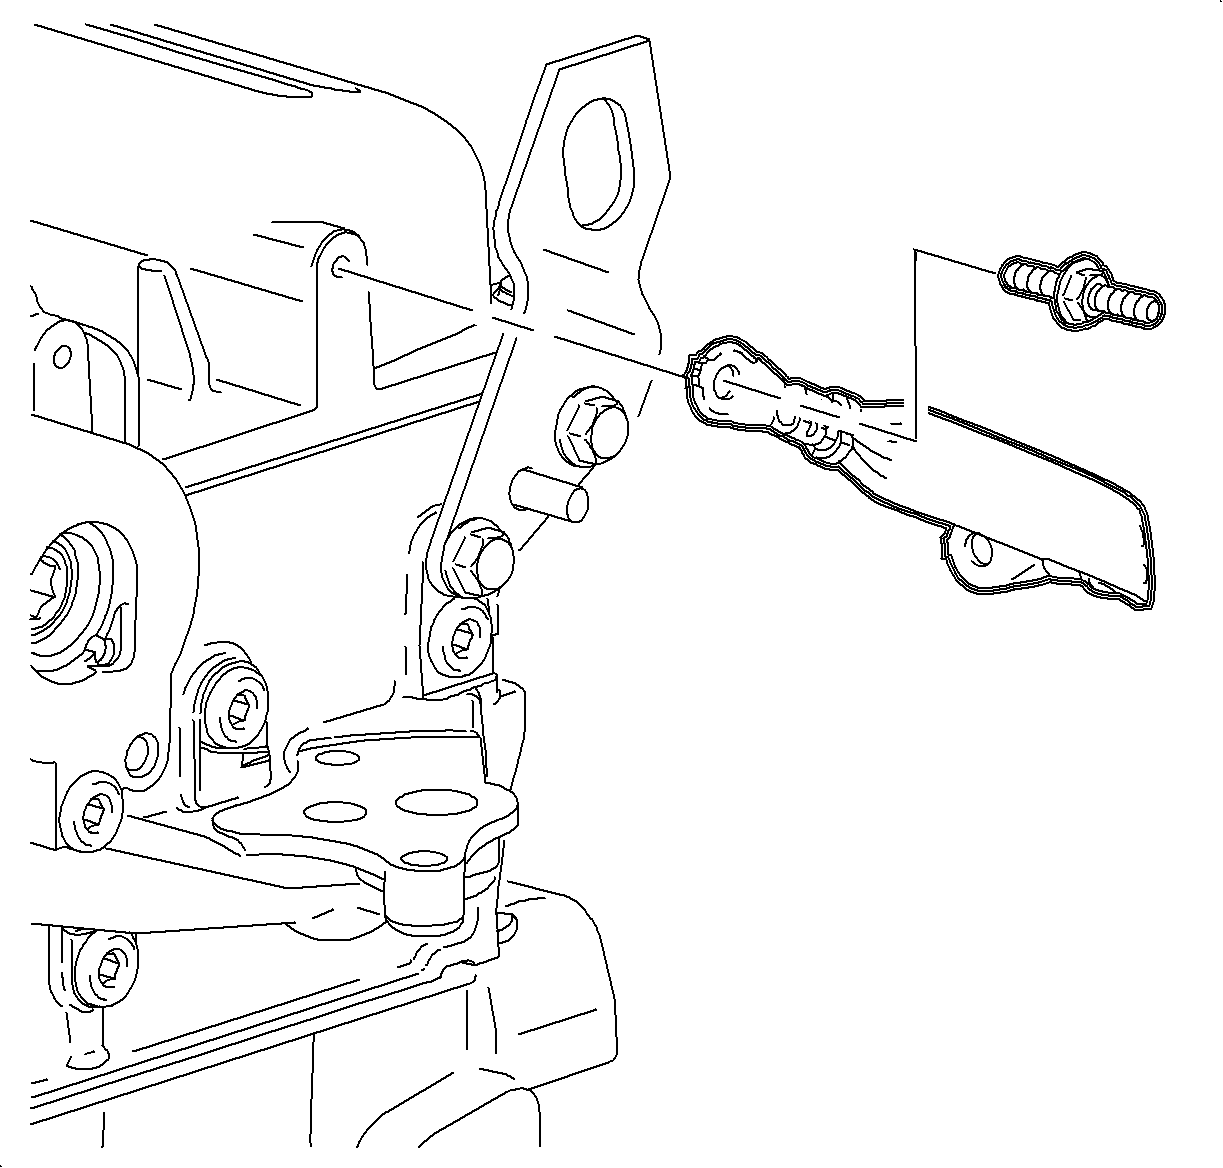
- Connect the ground strap to the camshaft cover assembly.
- Connect the degas hose and attach to the fuel rail.
- Connect the coolant pipe bracket bolts to the cylinder head.
- Install the spark plugs, if removed.
- Install the ignition module assembly to the cam cover and hand-tighten the retaining bolts.
- Install the air cleaner assembly and bolt.
- Install the outlet resonator/duct assembly into position.
- Connect the PCV fresh air vent hose assembly.
- Tighten the clamp at the throttle body assembly.
- Position the outlet resonator/duct assembly up with support bracket and install push-pin.
- Tighten the clamp at the air cleaner assembly.
- Connect the intake air temperature (IAT) sensor connector.
- Connect the negative battery cable.
Notice: Refer to Fastener Notice in the Preface section.
Tighten
Tighten the timing chain oil nozzle bolt to 10 N·m (89 lb in).
Notice: Set crankshaft to 60 degrees before top-dead center or after TDC to prevent valve to piston contact.

Important: When lowering the timing chain into the cylinder head, rotate the assembly 90 degrees to allow the chain to fall between the cylinder block bosses, then rotate the assembly back so that the camshaft sprocket is facing forward.

Important: The crankshaft sprocket timing mark will be at approximately the 5 o'clock position.
Notice: The camshaft sprocket bolts are not reusable, it is a torque-to-yield (TTY) bolt, and must be discarded to prevent premature failure.
Notice: Excess slack in the chain must be kept to the chain tensioner side (movable guide) of the cylinder block when installing the timing chain or the camshaft sprockets will not be correctly timed to the crankshaft sprocket.
Important: Make sure the crankshaft marks and the camshaft marks aligns with the colored links.
Tighten
Tighten the timing chain guide (adjustable) bolt to 10 N·m (89 lb in).
Tighten
Tighten the timing chain fixed bolts to 15 N·m (133 lb in).
Tighten
Tighten the timing chain bolt access hole plug to 40 N·m (30 lb ft).
Notice: Use a 24 mm wrench to support the camshaft while applying torque to camshaft sprocket bolt. Do not torque camshaft bolts against timing chain, as it may damage the timing chain.
Tighten
Tighten the camshaft sprocket bolts to 85 N·m (63 lb ft) plus 30 degrees
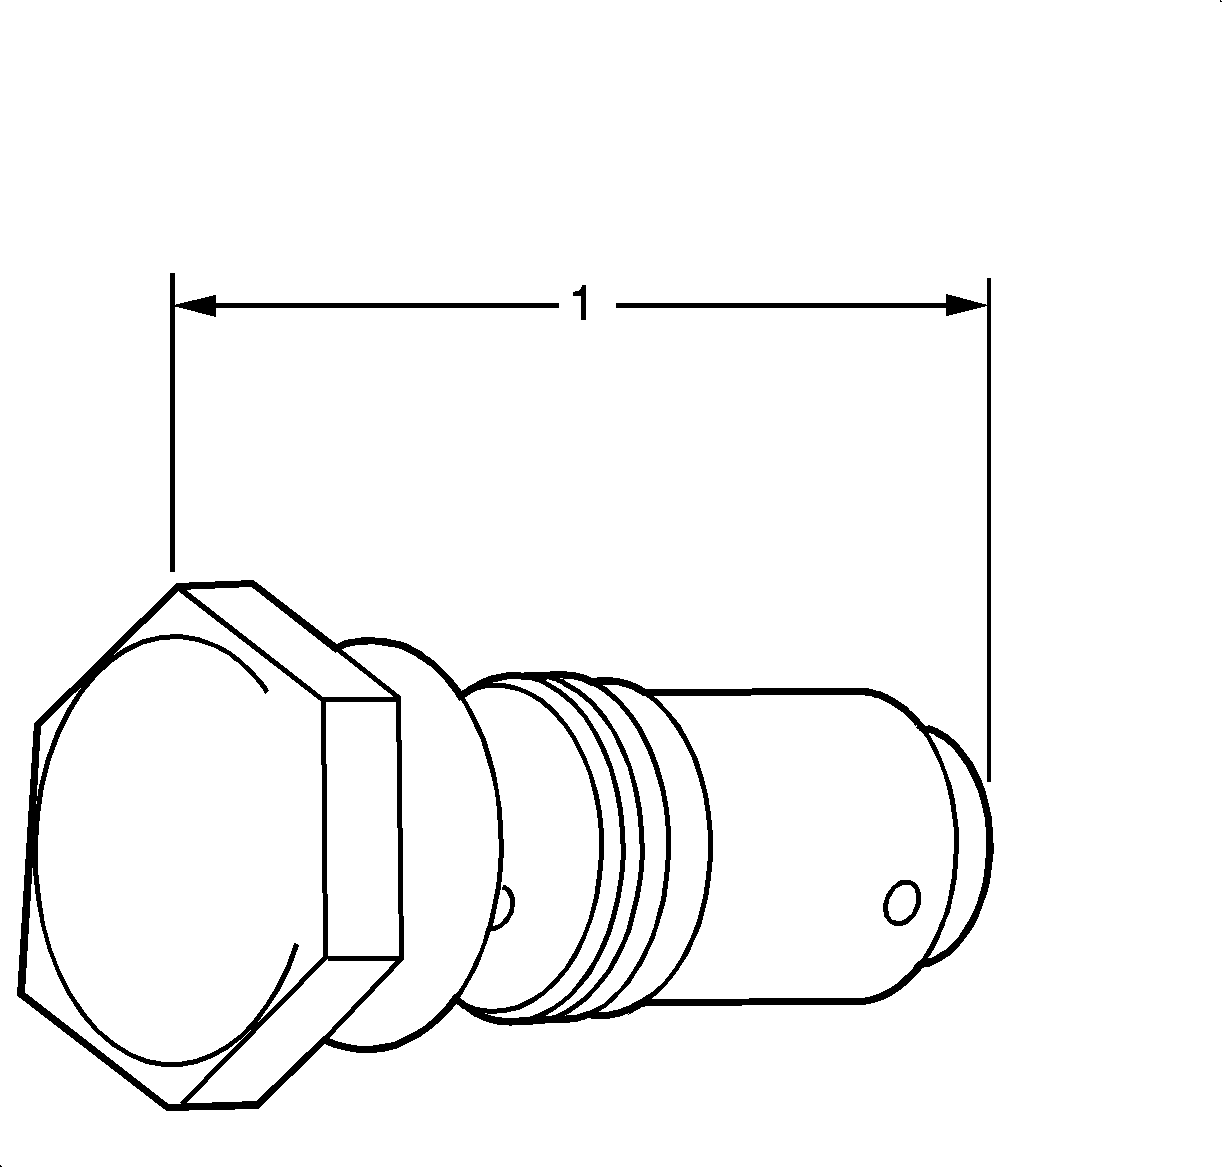
Important: A new tensioner should be supplied in the fully compressed non-active state. A tensioner in the compressed state will measure 72 mm (2.83 in) (1) from end to end. A tensioner in the active state will measure 85 mm (3.53 in) from end to end.
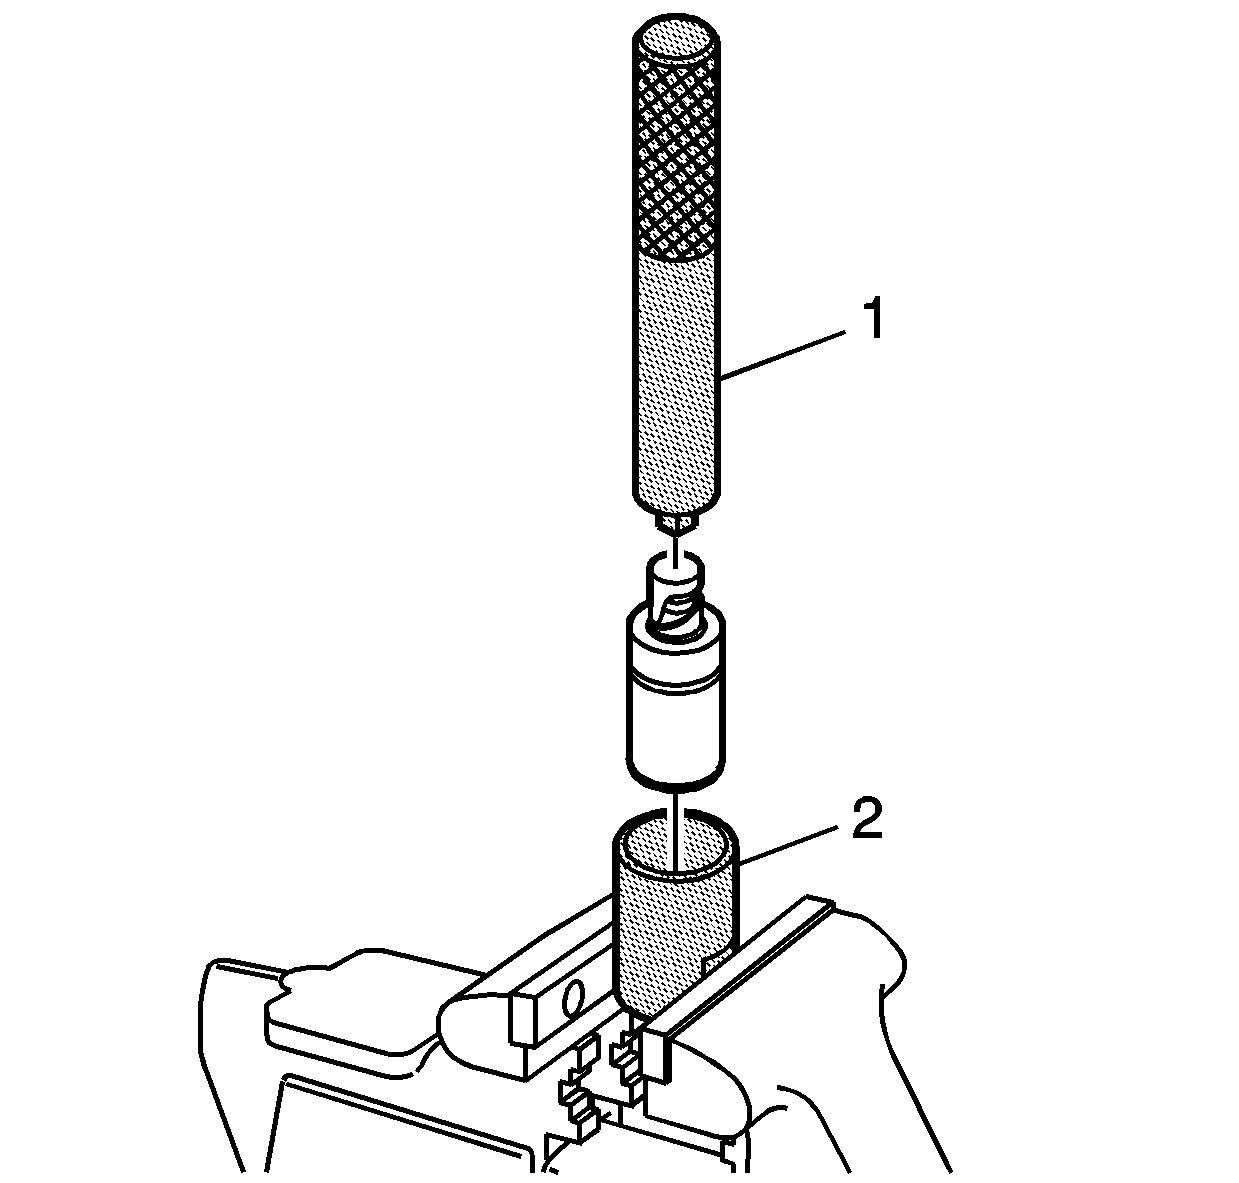
| 24.1. | Remove the piston assembly from the body of the timing chain tensioner by pulling it out. |
| 24.2. | Install J45027-2 (2) into a vise. |
| 24.3. | Install the notch end of the piston assembly into the J45027-2 (2). |
Tighten
Tighten the timing chain tensioner assembly bolt to 75 N·m (55 lb ft).
Tighten
Tighten the timing chain guide (upper) bolts to 10 N·m (89 lb in).
Tighten
Tighten the front cover-to-block bolts to 25 N·m (18 lb ft).
Tighten
Tighten the water pump bolts to 25 N·m (18 lb ft).
Tighten
Tighten the crankshaft pulley bolt to 100 N·m (74 lb ft) plus 75 degrees.
Tighten
Tighten the drive belt tensioner bolts to 45 N·m (33 lb ft).
Tighten
Tighten the engine mount bracket-to-engine bolts to 110 N·m (81 lb ft).
Tighten
Tighten the engine mount-to-body nuts to 110 N·m (81 lb ft).
Tighten
Tighten the engine mount-to-engine mount bracket bolts to 50 N·m (37 lb ft).
Tighten
Tighten the wheel nuts to 125 N·m (92 lb ft).
Tighten
Tighten the camshaft cover bolts to 10 N·m (89 lb in).
Notice: An open-end wrench must be used to support the fuel line to rail connection during loosening/tightening to avoid damaging the fuel rail assembly.
Tighten
Tighten the transfer line fitting-to-fuel rail to 10 N·m (89 lb in).
Tighten
Tighten the fuel line bracket bolt to 10 N·m (89 lb in).
Tighten
Tighten the camshaft cover ground strap bolts to 10 N·m (89 lb in).
Tighten
Tighten the coolant pipe bracket bolt to 10 N·m (89 lb in).
Tighten
Tighten the spark plugs to 20 N·m (15 lb ft).
Tighten
Tighten the ignition module-to-camshaft cover bolts to 8 N·m (71 lb in).
Tighten
Tighten the air cleaner-to-support bracket bolt to 10 N·m (89 lb in).
Tighten
Tighten the battery terminal bolt to 17 N·m (13 lb ft).
