Tools Required
| • | J 45542 Transmission Line Pressure Adapter |
Caution: One or more of the following guidelines may apply when performing specific required tests in the work stall:
| • | When a test requires spinning the drive wheels with the vehicle jacked up, adhere to the following precautions: |
| - | Do not exceed 56 km/h (35 mph) when spinning one drive wheel with the other drive wheel stopped. This limit is necessary because the speedometer indicates only one-half the actual vehicle speed under these conditions. Personal injury
may result from excessive wheel spinning. |
| - | If all of the drive wheels are spinning at the same speed, do not exceed 112 km/h (70 mph). Personal injury may result from excessive wheel spinning. |
| - | All persons should stay clear of the rotating components and the balance weight areas in order to avoid possible personal injury. |
| - | When running an engine in the repair stall for an extended period of time, use care not to overheat the engine and the transmission. |
| • | When a test requires jacking up the vehicle and running with the wheels and brake rotors removed, adhere to the following precautions: |
| - | Support the suspension at normal ride height. |
| - | Do not apply the brake with the brake rotors removed. |
| - | Do not place the transmission in PARK with the drive axles spinning. |
| - | Turn Off the ignition in order to stop the powertrain components from spinning. |
| • | When running an engine in the work stall, use the exhaust removal system to prevent breathing dangerous gases. |
Important: Ensure the area around the fluid pressure test hole plug is clean before removing the plug. Do not allow dust or other foreign particles to enter the fluid pressure test hole.
- Inspect the transmission fluid level to ensure that the level is correct. Refer to
Transmission Fluid Check .
- Raise the vehicle and correctly support. All four wheels will rotate. Refer to
Lifting and Jacking the Vehicle.
- Start the engine and allow the engine to idle until the fan operates.
- Install a scan tool.
- In order to connect to desired fluid pressure test hole plug the following is required:
| • | Line pressure - Accessible from under the vehicle. |
| • | 5th clutch or reverse clutch - Remove the O2 wire harness bracket. |
| • | 3rd clutch - Accessible from under the vehicle. |
| • | 2nd clutch - Accessible from the topside of the transmission. |
| • | 4th clutch - Disconnect the 4th clutch pressure switch connector. Remove the wire harness bracket bolt. |
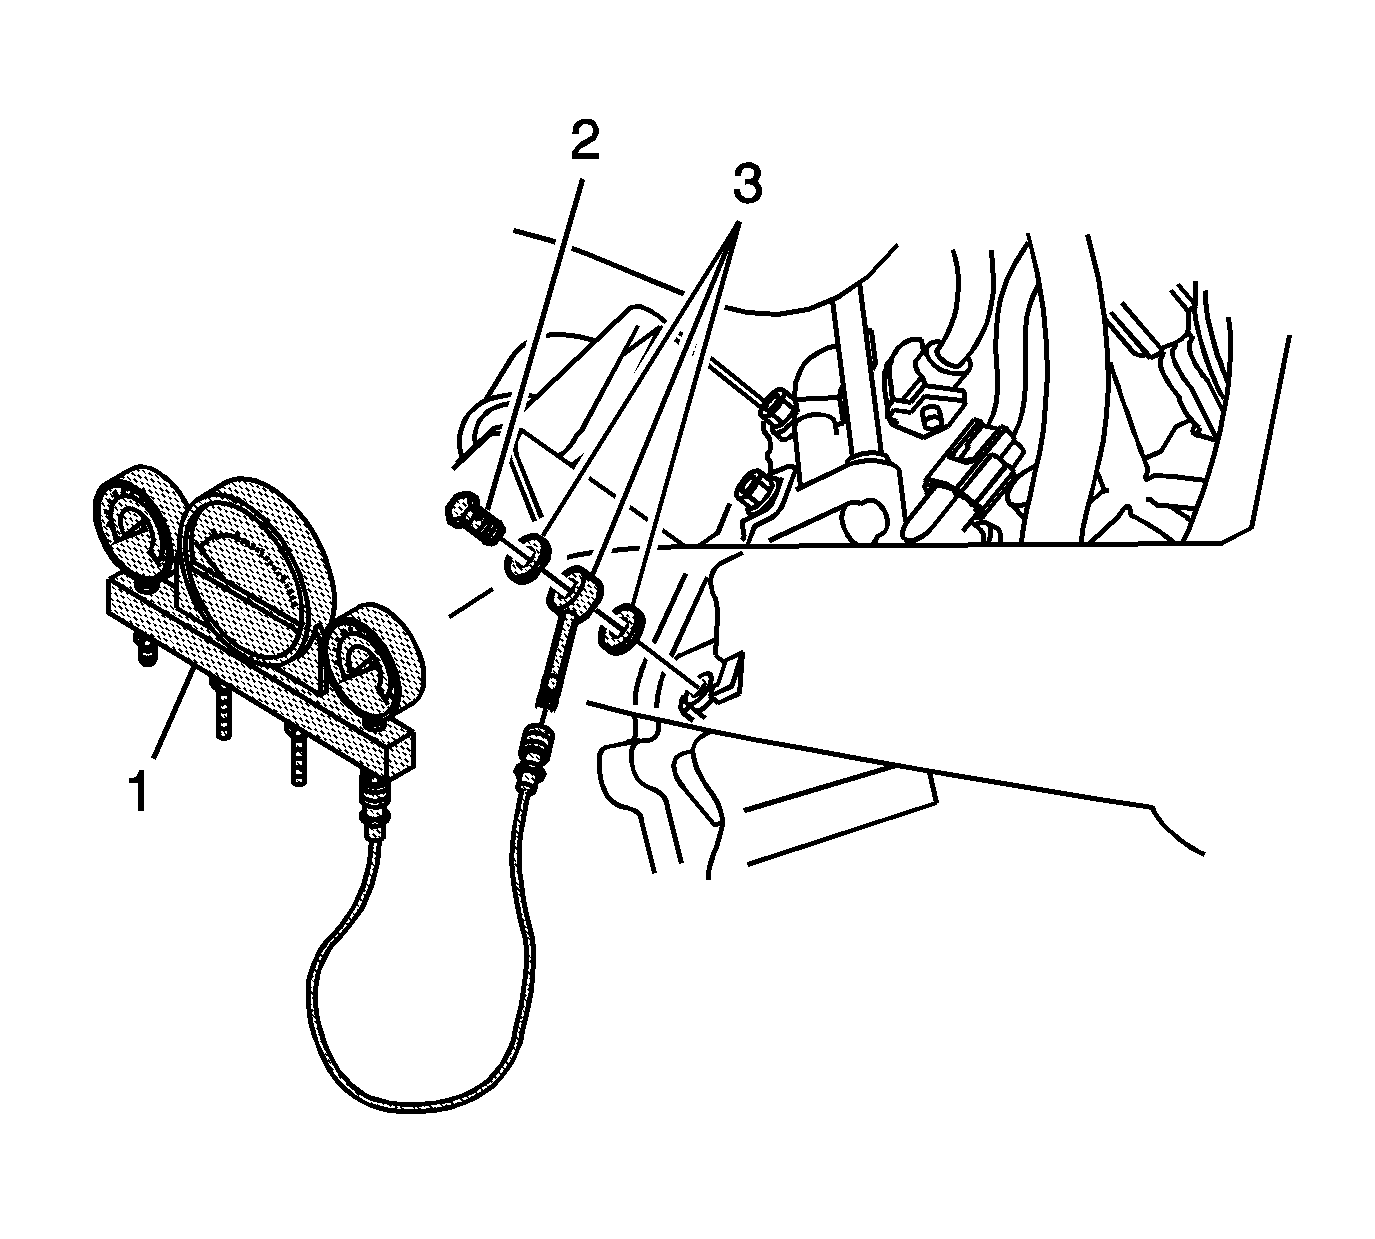
- Install the
J 45542 (3) using the J 45542-3 bolt (2) and 2 sealing washers to the desired fluid pressure test hole recommended in the symptom tables.
- Connect the
SA9127E (1) to the
J 45542 (3).
- When the test is completed, remove the
J 45542 .
- Install the fluid pressure test hole plug with a new seal. Do not use the seal again.
Tighten
Tighten the test hole plug to 18 N·m (13 lb ft)
Fluid Pressure Test Hole Plugs - Transmission Case
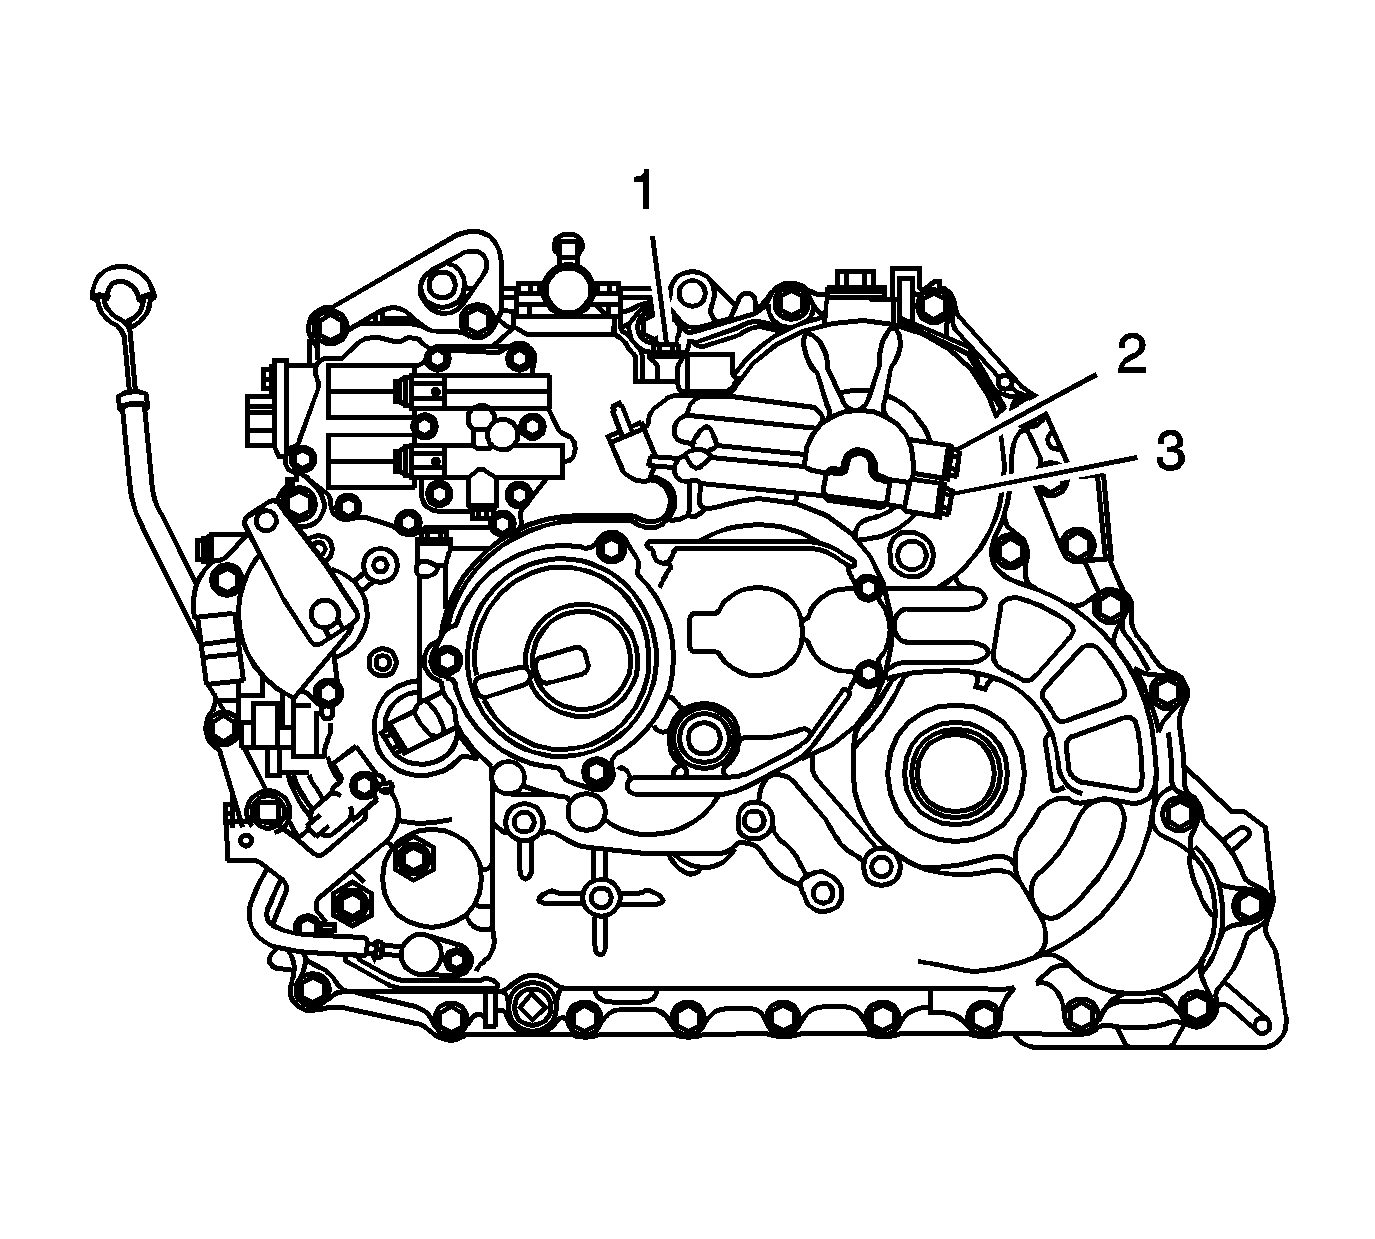
- 4th Clutch
- 1st Clutch
- Coast Clutch
Fluid Pressure Test Hole Plugs - Torque Converter Housing
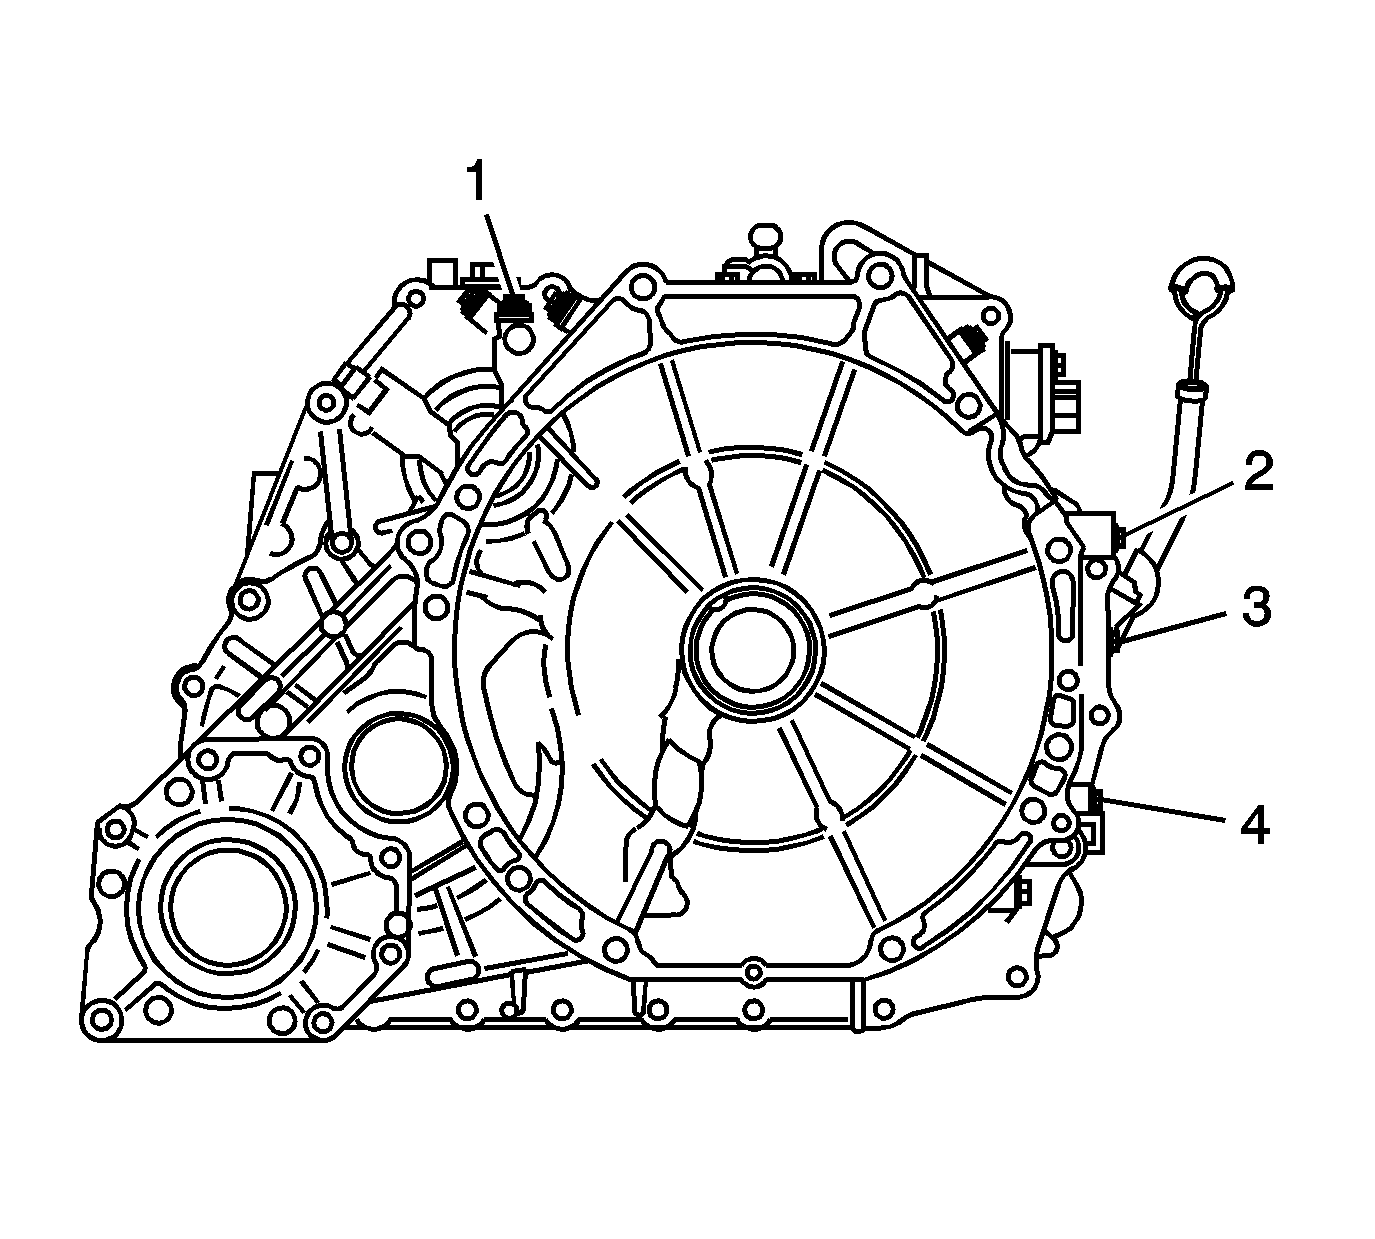
- 2nd Clutch
- 5th Clutch and Reverse Clutch
- Line Pressure
- 3rd Clutch
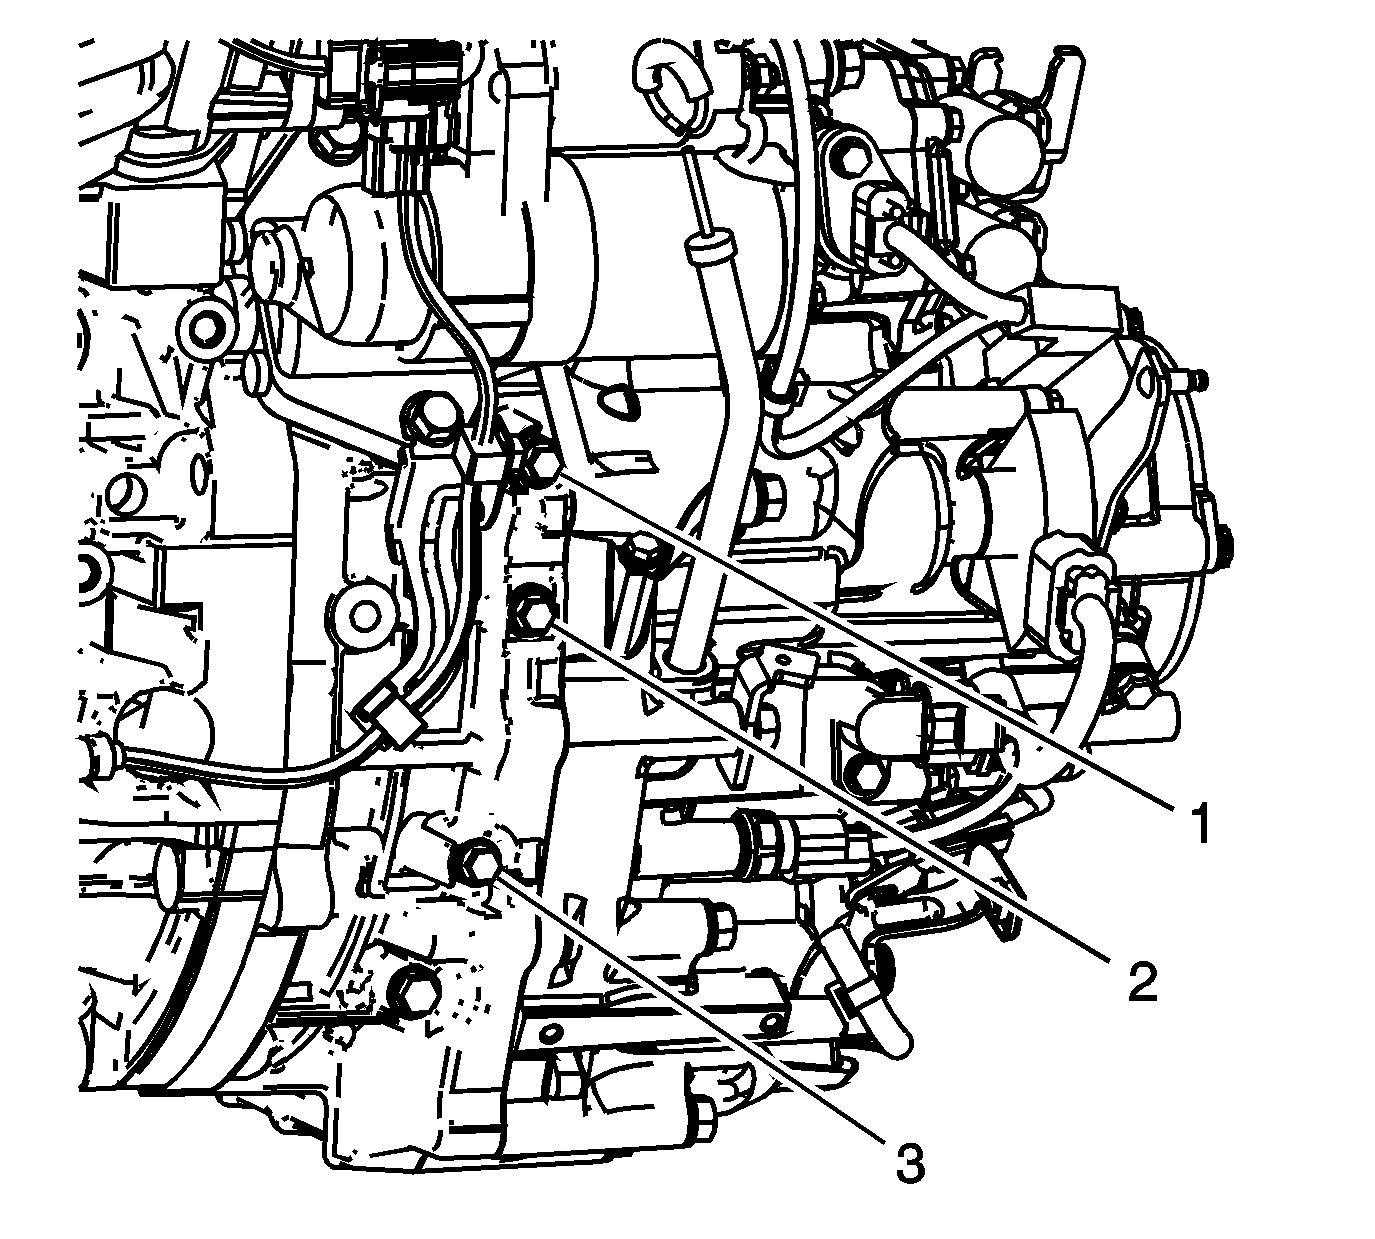
Line Pressure Test
- Remove the fluid pressure test hole plug (1).
- Connect the
J 45542 and the
SA9127E .
- Start the engine and operate at 2,000 RPM in the PARK or NEUTRAL position.
Important: If the transmission is not in the PARK or NEUTRAL position the gage may have a higher pressure reading.
- Measure the line pressure reading and compare the measurement to the following specifications:
Specifications
| • | Standard: 900-960 kPa (130-140 psi) |
| • | Service Limit: 850 kPa (120 psi) |
- If the pressure reading is below the service limit, inspect for the following conditions:
| • | Restriction in the automatic transmission filter |
| • | Faulty torque converter check valve |
| • | Automatic transmission fluid pump worn or damaged |
| • | Torque converter faulty |
| • | Regulator valve body for the following conditions: |
5th Clutch Pressure Test
- Remove the fluid pressure test hole plug (2).
- Connect the
J 45542 and the
SA9127E .
- Shift the transmission into Drive.
- Using the scan tool, command the transmission to shift into 5th gear.
- Increase the engine speed to 2,000 RPM.
- Measure the 5th clutch pressure reading and compare to the following specifications:
Specifications
| • | Standard: 890-970 kPa (130-140 psi) |
| • | Service Limit: 840 kPa (120 psi) |
- If the pressure reading is below the service limit, refer to the table at the end of this procedure for a possible cause.
3rd Clutch Pressure Test
- Remove the fluid pressure test hole plug (3).
- Connect the
J 45542 and the
SA9127E .
- Shift the transmission into Drive.
- Using the scan tool, command the transmission to shift into 3rd gear.
- Increase the engine speed to 2,000 RPM.
- Measure the 3rd clutch pressure reading and compare to the following specifications:
Specifications
| • | Standard: 890-970 kPa (130-140 psi) |
| • | Service Limit: 840 kPa (120 psi) |
- If the pressure reading is below the service limit, refer to the table at the end of this procedure for a possible cause.
Reverse Clutch Pressure Test
- Remove the fluid pressure test hole plug (2).
- Connect the
J 45542 and the
SA9127E .
- Shift the transmission into Reverse.
- Increase the engine speed to 2,000 RPM.
- Measure the 2nd clutch pressure reading and compare to the following specifications:
Specifications
| • | Standard: 890-970 kPa (130-140 psi) |
| • | Service Limit: 840 kPa (120 psi) |
- If the pressure reading is below the service limit, refer to the table at the end of this procedure for a possible cause.
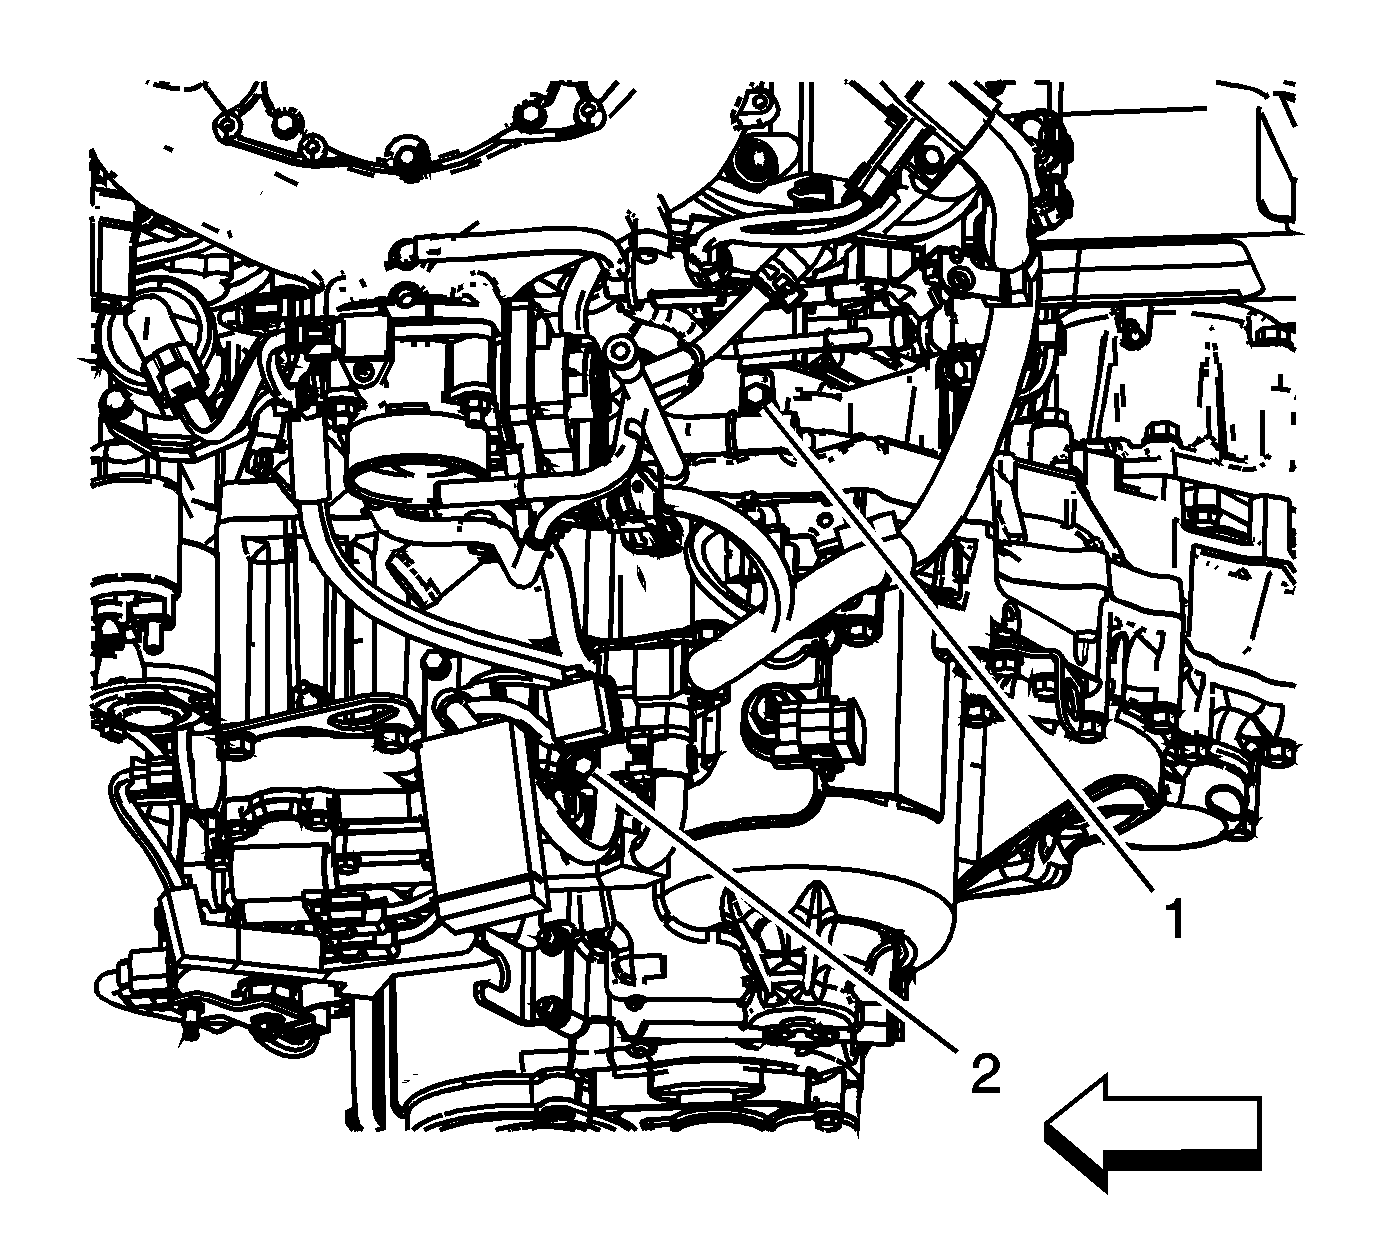
2nd Clutch Pressure Test
- Remove the fluid pressure test hole plug (1).
- Connect the
J 45542 and the
SA9127E .
- Shift the transmission into Drive.
- Using the scan tool, command the transmission to shift into 2nd gear.
- Increase the engine speed to 2,000 RPM.
- Measure the 2nd clutch pressure reading and compare to the following specifications:
Specifications
| • | Standard: 890-970 kPa (130-140 psi) |
| • | Service Limit: 840 kPa (120 psi) |
- If the pressure reading is below the service limit, refer to the table at the end of this procedure for a possible cause.
4th Clutch Pressure Test
- Remove the fluid pressure test hole plug (2).
- Connect the
J 45542 and the
SA9127E .
- Shift the transmission into Drive.
- Using the scan tool, command the transmission to shift into 4th gear.
- Increase the engine speed to 2,000 RPM.
- Measure the 4th clutch pressure reading and compare to the following specifications:
Specifications
| • | Standard: 890-970 kPa (130-140 psi) |
| • | Service Limit: 840 kPa (120 psi) |
- If the pressure reading is below the service limit, refer to the table at the end of this procedure for a possible cause.
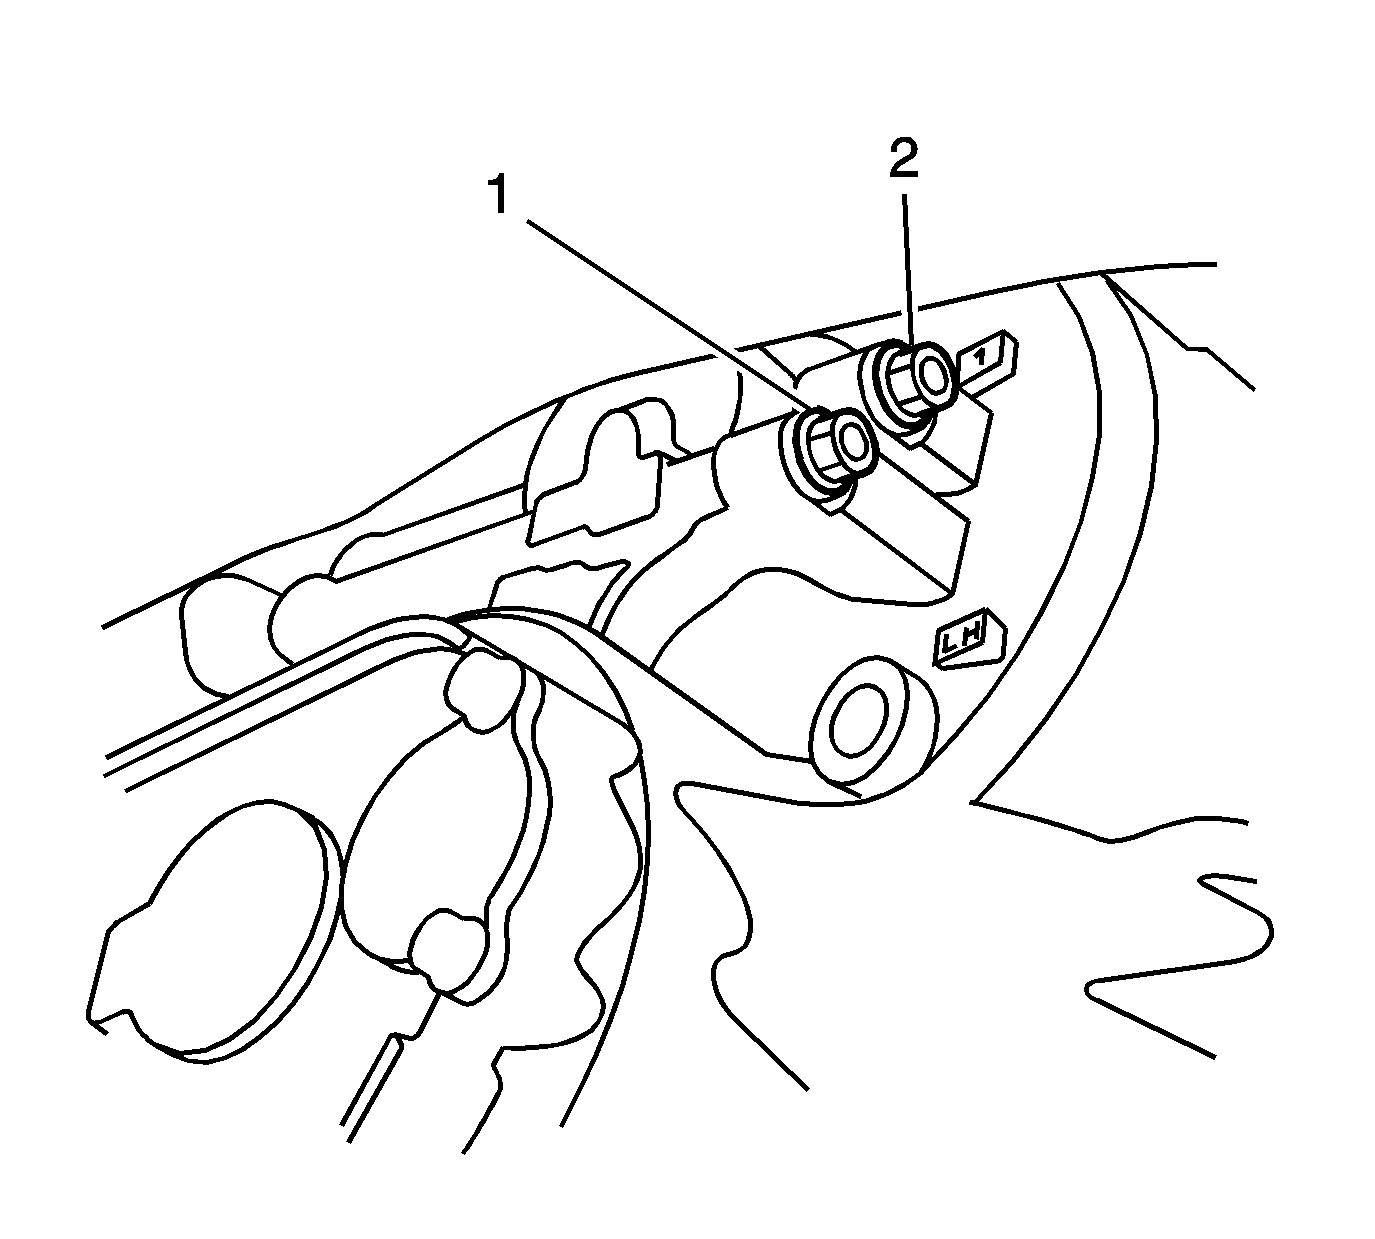
1st Clutch Pressure Test
- Remove the fluid pressure test hole plug (2).
- Connect the
J 45542 and the
SA9127E .
- Shift the transmission into Drive.
- Using the scan tool, command the transmission to shift into 1st gear.
- Increase the engine speed to 2,000 RPM.
- Measure the 1st clutch pressure reading and compare to the following specifications:
Specifications
| • | Standard: 890-970 kPa (130-140 psi) |
| • | Service Limit: 840 kPa (120 psi) |
- If the pressure reading is below the service limit, inspect for the following conditions:
| • | Faulty 1st clutch piston check valve |
| • | 1st clutch piston O-ring seals worn or damaged |
| • | Scored or worn clutch hub piston bore |
| • | 1st or 2nd clutch shaft fluid passage O-ring seals worn or damaged |
Coast Clutch Pressure Test
- Remove the fluid pressure test hole plug (1).
- Connect the
J 45542 and the
SA9127E .
- Shift the transmission into Drive.
- Using the scan tool, command the transmission to shift into 1st gear.
- Increase the engine speed to 2,000 RPM.
- Measure the coast clutch pressure reading and compare to the following specifications:
Specifications
| • | Standard: 760-830 kPa (110-120 psi) |
| • | Service Limit: 710 kPa (100 psi) |
- If the pressure reading is below the service limit, inspect for the following conditions:
| • | Faulty coast clutch piston check valve |
| • | coast clutch piston O-ring seals faulty |
| • | Scored or worn clutch hub piston bore |
| • | 1st or clutch housing fluid passage O-ring seals faulty |
Condition
| Probable Cause
|
No or low line pressure
|
| • | Torque converter check valve |
|
No or low 1st clutch pressure
|
|
No or low 2nd clutch pressure
|
|
No or low 3rd clutch pressure
|
|
No or low 4th clutch pressure
|
|
No or low 5th clutch pressure
|
|
No or low 5th clutch pressure in the Reverse position
|
|
No or low coast clutch pressure
|
|


