Battery Positive and Negative Cable Replacement LZ4
Removal Procedure
Warning: Refer to Battery Disconnect Warning in the Preface section.
- Remove the air cleaner outlet duct. Refer to Air Cleaner Outlet Duct Replacement.
- Release the electronic control module (ECM) bracket from the battery cover and set it aside with the ECM still connected. Refer to Engine Control Module Replacement.
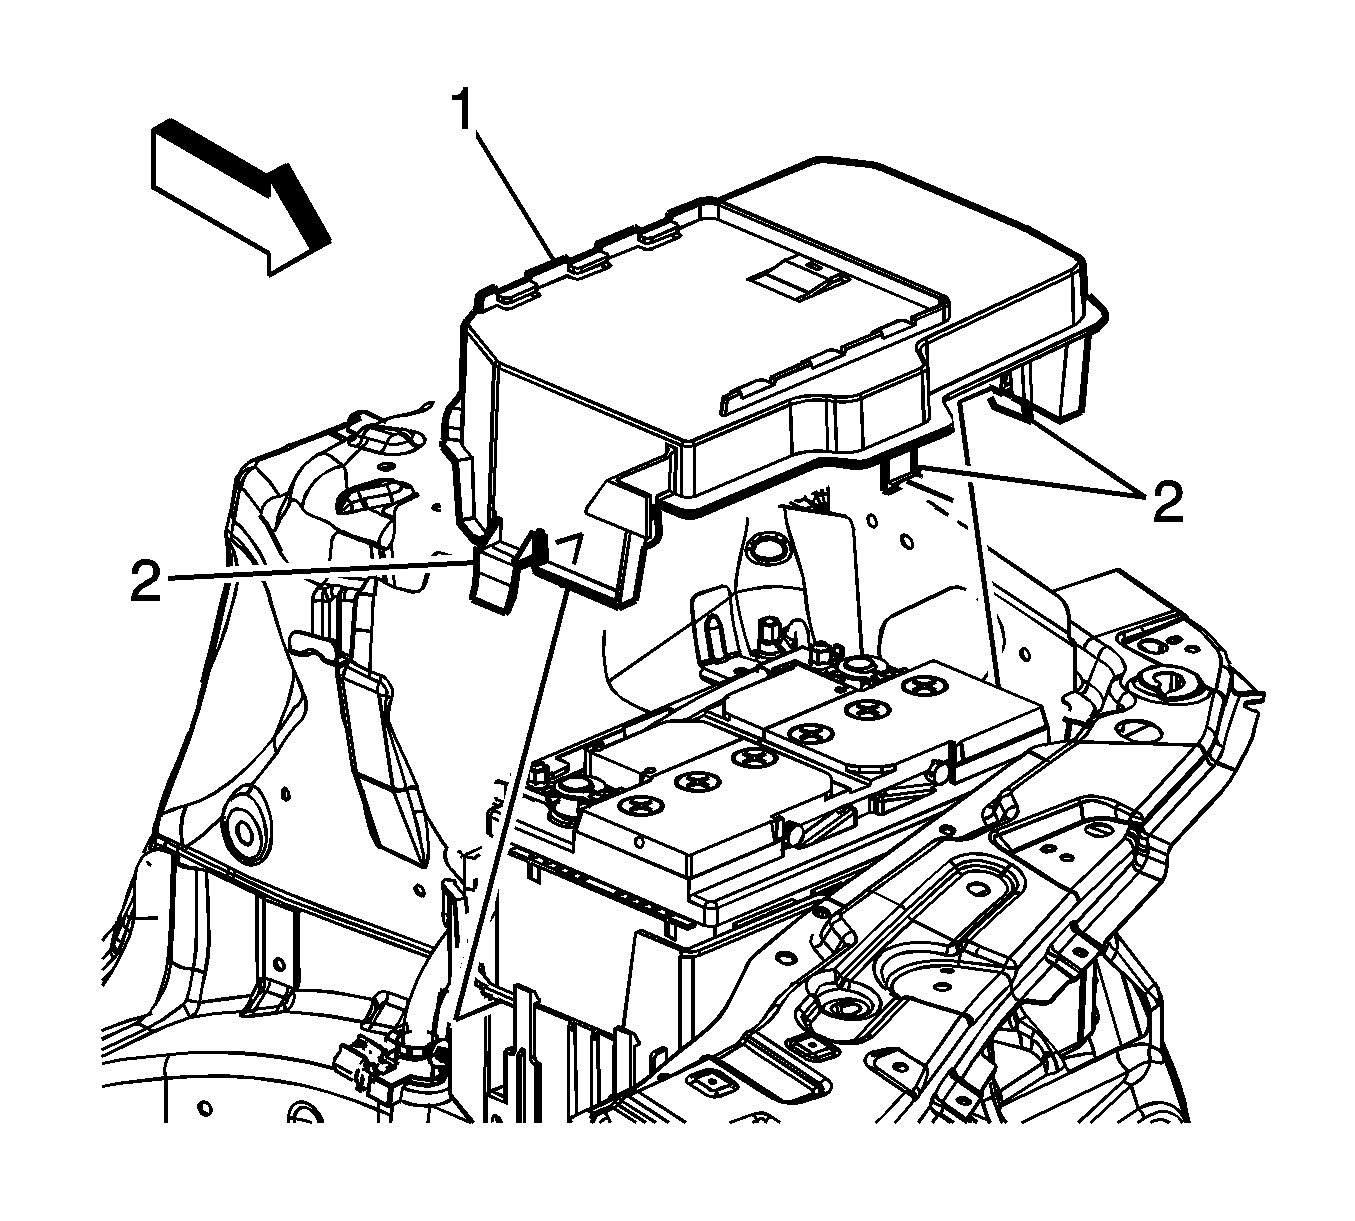
- Release the battery cover retaining tabs (2) and remove the battery cover (1).
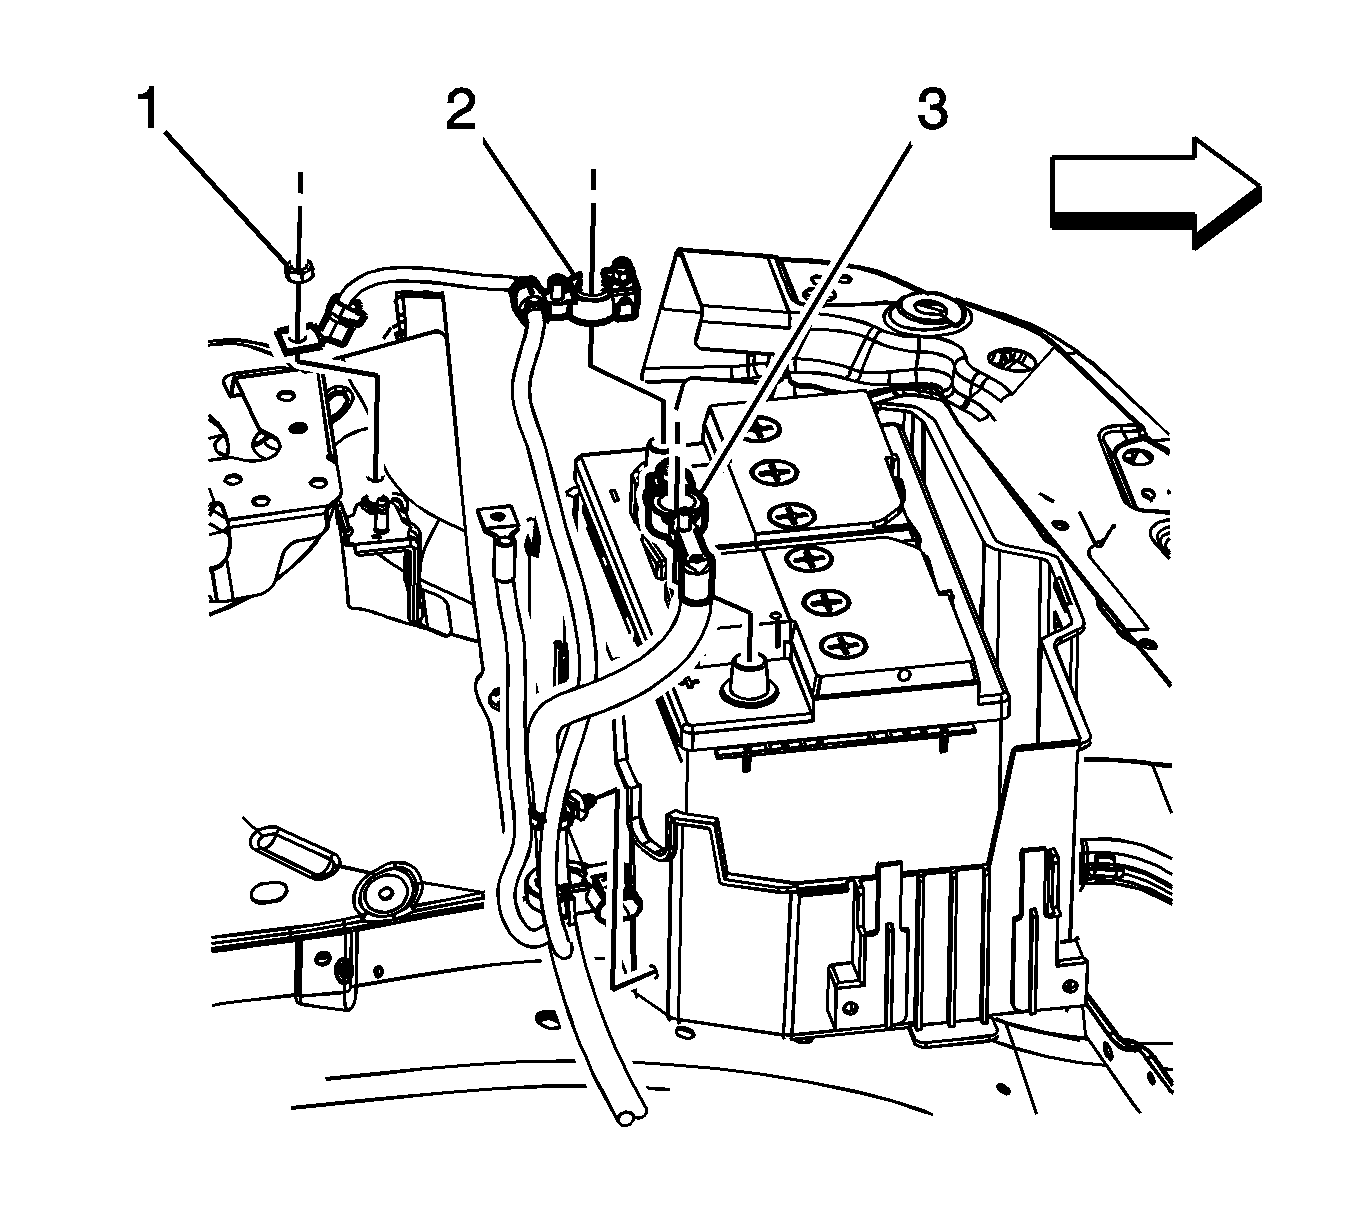
- Loosen the battery positive cable nut (3) and remove the battery positive cable from the battery.
- Remove the battery negative cable ground nut (1) and remove the battery negative cable ground from the body ground stud.
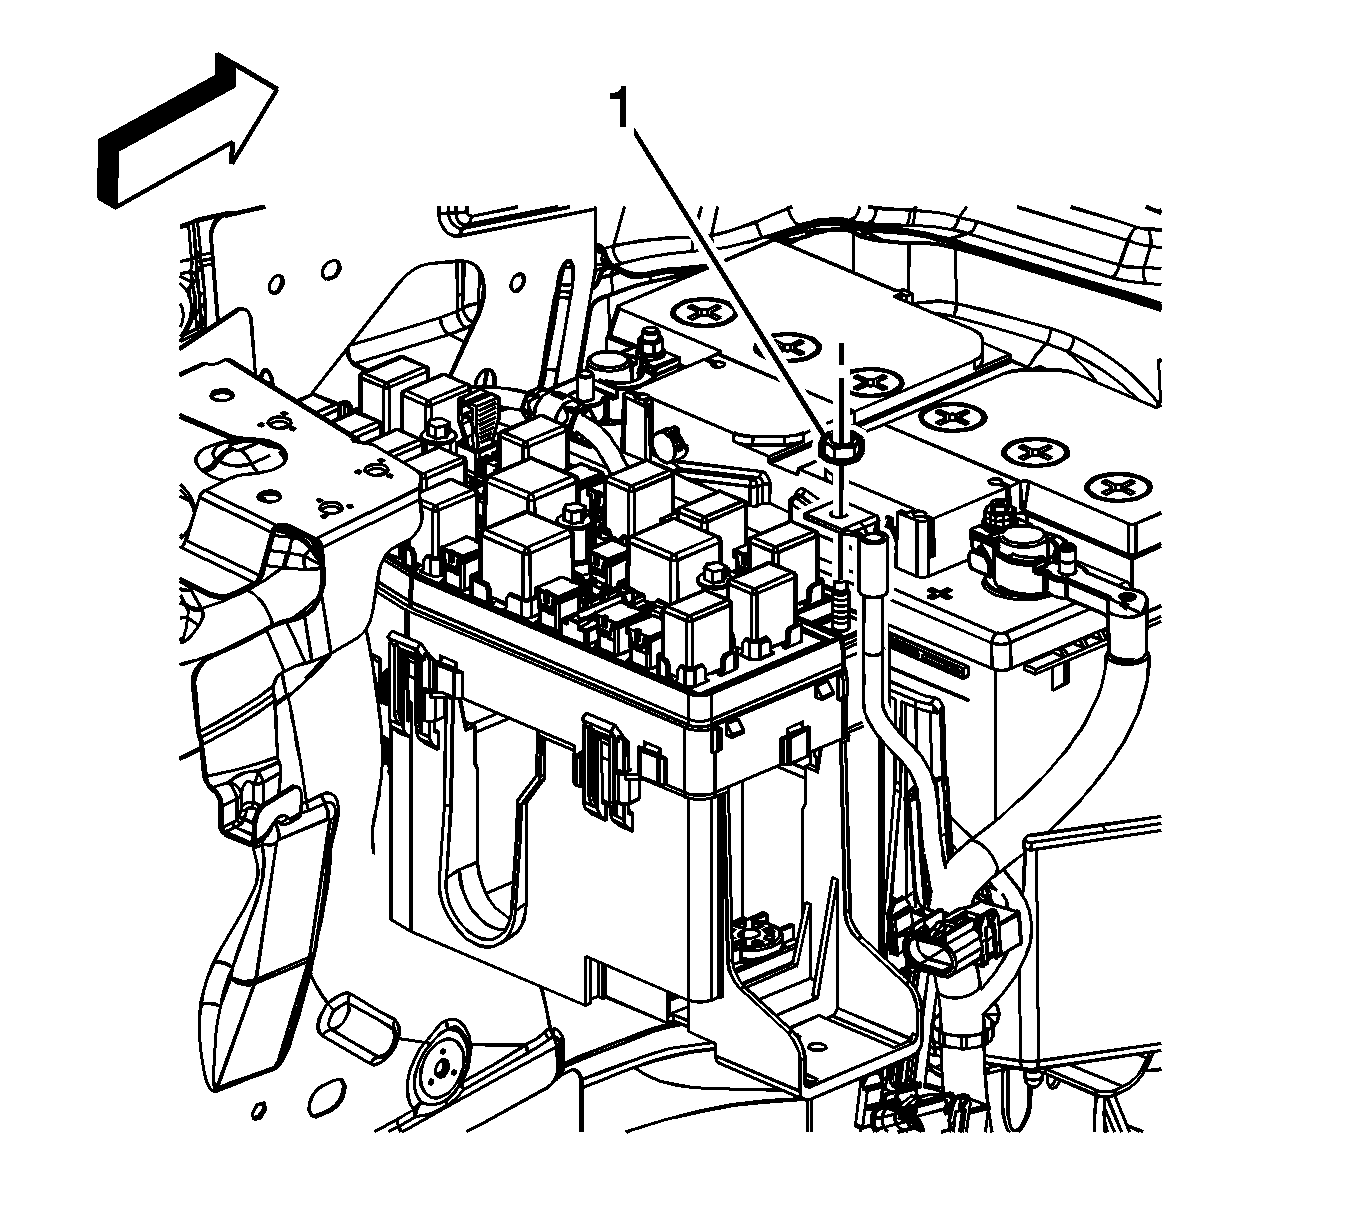
- Remove the battery positive cable junction block nut (1) and remove the battery positive cable from the junction block.
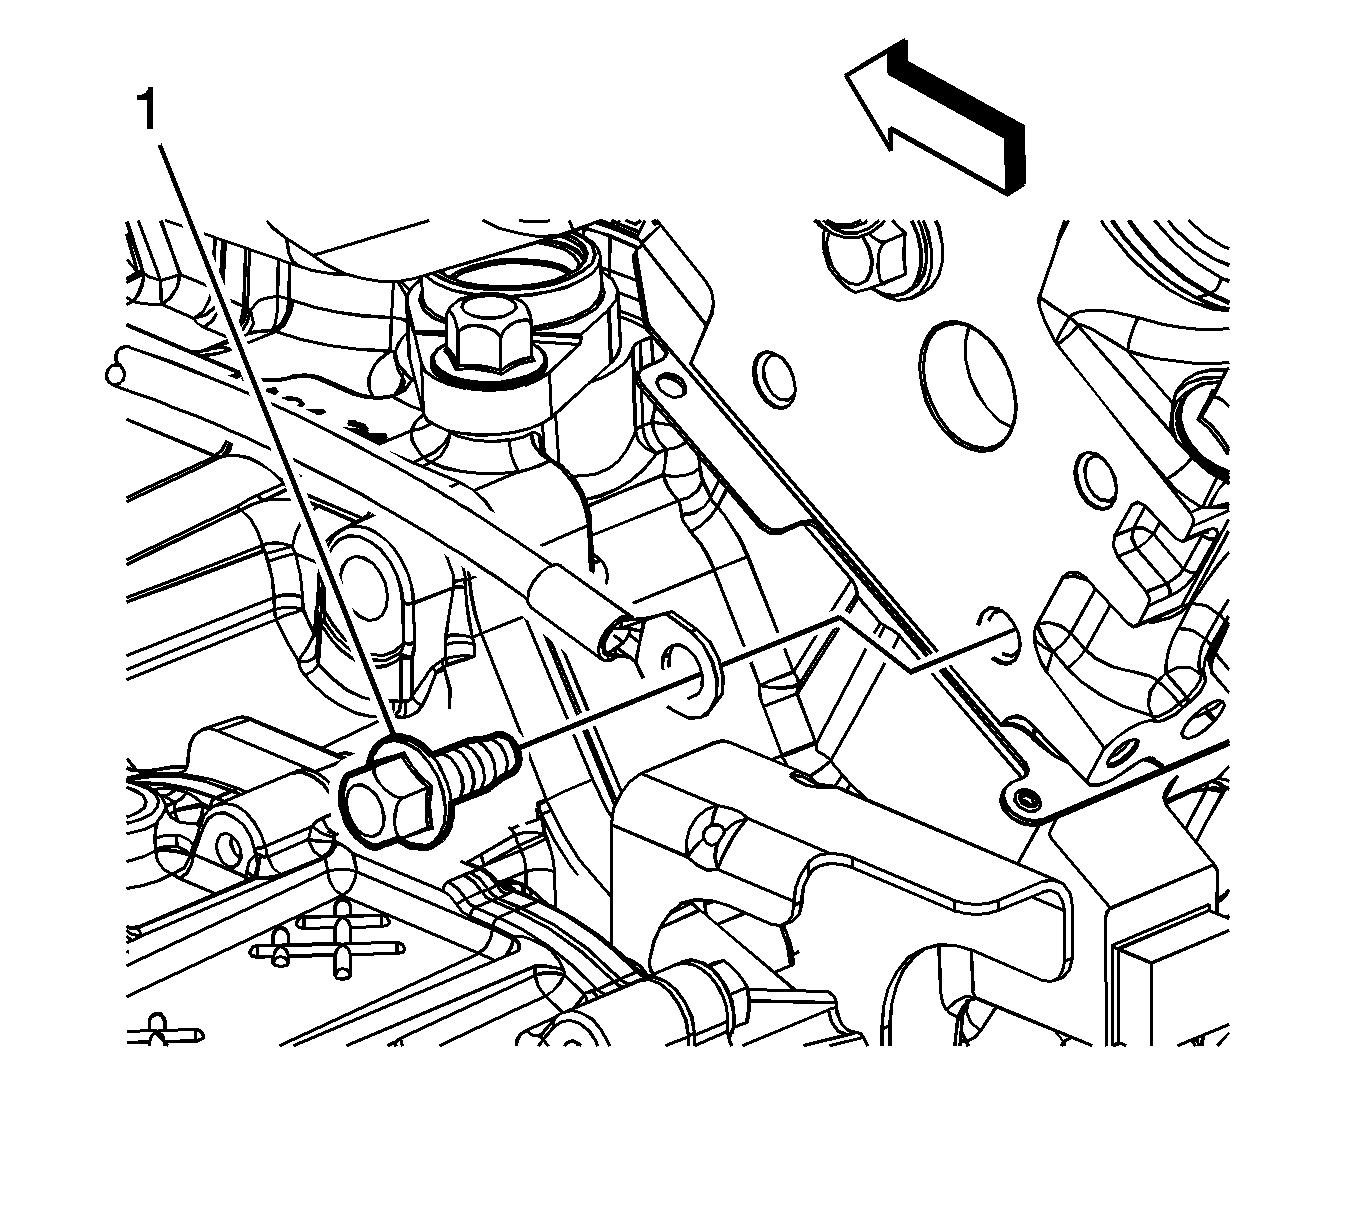
- Remove the engine wiring harness ground bolt (1) and the battery negative cable ground at the rear of the right side cylinder head.
- Raise and support the vehicle. Refer to Lifting and Jacking the Vehicle.
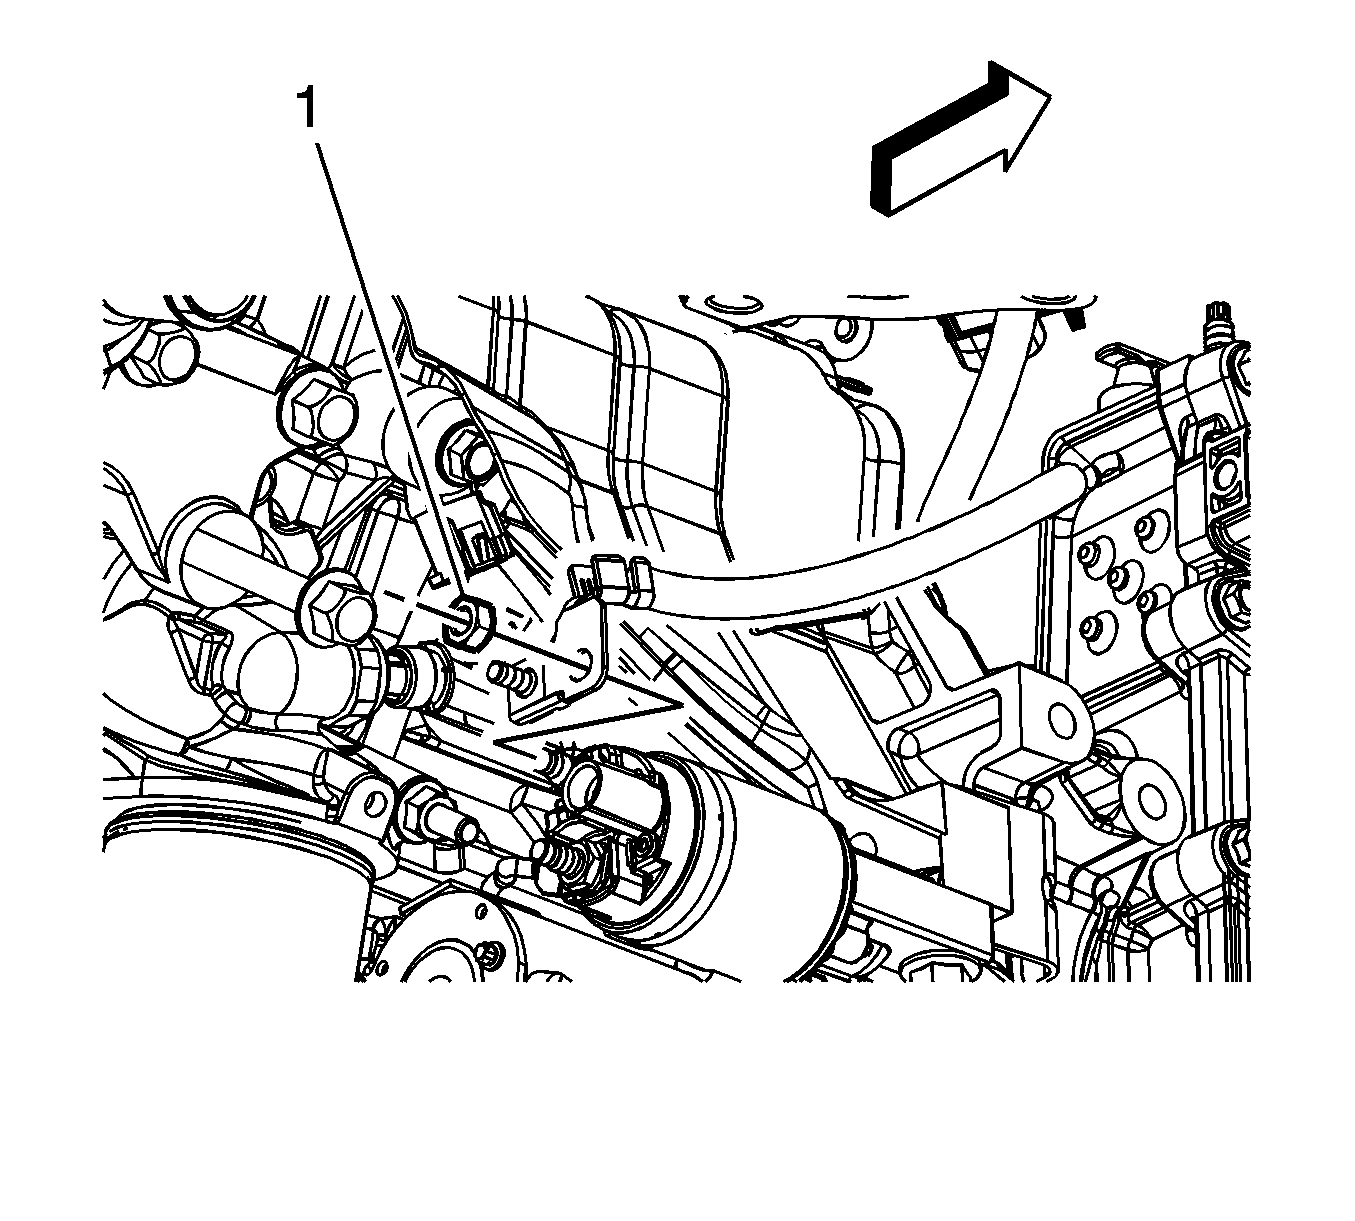
- Remove the starter solenoid BAT terminal nut (1) and remove the battery positive cable from the starter solenoid BAT stud.
- Remove the battery positive and negative cable from the vehicle.
- Transfer the battery current sensor if replacing the battery positive and negative cable. Refer to Battery Current Sensor Replacement.
Installation Procedure
- Position the battery positive and negative cable to the vehicle.
- Install the positive cable to the starter solenoid BAT stud and install the starter solenoid BAT terminal nut (1).
- Lower the vehicle.
- Install the positive cable to the junction block and install the positive cable junction block nut (1).
- Install the negative cable ground and engine wiring harness ground bolt (1) at the rear of the right side cylinder head.
- Install the negative cable ground to the body ground stud and install the negative cable ground nut (1).
- Install the positive cable to the battery and install the positive cable nut (3).
- Install the negative cable to the battery. Refer to Battery Negative Cable Disconnection and Connection.
- Install the battery cover (1) until the battery cover retaining tabs (2) lock into place.
- Position the ECM bracket in place. Refer to Engine Control Module Replacement.
- Install the air cleaner outlet duct. Refer to Air Cleaner Outlet Duct Replacement.
Note: Route the battery positive and negative cable the same way as originally installed.
Caution: Refer to Fastener Caution in the Preface section.

Tighten the nut to 15 N·m (11 lb ft).

Tighten the nut to 15 N·m (11 lb ft).

Tighten the bolt to 25 N·m (18 lb ft).

Tighten the nut to 10 N·m (89 lb in).
Tighten the nut to 5 N·m (45 lb in).

Battery Positive and Negative Cable Replacement LY7
Removal Procedure
Warning: Refer to Battery Disconnect Warning in the Preface section.
- Release the electronic control module (ECM) bracket from the battery cover and set it aside with the ECM still connected. Refer to Engine Control Module Replacement.
- Release the battery cover retaining tabs (2) and remove the battery cover (1).
- Loosen the battery positive cable nut (3) and remove the battery positive cable from the battery.
- Remove the battery negative cable ground nut (1) and remove the battery negative cable ground from the body ground stud.
- Remove the battery positive cable junction block nut (1) and remove the battery positive cable from the junction block.
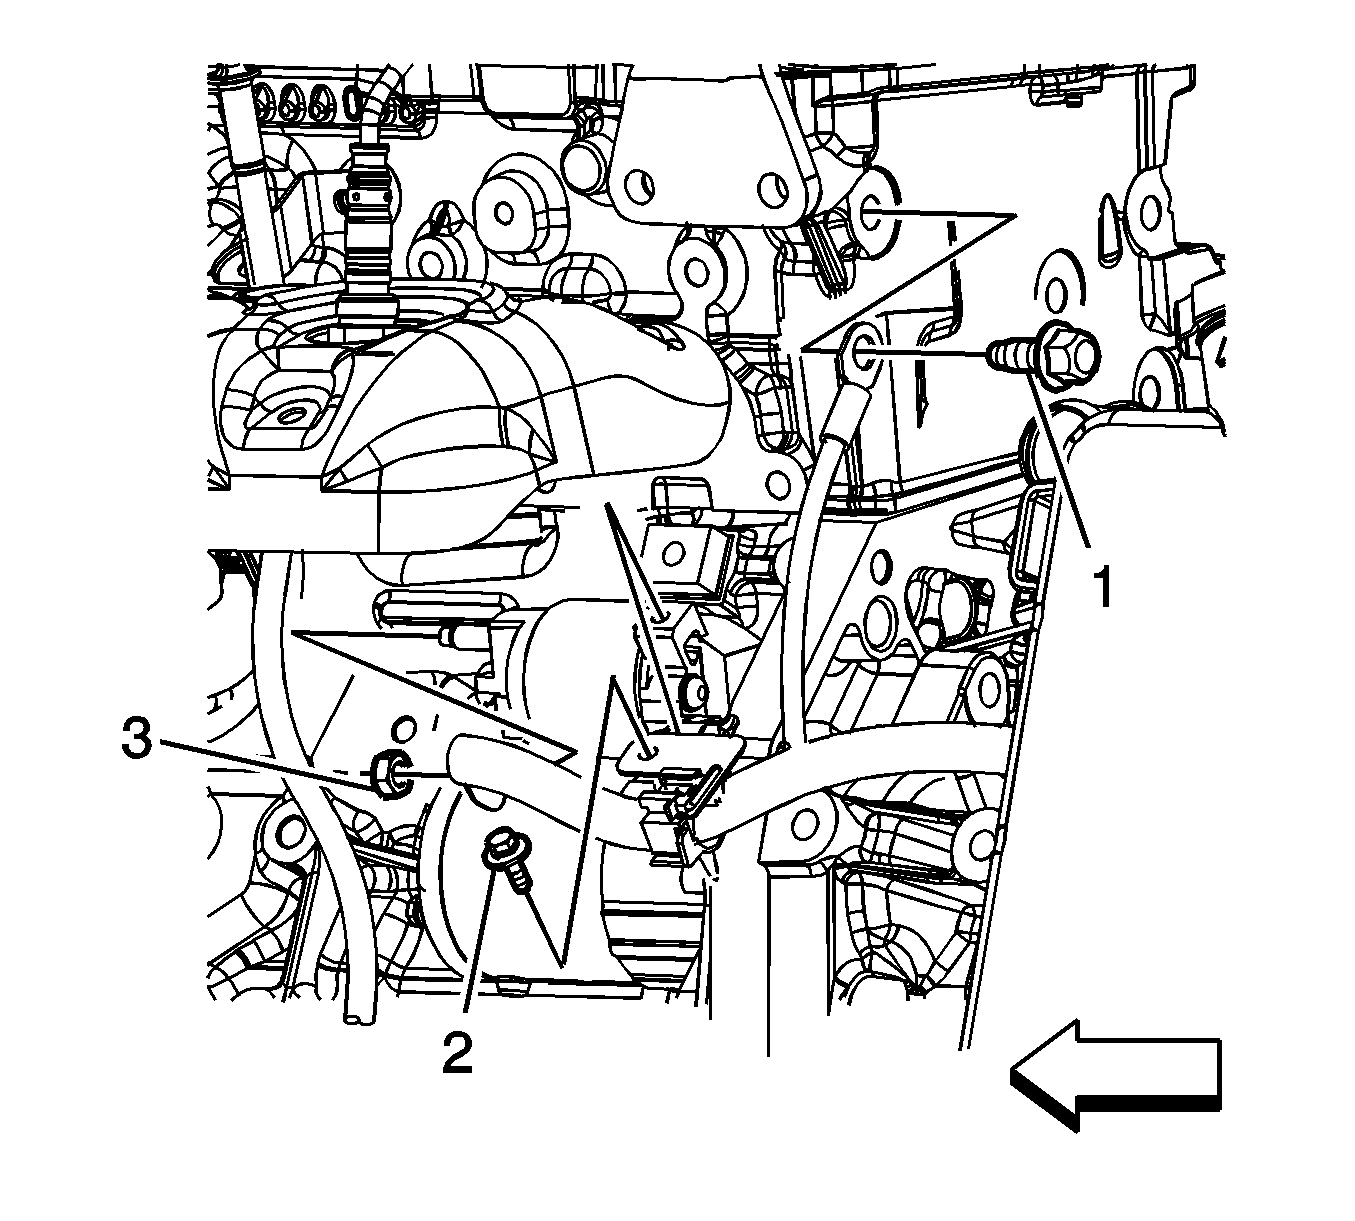
- Remove the engine wiring harness ground bolt (1) and the battery negative cable ground at the rear of the left side cylinder head.
- Remove the battery positive and negative cable bracket bolt (2).
- Raise and support the vehicle. Refer to Lifting and Jacking the Vehicle.
- Remove the starter solenoid BAT terminal nut (3) and remove the battery positive cable from the starter solenoid BAT stud.
- Remove the battery positive and negative cable from the vehicle.
- Transfer the battery current sensor if replacing the battery positive and negative cable. Refer to Battery Current Sensor Replacement.


Installation Procedure
- Position the battery positive and negative cable to the vehicle.
- Install the battery positive cable to the starter solenoid BAT stud and install the starter solenoid BAT terminal nut (1).
- Lower the vehicle.
- Install the battery positive and negative cable bracket bolt (2) and tighten to 10 N·m (89 lb in).
- Install the battery negative cable ground and engine wiring harness ground bolt (1) at the back of the left side cylinder head.
- Install the battery positive cable to the junction block and install the battery positive cable junction block nut (1).
- Install the battery negative cable ground to the body ground stud and install the battery negative cable ground nut (1).
- Install the positive cable to the battery and install the positive cable nut (3).
- Install the negative cable to the battery. Refer to Battery Negative Cable Disconnection and Connection.
- Align and install the battery cover (1) until the battery cover retaining tabs (2) lock into place.
- Position the ECM bracket in place. Refer to Engine Control Module Replacement.
Note: Route the battery positive and negative cable the same way as originally installed.
Caution: Refer to Fastener Caution in the Preface section.

Tighten the nut to 15 N·m (11 lb ft).
Tighten the bolt to 25 N·m (18 lb ft).

Tighten the nut to 15 N·m (11 lb ft).

Tighten the nut to 10 N·m (89 lb in).
Tighten the nut to 5 N·m (45 lb in).

Battery Positive and Negative Cable Replacement LE5
Removal Procedure
Warning: Refer to Battery Disconnect Warning in the Preface section.
- Release the electronic control module (ECM) bracket from the battery cover and set it aside with the ECM still connected. Refer to Engine Control Module Replacement.
- Release the battery cover retaining tabs (2) and remove the battery cover (1).
- Loosen the positive cable nut (3) and remove the battery positive cable from the battery.
- Remove the battery negative cable ground nut (1) and remove the battery negative cable ground from the body ground stud.
- Remove the battery positive cable junction block nut (1) and remove the battery positive cable from the junction block.
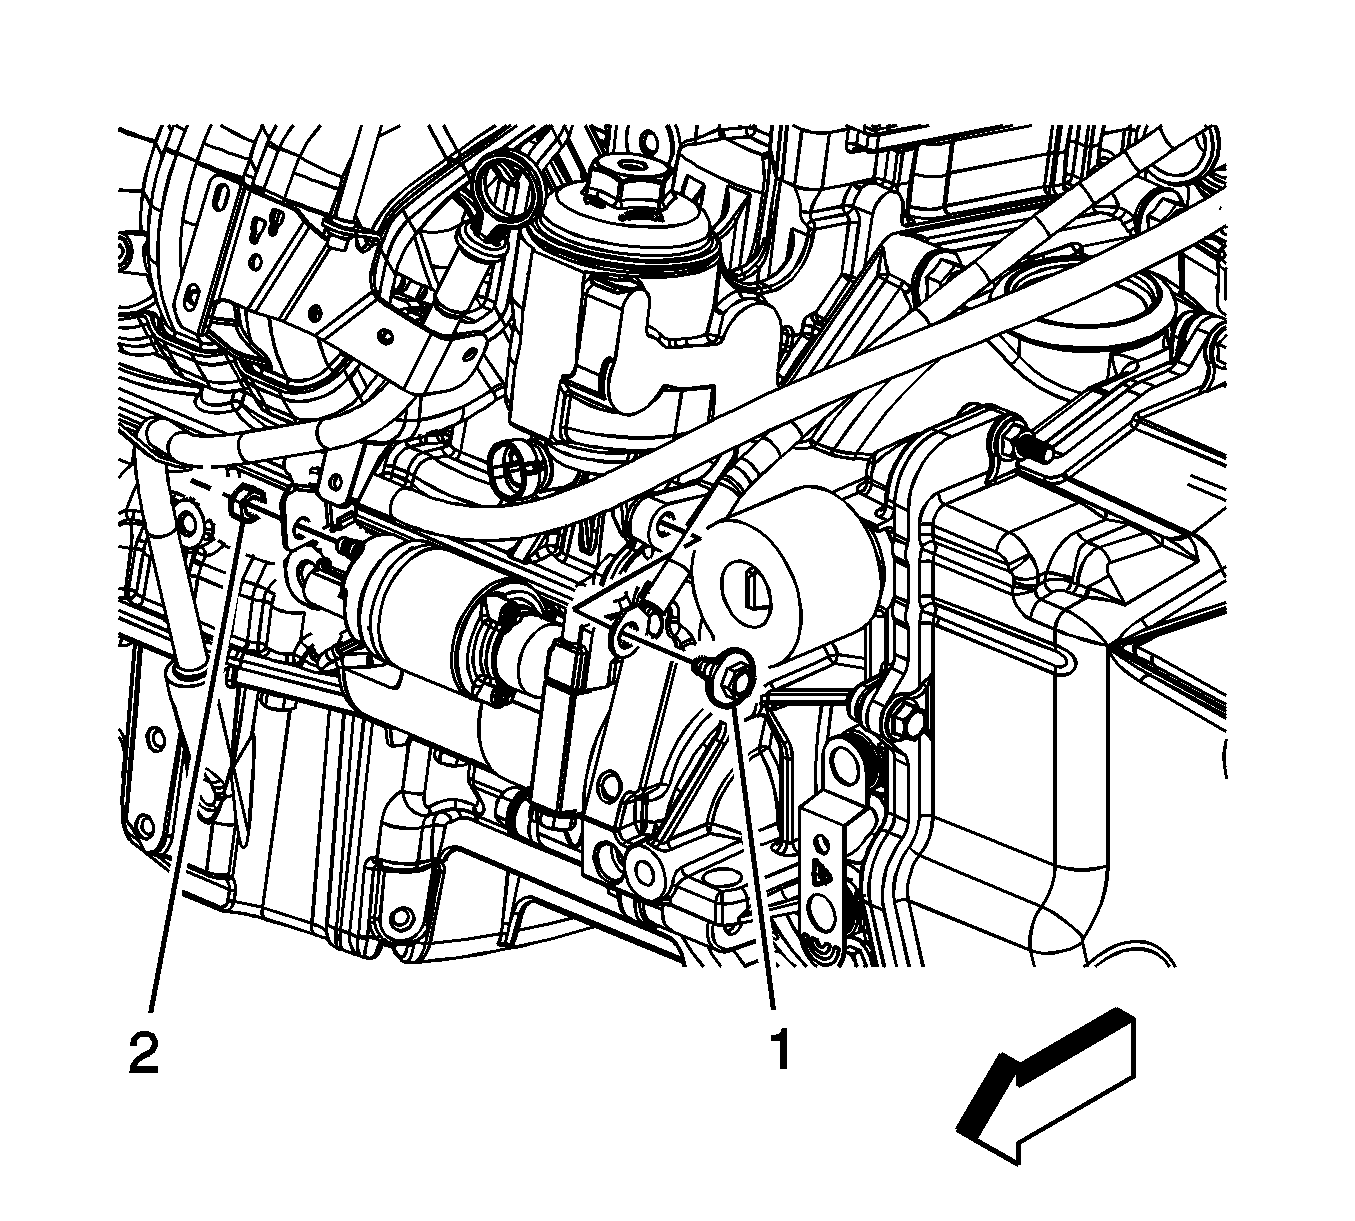
- Remove the engine wiring harness ground bolt (1) and the battery negative cable ground at the back of the left side of the engine.
- Raise and support the vehicle. Refer to Lifting and Jacking the Vehicle.
- Remove the starter solenoid BAT terminal nut (2) and remove the battery positive cable from the starter solenoid BAT stud.
- Remove the battery positive and negative cable from the vehicle.
- Transfer the battery current sensor if replacing the battery positive and negative cable. Refer to Battery Current Sensor Replacement.


Installation Procedure
- Position the battery positive and negative cable to the vehicle.
- Install the battery positive cable to the starter solenoid BAT stud and install the starter solenoid BAT terminal nut (2).
- Lower the vehicle.
- Install the battery negative cable ground and engine wiring harness ground bolt (1) at the back of the left side of the engine.
- Install the battery positive cable to the junction block and install the battery positive cable junction block nut (1).
- Install the battery negative cable ground to the body ground stud and install the battery negative cable ground nut (1).
- Install the positive cable to the battery and install the positive cable nut (3).
- Install the negative cable to the battery. Refer to Battery Negative Cable Disconnection and Connection.
- Align and install the battery cover (1) until the battery cover retaining tabs (2) lock into place.
- Position the ECM bracket in place. Refer to Engine Control Module Replacement.
Note: Route the battery positive and negative cable the same way as originally installed.
Caution: Refer to Fastener Caution in the Preface section.

Tighten the nut to 15 N·m (11 lb ft).
Tighten the bolt to 25 N·m (18 lb ft).

Tighten the nut to 15 N·m (11 lb ft).

Tighten the nut to 10 N·m (89 lb in).
Tighten the nut to 5 N·m (45 lb in).

