Headlamp Aiming Preparation
Aim the headlamps in order to obtain proper illumination
of the road. Test the headlamp aim under the following conditions:
| • | A new headlamp, halogen bulb assembly is installed. |
| • | Service or repairs to the front end area that may have disturbed
the headlamps or the headlamp mountings. |
Headlamp focus sets when the unit is made. No adjustment for focus is
necessary or possible.
Important: Some state and local laws specify requirements for headlamp aim. Follow
these laws.
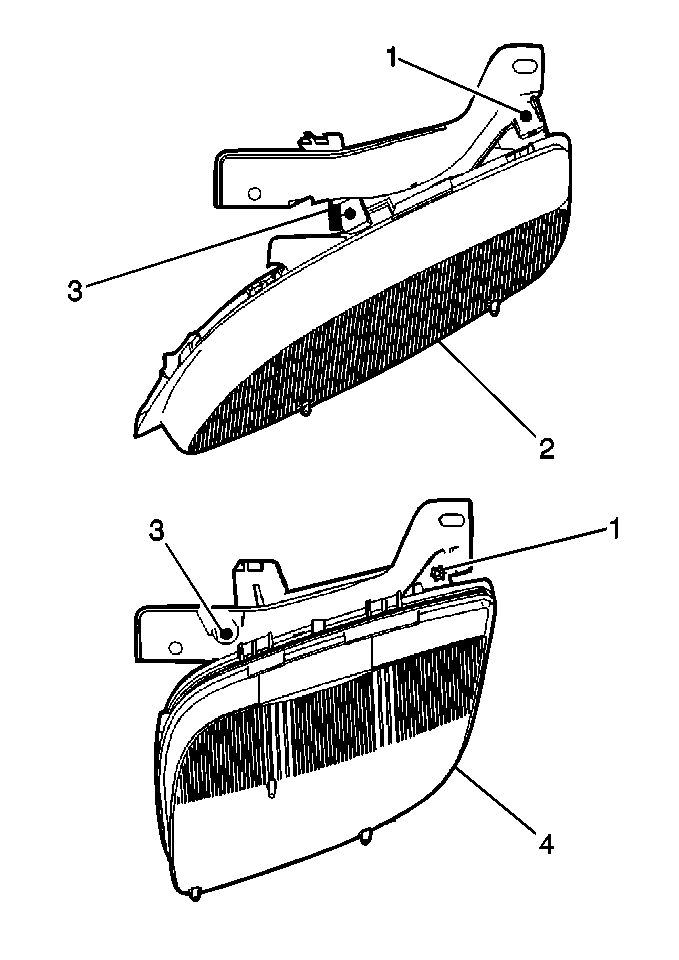
An adjusting screw on the other side of the headlamp assembly controls
the horizontal aim. An adjusting screw in the upper inboard area controls
the vertical aim. Adhere to the following instructions when aiming the
headlamps.
Aim Preparation
Perform the following actions in order to prepare the vehicle for aiming
the headlamps:
| • | Completely assemble all of the components on the vehicle. |
| • | Place the vehicle on a level pad or surface. |
| • | Stop all of the unnecessary operations or work on the vehicle
that affects the vehicle trim. |
| • | Stabilize the suspension. |
| • | Verify that the fuel level is full. |
| • | Rock the vehicle sideways. |
| • | Verify that the tires are inflated to the proper pressure. |
| • | The driver or the equivalent weight (165 lbs) must be in
the vehicle. |
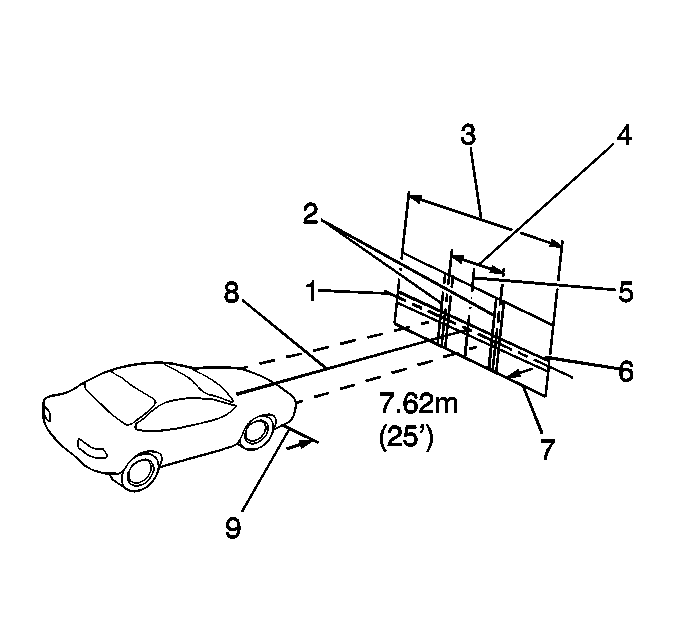
Headlamp Aiming Visual
Location
| • | Darken an area large enough to allow for the vehicle and an additional
7.62 m (25 ft) measured from the face of the headlamps to the
front of the screen. |
| • | Verify that the following items are level: |
| - | The bottom of the screen |
| - | The floor that the vehicle rests on |
| - | Compensate for an unlevel floor. |
Aiming Screen

- Use an aiming screen that
meets the following specifications:
| • | A height of 1.52 m (5 ft) |
| • | A width of 3.66 m (12 ft) (3) |
| • | Shaded from ambient light |
| • | Properly adjusted to the floor that the vehicle rests on. |
| • | Moveable in order to allow parallel alignment with the rear axle
of the vehicle. |
| • | Positioned in order to allow a horizontal line to pass an equal
distance midway between the two headlamps. |
- Ensure that the screen is equipped with the following items:
| • | A vertical centerline (5) |
| • | Two laterally adjustable vertical pieces of tape (2) |
| • | One vertically adjustable horizontal piece of tape (6) |
- If a standard commercial aiming screen is unavailable, use a wall
that meets the following specifications:
| • | A clear uninterrupted area at least 1.83 m (6 ft)
high by 3.66 m (12 ft) wide |
| • | A surface finished with a washable, no-gloss white paint |
- After setting up and locating the aiming screen, paint or tape
a reference line on the floor.
The reference line should be 7.62 m (25 ft) from the screen.
- Park the vehicle with the front of the headlamps directly over
the reference line.
Visual Procedure
- Prepare the vehicle. Refer to
Headlamp Aiming
.
- Park the vehicle according to the following specifications:
| • | With the headlamps directly over the reference line |
- Verify that all components are in place if other service has been
performed on the vehicle.
- Perform the following steps in order to line up the center line
of the vehicle with the center line of the aiming screen:
| 4.1. | Use tape in order to mark the vertical center of the vehicle and
the front windows. |
| 4.2. | Use the tape lines as sights in order to line up the centerline
of the vehicle and the screen. |

- Adjust the vertical tapes
on the screen in order to match the vertical centerline of each lamp.
Measure the distance from the centerline of the vehicle to the centerline
of the low beam lamp.
- Adjust the horizontal tapes on the screen in order to match the
horizontal centerline (3) of the low beam headlamp.
Measure the height from the floor to the center of a low beam.
- Turn ON the low beam lamps.

- Adjust the headlamps according
to the following conditions:
| • | The left edge of the high intensity zone on the screen for the
low beams is on the vertical line (3) for each side. |
| • | The top edge of the high intensity zone on the screen for the
low beams is on the horizontal line (1) for each side. |
Headlamp Aiming Mechanical
Tools Required
J 25300-D Headlamp Aimer
- Prepare the vehicle. Refer to
Headlamp Aiming
.

Important: Use the universal aimer on a known level floor or calibrate the universal
aimer for floor slope.
- Select and assemble the universal adapter (5) that fits the aiming
pad (2) pattern on the lens of the headlamp (1).

- Move the adjustment rods (2)
to the number that agrees with the number located on the headlamp lens.
- Attach the adapters.
Ensure that the correct adapter is used with the correct side aimer.
- Place the aimers with the adapters on to their respective sides.
- Ensure that all of the adjustment rods (2) contact the
aiming pads.
Add or remove an extension stud as necessary.
- Follow the instructions included in the J 25300-D
in order to aim the headlamps.


