Caution: Failure to adhere to the following precautions before tire balancing
can result in personal injury or damage to components:
• Clean away any dirt or deposits from the inside of the wheels. • Remove any stones from the tread. • Wear eye protection. • Use coated weights on aluminum wheels.
Tire and Wheel Balancer Calibration

Tire and wheel balancers can drift out of calibration, or can become inaccurate as a result of abuse. There will likely not be any visual evidence that a calibration problem exists. If the balancing equipment indicates that an assembly is balanced, however the balancer calibration is not within specifications, the assembly may actually be imbalanced.
Tire and wheel balancer calibration should be checked every two weeks, and/or whenever the balance readings are questionable.
Balancer Calibration Check
- Spin the balancer without a wheel or any of the adapters on the shaft.
- Inspect the balancer readings.
- Using the same balancer, balance a tire and wheel assembly that is within radial and lateral tolerances to zero.
- Add a 3 ounce test weight to the wheel at any location.
- Spin the tire and wheel assembly again, noting the readings.
- With the assembly imbalanced to 3 ounces, cycle the balancer 5 times.
- Inspect the balancer readings:
- Index the tire and wheel assembly at four separate locations on the balancer shaft, 90 degrees apart and cycle the balancer with the assembly at each location.
- Inspect the balancer readings:
- If the balancer fails any of these steps, the balancer should be checked by the manufacturer for defects.
Specification
zero within ¼ oz
| • | In the static and dynamic modes, the balancer should call for 3 ounces of weight, 180 degrees opposite the test weight. |
| • | In the dynamic mode, the weight should be called for on the flange of the wheel opposite the test weight. |
Specification
Maximum variation: ¼ oz
Specification
Maximum variation: ¼ oz
Tire and Wheel Assembly Balancing Guidelines
Important: Tire and wheel assemblies which exhibit excessive runout can produce vibrations even if the assemblies are balanced.
Therefore, it is strongly recommended that the tire and wheel assembly runout be measured and if the runout measurements ARE NOT within specifications, that the runout be corrected before the assemblies are balanced.If the runout of the tire and wheel assemblies has not yet been measured, refer to Tire and Wheel Vibration before proceeding.
There are two types of tire and wheel balance:
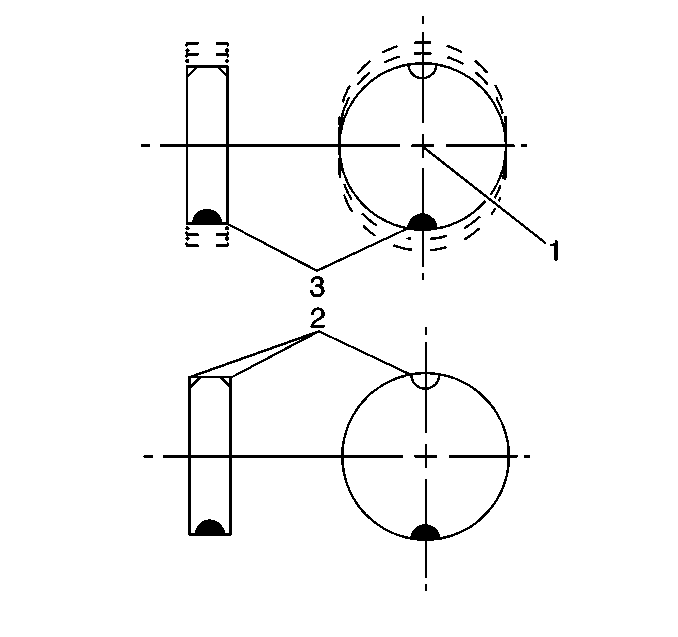
Static Balance

Static balance is the equal distribution of weight around the wheel. The wheel balance weights (2) are positioned on the wheel in order to offset the effects of the heavy spot (3). Wheels that are statically unbalanced produce a bouncing action called tramp.
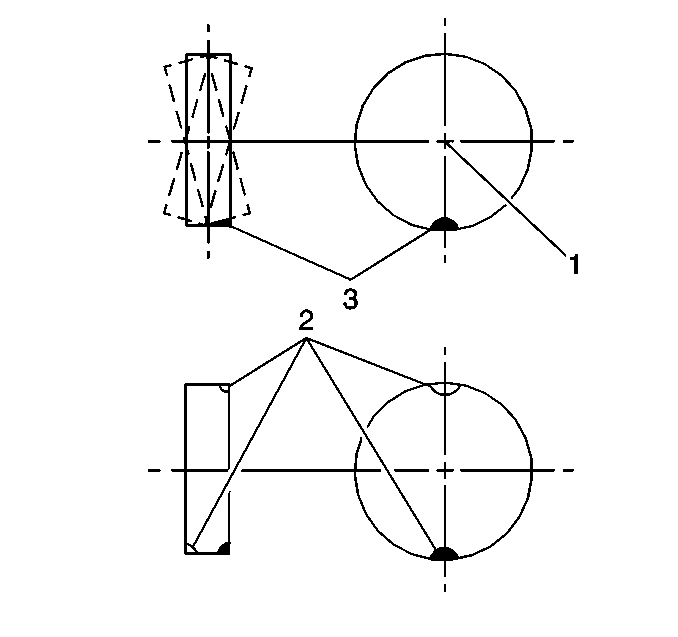
Dynamic Balance

Dynamic balance is the equal distribution of weight on each side of the spindle centerline (1). The wheel balance weights (2) are positioned on the wheel in order to offset the effects of the heavy spot (3). When the tire spins, the equal distribution of weight eliminates the tendency for the wheel to move from side to side. Wheels that are dynamically unbalanced may cause shimmy.
Most off-vehicle balancers are capable of checking both types of balance simultaneously.
As a general rule, most vehicles are more sensitive to static imbalance than to dynamic imbalance, however, vehicles equipped with low profile, wide tread path, high performance tires and wheels are susceptible to small amounts of dynamic imbalance. As little as ½ to ¾ of an ounce imbalance is capable of inducing a vibration in some vehicle models.
Balancing Procedure
- Raise and suitably support the vehicle. Refer to Lifting and Jacking the Vehicle in General Information.
- Mark the location of the wheels to the wheel studs and mark the specific vehicle position on each tire and wheel (LF, LR, RF, RR).
- Remove the tire and wheel assemblies one at a time and mount on a spin-type wheel balancer. Refer to Tire and Wheel Removal and Installation in Tires and Wheels.
- Carefully follow the wheel balancer manufacturer's instructions for proper mounting techniques to be used on different types of wheels.
- Be sure to use the correct type of coated wheel balance weights on aluminum wheels. Refer to Wheel Weight Usage .
- Balance all four tire and wheel assemblies as close to zero as possible.
- Using the matchmarks made prior to removal, install the tire and wheel assemblies to the vehicle. Refer to Tire and Wheel Removal and Installation in Tires and Wheels.
- Lower the vehicle.
- Road test the vehicle to verify that the vibration has been eliminated. Refer to Road Test .
- If the vibration is still present, or if the vibration is reduced but still unacceptable, inspect for the presence of radial or lateral force variation. Refer to Tire and Wheel Vibration .
Regard aftermarket wheels, especially those incorporating universal lug patterns, as potential sources of runout and mounting problems.
