Tools Required
J 43442 Flywheel Holder
Removal Procedure
- Disconnect the negative battery cable. Refer to Battery Negative Cable Disconnection and Connection in Engine Electrical.
- Remove the air cleaner intake duct. Refer to Air Cleaner Inlet Duct Replacement in Engine Controls - 3.5L.
- Disconnect the electrical wiring harness connectors from the transaxle and the PNP switch.
- Remove the automatic transaxle range selector cable from the PNP switch and the automatic transaxle range selector cable bracket. Refer to Range Selector Lever Cable Replacement .
- Remove the ground wire nuts and the ground wires from the studs.
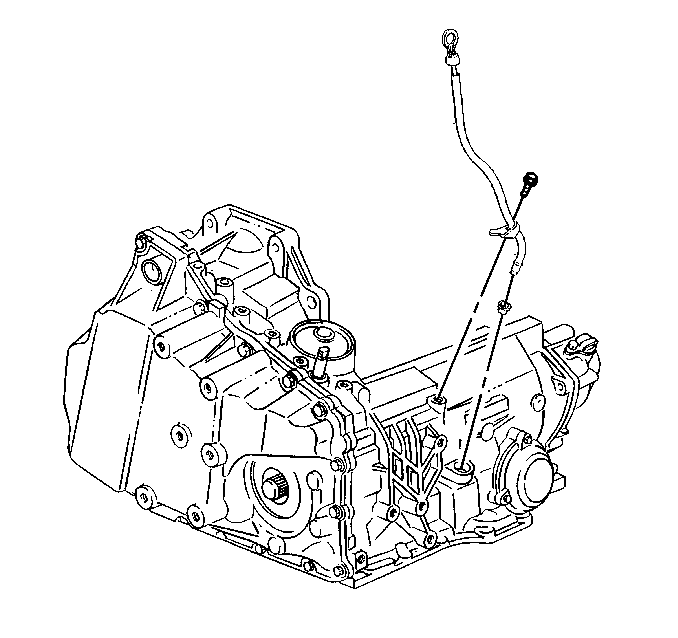
- Remove the upper transaxle bolts (1,3,4,5).
- Remove the engine mount strut bracket from the upper radiator support. Refer to Engine Mount Strut Bracket Replacement in Engine Mechanical - 3.5L.
- Install the engine support fixture. Refer to Engine Support Fixture in Engine Mechanical - 3.5L.
- Raise and support the vehicle. Refer to Lifting and Jacking the Vehicle in General Information.
- Drain the transaxle fluid.
- Remove the frame from the vehicle. Refer to Frame Replacement in Frame and Underbody.
- Position a transmission jack under the transaxle and secure the transmission jack to the transaxle.
- Remove the transaxle fluid filler tube bolt.
- Remove the transaxle fluid filler tube.
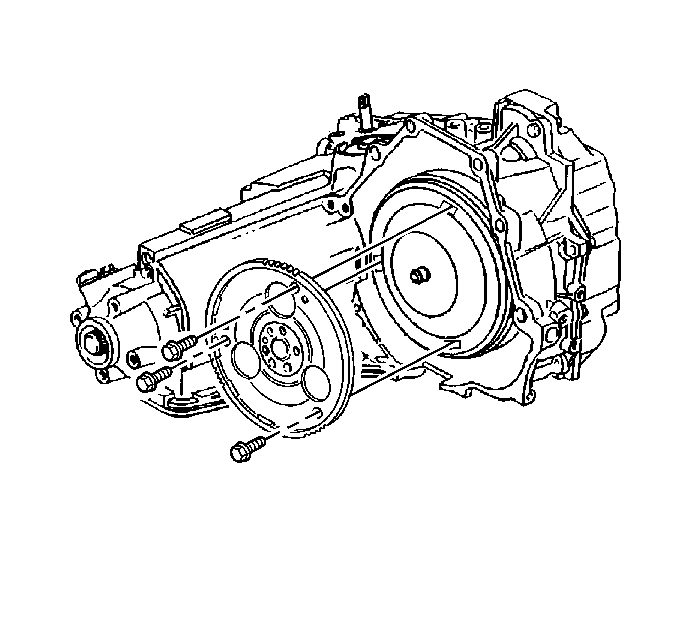
- Remove the torque converter cover bolts.
- Remove the torque converter cover.
- Remove the starter motor. Refer to Starter Motor Replacement in Engine Electrical.
- Use the J 43442 in order to gain access to the torque converter bolts and prevent the flywheel from turning.
- Remove the torque converter bolts.
- Remove the transaxle oil cooler pipes from the transaxle. Refer to Transmission Fluid Cooler Hose/Pipe Replacement .
- Remove the wheel drive shafts from the transaxle. Refer to Wheel Drive Shaft Replacement in Wheel Drive Shafts.
- Secure the wheel drive shafts to the steering knuckle and the struts.
- Disconnect the vehicle speed sensor electrical connector.
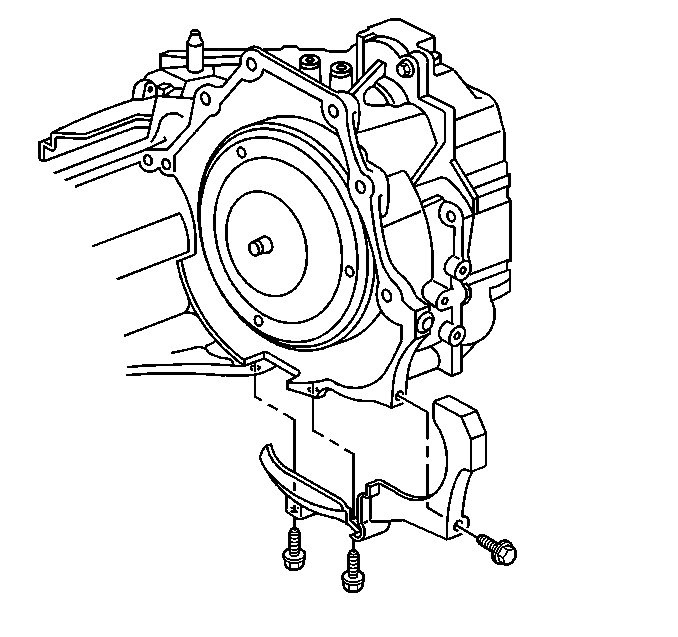
- Remove the transaxle brace. Refer to Transmission Brace Replacement .
- Remove the lower transaxle bolt (6) and the stud (0).
- Using the transmission jack lower and remove the transaxle from the vehicle.
- Remove the PNP switch. Refer to Transmission Mount Replacement .
- Remove the transaxle mount. Refer to Transmission Mount Replacement .
- If the transaxle is being disassembled and inspected. Refer to Transmission Overhaul in Automatic Transaxle 4T65-E Unit Repair.
- Flush the transmission cooler and lines. Refer to Transmission Fluid Cooler Flushing and Flow Test .

Important: The transaxle/engine bolts must be returned to their original position. The bolt installed in position number (5) is two millimeters shorter then the other transaxle/engine bolts and requires the use of thread sealant. The bolt installed in position number (3) has a special pilot point.
Important: Ensure the transmission jack is properly secured to the transaxle.

Installation Procedure
- Install the transaxle mount. Refer to Transmission Mount Replacement .
- Install the PNP switch. Refer to Transmission Mount Replacement .
- Install the transaxle to the transmission jack
- Use the transmission jack to raise and install the transaxle to the engine.
- Install the lower transaxle bolt (6) and the stud (0).
- Install the transaxle brace. Refer to Transmission Brace Replacement .
- Connect the vehicle speed sensor electrical connector.
- Remove the wheel drive shafts from the steering knuckle and the struts.
- Install the wheel drive shafts to the transaxle. Refer to Wheel Drive Shaft Replacement in Wheel Drive Shafts.
- Install the transaxle oil cooler pipes to the transaxle. Refer to Transmission Fluid Cooler Hose/Pipe Replacement .
- Install the J 43442 to the flywheel to gain access to install the torque converter bolts and prevent the flywheel from turning.
- Install the torque converter bolts.
- Install the starter motor. Refer to Starter Motor Replacement in Engine Electrical.
- Install the torque converter cover.
- Install the torque converter cover bolts.
- Install the transaxle fluid filler tube.
- Install the transaxle fluid filler tube bolt.
- Remove the transmission jack from the transaxle.
- Install the frame to the vehicle. Refer to Frame Replacement in Frame and Underbody.
- Lower the vehicle.
- Install the upper transaxle bolts (1,3,4,5).
- Install the ground wires and the nuts to the studs.
- Install the automatic transaxle range selector cable to the PNP switch and the automatic transaxle range selector cable bracket. Refer to Range Selector Lever Cable Replacement .
- Remove the engine support fixture.
- Connect the electrical wiring harness connectors to the transaxle and the PNP switch.
- Install the engine mount strut bracket to the upper radiator support. Refer to Engine Mount Strut Bracket Replacement in Engine Mechanical - 3.5L.
- Install the air cleaner intake duct. Refer to Air Cleaner Inlet Duct Replacement in Engine Controls - 3.5L.
- Connect the negative battery cable. Refer to Battery Negative Cable Disconnection and Connection in Engine Electrical.
- Adjust the fluid level.
- Inspect for fluid leaks.
- Measure the wheel alignment. Refer to Wheel Alignment Measurement in Wheel Alignment.
- Reset the TAP values. Refer to Adapt Function .
Important: Ensure the transaxle is secured properly to the transmission jack.
Notice: Refer to Fastener Notice in the Preface section.
Important: The transaxle/engine bolts must be returned to their original position. The bolt installed in position number 5 is two millimeters shorter then the other transaxle/engine bolts and requires the use of thread sealant. The bolt installed in position number (3) has a special pilot point.
Tighten
Tighten the bolt and the stud to 75 N·m (55 lb ft).
Tighten
Tighten the bolts to 63 N·m (46 lb ft).
Tighten
Tighten the bolts to 10 N·m (89 lb in).
Tighten
Tighten the bolt to 13 N·m (115 lb in).
Important: The transaxle/engine bolts must be returned to their original position. The bolt installed in position number (5) is two millimeters shorter then the other transaxle/engine bolts and requires the use of thread sealant. The bolt installed in position number (3) has a special pilot point.
Tighten
Tighten the upper transaxle bolts (1,3,4) to 75 N·m (55 lb ft).
Tighten
Tighten the upper transaxle bolt (5) to 50 N·m (36 lb ft).
Tighten
Tighten the nuts to 25 N·m (18 lb ft).
Notice: Do not overfill the transmission. Overfilling will result in foaming, loss of fluid, and possible damage to the transmission.
Important: It is recommended that transmission adaptive pressure (TAP) information be reset.
Resetting the TAP values using a scan tool will erase all learned values in all cells. As a result, The ECM, PCM or TCM will need to relearn TAP values. Transmission performance may be affected as new TAP values are learned.