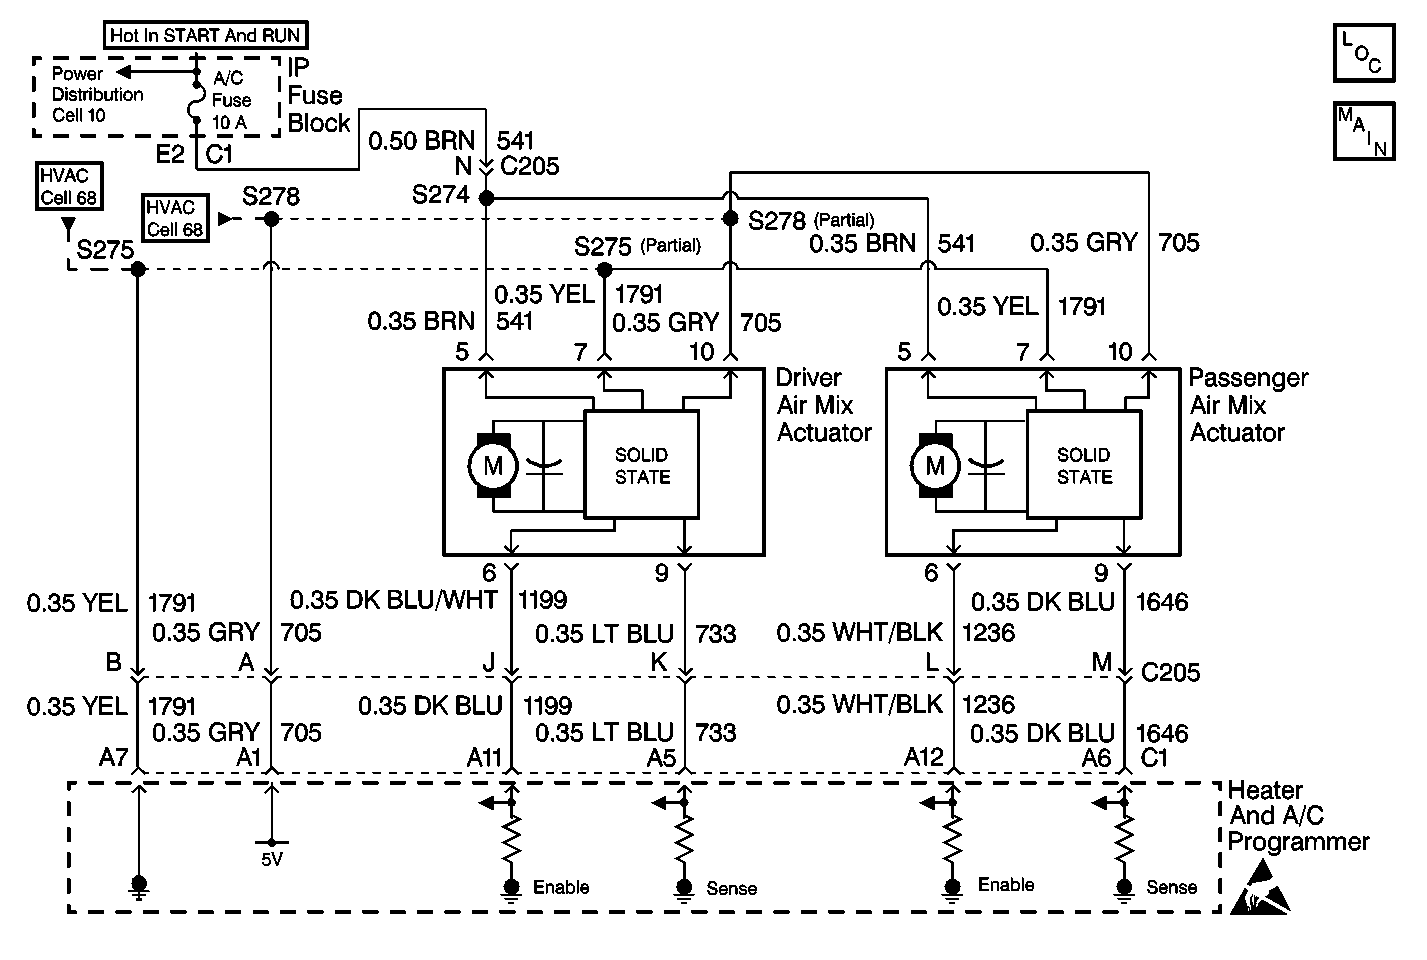
Circuit Description
The left temp door motor is an electronic actuator stepper motor with a feedback potentiometer. The heater and A/C programmer determines the position of the door motor based on the voltage from the potentiometer. When the air flow is cool (heater core bypass), the voltage is high. When the air flow is warm (through the heater core), the voltage is low. The heater and A/C programmer controls the left temp door motor position to maintain the air temperature selected by the driver.
| • | 0 volts moves toward full hot. |
| • | 2.5 volts stops the motor. |
| • | 5 volts moves toward full cold. |
The HCM determines the current position by monitoring the voltage on the feedback circuit 733 (LT BLU). A feedback potentiometer supplies a regulated 5 volt signal by the HCM on circuit 705 (GRY), and a ground from the HCM circuit 1791 (YEL). The pot is gear driven inside the actuator. The feedback voltage is a function of the motor position with a high voltage of 4-5 volts indicating full cold door position. A low voltage of less then 1 volt indicates the full hot position. Operation of the air mix door actuator can be evaluated through Scan Tool data.
Conditions for Setting the DTC
| • | Ignition is ON. |
| • | The heater and A/C programmer detects the signal circuit is less than 0.25 V (13 counts) or greater than 4.08 V (208 counts). |
Action Taken When the DTC Sets
| • | A default value of 2.50 V (128 counts) will be used for the sensor data by the heater and A/C programmer. |
| • | This default value results in only two positions of the actuator full hot and full cold being used by the system. |
Conditions for Clearing the DTC
| • | Using a Scan Tool . |
| • | A history DTC will clear after 50 fault free ignition cycles. |
| • | The DTC will become history if the heater and A/C programmer no longer detects a failure. |
Diagnostic Aids
| • | A disconnected or broken door may also set this DTC by allowing the actuator to travel to its internal stops (over travel condition). |
| • | Refer to Intermittents and Poor Connections Diagnosis in Wiring Systems. |
Test Description
The numbers below refer to the step numbers on the diagnostic table.
-
Perform the HVAC Diagnostic Symptom Check before continuing with the diagnosis of this DTC.
-
This step checks the working specs of the Left Temp Dr with the scan tool.
-
Checks the ground circuit of the driver air mix actuator motor for an open or a short.
-
Checks and repairs the harness connections of the heater and A/C programmer.
Step | Action | Value(s) | Yes | No |
|---|---|---|---|---|
Was the HVAC diagnostic system check performed? | -- | Go to Step 2 | Go to Diagnostic System Check | |
Does the scan tool indicate that the Left Temp Door actual parameter is within the specified range? | 0.25 to4.08 V (13 to 208 counts) | Go to Diagnostic Aids | Go to Step 3 | |
3 |
Does the scan tool indicate that the Left Temp Door Actual parameter changes when the Left Temp Door Position is commanded from Hot to Cold? | -- | Go to Step 12 | Go to Step 4 |
4 |
Does the scan tool indicate that the Left Temp Door Actual parameter is greater than the specified value? | 4.08 V | Go to Step 5 | Go to Step 9 |
5 |
Does the scan tool indicate that the Left Temp Door Actual parameter is less than the specified value? | 0.25 V | Go to Step 6 | Go to Step 10 |
6 |
Does the scan tool indicate that the Left Temp Door Actual parameter is greater than the specified value? | 4.08 V | Go to Step 8 | Go to Step 7 |
7 | Test the 5 volt reference circuit of the left temp door position sensor for a short to ground. Refer to Testing for Continuity and Wiring Repairs in Wiring Systems. Did you find and correct the condition? | -- | Go to Step 17 | Go to Step 14 |
8 | Test the 5 volt reference circuit of the left temp door position sensor for a short to voltage, a high resistance or an open. Refer to Testing for Continuity and Wiring Repairs in Wiring Systems. Did you find and correct the condition? | -- | Go to Step 17 | Go to Step 13 |
9 | Test the signal circuit of the left temp door position sensor for a short to ground. Refer to Testing for Continuity and Wiring Repairs in Wiring Systems. Did you find and correct the condition? | -- | Go to Step 17 | Go to Step 14 |
10 | Test the signal circuit of the left temp door position sensor for a short to voltage, a high resistance or an open. Refer to Testing for Continuity and Wiring Repairs in Wiring Systems. Did you find and correct the condition? | -- | Go to Step 17 | Go to Step 11 |
Test the motor ground circuit of the driver air mix actuator for a high resistance or an open. Refer to Testing for Continuity and Wiring Repairs in Wiring Systems. Did you find and correct the condition? | -- | Go to Step 17 | Go to Step 14 | |
12 | Inspect the air mix door for a condition allowing excessive travel of the actuator. Did you find and correct the condition? | -- | Go to Step 17 | Go to Step 13 |
13 | Inspect for poor connections at the harness connector of the driver air mix actuator. Refer to Intermittents and Poor Connections Diagnosis and Connector Repairs in Wiring Systems. Did you find and correct the condition? | -- | Go to Step 17 | Go to Step 15 |
Inspect for poor connections at the hartness connector of the heater and A/C programmer. Refer to Intermittents and Poor Connections Diagnosis and Connector Repairs in Wiring Systems. Did you find and correct the condition? | -- | Go to Step 17 | Go to Step 16 | |
15 | Replace the driver air mix actuator. Refer to Air Mix Actuator Replacement - Driver . Did you complete the replacement? | -- | Go to Step 17 | -- |
16 | Replace the heater and A/C programmer. Refer to Programmer Replacement . Did you complete the replacement? | -- | Go to Step 17 | -- |
17 |
Does the DTC reset? | -- | Go to Step 2 | System OK |
