Sunroof Exterior Trim Cover Replacement Front
Special Tools
J 25070
Heat Gun
Removal Procedure
- Open the front sunroof window approximately 350 mm (14 in) in order to access the front trim panel.
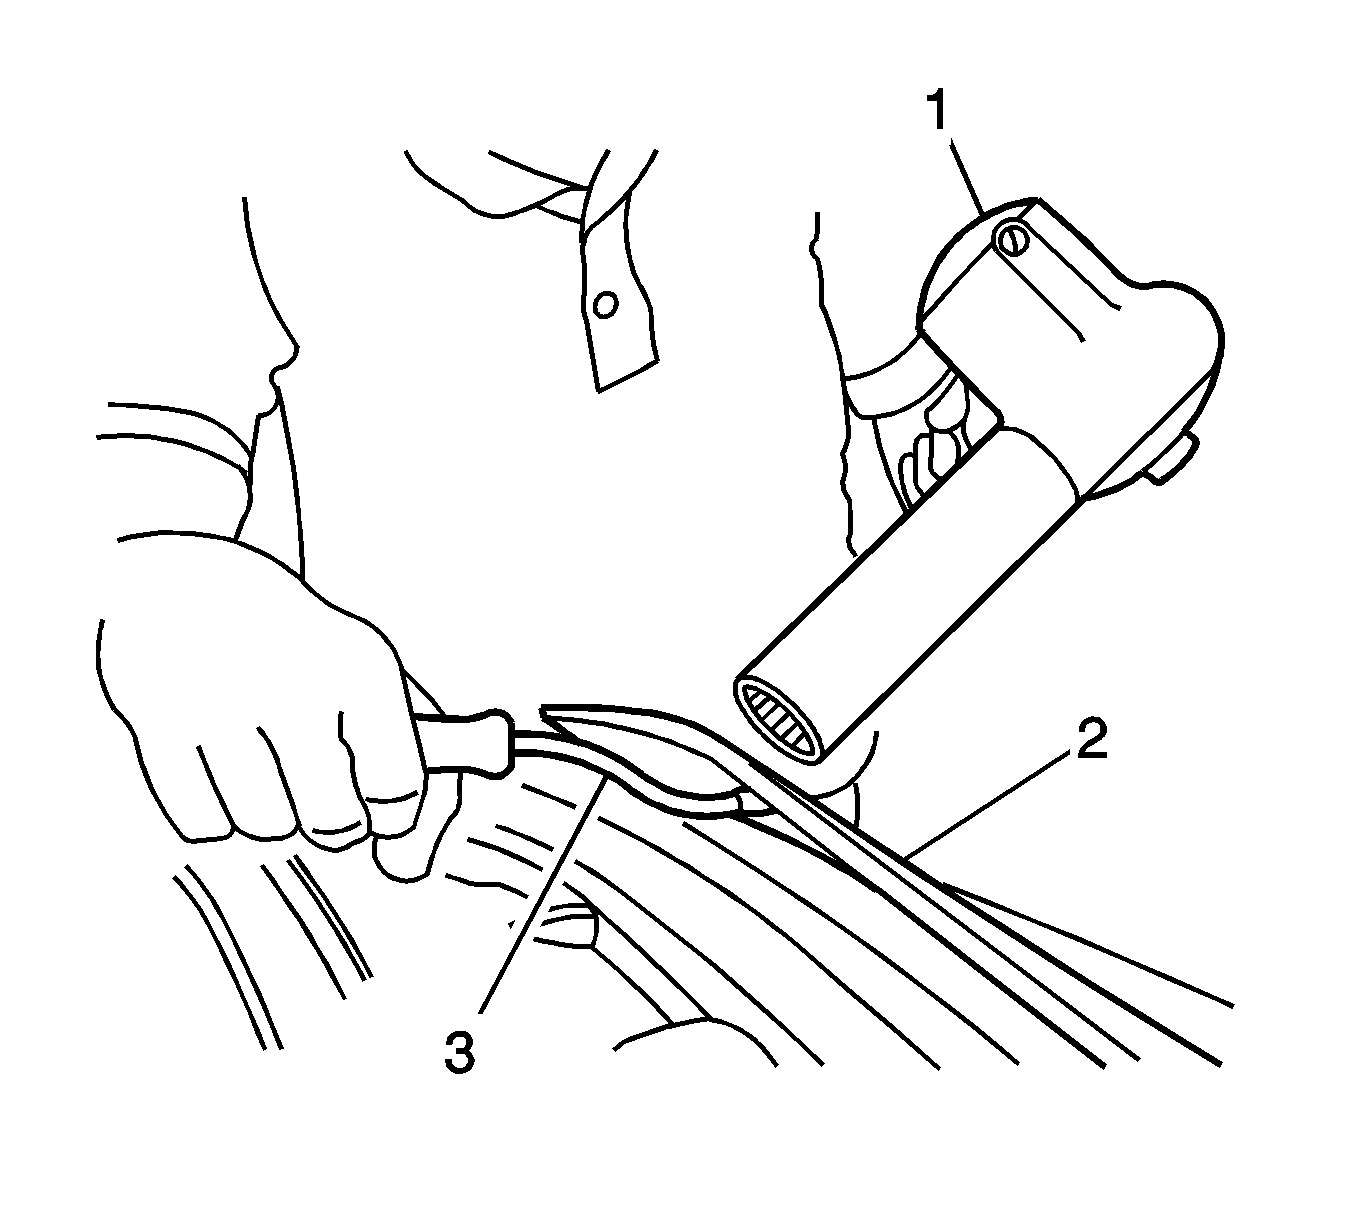
- Use
J 25070
(1) to heat the front trim cover (2) in order to release the double-sided
foam tape.
- Use a suitable tool (3) to pry upward to release front trim cover from the sunroof frame.
Installation Procedure
- Use 3M® General Purpose Adhesive Cleaner P/N 08984 or equivalent to remove all traces of the adhesive foam tape (1) from the sunroof frame.
- Use 3M® Automotive Adhesion Promoter Wipes P/N 06396 or equivalent to thoroughly wipe down the sunroof frame where you will apply the trim cover.
Important: The ambient temperature of the building should be above 16°C (60°F) to ensure correct adhesion of the front trim cover.
- Using
J 25070
warm the sunroof frame to 21°C (70°F).
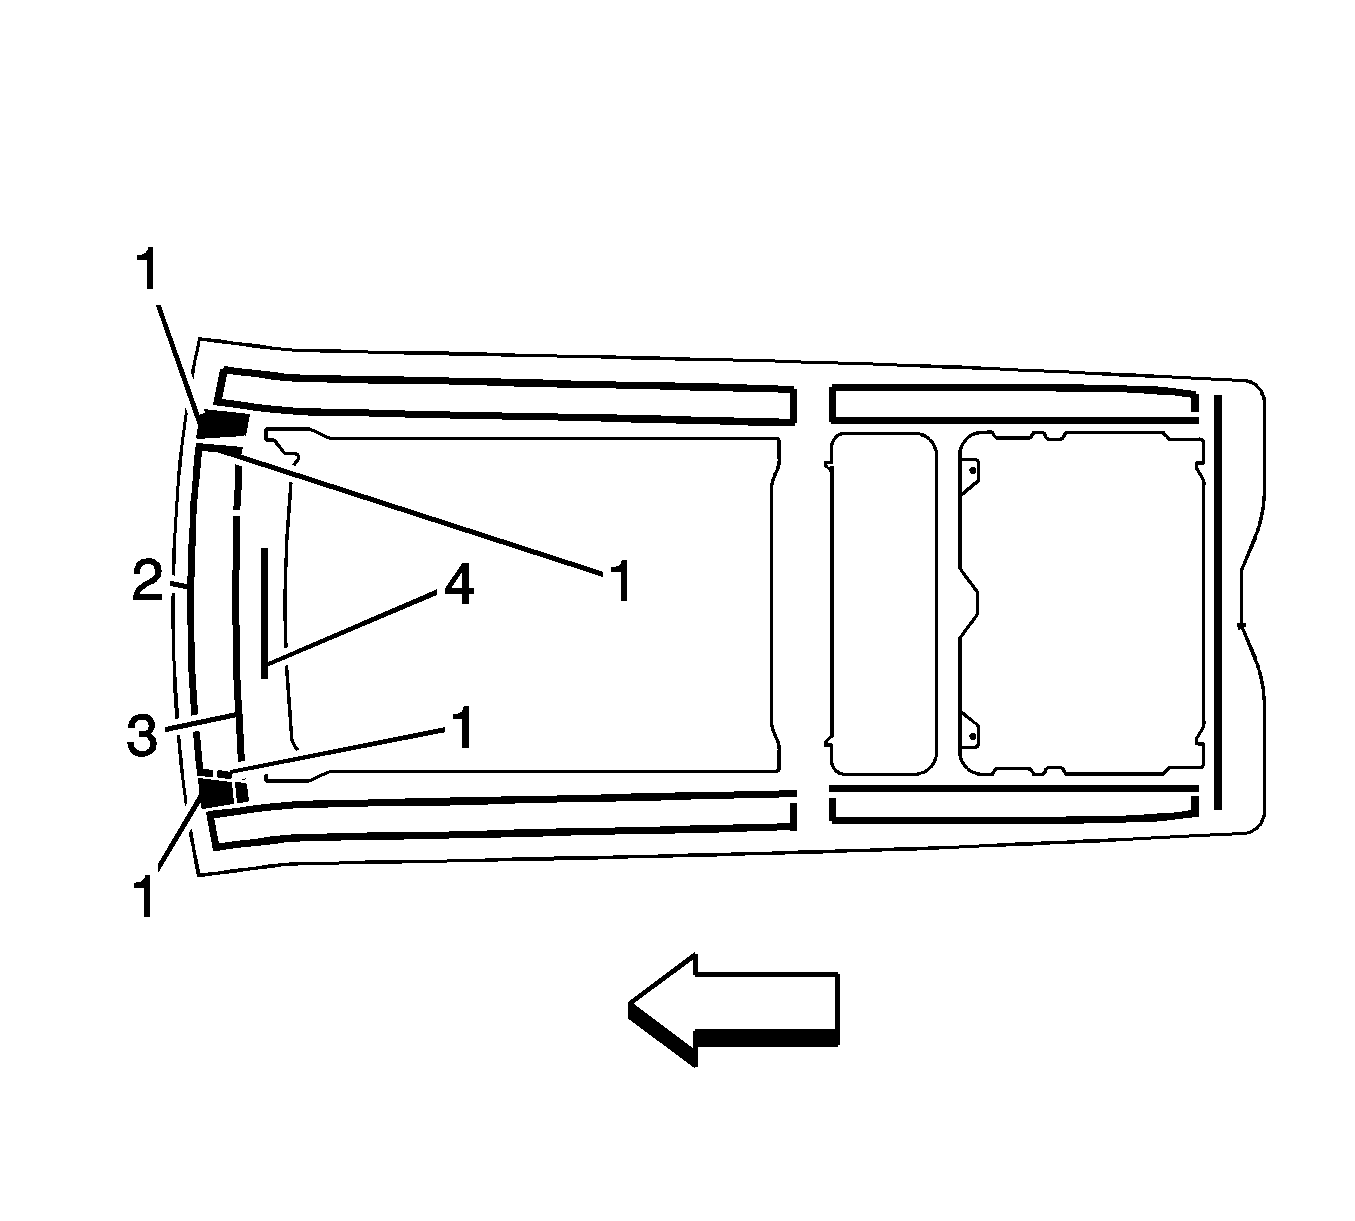
Important: Pull the backing from the trim cover tape just prior to installation. Do NOT touch the adhesive with your hands or allow the tape to come into contact with dirt or foreign matter. Do NOT let the tape come into contact
with the front trim cover before you align the trim cover.
- Install the front side trim cover to the left or right sides of the sunroof frame do the following:
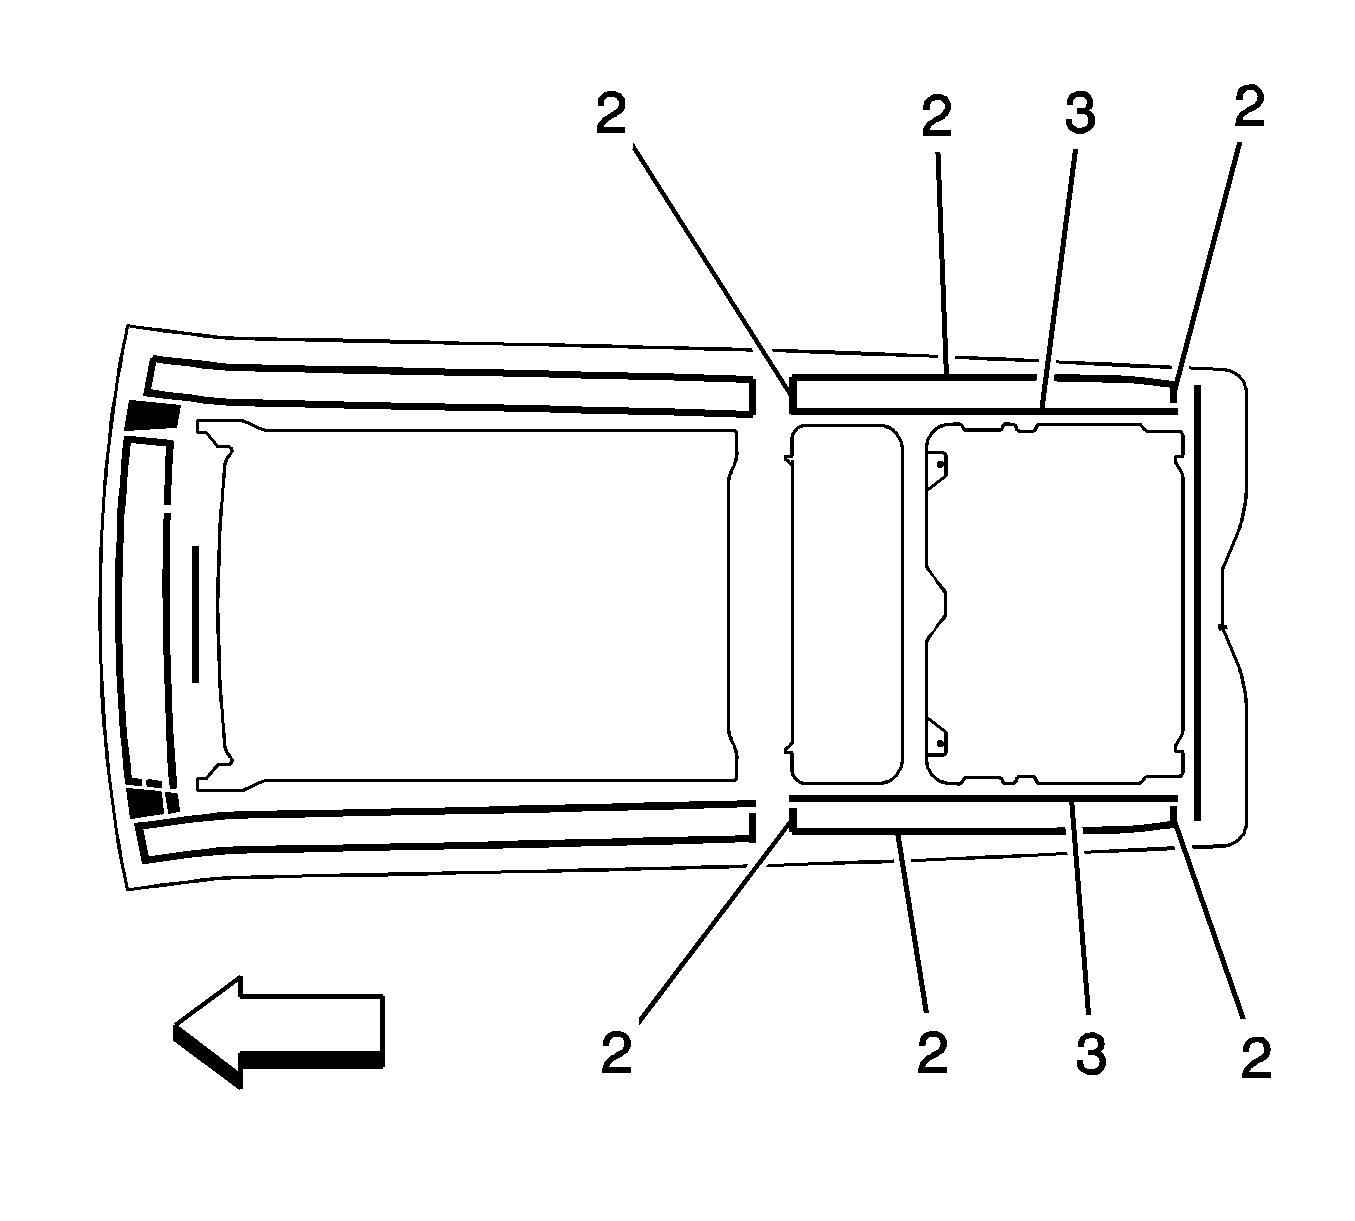
| 4.1. | Use 3M® P/N 051131-06383 adhesive foam tape or equivalent, apply a signal layer of tape to the frame front edge (1). |
| 4.2. | Use 3M® P/N 051131-06382 adhesive foam tape or equivalent, apply a signal layer of tape to the frame front edge (2,3). |
| 4.3. | Use 3M® P/N 051131-06382 adhesive foam tape or equivalent, apply a signal layer of tape to the front edge of the frame (2,3). |
Apply a double layer to number (3).
| 4.4. | Use moderate hand pressure to ensure proper adhesion of the double-sided foam tape. |
| 4.5. | Remove the backing from the adhesive foam tape. |
| 4.6. | Carefully align the cover tabs to the frame. |
| 4.7. | Lower the front trim covers to the sunroof frame. |
| 4.8. | Use moderate hand pressure to ensure proper adhesion of the rear side trim cover to sunroof frame |
- Close the front sunroof window.
Sunroof Exterior Trim Cover Replacement Front Sides
Special Tools
J 25070
Heat Gun
Removal Procedure
- Remove the front sunroof window in order to access the front side trim cover. Refer to
Sunroof Window Replacement.
- Remove the exterior front trim cover. Refer to
Sunroof Exterior Trim Cover Replacement.
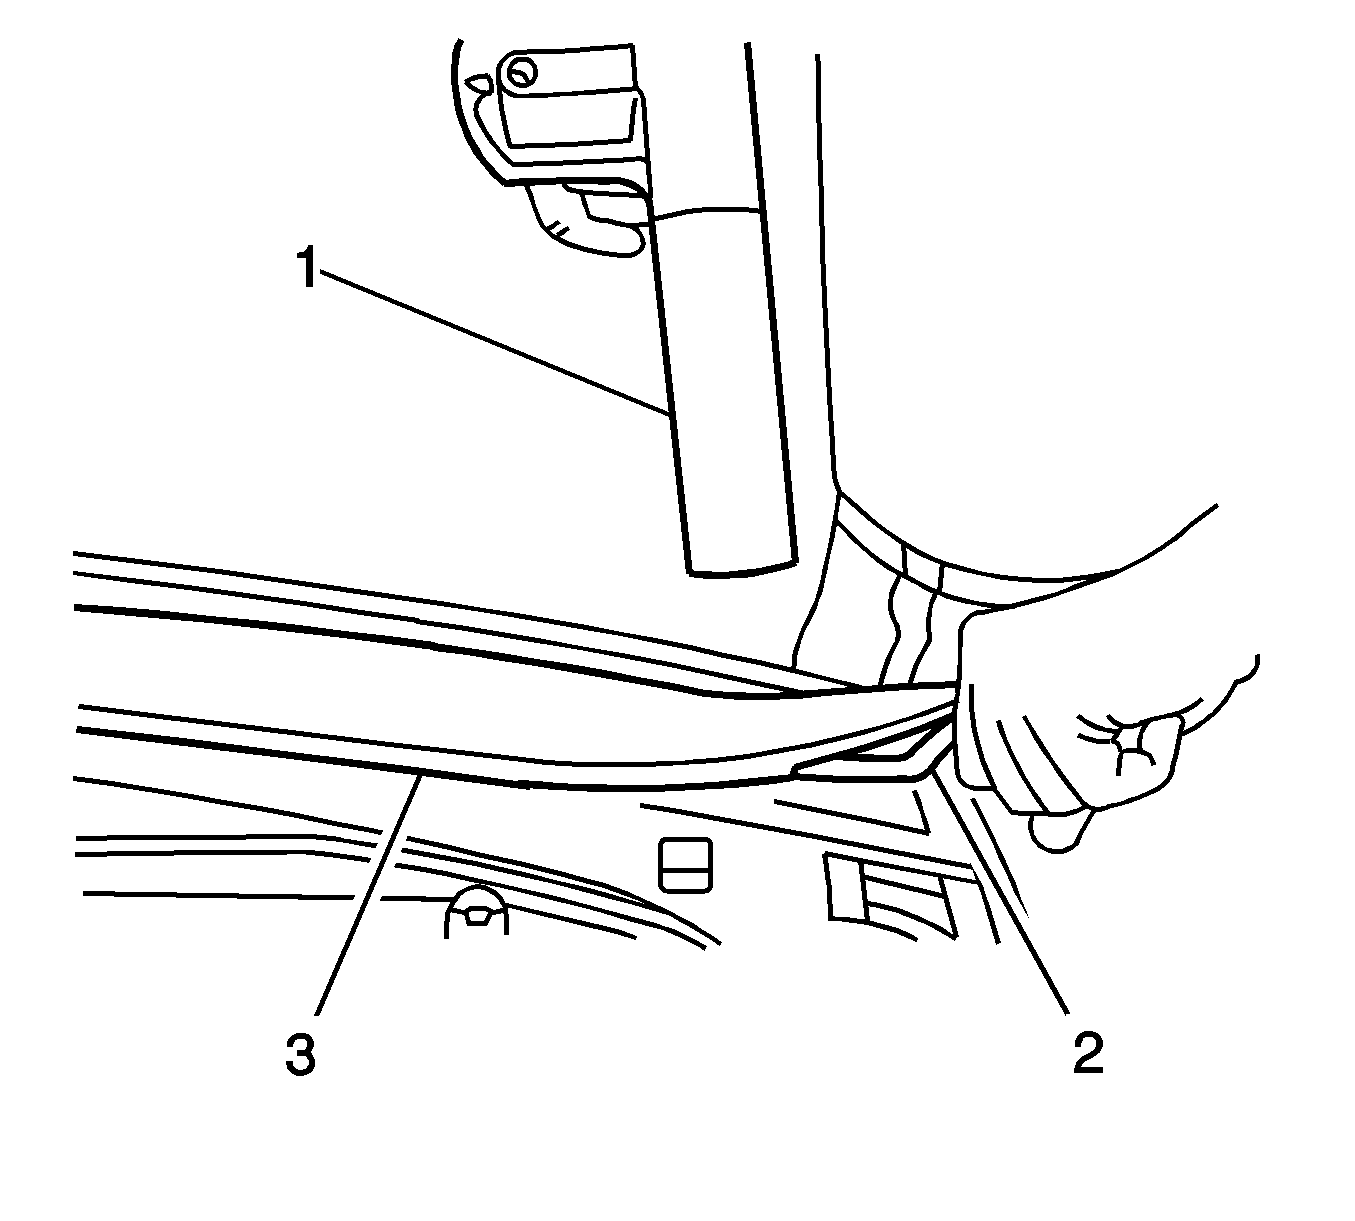
- Use
J 25070
(1) to heat the trim cover (3) in order to release
the double-sided foam tape.
- Use a suitable tool (2) to pry upward to release front trim cover from the sunroof frame.
- Remove the trim cover from the sunroof frame.
Installation Procedure
- Use 3M® General Purpose Adhesive Cleaner P/N 08984 or equivalent to remove all traces of the adhesive foam tape from the sunroof frame.
- Use 3M® Automotive Adhesion Promoter Wipes P/N 06396 or equivalent to thoroughly wipe down the sunroof frame where you will apply the trim cover.
Important: The ambient temperature of the building should be above 16°C (60°F) to ensure correct adhesion of the front side trim cover.
- Using
J 25070
warm the sunroof frame to 21°C (70°F).
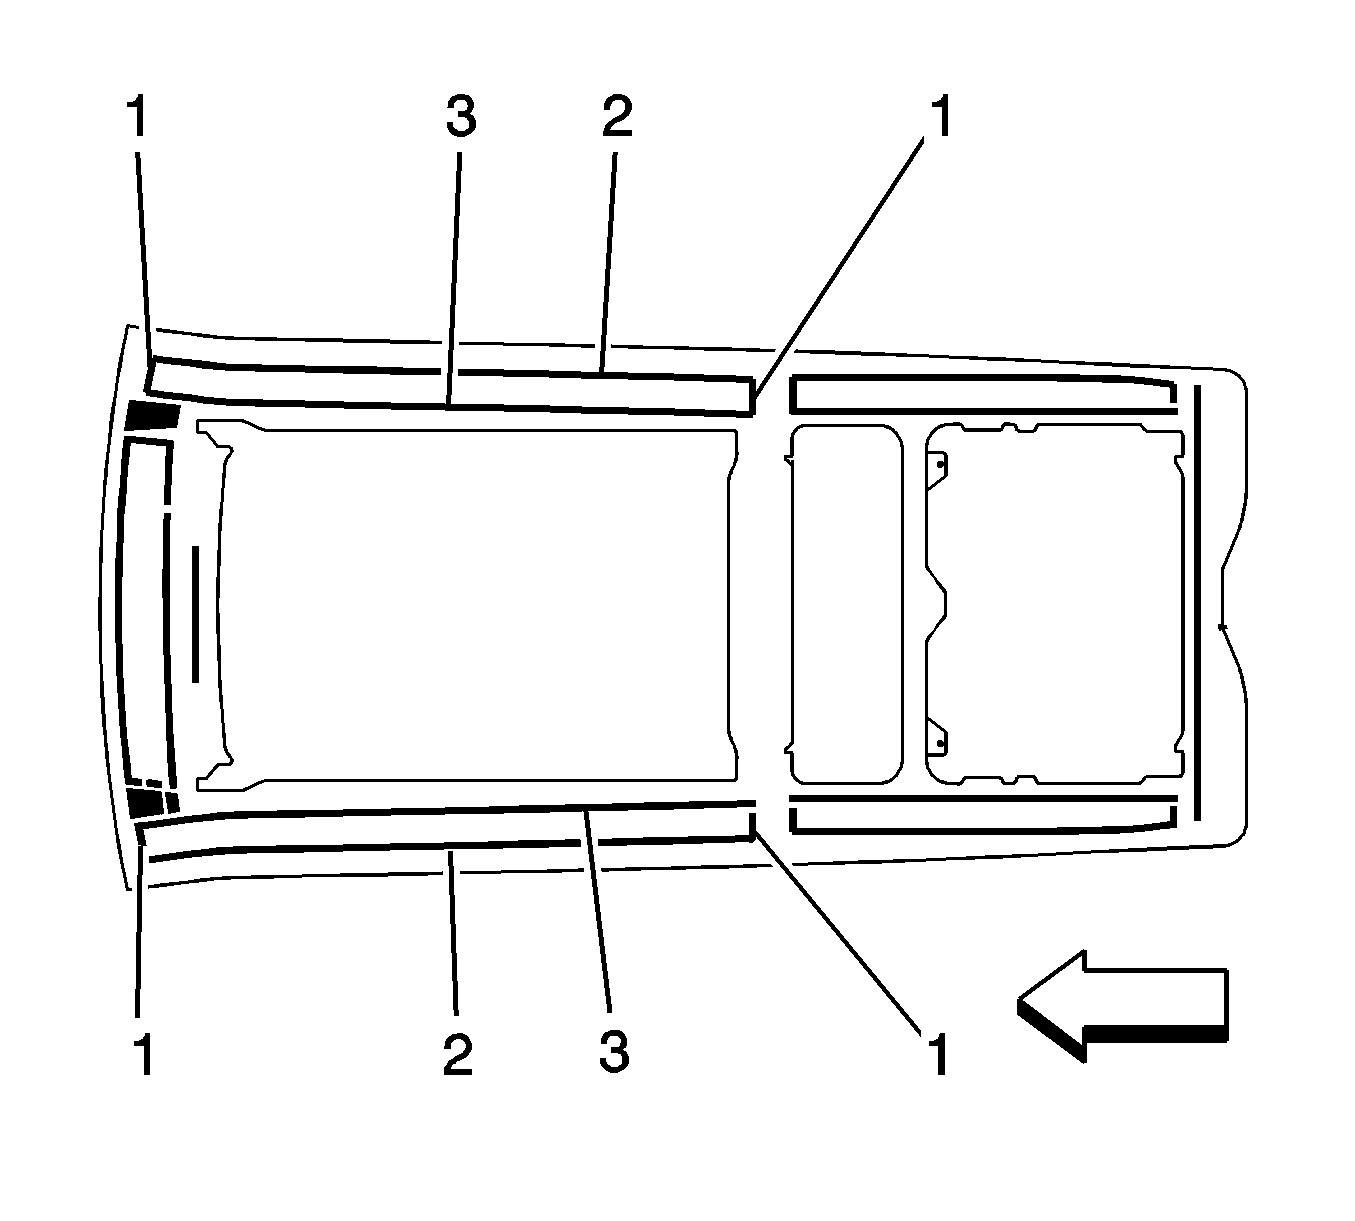
Important: Pull the backing from the trim cover tape just prior to installation. Do NOT touch the adhesive with your hands or allow the tape to come into contact with dirt or foreign matter. Do NOT let the tape come into contact
with the front side trim cover before you align the trim cover.
- Install the front side trim cover to the left or right sides of the sunroof frame do the following:
| 4.1. | Use 3M® P/N 051131-06383 adhesive foam tape or equivalent, apply a signal layer of tape to the front frame side ends (1). |
Use 3M® P/N 051131-06382 adhesive foam tape or equivalent, apply a signal
layer of tape to the front frame side (2).
Apply a double layer to number (3).
| 4.2. | Use moderate hand pressure to ensure proper adhesion of the double-sided foam tape. |
| 4.3. | Remove the backing from the adhesive foam tape. |
| 4.4. | Carefully align the cover tabs to the frame. |
| 4.5. | Lower the front side trim covers to the sunroof frame. |
| 4.6. | Use moderate hand pressure to ensure proper adhesion of the front side trim cover to sunroof frame |
- Install the front side trim covers. Refer to
Sunroof Exterior Trim Cover Replacement.
- Install the front sunroof window. Refer to
Sunroof Window Replacement.
Sunroof Exterior Trim Cover Replacement Rear Sides
Special Tools
J 25070
Heat Gun
Removal Procedure
- Remove the front side trim covers. Refer to
Sunroof Exterior Trim Cover Replacement.

- Use
J 25070
(1) to heat the rear side trim cover in order to release the double-sided foam
tape.
- Use a suitable tool (3) to pry upward to release the rear side trim cover from the sunroof frame.
Installation Procedure
- Use 3M® General Purpose Adhesive Cleaner P/N 08984 or equivalent to remove all traces of the adhesive foam tape from the sunroof frame.
- Use 3M® Automotive Adhesion Promoter Wipes P/N 06396 or equivalent to thoroughly wipe down the sunroof frame where you will apply the trim cover.
Important: The ambient temperature of the building should be above 16°C (60°F) to ensure correct adhesion of the rear side trim cover.
- Using
J 25070
warm the sunroof frame to 21°C (70°F).
Important: Pull the backing from the trim cover tape just prior to installation. Do NOT touch the adhesive with your hands or allow the tape to come into contact with dirt or foreign matter. Do NOT let the tape come into contact
with the rear side trim cover before you align the trim cover.
- Install the rear side trim cover to the left or right sides of the sunroof frame do the following:
| 4.1. | Use 3M® P/N 051131-06382 adhesive foam tape or equivalent, apply a signal layer of tape to the frame side (2,3). |
Apply a double layer to number (3).
| 4.2. | Use moderate hand pressure to ensure proper adhesion of the double-sided foam tape. |
| 4.3. | Remove the backing from the adhesive foam tape. |
| 4.4. | Carefully align the cover tabs to the frame. |
| 4.5. | Lower the rear side trim covers to the sunroof frame. |
| 4.6. | Use moderate hand pressure to ensure proper adhesion of the rear side trim cover to sunroof frame |
- Install the front side trim covers. Refer to
Sunroof Exterior Trim Cover Replacement.
Sunroof Exterior Trim Cover Replacement Rear
Special Tools
J 25070
Heat Gun
Removal Procedure
- Open the liftgate.
- Remove the digital radio antenna, if equipped. Refer to
Digital Radio Antenna Replacement.
- Remove the rear window. Refer to
Sunroof Window Replacement.

- Use
J 25070
(1) to heat the rear trim cover in order to release the double-sided foam tape.
- Use a suitable tool (3) to pry upward to release the rear trim cover from the sunroof frame.
- Remove the rear trim cover from the sunroof frame.
Installation Procedure
- Use 3M® General Purpose Adhesive Cleaner P/N 08984, or equivalent, to remove all traces of the adhesive foam tape (1) from the sunroof frame.
- Use 3M® Automotive Adhesion Promoter Wipes P/N 06396, or equivalent, to thoroughly wipe down the sunroof frame where you will apply the trim cover.
Important: The ambient temperature of the building should be above 16°C (60°F) to ensure correct adhesion of the trim cover.
- Using
J 25070
warm the sunroof frame to 21°C (70°F).
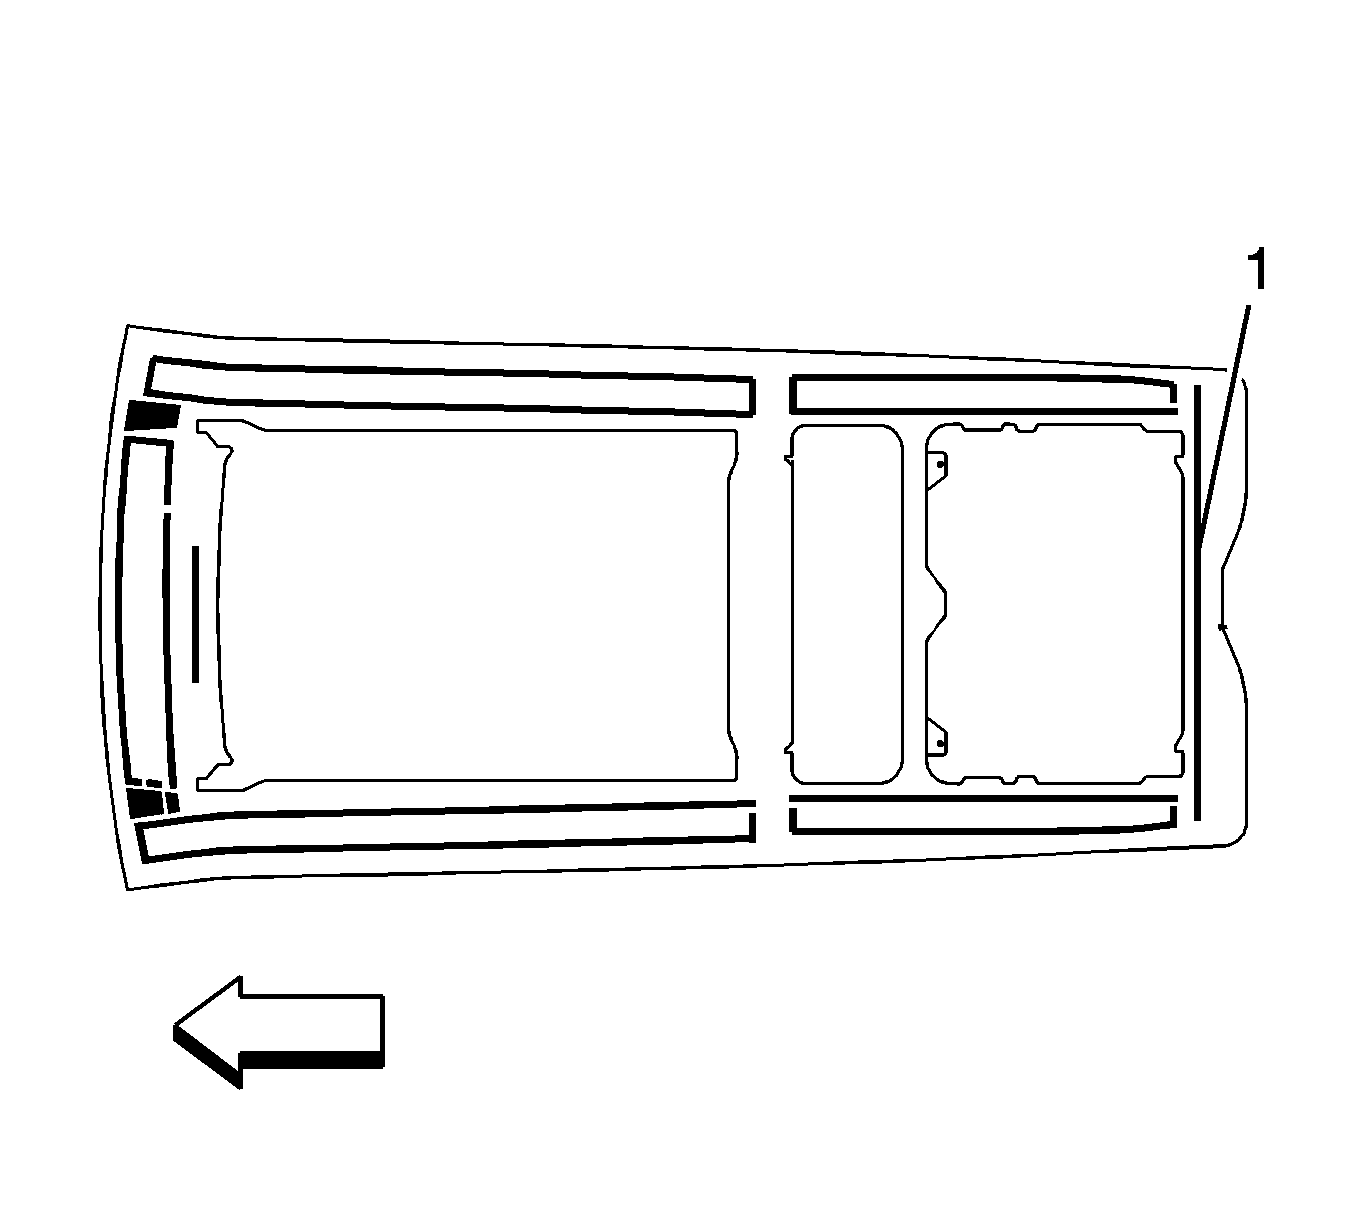
Important: Pull the backing from the trim cover tape just prior to installation. Do NOT touch the adhesive with your hands or allow the tape to come into contact with dirt or foreign matter. Do NOT let the tape come into contact
with the rear trim cover before you align the trim cover.
- Install the rear trim cover to sunroof frame do the following:
| 4.1. | Use 3M® P/N 051131-06382 adhesive foam tape or equivalent, apply a signal layer of tape to the frame side (1) |
| 4.2. | Use moderate hand pressure to ensure proper adhesion of the double-sided foam tape. |
| 4.3. | Remove the backing from the adhesive foam tape. |
| 4.4. | Carefully align the cover tabs to the frame. |
| 4.5. | Lower the rear trim covers to the sunroof frame. |
| 4.6. | Use moderate hand pressure to ensure proper adhesion of the rear side trim cover to sunroof frame |
- Install the rear window. Refer to
Sunroof Window Replacement.
- Install the digital radio antenna, if equipped. Refer to
Digital Radio Antenna Replacement.
- Close the liftgate.


