Tool Required
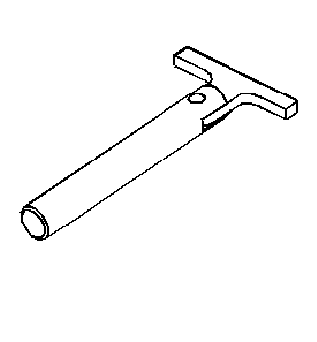
J 8080 Main Bearing Shell Remover and Installer
Removal Procedure
Crankshaft bearings are of the precision insert type. If the clearances are found to be excessive, a new bearing, both upper and lower halves, will be required. Service bearings are available in both standard size and undersize.
Selective fitting of both connecting rod and crankshaft bearing inserts is necessary in production in order to obtain close tolerances. For example, on a rear crankshaft bearing you may find one half of a standard insert with one half of a 0.0254 mm (0.001 in) undersize insert which will decrease the clearance 0.0127 mm (0.0005 in) from using a full standard bearing.
- Remove the spark plugs.
- Raise and suitably support the vehicle.
- Remove the oil pan. Refer to Oil Pan Replacement .
- Remove the oil pump. Refer to Oil Pump Replacement .
- Remove the cap and the lower bearing of the crankshaft bearing requiring replacement.
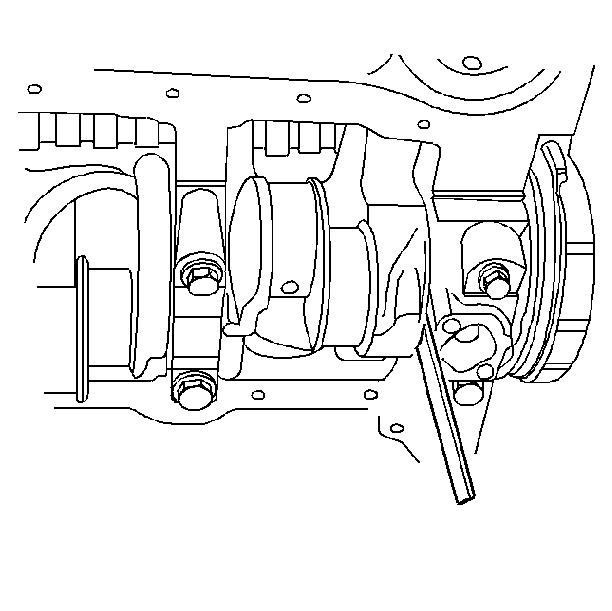
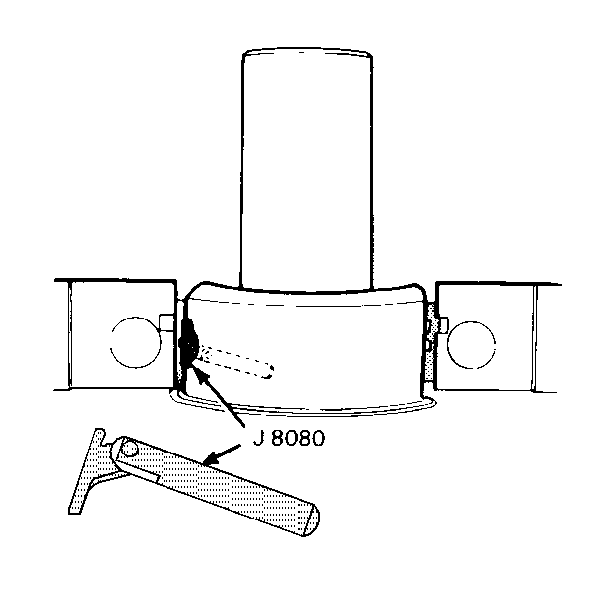
- Insert the J 8080 into the oil hole in the crankshaft journal.
- Rotate the crankshaft allowing the J 8080 to push against the insert's straight (unnotched) side. This will roll the upper bearing out of the block.
- Remove the J 8080 from the crankshaft.
- Inspect the lower half of the crankshaft bearing insert shows a greater wear and the most distress from fatigue. If upon inspection the lower half is suitable for use, it can be assumed that the upper half is also satisfactory. If the lower half shows evidence of wear or damage, both upper and lower halves should be replaced. Never replace one half without replacing the other half.
- With the oil pan and the oil pump removed, and starting with the rear crankshaft bearing, remove the bearing cap and wipe the oil from the journal and bearing cap. Note the location of the stud bolts.
- Place a piece of plastigage the full width of the bearing on the journal.
- Install the bearing cap and evenly tighten the retaining bolts to specifications. The bearing cap must be tightened to specification in order to assure the proper reading. The variation in torque affect the compression of the gauging plastic.
- Remove the bearing caps. The flattened plastigage will be found adhering to either the bearing shell or the journal.
- Without removing the plastigage, measure the compressed width at the widest point with graduations on the plastigage envelope. Normally the crankshaft bearing journals wear evenly and are not out of round. However, if a bearing is being fitted to an out of round journal 0.025 mm (0.001 in) maximum, be sure to fit to the maximum diameter of the journal. If the bearing is fitted to the minimum diameter, and the journal is out of round 0.025 mm (0.001 in), the interference between the bearing and the journal will result in rapid bearing failure. If flattened plastigage tapers toward the middle or the ends, there is a difference in clearance indication the taper, low spot or the other irregularity of the bearing or the journal. Measure the journal with a micrometer if the flattened plastigage indicates more than 0.025 mm (0.001 in) difference.
- If the bearing clearance is within specification, the bearing insert is satisfactory. If the clearance is not within specification, replace the insert. Always replace both the upper and the lower inserts as a unit. When the bearing cap is installed and the clearance is less than 0.025 mm (0.001 in), inspect for burrs or nicks.
- A standard 0.025 mm (0.001 in) or 0.05 mm (0.002 in) undersize bearing may produce proper clearance. If not, it will be necessary to regrind the crankshaft journal for use with the next undersize bearing. After selecting the new bearing recheck clearance.
- Proceed to the next bearing. When checking the #1 crankshaft bearing, loosen the accessory drive belt in order to prevent tapered reading with the plastigage. After all the bearings have been checked, rotate the crankshaft in order to inspect for excessive drag.
Important: If replacing the rear crankshaft bearing, check for the correct part number. Some rear crankshaft bearings are 0.20 mm (0.008 in) wider than standard. The crankshaft will be identified by "0.008" stamped on the rear counterweight.

Important: In order to obtain the most accurate results when checking the crankshaft bearing clearances, use gauging plastic.
If the engine is out of the vehicle and the upside down, the crankshaft will rest on the upper bearings and the total clearance can be measured between the lower bearing and journal. If the engine is to remain in the vehicle, the crankshaft must be supported upward to remove any clearance from the upper bearing. The total clearance can then be measured between the lower bearing and journal. In order to assure the proper seating of the crankshaft, all the bearing cap bolts should be at their specified torque. In addition, prior to checking the fit of the bearings, the surface of the crankshaft journal and the bearing should be wiped clean of oil.Notice: Use the correct fastener in the correct location. Replacement fasteners must be the correct part number for that application. Fasteners requiring replacement or fasteners requiring the use of thread locking compound or sealant are identified in the service procedure. Do not use paints, lubricants, or corrosion inhibitors on fasteners or fastener joint surfaces unless specified. These coatings affect fastener torque and joint clamping force and may damage the fastener. Use the correct tightening sequence and specifications when installing fasteners in order to avoid damage to parts and systems.
Important: Do not rotate the crankshaft while the plastigage is between the bearing and the journal.
Tighten
Tighten the crankshaft bearing cap bolts and studs to 105 N·m
(77 lb ft).
Installation Procedure
- Install the crankshaft bearing into the engine block and the crankshaft bearing caps and the rear crankshaft bearing cap.
- Coat the crankshaft bearings with oil.
- Insert the plain, unnotched end between the crankshaft and the indented or notched side of the block. Rotate the bearing into place using the J 8080 as previously described. Remove the J 8080 from the oil hole in the crankshaft journal.
- Install the crankshaft bearing caps and the rear crankshaft bearing cap with the assembled crankshaft bearings with the arrows pointing toward the front of the engine.
- Install the crankshaft bearing cap bolts and studs.
- With the crankshaft, crankshaft bearings, and the crankshaft bearing caps and the rear crankshaft bearing cap install and the bolts and studs started, thrust crankshaft rearward to set and align bearing caps. Thrust the crankshaft forward to align the rear faces of the rear crankshaft bearings.
- Measure the crankshaft end play, using a dial indicator or feeler gauge. Refer to Engine Mechanical Specifications .
- If using a feeler gauge, measure between the front of the rear crankshaft bearing cap and the crankshaft thrust surface.
Notice: Use the correct fastener in the correct location. Replacement fasteners must be the correct part number for that application. Fasteners requiring replacement or fasteners requiring the use of thread locking compound or sealant are identified in the service procedure. Do not use paints, lubricants, or corrosion inhibitors on fasteners or fastener joint surfaces unless specified. These coatings affect fastener torque and joint clamping force and may damage the fastener. Use the correct tightening sequence and specifications when installing fasteners in order to avoid damage to parts and systems.
Tighten
Tighten the crankshaft bearing cap bolts and studs to 105 N·m
(77 lb ft).