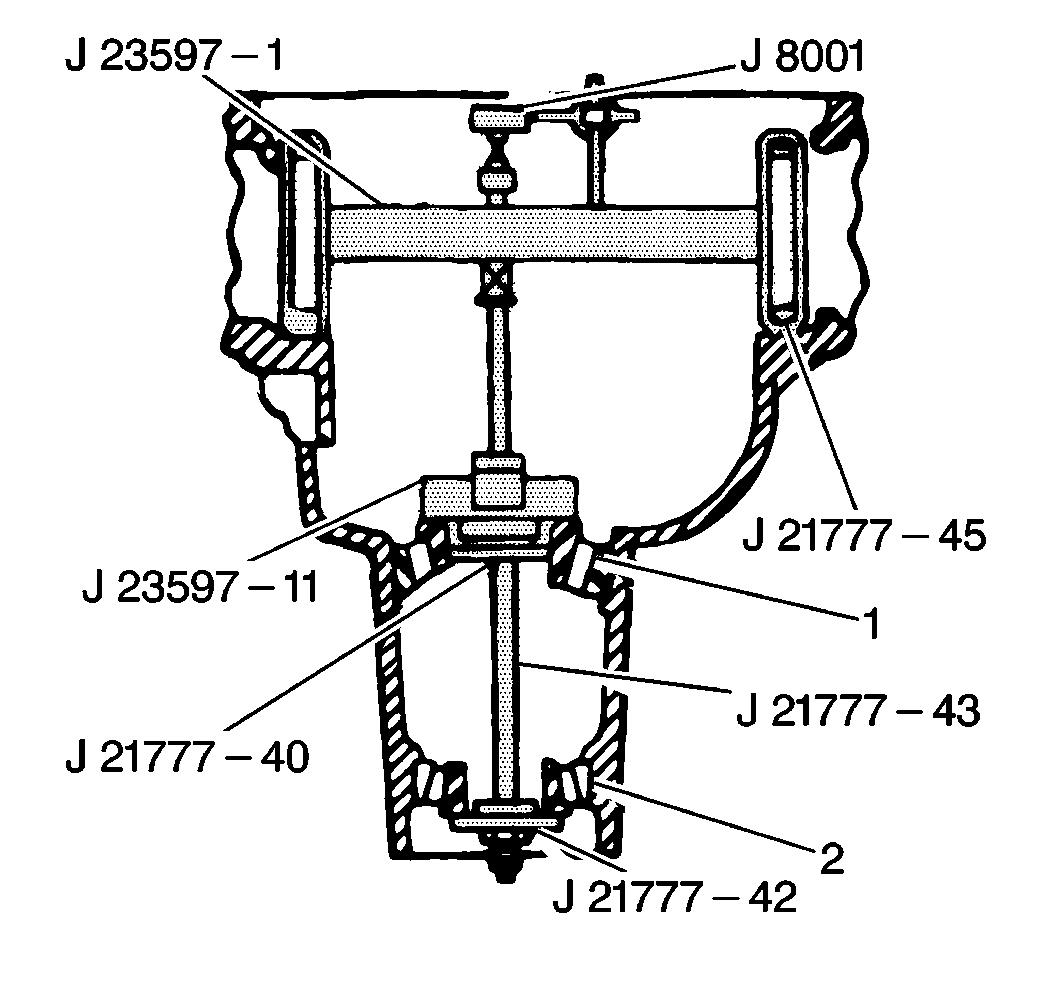
Tools Required
Use a pinion setting gage in order to measure differential drive pinion
gear depth. The gage provides a zero pinion as a gaging reference.

- Install the J 21777-40
, J 21777-42
, the J 21777-43
, and the J 21777-45
.
- Install the J 23597-11
.
- Install the J 21777-42
into the rear axle housing.
Notice: Use the correct fastener in the correct location. Replacement fasteners
must be the correct part number for that application. Fasteners requiring
replacement or fasteners requiring the use of thread locking compound or sealant
are identified in the service procedure. Do not use paints, lubricants, or
corrosion inhibitors on fasteners or fastener joint surfaces unless specified.
These coatings affect fastener torque and joint clamping force and may damage
the fastener. Use the correct tightening sequence and specifications when
installing fasteners in order to avoid damage to parts and systems.
- Install the drive pinion gear setting gage nut into the rear axle housing.
Tighten
Tighten the differential drive pinion gear setting gage nut to 2.3 N·m
(20 lb in).
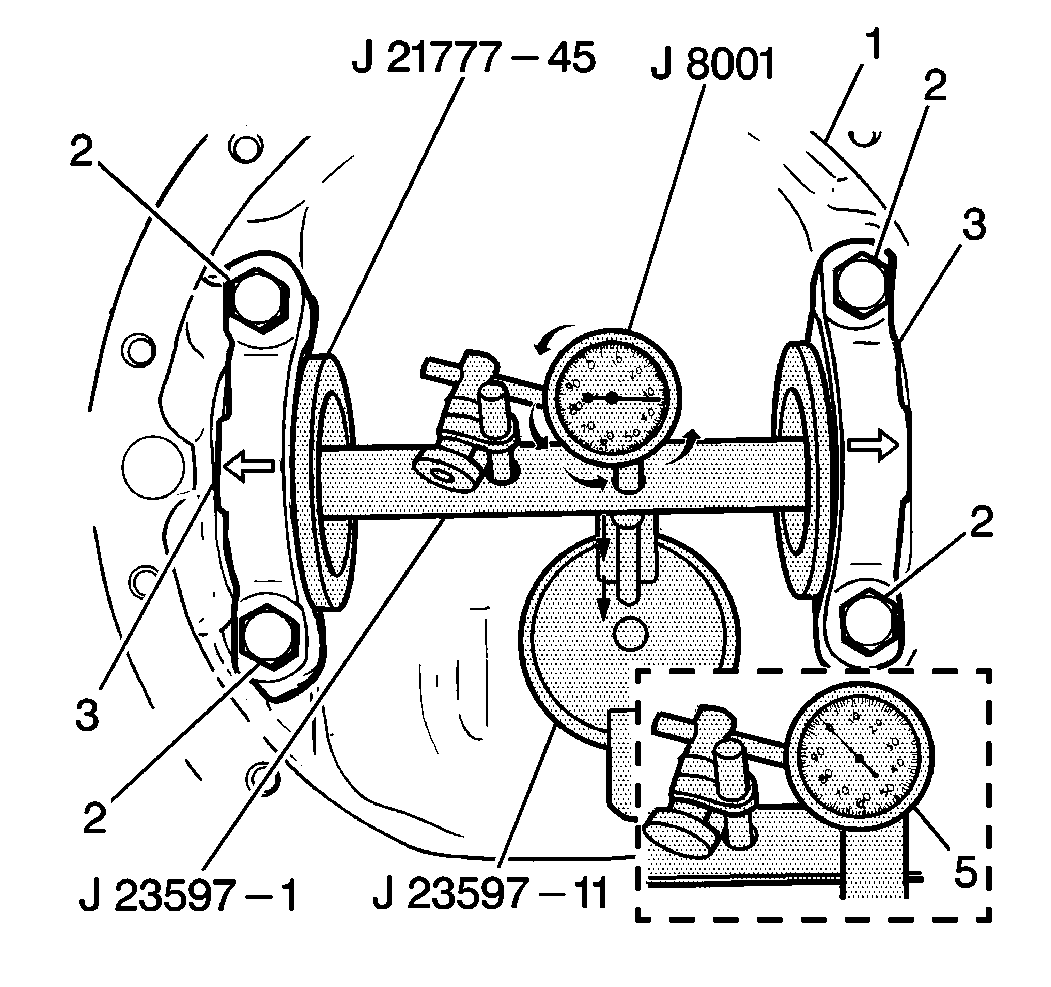
- Rotate the J 23597-11
in order to seat the following components:
| • | The differential drive pinion gear outer bearing (2) |
| • | The differential drive pinion gear inner bearing (1) |

- Mount the J 8001
onto the J 23597-1
.
- Preload the dial indicator against the plunger about 1.27 mm
(0.050 in).
- Install the J 21777-45
onto the J 23597-11
.
Position this unit into the rear axle housing.
- Install the following components:
| • | The carrier bearing caps (3) |
| • | The bearing cap bolts/screws (2) |
Tighten
Tighten the differential carrier bearing cap bolt/screws (2)
to 75 N·m (55 lb ft).
- Use the following steps in order to measure the differential drive
pinion gear depth:
| 10.1. | Rotate the J 23597-1
slowly back and forth until the J 8001
reads the greatest deflection. |
The deflection
is the point where the needle changes direction.
| 10.2. | At the point of deflection, set the J 8001
to zero. |
| 10.3. | Repeat the rocking action in order to verify the zero setting. |
| 10.4. | After obtaining the zero setting, rotate the J 23597-1
until the plunger no longer touches
the J 23597-11
. |
This action provides the gauge reference of a zero or nominal drive
pinion gear.
| 10.5. | Use the following information in order to select the correct shim: |
| • | Record the J 8001
reading at the pointer position. |
| • | The required drive pinion
gear shim thickness is equal to the J 8001
reading. |
| • | For example, if the pointer moved counterclockwise
1.70 mm (0.067 in) to a dial reading of 0.84 mm (0.033 in),
a shim thickness of 0.84 mm (0.033 in) is required. |
| • | Drive pinion gear shims are available in 0.03-0.94 mm
(0.001-0.037 in). |
| • | The thickness of each shim is
etched on the flat surface of the shim. |

- Loosen the J 21777-43
.
- Remove all of the tools from the rear axle housing.
- Remove the inner (1) and the outer (2) drive pinion
gear bearings from the rear axle housing.
- Install the correct drive pinion gear shim on the drive pinion
gear.
- Use the following steps in order to set the proper drive pinion
gear depth:
| 15.1. | Use the set-up dimension determined by J 8001
as a starting point. |
| 15.2. | Perform a ring gear tooth pattern test in order to determine if
additional drive pinion gear shim changes are necessary. Refer to
Pinion and Ring Gear Inspection
. |
- Install the drive pinion gear inner and outer bearings. Refer
to
Drive Pinion Assemble
.
- Assemble the differential case. Refer to
Differential Carrier Assembly Replacement
.
- With a new drive pinion gear seal installed, measure the total
bearing preload of the assembly at the drive pinion gear nut:
Specification
| • | Rotating torque 3.6-6.2 N·m (32-55 lb in)
with new inner and outer drive pinion gear bearings. |
| • | Rotating torque 1.8-3.1 N·m (16-28 lb in)
with used inner and outer drive pinion gear bearings. |
