Headlining Trim Panel Replacement Sportwagon
Removal Procedure
Caution: Refer to Battery Disconnect Caution in the Preface section.
- Disconnect the battery ground cable. Refer to
Battery Negative Cable Disconnection and Connection.
- Remove the dome lamp assembly. Refer to
Dome Lamp Replacement.
- Remove the rear dome lamp assembly. Refer to
Dome Lamp Replacement.
- Remove the sunshade assembly on both sides. Refer to
Sunshade Replacement.
- Remove the video disc player display bezel - Display (where fitted).
Refer to
Video Disc Player Bezel Replacement.
- Remove the video disc player display bezel - Player (where fitted).
Refer to
Video Disc Player Display Bezel Replacement.
- Remove the assist handles on both sides. Refer to
Assist Handle Replacement
- Remove the windshield garnish molding on both sides. Refer to
Windshield Garnish Molding Replacement.
- Remove the center pillar lower trim panel on both sides. Refer to
Center Pillar Lower Trim Panel Replacement.
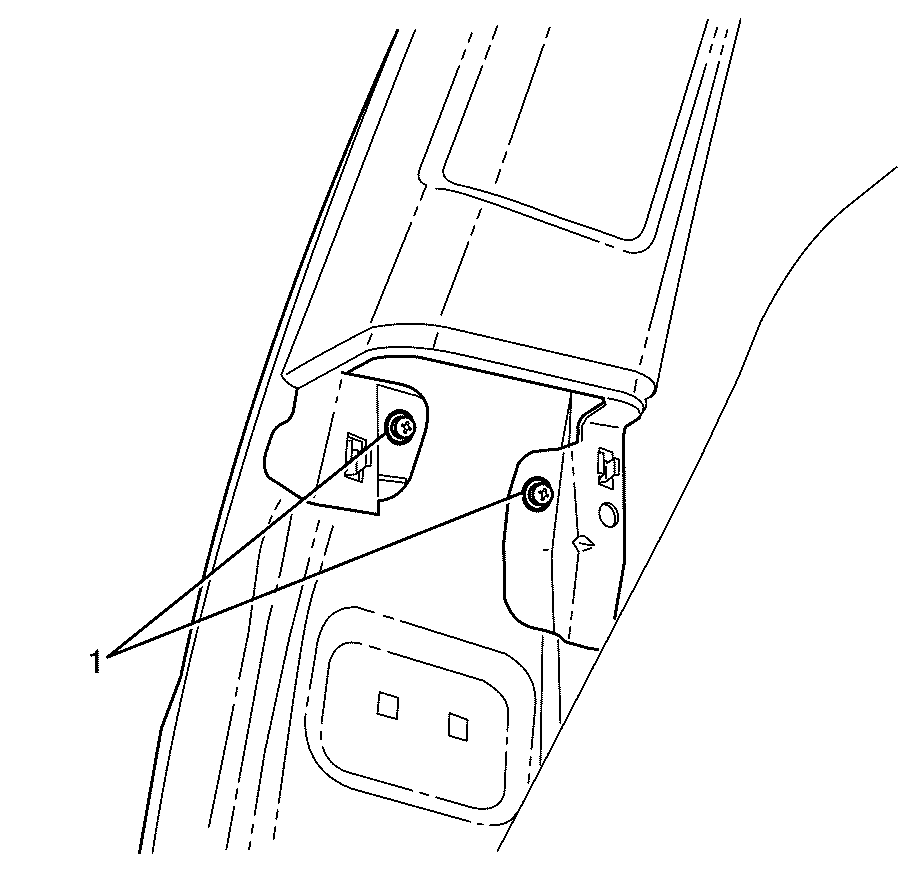
- Remove the center pillar upper trim panel
retaining screws (1). Repeat on opposite side.
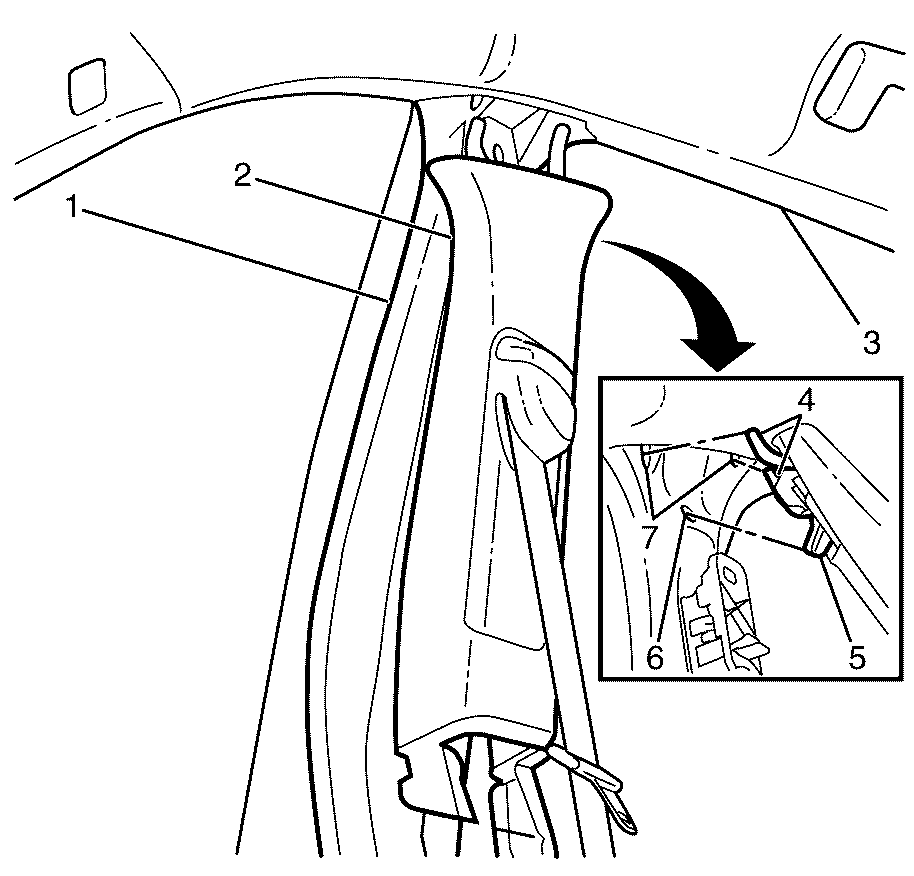
- Tilt the base of the center pillar upper
trim panel (2) away from the center pillar (1) until the center pillar
upper trim panel locating dowel (5) has disengaged from the center pillar datum
hole (6). Repeat on opposite side.
- Lower the center pillar upper trim panel (2) down and away from
the roof panel trim (3) until the center pillar upper trim panel locating pins (4)
have disengaged from the roof panel datum holes (7). Repeat on opposite side.
- Remove the body lock pillar upper trim panel on both sides. Refer to
Body Lock Pillar Upper Trim Panel Replacement.
- Remove the headlining rear trim panel retainer. Refer to
Headlining Rear Trim Panel Retainer Replacement.
- Remove the body side window rear garnish moulding on both sides. Refer
to
Body Side Window Rear Garnish Molding Replacement.
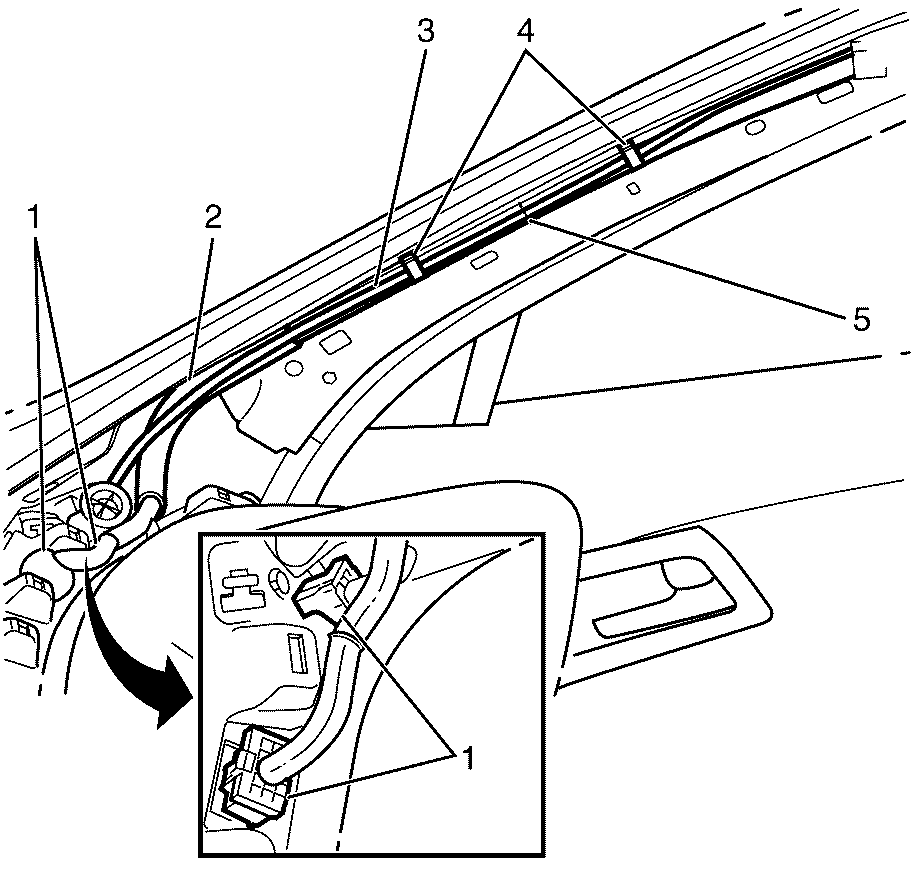
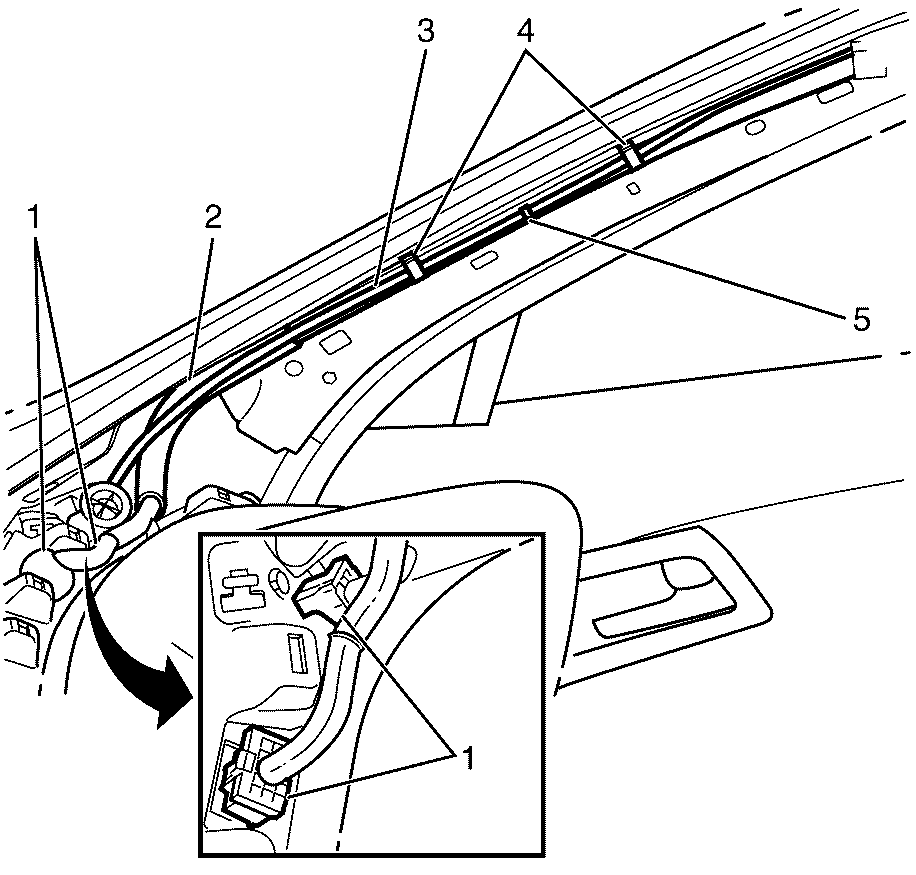
- Detach the headlining wiring harness (2)
from the headlining wiring harness/washer hose retaining clips (4).
- Disconnect the headlining wiring harness to instrument panel wiring harness
electrical connectors (1).
- Detach the headlining washer hose (3) from the headlining wiring
harness/washer hose retaining clips (4).
- Cut the headlining washer hose (3) between the headlining wiring
harness/washer hose retaining clips (5).
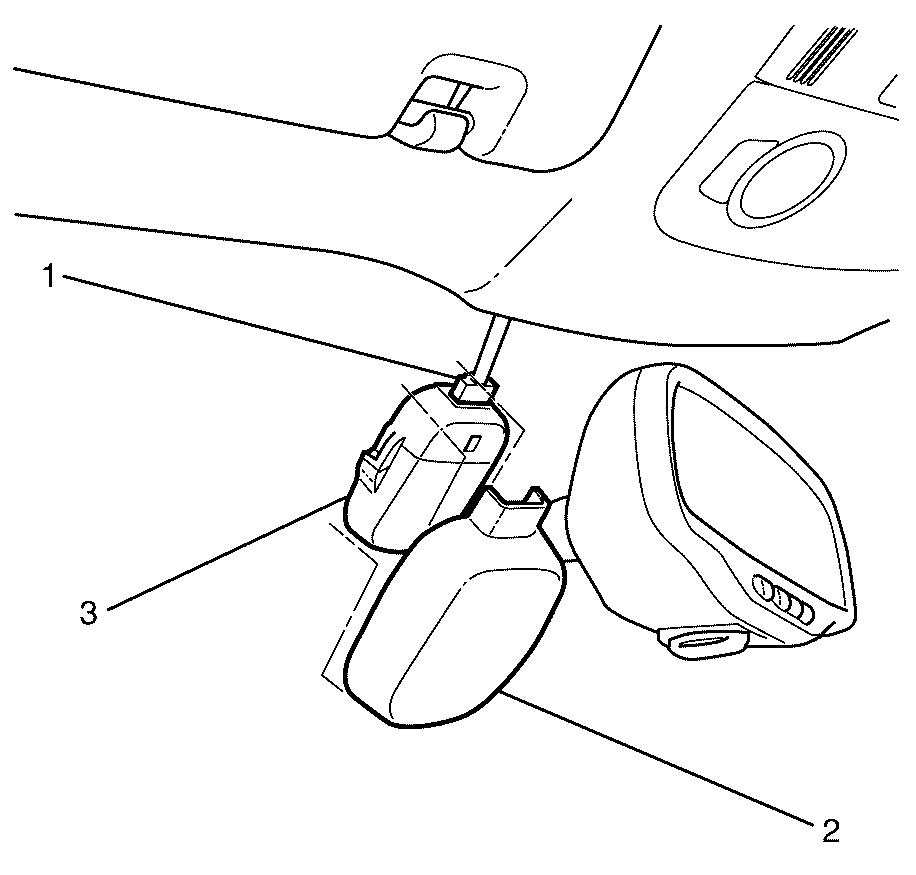
- Detach the windshield outside moisture sensor
cover (2) from the windshield outside moisture sensor (3).
- Disconnect the windshield outside moisture sensor electrical connector (1)
from the windshield outside moisture sensor (3).
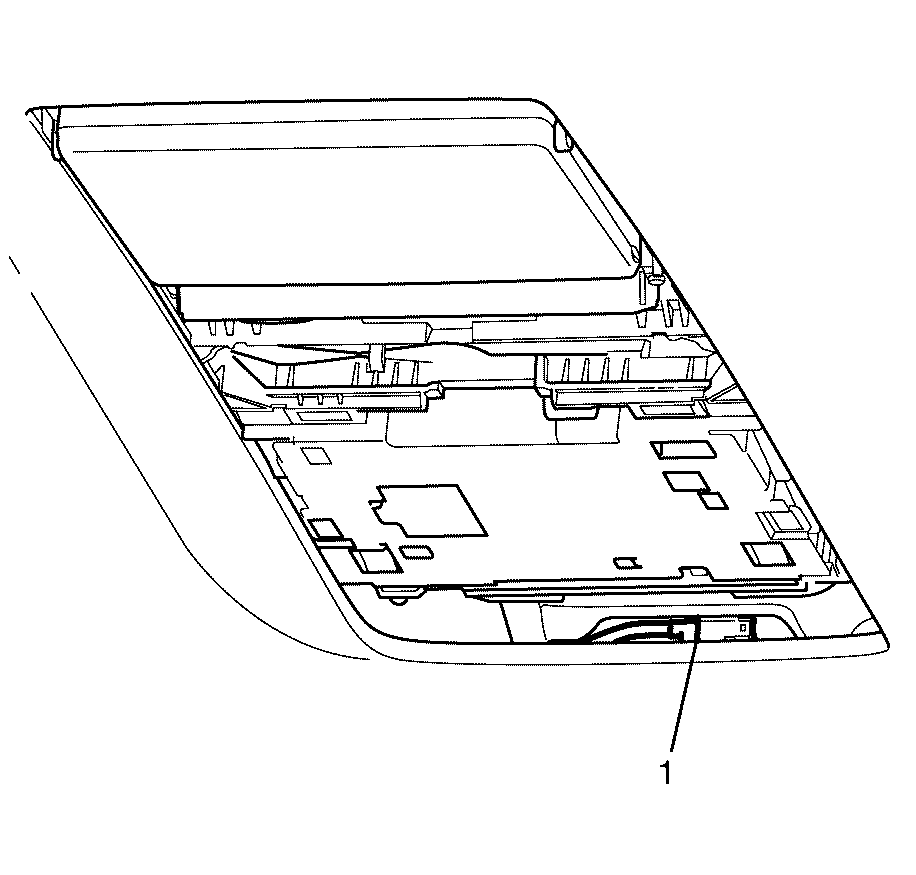
- Disconnect the headlining wiring harness
to rear seat entertainment assembly wiring harness connector (1) (where fitted).
- Recline both the rear split fold seat backs to their forward position.
- Recline both the front seat backs to their lowest position.
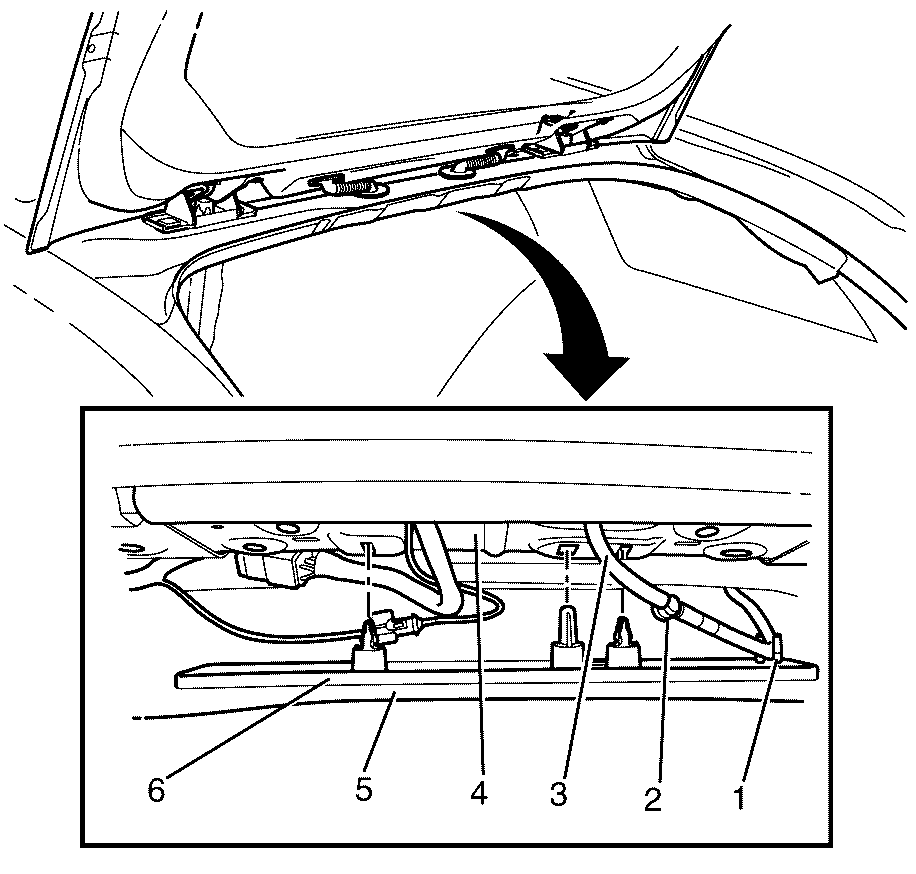
Important: To avoid damage to the headlining carefully
pull down on the headlining rear clip assembly (6) to detach the headlining (5)
from the roof panel (4).
- Detach and lower the headlining (5).
- Remove the rear window washer hose (3) from the headlining clip
assembly washer hose guide (1).
- Disconnect the rear window washer hose (3) from rear window washer
connector (2).
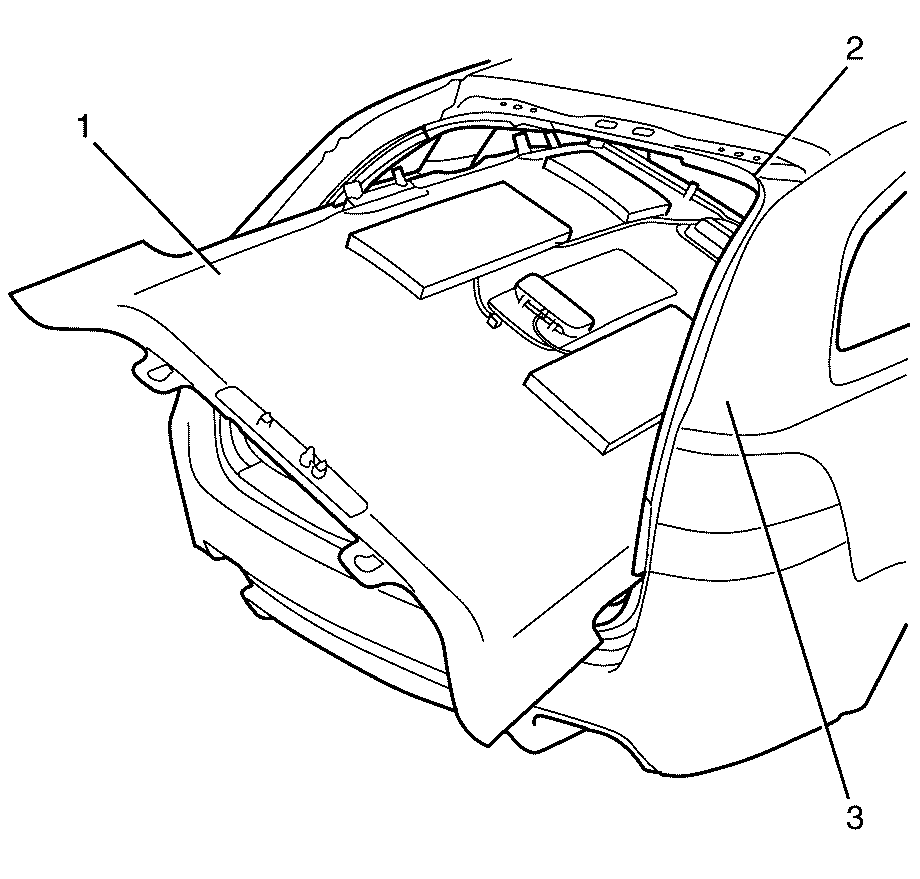
Important: Remove the headlining (1) from the
vehicle (3) with the aid or an assistant to avoid marking or damaging it.
- Tilt the headlining (1) to one side to achieve maximum clearance between
the headlining (1) and the liftgate opening (2).
Important: Care must be taken not to crease the headlining (1)
when removing it through the liftgate opening (2).
- Remove the headlining (1) from the vehicle (3) through the liftgate
opening (2).
Installation Procedure

Important: Install the headlining (1) to the
vehicle (3) with the aid or an assistant to avoid marking or damaging it.
- Tilt the headlining (1) to one side to achieve maximum clearance between
the headlining (1) and the liftgate opening (2).
Important: Care must be taken not to crease the headlining (1)
when installing it through the liftgate opening (2).
- Install the headlining (1) to the vehicle (3) through the liftgate
opening (2).

- Connect the rear window washer hose (3)
to the rear window washer connector (2).
Important: To avoid crimping or puncturing the rear
window washer hose (3) make sure it locates correctly into the headlining clip
assembly washer hose guide (1).
- Install the headlining clip assembly (6) into the roof panel (4).

- Connect the headlining wiring harness to
rear seat entertainment assembly wiring harness connector (1) (where fitted).
- Recline both the rear split fold seat backs to their upright position.
- Recline both the front seat backs to their upright position.

- Connect the windshield outside moisture
sensor electrical connector (1) to the windshield outside moisture sensor (3).
- Attach the windshield outside moisture sensor cover (2) to the
windshield outside moisture sensor (3).
Important: Make sure the headlining washer hose in line
joiner (5) is securely installed into both ends of the headlining washer hose (3).
- Cut the NEW headlining washer hose to the correct length, so it meets up with
the old headlining washer hose which was cut.
- Join the headlining washer hose ends with an in line hose joiner, GMH
part number 92213809.
- Attach the headlining washer hose (2) to the headlining wiring
harness/washer hose retaining clips (4).
- Connect the headlining wiring harness to instrument panel wiring harness
electrical connectors (1).
- Attach the headlining wiring harness (2) to the headlining wiring
harness/washer hose retaining clips (4).
- Install the body side window rear garnish moulding on both sides. Refer
to
Body Side Window Rear Garnish Molding Replacement.
- Install the headlining rear trim panel retainer on both sides. Refer to
Headlining Rear Trim Panel Retainer Replacement.
- Install the body lock pillar upper trim panel on both sides. Refer to
Body Lock Pillar Upper Trim Panel Replacement.
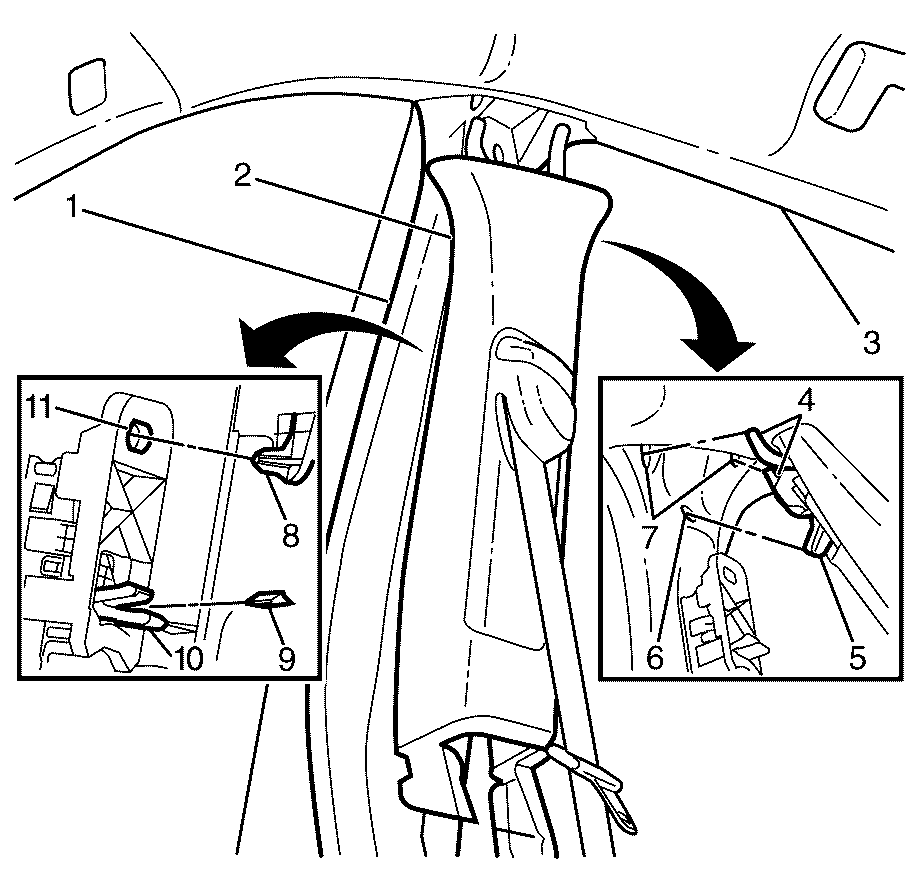
- Raise the center pillar upper trim panel (2)
up towards the roof panel trim (3) until the center pillar upper trim panel
locating pins (4) have engaged into the roof panel datum holes (7).
Repeat on opposite side.
Important: Make sure the center pillar upper trim height
adjuster lever (9) locates into the seat belt height adjuster release lever (10)
and the center pillar upper trim height adjuster dowel (8) locates into the
seat belt height adjuster datum hole (11). Incorrect fitment may damage the
center pillar upper trim height adjuster and/or restrict the front seat belt movement
(where fitted).
- Tilt the base of the center pillar upper trim panel (2) towards the center
pillar (1) until the center pillar upper trim panel locating dowel (5)
has engaged into the center pillar datum hole (6). Repeat on opposite side.
Notice: Refer to Fastener Notice in the Preface section.

- Install the center pillar upper trim panel retaining screws (1). Repeat
on opposite side.
Tighten
Tighten the screws to 2 N·m
(18 lb in).
- Check the seat belt operation on both sides.
- Install the center pillar lower trim panel on both sides. Refer to
Center Pillar Lower Trim Panel Replacement.
- Install the windshield garnish molding on both sides. Refer to
Windshield Garnish Molding Replacement.
- Install the assist handles on both sides. Refer to
Assist Handle Replacement
- Install the video disc player display bezel - Player (where fitted).
Refer to
Video Disc Player Display Bezel Replacement.
- Install the video disc player display bezel - Display (where fitted).
Refer to
Video Disc Player Bezel Replacement.
- Install the sunshade assembly on both sides. Refer to
Sunshade Replacement.
- Install the rear dome lamp assembly. Refer to
Dome Lamp Replacement.
- Install the dome lamp assembly. Refer to
Dome Lamp Replacement.
Caution: Refer to Battery Disconnect Caution in the Preface section.
- Connect the battery ground cable. Refer to
Battery Negative Cable Disconnection and Connection.
- Check the operation of the rear window washer and make sure there are
no water leaks.
Headlining Trim Panel Replacement RHD Sedan
Removal Procedure
Notice: Refer to General Repair Instructions in the Preface section.
- Remove the fuse from the passenger compartment fuse and relay panel assembly.
- Remove the following components as required:
Notice: Refer to General Repair Instructions in the Preface section.
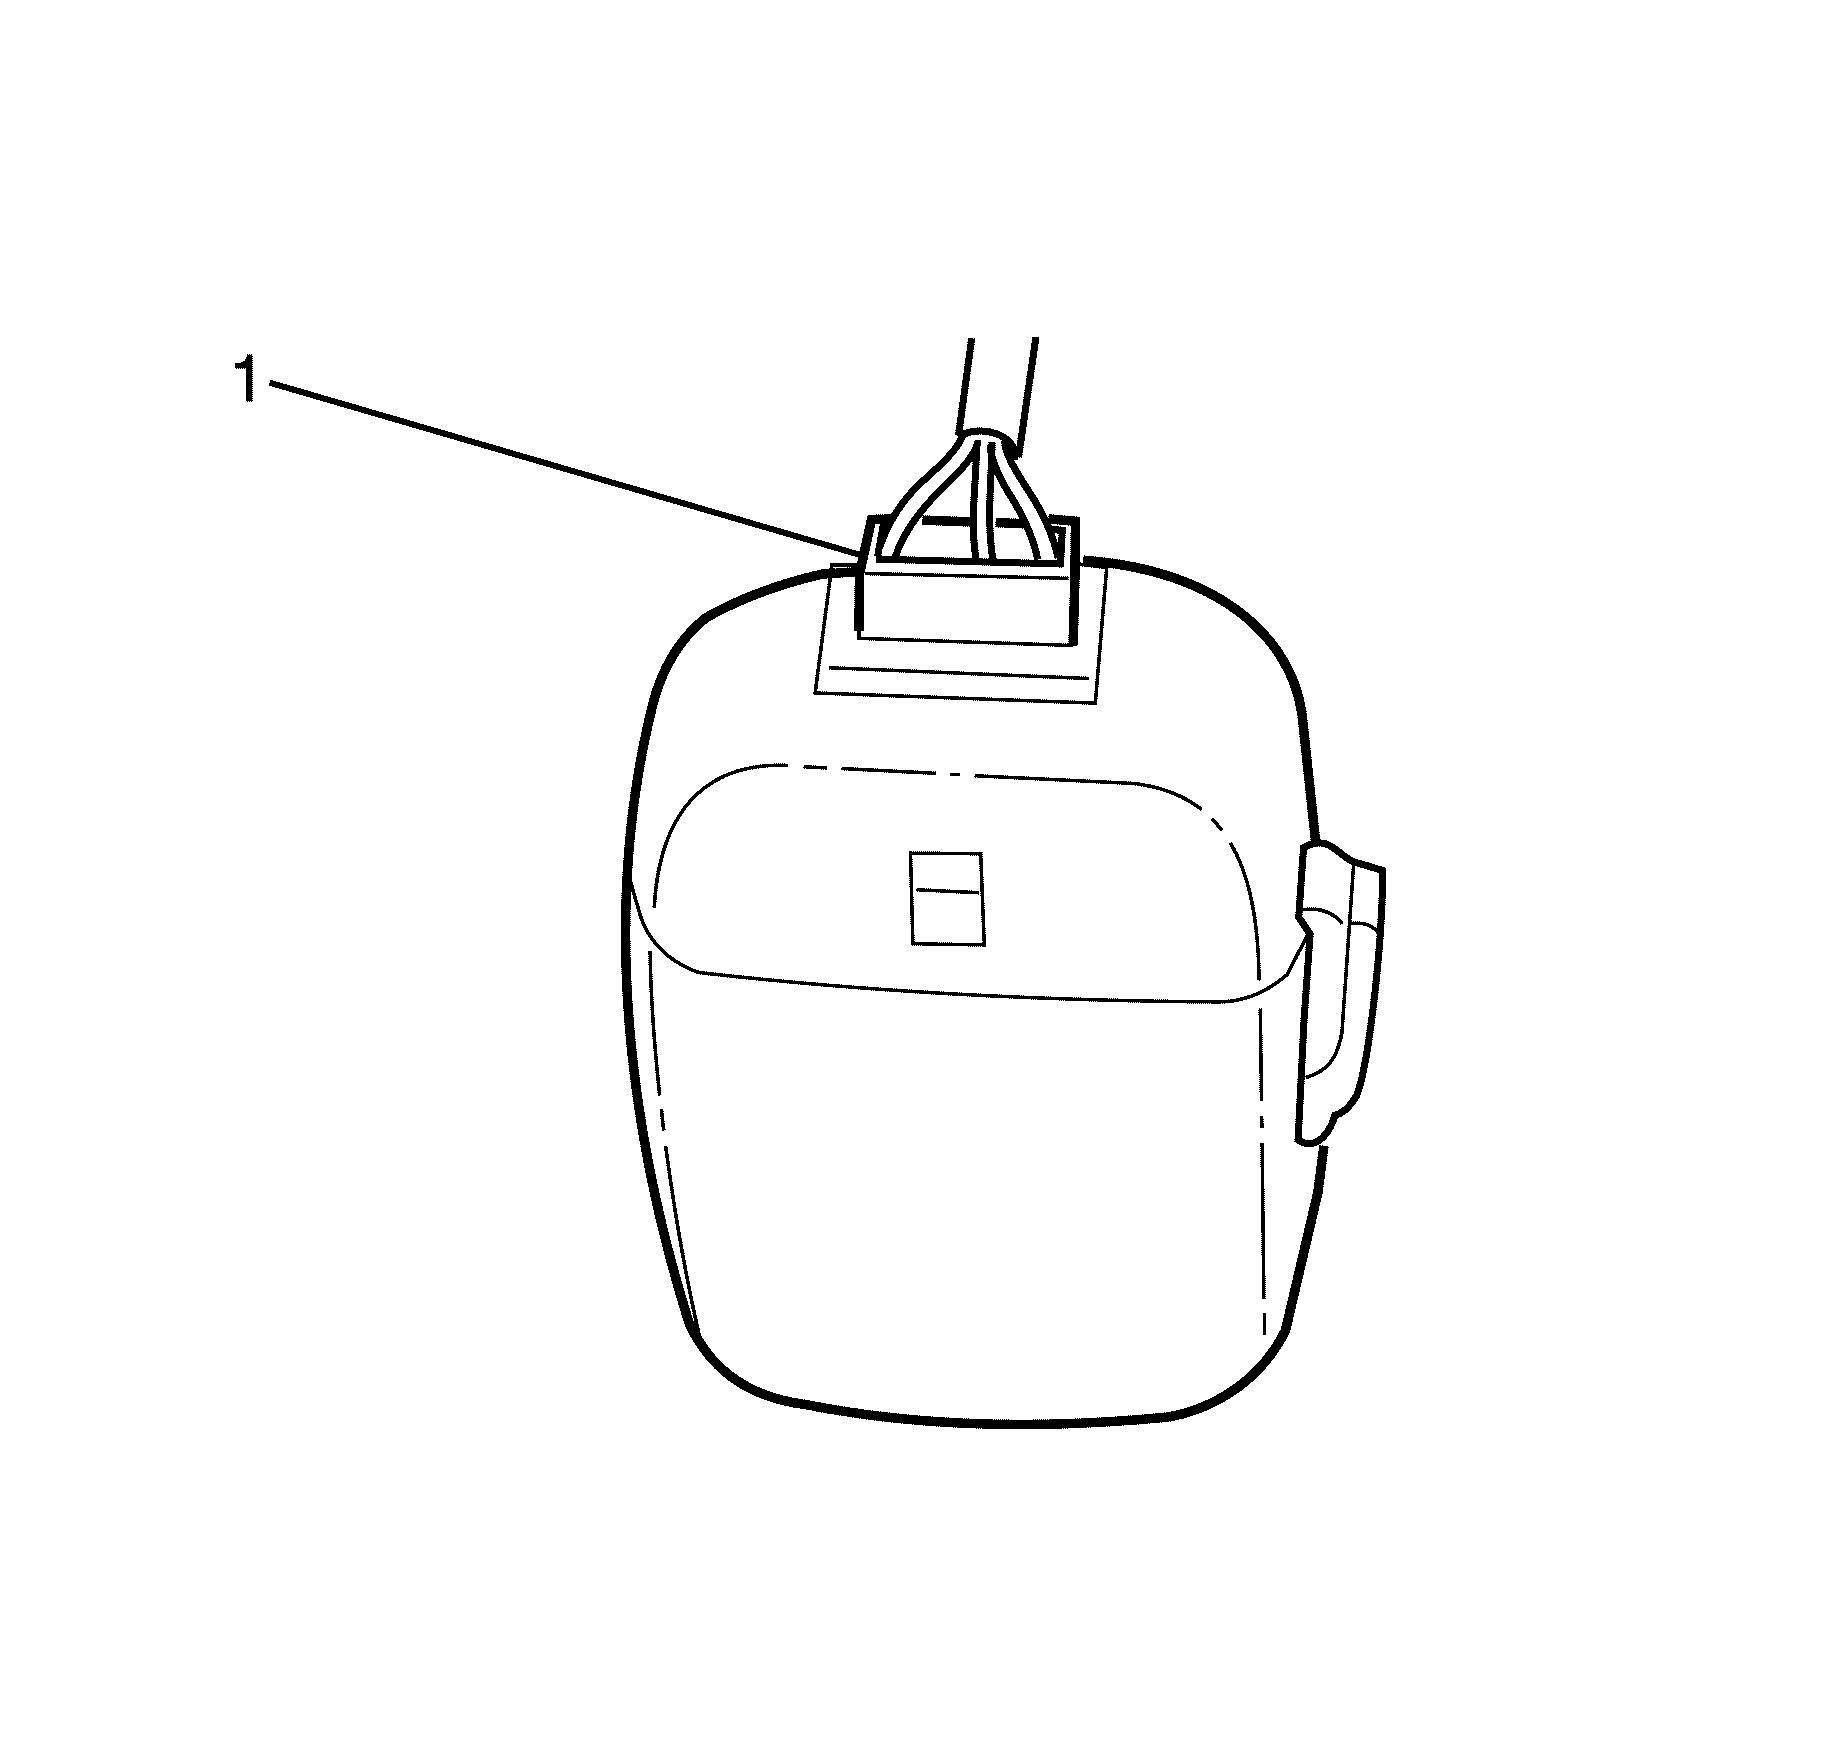
- Disconnect the rain sensor electrical connector (1).
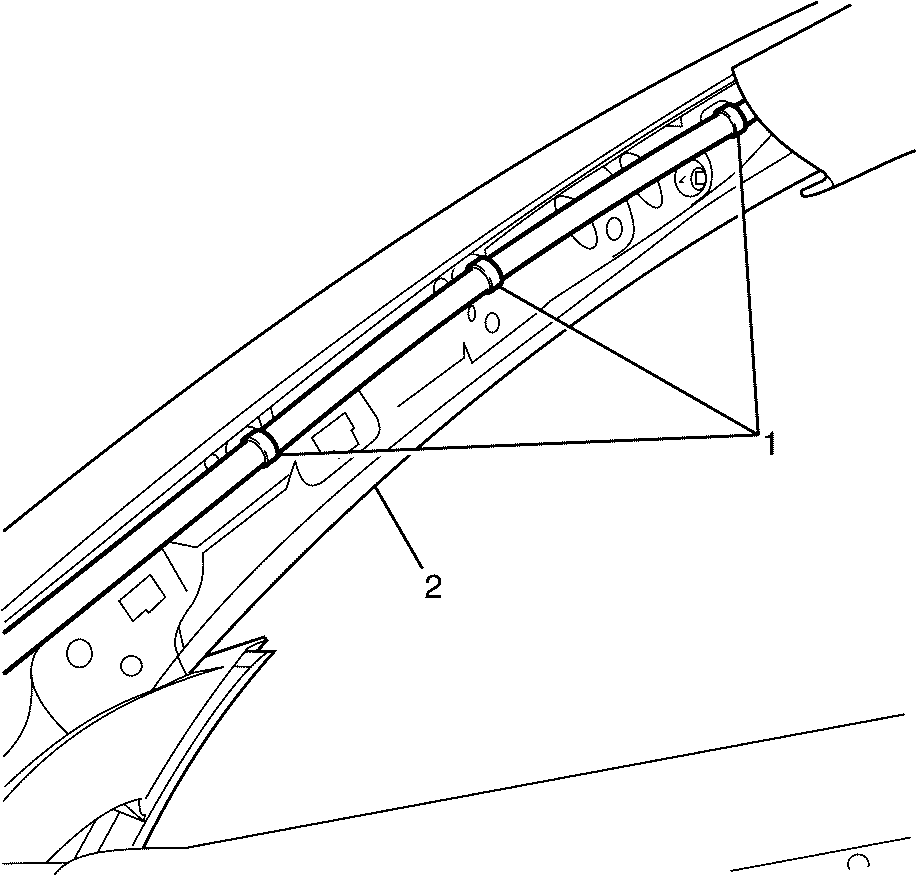
- Detach the headlining wiring harness retaining clips
(1) located on the A-pillar inner panel (2).
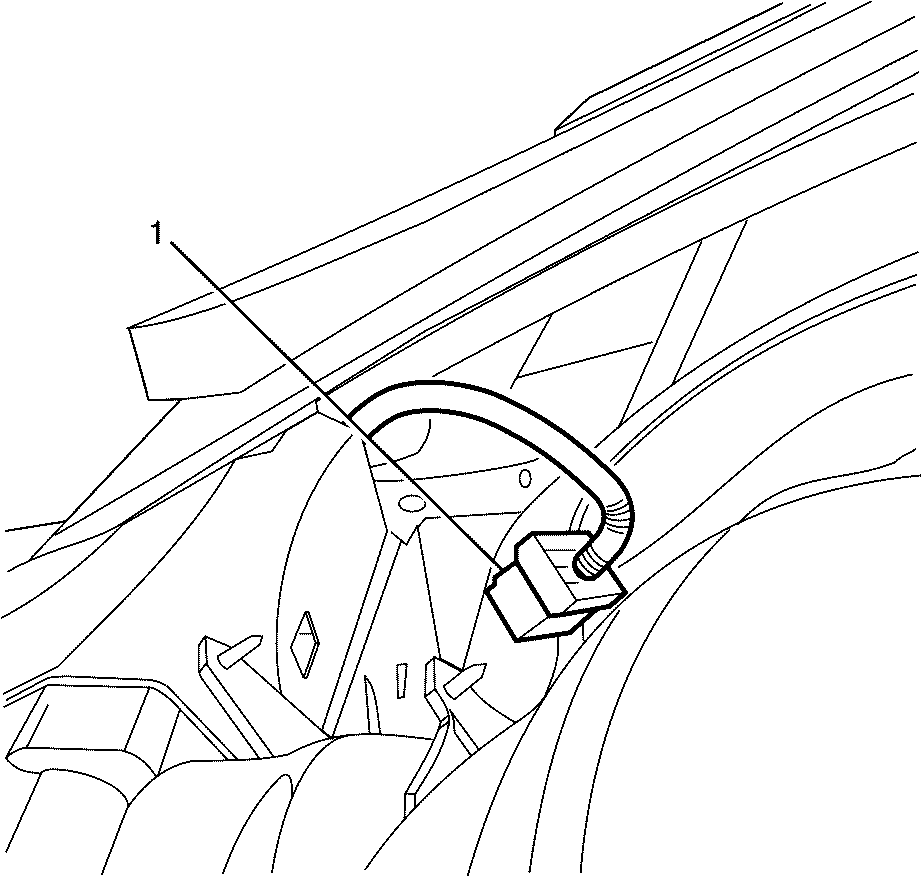
- Disconnect the headliner electrical connector (1), which
is located under the defroster grille.
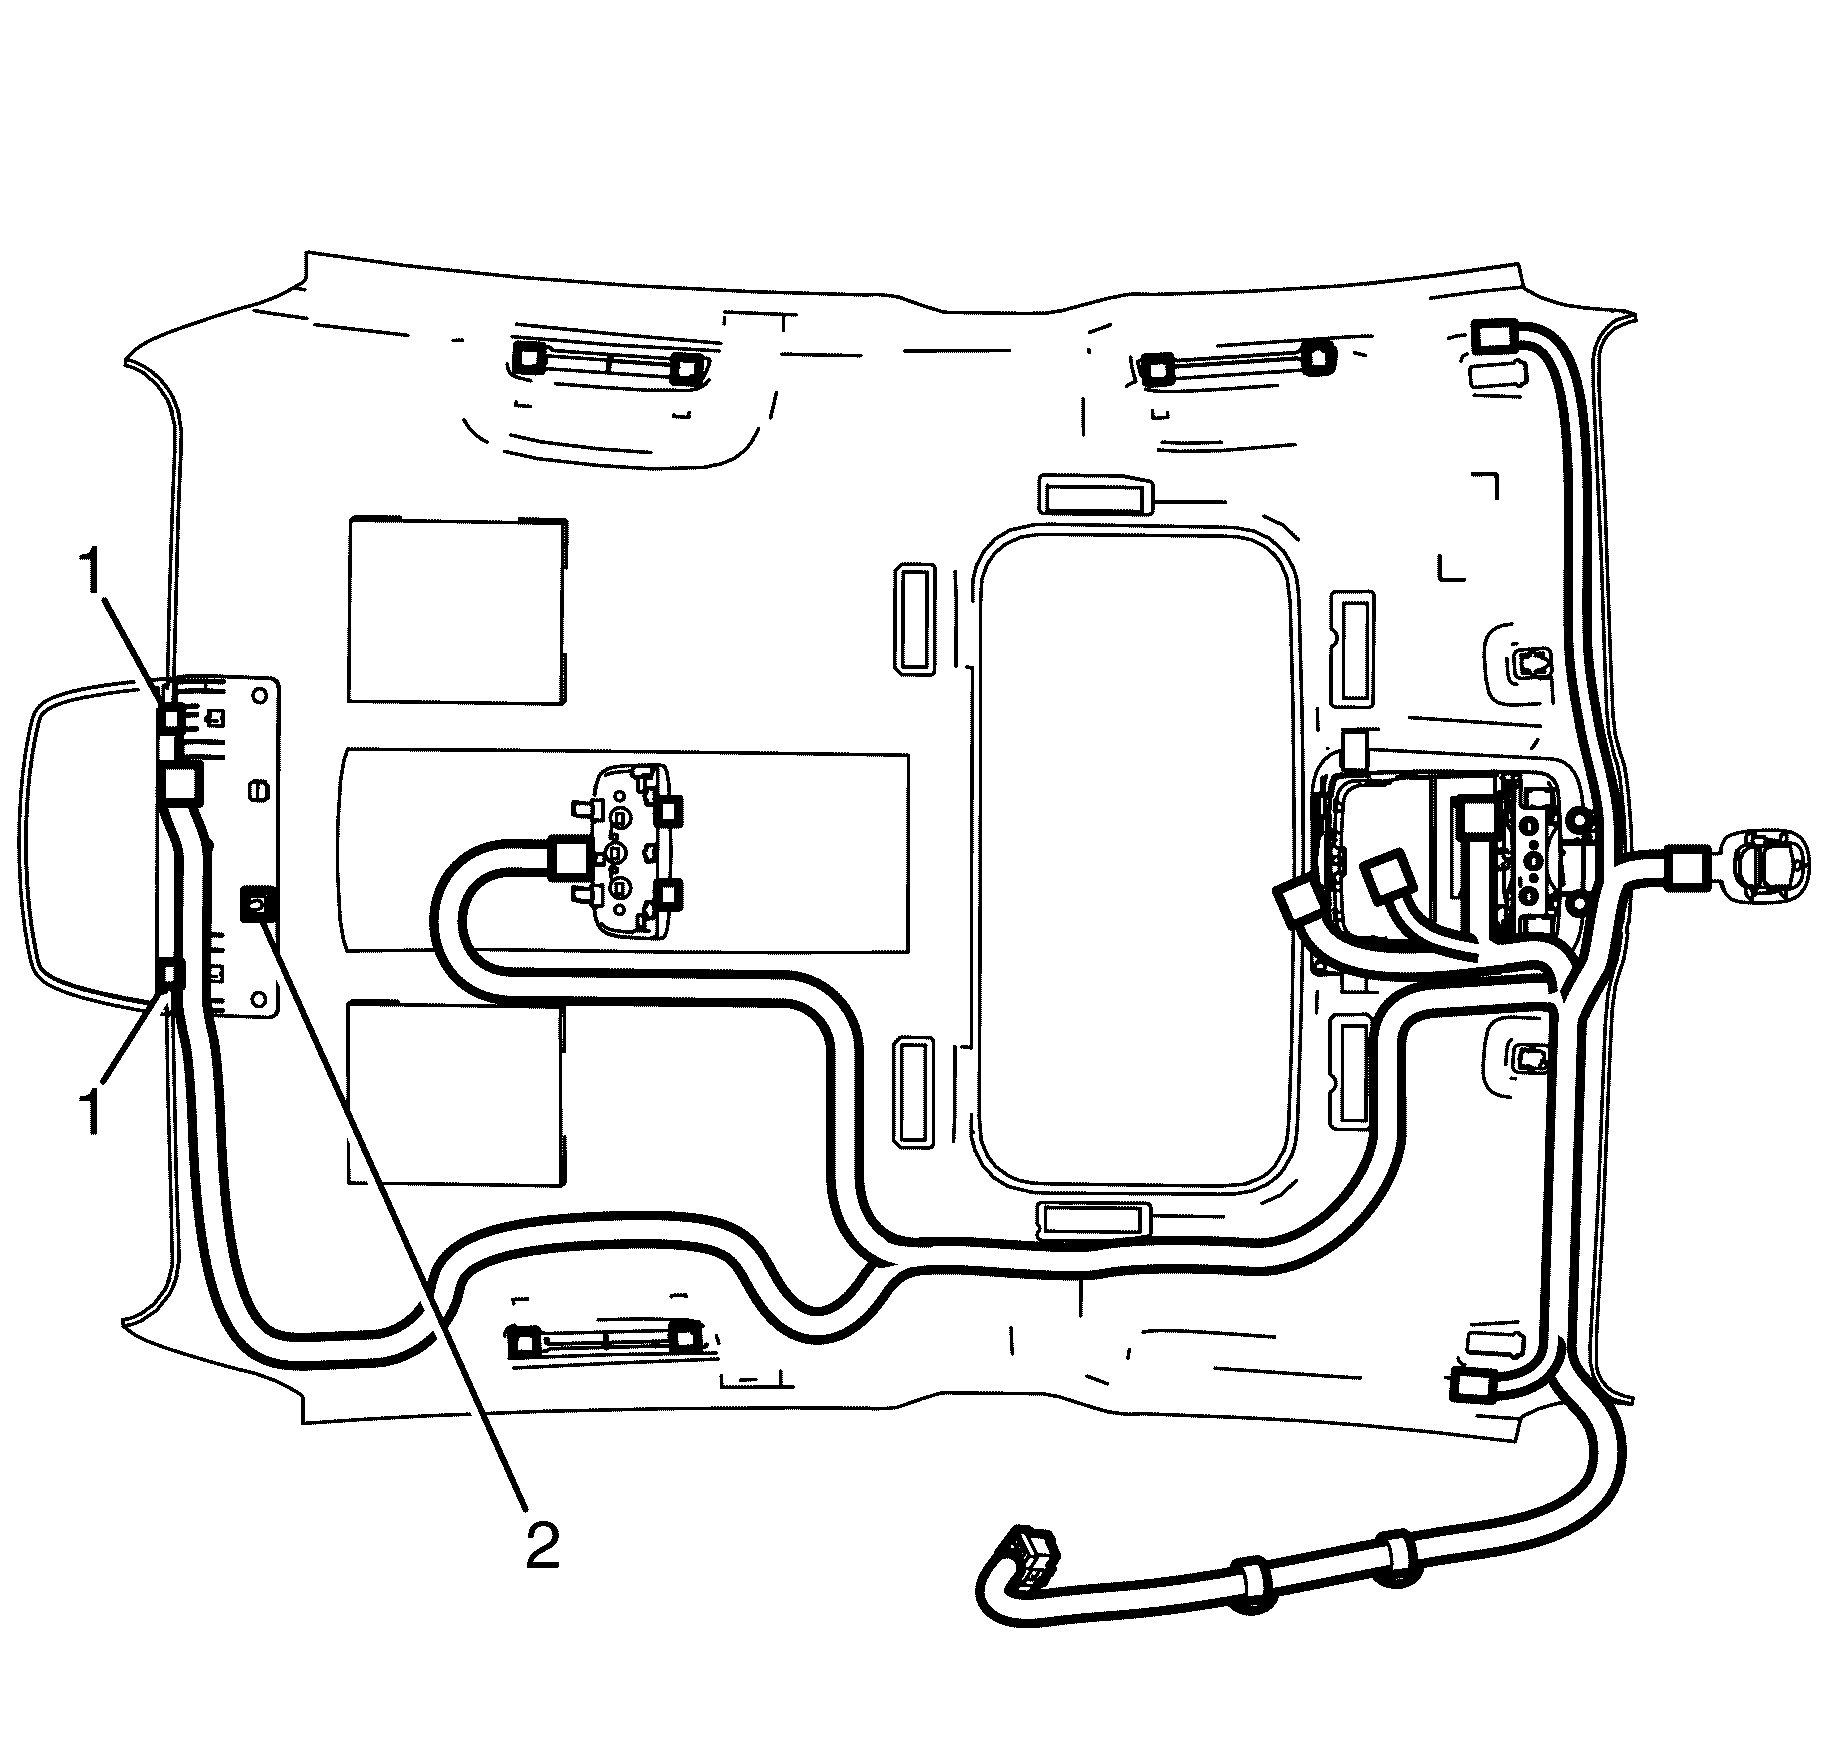
Important: Removal and installation of the headliner
requires the aid of an assistant, under no circumstances should it be removed or installed
by one person.
- Once all the components have been removed, disengage the rear retaining clips
(1).
- Remove the headliner assembly.
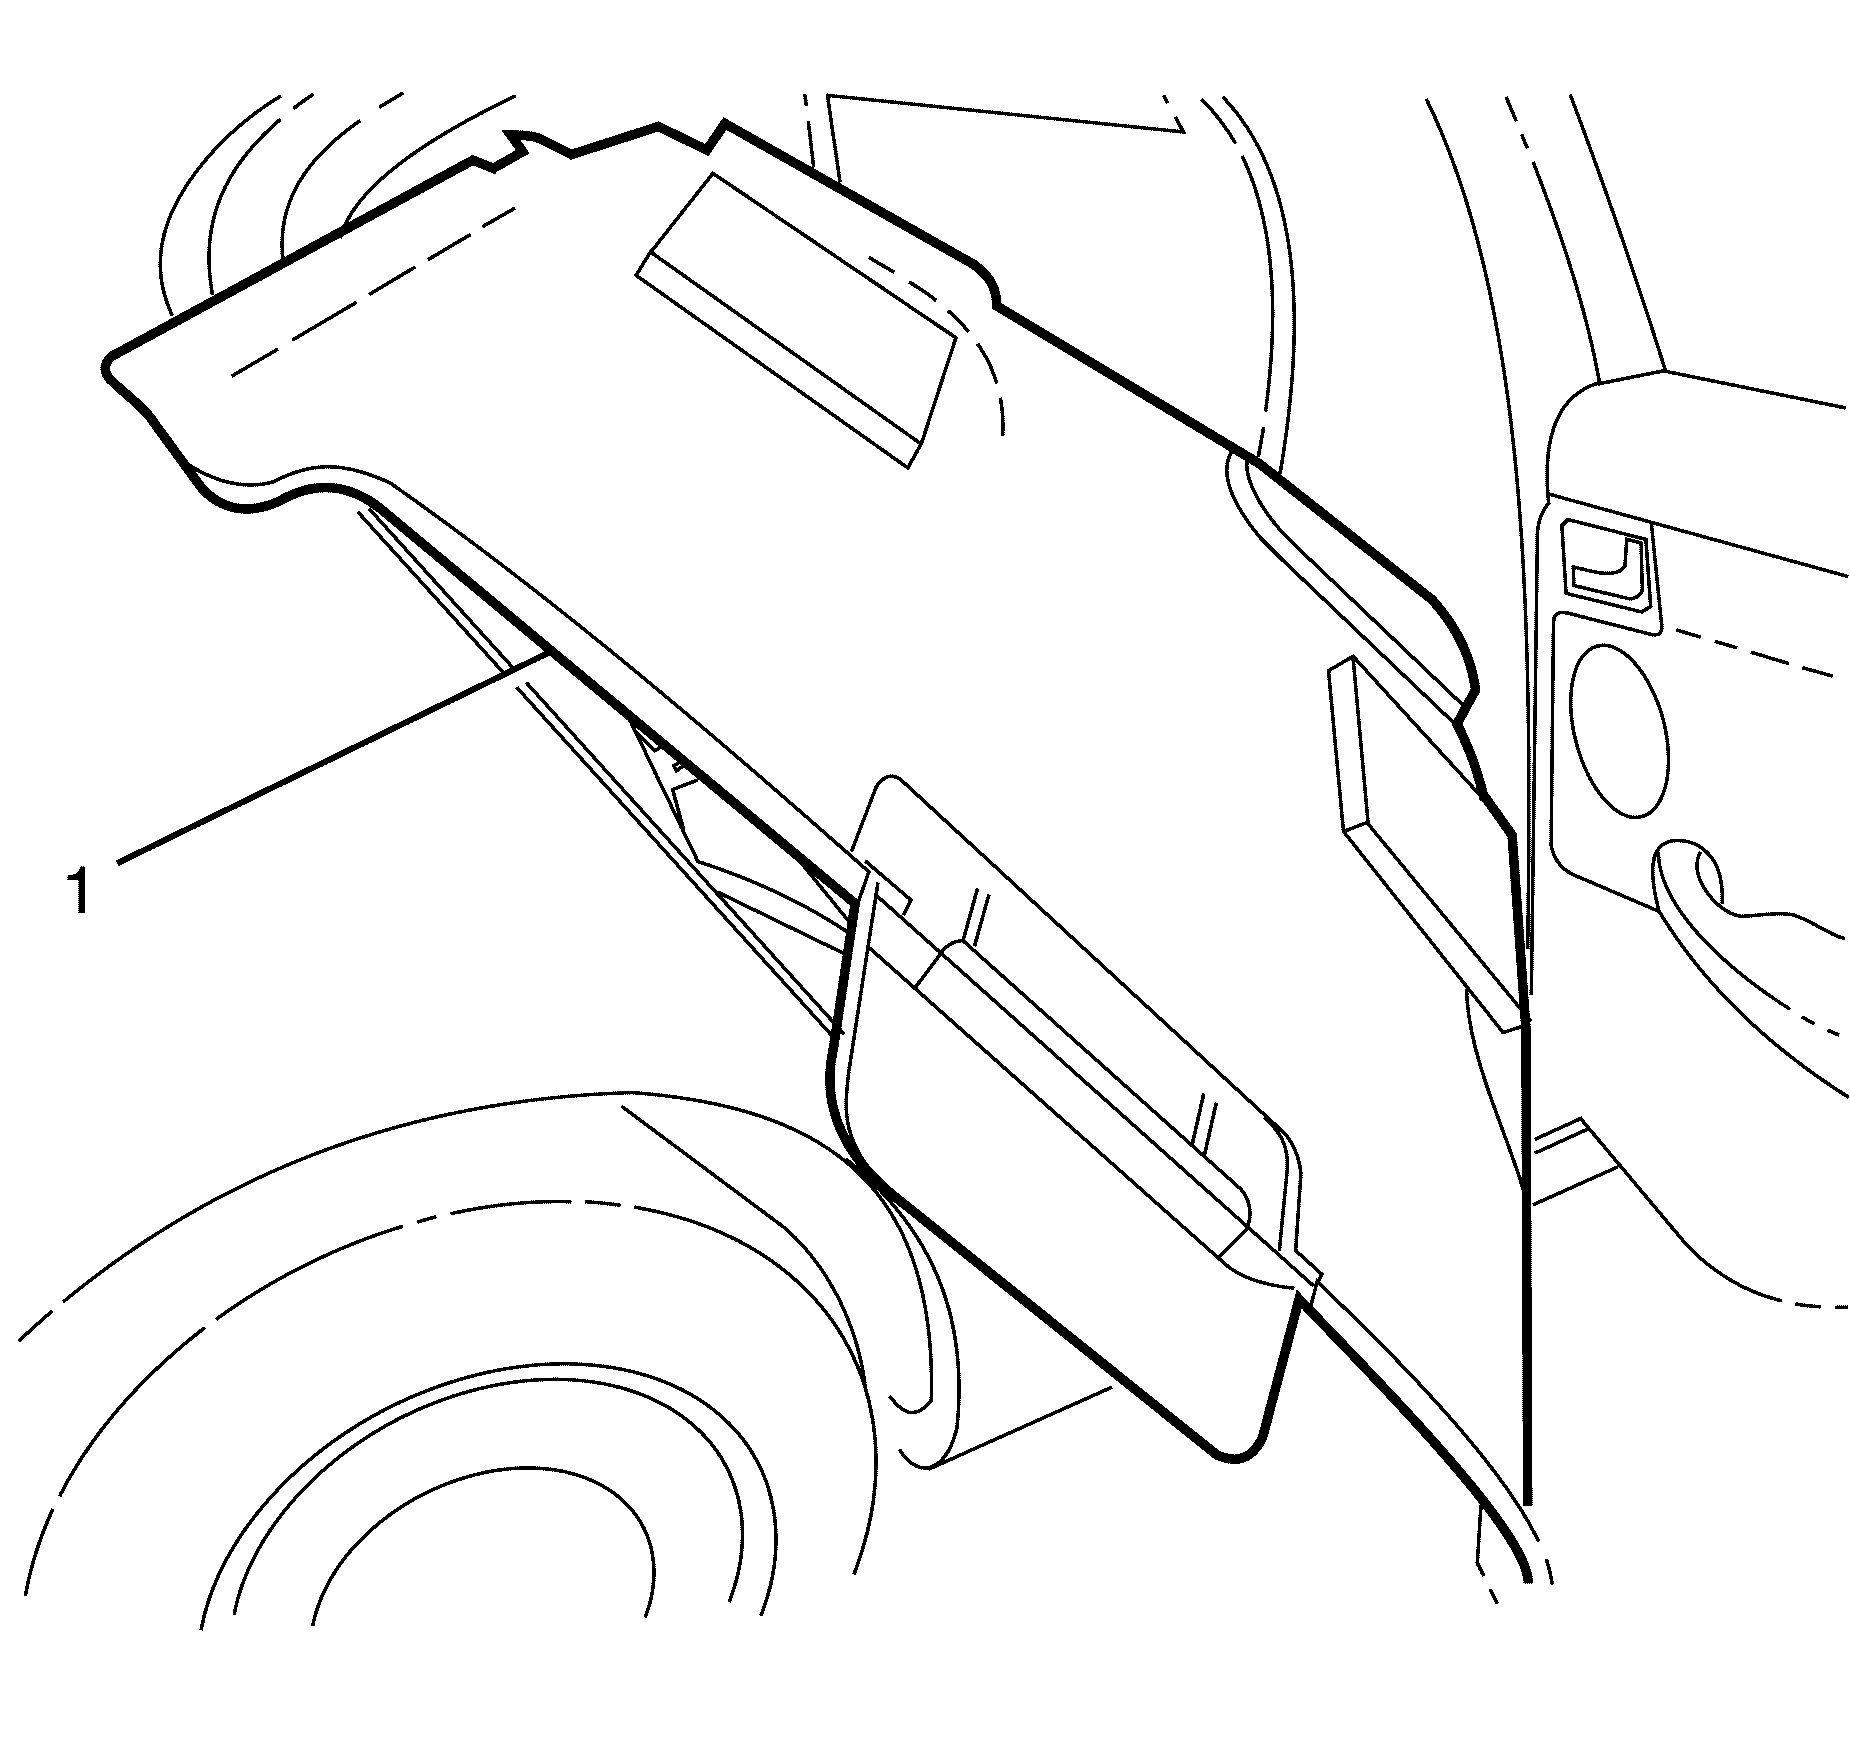
Important: The headliner must be removed as shown above.
- With the aid of an assistant, remove the headlining (1) via the right hand passenger
rear door.
Installation Procedure

Important: Take care not to fold the headliner. Folding
the headliner will result in visible creases in the headliner fabric.
- With the aid of an assistant, carefully place headlining (1) into vehicle via
right hand rear door, as per removal.

- Locate the datum pin (2) to the rear of the roof
assembly.
Important: Make sure that the headliner datum pin is
located in the rear of the roof assembly.
- Carefully engage the headliner retaining clips (1).

- Connect the headliner electrical connector (1).

- Attach the headlining wiring harness retaining clips
(1) to the A-pillar inner panel (2).

- Connect the rain sensor electrical connector (1).
- Install the following components as per removal:
- Test all components removed for correct operation.
Headlining Trim Panel Replacement LHD Sedan
Removal Procedure
Notice: Refer to General Repair Instructions in the Preface section.
- Remove the fuse from the passenger compartment fuse and relay panel assembly.
- Remove the following components as required:
Notice: Refer to General Repair Instructions in the Preface section.

- Disconnect the rain sensor electrical connector (1).
Notice: Refer to General Repair Instructions in the Preface section.
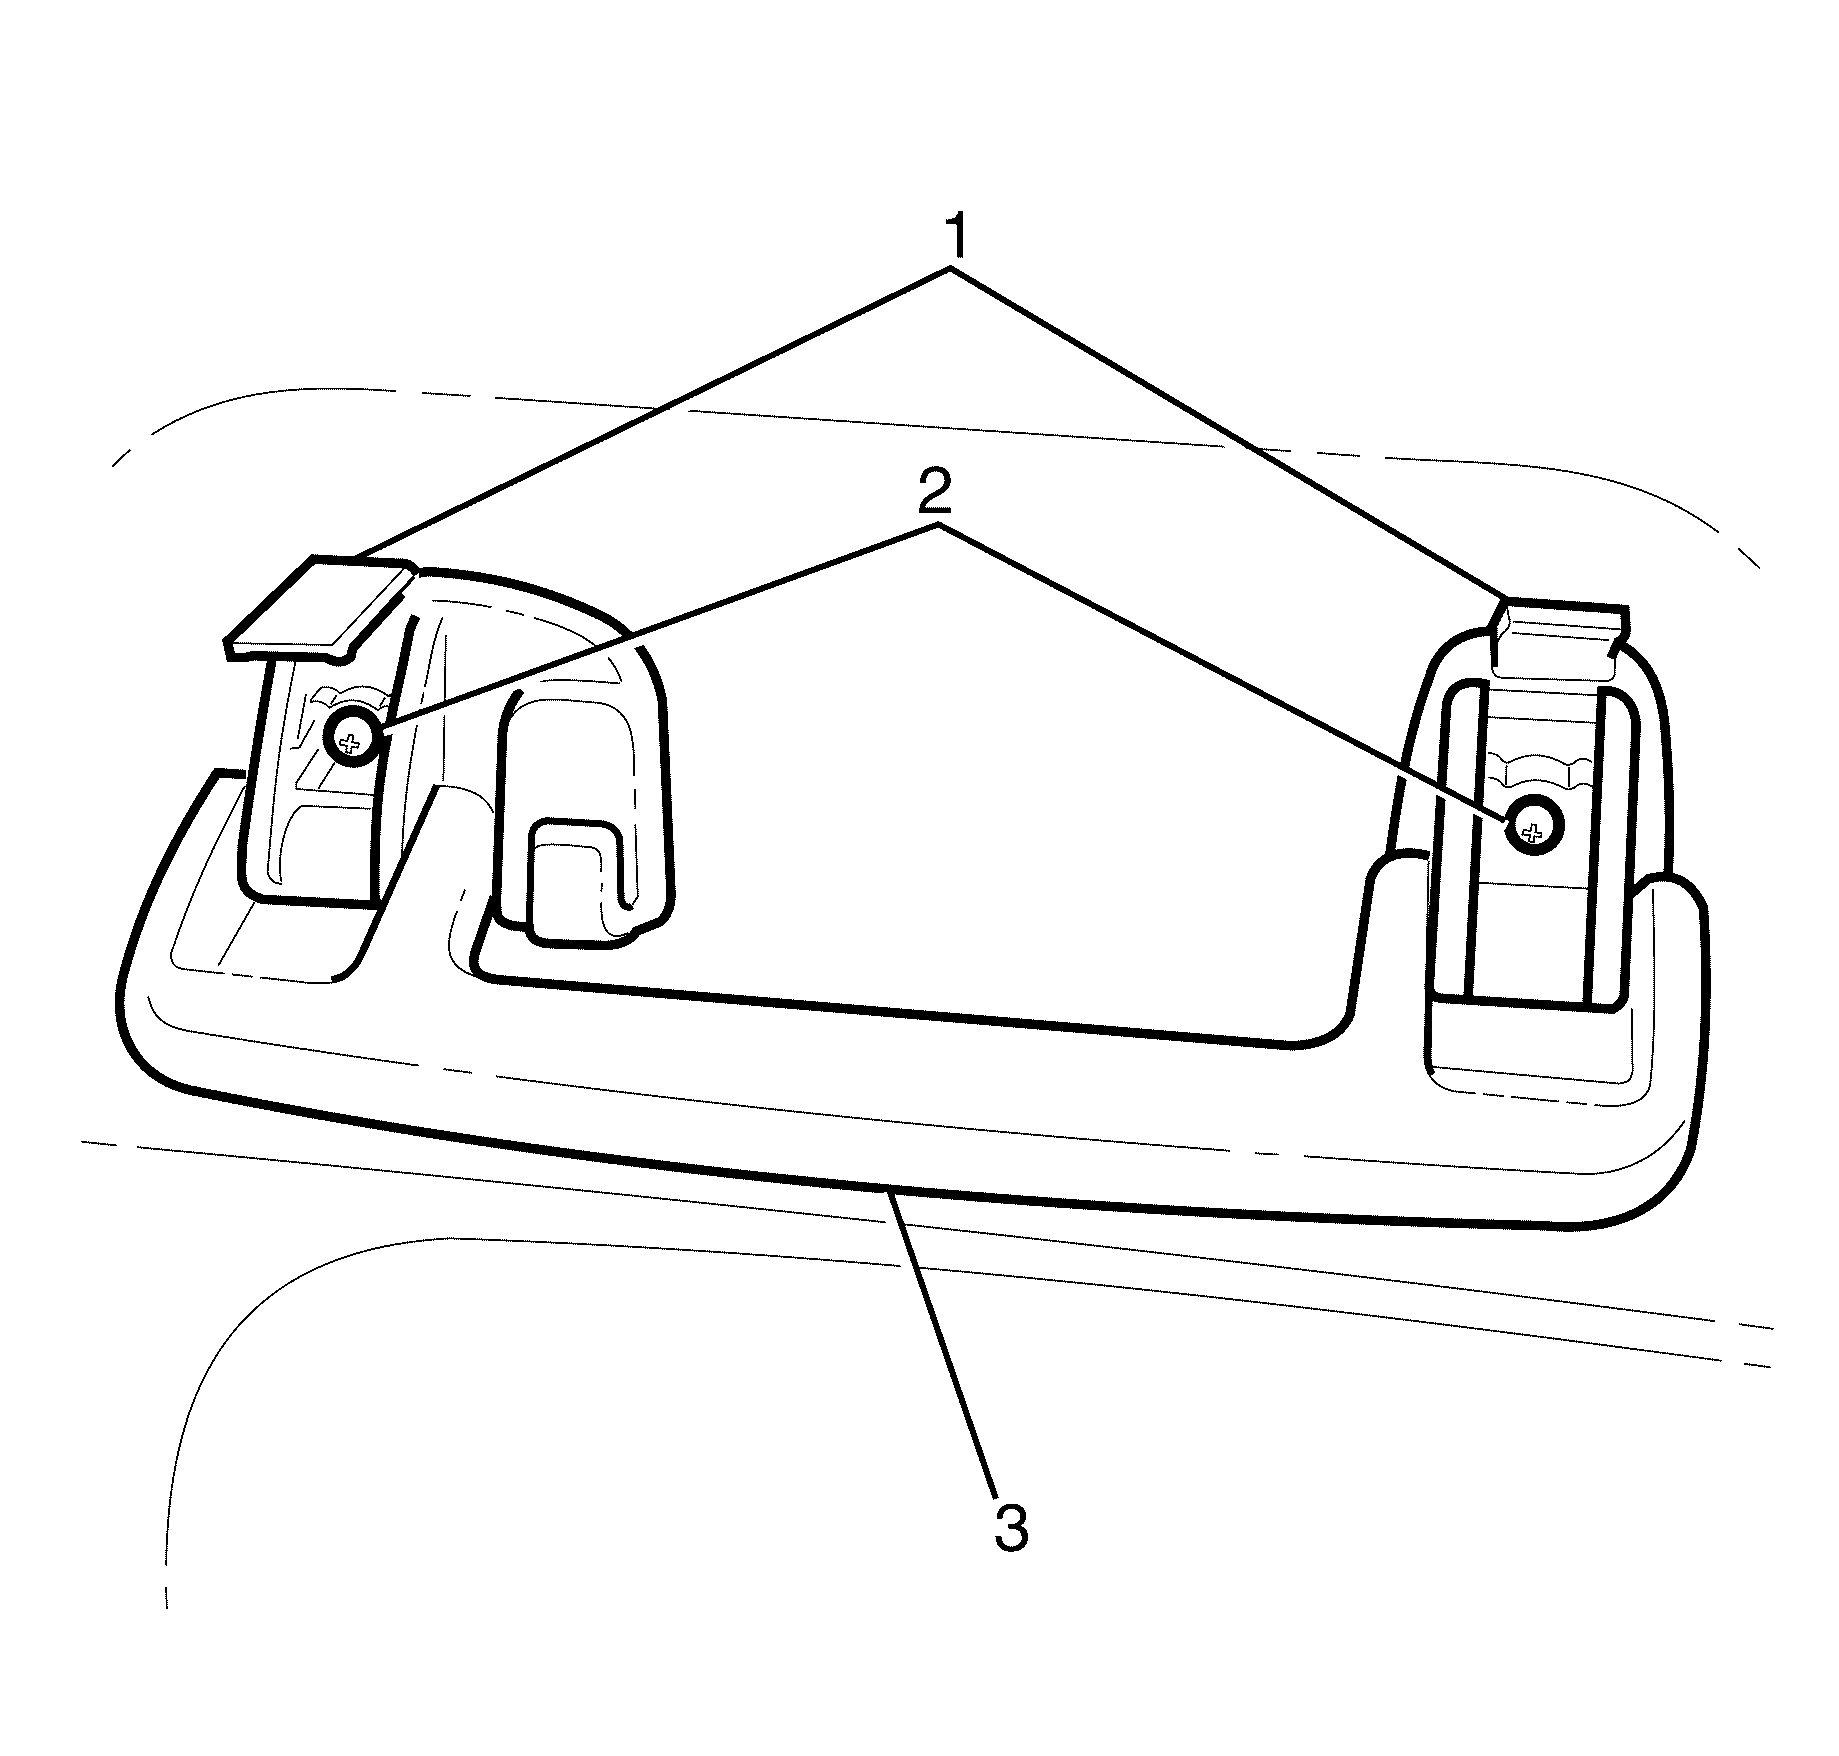
- Prise open the assist handle (3) screw covers (1).
- Remove the two retaining screws (2) and leave the assist handles attach
the headliner.
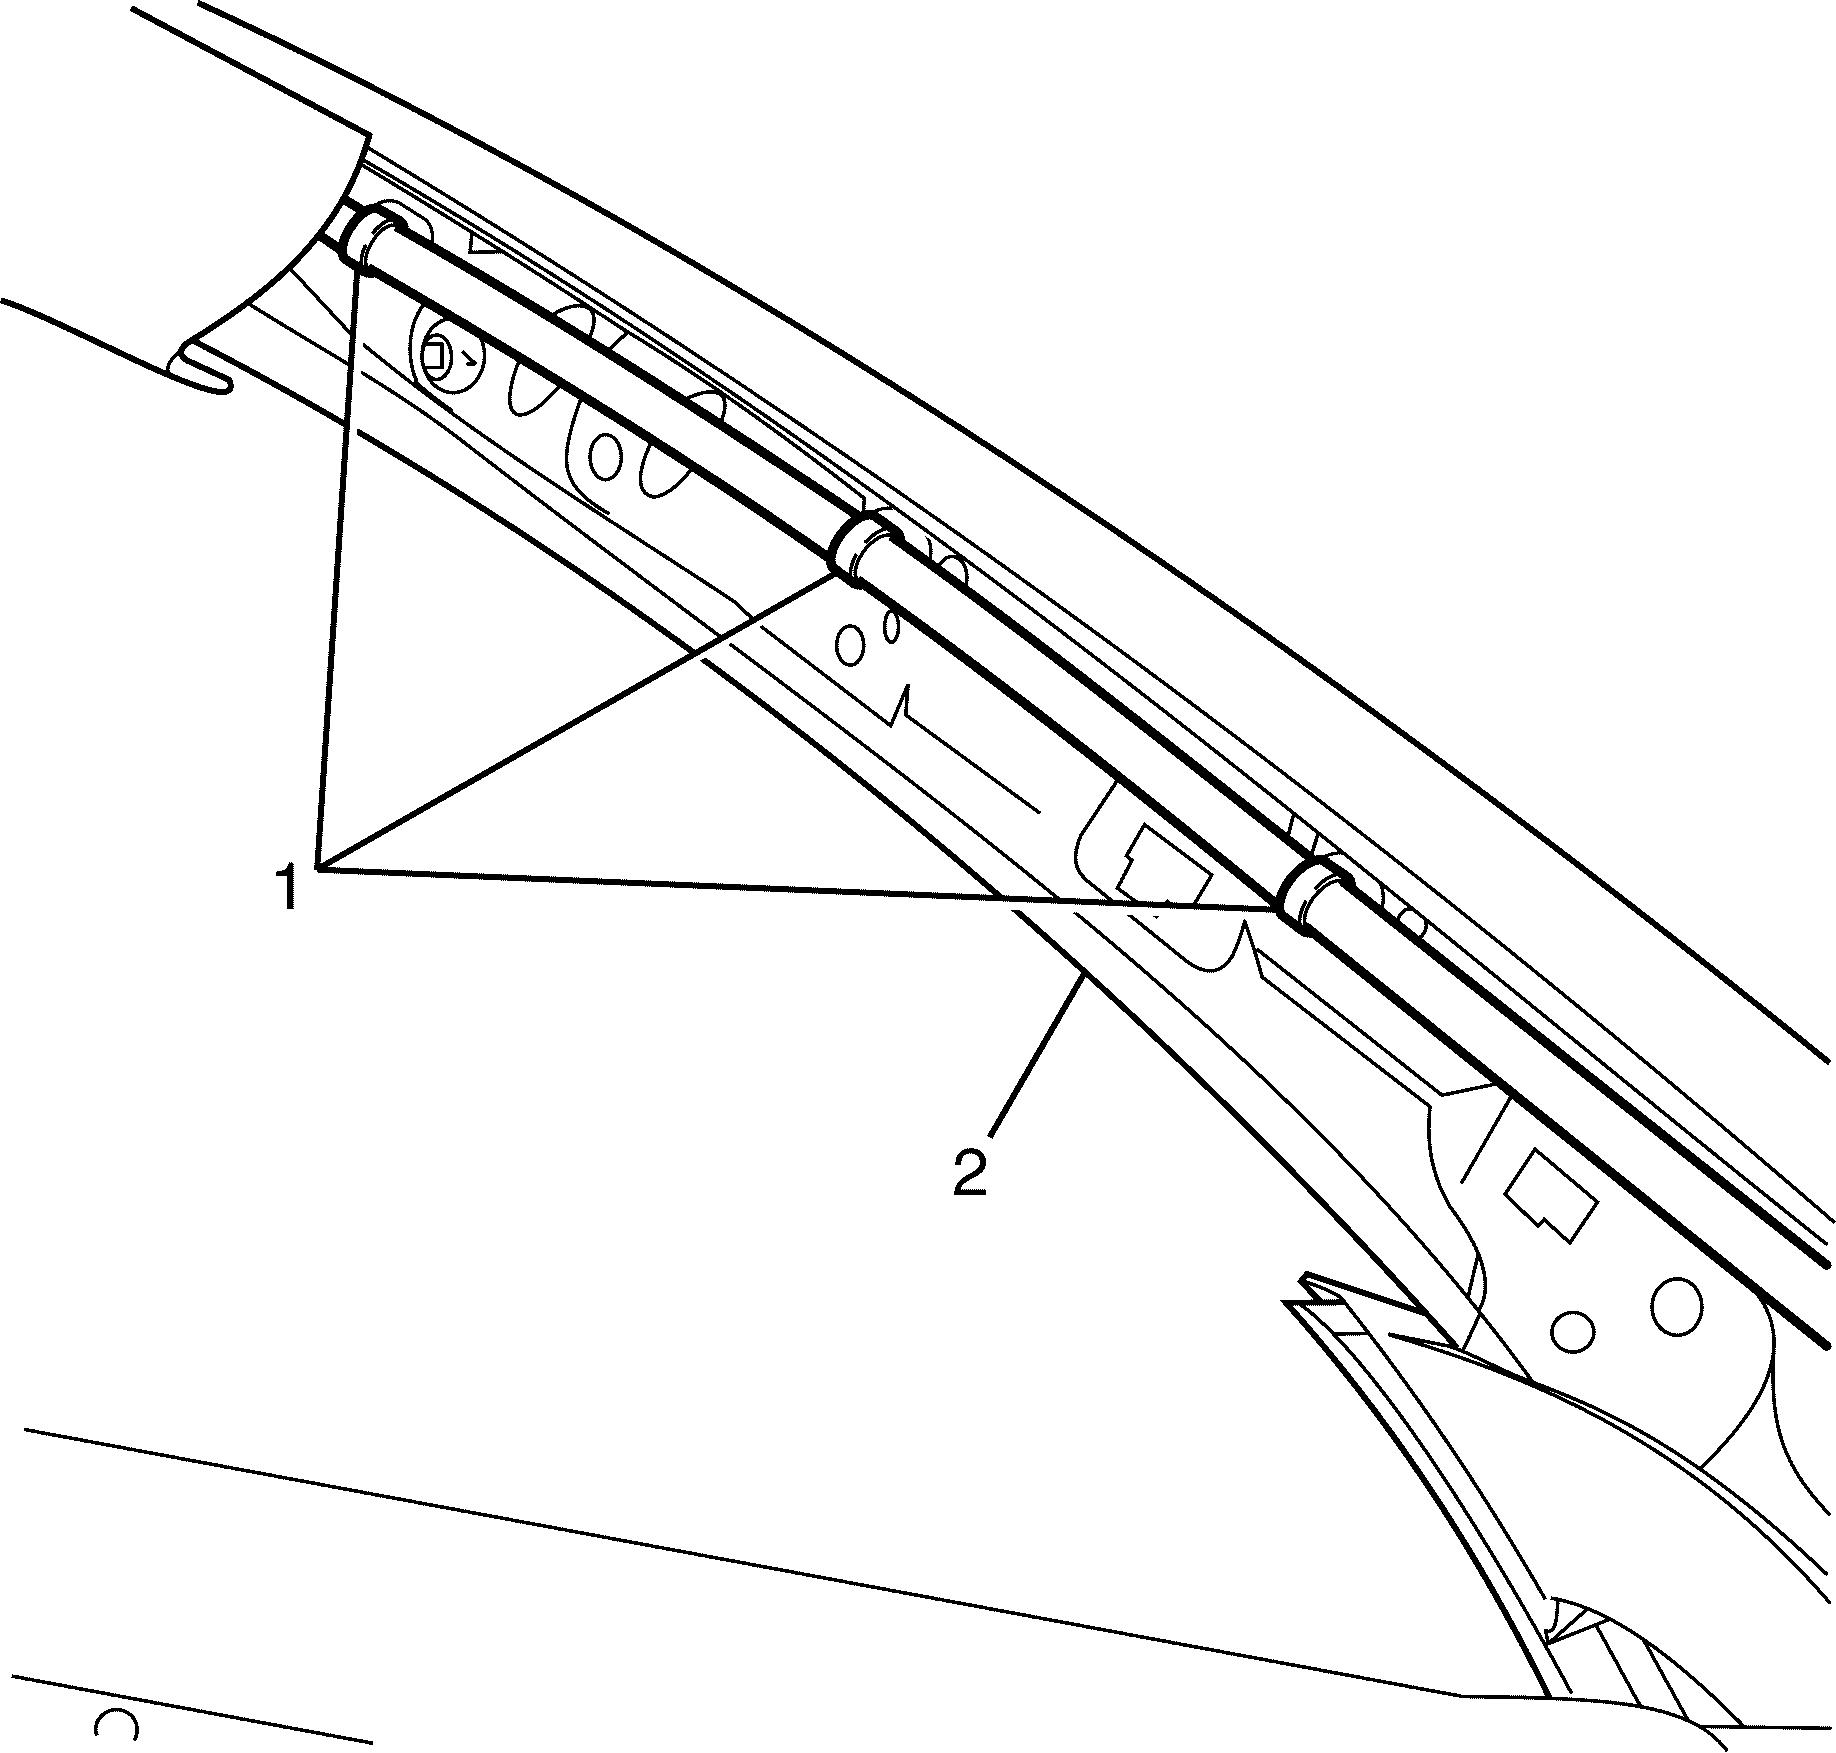
- Detach the headlining wiring harness retaining clips
(1) located on the A-pillar inner panel (2).
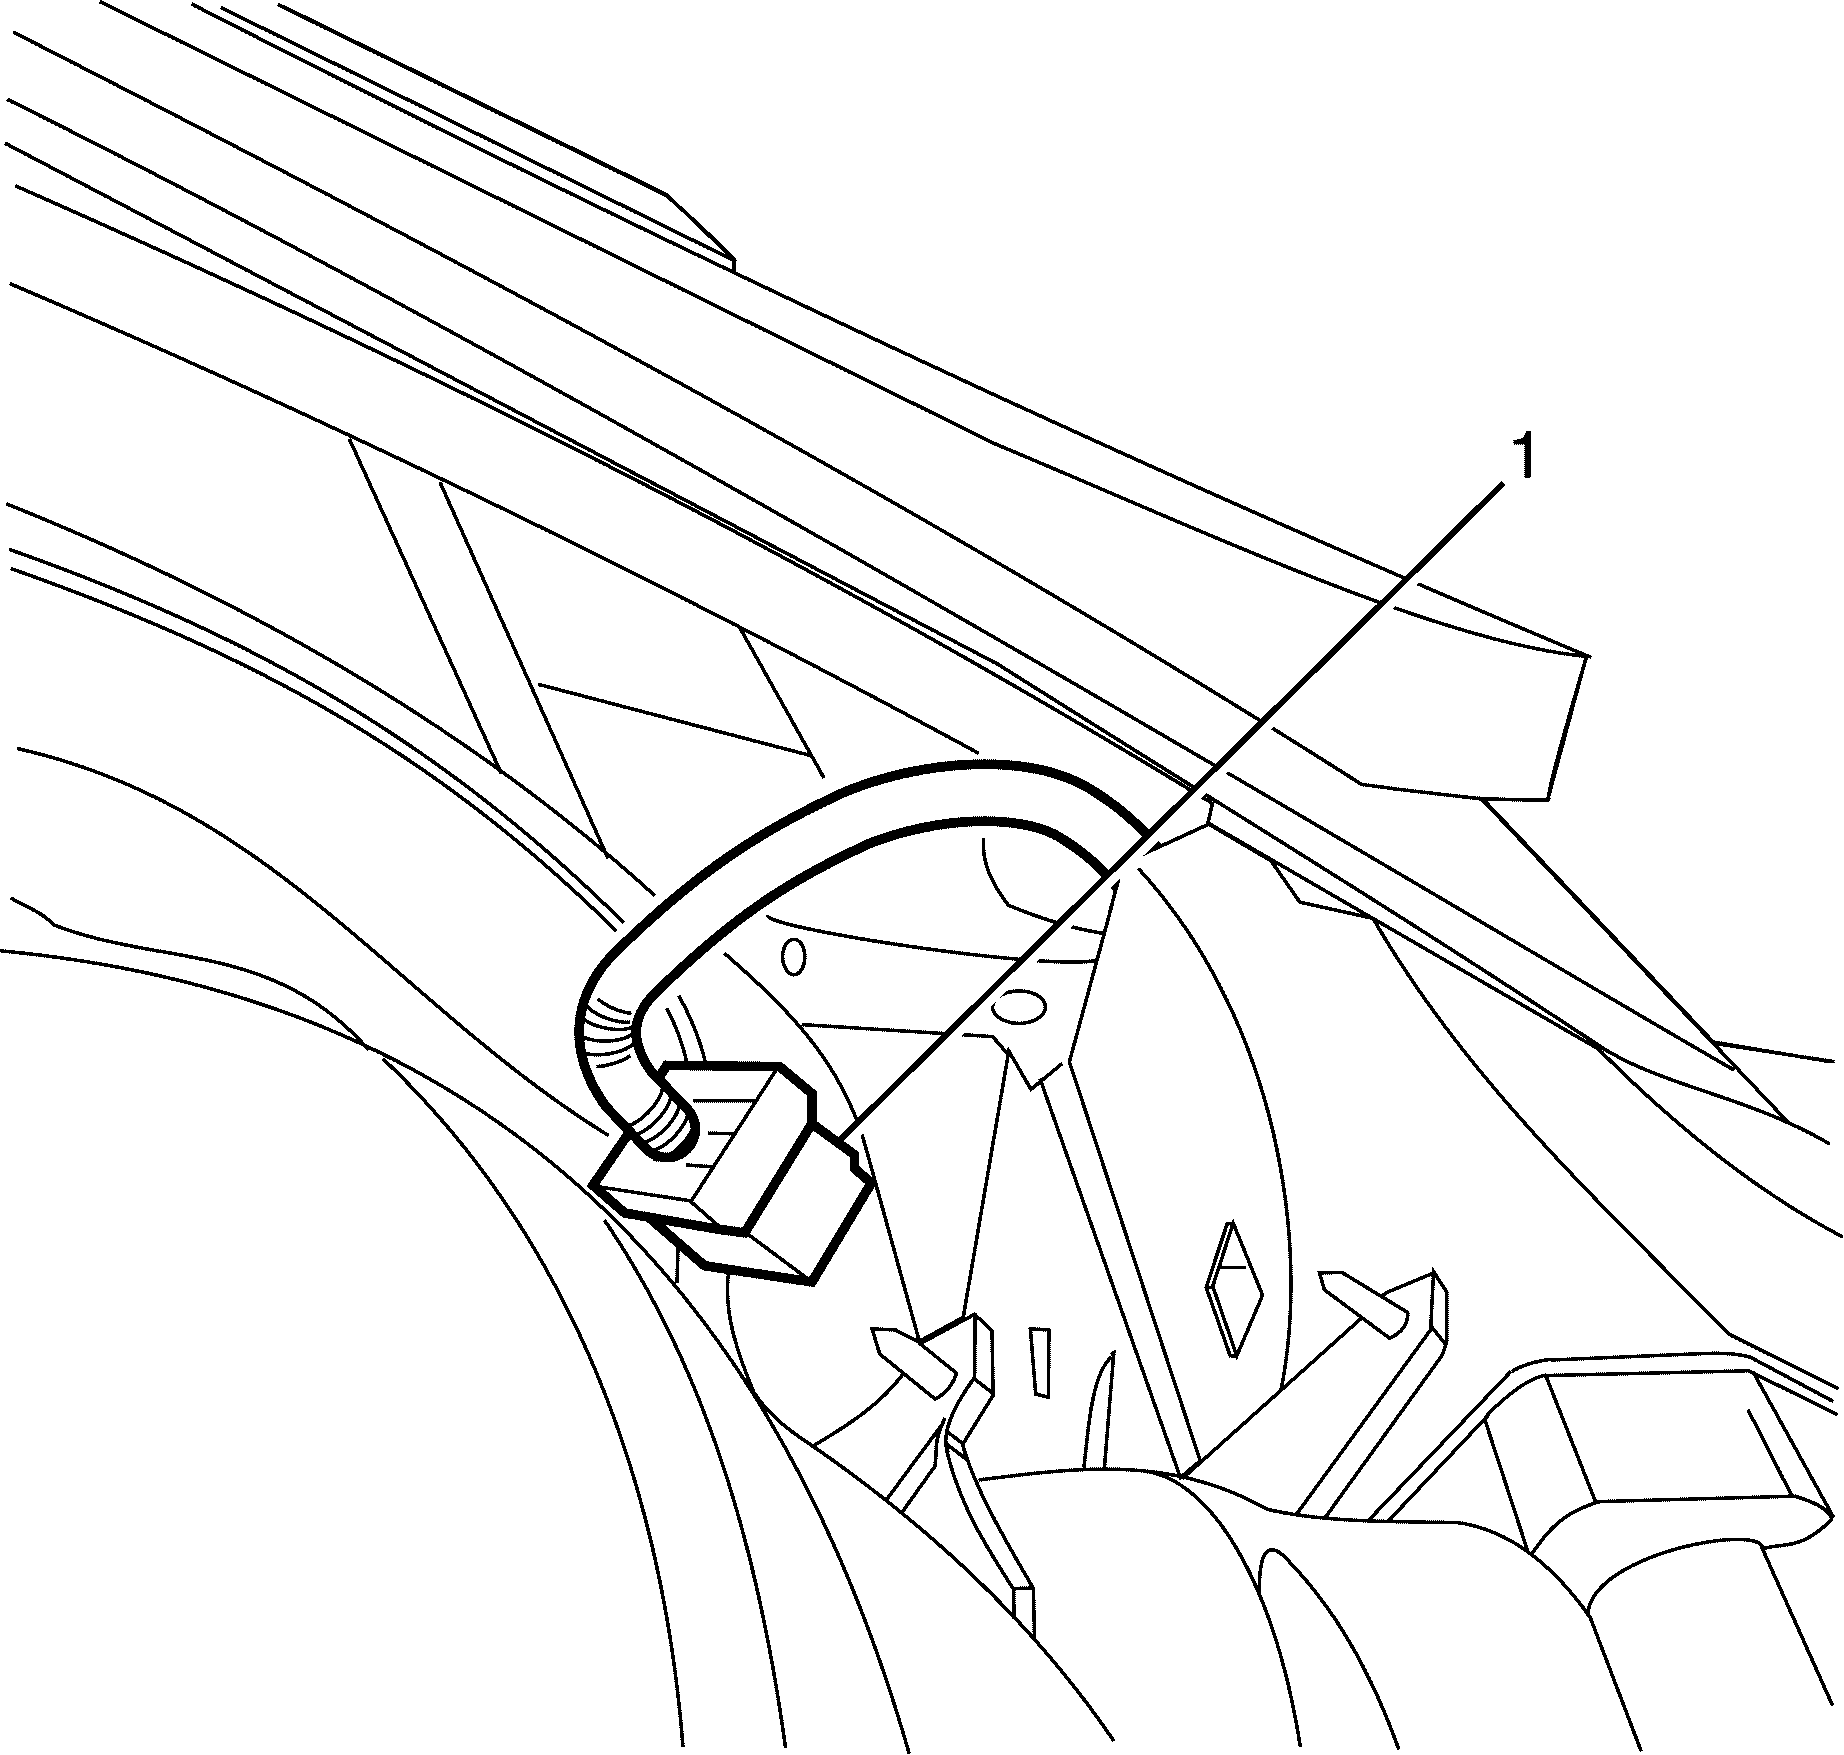
- Disconnect the headliner electrical connector (1),
which is located under the defroster grill.
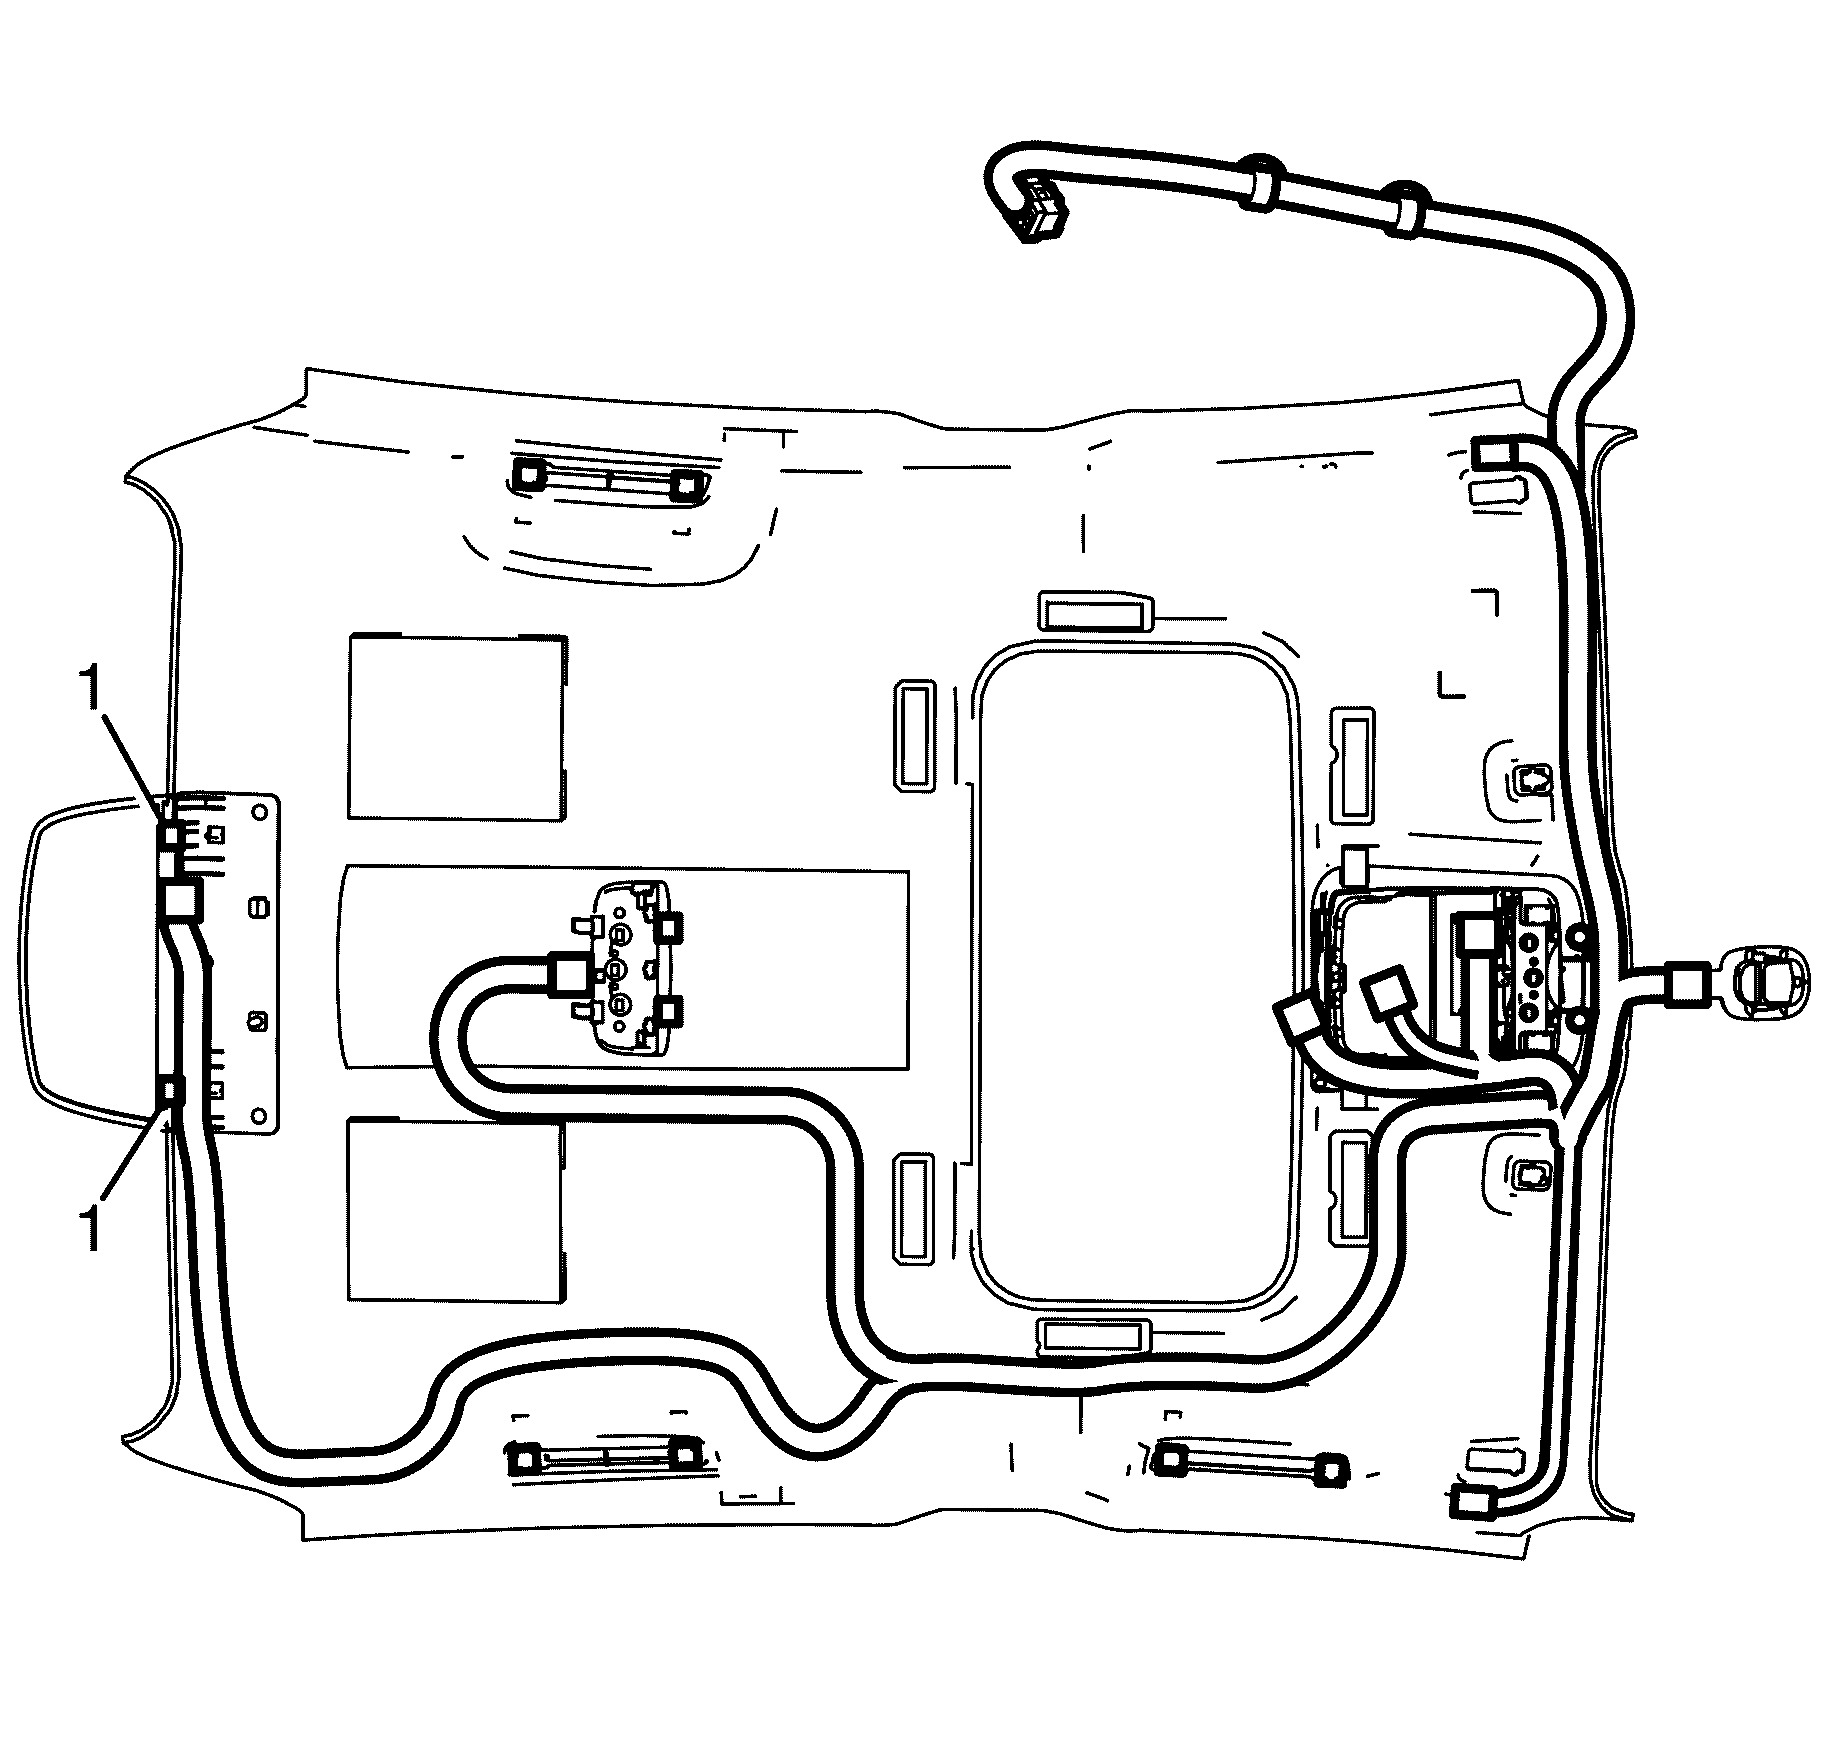
Important: Removal and installation of the headliner
requires the aid of an assistant, under no circumstances should it be removed or installed
by one person.
- Once all the components have been removed, disengage the rear retaining clips
(1).
- Remove the headliner assembly.
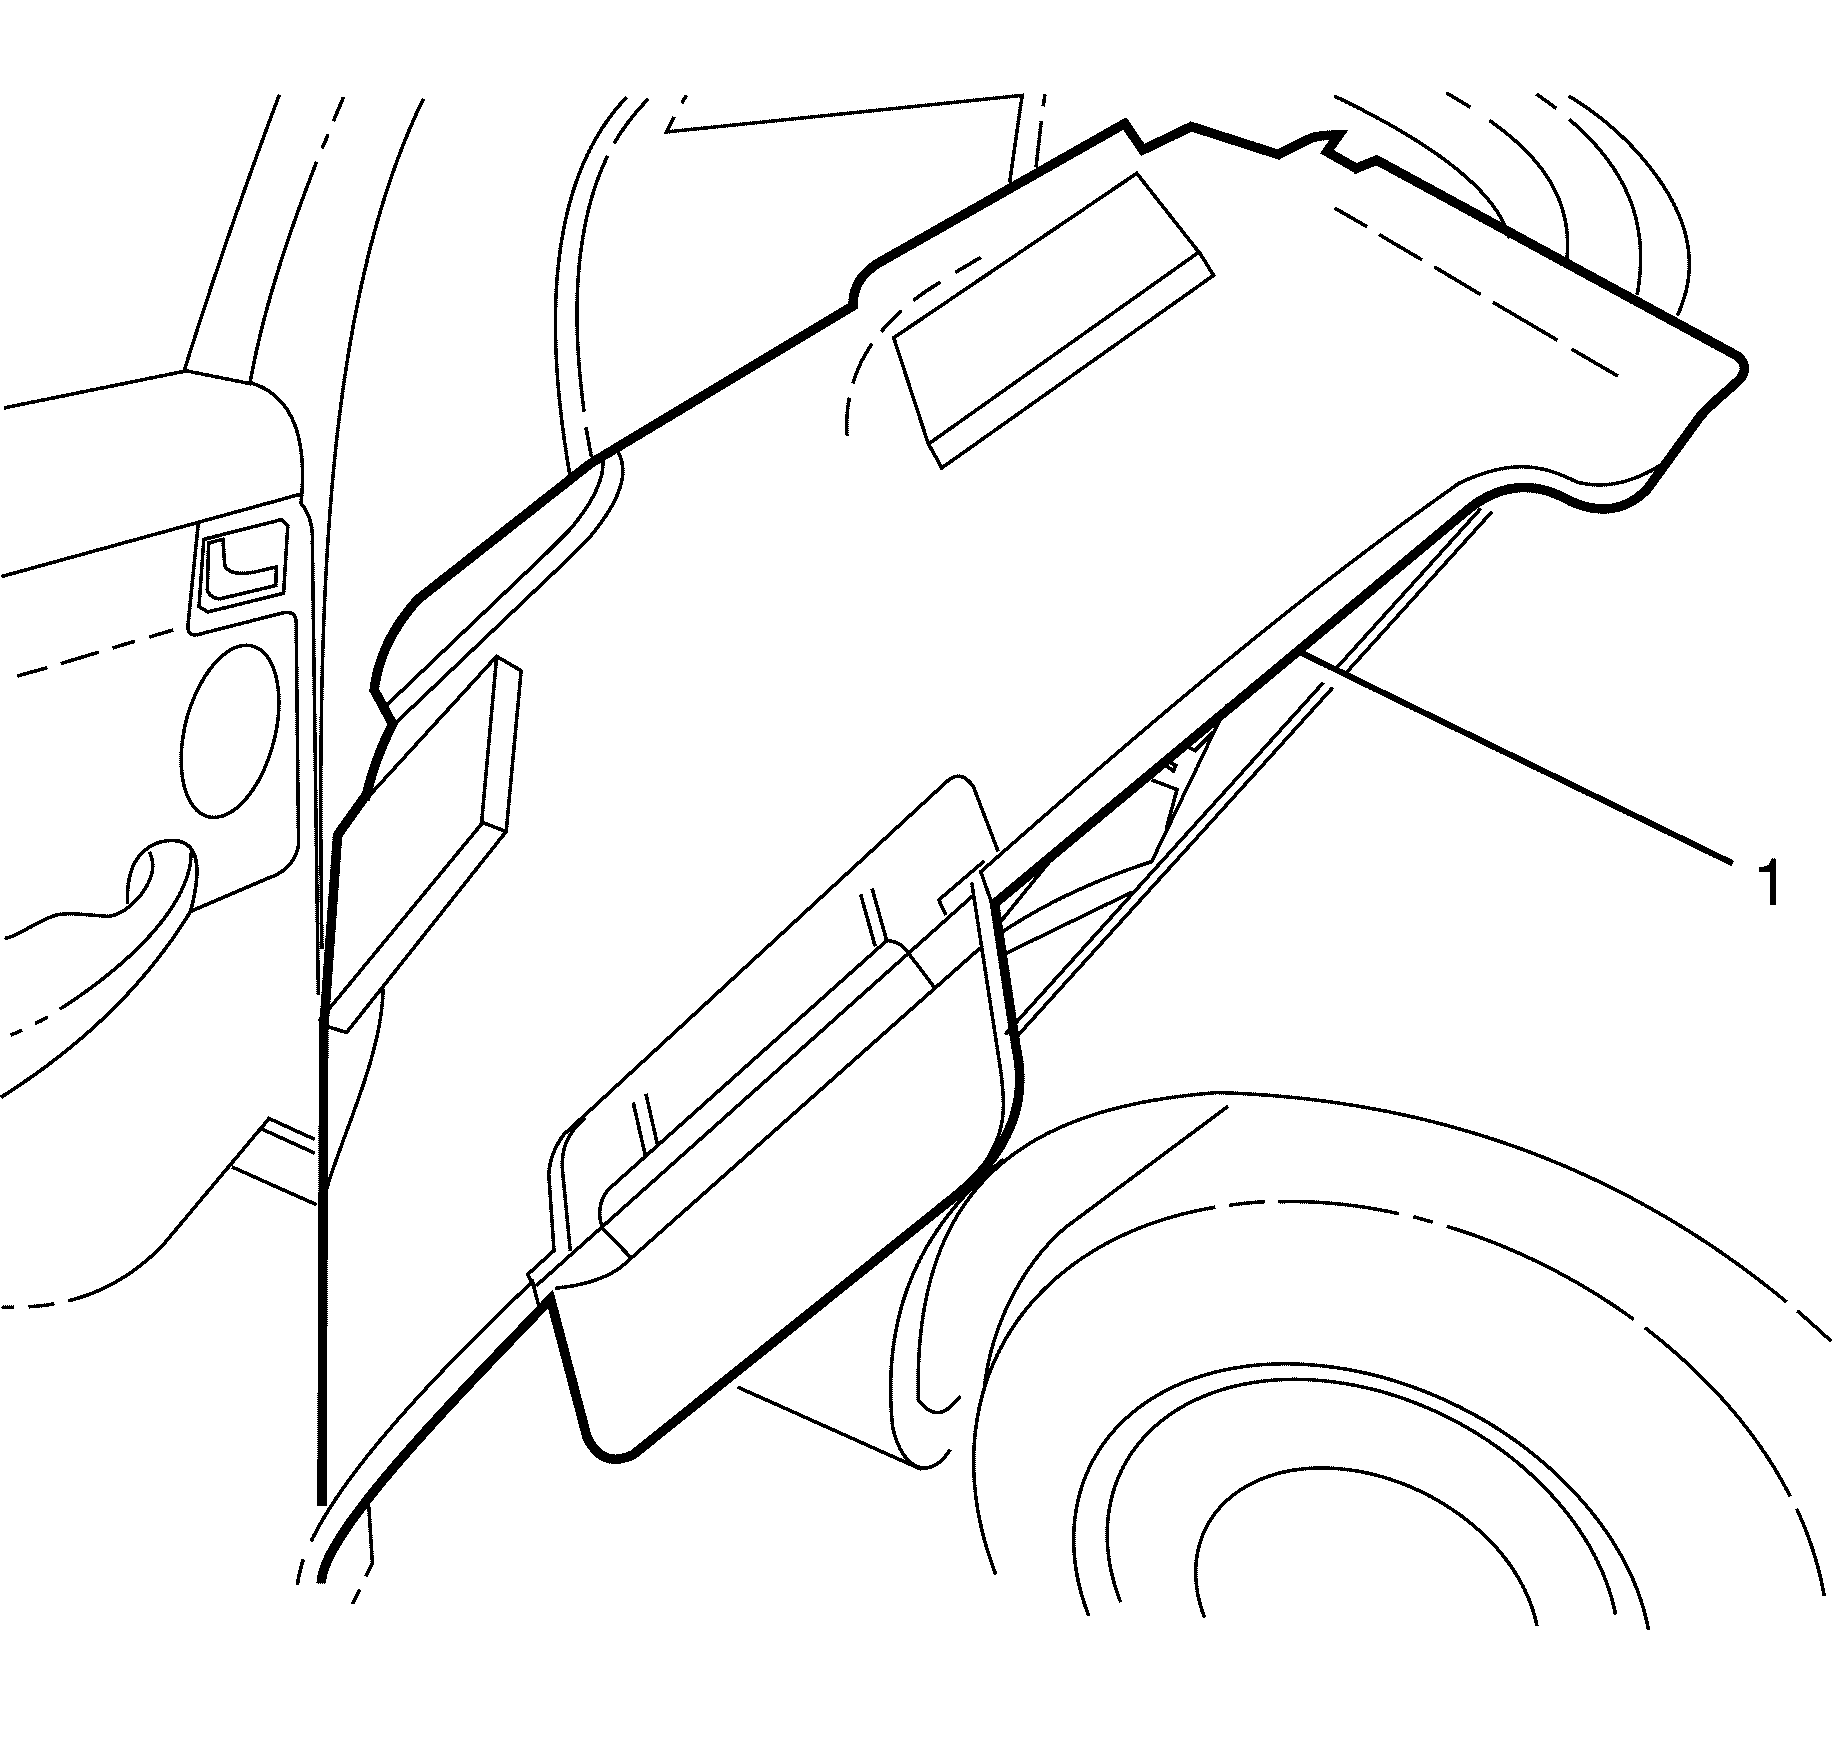
Important: The headliner must be removed as shown above.
- Remove the headlining (1) via the left hand passenger rear door.
Installation Procedure

- Carefully place headlining (1) into vehicle via right
hand rear door, as per removal.

- Carefully engage the headliner retaining clips (1).

- Connect the headliner electrical connector (1).

- Attach the headlining wiring harness retaining clips
(1) to the A-pillar inner panel (2).
Notice: Refer to General Repair Instructions in the Preface section.

- Install the assist handles (3) retaining torx screws (2).
Tighten
Tighten the assist handle retaining screws to 2.0 N·m
(18 lb in).
- Close the retaining torx screw covers (1).

- Connect the rain sensor electrical connector (1).
- Install the following components as per removal:
- Test all components removed for correct operation.


