Camshaft Bearing Removal and Installation Removal and Installation
Removal Procedure
Tools Required
J 33049 Camshaft Bearing Remover/Installer
- Prior to bearing removal, inspect the camshaft bearings for loose fit in the engine block bearing bores.
- Repair or replace the components as required.
- Select the expanding driver (4-8) and washer (2,3) from the tool information.
- Assemble the tool.
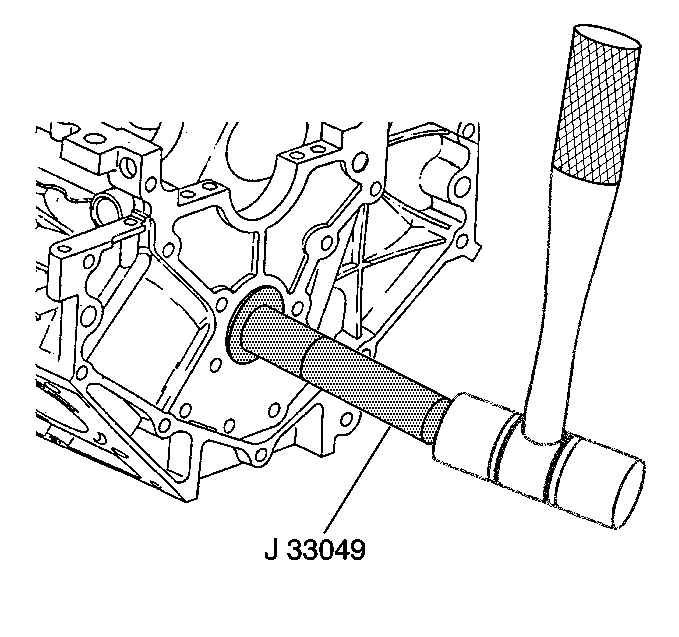
- Insert the tool through the front of the engine block and into the bearing.
- Tighten the expander assembly (15) nut until snug.
- Push the guide cone (1) into the front camshaft bearing to align the tool.
- Drive the bearing from the block bore.
- Repeat the above procedures to remove the remaining bearings.

Important: A loose camshaft bearing may be caused by an enlarged, out of round or damaged engine block bearing bore.
Refer to Camshaft and Bearings Cleaning and Inspection .

Refer to Camshaft Bearing Removal and Installation .

Important: To remove the front camshaft bearing, operate the tool from the rear of the block using the guide cone (1) in the rear camshaft bearing bore.
Installation Procedure
Tools Required
J 33049 Camshaft Bearing Remover/Installer
- Inspect the camshaft bearings for loose fit in the bearing bores.
- Select the expanding driver (4-8) and washer (2,3) from the tool instructions.
- Assemble the tool.
- Insert the tool through the front of the engine block and to the bearing bore.
- Install the bearing onto the expanding driver (4-8).
- Tighten the expander assembly (15) nut until the tool is snug in the bearing.
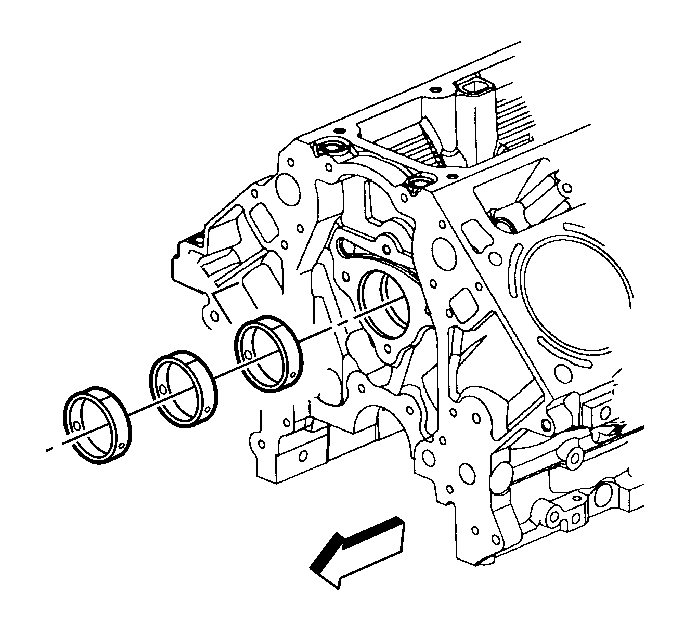
- Align the oil lubrication hole in the bearing with the oil galleries in the engine block.
- Push the guide cone (1) into the front camshaft bearing bore to align the tool.
- Drive the bearing into the bore.
- Repeat the above procedures to install the remaining bearings.
- Perform a final inspection to insure all the oil lubrication holes in the bearings align with the oil galleries in the engine block.

Refer to Camshaft and Bearings Cleaning and Inspection .
| • | A loose camshaft bearing may be caused by an enlarged, out-of-round or damaged engine block bearing bore. |
| • | Repair or replace the components as required. |

Refer to Camshaft Bearing Removal and Installation .


Important: The camshaft bearing oil holes must align with the oil galleries in the engine block. When the camshaft bearing is properly aligned, the seam in the bearing will be located at the 12 o'clock position (with the engine in an upright position).
After installation of camshaft bearings, inspect the camshaft bearing oil holes for proper alignment with the oil galleries. An improperly aligned camshaft bearing oil gallery hole will restrict oil flow to the bearing and camshaft journal.When properly aligned, the seam in the camshaft bearing will be located at the 12 o'clock position (with the engine in an upright position).

Important: To install the front camshaft bearing, operate the tool from the rear of the block using the nylon cone (1) in the rear camshaft bearing bore.
Camshaft Bearing Removal and Installation J 33049 Tool Instructions
Bearing, Expander, and Expander Driver Information
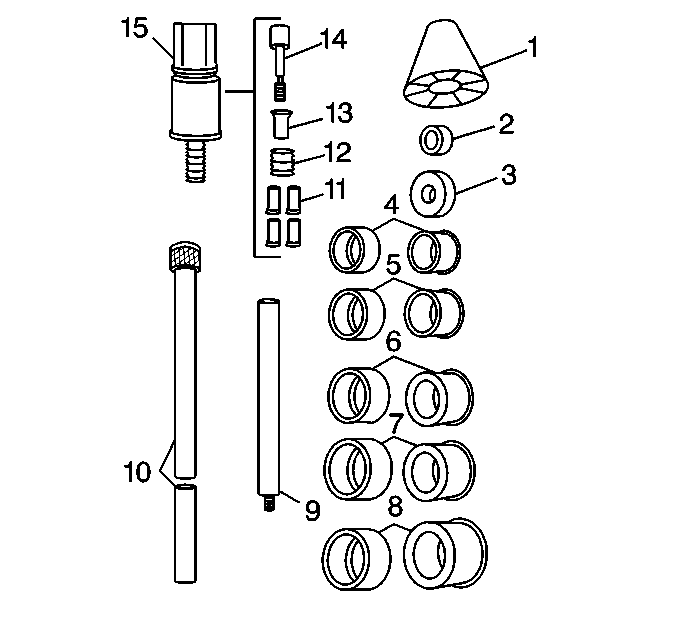
- The tool consists of a guide cone (1), driving washers (2,3), expander bearing drivers (4-8), driver bars (9,10), expander jaws (11), expander sleeve (12), expander cone (13), expander shaft (14), and expander assembly (15).
- Expander bearing driver number one inside diameter is 28.575-37.465 mm (1.125-1.475 in) and is used with the expander assembly and the small washer.
- Expander bearing driver number two inside diameter is 37.465-43.180 mm (1.475-1.700 in) and is used with number one expanding driver and the small washer.
- Expander bearing driver number three inside diameter is 43.180-48.895 mm (1.700-1.925 in) and is used with number two expanding driver and the large washer.
- Expander bearing driver number four inside diameter is 48.895-54.610 mm (1.925-2.150 in) and is used with number three expanding driver and the large washer.
- Expander bearing driver number five inside diameter is 54.610-60.325 mm (2.150-2.375 in) and is used with number four expanding driver and the large washer.
- Expander bearing driver number six inside diameter is 60.325-68.326 mm (2.375-2.690 in) and is used with number five expanding driver and the large washer.

Tool Assembly and Operation
- Select the proper expanding driver and washer from the expanding driver and washer information.
- Place the expanding driver onto the expander assembly.
- Check to insure that the separation lines between segments of the expanding driver align with the separation lines of the expander assembly.
- Place the guide cone over the driving bar (with the small end of the cone facing the driver assembly).
- Place the driving washer over the threaded portion of the expander assembly.
- Screw the expander assembly (with driving washer) to the driving bar.
- It may be necessary to install the driver bar extension for removal of the rear bearings.
- Operate the tool from the front of the engine block.
- Slide the nylon cone into the front camshaft bearing (this will properly align the tool).
- Drive the bearing out of or into the engine block.
- Repeat the procedure for the additional bearings (except the front bearing).
- Reverse the above procedures for camshaft bearing installation.

Important: Failure to select the proper driving washer may result in damage to the expander assembly.
Important: To install or remove expanding driver, always push on or pull from the ends.
Pressure on the outside diameter may cause a bind against the rubber expander sleeve.
Insert the tool into the rear camshaft bearing and tighten until snug.
Note: On some engine blocks the nut on the expander assembly is inaccessible except from either end. In this case you must use a socket and extension to enlarge and reduce the expander assembly.
To remove the front camshaft bearing, operate the tool from the rear of the block using the guide cone in the rear camshaft bearing bore.
