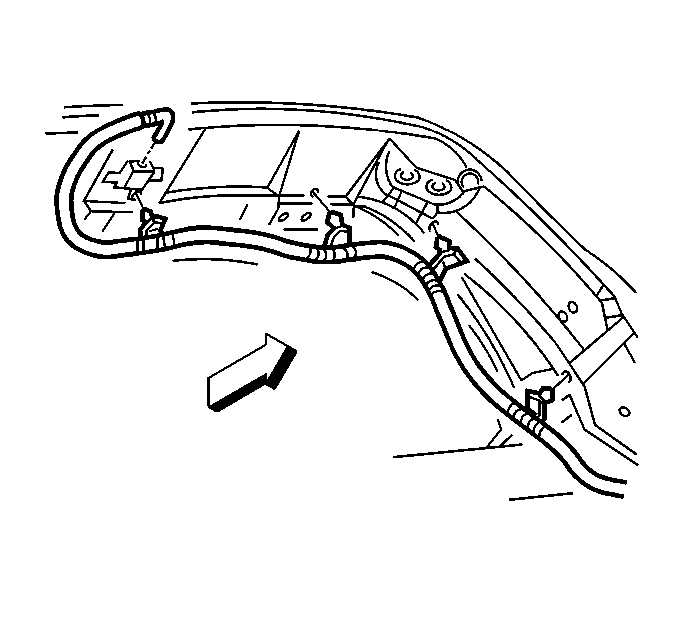
Coaxial Cable Replacement Rear Lift Window Antenna
Removal Procedure
- Remove the roof bow interior trim panel. Refer to Rear Roof Bow Trim Panel Replacement in Exterior/Interior Trim.
- Remove the LH rear compartment side trim panel. Refer to Rear Compartment Side Trim Panel in Exterior/Interior Trim.
- Remove the LH lock pillar trim panel. Refer to Body Lock Pillar Trim Panel Replacement in Exterior/Interior Trim.
- Disconnect the rear lift window antenna coaxial cable from the antenna buffer.
- Begining at the antenna buffer, carefully remove the push-in fastener retainers securing the coaxial cable along the roof bow.
- Remove the push-in fastener retainers securing the coaxial cable to the lock pillar and the front seat back reinforcement panel.
- Disconnect the coaxial cable from the antenna module.
- Remove the coaxial cable.
Installation Procedure
- Install the rear lift window antenna coaxial cable push-in fastener retainers to the front seat back reinforcement panel and along the lock pillar.
- Connect the coaxial cable to the antenna module.
- Working up the roof bow, install the remaining coaxial cable push-in fastener retainers.
- Connect the coaxial cable to the antenna buffer.
- Install the lock pillar trim panel. Refer to Body Lock Pillar Trim Panel Replacement in Exterior/Interior Trim.
- Install the rear compartment side trim panel. Refer to Rear Compartment Side Trim Panel in Exterior/Interior Trim.
- Install the roof bow interior trim panel. Refer to Rear Roof Bow Trim Panel Replacement in Exterior/Interior Trim.
Coaxial Cable Replacement Windshield Antenna
Removal Procedure
- Remove the LH sill plate. Refer to Sill Plate in Exterior/Interior Trim.
- Remove the LH lock pillar trim. Refer to Body Lock Pillar Trim Panel Replacement in Exterior/Interior Trim.
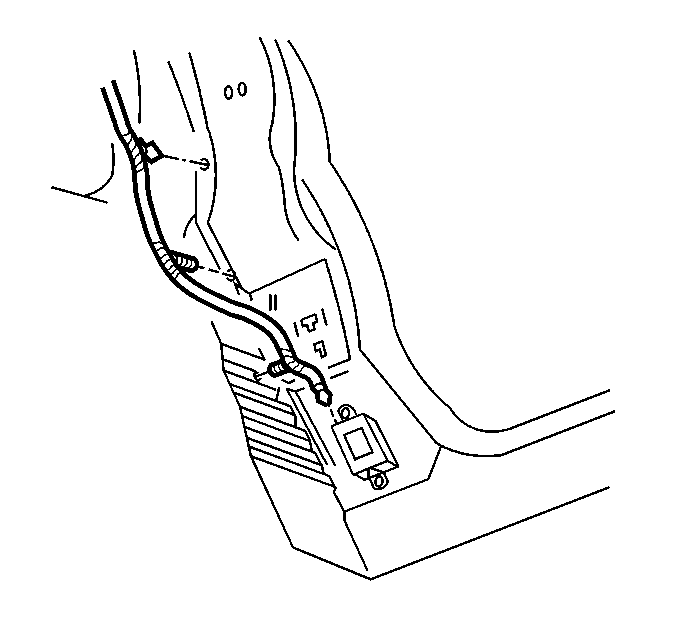
- Disconnect the front windshield antenna coaxial cable from the antenna module.
- Release the coaxial cable from the body retaining clips.
- Remove the coaxial cable push-in retainers from the floor panel support.
- Separate the front windshield antenna coaxial cable from the radio control coaxial cable.
- Remove the LH I/P lower insulator panel. Refer to Instrument Panel Insulator Panel Replacement in Instrument Panel, Gages and Console.
- Remove the coaxial cable from the insulation tape along the hinge pillar.
- Remove the windshield side garnish moldings. Refer to Windshield Side Garnish Molding Replacement in Stationary Windows.
- Remove the sunshades. Refer to Sunshade Replacement in Exterior/Interior Trim.
- Remove the windshield upper garnish molding. Refer to Windshield Upper Garnish Molding Replacement in Stationary Windows.
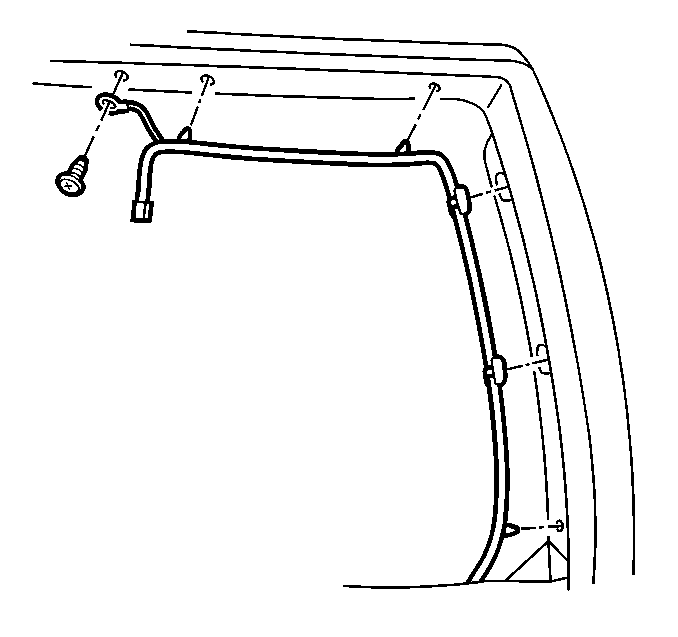
- Disconnect the coaxial cable from the front windshield antenna connector.
- Remove the bolt retaining the coaxial cable ground wire to the windshield frame.
- Remove the coaxial cable push-in and stick-on fasteners from the windshield frame.
- Remove the coaxial cable from the vehicle.


Installation Procedure
- Install the front windshield antenna cable coaxial cable into position.
- Install the coaxial cable push-in and stick-on fasteners to the windshield frame.
- Connect the coaxial cable to the front windshield antenna connector.
- Install the coaxial cable to windshield frame ground wire bolt.
- Check that the I/P harness (1), which runs along the windshield frame, is positioned as shown in relation to the ground wire bolt (2).
- Install the windshield upper garnish molding. Refer to Windshield Upper Garnish Molding Replacement in Stationary Windows.
- Install the sunshades. Refer to Sunshade Replacement in Exterior/Interior Trim.
- Install the windshield side garnish moldings. Refer to Windshield Side Garnish Molding Replacement in Stationary Windows.
- Install the coaxial cable to the insulation tape along the hinge pillar.
- Install the LH I/P lower insulator panel. Refer to Instrument Panel Insulator Panel Replacement in Instrument Panel, Gages and Console.
- Tape the front windshield antenna coaxial cable to the radio control antenna coaxial cable.
- Install the coaxial cable push-in retainers to the floor panel support.
- Secure the coaxial cable to the body retaining clips.
- Connect the coaxial cable to the antenna module.
- Install the LH lock pillar trim. Refer to Body Lock Pillar Trim Panel Replacement in Exterior/Interior Trim.
- Install the LH sill plate. Refer to Sill Plate in Exterior/Interior Trim.
Tighten
Tighten the front windshield antenna coaxial cable ground wire bolt
to 1.8 N·m (16 lb in).
Notice: Use the correct fastener in the correct location. Replacement fasteners must be the correct part number for that application. Fasteners requiring replacement or fasteners requiring the use of thread locking compound or sealant are identified in the service procedure. Do not use paints, lubricants, or corrosion inhibitors on fasteners or fastener joint surfaces unless specified. These coatings affect fastener torque and joint clamping force and may damage the fastener. Use the correct tightening sequence and specifications when installing fasteners in order to avoid damage to parts and systems.

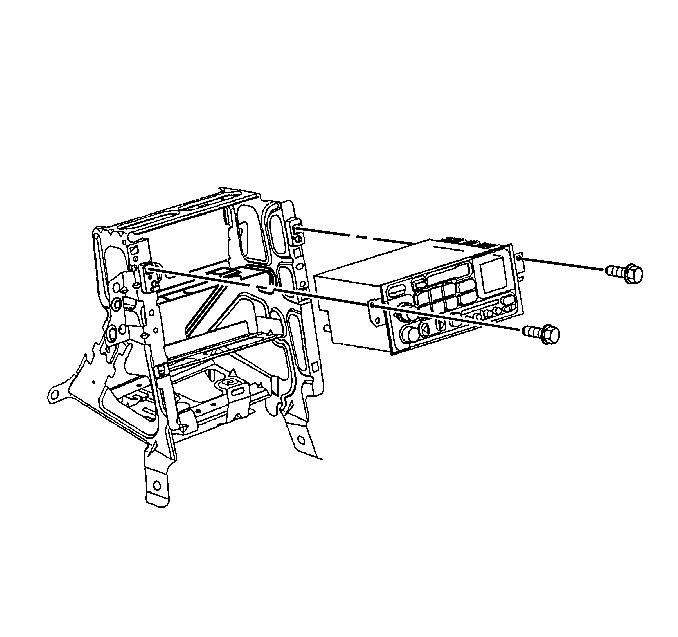
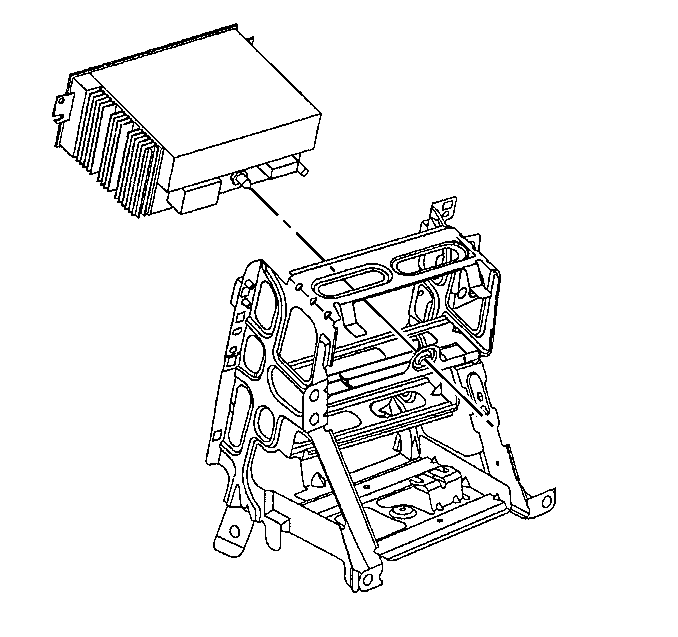
Coaxial Cable Replacement Radio Control
Removal Procedure
- Remove the console. Refer to Console Replacement in Instrument Panel, Gages and Console.
- Remove the I/P accessory trim plate. Refer to Instrument Panel Accessory Trim Plate Replacement in Instrument Panel, Gages and Console.
- Remove the driver knee bolster trim panel. Refer to Driver Knee Bolster Panel Replacement in Instrument Panel, Gages and Console.
- Remove the ignition switch bezel.
- Remove the ignition switch retaining bolts.
- Remove the ignition switch from the ignition switch housing bracket and reposition the switch.
- Remove the screws retaining the radio control to the I/P center support bracket.
- Begin to remove the radio control from the center support bracket in order to access the coaxial cable.
- Disconnect the radio control coaxial cable from the radio control.
- Separate the radio control coaxial cable from the I/P wiring harness along the I/P lower support beam.
- Remove the LH I/P lower insulator panel. Refer to Instrument Panel Insulator Panel Replacement in Instrument Panel, Gages and Console.
- Remove the coaxial cable from the insulation tape along the hinge pillar.
- Remove the LH sill plate. Refer to Sill Plate in Exterior/Interior Trim.
- Remove the LH lock pillar trim. Refer to Body Lock Pillar Trim Panel Replacement in Exterior/Interior Trim.
- Disconnect the radio control coaxial cable from the antenna module.
- Release the coaxial cable from the body retaining clips.
- Remove the coaxial cable push-in retainers from the floor panel support.
- Separate the radio control coaxial cable from the front windshield antenna coaxial cable.
- Remove the radio control coaxial cable.
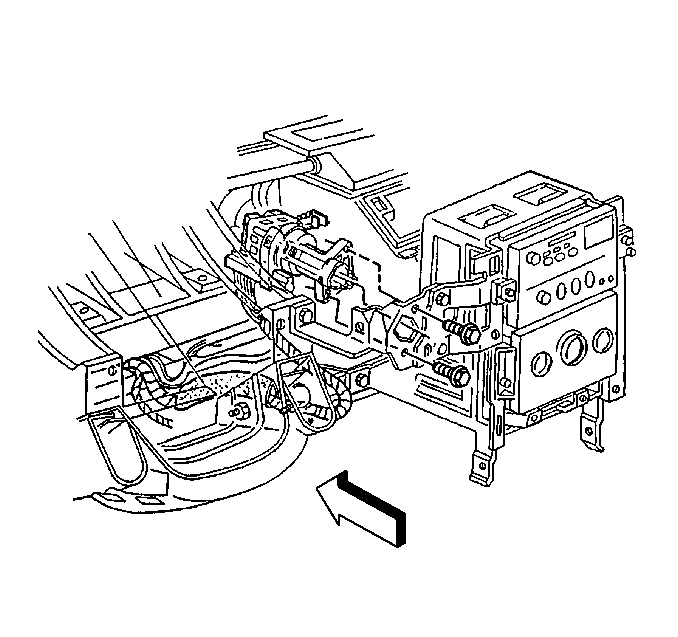
Carefully pull from the top to unsnap.
(Reposition the ignition switch to better access the coaxial cable.)


Installation Procedure
- Install the radio control coaxial cable into position.
- Tape the radio control coaxial cable to the I/P wiring harness along the I/P lower support beam.
- Connect the radio control coaxial cable to the radio control.
- Align the radio control locator tab to the I/P center support bracket locator hole.
- Install the radio control.
- Install the radio control retaining screws.
- Install the ignition switch to the ignition switch housing bracket.
- Install the ignition switch retaining bolts.
- Install the ignition switch bezel to the switch.
- Install the coaxial cable to the insulation tape along the hinge pillar.
- Install the LH I/P lower insulator panel. Refer to Instrument Panel Insulator Panel Replacement in Instrument Panel, Gages and Console.
- Tape the radio control coaxial cable to the front windshield antenna coaxial cable.
- Install the coaxial cable push-in retainers to the floor panel support.
- Secure the coaxial cable to the body retaining clips.
- Connect the coaxial cable to the antenna module.
- Install the LH lock pillar trim. Refer to Body Lock Pillar Trim Panel Replacement in Exterior/Interior Trim.
- Install the LH sill plate. Refer to Sill Plate in Exterior/Interior Trim.
- Install the driver knee bolster trim panel. Refer to Driver Knee Bolster Panel Replacement in Instrument Panel, Gages and Console.
- Install the I/P accessory trim plate. Refer to Instrument Panel Accessory Trim Plate Replacement in Instrument Panel, Gages and Console.
- Install the console. Refer to Console Replacement in Instrument Panel, Gages and Console.
Tighten
Tighten the radio control retaining screws to 2.5 N·m (22 lb in).
Notice: Use the correct fastener in the correct location. Replacement fasteners must be the correct part number for that application. Fasteners requiring replacement or fasteners requiring the use of thread locking compound or sealant are identified in the service procedure. Do not use paints, lubricants, or corrosion inhibitors on fasteners or fastener joint surfaces unless specified. These coatings affect fastener torque and joint clamping force and may damage the fastener. Use the correct tightening sequence and specifications when installing fasteners in order to avoid damage to parts and systems.
Tighten
Tighten the ignition switch retaining bolts to 5.5 N·m
(49 lb in).
Align the bezel slots to the switch pins, then push to secure.
