- Recover the refrigerant from the A/C system. Refer to
Refrigerant Recovery and Recharging
.
- Remove the battery heat shield. Refer to
Battery Heat Shield Replacement
in Engine Electrical.
- Remove the intake manifold. Refer to
Intake Manifold Replacement
in Engine Mechanical 5.7-L.
- Disconnect the hose clamp and hose from the RH air injection check valve.
If equipped
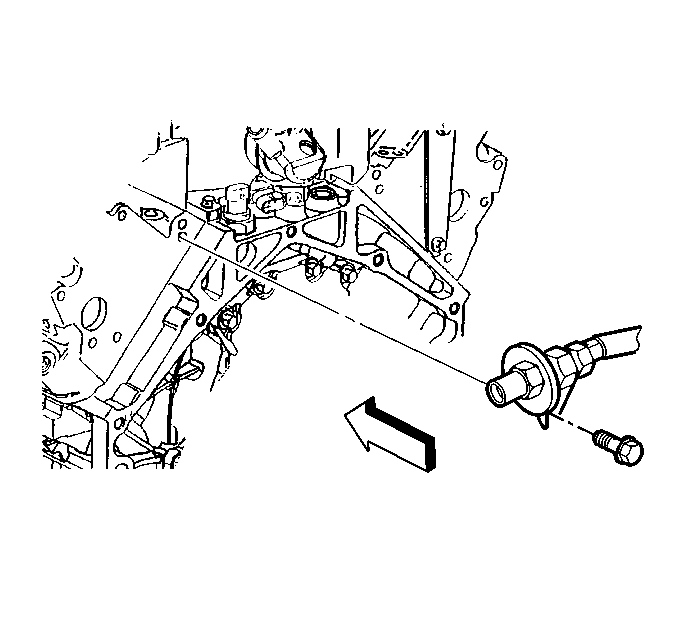
- Remove the RH air injection check valve
to LH cylinder head bolt. If equipped
- Remove the RH air injection check valve to RH cylinder head bolts. If
equipped
- Remove the RH air injection pipe. If equipped
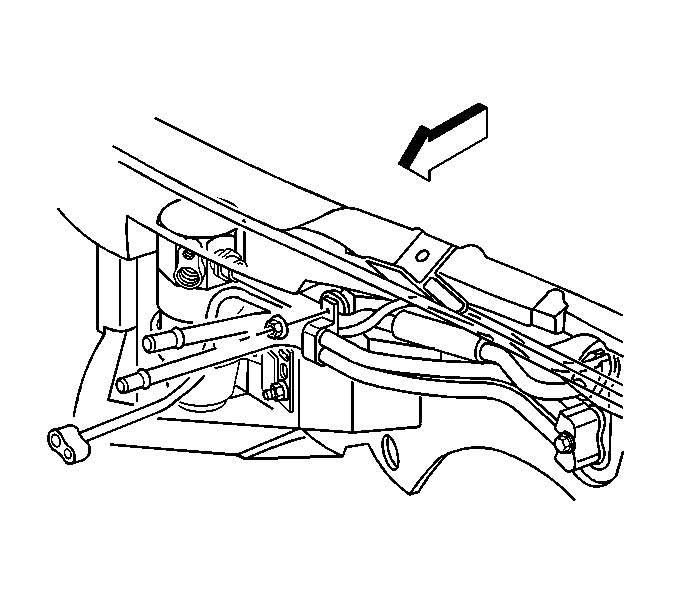
- Remove the nut retaining the heater pipe
bracket to the cowl.
- Reposition the heater pipe bracket.
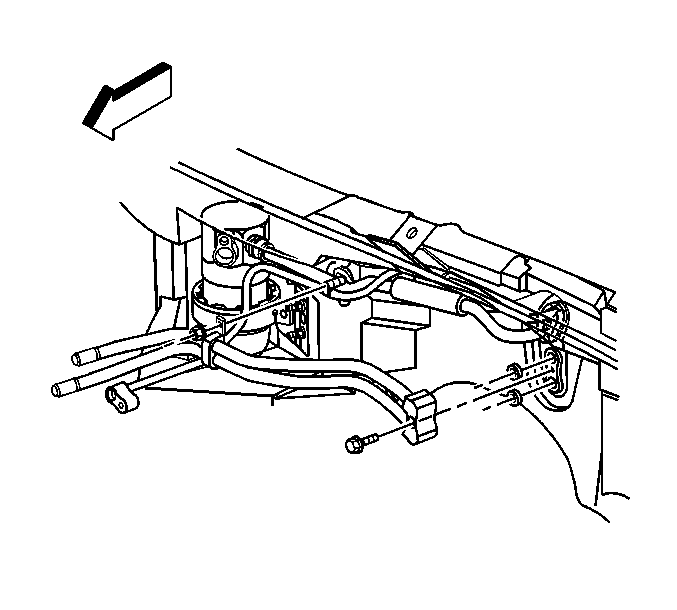
- Remove the heater pipe to heater core retaining
bolt.
Important: Cap or plug the open heater pipe assembly and the heater core to prevent system
contamination.
- Disconnect the heater pipe assembly from the heater core.
| • | Allow any remaining coolant to drain |
| • | Remove and discard the sealing washers |
| • | Cap or plug the heater pipe assembly and the heater core to prevent contamination |
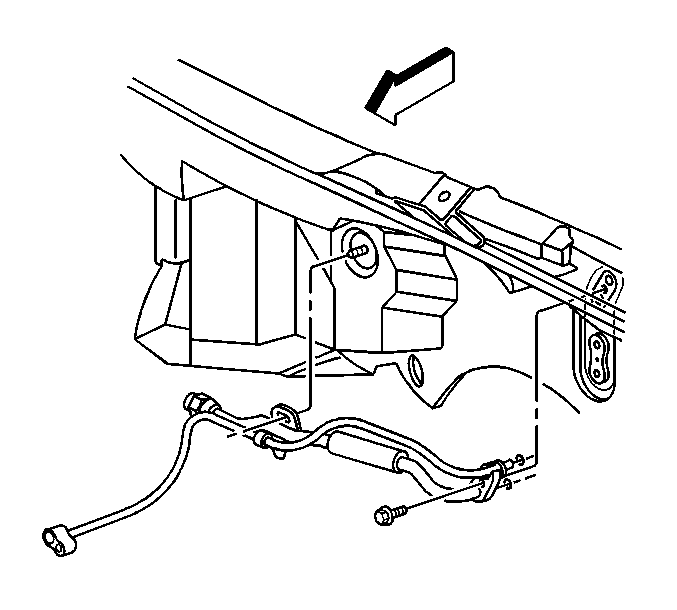
- Remove the accumulator hose to evaporator
retaining bolt.
Important: Cap or tape the A/C components immediately to prevent system contamination.
- Disconnect the accumulator hose and the evaporator tube - rear
from the evaporator.
| • | Discard the O-ring seals |
| • | Cap or tape the hose end, the tube end and the evaporator to prevent contamination. |
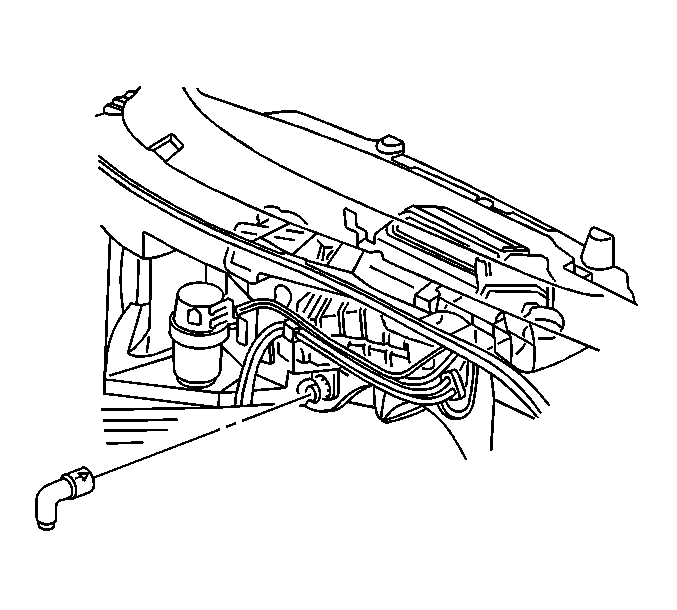
- Remove the HVAC module drain tube from
the HVAC module.
- Remove the I/P upper trim pad. Refer to
Instrument Panel Upper Trim Pad Replacement
in Instrument Panel, Gages
and Console.
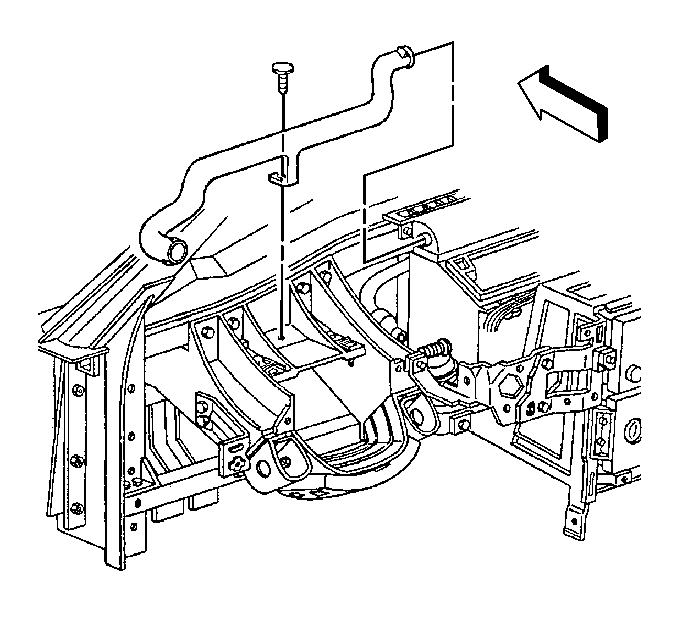
- Remove the LH side window defogger outlet
duct - lower.
| 16.1. | Remove the push-in retainer. |
| 16.2. | Use a twisting motion to release the defogger outlet duct - lower
from the windshield defroster duct, then from the defogger outlet duct - upper. |
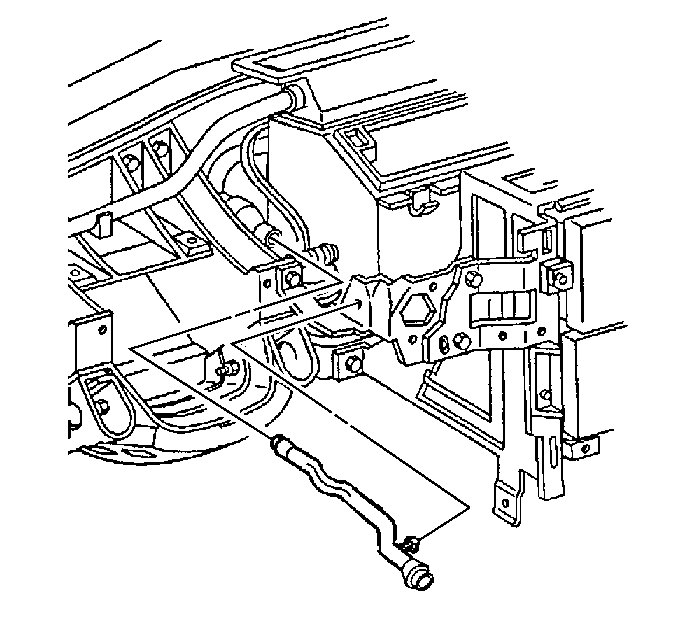
- Remove the inside air temperature sensor
aspirator duct.
| 17.1. | Depress the duct retaining tab and remove the duct from the ignition
switch housing bracket. |
| 17.2. | Use a twisting motion to release the duct from the duct muffler. |
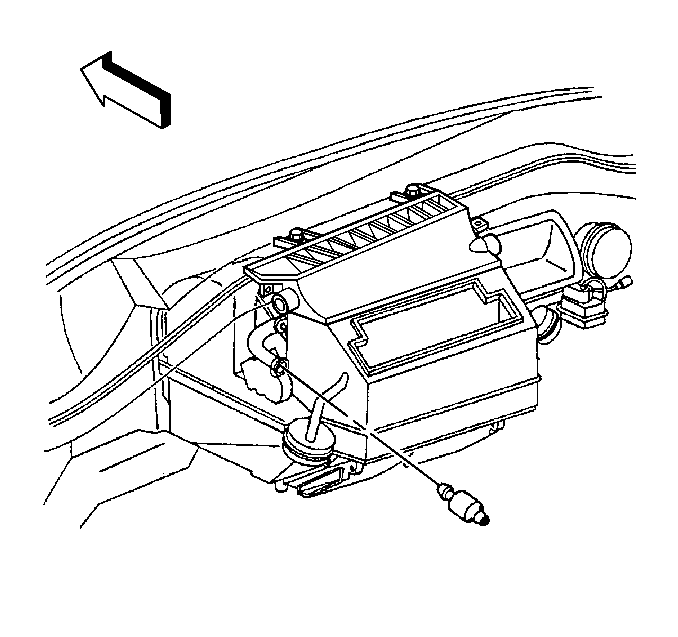
- Disconnect the DRL sensor electrical connector,
if equipped.
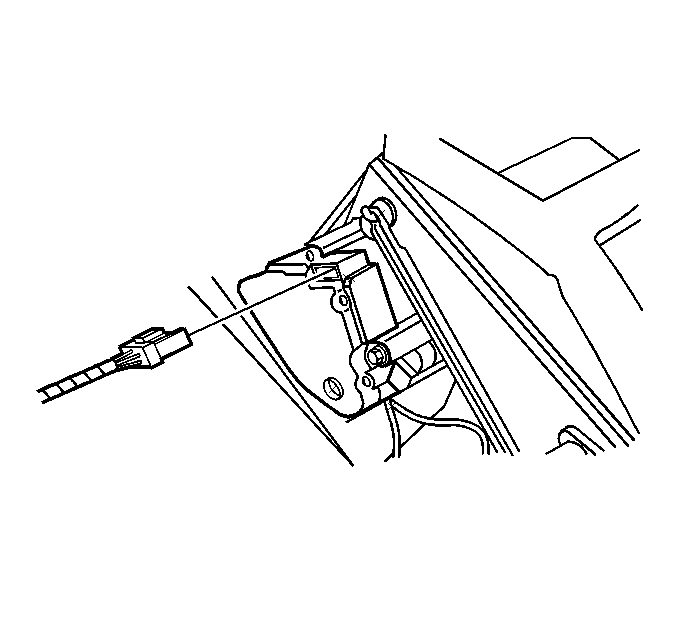
- Disconnect the electrical connector from
the LH temperature actuator.
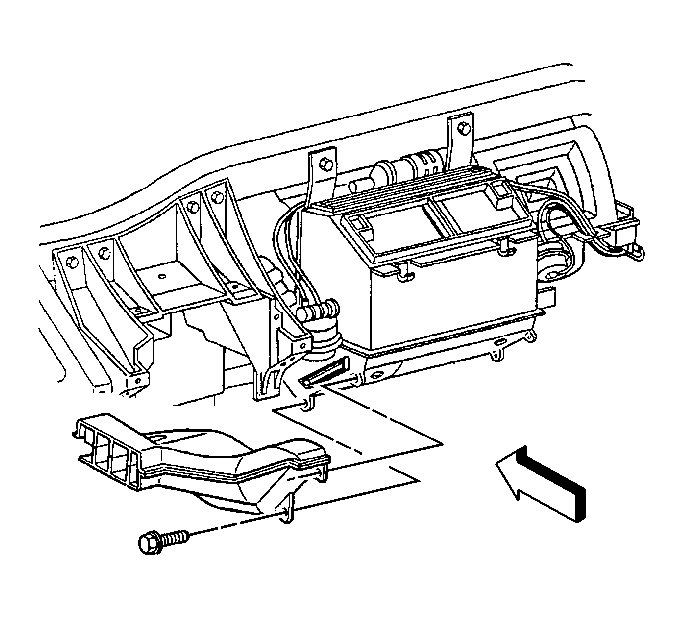
- Remove the I/P center support bracket and
the ignition switch housing bracket. Refer to
Instrument Panel Center Support Bracket Replacement
in Instrument Panel,
Gages and Console.
- Remove the LH floor air outlet duct retaining screws.
- Remove the LH floor air outlet duct.
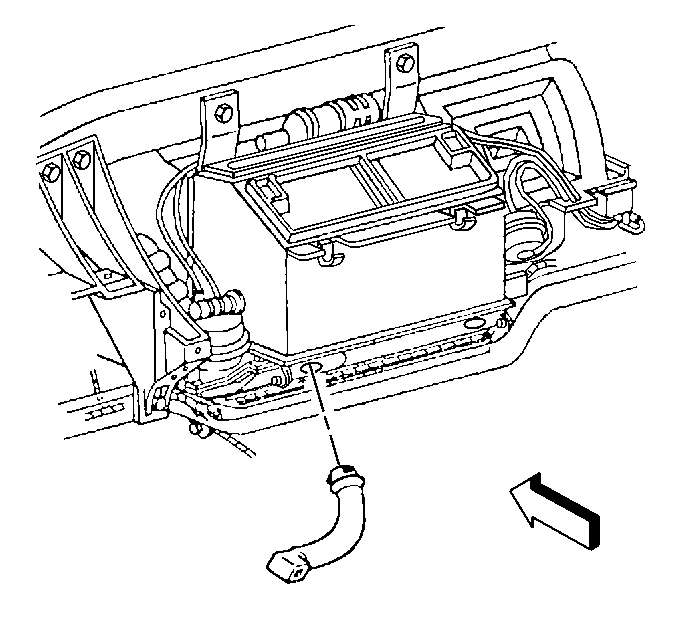
- Remove the LH floor air outlet duct - rear.
Rotate the duct 1/4 turn clockwise to release.
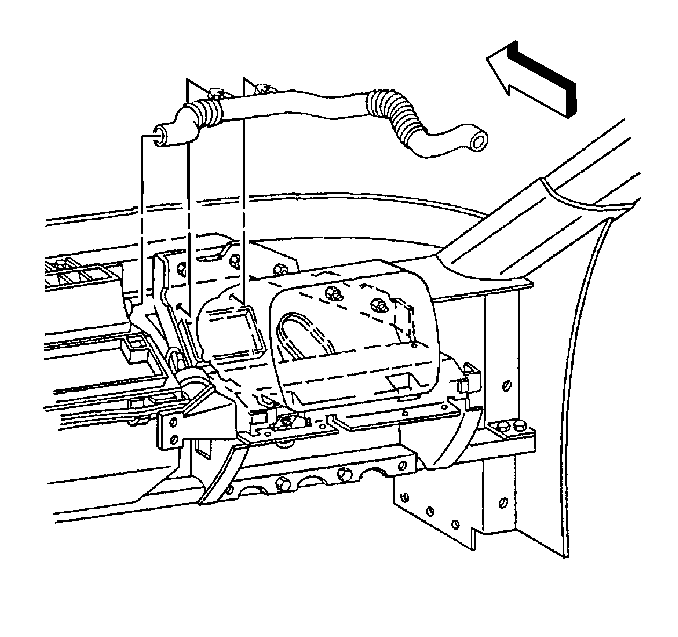
- Remove the RH side window defogger outlet
duct - lower.
| 24.1. | Depress the defogger outlet duct - lower retaining
tabs and release the duct from the passenger SIR bracket. |
| 24.2. | Use a twisting motion to release the defogger outlet duct - lower
from the windshield defroster duct, then from the defogger outlet duct - upper. |
- Remove the passenger SIR bracket and the passenger knee bolster bracket.
Refer to
Knee Bolster Bracket Replacement
in Instrument Panel, Gages and Console.
- Disconnect the sunload sensor electrical connector.
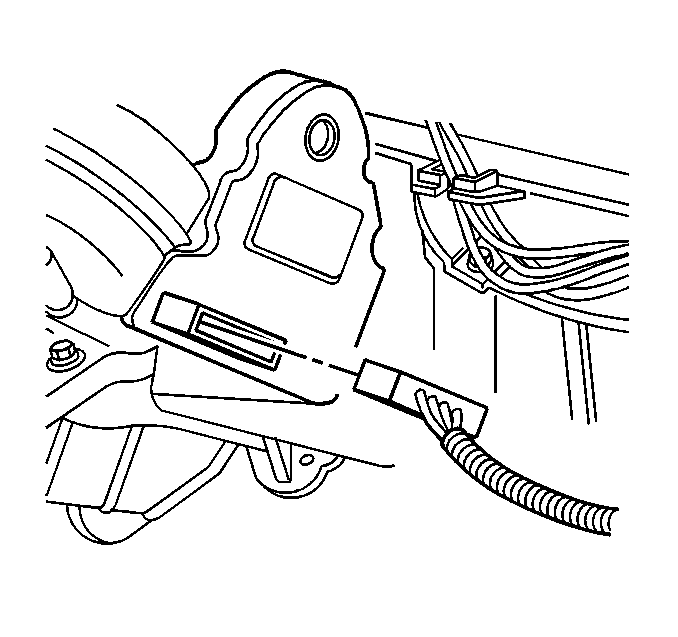
- Disconnect the electrical connector from
the RH temperature actuator.
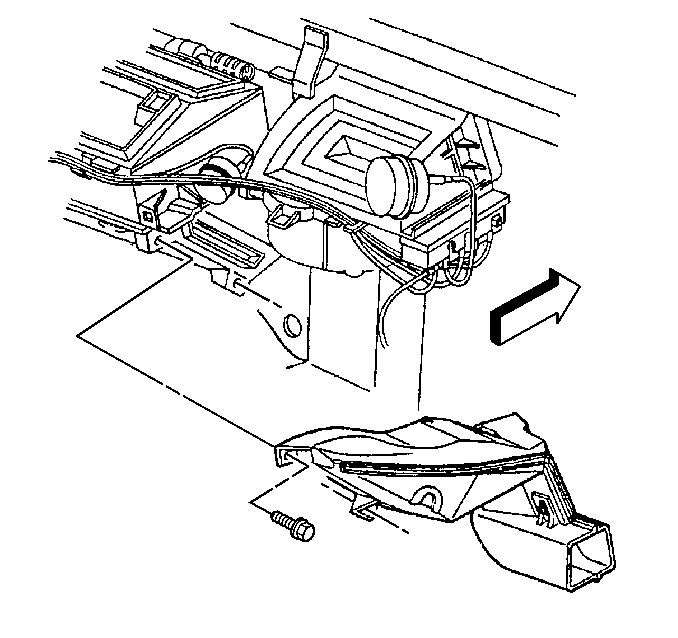
- Remove the RH floor air outlet duct retaining
screws.
- Remove the RH floor air outlet duct.
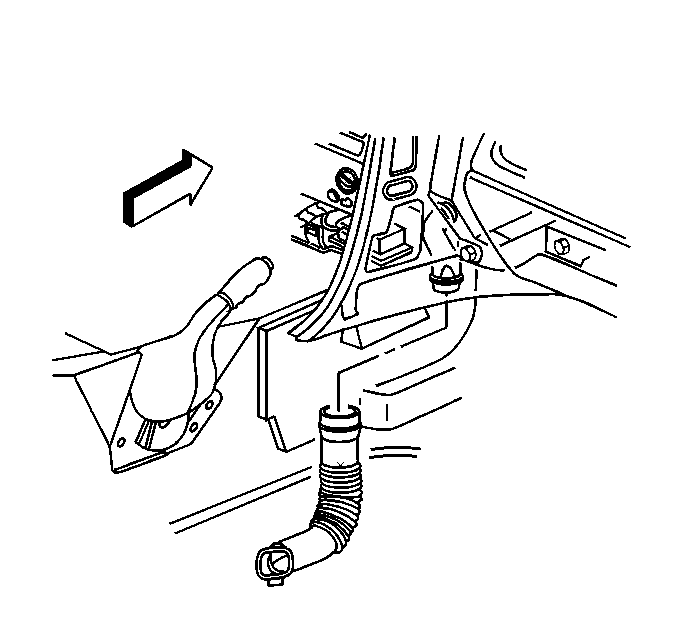
- Reposition the carpet away from the RH
side of the driveline tunnel to access the carpet air outlet duct.
- Use a rotating motion the release the carpet air outlet duct from the
floor air outlet duct - rear.
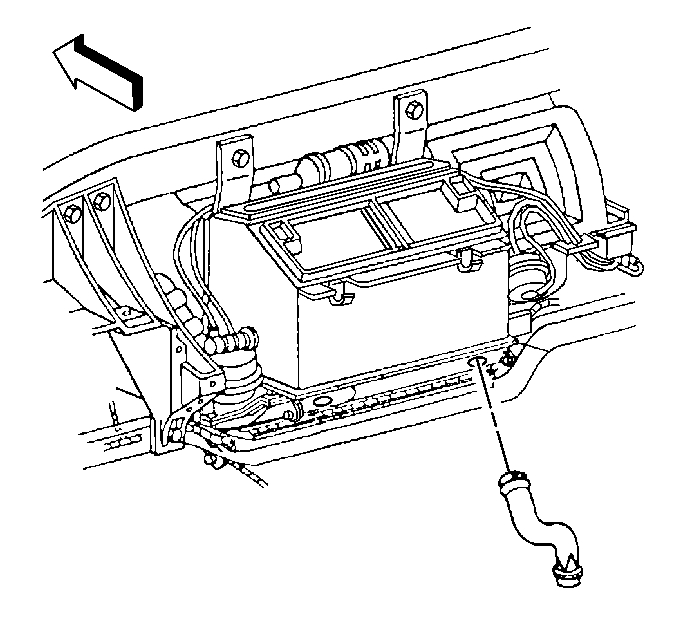
- Remove the RH floor air outlet duct - rear.
Rotate the duct - rear 1/4 turn counterclockwise to release.
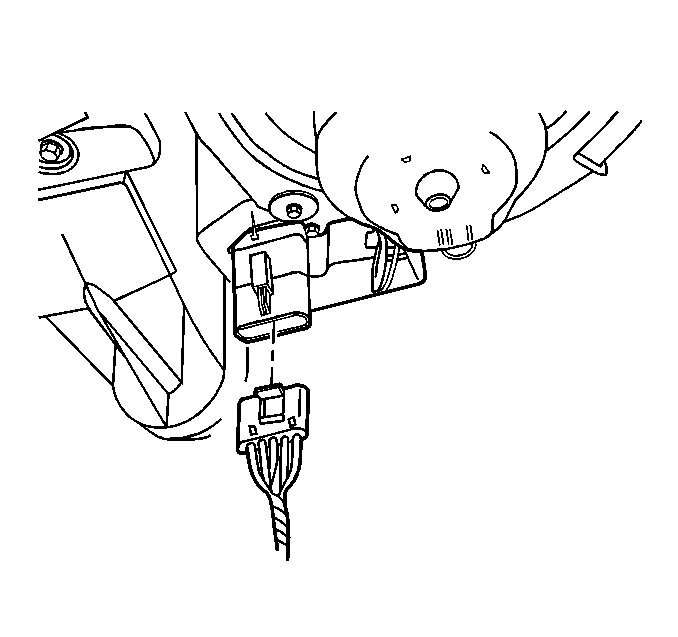
- Disconnect the electrical connector from
the blower motor control module.
- Remove the blower motor. Refer to
Blower Motor Replacement
.
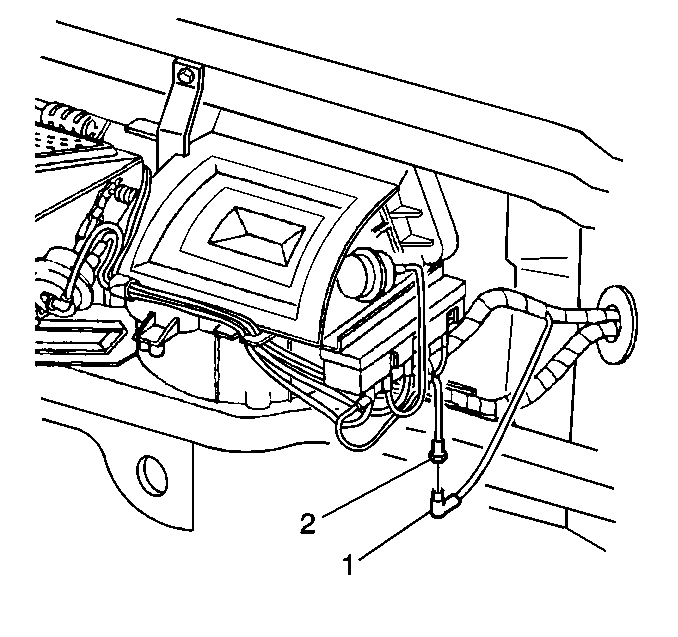
- Disconnect the I/P harness vacuum supply
line (1) from the HVAC module vacuum harness (2).
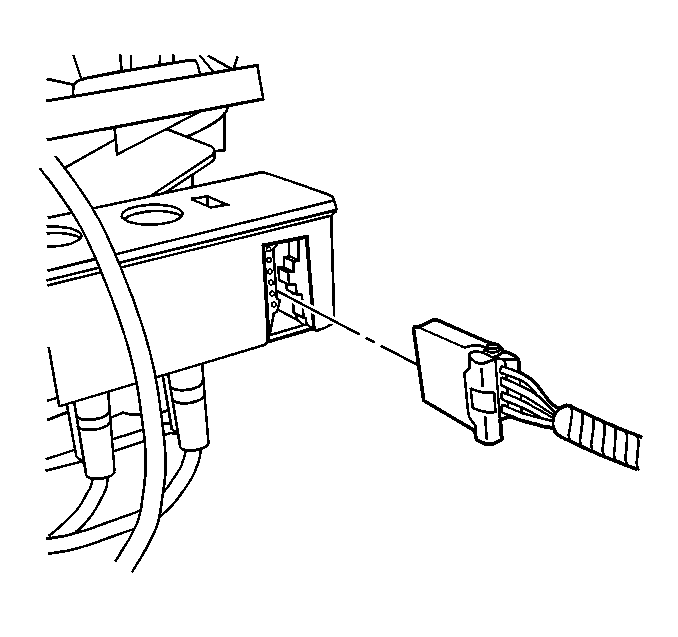
- Disconnect the electrical connector from
the vacuum electric solenoid.
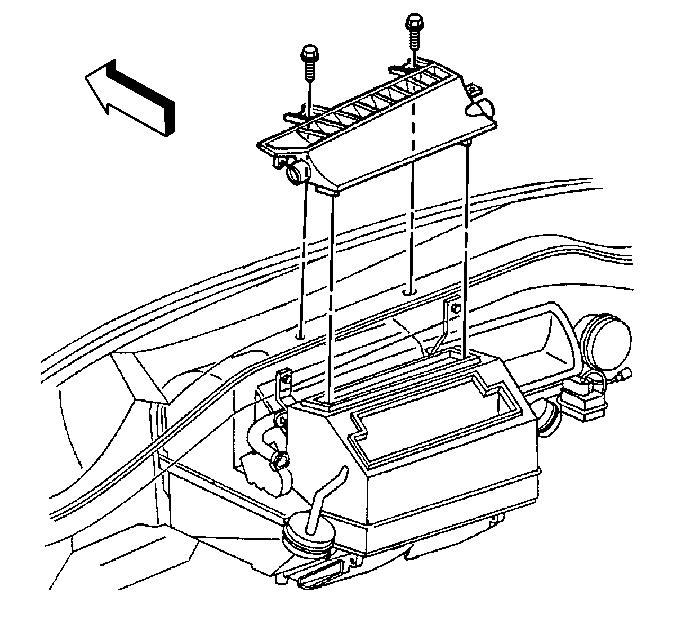
- Remove the windshield defroster duct retaining screws.
- Remove the windshield defroster duct.
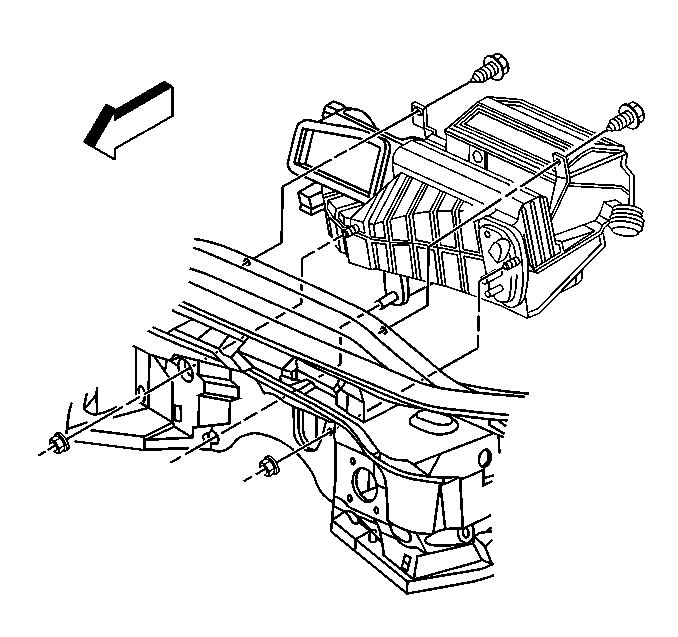
- Remove the HVAC module retaining and sealing
nuts from the cowl.
Reposition the refrigerant lines slightly, if necessary.
- Remove the HVAC module retaining bolts from the I/P upper support beam.
- Carefully remove the HVAC module from the vehicle.
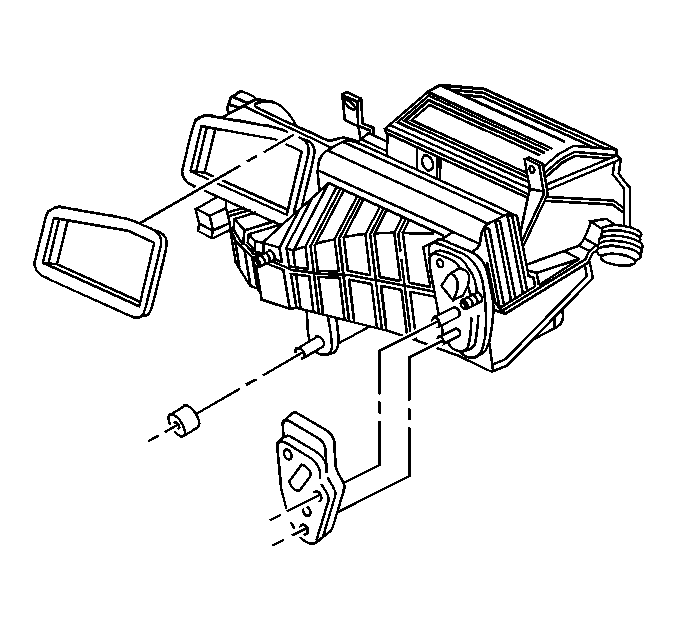
- Remove
and discard the HVAC module air inlet, drain and plumbing seals.

- Install
new air inlet, drain and plumbing seals to the HVAC module.
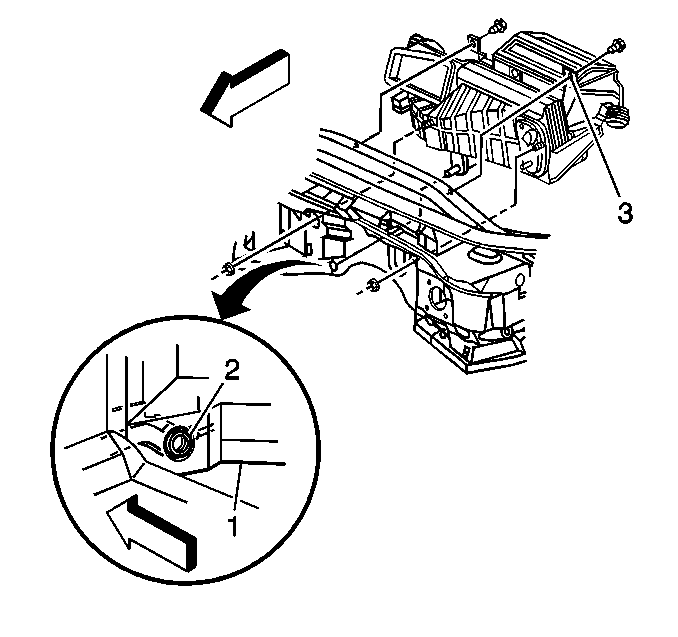
- Carefully install the HVAC module to the
vehicle in the following SEQUENCE.
| | Important: Ensure that the cut-outs on the dash mat are properly aligned so
that the air inlet, drain, and plumbing seals are seated directly against the cowl
and not the dashmat.
|
| 2.1. | Inspect the dashmat (1) for proper alignment to the cowl. Align if necessary. |
The opening in the dashmat for the HVAC module drain should be aligned so that
the drain opening in the cowl is approximately centered in the dash mat
opening; allowing ample room for the module drain seal (2) to fully seat
against the cowl.
| 2.2. | ALIGN the heater core joint fitting, the condenser joint fitting, the
HVAC module drain and the HVAC module studs to the corresponding openings
on the cowl. |
| 2.3. | INSERT the LH stud into the cowl FIRST, then the module drain, then the
RH stud. |
| 2.4. | Install the HVAC module LH retaining bolt to the I/P upper support beam
module net locating hole (3). |
Notice: Use the correct fastener in the correct location. Replacement fasteners
must be the correct part number for that application. Fasteners requiring
replacement or fasteners requiring the use of thread locking compound or sealant
are identified in the service procedure. Do not use paints, lubricants, or
corrosion inhibitors on fasteners or fastener joint surfaces unless specified.
These coatings affect fastener torque and joint clamping force and may damage
the fastener. Use the correct tightening sequence and specifications when
installing fasteners in order to avoid damage to parts and systems.
| 2.5. | Install the HVAC module RH retaining bolt to the I/P upper support beam. |
Tighten
Tighten the bolts to 10 N·m (89 lb in).
| | Important: To prevent possible water leaks or wind/road noise from entering the vehicle
passenger compartment, DO NOT reuse the old HVAC module retaining and sealing
nuts.
|
| 2.6. | Install the HVAC module new retaining and sealing nuts. |
| 2.7. | Tighten the HVAC module retaining and sealing nuts. |
Tighten
Tighten the nuts to 10 N·m (89 lb in).

- Install and align the windshield defroster duct to the HVAC module opening
and the I/P upper support beam.
- Install the windshield defroster duct LH retaining screw (net locating
hole).
- Install the windshield defroster duct RH retaining screw.
Tighten
Tighten the screws to 10 N·m (89 lb in).

- Connect the electrical connector to the
vacuum electric solenoid.

- Connect the I/P harness vacuum supply line
(1) to the HVAC module vacuum harness (2).

- Install the blower motor. Refer to
Blower Motor Replacement
.
- Connect the electrical connector to the blower motor control module.

- Position and align the RH floor air outlet
duct - rear to the HVAC module, then push firmly and evenly
to secure the duct.

- Secure the carpet air outlet duct to the
RH floor air outlet duct - rear.
Use a rotating motion to secure the carpet air outlet duct to the floor air
outlet duct - rear.
- Position the front floor carpet to the RH side of the driveline tunnel.

- Install the RH floor air outlet duct to
the HVAC module.
- Install the RH floor air outlet duct retaining screws.
Tighten
Tighten the screws to 1.6 N·m (14 lb in).

- Connect the electrical connector to the
RH temperature actuator.
- Connect the sunload sensor electrical connector.

- Install the passenger SIR bracket and the
passenger knee bolster bracket. Refer to
Knee Bolster Bracket Replacement
in Instrument Panel, Gages and Console.
- Install the RH side window defogger outlet duct - lower.
| 18.1. | Use a twisting motion to secure the defogger outlet duct - lower
to the defogger outlet duct - upper, then to the windshield
defroster duct. |
| 18.2. | Install the defogger outlet duct - lower retaining
tabs to the passenger SIR bracket. |

- Position and align the LH floor air outlet
duct - rear to the HVAC module, then push firmly and evenly
to secure the duct.

- Install the LH floor air outlet duct to
the HVAC module.
- Install the LH floor air outlet duct retaining screws.
Tighten
Tighten the screws to 1.6 N·m (14 lb in).
- Install the I/P center support bracket and the ignition switch housing
bracket. Refer to
Instrument Panel Center Support Bracket Replacement
in Instrument Panel, Gages and Console.

- Connect the electrical connector to the
LH temperature actuator.
- Connect the DRL sensor electrical connector, if equipped.

- Install the inside air temperature sensor
aspirator duct muffler.
Use a twisting motion to secure the duct muffler.

- Install the inside air temperature sensor
aspirator duct.
| 26.1. | Use a twisting motion to secure the duct to the duct muffler. |
| 26.2. | Install the duct retaining tab to the ignition switch housing bracket. |

- Install the LH side window defogger outlet
duct - lower.
| 27.1. | Use a twisting motion to secure the defogger outlet duct - lower
to the defogger outlet duct - upper, then to the windshield defroster
duct. |
| 27.2. | Install the push-in retainer. |
- Install the I/P upper trim pad. Refer to
Instrument Panel Upper Trim Pad Replacement
in Instrument Panel, Gages
and Console.
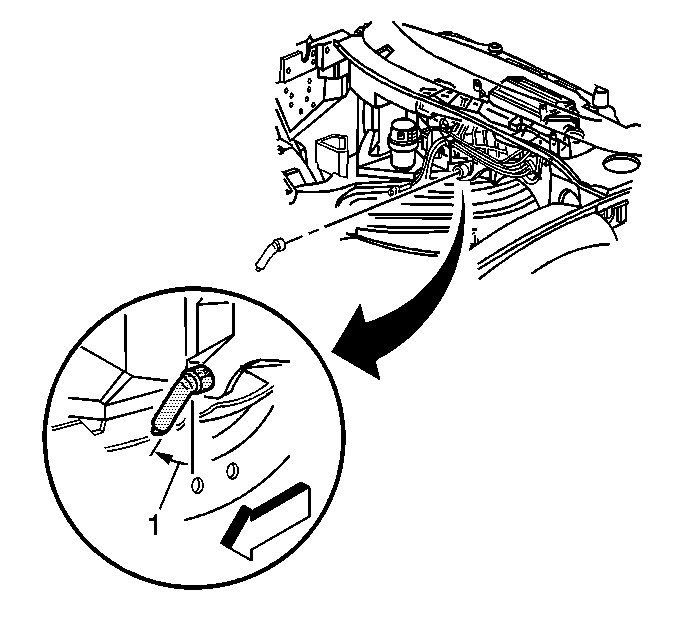
- Install the HVAC module drain tube to the
module.
| • | Ensure that the drain tube is fully seated to the HVAC module. |
| • | Align the drain tube to contact the cowl as shown (1). |
- Remove the cap or tape from the accumulator hose, evaporator tube - rear
and the evaporator.
- Install a new O-ring. Refer to
O-Ring Replacement
.

- Install the accumulator hose and evaporator
tube - rear to the evaporator.
- Install the accumulator hose to evaporator retaining bolt.
Tighten
Tighten the bolt to 16 N·m (12 lb ft).

- Remove the cap or plug from the heater
pipe assembly and the heater core.
- Install new sealing washers. Refer to
Sealing Washer Replacement
.
- Connect the heater pipe assembly to the heater core.
- Install the heater pipe assembly retaining bolt.
Tighten
Tighten the bolt to 16 N·m (12 lb ft).
- Install the RH air injection pipe.
- Install the RH air injection pipe to RH cylinder head bolts.
Tighten
Tighten the bolts to 20 N·m (15 lb ft).

- Install the RH air injection check valve
to LH cylinder head bolt.
Tighten
Tighten the bolt to 20 N·m (15 lb ft).
- Connect the hose and hose clamp to the RH air injection check valve.

- Install the heater pipe bracket into position.
- Install the heater pipe bracket retaining nut.
Tighten
Tighten the nut to 10 N·m (89 lb in).
- Install the intake manifold. Refer to
Intake Manifold Replacement
in Engine Mechanical 5.7-L.
- Install the battery heat shield. Refer to
Battery Heat Shield Replacement
in Engine Electrical.
- Evacuate and recharge the A/C system. Refer to
Refrigerant Recovery and Recharging
.
- Leak test the fittings of the component using J 39400-A
.


