For 1990-2009 cars only
Removal Procedure
- Disconnect the negative battery cable. Refer to Battery Negative Cable Disconnection and Connection.
- Remove the air cleaner assembly. Refer to Air Cleaner Assembly Replacement.
- Install the engine support fixture. Refer to Engine Support Fixture.
- Remove the drive belt. Refer to Drive Belt Replacement.
- Drain the cooling system. Refer to Cooling System Draining and Filling.
- Raise and support the vehicle. Refer to Lifting and Jacking the Vehicle.
- Remove the crankshaft balancer. Refer to Crankshaft Balancer Replacement.
- Remove the lower belt idler pulley. Refer to Drive Belt Idler Pulley Replacement - Lower.
- Remove the engine oil pan. Refer to Oil Pan Replacement.
- Lower the vehicle.
- Remove the left belt idler pulley. Refer to Drive Belt Idler Pulley Replacement - Left Side.
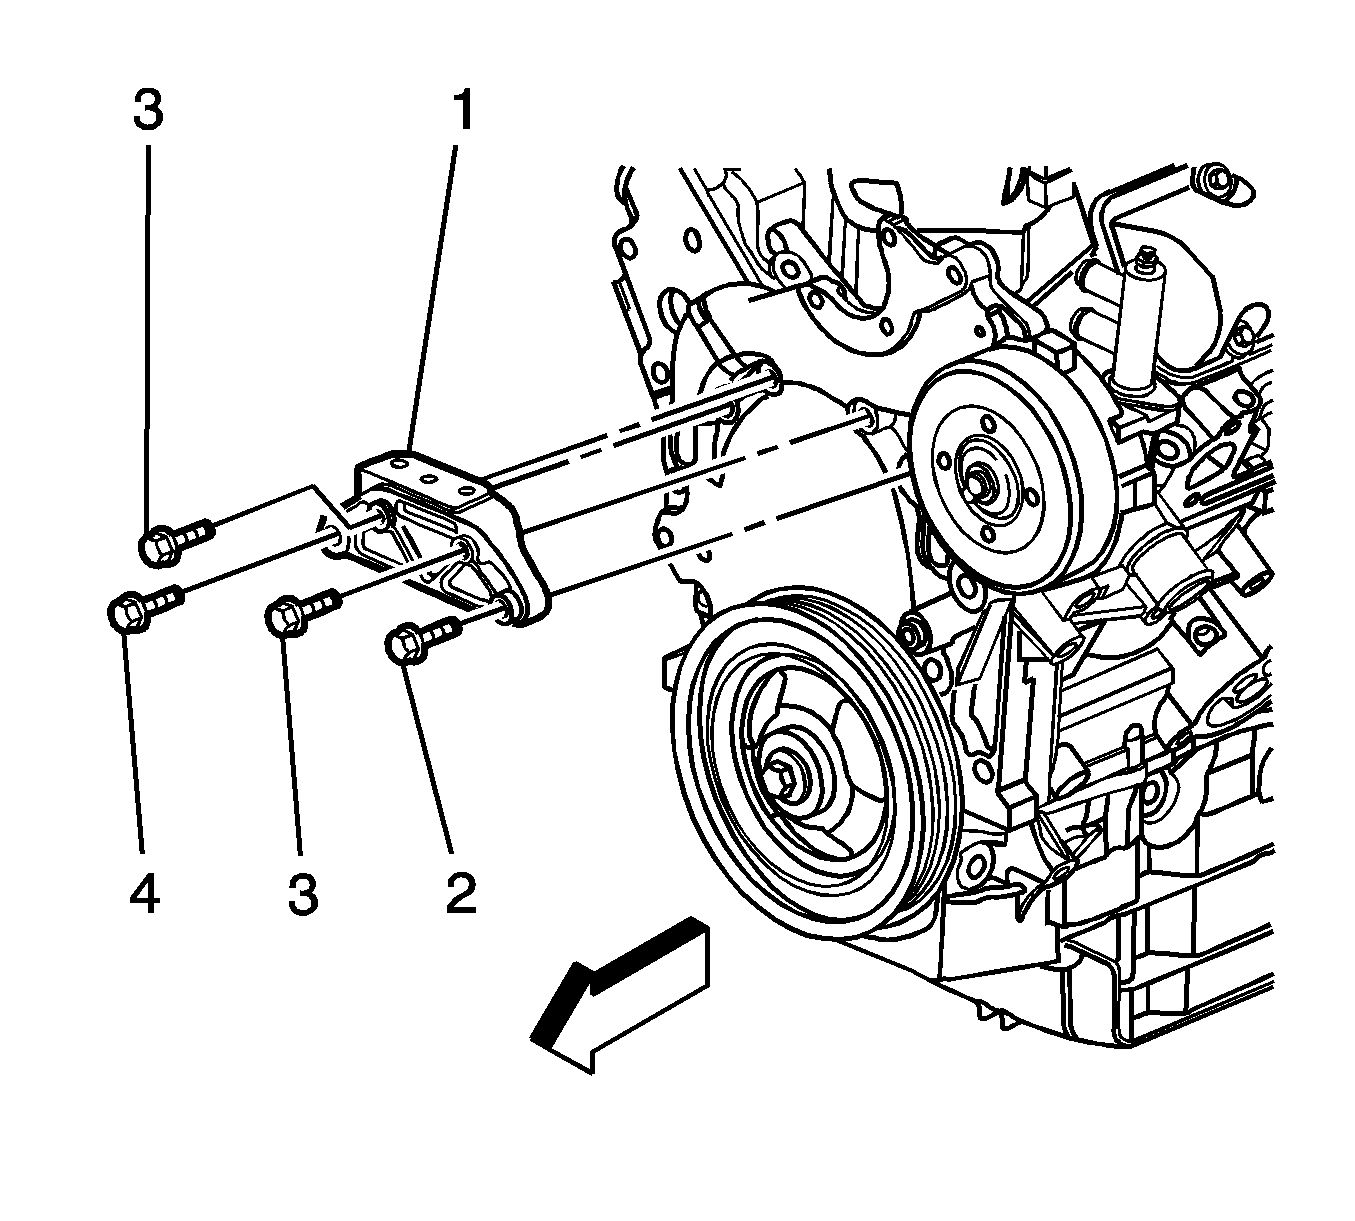
- Remove the right engine mount bracket bolts (2-4).
- Remove the right engine mount bracket (1).
- Remove the water pump. Refer to Water Pump Replacement.
- Remove the thermostat bypass hose adapter. Refer to Thermal Bypass Fitting Replacement.
- Remove the radiator outlet hose from the engine front cover. Refer to Radiator Outlet Hose Replacement.
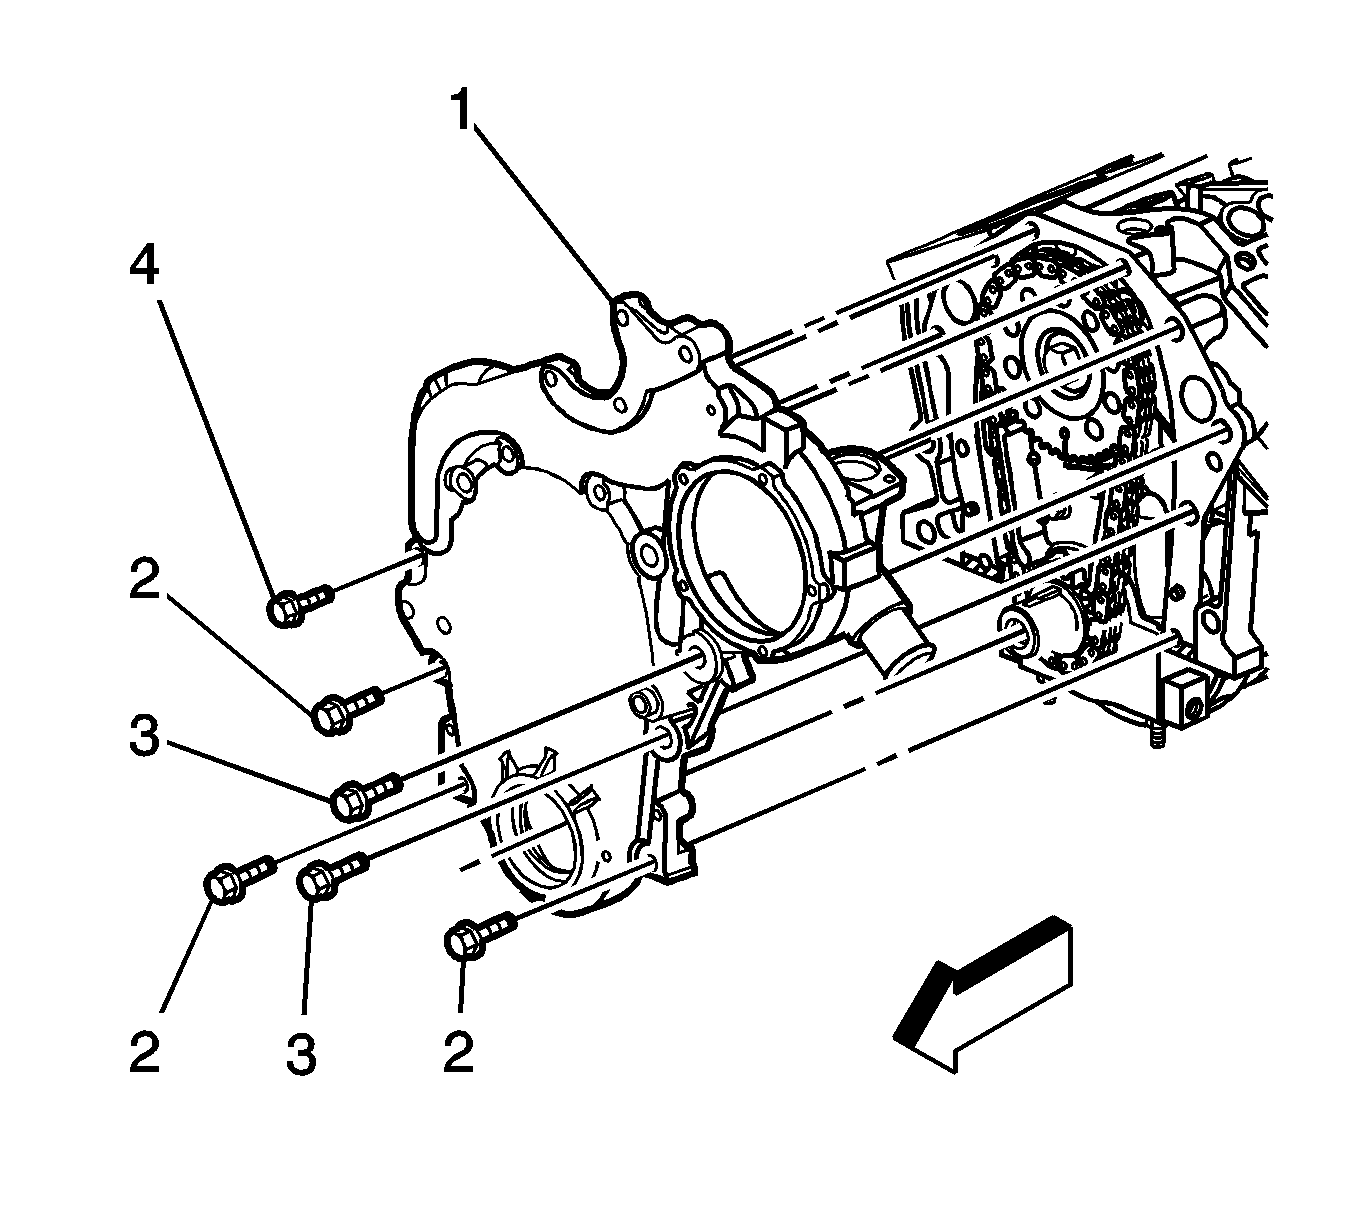
- Remove the engine front cover bolts (2-4).
- Remove the engine front cover (1).
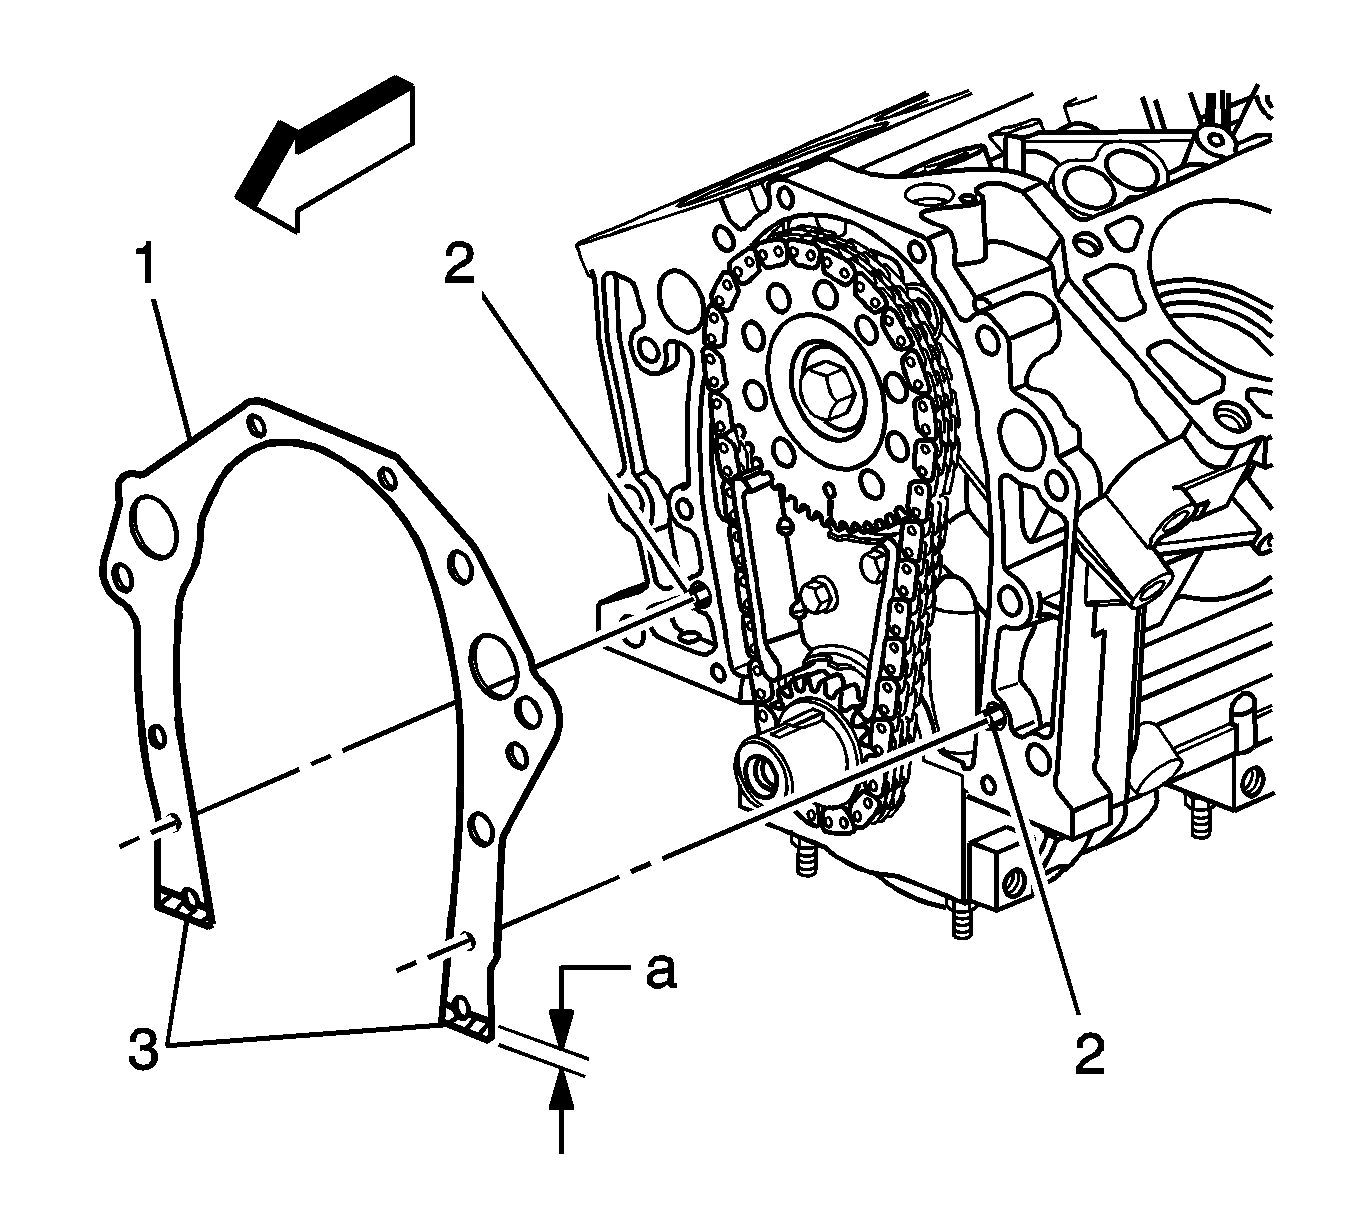
- Remove the engine front cover gasket (1).
- Clean the engine block and front cover gasket sealing surfaces.


Installation Procedure
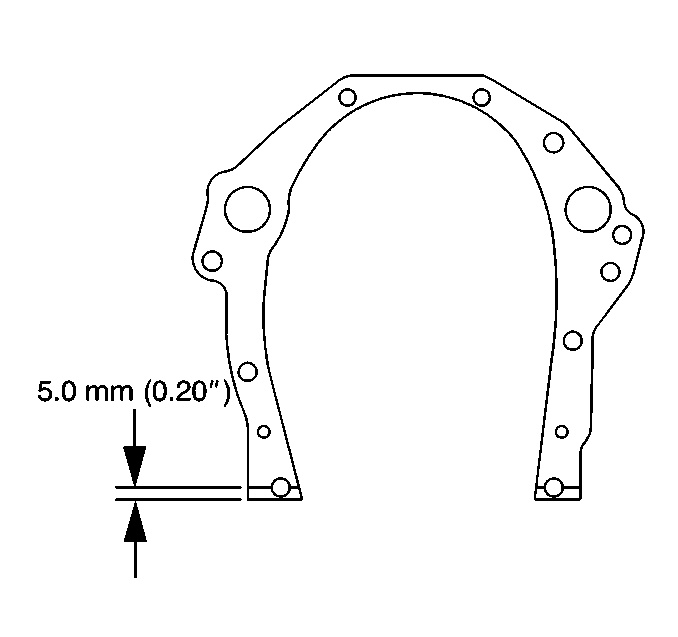
- Apply sealer to the lower tabs of the engine front cover gasket. Refer to Adhesives, Fluids, Lubricants, and Sealers for the correct part number. Uniformly apply the sealer to both sides of the gasket lower tabs with the sealant bead being no less than 5.0 mm (0.20 in) wide as shown. Torque front cover immediately after installation of sealer coated gasket.
- Install the gasket (1) to the engine block positioning the gasket on the locating pins (2).
- Install the engine front cover (1) to the engine block aligning the cover with the locating pins.
- Install the engine front cover bolts (3, 4) and tighten to 55 N·m (41 lb ft).
- Install the engine front cover bolts (2) and tighten to 27 N·m (20 lb ft).
- Install the radiator outlet hose to the engine front cover. Refer to Radiator Outlet Hose Replacement.
- Install the thermostat bypass hose adapter. Refer to Thermal Bypass Fitting Replacement.
- Install the water pump. Refer to Water Pump Replacement.
- Install the right engine mount bracket (1).
- Install the right engine mount bracket bolts (2-4) and tighten to 55 N·m (41 lb ft).
- Install the engine mount bracket bolts (3) and tighten to 25 N·m (18 lb ft).
- Install the left belt idler pulley. Refer to Drive Belt Idler Pulley Replacement - Left Side.
- Raise and support the vehicle. Refer to Lifting and Jacking the Vehicle.
- Install the engine oil pan. Refer to Oil Pan Replacement.
- Install the lower belt idler pulley. Refer to Drive Belt Idler Pulley Replacement - Lower.
- Install the crankshaft balancer. Refer to Crankshaft Balancer Replacement.
- Lower the vehicle.
- Install the drive belt. Refer to Drive Belt Replacement.
- Remove the engine support fixture.
- Install the air cleaner assembly. Refer to Air Cleaner Assembly Replacement.
- Connect the negative battery cable. Refer to Battery Negative Cable Disconnection and Connection.
- Fill the cooling system. Refer to Cooling System Draining and Filling.


Caution: Refer to Fastener Caution in the Preface section.

