Cylinder Head Replacement Left Side
Removal Procedure
Important: Before removing the cylinder head from the engine, perform a compression
test and note the results.
- Remove the intake manifold:
- Remove the left camshaft carrier. Refer to
Camshaft Carrier Replacement
.
- Remove the left exhaust manifold. Refer to
Exhaust Manifold Replacement
.
- Remove the oil level indicator tube bolt. Refer to
Oil Level Indicator and Tube Replacement
.
- Disconnect the electrical connector from the temperature sending
unit.
- Remove the cylinder head bolts.
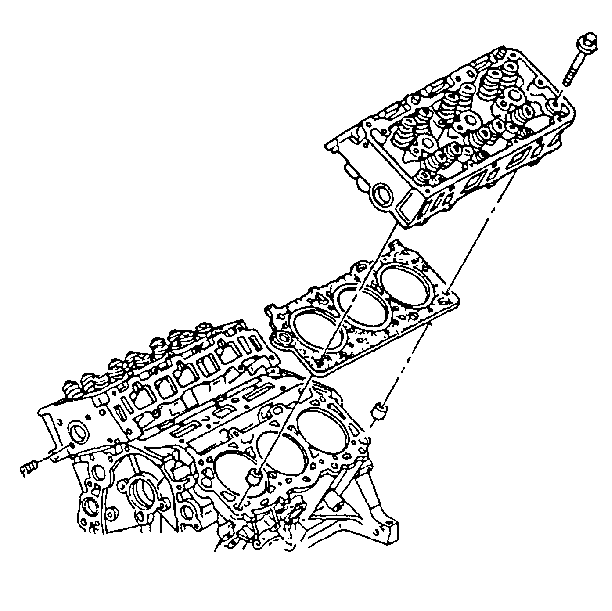
- Remove the cylinder head.
- Remove the cylinder head gasket.
- Clean the mating surfaces on the cylinder head.
- Clean the cylinder head bolts.
- Clean the cylinder block bolt threads. Ensure that all of the
oil is removed from the bolt holes.
- If replacing the cylinder head, transfer the following parts:
Installation Procedure
Tools Required
J 36660-A Torque Angle
Meter
Important: Cylinder head gaskets must be replaced any time the cylinder head is
removed.
- Install the gasket with the metal tabs between the cylinders facing up.
- Install the cylinder head.
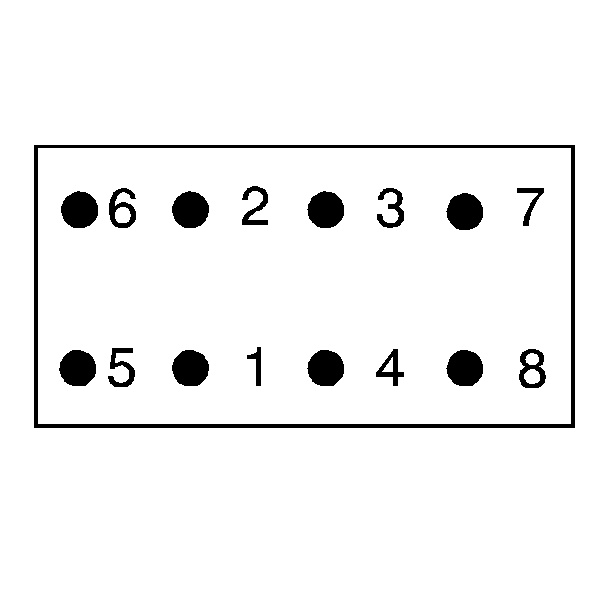
- Install the cylinder head bolts.
Tighten
| • | Install the bolts in proper sequence using J 36660-A
. |
| • | Initially tighten the bolts to 60 N·m (44 lb ft).
Use the J 36660-A
in order
to rotate the bolts an additional 90 degrees. |
Notice: Use the correct fastener in the correct location. Replacement fasteners
must be the correct part number for that application. Fasteners requiring
replacement or fasteners requiring the use of thread locking compound or sealant
are identified in the service procedure. Do not use paints, lubricants, or
corrosion inhibitors on fasteners or fastener joint surfaces unless specified.
These coatings affect fastener torque and joint clamping force and may damage
the fastener. Use the correct tightening sequence and specifications when
installing fasteners in order to avoid damage to parts and systems.
- Install the electrical connector to the temperature sending unit.
- Install the oil level indicator tube. Refer to
Oil Level Indicator and Tube Replacement
.
- Install the left exhaust manifold. Refer to
Exhaust Manifold Replacement
.
- Install the left camshaft carrier. Refer to
Camshaft Carrier Replacement
.
- Install the intake manifold:
- Drain the engine oil from the crankcase.
- Refill the crankcase with new engine oil. Do this in order to
avoid oil contamination during the cylinder head removal. Refer to Maintenance
and Lubrication.
Cylinder Head Replacement Right Side
Removal Procedure
Important: Before removing the cylinder head from the engine, perform a compression
test and note the results.
- Remove the intake manifold:
- Remove the right camshaft carrier. Refer to
Camshaft Carrier Replacement
.
- Remove the exhaust crossover pipe. Refer to
Exhaust Crossover Replacement
.
- Raise and suitably support the vehicle. Refer to General Information.
- Disconnect the front exhaust pipe at the manifold. Refer to Exhaust
System.
- Lower the vehicle.
- Disconnect the electrical connector from the oxygen sensor.
- Remove the rear timing belt tensioner actuator bracket. Refer
to
Timing Belt Tensioner Actuator Bracket Replacement
.
- Remove the cylinder head bolts.
- Remove the cylinder head with the exhaust manifold.
- Remove the gasket.
- Clean the mating surfaces on the cylinder head.
- Clean the cylinder head bolts.
- Clean the cylinder block bolt threads. Ensure that all of the
oil is removed from the bolt holes.
- If you are replacing the cylinder head, transfer the following
parts:
Installation Procedure
Tools Required
J 36660-A Torque Angle
Meter
Important: Cylinder head gaskets must be replaced any time the cylinder head is
removed.
- Install the gasket with the metal tabs between the cylinders facing up.
- Install the cylinder head with the exhaust manifold.
- Install the cylinder head bolts.
Tighten
| • | Tighten the bolts in proper sequence using the J 36660-A
. |
| • | Initially tighten the bolts to 60 N·m (44 lb ft).
Use the J 36660-A
in order
to rotate the bolts an additional 90 degrees. |
Notice: Use the correct fastener in the correct location. Replacement fasteners
must be the correct part number for that application. Fasteners requiring
replacement or fasteners requiring the use of thread locking compound or sealant
are identified in the service procedure. Do not use paints, lubricants, or
corrosion inhibitors on fasteners or fastener joint surfaces unless specified.
These coatings affect fastener torque and joint clamping force and may damage
the fastener. Use the correct tightening sequence and specifications when
installing fasteners in order to avoid damage to parts and systems.
- Install the rear timing belt tensioner actuator bracket. Refer
to
Timing Belt Tensioner Actuator Bracket Replacement
.
- Connect the electrical connector to the oxygen sensor.
- Raise the vehicle. Suitably support the vehicle. Refer to General
Information.
- Install the front exhaust pipe at the manifold. Refer to Exhaust
System.
- Lower the vehicle.
- Install the exhaust crossover pipe. Refer to
Exhaust Crossover Replacement
.
- Install the left camshaft carrier. Refer to
Camshaft Carrier Replacement
.
- Install the intake manifold:
- Refill the crankcase with clean oil in order to avoid the possible
contamination by engine coolant and/or foreign material when removing the
cylinder head. Refer to Cooling and Radiator.
