Notice: Before adding any sound equipment to the vehicle, such as an audio system, CD player, CB radio, mobile telephone, or two-way radio, make sure that it can be added by checking with your dealer/retailer. Also, check federal rules covering mobile radio and telephone units. If sound equipment can be added, it is very important to do it properly. Added sound equipment can interfere with the operation of the vehicle's engine, radio, or other systems, and even damage them. The vehicle's systems can interfere with the operation of sound equipment that has been added.
Notice: The chime signals related to safety belts, parking brake, and other functions of the vehicle operate through the navigation system. If that equipment is replaced or additional equipment is added to the vehicle, the chimes may not work. Make sure that replacement or additional equipment is compatible with the vehicle before installing it. See "Accessories and Modifications" in the Index of the vehicle's owner manual.
Your vehicle has a feature call Retained Accessory Power (RAP). With RAP, the audio system will continue to play even after the ignition is turned off. See "Retained Accessory Power (RAP)" in the Index of your vehicle's owner manual for more information.
The audio system is operated using navigation system menus.
Playing the Radio
(Power/Volume): Press this knob to turn the audio and navigation system on and off. Turn the knob to increase or decrease the volume.Finding a Station
BAND: Press this hard key to access the band menu and to switch between AM, FM1, FM2, XM1, or XM2, if equipped.(Tuning) Knob: Turn this knob to change radio frequencies.
SEEK : Press the SEEK up or down arrows to go to the next or previous station and stay there.
To scan stations, press and hold the SEEK up or down arrow for two seconds until you hear a beep. The radio will go to a station, play for a few seconds, then go on to the next station. Press either SEEK arrow again to stop scanning.
To scan preset stations, press and hold the SEEK up or down arrow for more than four seconds. You will hear two beeps and PSCAN will appear on the display, along with the highlighted preset. The radio will go to one of the preset stations, play for a few seconds, then go on to the next preset station. Press either SEEK arrow again to stop scanning presets.
The radio will only seek and scan stations with a strong signal that are in the selected band.
Setting Preset Stations
Up to 30 stations, six AM, six FM1, six FM2, six XM1, and six XM2, if equipped, can be programmed using the six screen buttons on the bottom of each band menu. To set preset stations, do the following:
- Turn the audio system on.
- Press the BAND hard key to select AM, FM1, FM2, XM1, or XM2, if equipped.
- Tune to the desired station using the SEEK hard key arrows or the tuning knob.
- Press and hold one of the six preset screen buttons until you hear a beep. Whenever that preset screen button is pressed, the station that was set will return.
- Repeat the steps for each preset and source.
Band Menu
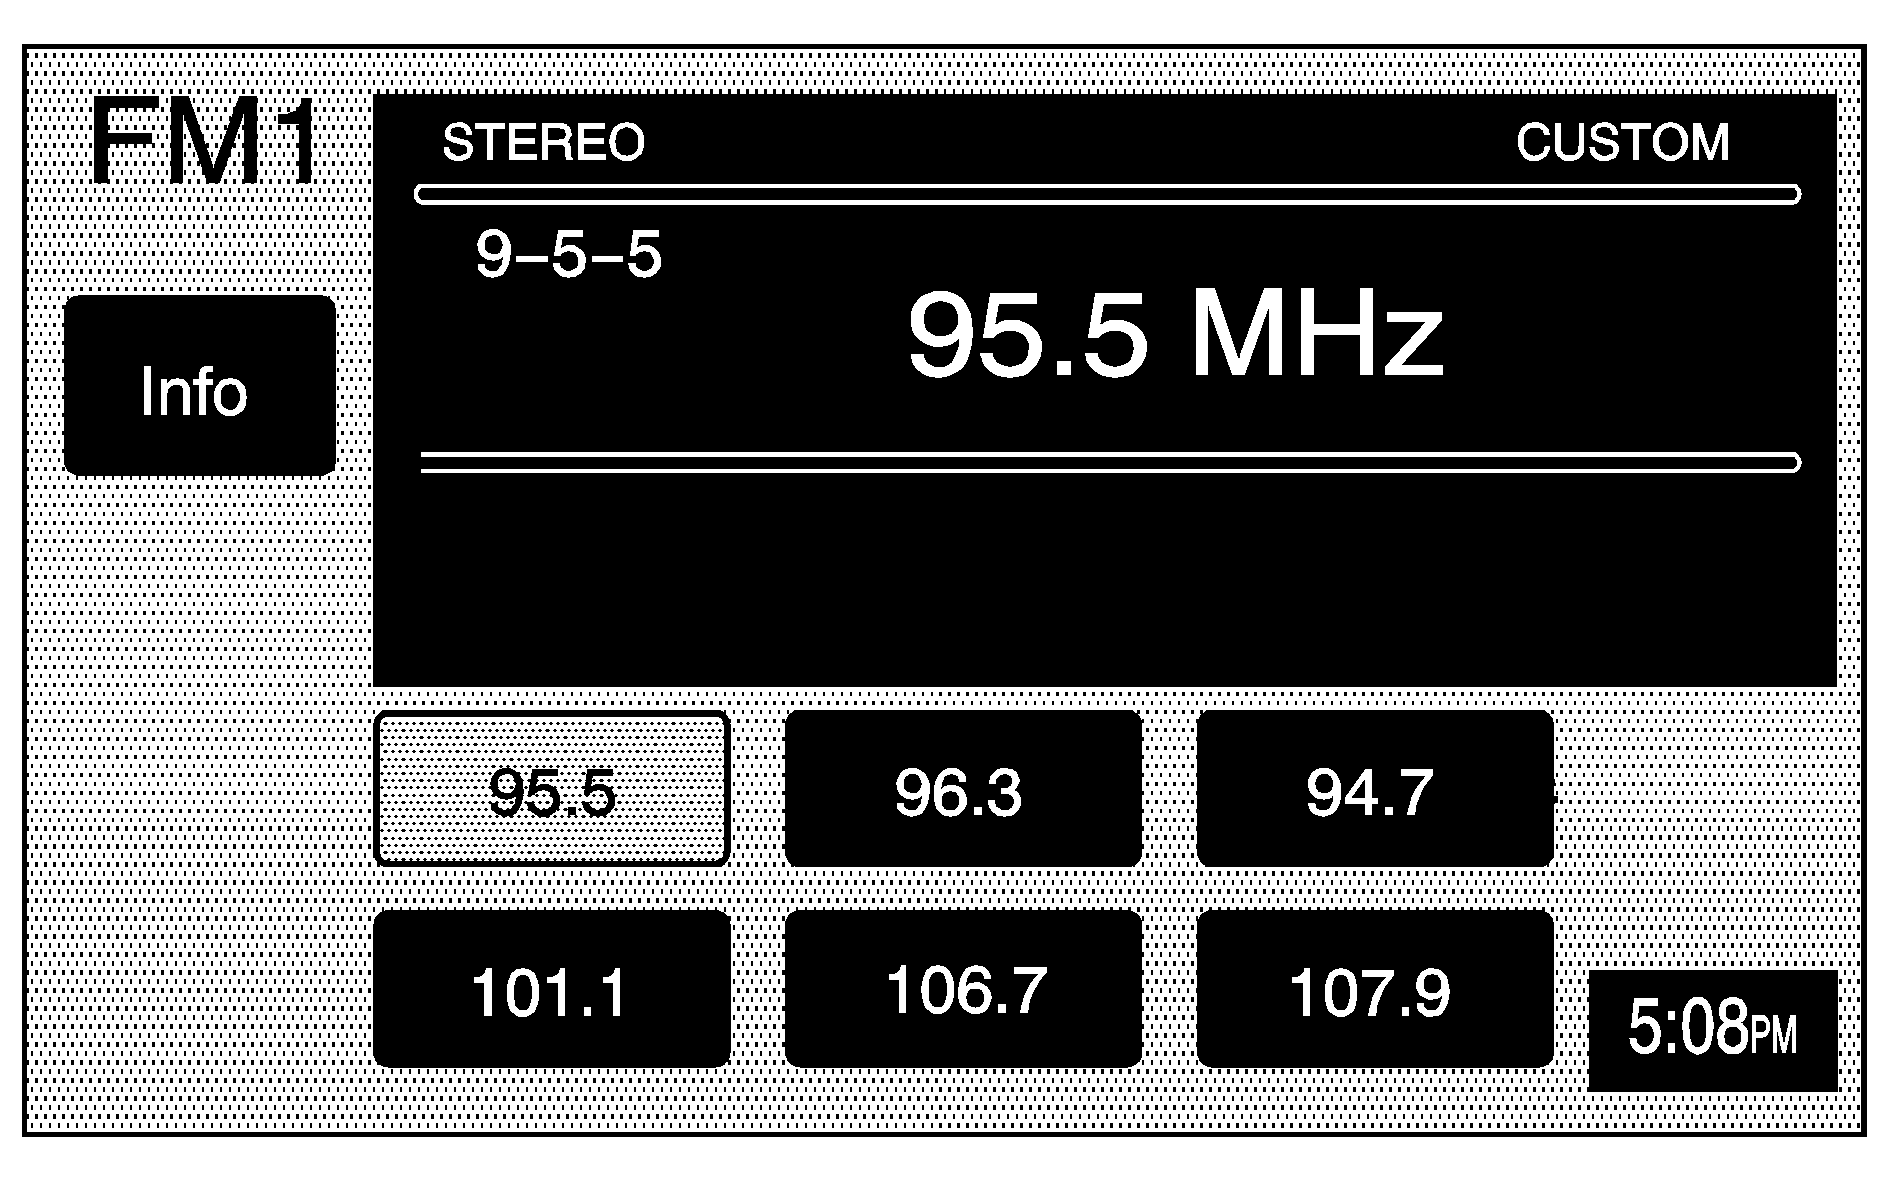
If the radio is on while the navigation system is not in use, this band menu will display the current audio information, as well as list the presets for the current band.
FM1 Source shown, Other Sources similar
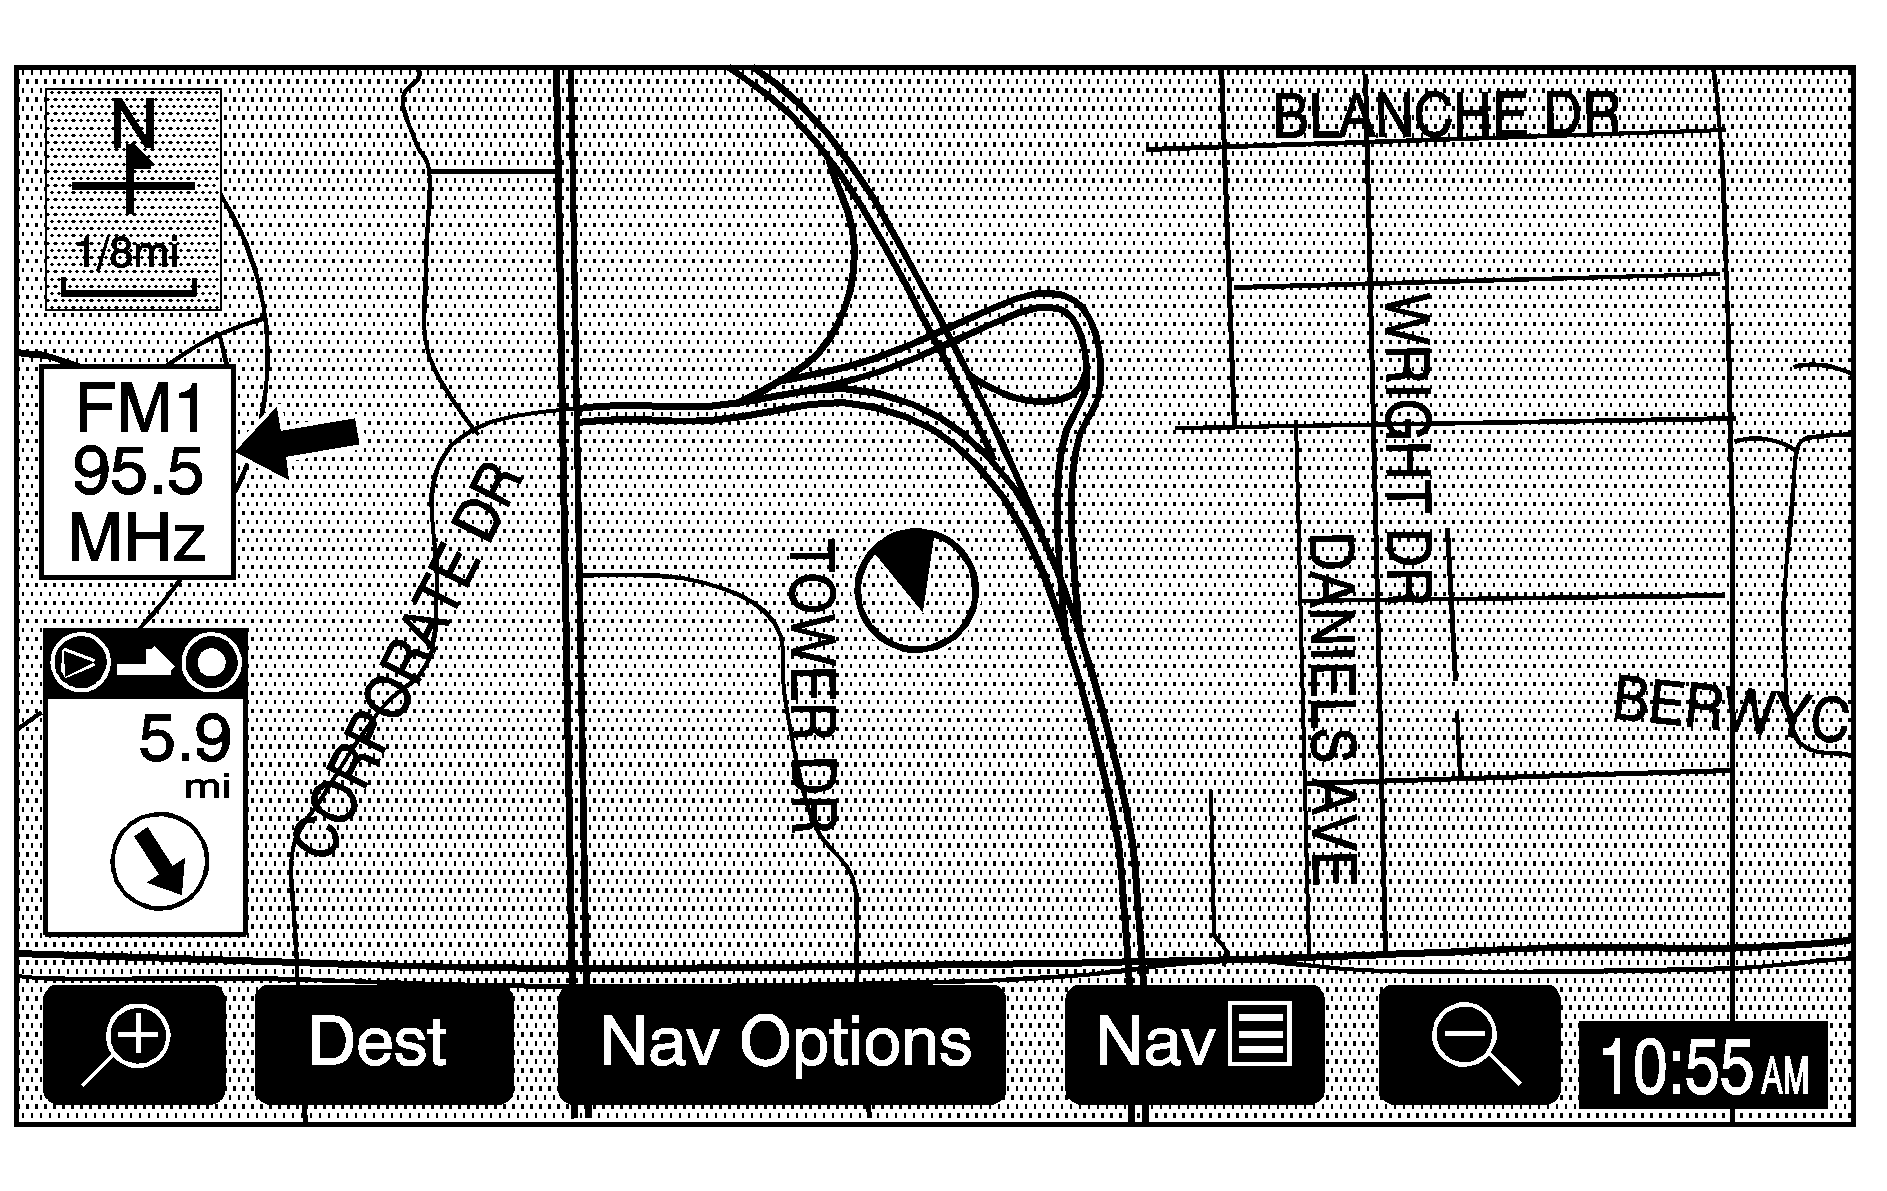
If the radio is on while the navigation system is in use, a smaller band menu will appear, located on the left side of the map screen. This audio screen will display the current audio information, such as band and station. Touch the smaller band menu screen button to access the full screen band menu.
FM1 Source shown, Other sources Similar
Audio Menu
(Audio): Press this hard key to display the Audio menu. Several adjustment options are available from this menu.Audio Menu
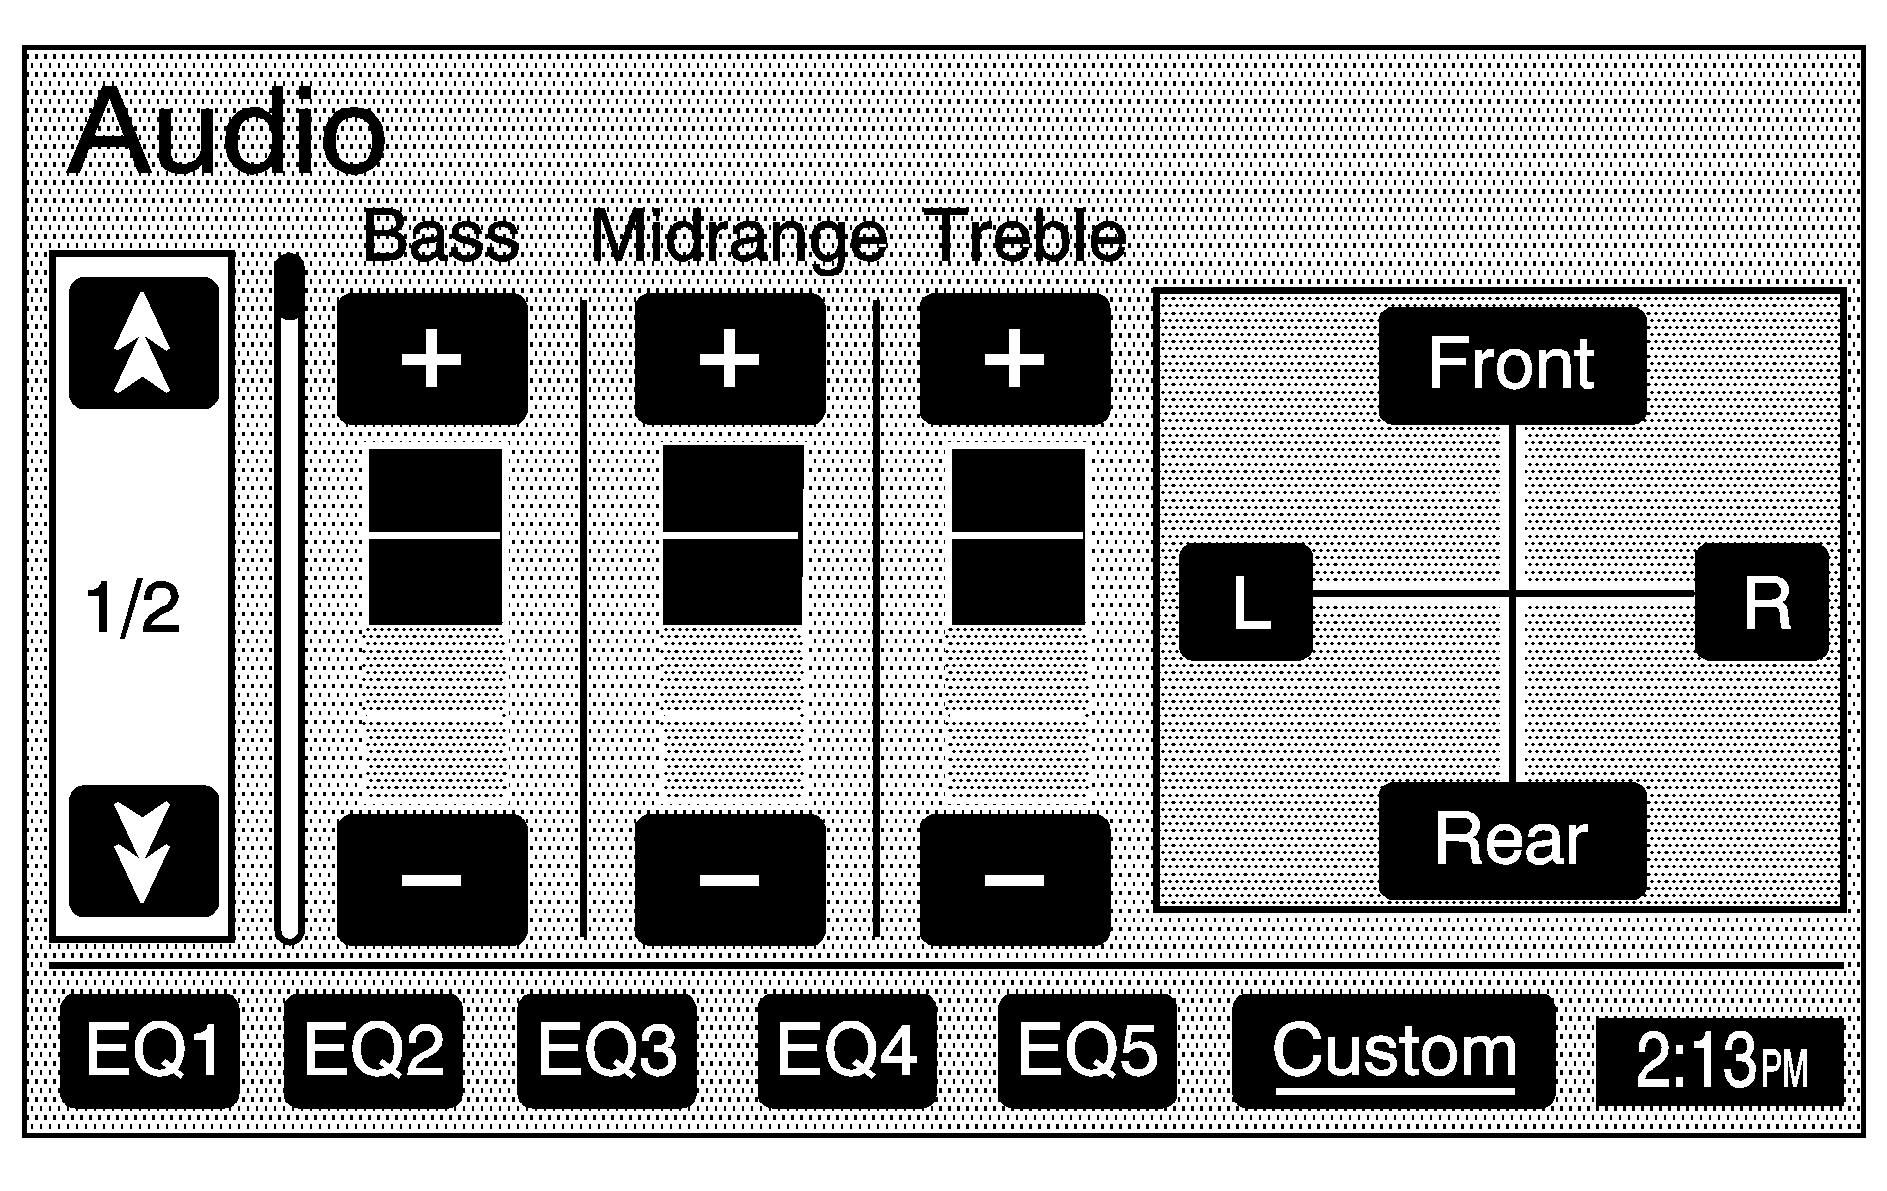
Tone (Bass/Midrange/Treble): Touch the plus (+) and minus (-) sign screen buttons to increase or decrease the Bass, Midrange, or Treble. If a station is weak or noisy, decrease the treble.
Speakers (Balance/Fade): Touch the L (left) or R (right) screen buttons to adjust the balance between the left and right speakers. Touch the Front or Rear screen buttons to adjust the fade between the front and rear speakers.
Speed Compensated Volume (SCV): With SCV, the audio system will adjust automatically to make up for road and wind noise as you drive, by increasing the volume as vehicle speed increases. Touch the down arrow screen button to access the second page of the Audio menu. Set the volume at the desired level, then select Low, Med, or High. The volume level should always sound the same to you as you drive. To turn SCV off, touch the Off screen button.
EQ (Equalizer): Use the screen buttons labeled EQ1 through EQ5 to choose preset bass, midrange, and treble equalization settings. The Custom screen button allows you to choose and set the equalization levels. To set a custom equalization setting, adjust each setting to the desired level, then touch the Custom screen button until you hear a beep. After adjustments are made, press the BAND hard key to go back to the preset station menu. Now that you have preset the station and the EQ setting, you can assign the EQ to the preset station. To do this, touch the desired preset station screen button until you hear a beep. The EQ setting will now be assigned to that station unless you decide to change it. If you were at the CD screen before setting an EQ and you press the CD hard key, you will be returned to the CD screen, and the EQ will be set to that screen until you change it.
See "Rear Seat Audio (RSA)", "Theft-Deterrent Feature", "Audio Steering Wheel Controls", "Radio Reception", and the antenna information in the Index of your vehicle's owner manual for more information.
Radio Data Systems (RDS)
The audio system has a Radio Data System (RDS). RDS features are available for use only on FM stations that broadcast RDS info. With RDS, the radio can do the following:
| • | Display station name |
| • | Display messages from radio stations |
| • | Display song title and artist name |
This system relies on receiving specific information from these stations and will only work when the information is available. In rare cases, a radio station may broadcast incorrect information that will cause the radio features to work improperly. If this happens, contact the radio station.
While the radio is tuned to an RDS station, the station name will appear on the display with the frequency.
Touch the Info screen button on the band menu to receive information the selected radio station is currently broadcasting.
XM™ Satellite Radio Service
XM™ is a satellite radio service that is based in the 48 contiguous United States and 10 Canadian provinces. XM Satellite Radio has a wide variety of programming and commercial-free music, coast-to-coast, and in digital-quality sound. During your trial or when you subscribe, you will get unlimited access to XM Radio Online for when you are not in the vehicle. A service fee is required to receive the XM service. For more information, contact XM at xmradio.com or call 1-800-929-2100 in the U.S. and xmradio.ca or call 1-877-438-9677 in Canada.
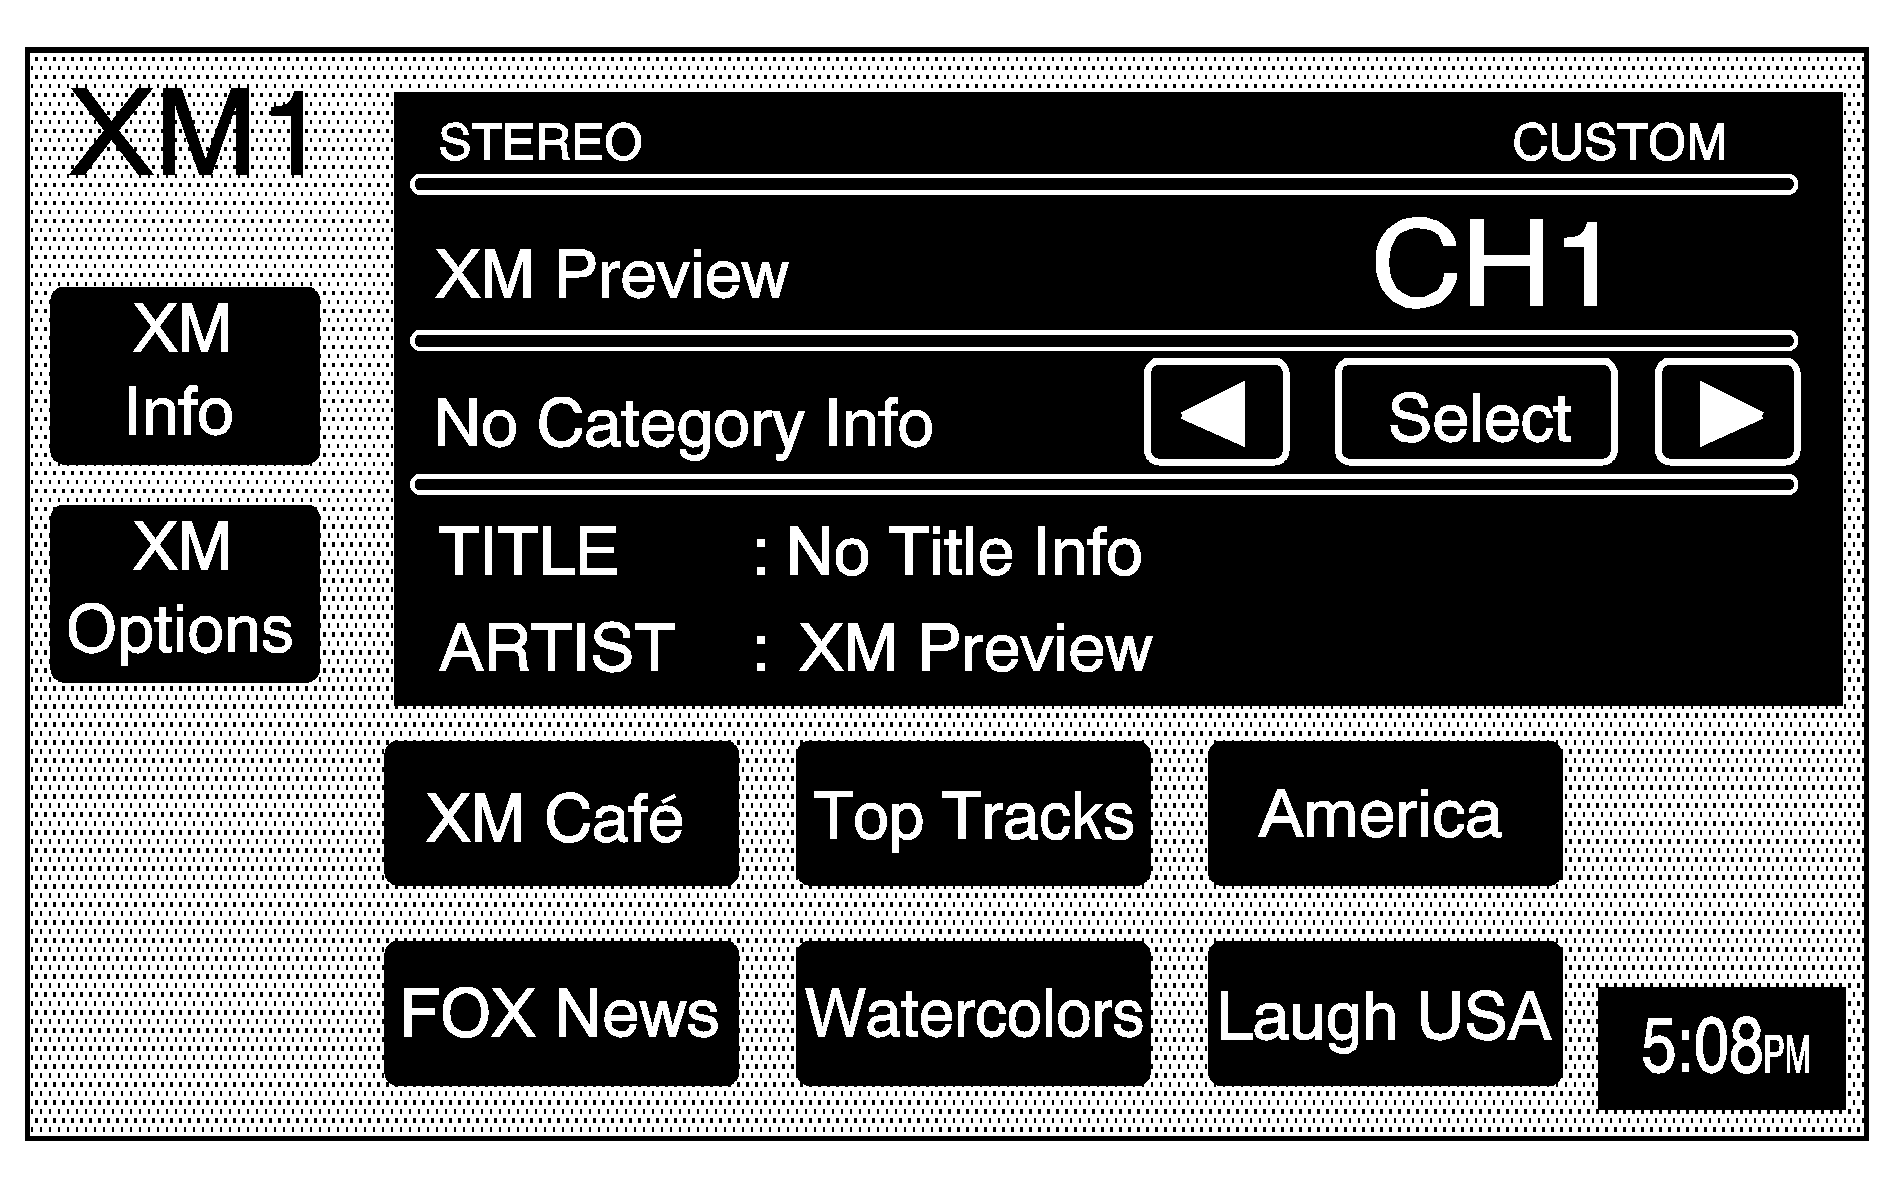
Press the BAND hard key repeatedly until you reach the XM™ selection. When XM™ is active, the channel name and number, song title, and artist will display on the screen.
Touch the XM Info screen button to display additional XM station information.
XM™ Options
Touch the XM Options screen button to access the XM Options menu.
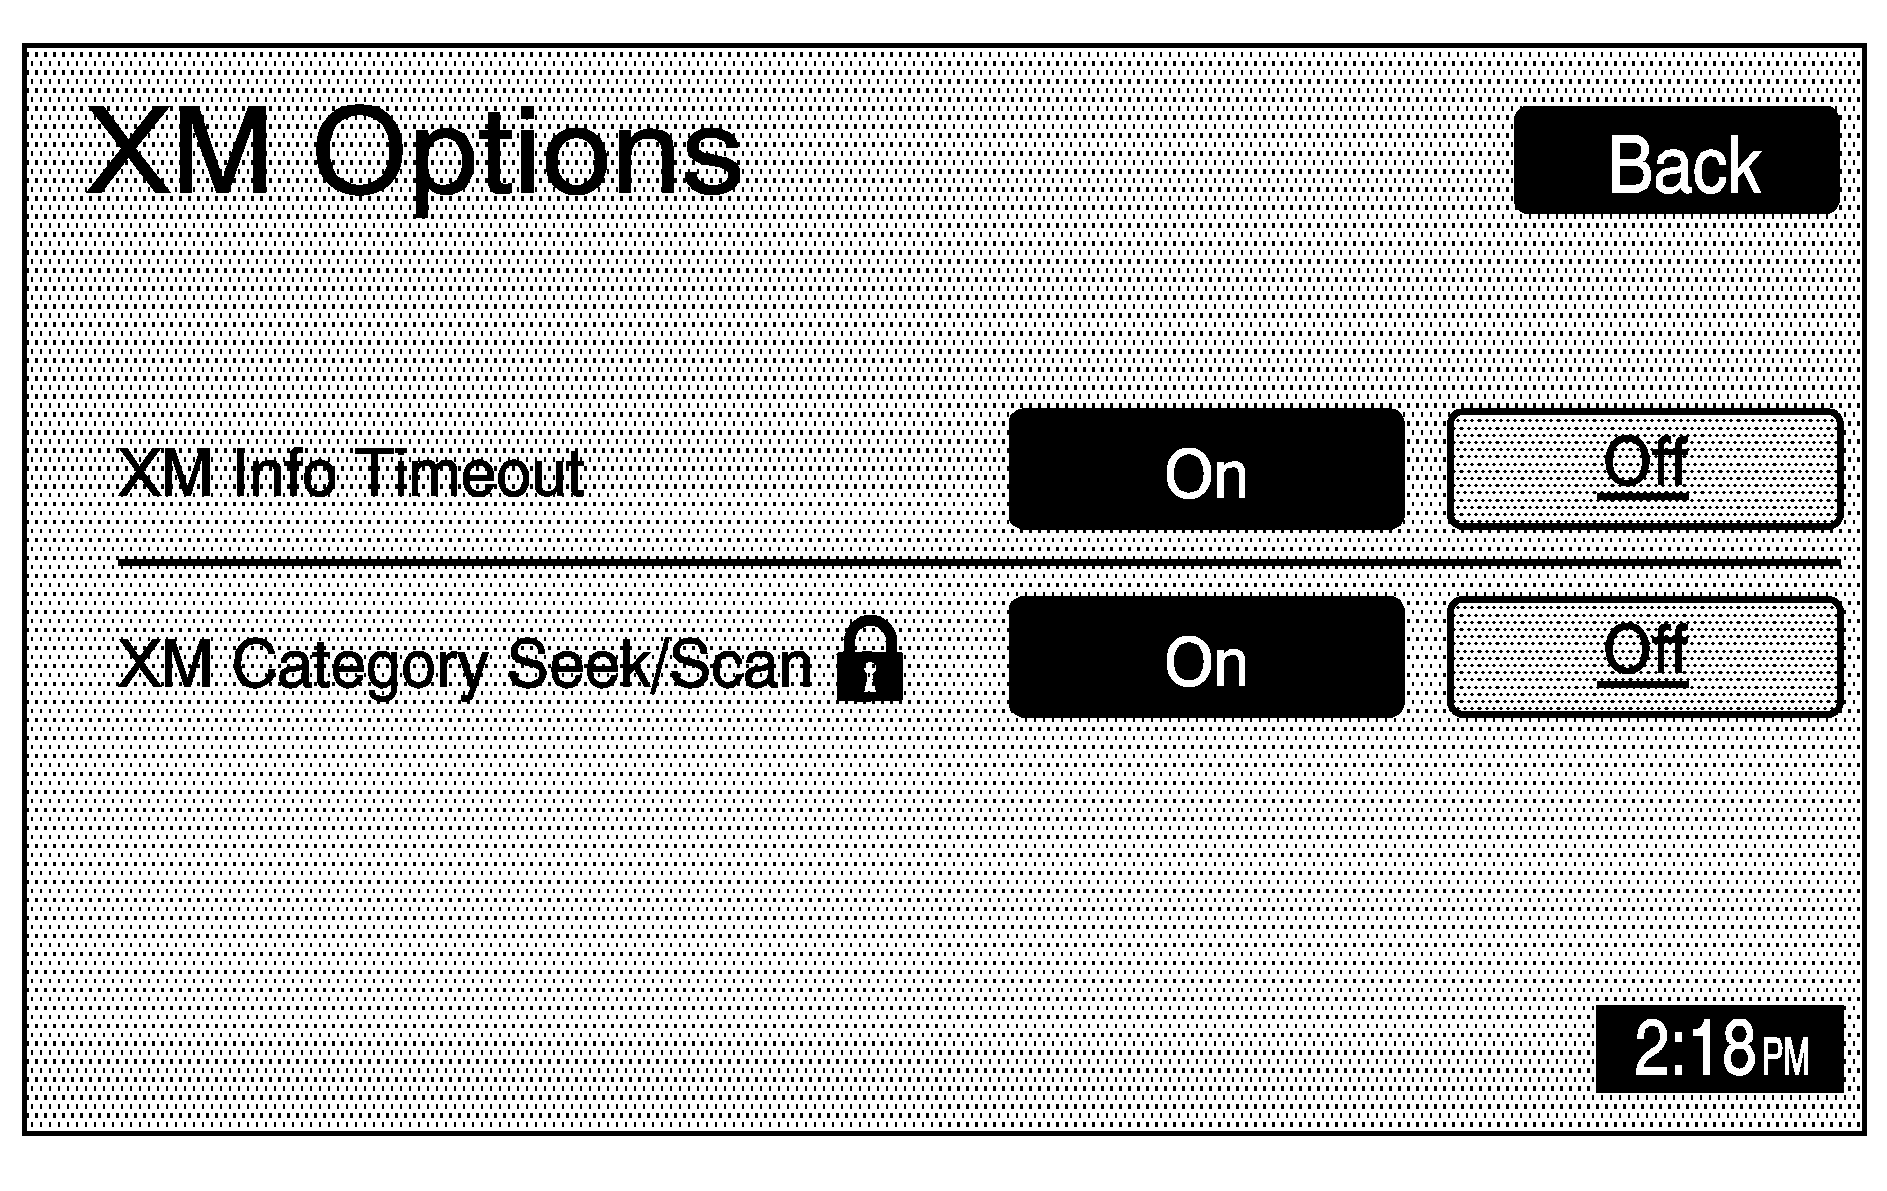
This menu allows you to seek or scan for stations based on their category. Touch the On screen button next to XM Info Timeout to hide XM™ information after a certain amount of time has passed. Touch Off to turn this feature off.
While in this menu, turn XM Category Seek/Scan on to scroll through the categories you want to seek to. This option will take you to the first available channel in that category.
XM™ Radio Messages
See "XM™ Radio Messages" in the vehicle's owner manual" for a list of possible XM messages.
Notice: Before adding any sound equipment to the vehicle, such as an audio system, CD player, CB radio, mobile telephone, or two-way radio, make sure that it can be added by checking with your dealer/retailer. Also, check federal rules covering mobile radio and telephone units. If sound equipment can be added, it is very important to do it properly. Added sound equipment can interfere with the operation of the vehicle's engine, radio, or other systems, and even damage them. The vehicle's systems can interfere with the operation of sound equipment that has been added.
Notice: The chime signals related to safety belts, parking brake, and other functions of the vehicle operate through the navigation system. If that equipment is replaced or additional equipment is added to the vehicle, the chimes may not work. Make sure that replacement or additional equipment is compatible with the vehicle before installing it. See "Accessories and Modifications" in the Index of the vehicle's owner manual.
Playing the Radio
(Power/Volume):
| • | Press to turn the audio system on and off. |
| • | Turn to increase or to decrease the volume. |
| • | Press and hold for more than two seconds to turn off the navigation system, the Rear Seat Entertainment (RSE) video screen, and Rear Seat Audio (RSA). If the vehicle has not been turned off, the RSE and the RSA can be turned back on by pressing this knob. The last active source resumes playing. |
(Tuning Knob):
| • | Turn to go to the next or previous frequency. |
| • | Press to go to the Sound menu. |
AUDIO:
| • | Press to display the audio screen. |
| • | Press to switch between AM, FM, or XM (if equipped), DISC, or AUX (Auxiliary), or select the screen button. See CD Player , DVD Player , or Auxiliary Devices for more information. |
Finding a Station
There are three ways to find/change stations:
| • | If viewing a full map screen, use the SEEK keys and knob. Preset stations cannot be changed from the full map screen. |
AM source shown, other sources similar
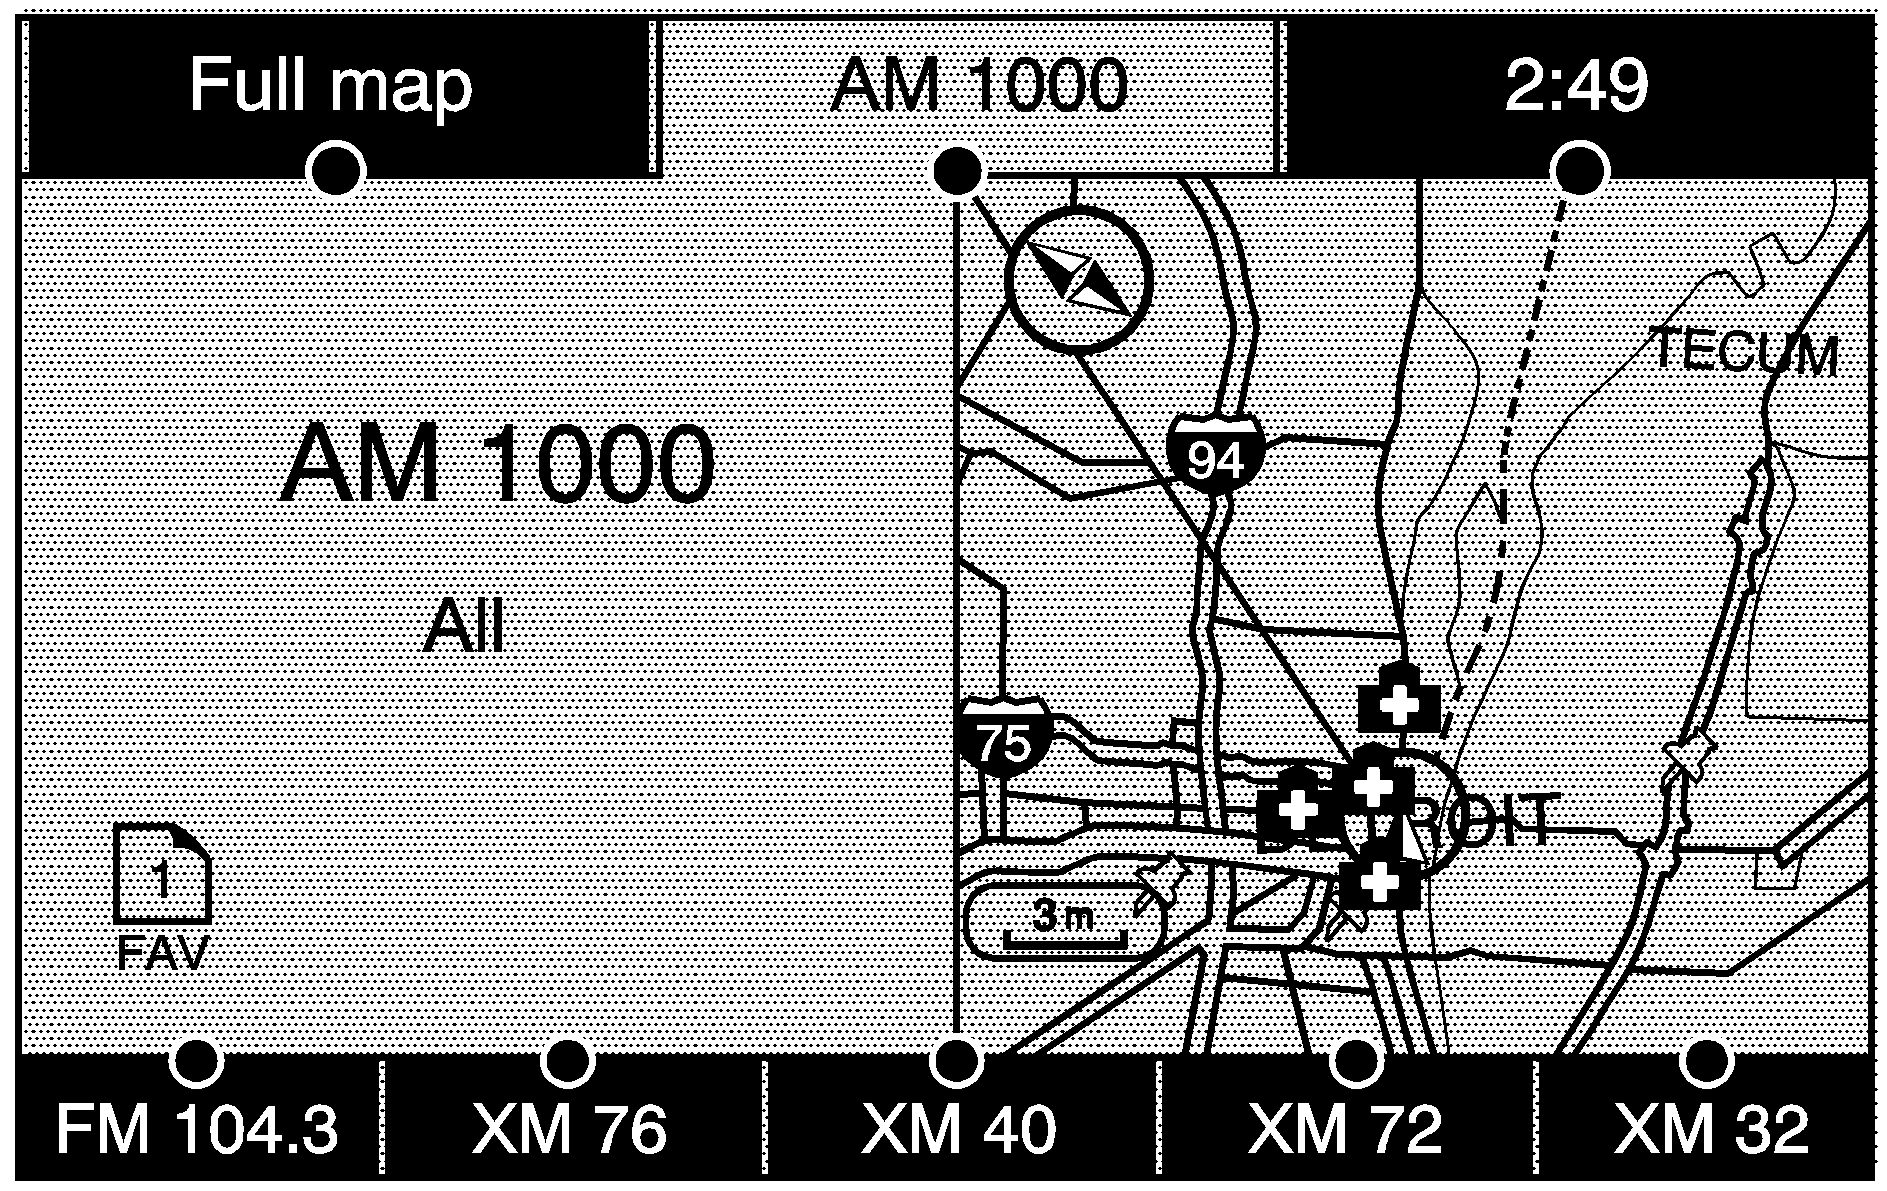
| • | If viewing a full map screen, select the source screen (AM, FM, XM, CD, etc.) button. The display splits between the audio screen and the map screen. All station-changing functions can be performed from this screen. |
FM source shown, other sources similar
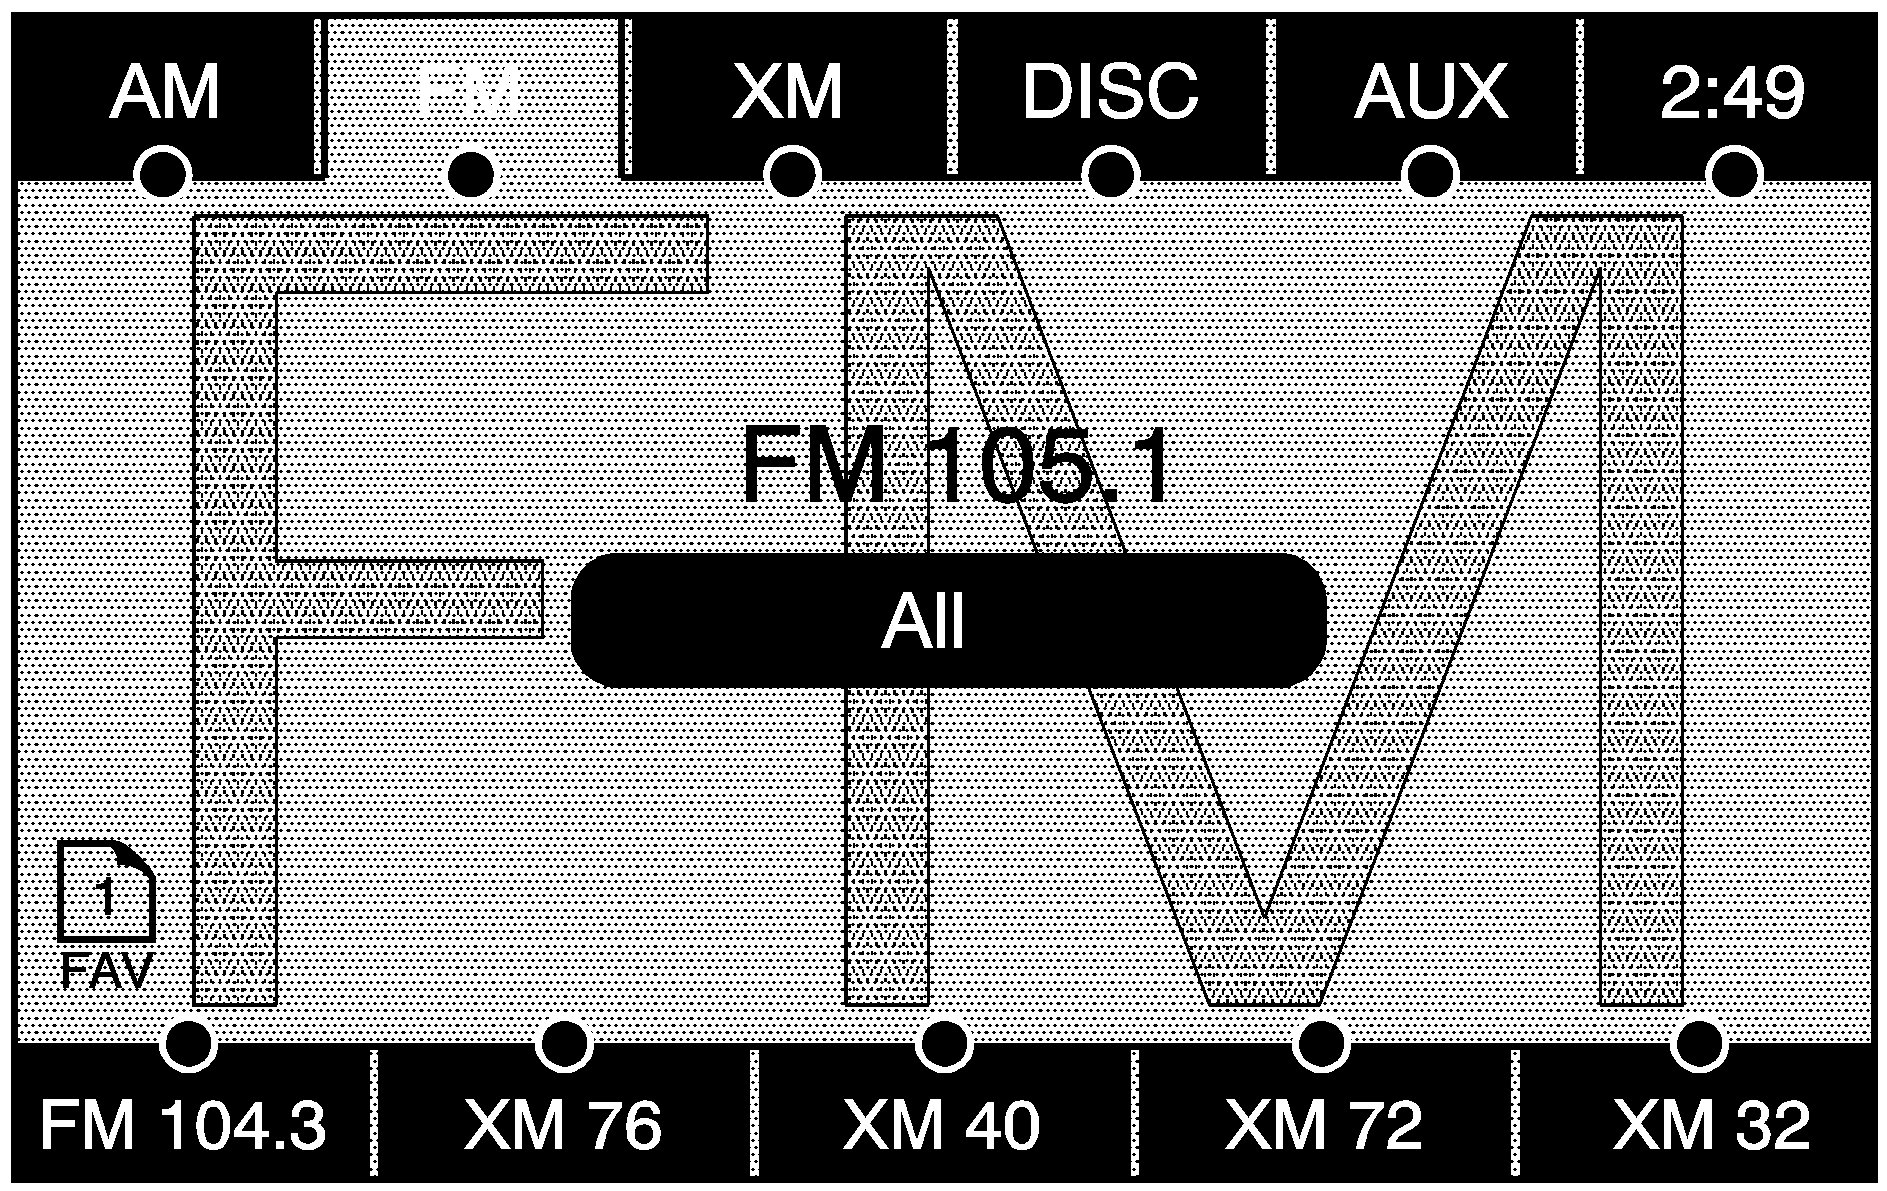
| • | If you do not want to view a split screen or you are not on a map screen, press the AUDIO hard key to enter the audio menu. |
FM source shown, other sources similar
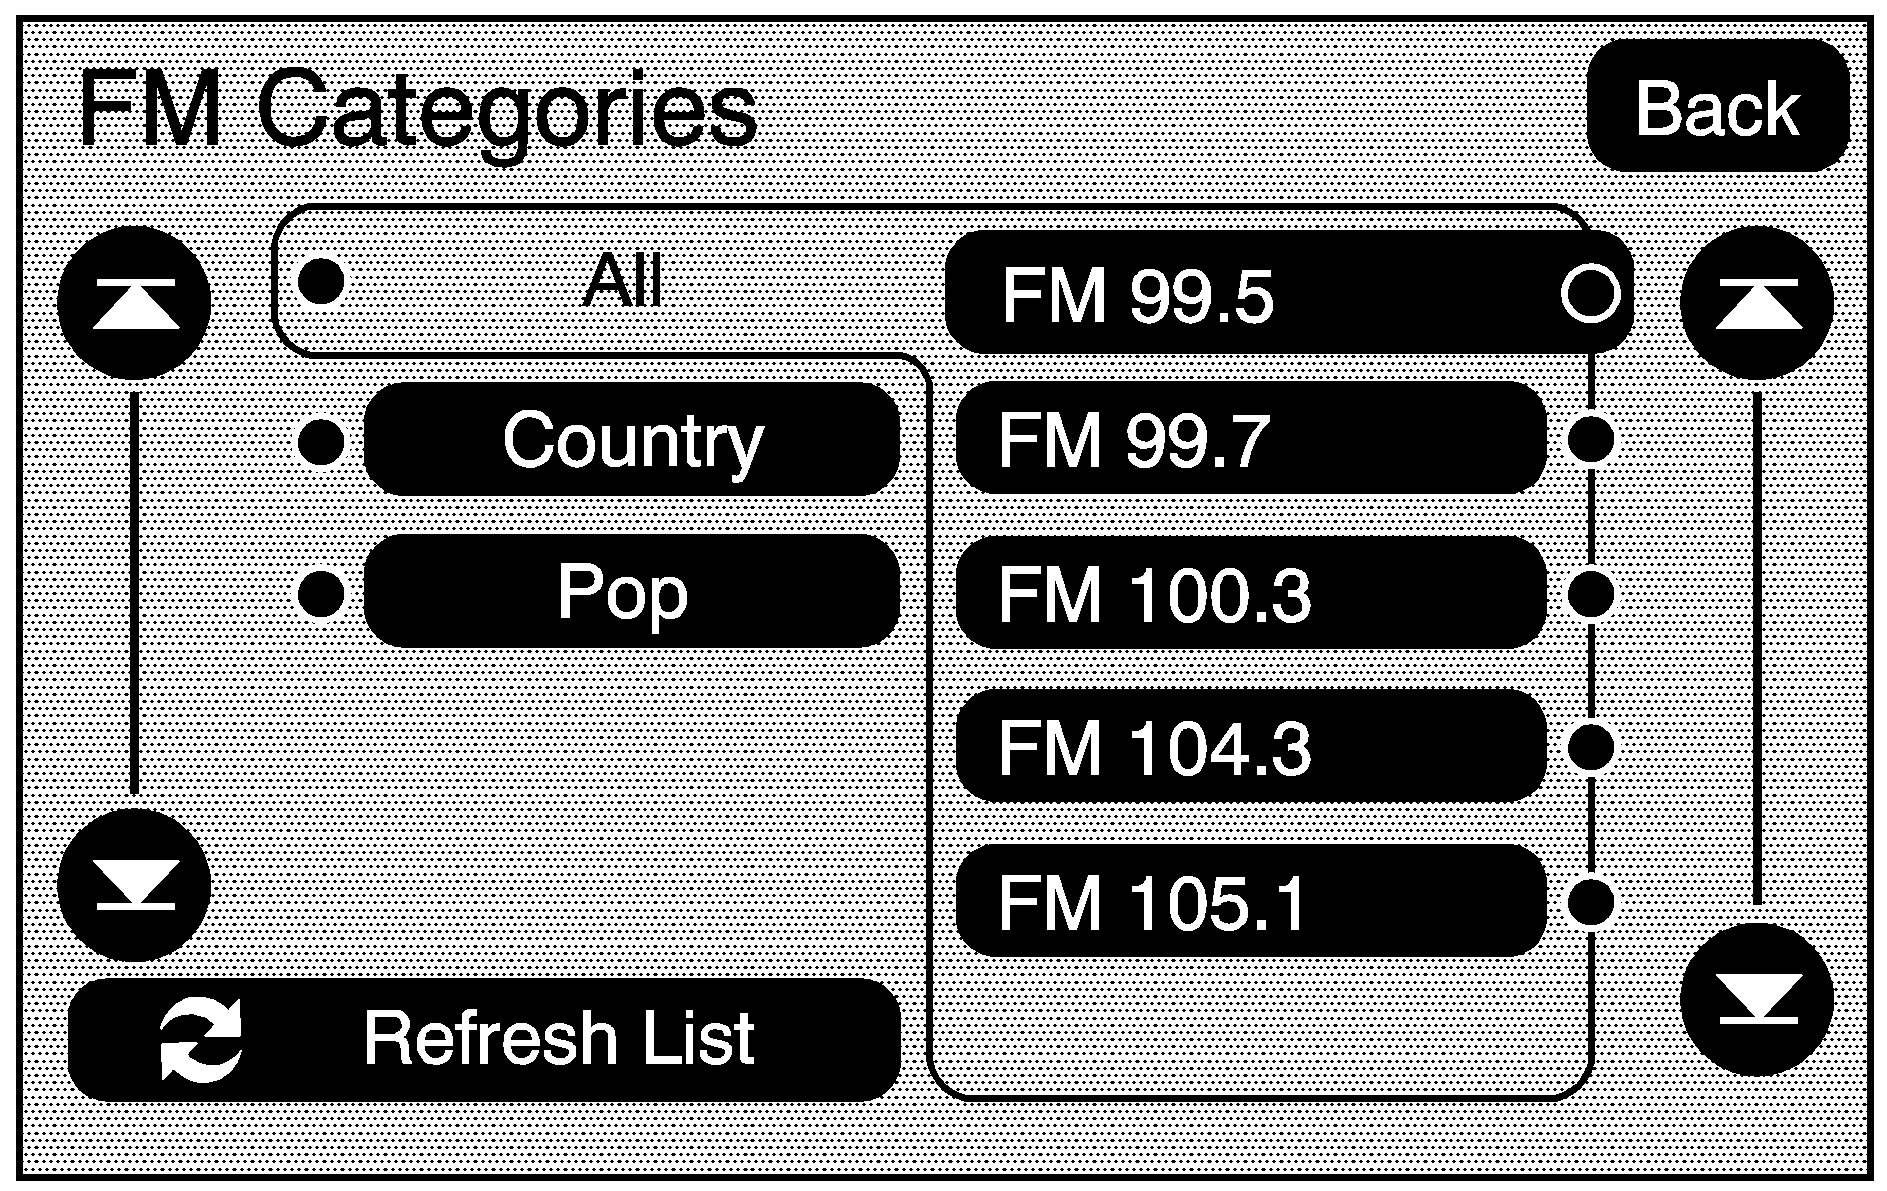
Category:
- Select the screen button, located in the middle of the screen, to receive a list of all of the selected band stations in the area.
- Use the up and down arrow screen buttons to scroll the frequencies.
- Select the desired frequency.
XM lists also contain a category to select and the stations or channels that pertain to the category. For XM, select the left and right arrow screen buttons to change categories. The station information displays. See "Radio Menu" later in this section to add and remove XM categories from the category list. When listening to XM stations, all of the categories can be selected when using the right and left arrow screen buttons on the main audio screen. Categories cannot be selected from the category list screen when they have been removed.
FM lists may also contain a category to select if stations in the area support Radio Data Systems (RDS).
Refresh List: Select this screen button to refresh the list of stations.When viewing a map screen the name of the station or channel displays in the top center tab.
SEEK / SEEK: To seek stations, press the right or left arrow keys to go to the next or previous station. To scan stations, press and hold either arrow for more than two seconds. The radio goes to a station, plays for a few seconds, then goes on to the next station. To stop scanning, press either arrow again.Storing Radio Station Presets
This feature allows up to 30 preset stations to be stored. You can mix AM, FM, and XM (if equipped). To store presets:
- Press to turn the system on.
- If viewing a map screen, select the source screen button, press the AUDIO key, or press the FAV (favorite) key.
- Select the band.
- Seek, scan, or tune to the desired station, to select the station.
- Press and hold one of the preset screen buttons for more than two seconds or until a beep is heard.
- Repeat the steps for each preset.
Sound Menu
Base shown; Uplevel similar
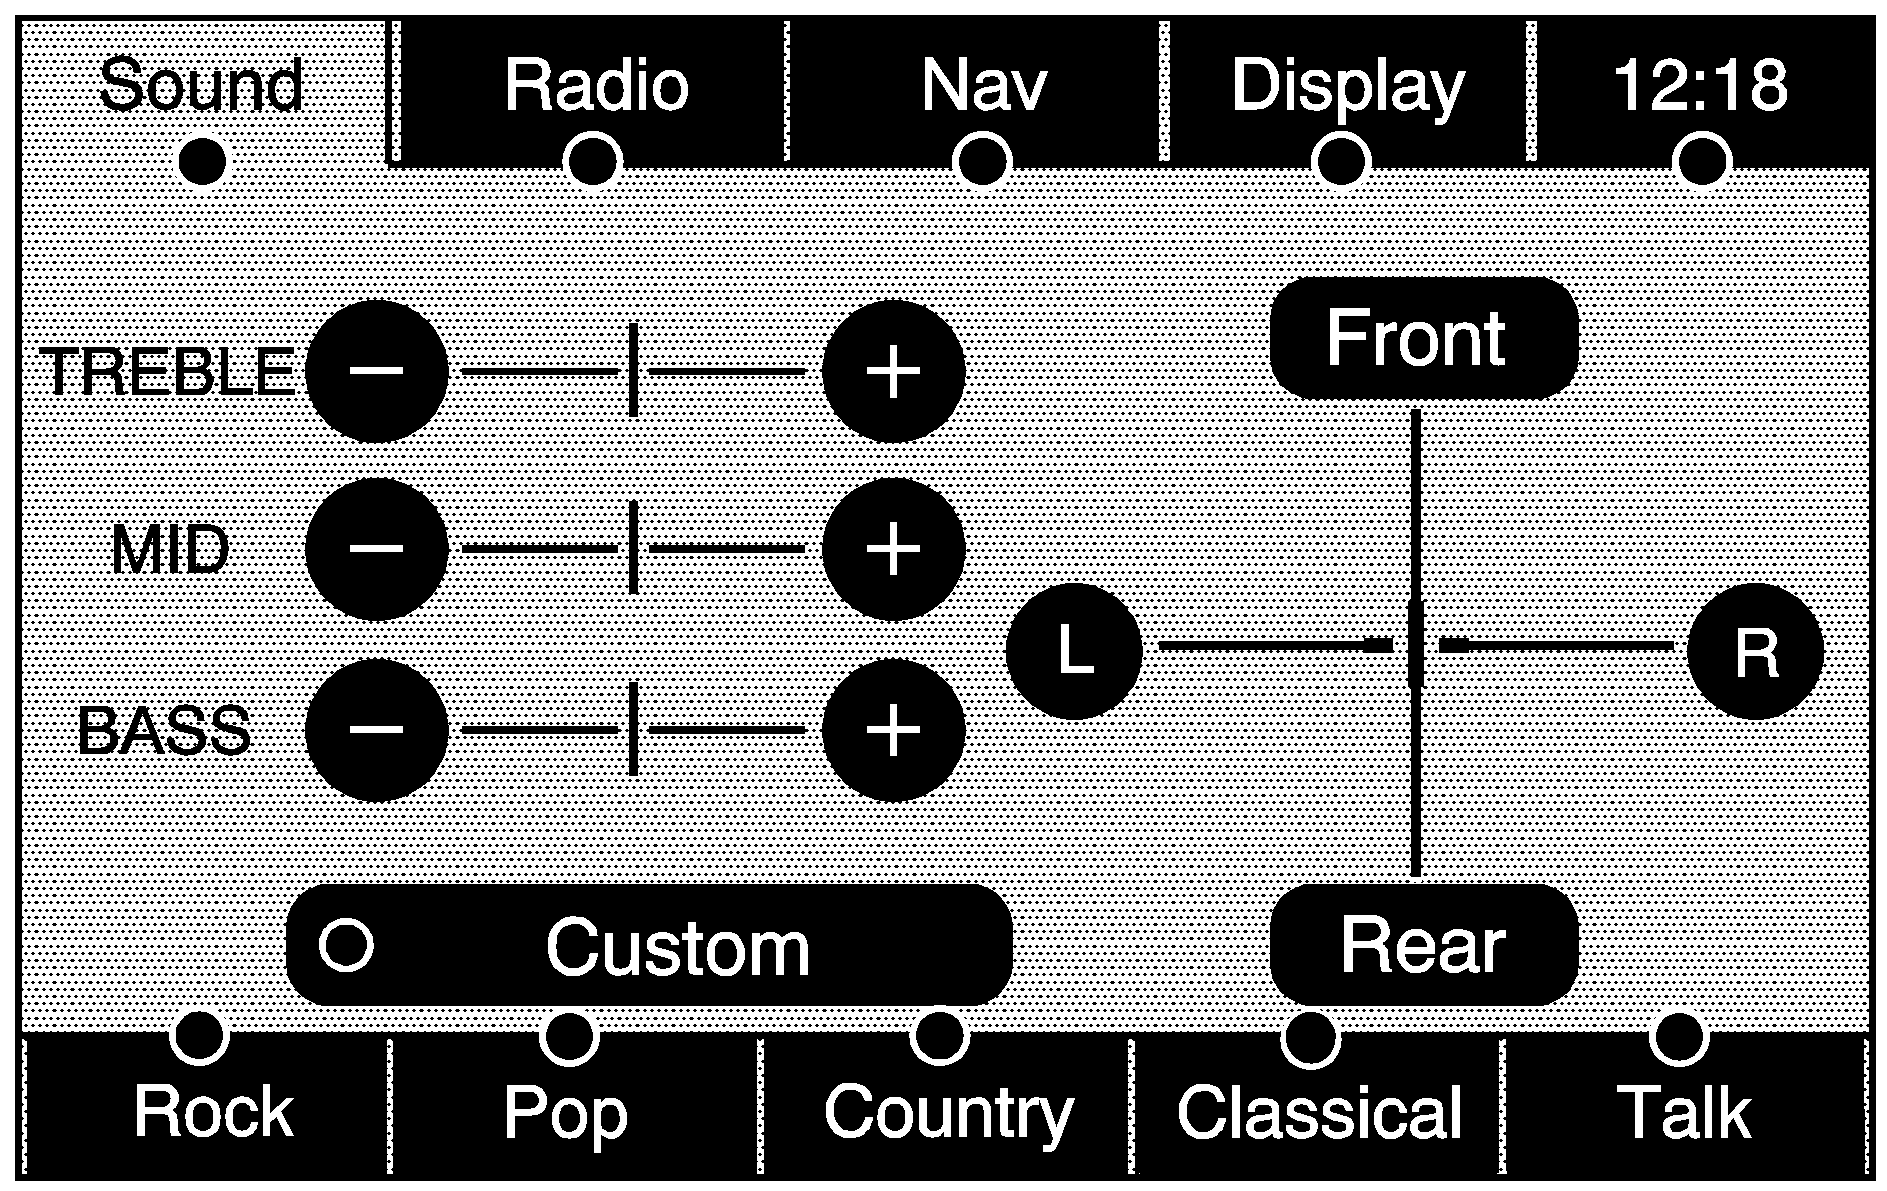
SOUND: Press this key or press the MENU key to access the Sound menu to adjust the treble, midrange, bass, fade, balance, and equalization.
Setting the Tone
TREBLE: Select and hold the plus (+) or minus (-) sign to increase or decrease the treble. If a station is weak or noisy, decrease the treble.MID (Midrange): Select and hold the plus (+) or minus (-) sign to increase or decrease the midrange.
BASS: Select and hold the plus (+) or minus (-) sign to increase or decrease the bass.
Adjusting the Speakers
L/R (Left/Right) (Balance): To adjust the balance between the left and the right speakers, select and hold the L or R screen buttons.Front/Rear (Fade): To adjust the fade between the front and the rear speakers, select and hold the Front or Rear screen buttons.
Automatic Equalization
With automatic equalization customized equalization settings designed for Rock, Pop, Country, Classical, and Talk can be selected. Select one of the equalization screen buttons to hear the change in sound.
Custom: Select this screen button to adjust the bass, treble, and midrange settings as desired. The system saves separate settings for each source.Talk: The Acadia and Enclave has only an equalization setting for Talk. Select Talk to adjust the tone settings to an automatic preset for talk radio.
Rear Seat Audio (RSA)
With this feature, if the Rear Seat Audio (RSA) system has been turned on, it can be turned off by selecting the Rear Seat Audio Off screen button. See "Rear Seat Audio (RSA)" in the Index of your vehicles owner manual.
Radio Menu
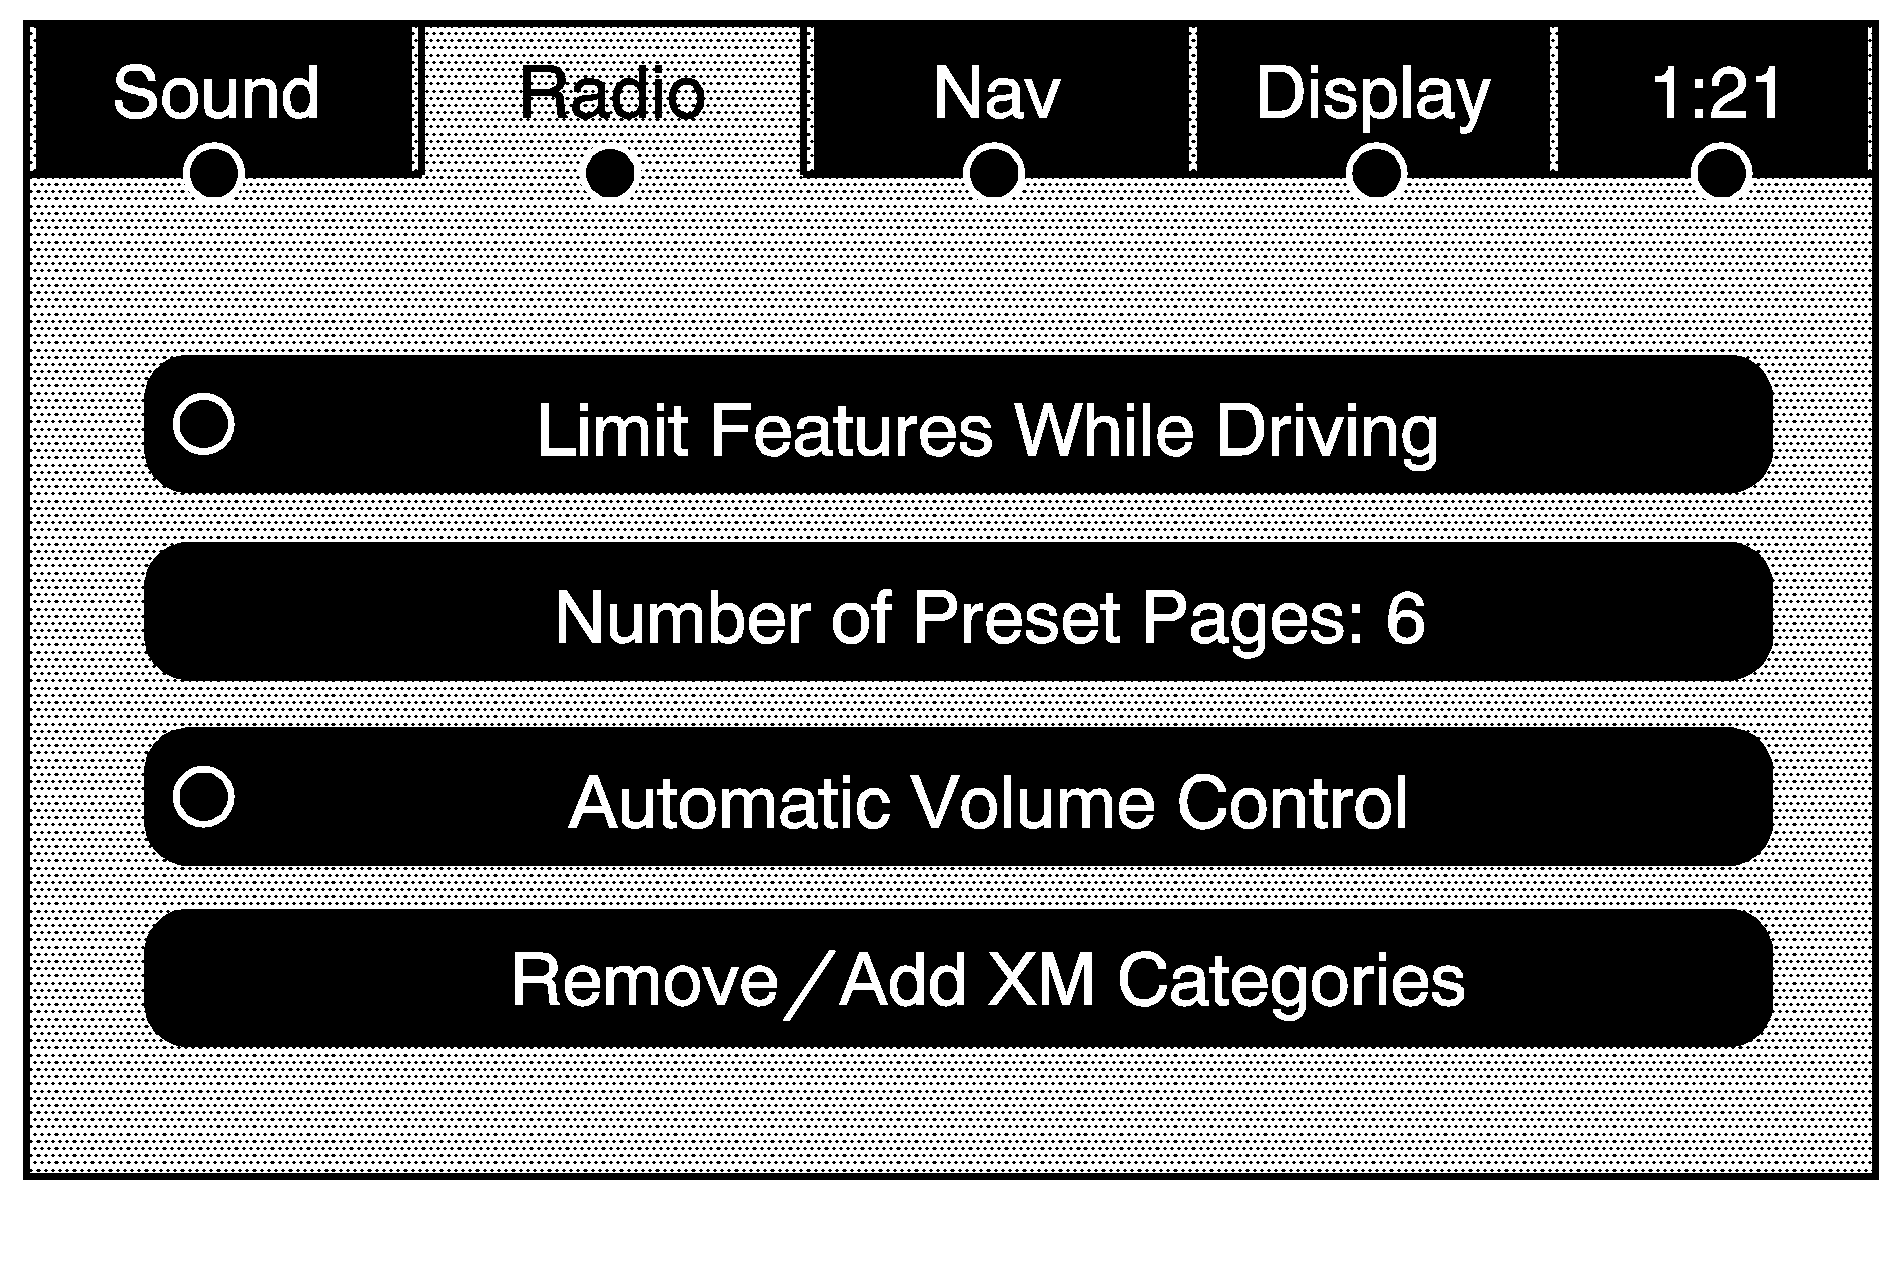
Press the MENU key to enter the configure menu screen, then press it repeatedly until Radio is selected, or select the Radio screen button to make changes for radio information displayed, number of preset pages, XM categories, if equipped, and automatic volume control.
Limit Features While Driving
Touch the Limit Features While Driving screen button to turn on and off the ability to limit functions while driving. When this screen button is highlighted, the following functions will be limited while driving:
| • | Music Navigator Scrolling |
| • | Radio Category Scrolling |
| • | Navigation Menu Scrolling and some functions |
See "Category" earlier in this section for more information. See "From Map" under Destination for more information.
Number of Preset Pages
Select the Number of Preset Pages screen button to change the number of preset pages, 1 through 6. Each preset page can contain five preset stations. Select the desired numbered screen button.
Automatic Volume Control
Automatic Volume Control: With automatic volume control, the audio system adjusts automatically to make up for road and wind noise while driving. To use Automatic Volume Control:- Set the volume at the desired level.
- Press the MENU key to enter the menu screen, then press it repeatedly until Radio is selected, or touch the Radio screen button.
- Press the Automatic Volume Control screen button.
- Touch the LOW, MEDIUM, or HIGH screen buttons. Each higher setting allows for more compensation at faster vehicle speeds.
Then, as the vehicle is being driven, automatic volume control automatically increases the volume, as necessary, to overcome noise at any speed. The volume level should always sound consistent while driving. To turn automatic volume control off, touch the OFF screen button.
Remove/Add XM Categories
- Select the Remove/Add XM Categories screen button to remove or add XM categories when selecting from the category list screen. The list of XM categories appear on the screen.
- Use the up and down arrow screen buttons to scroll through the list. The categories to remove highlights and the categories to add are dark in color.
- Select the category that you would like to add or remove.
- Select the Restore All Categories screen button to add all categories that have been removed.
Radio Data System (RDS)
The audio system has a Radio Data System (RDS). RDS features are available for use only on FM stations that broadcast RDS information. With RDS, the radio can:
| • | Receive announcements concerning local and national emergencies |
| • | Display messages from radio stations |
This system relies on receiving specific information from these stations and only work when the information is available. In rare cases, a radio station may broadcast incorrect information that can cause the radio features to work improperly. If this happens, contact the radio station.
The RDS system is always on. When information is broadcast from the FM station you are listening to, the station name or call letters display on the audio screen. RDS may provide a program type (PTY) for current programming and the name of the program being broadcast.
XM™ Satellite Radio Service
XM™ is a satellite radio service that is based in the 48 contiguous United States and 10 Canadian provinces. XM™ Satellite Radio has a wide variety of programming and commercial-free music, coast-to-coast, and in digital-quality sound. During the trial or when you subscribe, you will get unlimited access to XM™ Radio Online for when you are not in the vehicle. A service fee is required to receive the XM™ service. For more information, contact XM™ at xmradio.com or call 1-800-929-2100 in the U.S. and xmradio.ca or call 1-877-438-9677 in Canada.
When XM™ is active, the channel name and number, song title, and artist displays on the screen.
XM™ Radio Messages
See "XM™ Radio Messages" in the vehicle's owner manual for a list of possible XM messages.
