Tools Required
| • | Urethane Adhesive Kit GM P/N 12346392 or equivalent |
| • | J 39032 Stationary Glass Removal Tool |
| • | Cartridge-Type Caulking Gun |
| • | Commercial-Type Utility Knife |
Removal Procedure
- Lower the endgate window.
- Remove the front and rear roof appliques. Refer to Roof Front Applique Replacement and to Roof Rear Applique Replacement in Exterior Trim.
- Remove the moveable roof panel assembly. Refer to Moveable Roof Panel Assembly Replacement .
- Remove the endgate weatherstrip from the end of the moveable roof frame. Refer to Endgate Weatherstrip Replacement in Body Rear End.
- Remove the lock pillar upper tie bar trim panel. Refer to Body Lock Pillar Upper Tie Bar Trim Cover Replacement - Cargo Compartment in Interior Trim.
- Remove the moveable roof control module. Refer to Moveable Roof Panel Control Module Replacement .
- Remove the moveable roof motor/actuator. Refer to Moveable Roof Panel Motor/Actuator Replacement .
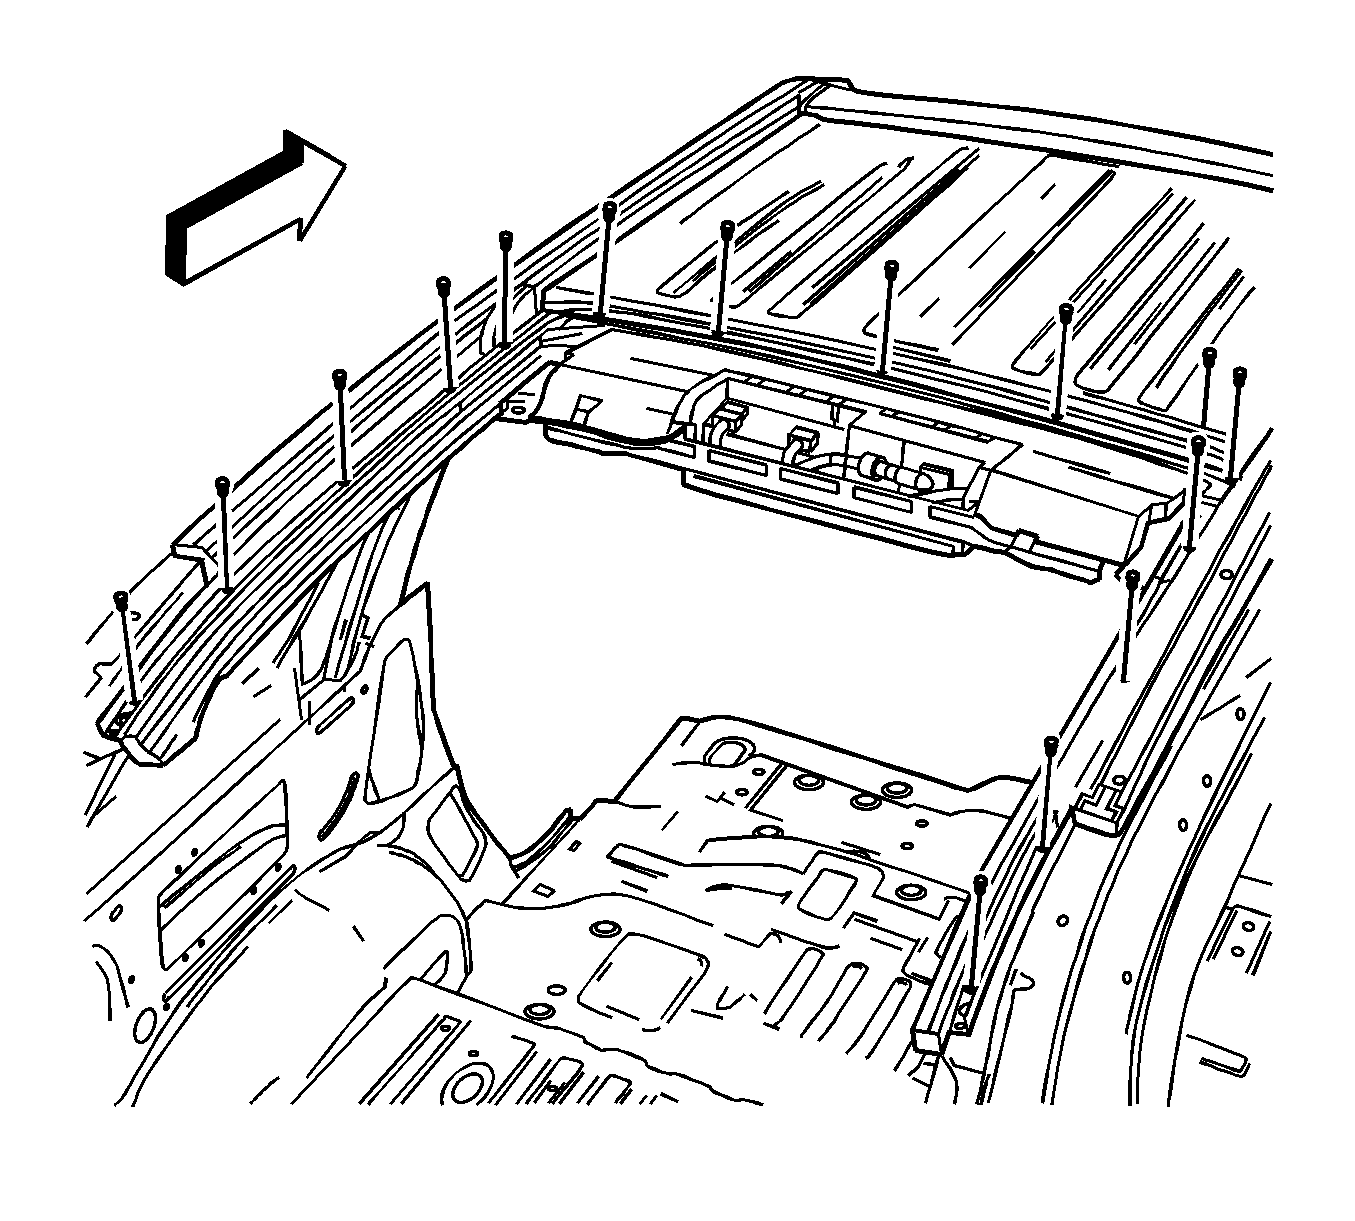
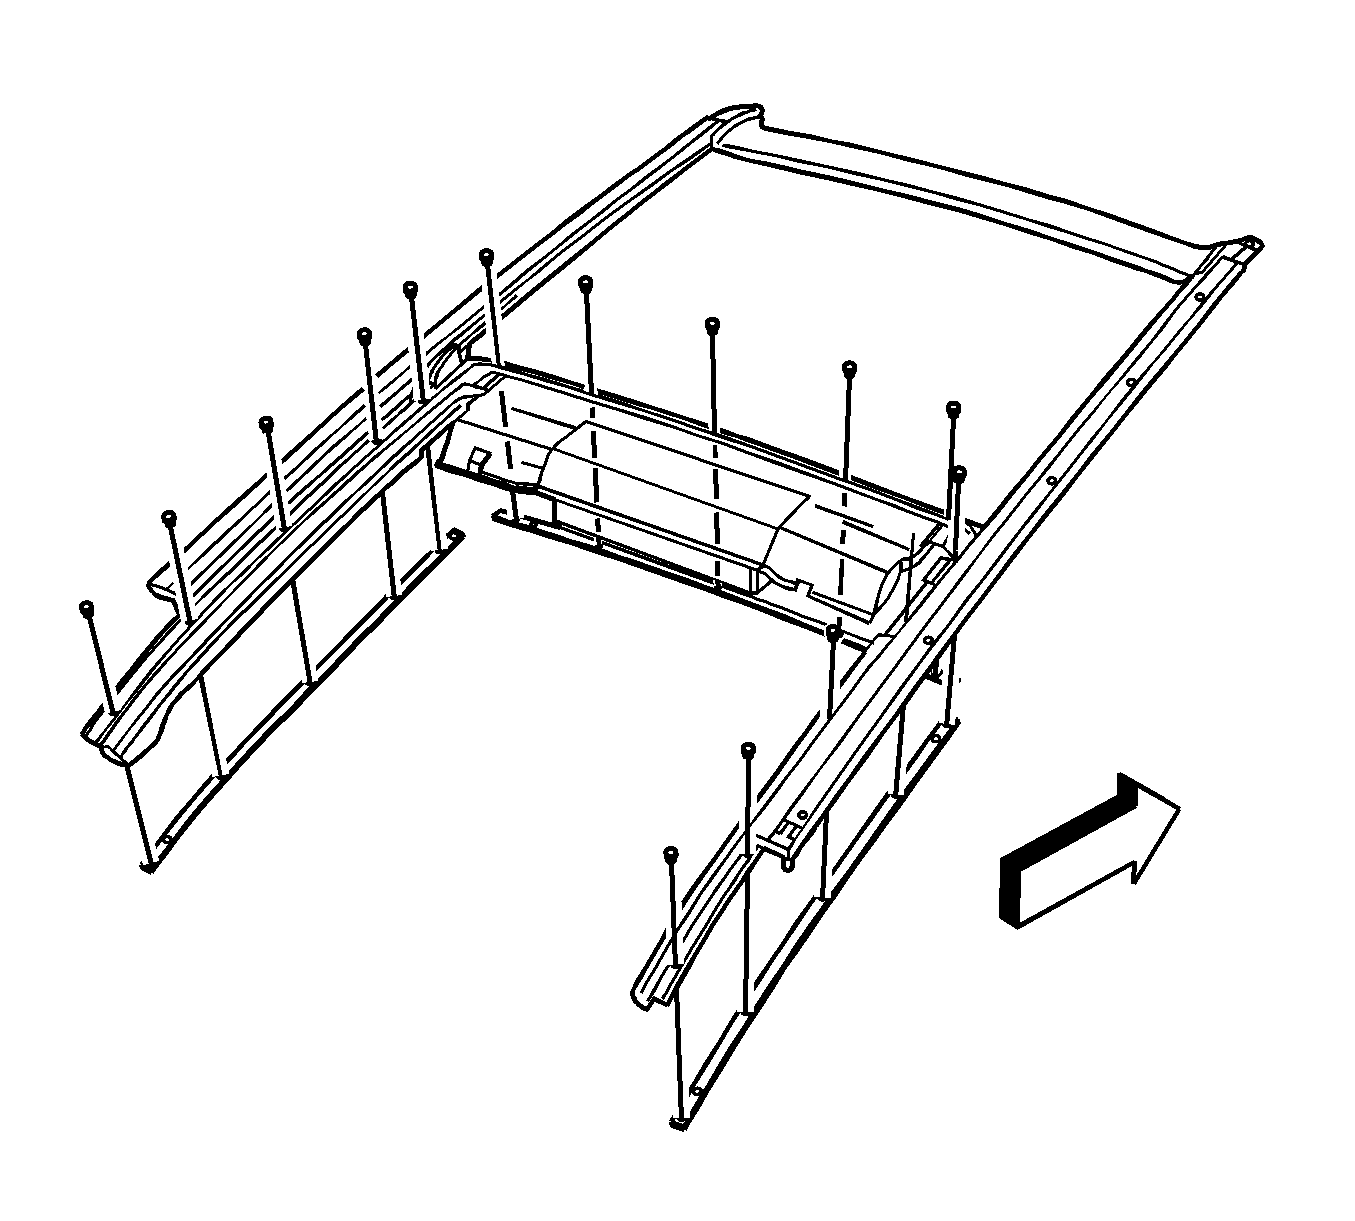
- Remove the screws retaining the moveable roof frame to the lower rails, on both side rails and the front cross beam.
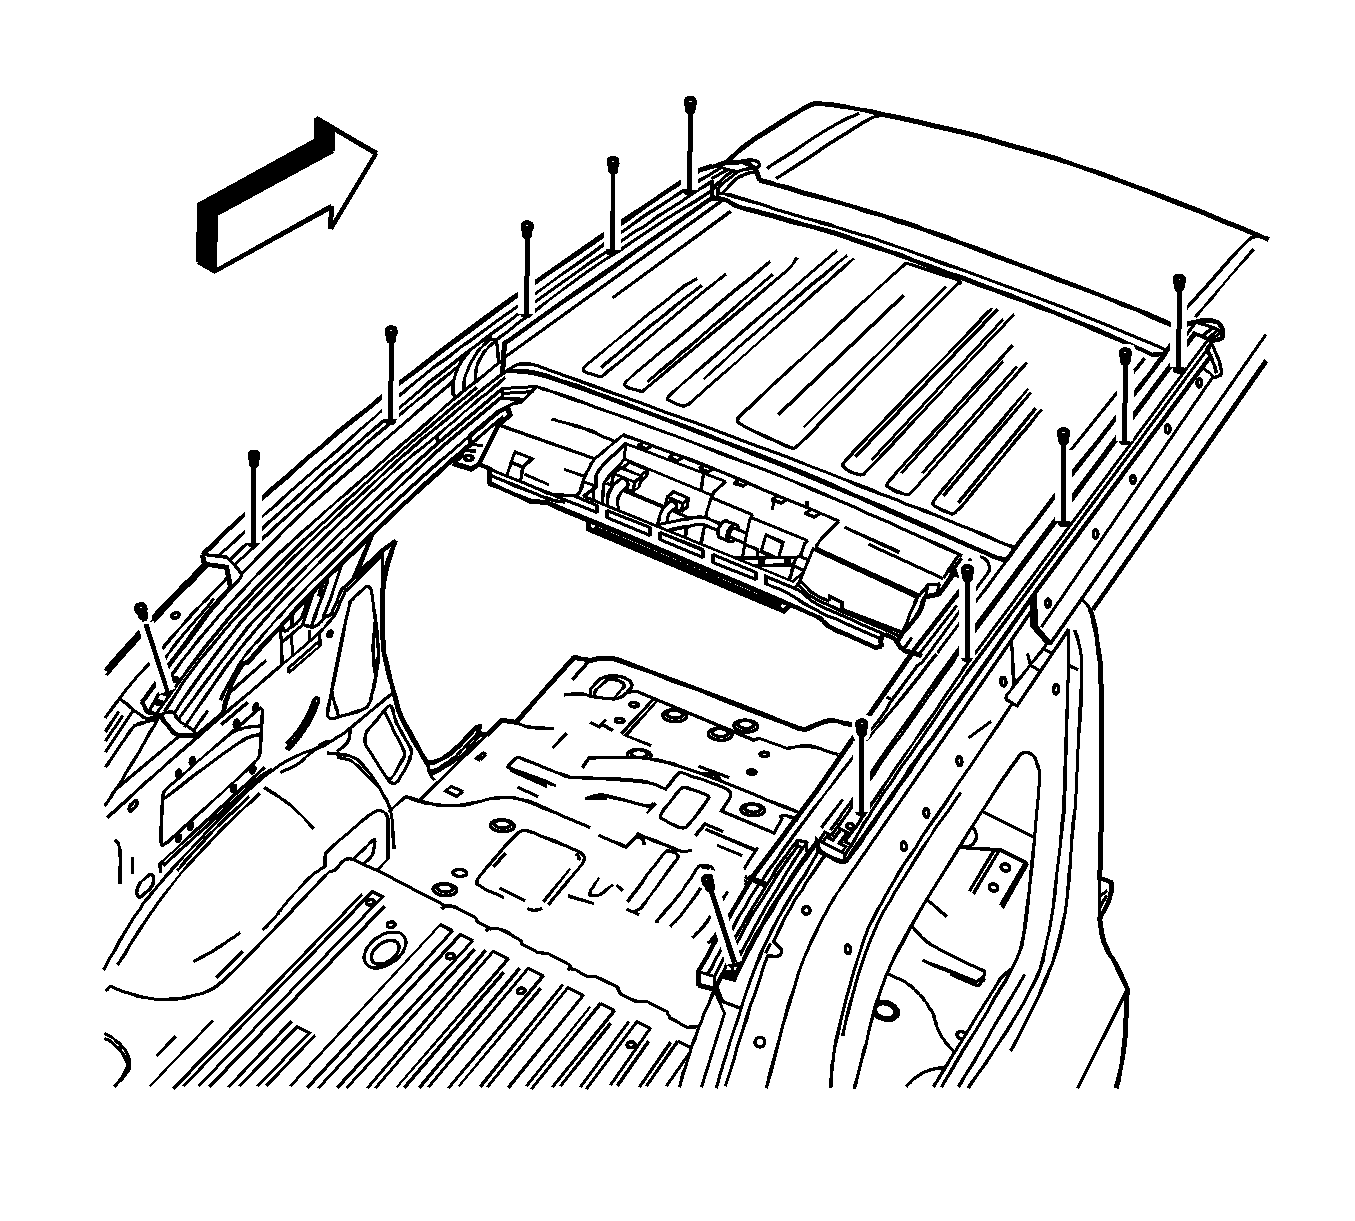
- Remove the bolts retaining the moveable roof to the body.
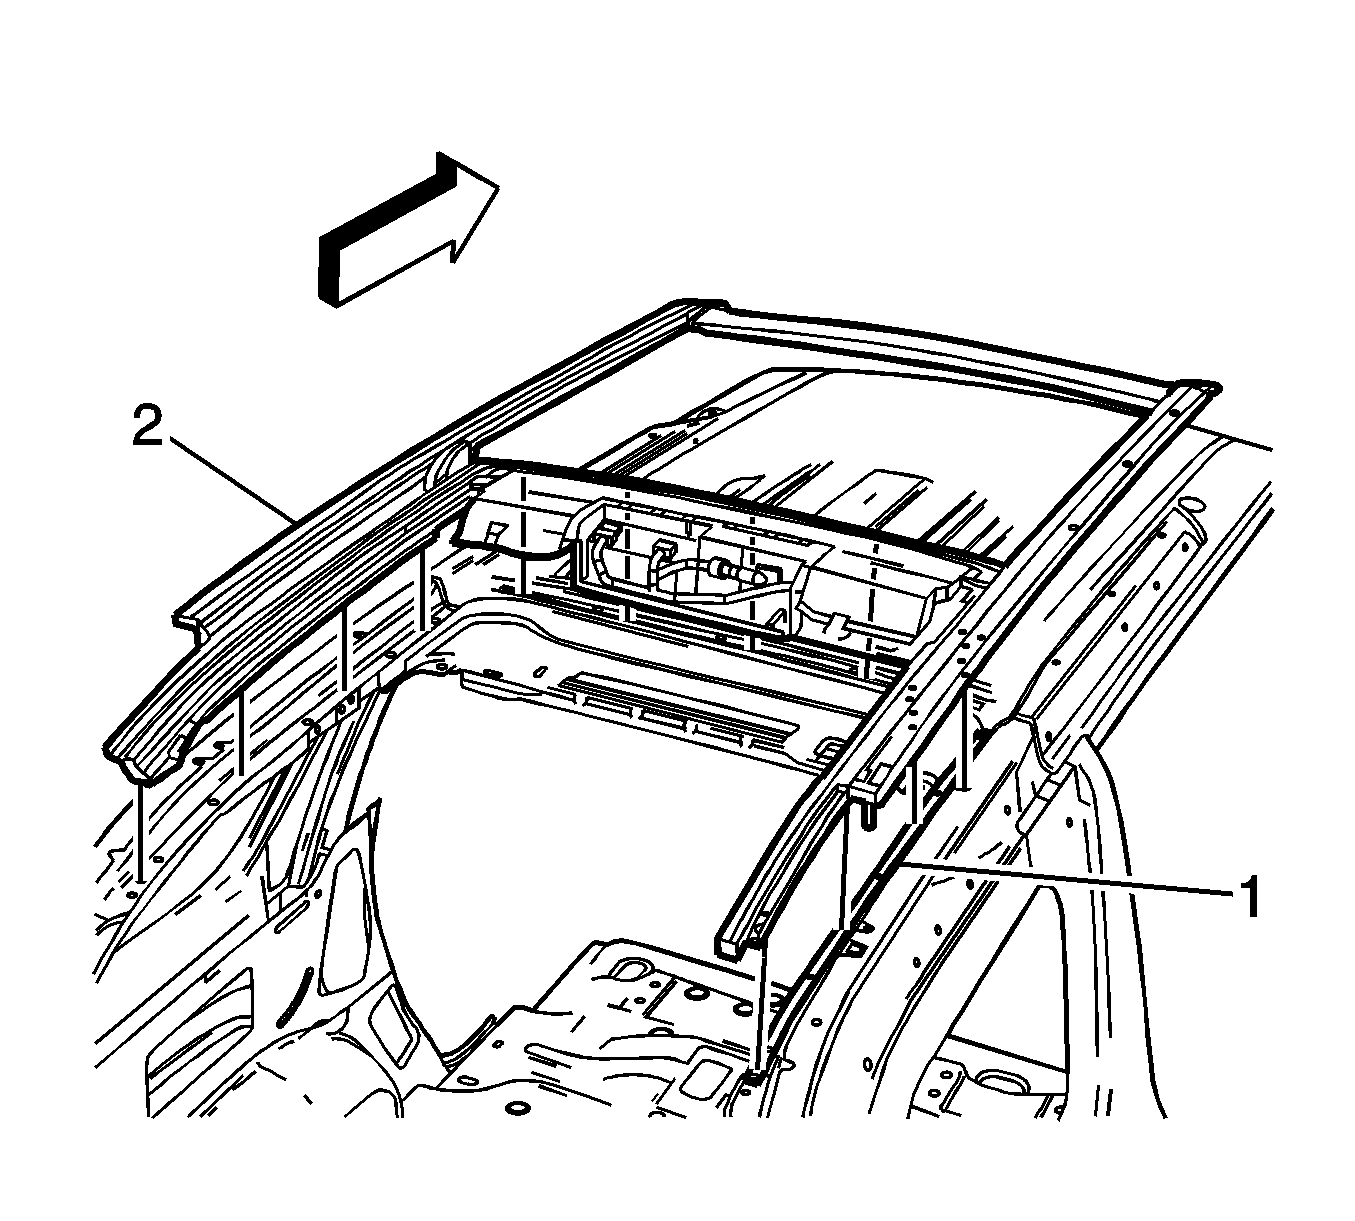
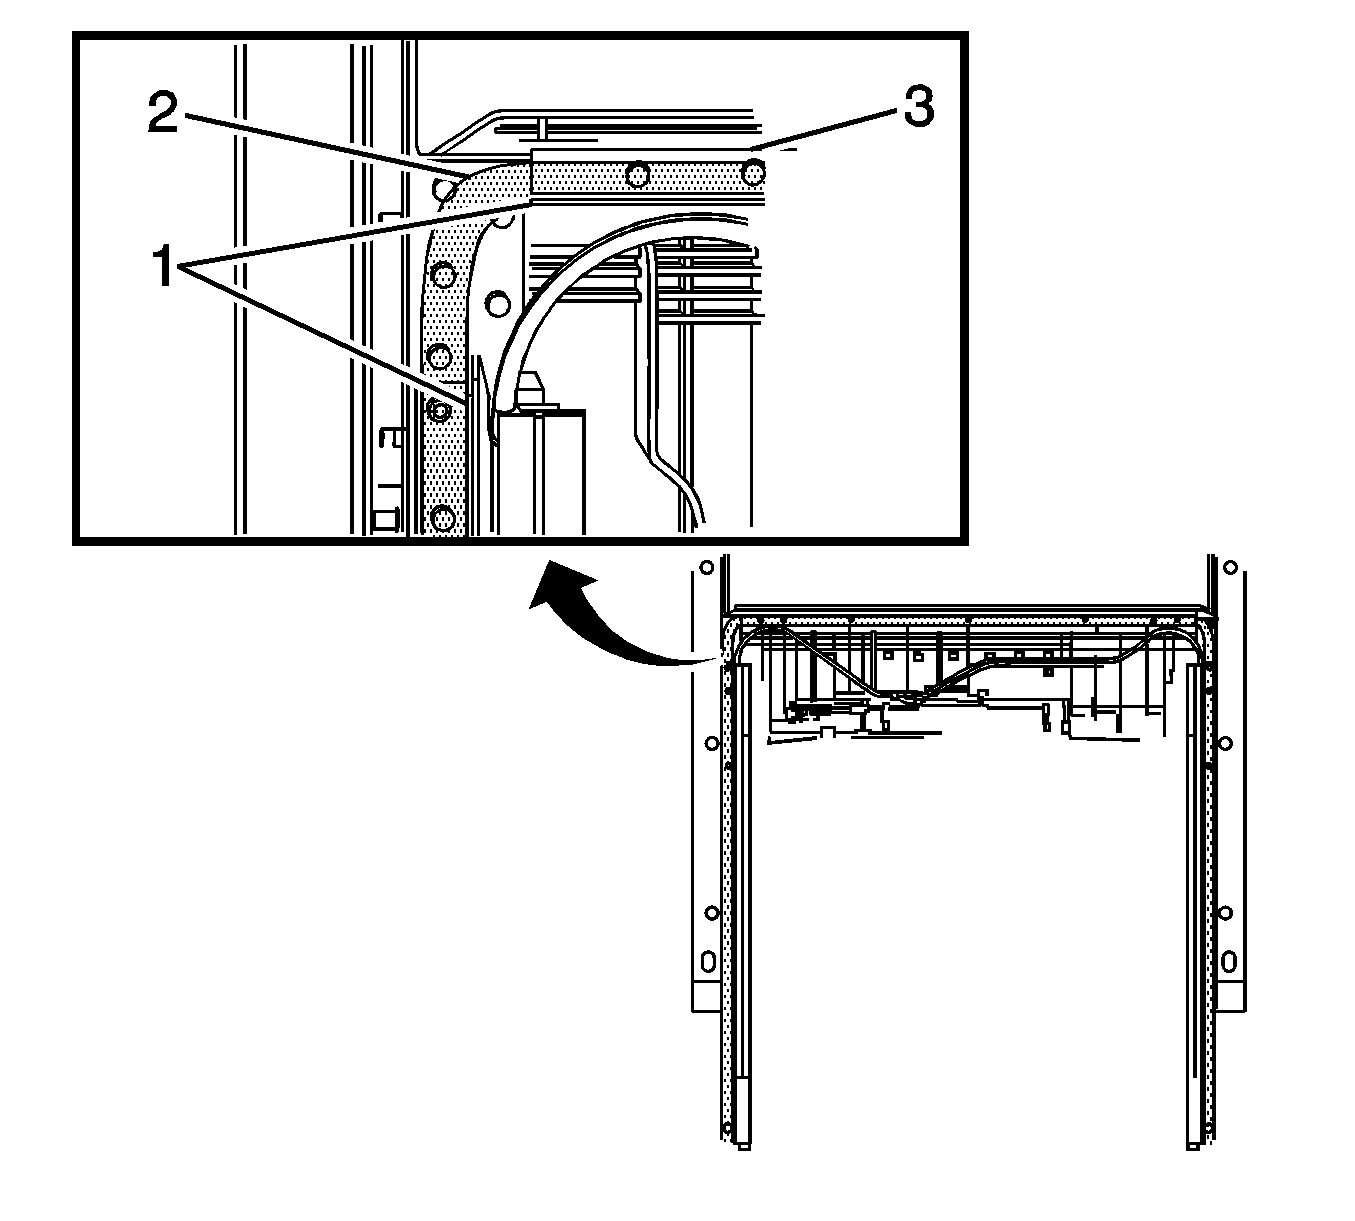
- Carefully lift upwards on the back of the moveable roof frame to separate the frame (2) from the lower rails (1) and urethane. It may be necessary to pry upwards from under the moveable roof rails with a flat-bladed tool to separate the rails from the urethane.
- With the aid of an assistant, remove the moveable roof panel frame from the vehicle.
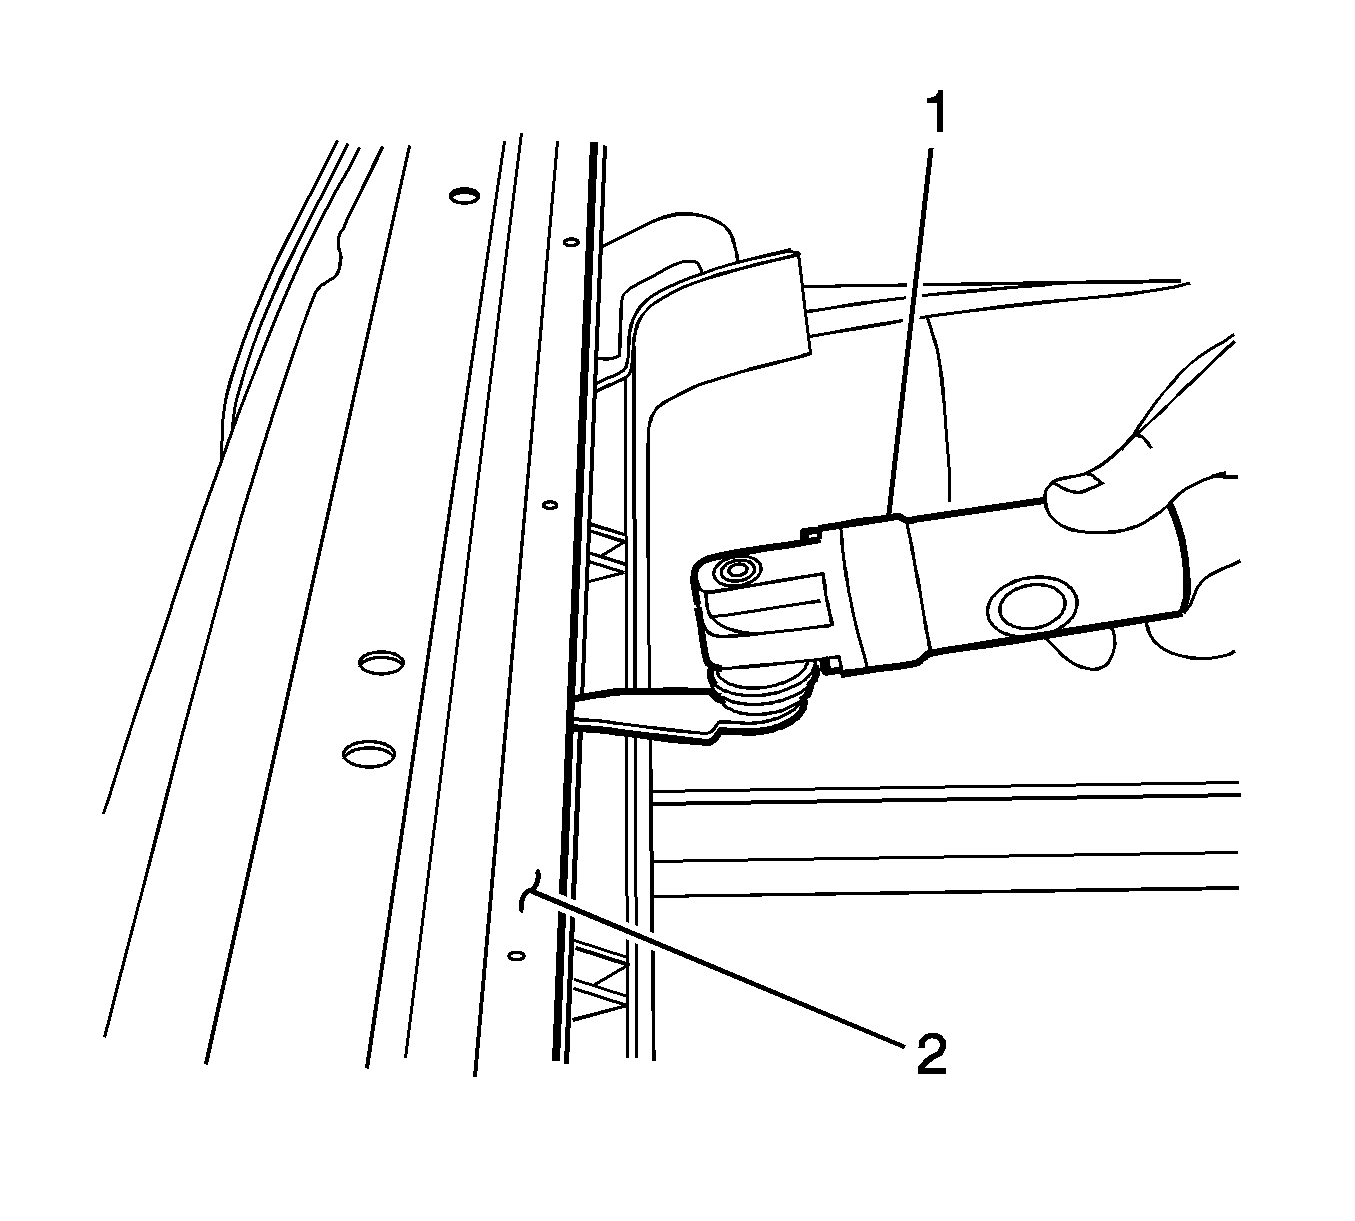
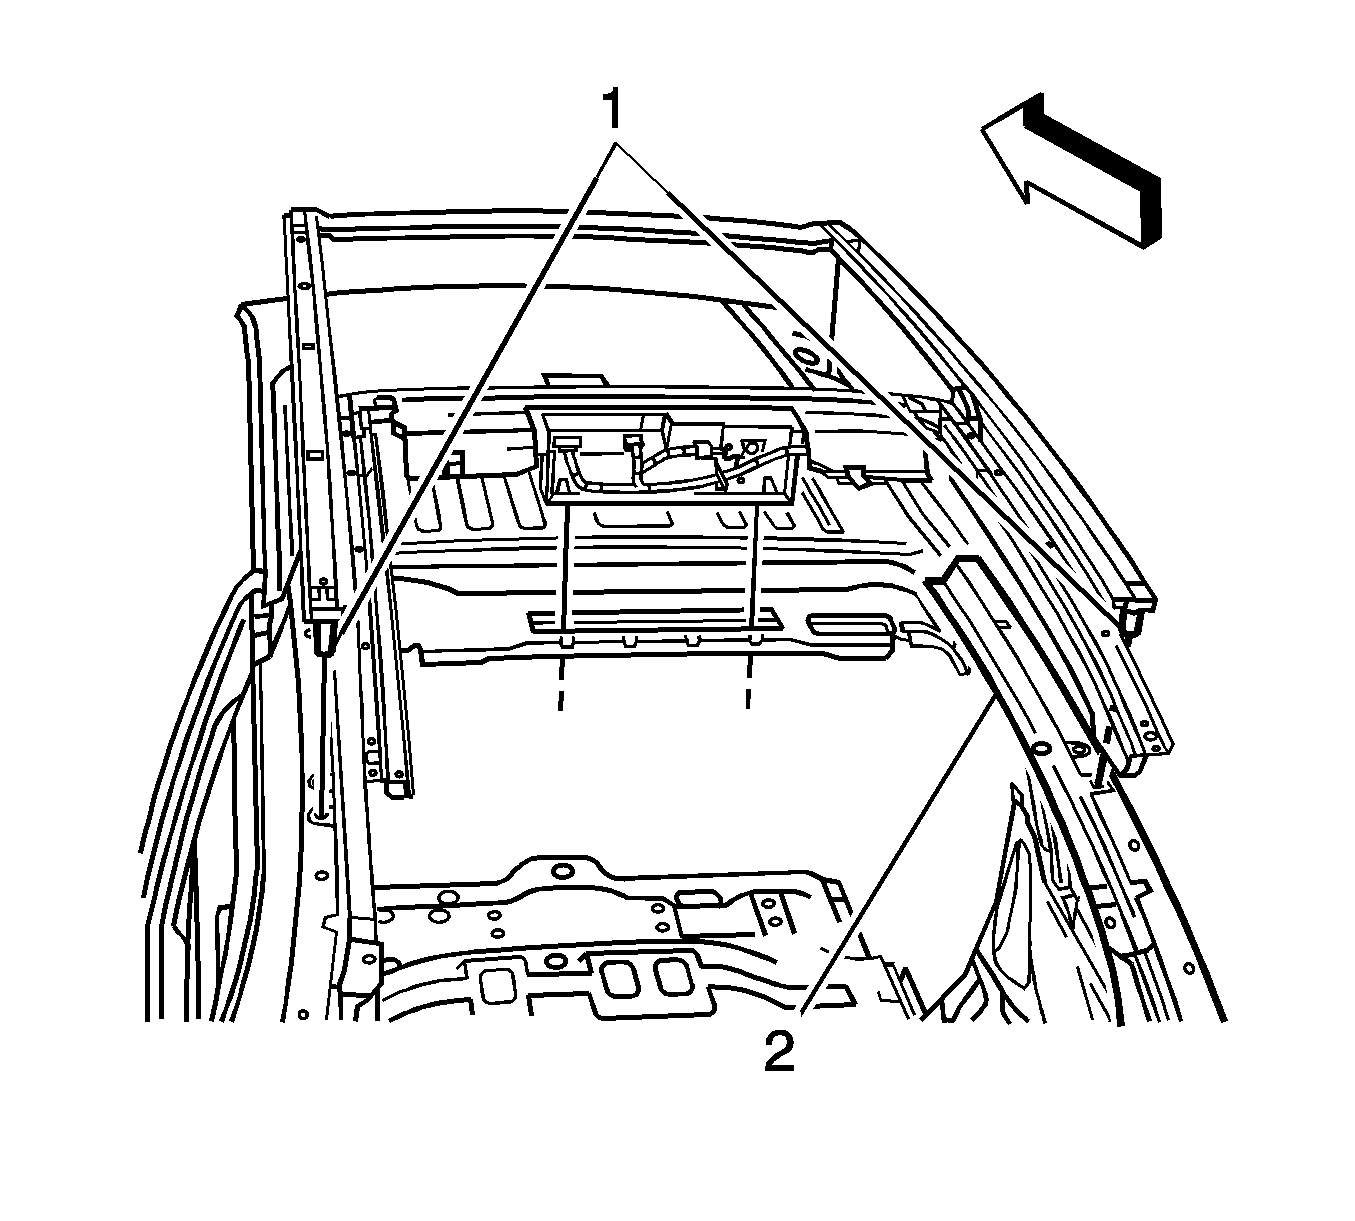
- Using the J 39032 or equivalent (1), carefully cut the urethane retaining the lower rails (2) to the body.
- Remove the lower rails and any excessive urethane from the vehicle.
Important: Remove all but 2 mm (3/64 in) of the existing urethane adhesive from the pinch-weld flange.
Installation Procedure
Important: The lower rails and urethane must be replaced if the moveable roof panel frame is removed to prevent water leakage.
Important: The urethane must be applied to the moveable roof panel frame in the correct location, and with the correct bead size to prevent water leakage.
Important: If corrosion of the pinch-weld flange is present or if sheet metal repairs or replacement are required, the pinch-weld flange must be refinished in order to restore the bonding area strength. If paint repairs are required, mask the flange bonding area prior to applying the color coat in order to provide a clean primer only surface. Materials such as BASF DE15, Dupont 2610, Sherwin-Williams PSE 4600 and NP70, Martin-Semour 5120, PPG DP90LF, Spies/Hecker 3688/8590 3688/5150 4070/5090, and Standox 11158/13320 14653/14980 are approved for this application.
- Remove all mounds or loose pieces of urethane adhesive from the sheet metal flange.
- Install new lower rails to the moveable roof panel frame with the lower rail screws.
- Shake the black #3 primer for at least 1 minute. Prime any nicks or scratches on the body flange.
- With the aid of an assistant, dry fit the roof module to the body, to assure proper fit.
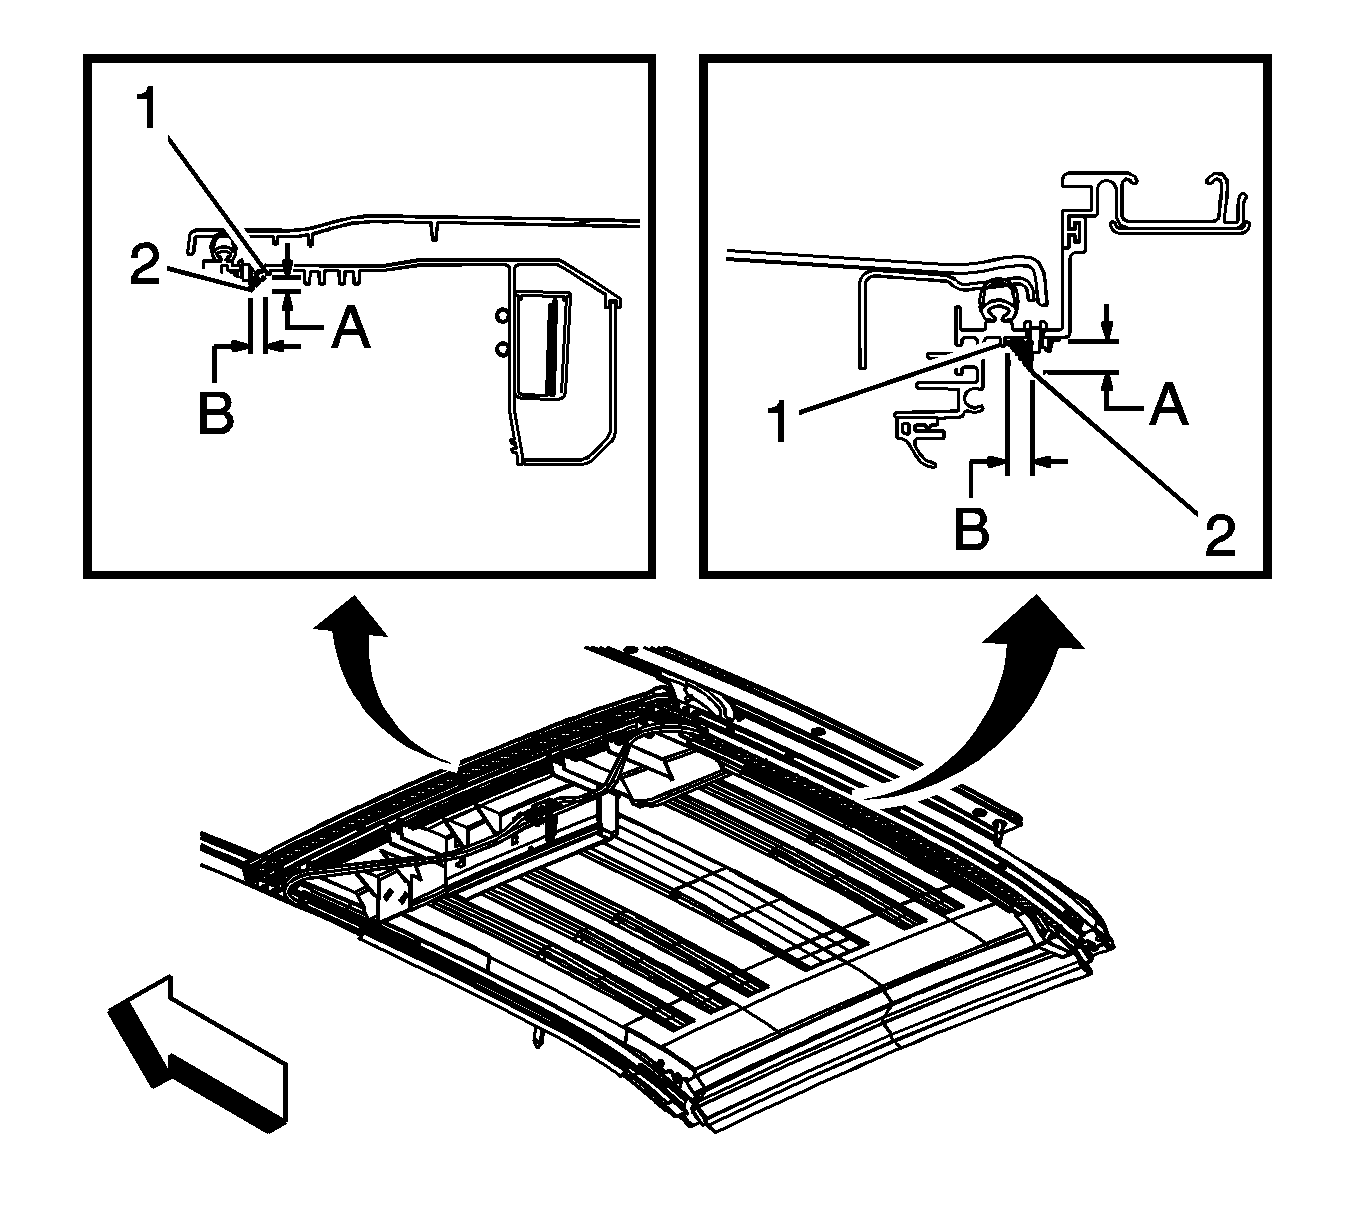
- The urethane (2) should be applied to the inboard side of the lower rails (3), and must be touching the up-standing rib (1) of the moveable roof panel frame to prevent water leakage between the lower rail and the moveable roof panel frame.
- Apply a smooth and continuous bead of urethane (2) 10 mm (0.39 in) wide (B), and 14 mm (0.55 in) high (A) to the underside of the roof module. Ensure the urethane bead is touching the up-standing rib (1) along the inboard side of the lower rails.
- With the aid of an assistant, carefully install the moveable roof panel frame to the body. Be sure to align the locating pins (1) to the correct holes in the body before lowering the moveable roof panel frame onto the body flange (2).
- Install the bolts retaining the moveable roof frame to the body.
- Install the moveable roof motor/actuator. Refer to Moveable Roof Panel Motor/Actuator Replacement .
- Install the moveable roof control module. Refer to Moveable Roof Panel Control Module Replacement .
- Install the lock pillar upper tie bar trim panel. Refer to Body Lock Pillar Upper Tie Bar Trim Cover Replacement - Cargo Compartment in Interior Trim.
- Install the endgate weatherstrip to the end of the moveable roof frame. Refer to Endgate Weatherstrip Replacement in Body Rear End.
- Install the moveable roof panel assembly. Refer to Moveable Roof Panel Assembly Replacement .
- Install the front and rear roof appliques. Refer to Roof Front Applique Replacement and to Roof Rear Applique Replacement in Exterior Trim.
- Perform a moveable roof panel learn cycle, by pressing and holding the roof switch in the forward position until the roof panel is fully opened, then pressing and holding the roof switch in the rearward position until the roof panel is fully closed.
- Inspect for proper operation of the moveable roof panel and endgate window.
Notice: Refer to Fastener Notice in the Preface section.
Tighten
Tighten the lower rail screws to 2.5 N·m (22 lb in).
Important: Do not apply the black #3 primer to the existing bead of urethane adhesive on the pinch-weld flange. Apply the primer only to nicks, scratches or the primed surfaces.

Tighten
Tighten the moveable roof frame bolts to 5.0 N·m (44 lb in).
