Fuel Injector Replacement 4.3L (RPO L35) Engine
Removal Procedure
Important: The engine oil may be contaminated with fuel if the fuel injectors are leaking.
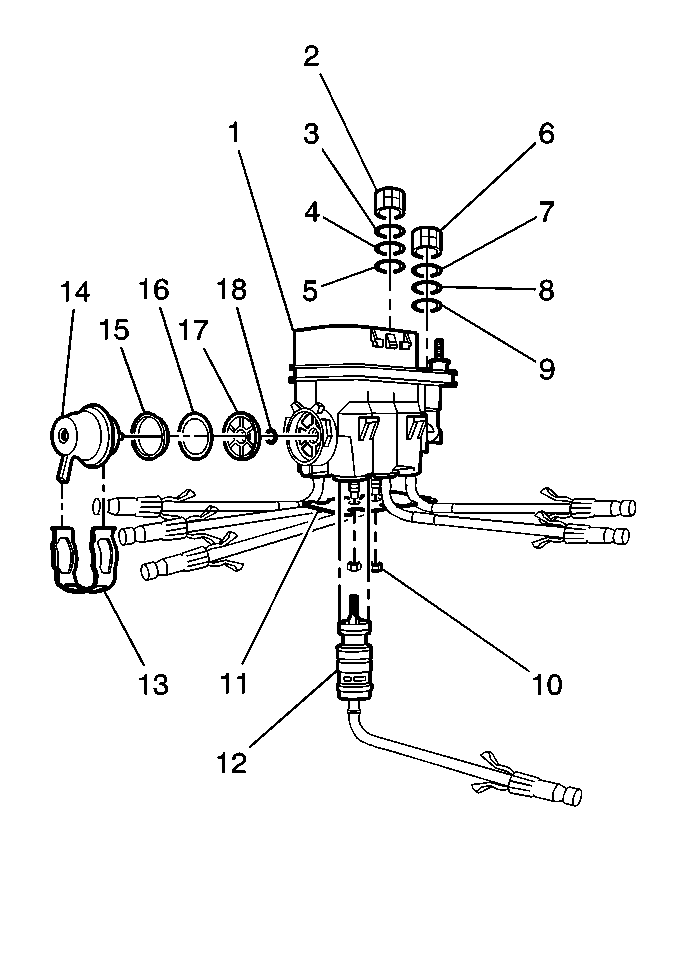
- Remove the fuel meter body. Refer to Fuel Meter Body Assembly Replacement .
- Remove the injector retainer lock nuts (10) and retainer (11).
- While pulling the poppet nozzle tube downward, push with a small tip punch down between the injector terminals until the injector is removed.

Notice: Use care in removing the fuel injectors to prevent damage to the electrical connector terminals.
The fuel injector is serviced as a complete assembly only. Also since the injectors are electrical components, these injectors should not be immersed in any type of liquid solvent or cleaner as damage may occur. Fuel injector cleaning is not recommended.Installation Procedure
Important: When ordering new fuel injectors, be sure to order the correct injector for the application being serviced.
- Lubricate the NEW injector O-ring seals with clean engine oil.
- Install the fuel injector (12) into the fuel meter body injector socket.
- Install the retainer (11) and injector retainer lock nuts (10).
- Install the fuel meter body. Refer to Fuel Meter Body Assembly Replacement .

Notice: Use the correct fastener in the correct location. Replacement fasteners must be the correct part number for that application. Fasteners requiring replacement or fasteners requiring the use of thread locking compound or sealant are identified in the service procedure. Do not use paints, lubricants, or corrosion inhibitors on fasteners or fastener joint surfaces unless specified. These coatings affect fastener torque and joint clamping force and may damage the fastener. Use the correct tightening sequence and specifications when installing fasteners in order to avoid damage to parts and systems.
Tighten
Tighten the nuts to 3 N·m (27 lb in).
Fuel Injector Replacement 4.3L (RPO LU3) Engine
Removal Procedure
Important: The engine oil may be contaminated with fuel if the fuel injectors are leaking.
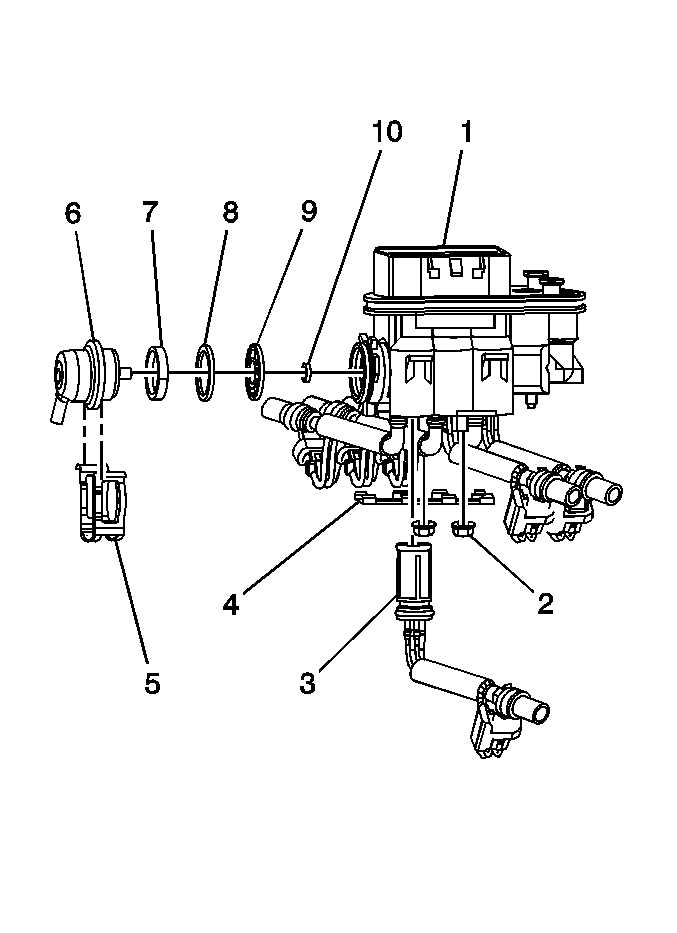
- Remove the fuel meter body. Refer to Fuel Meter Body Assembly Replacement .
- Remove the injector retainer lock nuts (4) and retainer (2).
- While pulling the fuel injector downward, push with a small tip punch down between the injector terminals until the injector is removed.

Notice: Use care in removing the fuel injectors to prevent damage to the electrical connector terminals.
The fuel injector is serviced as a complete assembly only. Also since the injectors are electrical components, these injectors should not be immersed in any type of liquid solvent or cleaner as damage may occur. Fuel injector cleaning is not recommended.Installation Procedure
Important: When ordering new fuel injectors, be sure to order the correct injector for the application being serviced.
- Lubricate the NEW injector O-ring seals with clean engine oil.
- Install the fuel injector (3) into the fuel meter body injector socket.
- Install the retainer (4) and the injector retainer lock nuts (2).
- Install the fuel meter body. Refer to Fuel Meter Body Assembly Replacement .

Notice: Use the correct fastener in the correct location. Replacement fasteners must be the correct part number for that application. Fasteners requiring replacement or fasteners requiring the use of thread locking compound or sealant are identified in the service procedure. Do not use paints, lubricants, or corrosion inhibitors on fasteners or fastener joint surfaces unless specified. These coatings affect fastener torque and joint clamping force and may damage the fastener. Use the correct tightening sequence and specifications when installing fasteners in order to avoid damage to parts and systems.
Tighten
Tighten the nuts to 3 N·m (27 lb in).
