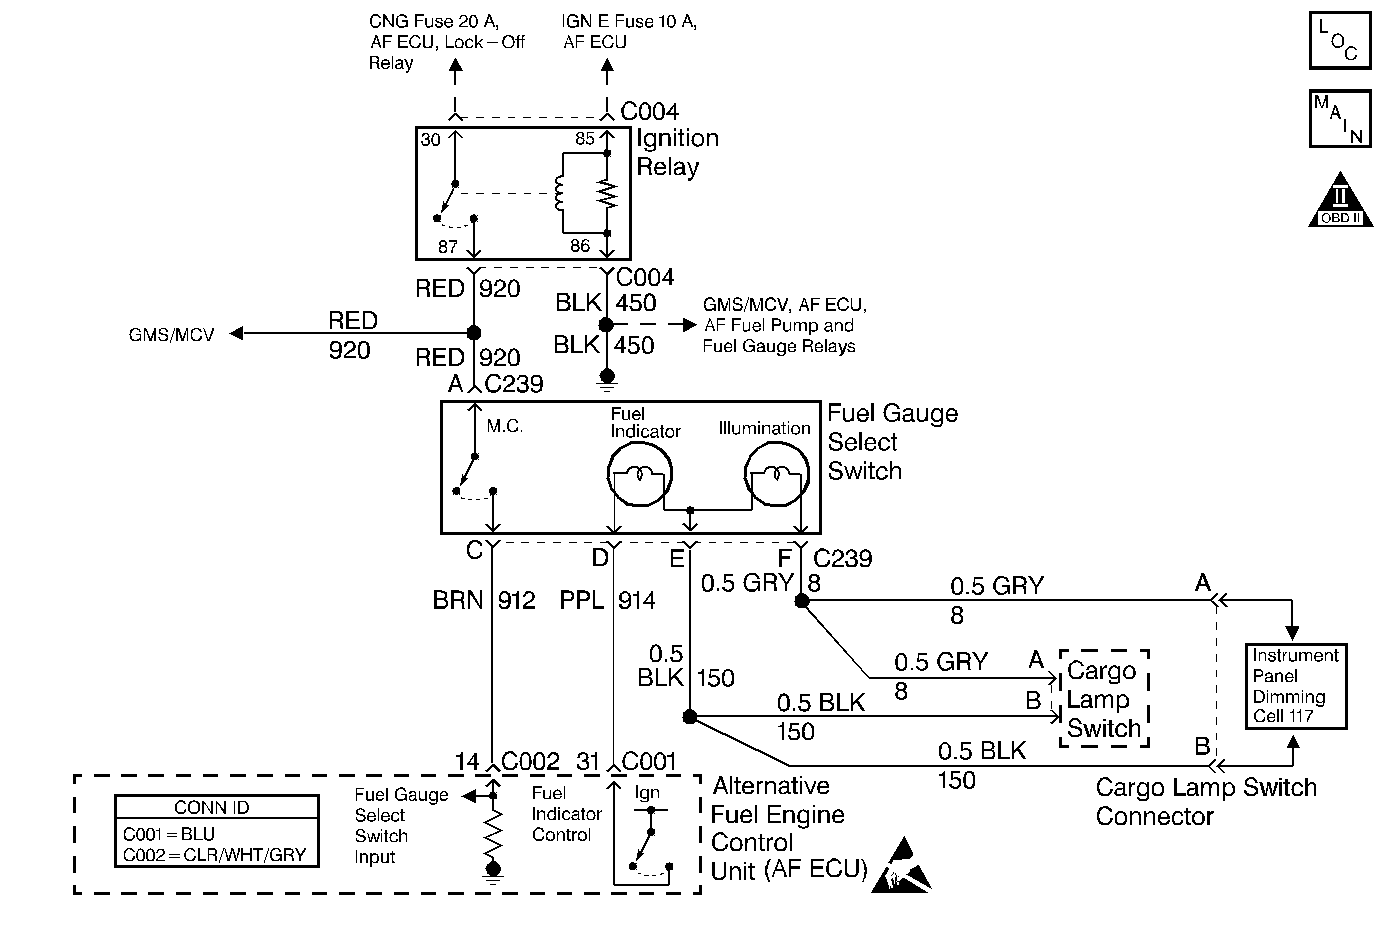
Circuit Description
The fuel gauge select switch assembly contains three components. The fuel gauge select switch is used to indicate to the AF ECU that the operator of the vehicle has requested the fuel gauge display the level of fuel for the DORMANT or non-operating fuel system. The fuel indicator lamp (FIL) is used by the AF ECU to indicate to the operator of the vehicle which fuel system is in use. When illuminated the vehicle is operating on gasoline. The illumination bulb is used for switch location purposes during night-time driving conditions.
The fuel gauge select switch is supplied power by the Ignition relay whenever the ignition is in the ON or RUN positions. The AF ECU monitors the fuel gauge select switch Input circuit for this voltage. When the switch is depressed and the contacts close the AF ECU will energize or de-energize (depending on the fuel system in use) the fuel gauge relay allowing the fuel gauge to display the fuel level of the dormant fuel system.
The fuel indicator lamp (FIL) is supplied power by the AF ECU and the ground path is supplied by the vehicle illumination circuit ground supply. The AF ECU will supply power to the FIL for a two second bulb check at ignition ON during CNG operation or continuously during gasoline operation when the ignition is in the ON or RUN positions. The illumination bulb is supplied power by the head lamp switch assembly and the ground path is supplied by the vehicle illumination circuit ground supply.
Test Description
The number(s) below refer to the step number(s) on the diagnostic table.
-
The AF Powertrain OBD System Check MUST be performed before proceeding with this diagnostic table. Failure to perform the OBD System Check will result in mis-diagnosis.
-
This step checks for proper operation of the FIL.
-
The FIL should only stay illuminated when the engine is operating on gasoline.
-
This step checks the AF ECUs ability to operate the FIL.
-
This step checks the ground circuit to the fuel gauge select switch/fuel indicator lamp assembly. If the illumination bulb fails to operate then the failure must be the ground circuit or the switch assembly.
-
This step checks for a shorted Fuel Indicator Lamp control circuit or a shorted fuel gauge selector switch/fuel indicator lamp assembly
-
If the CNG fuse opens when the switch is depressed check for the Fuel Gauge Select Switch Input circuit shorted to ground or an internally shorted AF ECU.
This step checks the AF ECUs ability to monitor the Fuel Gauge Select Switch Input circuit.
-
If the CNG fuse or the jumper fuse opens when the circuit is jumpered check for the Fuel Gauge Select Switch Input circuit shorted to ground or an internally shorted AF ECU. In addition a short may have damaged the fuel gauge select switch.
-
Inspect the harness for a disconnected cargo lamp harness connector.
Step | Action | Value(s) | Yes | No | ||||||
|---|---|---|---|---|---|---|---|---|---|---|
Were you sent here from other diagnostic service information? | -- | Go to Alternative Fuels (AF) Powertrain On Board (OBD) System Check | ||||||||
Did the FIL illuminate for a two second bulb check and then go OFF? | -- | |||||||||
Did the FIL remain illuminated? | -- | |||||||||
Does the FIL go OFF when commanded? | -- | |||||||||
5 |
Is the repair complete? | -- | -- | |||||||
Is the ILLUMINATION bulb ON? | -- | |||||||||
7 |
Did the test lamp illuminate for a two second bulb check OR remain ON? | -- | ||||||||
Is the FIL illuminated? | -- | |||||||||
Did the scan tool parameter indicate a change in the fuel gauge type was requested? | -- | |||||||||
10 | Is there a fuel gauge operation or accuracy concern? | -- | System OK | |||||||
11 |
Is the test lamp illuminated? | -- | ||||||||
12 |
Is circuit continuity indicated? | -- | ||||||||
13 |
Is the test lamp illuminated? | -- | ||||||||
Did the scan tool parameter indicate a change in the fuel gauge type was requested when the circuit was jumpered? | -- | |||||||||
15 |
Was a wiring or terminal repair necessary? | -- | ||||||||
16 | Repair the short to voltage on the Fuel Indicator Control circuit or replace the internally shorted fuel gauge select switch. Is the repair or replacement complete? | -- | -- | |||||||
Repair the open bulb ground circuit to the fuel gauge select switch terminal (E). Is the repair complete? | -- | -- | ||||||||
18 | Repair the open Fuel Indicator Control circuit or terminals. Is the repair complete? | -- | -- | |||||||
19 | Repair the open fuel gauge select switch power supply circuit between the switch terminal (A) and the circuit splice. Is the repair complete? | -- | -- | |||||||
20 | Replace the fuel gauge select switch assembly. Refer to Fuel Gauge Selector Switch/Fuel Indicator Lamp Replacement Is the replacement complete? | -- | -- | |||||||
21 |
Is the replacement complete? | -- | -- | |||||||
22 |
Does the vehicle operate on CNG with normal driveability, no FIL/MIL illumination and no stored DTCs? | -- | System OK | Go to Alternative Fuels (AF) Powertrain On Board (OBD) System Check |
