Exhaust Manifold Replacement Right
Removal Procedure
- Disconnect the battery negative cables from the batteries. Refer to Battery Cable in Engine Electrical.
- Remove the air cleaner assembly from the vehicle. Refer to Air Cleaner Assembly Replacement in Engine Controls-6.5L.
- Remove the turbocharger assembly from the exhaust manifold. Refer to Turbocharger .
- Raise the vehicle and support the vehicle with safety stands.
- Remove the starter from the vehicle. Refer to Starter Motor Replacement in Engine Electrical.
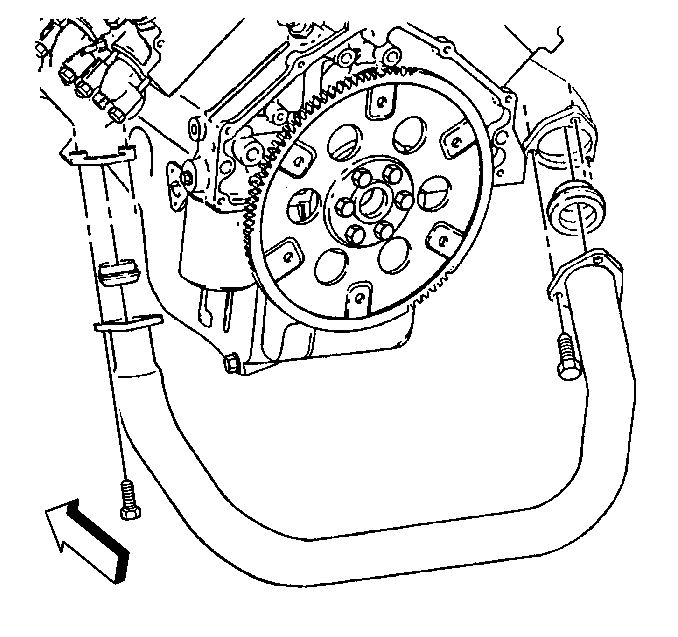
- Remove the inspection cover from the transmission.
- Remove the exhaust crossover pipe bolts from the exhaust manifold.
- Remove the safety stands and partially lower the vehicle.
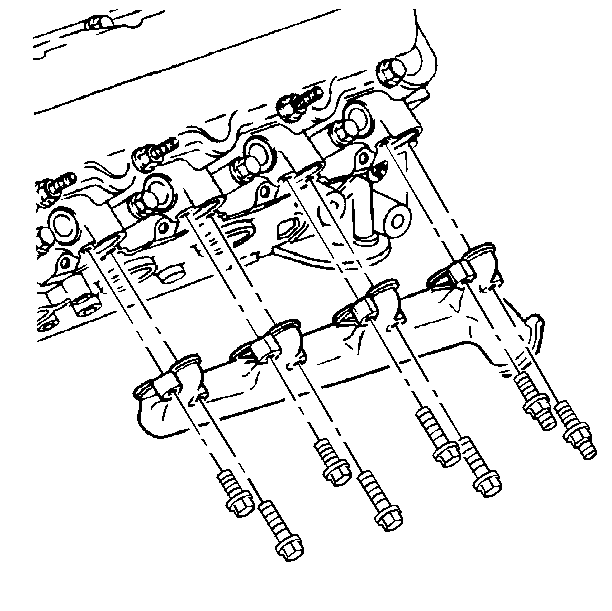
- Remove the glow plugs from the cylinder head. Refer to Glow Plug Replacement - Right Side in Engine Controls-6.5L.
- Remove the inner wheel housing splash shield.
- Remove the exhaust manifold bolts (all but the front and rear) and bolts from the cylinder head.
- Completely lower the vehicle.
- Remove the remaining bolts exhaust manifold.
- Remove the exhaust manifold from the cylinder head.
- Clean the threads on the exhaust manifold bolts.

Installation Procedure
- Install the exhaust manifold to the cylinder head.
- Install a bolt to the front and rear of the exhaust manifold.
- Raise the vehicle and support with safety stands.
- Install the exhaust manifold bolts.
- Install the inspection cover to the transmission.
- Install the starter to the engine block. Refer to Starter Motor Replacement in Engine Electrical.
- Install the exhaust crossover pipe to the exhaust manifold.
- Remove the safety stands and partially lower the vehicle.
- Install the glow plugs in the cylinder head. Refer to Glow Plug Replacement - Right Side in Engine Controls-6.5L.
- Lower the vehicle completely.
- Install the turbocharger to the exhaust manifold. Refer to Turbocharger .
- Install the air cleaner assembly to the vehicle. Refer to Air Cleaner Assembly Replacement in Engine Controls--6.5L.
- Connect the battery negative cables to the batteries. Refer to Battery Cable in Engine Electrical.
Notice: Use the correct fastener in the correct location. Replacement fasteners must be the correct part number for that application. Fasteners requiring replacement or fasteners requiring the use of thread locking compound or sealant are identified in the service procedure. Do not use paints, lubricants, or corrosion inhibitors on fasteners or fastener joint surfaces unless specified. These coatings affect fastener torque and joint clamping force and may damage the fastener. Use the correct tightening sequence and specifications when installing fasteners in order to avoid damage to parts and systems.
Tighten
Tighten the bolts and stud/nuts to 35 N·m (26 lb ft).
Exhaust Manifold Replacement Left
Removal Procedure
- Remove the exhaust crossover pipe bolts from the exhaust manifolds left exhaust manifold.
- Loosen the exhaust crossover pipe bolts at the right exhaust manifold.
- Secure the exhaust crossover pipe out of the way.
- Partially raise the vehicle and remove the splash shield from the wheel housing.
- Remove the glow plugs from the cylinder head. Refer to Glow Plug Replacement - Left Side in Engine Controls-6.5L.
- Completely raise the vehicle.
- Remove the exhaust manifold from underneath the vehicle.
- Clean the threads on the exhaust manifold bolts and stud/nuts.
Important: The exhaust crossover pipe does not have to be removed from the vehicle to perform this service procedure.
Disconnect the battery negative cables from the batteries. Refer to Battery Cable in Engine Electrical.
Installation Procedure
- Install the exhaust manifold from underneath the vehicle.
- Install the exhaust manifold bolts and stud/nuts.
- Partially lower the vehicle.
- Install the glow plugs in the cylinder heads. Refer to Glow Plug Replacement - Left Side in Engine Controls-6.5L.
- Install the exhaust crossover pipe to the exhaust manifold.
- Install the splash shield to the inner wheel housing.
- Completely lower the vehicle.
- Connect the battery negative cables to the batteries. Refer to Battery Cable in Engine Electrical.
Notice: Use the correct fastener in the correct location. Replacement fasteners must be the correct part number for that application. Fasteners requiring replacement or fasteners requiring the use of thread locking compound or sealant are identified in the service procedure. Do not use paints, lubricants, or corrosion inhibitors on fasteners or fastener joint surfaces unless specified. These coatings affect fastener torque and joint clamping force and may damage the fastener. Use the correct tightening sequence and specifications when installing fasteners in order to avoid damage to parts and systems.
Tighten
Tighten the bolts and stud/nuts to 35 N·m (26 lb ft).
