For 1990-2009 cars only
Removal Procedure
- Raise and suitably support the vehicle. Refer to Lifting and Jacking the Vehicle in General Information.
- Reference mark the rear propeller shaft to the pinion flange and to the front propeller shaft, then reference mark the front shaft to the yoke at the transmission.
- Remove the propeller shaft at the rear drive axle. Refer to Two-Piece Propeller Shaft Replacement in Rear Drive Axle.
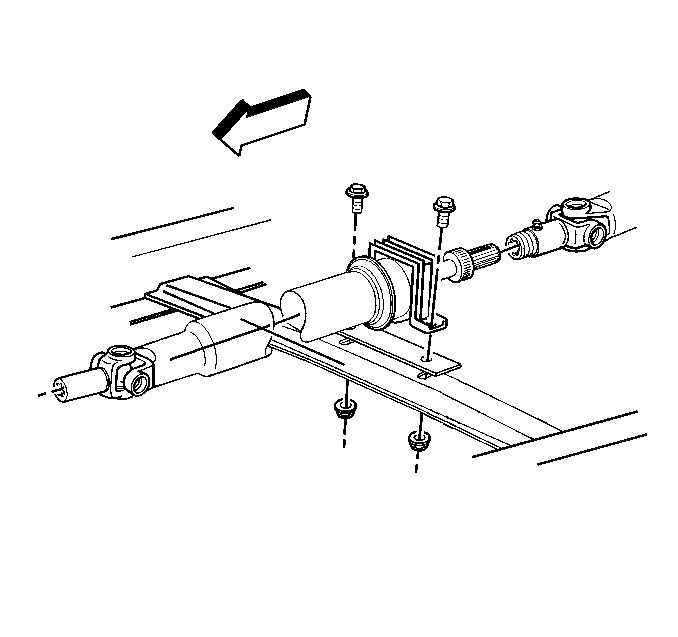
- Remove the center bearing support bracket from the crossmember.
- Remove the rear propeller shaft with the center bearing by sliding the shaft from the spline.
- Remove the propeller shaft from the rear of the transmission or transfer case.
- Clean the mating surfaces bearing caps, bearing straps and pinion yoke of corrosion using crocus cloth or 400 grit sandpaper.
- Clean all parts with an approved solvent.
- Inspect the outer surface of the front slip yoke for burrs. Burring damages the transmission seal.
- Inspect the slip yoke splines for wear.
- Inspect for proper installation and uniform seating of the bearing cups.
- Inspect for twisted slip yoke splines or the wrong universal joint.
Installation Procedure
- Lubricate the slip yoke splines, if needed. Refer to Fluid and Lubricant Recommendations in Maintenance and Lubrication.
- Install the front propeller shaft to the transmission lining up the index splines.
- Install the rear propeller shaft with the center bearing. Ensure the spline of both front and rear shaft mesh.
- Install the bolts of the center bearing to the crossmember.
- Install the rear propeller shaft. Line up the reference marks. Refer to Two-Piece Propeller Shaft Replacement in Rear Drive Axle.
- Lower vehicle.
Notice: Refer to Fastener Notice in the Preface section.
Tighten
Tighten the center bearing support bolts and nuts
to 70 N·m (50 lb ft).
