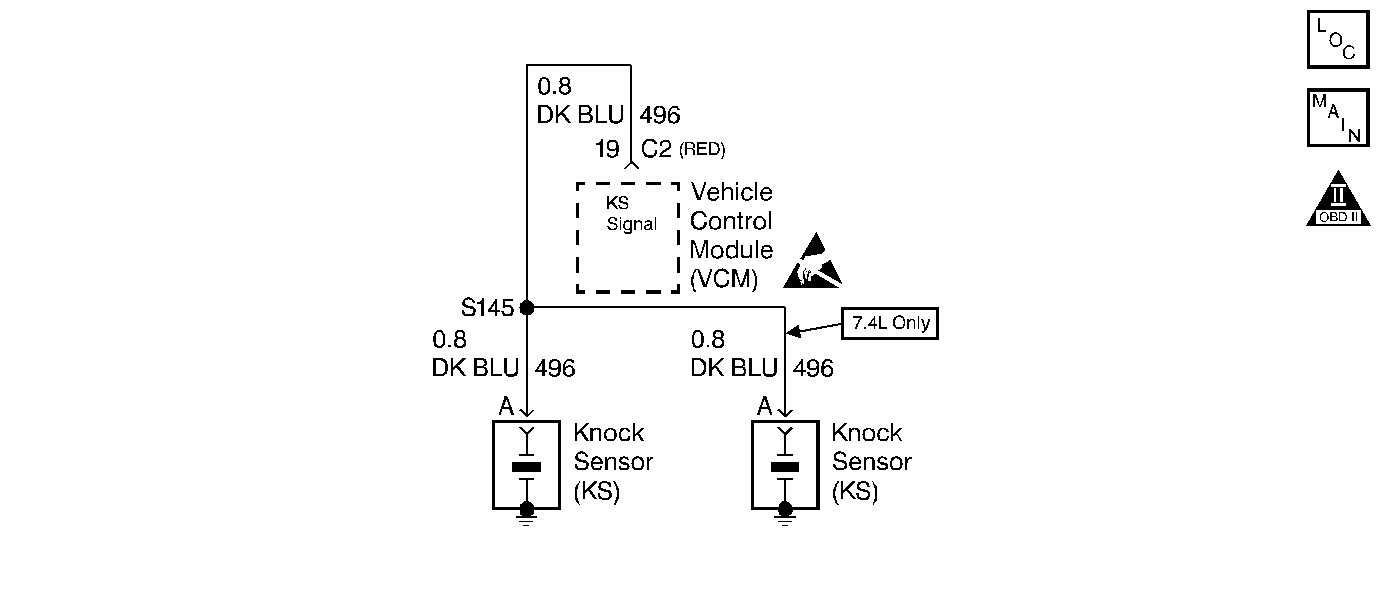
Circuit Description
The control module contains a removable knock sensor (KS) module which receives the knock sensor input. The knock sensor signal input is filtered by this module before it is input to the controls module. Spark knock is continuously monitored during engine operation. If knock occurs for longer than a calibrated time, this diagnostic trouble code (DTC) will set.
Conditions for Running the DTC
| • | The DTC P0327 is not active |
| • | The engine run time is more than 120 seconds. |
| • | The system voltage is between 10-17.1 volts. |
Conditions for Setting the DTC
The VCM detects engine knock for more than 50 seconds.
Action Taken When the DTC Sets
| • | The control module illuminates the malfunction indicator lamp (MIL) if a failure is detected during 2 consecutive key cycles. |
| • | The control module sets the DTC and records the operating conditions at the time the diagnostic failed. The failure information is stored in the scan tool Freeze Frame/Failure Records. |
Conditions for Clearing the MIL or DTC
| • | The control module turns OFF the MIL after 3 consecutive drive trips when the test has run and passed. |
| • | A history DTC will clear if no fault conditions have been detected for 40 warm-up cycles. A warm-up cycle occurs when the coolant temperature has risen 22°C (40°F) from the startup coolant temperature and the engine coolant reaches a temperature that is more than 70°C (158°F) during the same ignition cycle. |
| • | Use a scan tool in order to clear the DTCs. |
Diagnostic Aids
Check for the following conditions:
| • | A damaged or improperly installed knock sensor module. Check for the following items: |
| - | Bent pins |
| - | Deformed terminals |
| - | Electronic Spark Control module/PROM not completely seated |
| • | An improplerly torqued knock sensor. Refer to
Notice: Use the correct fastener in the correct location. Replacement fasteners must be the correct part number for that application. Fasteners requiring replacement or fasteners requiring the use of thread locking compound or sealant are identified in the service procedure. Do not use paints, lubricants, or corrosion inhibitors on fasteners or fastener joint surfaces unless specified. These coatings affect fastener torque and joint clamping force and may damage the fastener. Use the correct tightening sequence and specifications when installing fasteners in order to avoid damage to parts and systems. in Cautions and Notices. Torque the knock sensor to 19 N·m (14 lb ft). |
Review the Fail Records vehicle mileage since the diagnostic test last failed to determine how often the conditions occur that caused the DTC to set . This may assist in diagnosing the condition.
An intermittent may be caused by any of the following conditions:
| • | A poor connection |
| • | Rubbed through wire insulation |
| • | A broken wire inside the insulation |
Thoroughly check any circuitry that is suspected of causing the intermittent complaint. Refer to Intermittents and Poor Connections Diagnosis in Wiring Systems.
If a repair is necessary, refer to Wiring Repairs or Connector Repairs in Wiring Systems.
Test Description
The numbers below refer to the step numbers on the diagnostic table.
-
This step ensures that the condition is present.
-
This step checks for an improperly installed Knock Sensor module.
Step | Action | Value(s) | Yes | No |
|---|---|---|---|---|
1 |
Important: Before clearing the DTCs, use the scan tool Capture Info to save the Freeze Frame and Failure Records for reference. The control module's data is deleted once the Clear Info function is used. Did you perform the Powertrain On-Board Diagnostic (OBD) System Check? | -- | ||
|
Important: If you can hear the engine knock, repair the engine mechanical problem before proceeding with this diagnostic.
Does the scan tool indicate the DTC P0325 Failed This Ignition? | -- | |||
3 |
Does the scan tool indicate DTC P0325 test Failed This Ignition? | -- | Go to Diagnostic Aids | |
4 | Check the KS signal circuit wiring for incorrect routing near the secondary wires. Repair as necessary. Did you find a problem? | -- | ||
Check the knock sensor module for incorrect installation. Repair as necessary. Refer to VCM Replacement/Programming . Did you find a problem? | -- | |||
6 | Replace the knock sensor module. Refer to VCM Replacement/Programming . Is the action complete? | -- | -- | |
7 |
Does the scan tool indicate the diagnostic Passed? | -- | ||
8 |
Is the action complete? | -- | -- | |
9 |
Does the scan tool indicate the diagnostic Passed? | -- | ||
10 | Does the scan tool display any additional undiagnosed DTCs? | -- | Go to the applicable DTC table | System OK |
