Fuel Injector Replacement Left Side
Tools Required
| • | EN-47909 Injector Bore and Sleeve Cleaning Kit |
| • | J 44639 Fuel Injector Removal Tool |
Removal Procedure
Important: Refer to Engine Controls Component Views for fuel injector locations. Failure to identify the correct cylinder will result in misdiagnosis.
- Perform the lower valve cover removal procedure. Refer to Valve Rocker Arm Cover Replacement - Lower Left Side in Engine Mechanical - 6.6L (LB7).
- Remove the return line from injectors.
- Remove the retaining bolt from the injector bracket.
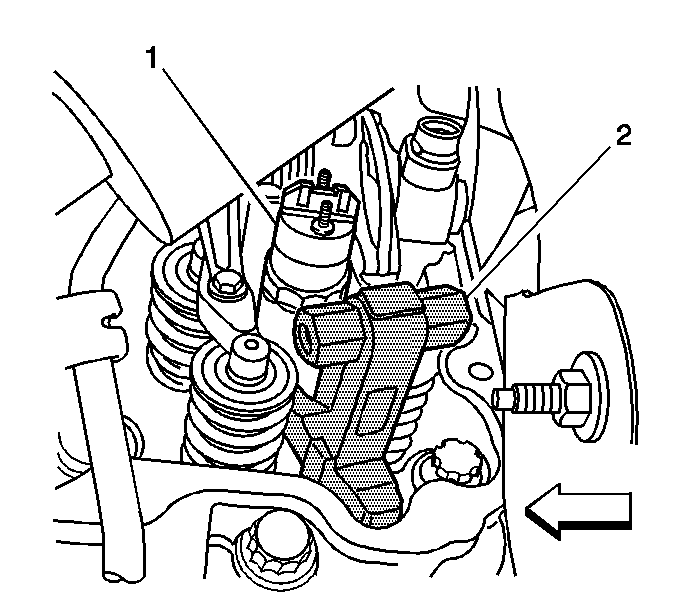
- Install the J 44639 (2) on the injector retainer bracket.
- Install a wrench on the J 44639 (2) and pry away from the fuel injector (1).
- Remove the faulty injectors.
- Remove the copper compression washer from injection hole if the washer did not remove with the injector.
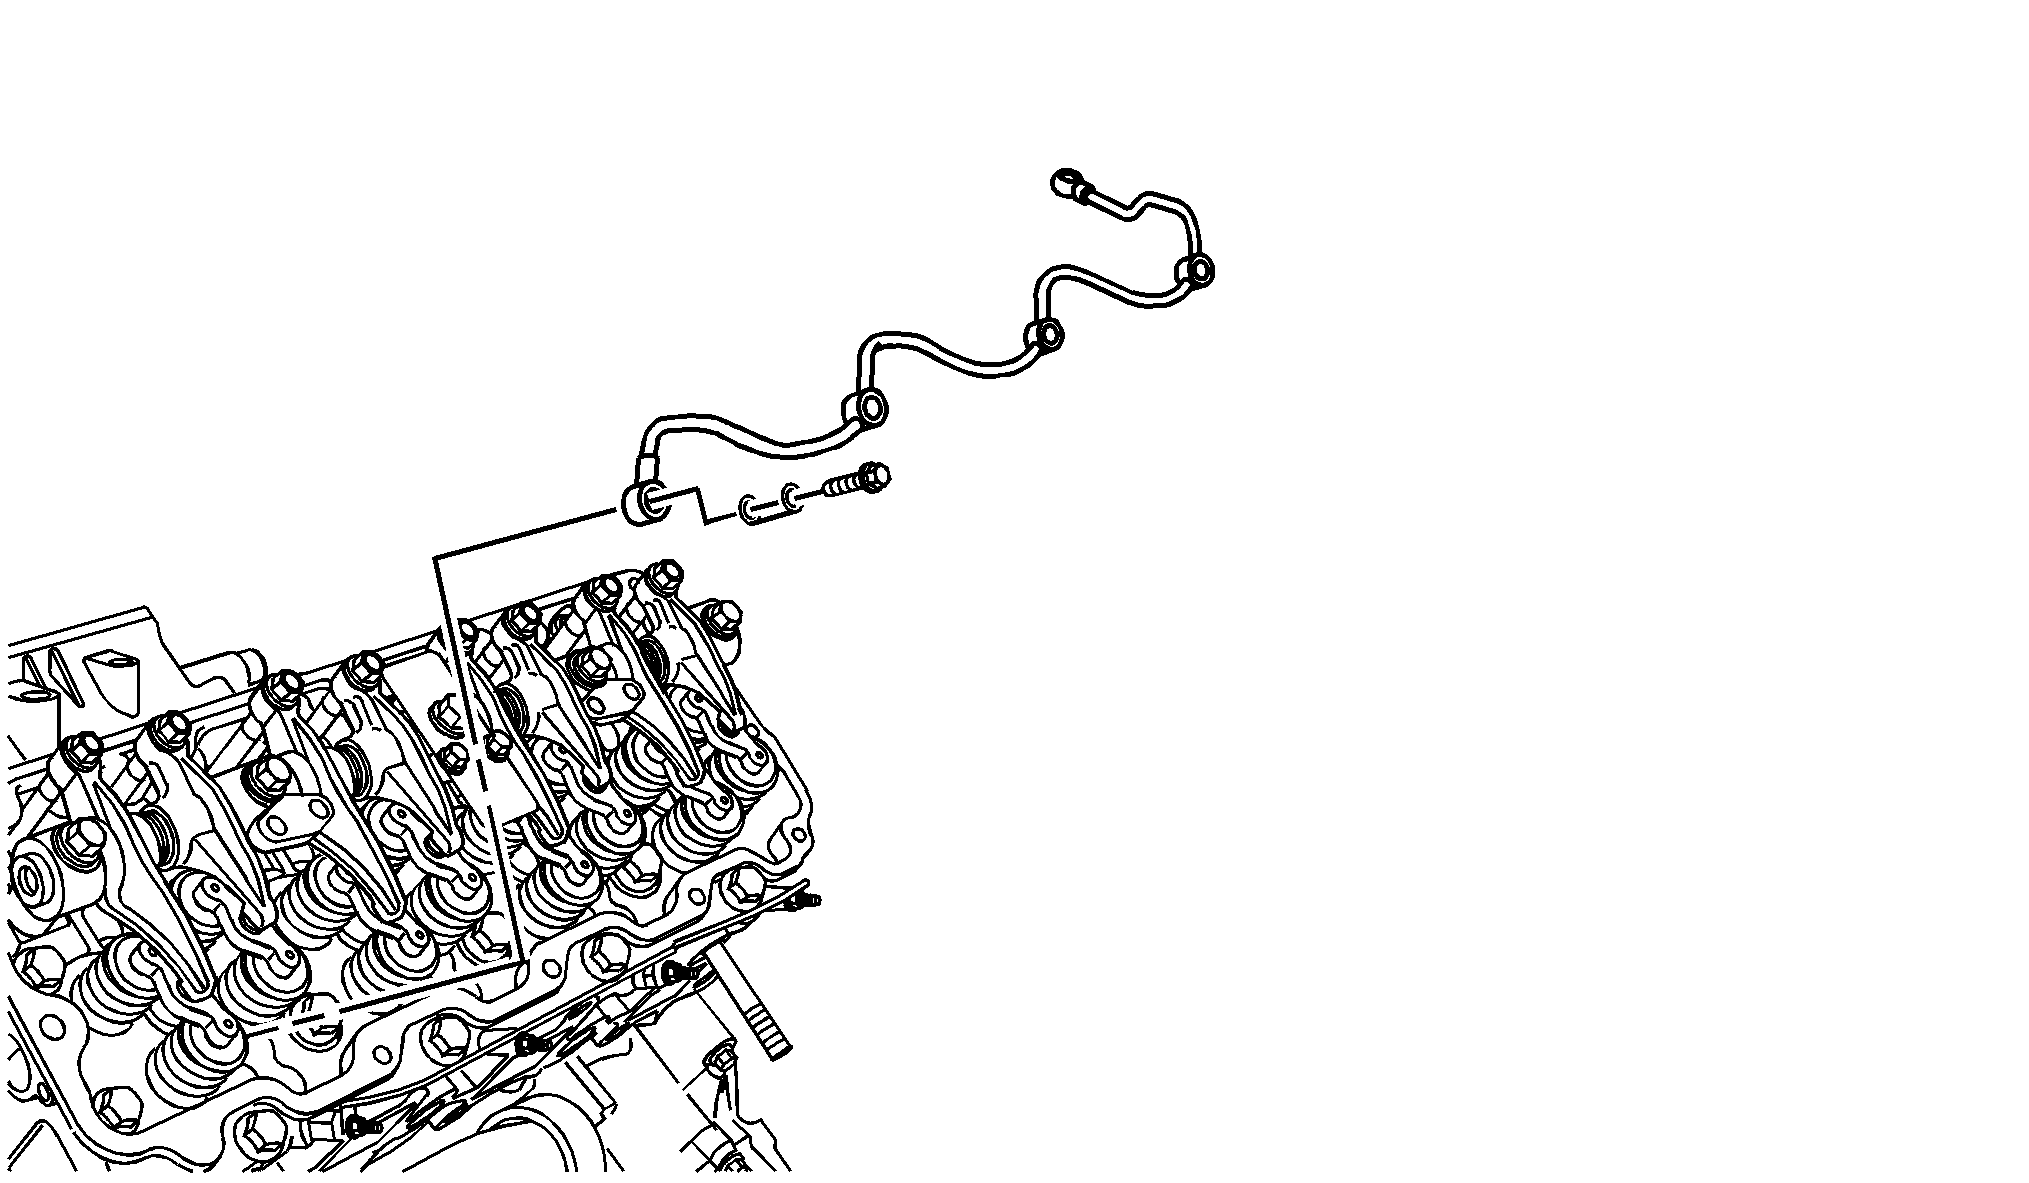
Important: When the fuel injector pressure lines are removed, debris may fall into the fuel injector inlet fitting. Remove any debris from the inlet fitting of the fuel injector.
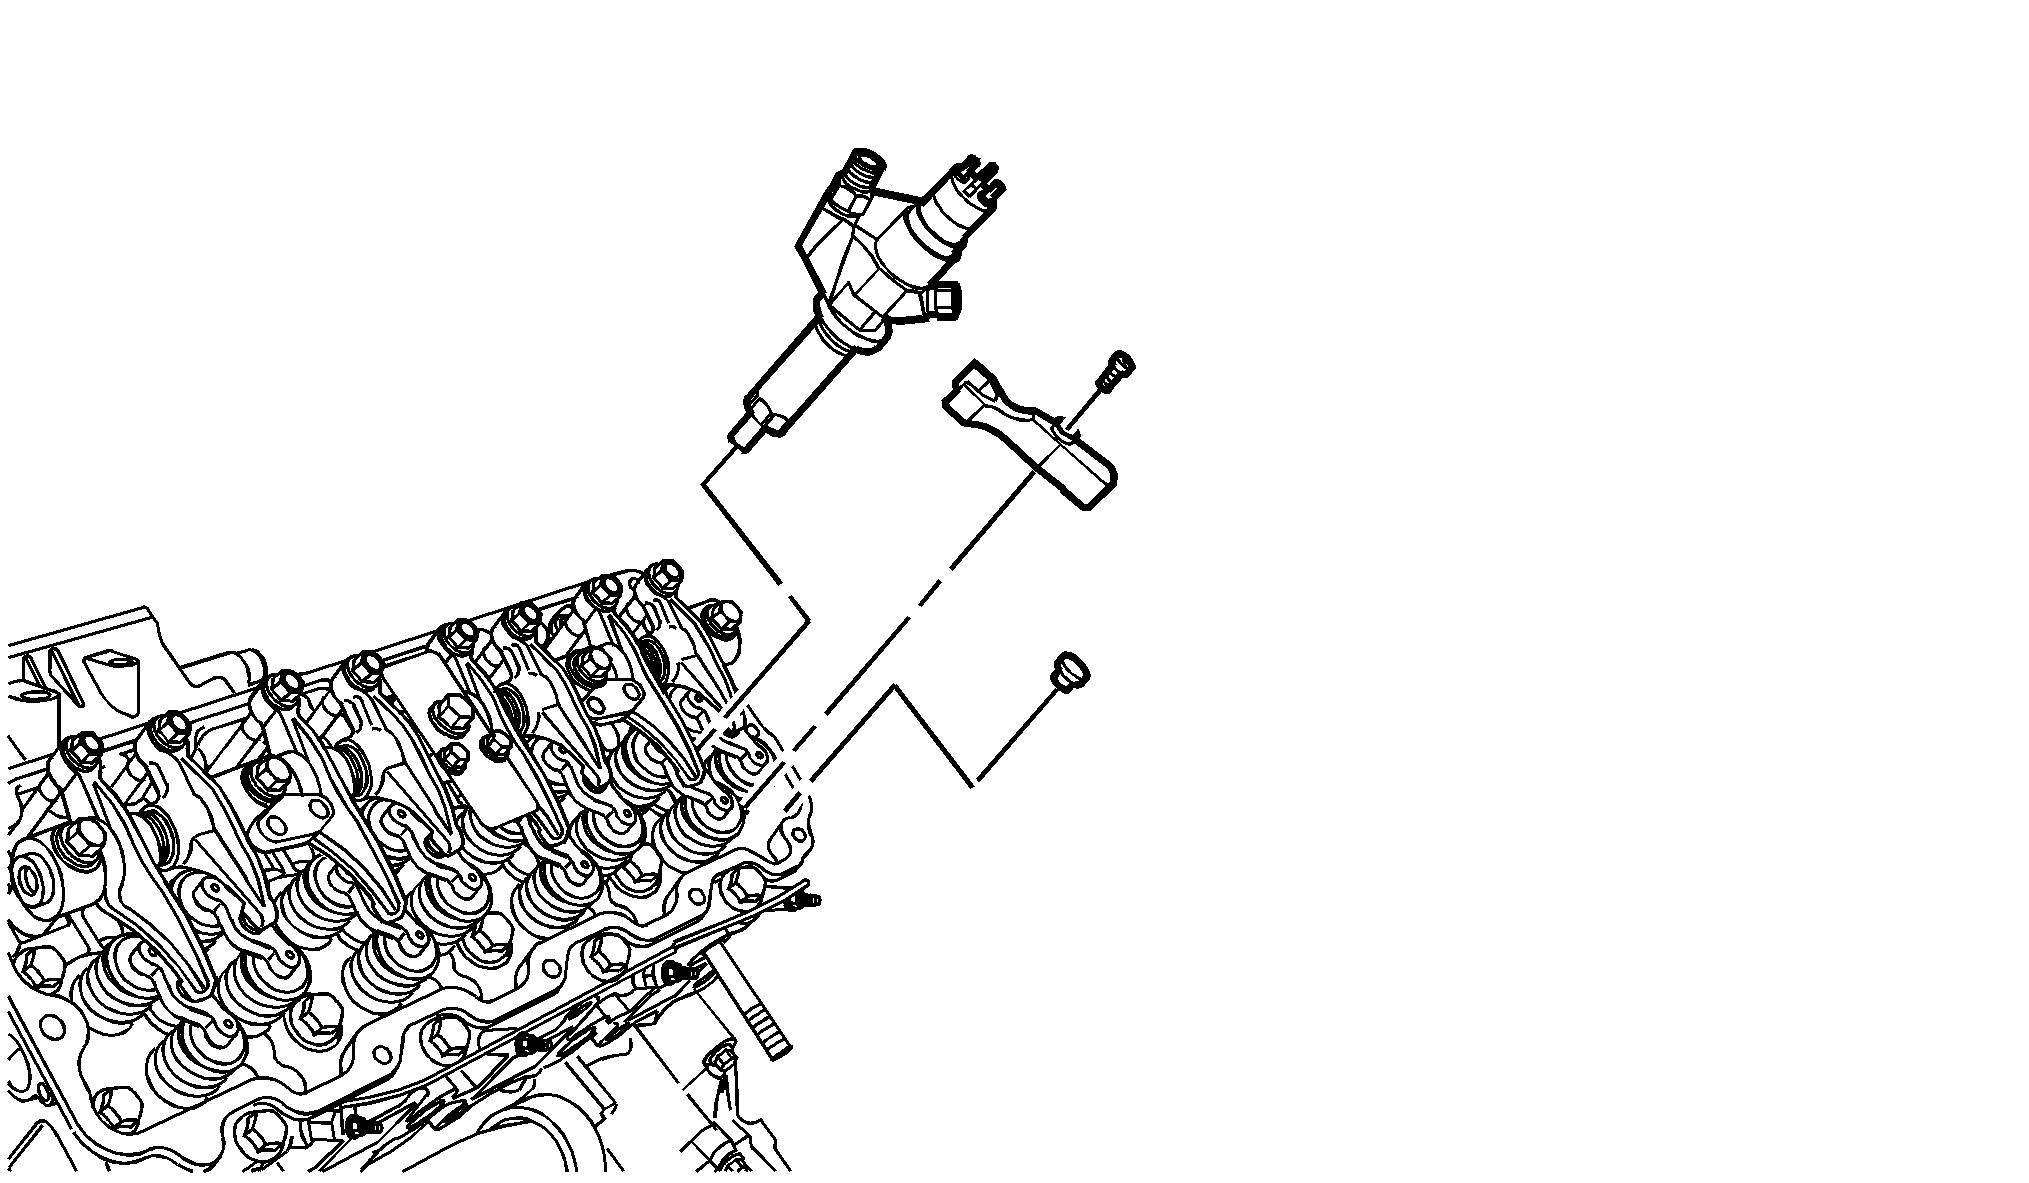
Important: Confirm which side of the banjo washers have the largest hole.
Fuel Injector Cleaning and Inspection
Important: If reusing the old injectors perform the following:
- Use a soft bristle non-metallic brush and Top Engine Cleaner, GM P/N 1052626 (Canadian P/N 993026) or equivalent, to remove any deposits from the nozzle tip (1) and the copper washer sealing area (2) before re-installation.
- Inspect the fuel injector nozzle tip (1) for any signs of discoloration (dark yellow, tan, or blue) due to excessive heat.
- Replace the injector if any damage is found.
- Clean the fuel injector high pressure line.
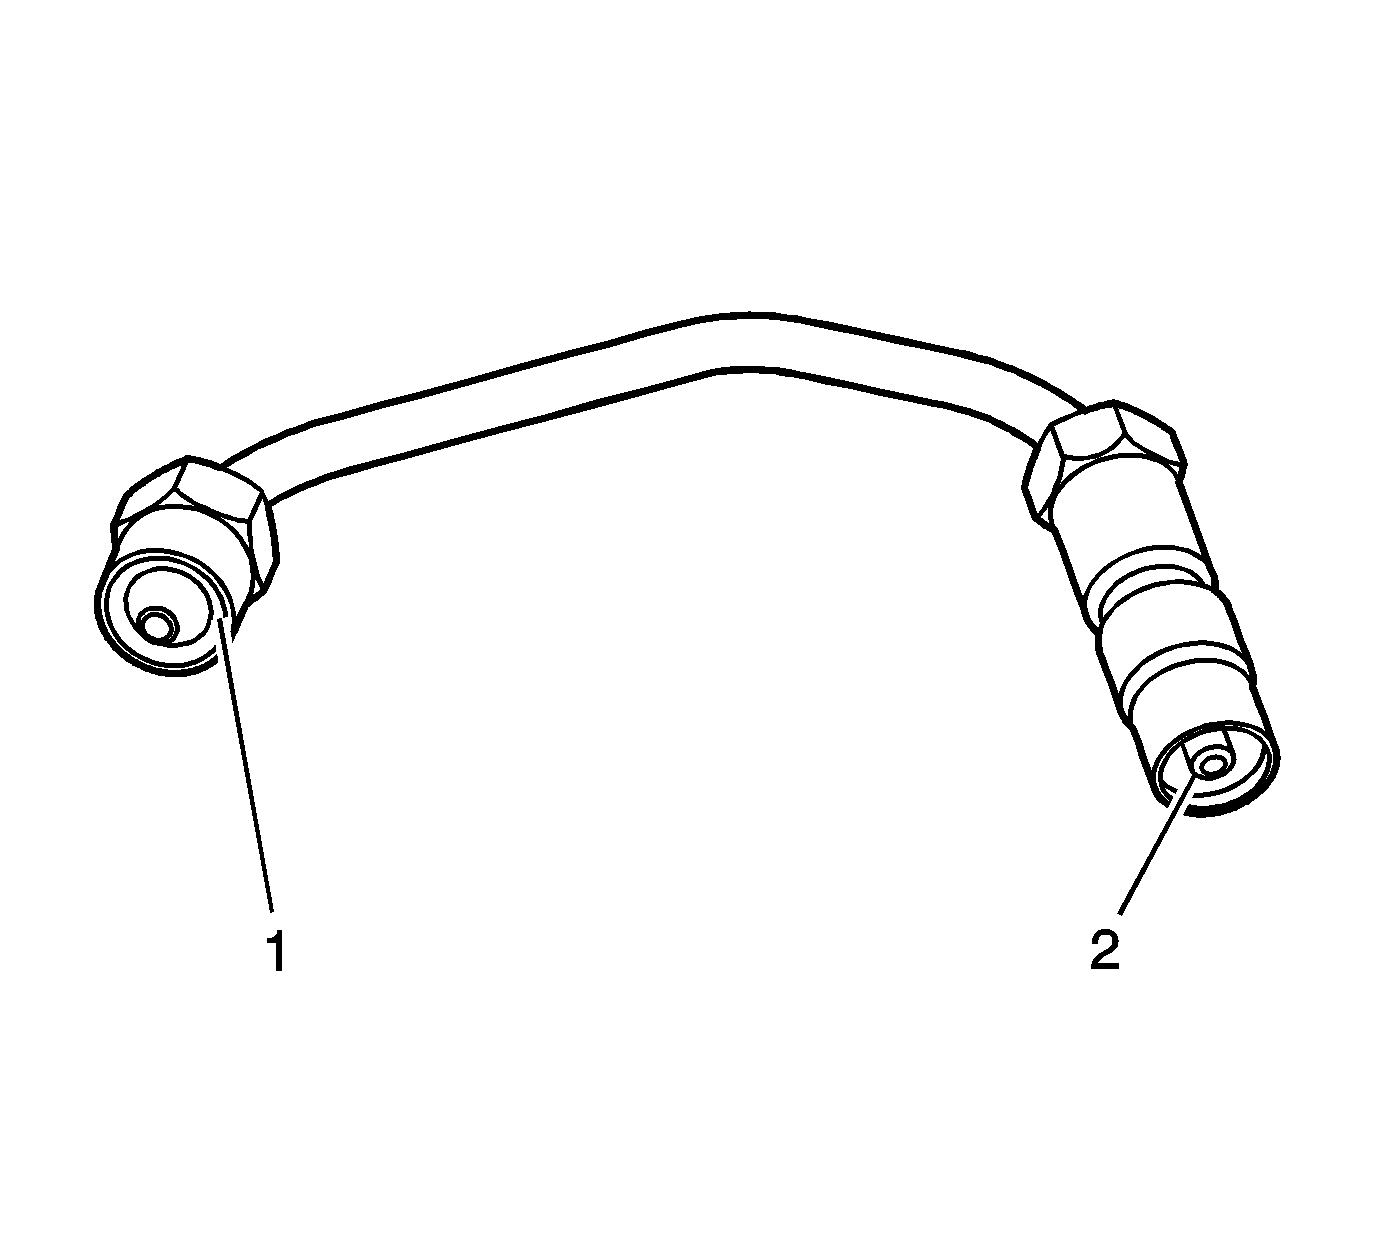
- Inspect the fuel injector high pressure line for excessive corrosion or damage to the sealing surfaces (1, 2). Replace the line if any damage is found.
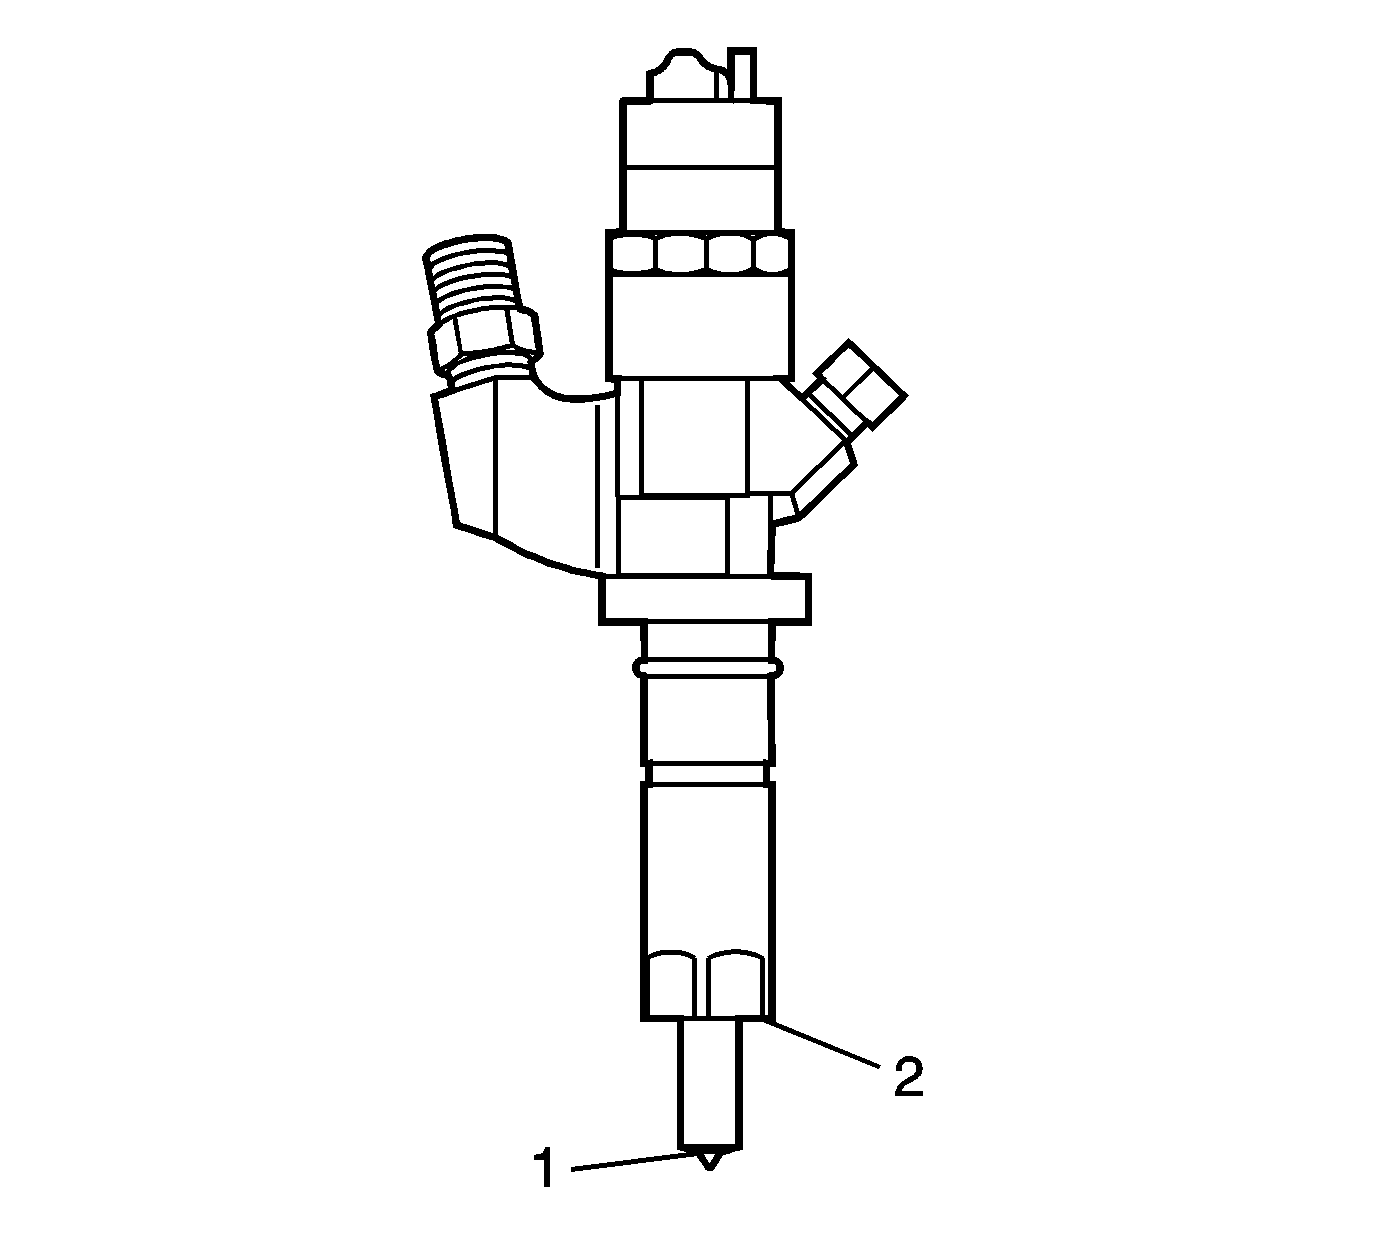
Notice: The fuel injector must be cleaned with the proper cleaning equipment. DO NOT use abrasive cleaning methods, such as a metallic brush, to remove deposits. Cleaning an injector with improper tools will damage the fuel injector.
Injector Bore Cleaning
Important: The procedure below will aid in the cleaning of carbon deposits from the injector sleeve during an injector replacement
- Install the EN-47909-2 Radial Brush (brass), to the EN-47909-1 Handle Assembly.
- Insert the brush into the injector bore and rotate the handle in order to break loose any carbon deposits from the injector bore walls and the combustion deck hole.
- Using compressed air, evacuate any debris from the injector bore.
- Remove the radial brush from the handle assembly.
- Install the EN-47909-3 Axial Brush (nylon), to the EN-47909-1.
- Insert the axial brush into the injector bore and rotate the handle while also applying a slight downward pressure, in order to force the brush ends into the bottom corners of the injector bore.
- Using compressed air, evacuate any debris from the injector bore.
- Lightly dampen EN-47909-20 Cotton Swab with Top Engine Cleaner, GM P/N 1052626 (Canadian P/N 993026) or equivalent, and wipe away any deposits from the injector bore.
- Inspect the injector bore for any deposits and repeat brushing if necessary.
Caution: Wear safety glasses in order to avoid eye damage.
Caution: Wear safety glasses in order to avoid eye damage.
Notice: Do not allow excessive amounts of solvent to go into the cylinder during cleaning. Failure to do so may cause engine damage upon startup.
Important: DO NOT crank the engine in order to expel any solvent from the cylinder. Cranking the engine with the injector removed may cause the injector sleeve to unseat and fill the cylinder with engine coolant.
Installation Procedure
- If the fuel injector sleeve was pulled from the cylinder head when removing the injector(s), refer to Fuel Injector Nozzle Tube Sleeve Replacement in Engine Mechanical - 6.6L (LB7).
- Install a NEW O-ring onto the fuel injector.
- Lubricate the O-ring with engine oil.
- Install a NEW copper washer into the fuel injector bore in the cylinder head.
- Install the fuel injector bracket pin.
- Install the fuel injector with fuel injector bracket.
- Install the fuel injector bracket bolt.
- Install the fuel injector return pipe assembly.
- Install the fuel injector return line to injector eye bolts and washers. Lubricate the washers with diesel fuel before installing.
- Install the fuel injector return line to cylinder head eye bolts and washers. Lubricate the washers with diesel fuel before installing.
- Perform the lower valve cover installation procedure. Refer to Valve Rocker Arm Cover Replacement - Lower Left Side in Engine Mechanical - 6.6L (LB7).
- Perform the upper valve cover procedure. Refer to Valve Rocker Arm Cover Replacement - Upper Left Side in Engine Mechanical - 6.6L (LB7).

Notice: Refer to Fastener Notice in the Preface section.
Tighten
Tighten the fuel injector bracket bolt to 50 N·m (37 lb ft).

Tighten
Tighten the fuel injector return line to injector eye bolts to 16 N·m (12 lb ft).
Tighten
Tighten the fuel injector return line to cylinder head eye bolts to 17 N·m (12 lb ft).
Fuel Injector Replacement Right Side
Tools Required
| • | EN-47909 Injector Bore and Sleeve Cleaning Kit |
| • | J 44639 Fuel Injector Removal Tool |
Removal Procedure
Important: Refer to Engine Controls Component Views for fuel injector locations. Failure to identify the correct cylinder will result in misdiagnosis.
- Perform the upper valve cover removal procedure. Refer to Valve Rocker Arm Cover Replacement - Lower Right Side in Engine Mechanical - 6.6L (LB7).
- Remove the return line from injectors.
- Remove the retaining bolt from the injector bracket.
- Install the J 44639 (2) on the injector retainer bracket.
- Install a wrench on the J 44639 (2) and pry away from the fuel injector (1).
- Remove the faulty injectors.
- Remove the copper compression washer from injection hole if the washer did not remove with the injector.

Important: When the fuel injector pressure lines are removed, debris may fall into the fuel injector inlet fitting. Remove any debris from the inlet fitting of the fuel injector.


Important: Confirm which side of the banjo washers have the largest hole.
Fuel Injector Cleaning and Inspection
Important: If reusing the old injectors perform the following:
- Use a soft bristle non-metallic brush and Top Engine Cleaner, GM P/N 1052626 (Canadian P/N 993026) or equivalent, to remove any deposits from the nozzle tip (1) and the copper washer sealing area (2) before re-installation.
- Inspect the fuel injector nozzle tip (1) for any signs of discoloration (dark yellow, tan, or blue) due to excessive heat.
- Replace the injector if any damage is found.
- Clean the fuel injector high pressure line.
- Inspect the fuel injector high pressure line for excessive corrosion or damage to the sealing surfaces (1, 2). Replace the line if any damage is found.

Notice: The fuel injector must be cleaned with the proper cleaning equipment. DO NOT use abrasive cleaning methods, such as a metallic brush, to remove deposits. Cleaning an injector with improper tools will damage the fuel injector.

Injector Bore Cleaning
Important: The procedure below will aid in the cleaning of carbon deposits from the injector sleeve during an injector replacement
- Install the EN-47909-2 Radial Brush (brass), to the EN-47909-1 Handle Assembly.
- Insert the brush into the injector bore and rotate the handle in order to break loose any carbon deposits from the injector bore walls and the combustion deck hole.
- Using compressed air, evacuate any debris from the injector bore.
- Remove the radial brush from the handle assembly.
- Install the EN-47909-3 Axial Brush (nylon), to the EN-47909-1.
- Insert the axial brush into the injector bore and rotate the handle while also applying a slight downward pressure, in order to force the brush ends into the bottom corners of the injector bore.
- Using compressed air, evacuate any debris from the injector bore.
- Lightly dampen EN-47909-20 Cotton Swab with Top Engine Cleaner, GM P/N 1052626 (Canadian P/N 993026) or equivalent, and wipe away any deposits from the injector bore.
- Inspect the injector bore for any deposits and repeat brushing if necessary.
Caution: Wear safety glasses in order to avoid eye damage.
Caution: Wear safety glasses in order to avoid eye damage.
Notice: Do not allow excessive amounts of solvent to go into the cylinder during cleaning. Failure to do so may cause engine damage upon startup.
Important: DO NOT crank the engine in order to expel any solvent from the cylinder. Cranking the engine with the injector removed may cause the injector sleeve to unseat and fill the cylinder with engine coolant.
Installation Procedure
- If the fuel injector sleeve was pulled from the cylinder head when removing the injector(s), refer to Fuel Injector Nozzle Tube Sleeve Replacement in Engine Mechanical - 6.6L (LB7).
- Install a NEW O-ring onto the fuel injector.
- Lubricate the O-ring with engine oil.
- Install a NEW copper washer into the fuel injector bore in the cylinder head.
- Install the fuel injector bracket pin.
- Install the fuel injector with fuel injector bracket.
- Install the fuel injector bracket bolt.
- Install the fuel injector return pipe assembly.
- Install the fuel injector return line to injector eye bolts and washers. Lubricate the washers with diesel fuel before installing.
- Install the fuel injector return line to cylinder head eye bolts and washers. Lubricate the washers with diesel fuel before installing.
- Perform the lower valve cover installation procedure. Refer to Valve Rocker Arm Cover Replacement - Lower Right Side in Engine Mechanical - 6.6L (LB7).
- Perform the upper valve cover installation procedure. Refer to Valve Rocker Arm Cover Replacement - Upper Right Side in Engine Mechanical - 6.6L (LB7).

Notice: Refer to Fastener Notice in the Preface section.
Tighten
Tighten the fuel injector bracket bolt to 50 N·m (37 lb ft).

Tighten
Tighten the fuel injector return line to injector eye bolts to 16 N·m (12 lb ft).
Tighten
Tighten the fuel injector return line to cylinder head eye bolts to 17 N·m (12 lb ft).
