Rear Brake Caliper Mount Plate Replacement 6500, 7500, 8500
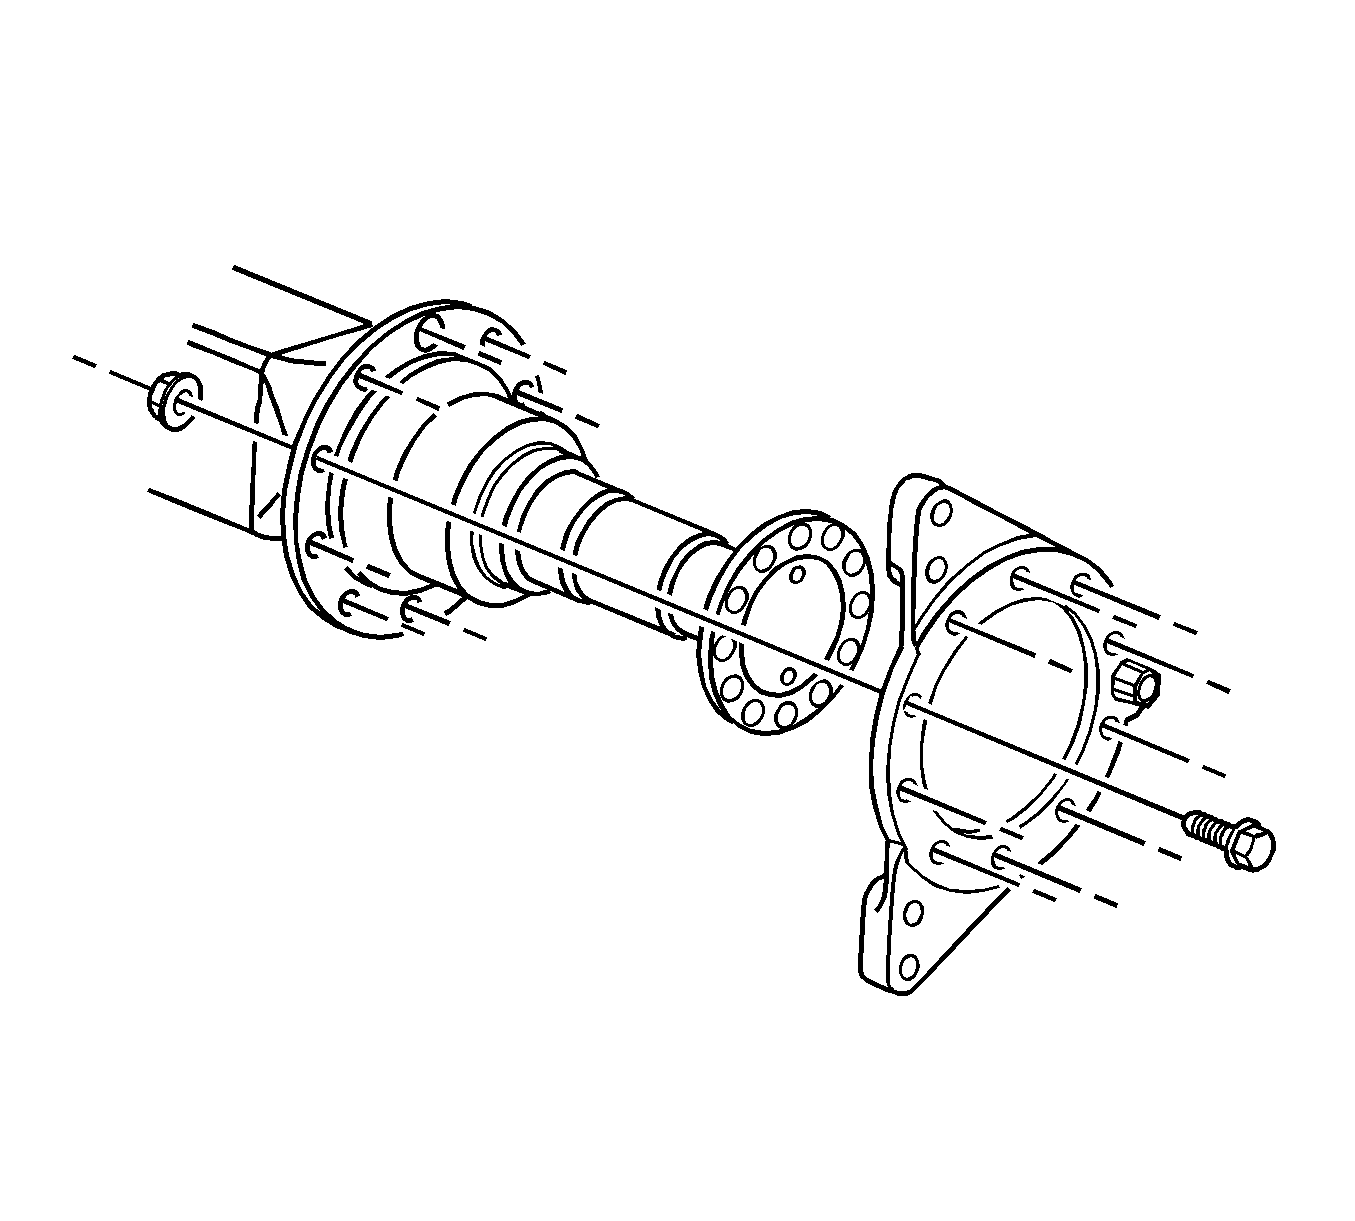
Use the brake caliper mounting plate in order to mount all of the stationary brake components. An L or R following the part number cast on the back of the plates indicates left or right side mounting. Some plates may also have an L or R painted on the front.
Caution: Refer to Brake Dust Caution in the Preface section.
Removal Procedure
- Apply the parking brake.
- Block the wheels.
- Remove the brake caliper. Refer to Rear Brake Caliper Replacement.
- Do not remove the brake line from the caliper.
- Remove the hub and brake rotor assembly. Refer to Rear Brake Rotor Replacement.
- Remove the bolts and washers.
- Remove the brake caliper mounting plate.
- Inspect the support rails for rust, corrosion, and wear.
- Clean the support rails with a wire brush.
- Inspect the brake caliper mounting plate for cracks or elongated bolt holes.
Notice: Support the brake caliper with heavy mechanic wire, or equivalent, whenever it is separated from its mount and the hydraulic flexible brake hose is still connected. Failure to support the caliper in this manner will cause the flexible brake hose to bear the weight of the caliper, which may cause damage to the brake hose and in turn may cause a brake fluid leak.

Replace the mounting plate if necessary.
Installation Procedure
- Install the brake caliper mounting plate.
- Apply 272 Threadlocker GM P/N 12345493 (Canadian P/N 10953488) or equivalent, to the threads of each brake caliper mounting plate bolt.
- Install the bolts and washers.
- Install the hub and brake rotor assembly. Refer to Rear Brake Rotor Replacement.
- Install the brake caliper. Refer to Rear Brake Caliper Replacement.
- Remove the wheel blocks.

Important: Ensure that the threads are clean and greaseless before applying threadlocker.
Notice: Use the correct fastener in the correct location. Replacement fasteners must be the correct part number for that application. Fasteners requiring replacement or fasteners requiring the use of thread locking compound or sealant are identified in the service procedure. Do not use paints, lubricants, or corrosion inhibitors on fasteners or fastener joint surfaces unless specified. These coatings affect fastener torque and joint clamping force and may damage the fastener. Use the correct tightening sequence and specifications when installing fasteners in order to avoid damage to parts and systems.
Tighten
| • | Tighten the brake shield bolts to 32 N·m (24 lb ft). |
| • | Tighten the brake caliper mounting plate bolts to 280 N·m (206 lb ft). |
Rear Brake Caliper Mount Plate Replacement 4500, 5500, HPK
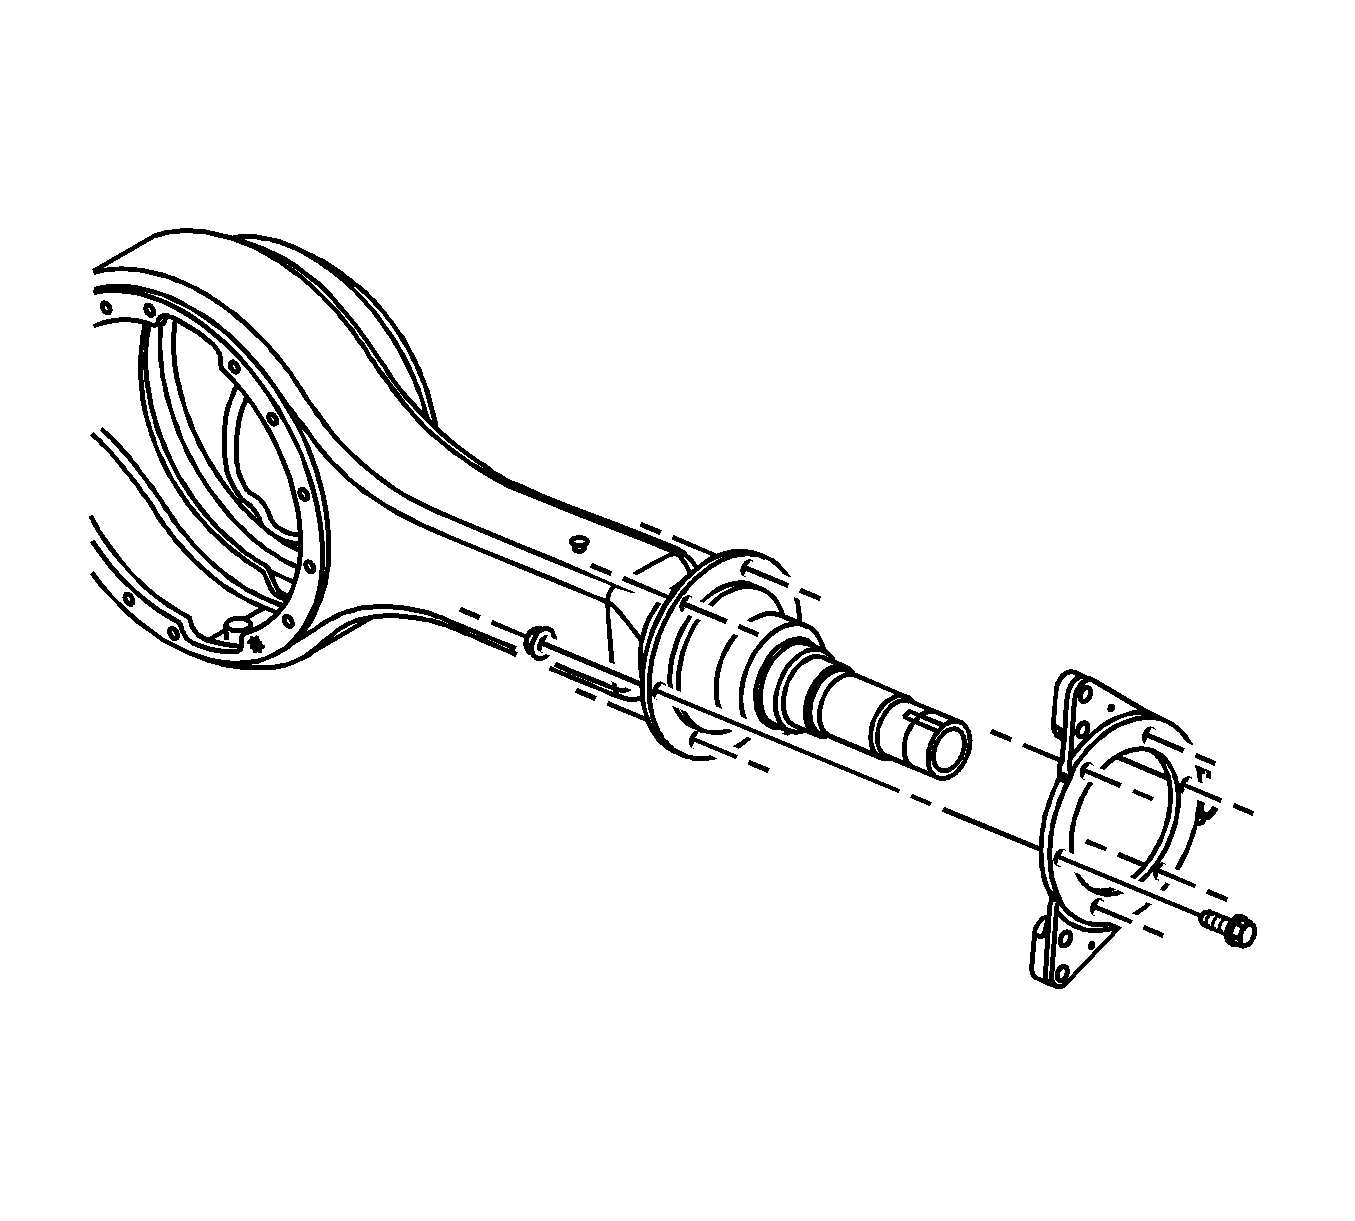
Use the brake caliper mounting plate in order to mount all of the stationary brake components. An L or R following the part number cast on the back of the plates indicates left or right side mounting. Some plates may also have an L or R painted on the front.
Caution: Refer to Brake Dust Caution in the Preface section.
Removal Procedure
- Apply the parking brake.
- Block the wheels.
- Remove the brake caliper. Refer to Rear Brake Caliper Replacement.
- Do not remove the brake line from the caliper.
- Remove the hub and brake rotor assembly. Refer to Rear Brake Rotor Replacement.
- Remove the bolts and washers.
- Remove the brake caliper mounting plate.
- Inspect the support rails for rust, corrosion, and wear.
- Clean the support rails with a wire brush.
- Inspect the brake caliper mounting plate for cracks or elongated bolt holes.
Notice: Support the brake caliper with heavy mechanic wire, or equivalent, whenever it is separated from its mount and the hydraulic flexible brake hose is still connected. Failure to support the caliper in this manner will cause the flexible brake hose to bear the weight of the caliper, which may cause damage to the brake hose and in turn may cause a brake fluid leak.

Replace the mounting plate if necessary.
Installation Procedure
- Install the brake caliper mounting plate.
- Apply 272 Threadlocker GM P/N 12345493 (Canadian P/N 10953488) or equivalent, to the threads of each brake caliper mounting plate bolt.
- Install the bolts and washers.
- Install the hub and brake rotor assembly. Refer to Rear Brake Rotor Replacement.
- Install the brake caliper. Refer to Rear Brake Caliper Replacement.
- Remove the wheel blocks.

Important: Ensure that the threads are clean and greaseless before applying threadlocker.
Notice: Use the correct fastener in the correct location. Replacement fasteners must be the correct part number for that application. Fasteners requiring replacement or fasteners requiring the use of thread locking compound or sealant are identified in the service procedure. Do not use paints, lubricants, or corrosion inhibitors on fasteners or fastener joint surfaces unless specified. These coatings affect fastener torque and joint clamping force and may damage the fastener. Use the correct tightening sequence and specifications when installing fasteners in order to avoid damage to parts and systems.
Tighten
| • | Tighten the brake shield bolts to 32 N·m (24 lb ft). |
| • | Tighten the brake caliper mounting plate bolts to 280 N·m (206 lb ft). |
Rear Brake Caliper Mount Plate Replacement 4500, 5500, GL4/GL8/HD2-J69
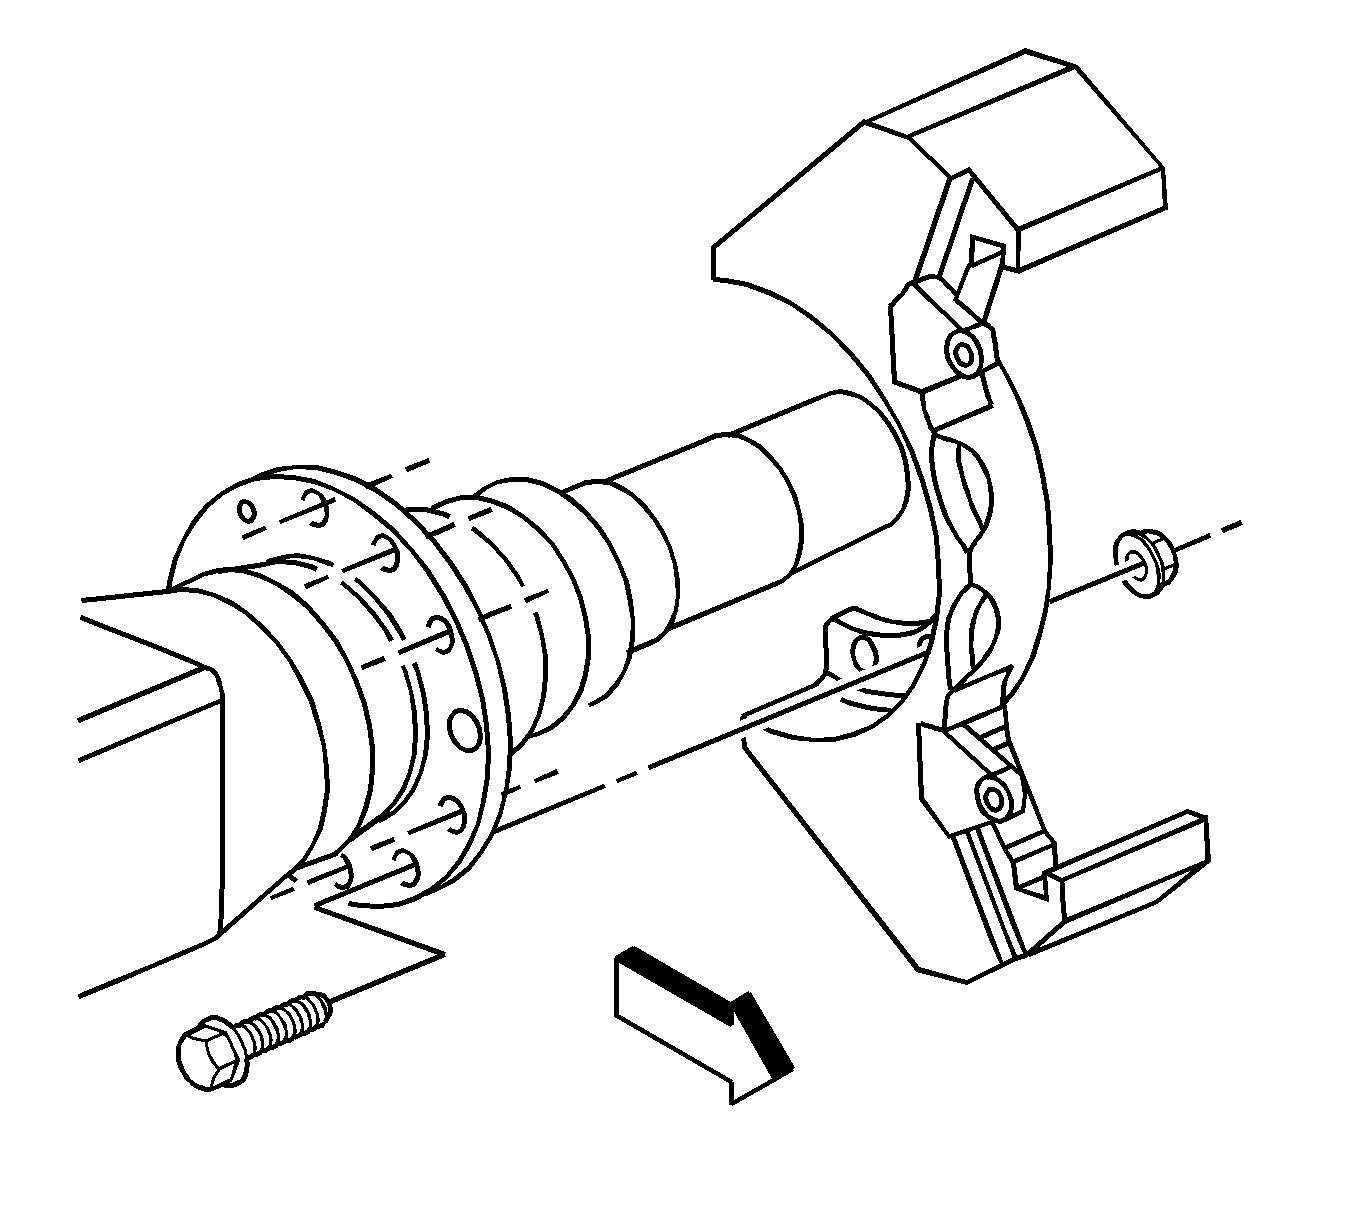
Use the brake caliper mounting plate in order to mount all of the stationary brake components. An L or R following the part number cast on the back of the plates indicates left or right side mounting. Some plates may also have an L or R painted on the front.
Caution: Refer to Brake Dust Caution in the Preface section.
Removal Procedure
- Apply the parking brake.
- Block the wheels.
- Remove the brake caliper. Refer to Rear Brake Caliper Replacement.
- Do not remove the brake line from the caliper.
- Remove the hub and brake rotor assembly. Refer to Rear Brake Rotor Replacement.
- Remove the bolts and washers.
- Remove the brake caliper mounting plate.
- Inspect the support rails for rust, corrosion, and wear.
- Clean the support rails with a wire brush.
- Inspect the brake caliper mounting plate for cracks or elongated bolt holes.
Notice: Support the brake caliper with heavy mechanic wire, or equivalent, whenever it is separated from its mount and the hydraulic flexible brake hose is still connected. Failure to support the caliper in this manner will cause the flexible brake hose to bear the weight of the caliper, which may cause damage to the brake hose and in turn may cause a brake fluid leak.

Replace the mounting plate if necessary.
Installation Procedure
- Install the brake caliper mounting plate (11) to the steering knuckle.
- Apply 272 Threadlocker GM P/N 12345493 (Canadian P/N 10953488) or equivalent, to the threads of each brake caliper mounting plate bolt.
- Install the bolts and washers.
- Install the hub and brake rotor assembly. Refer to Rear Brake Rotor Replacement.
- Install the brake caliper. Refer to Rear Brake Caliper Replacement.
- Remove the wheel blocks.

Important: Ensure that the threads are clean and greaseless before applying threadlocker.
Notice: Refer to Fastener Notice in the Preface section.
Tighten
| • | Tighten the brake shield bolts to 32 N·m (24 lb ft). |
| • | Tighten the brake caliper mounting plate bolts to 110 N·m (82 lb ft). |
