Removal Procedure - Rear
- Remove the front floor panel carpet. Refer to Front Floor Panel Carpet Replacement.
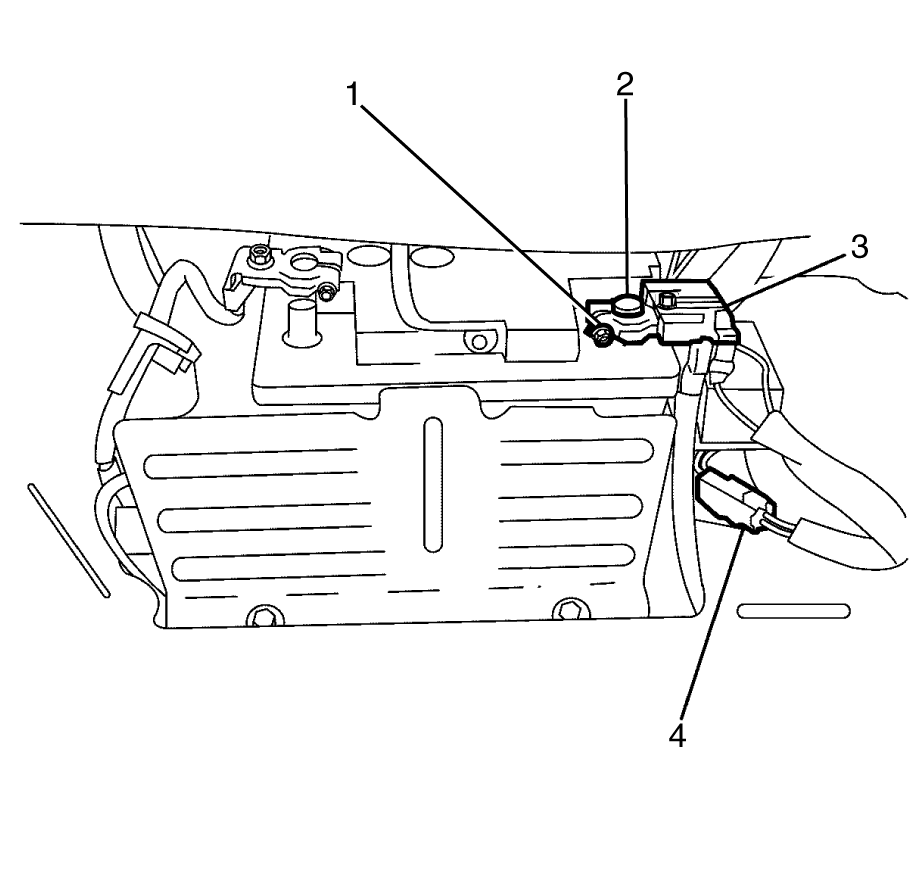
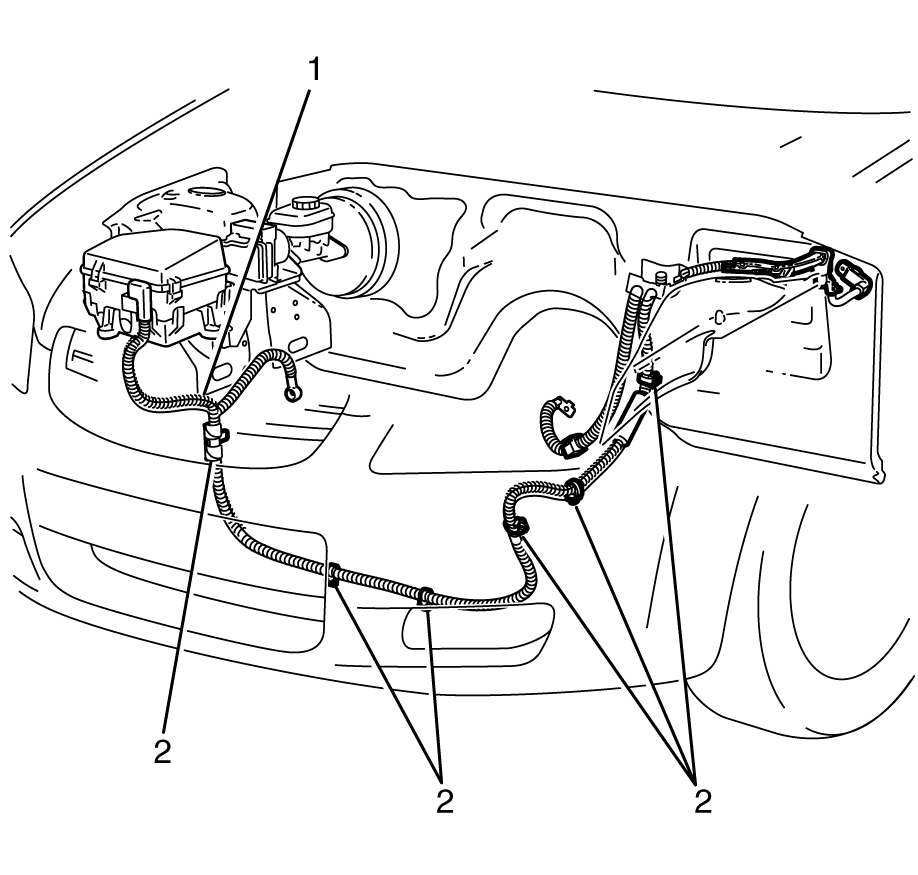
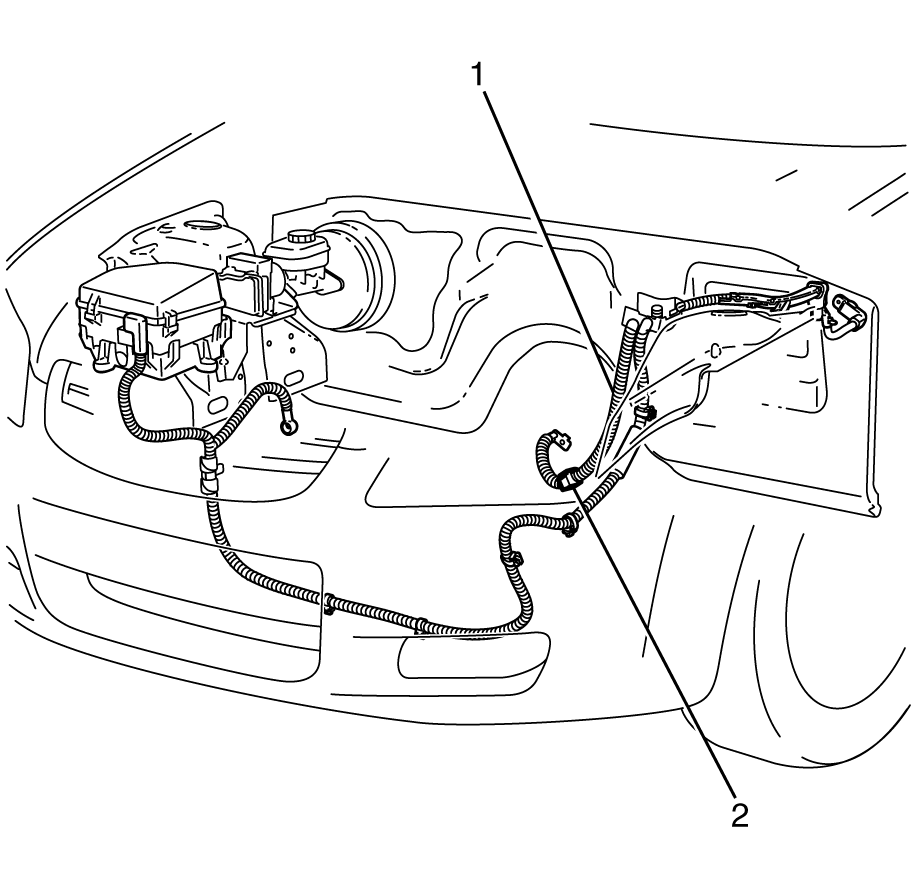
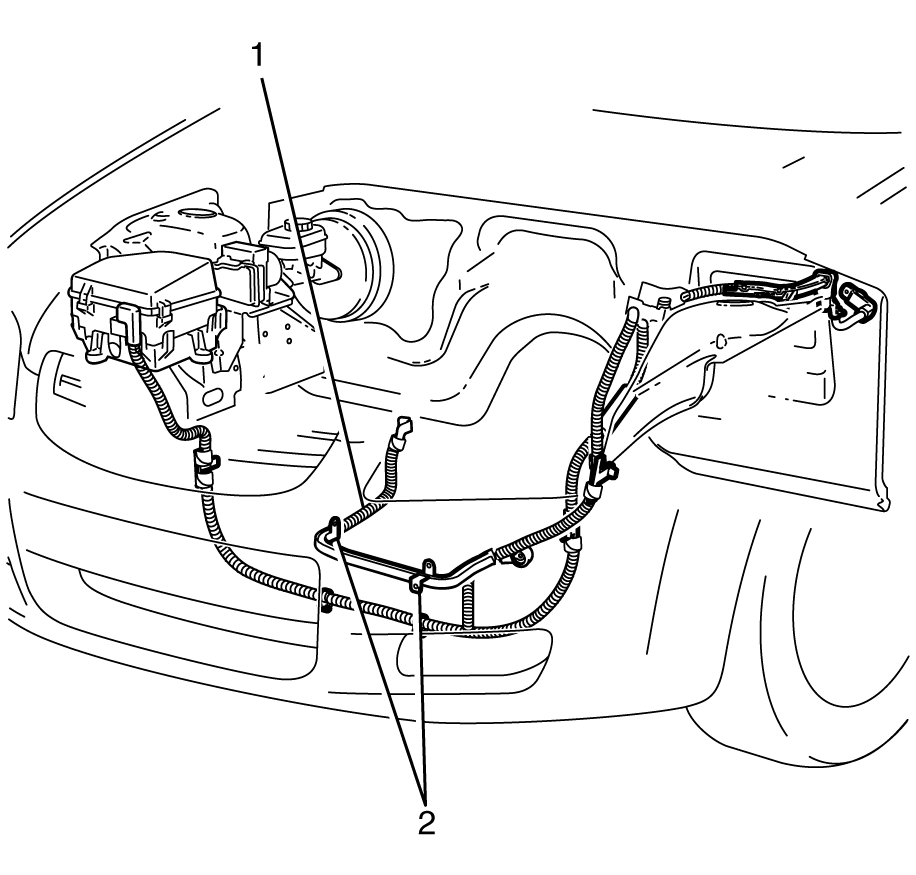
- Remove the battery positive cable to battery positive terminal retaining nut (1).
- Remove the battery positive cable (3) from the battery positive terminal (2).
- Disconnect the rear fuse block electrical connector (4).
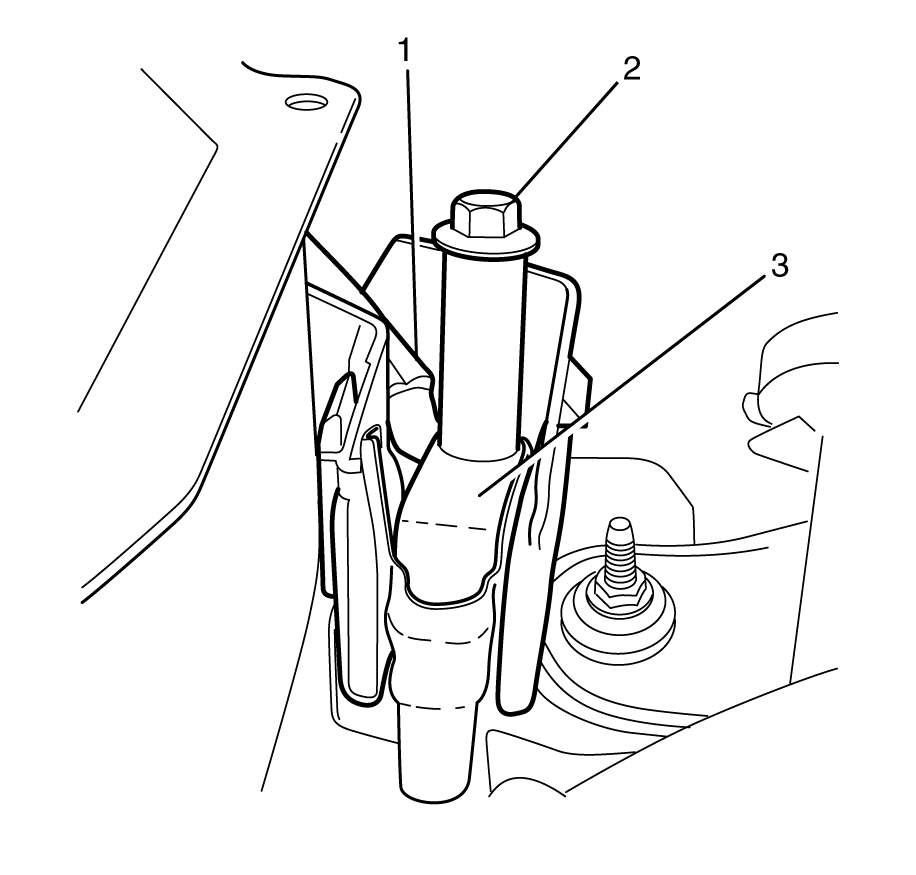
- Detach the remote battery positive post cover (2) from the remote battery positive cable upper protective cover (3).
- Remove the remote battery positive cable upper protective cover (3) from the remote battery positive cable lower protective cover (4).
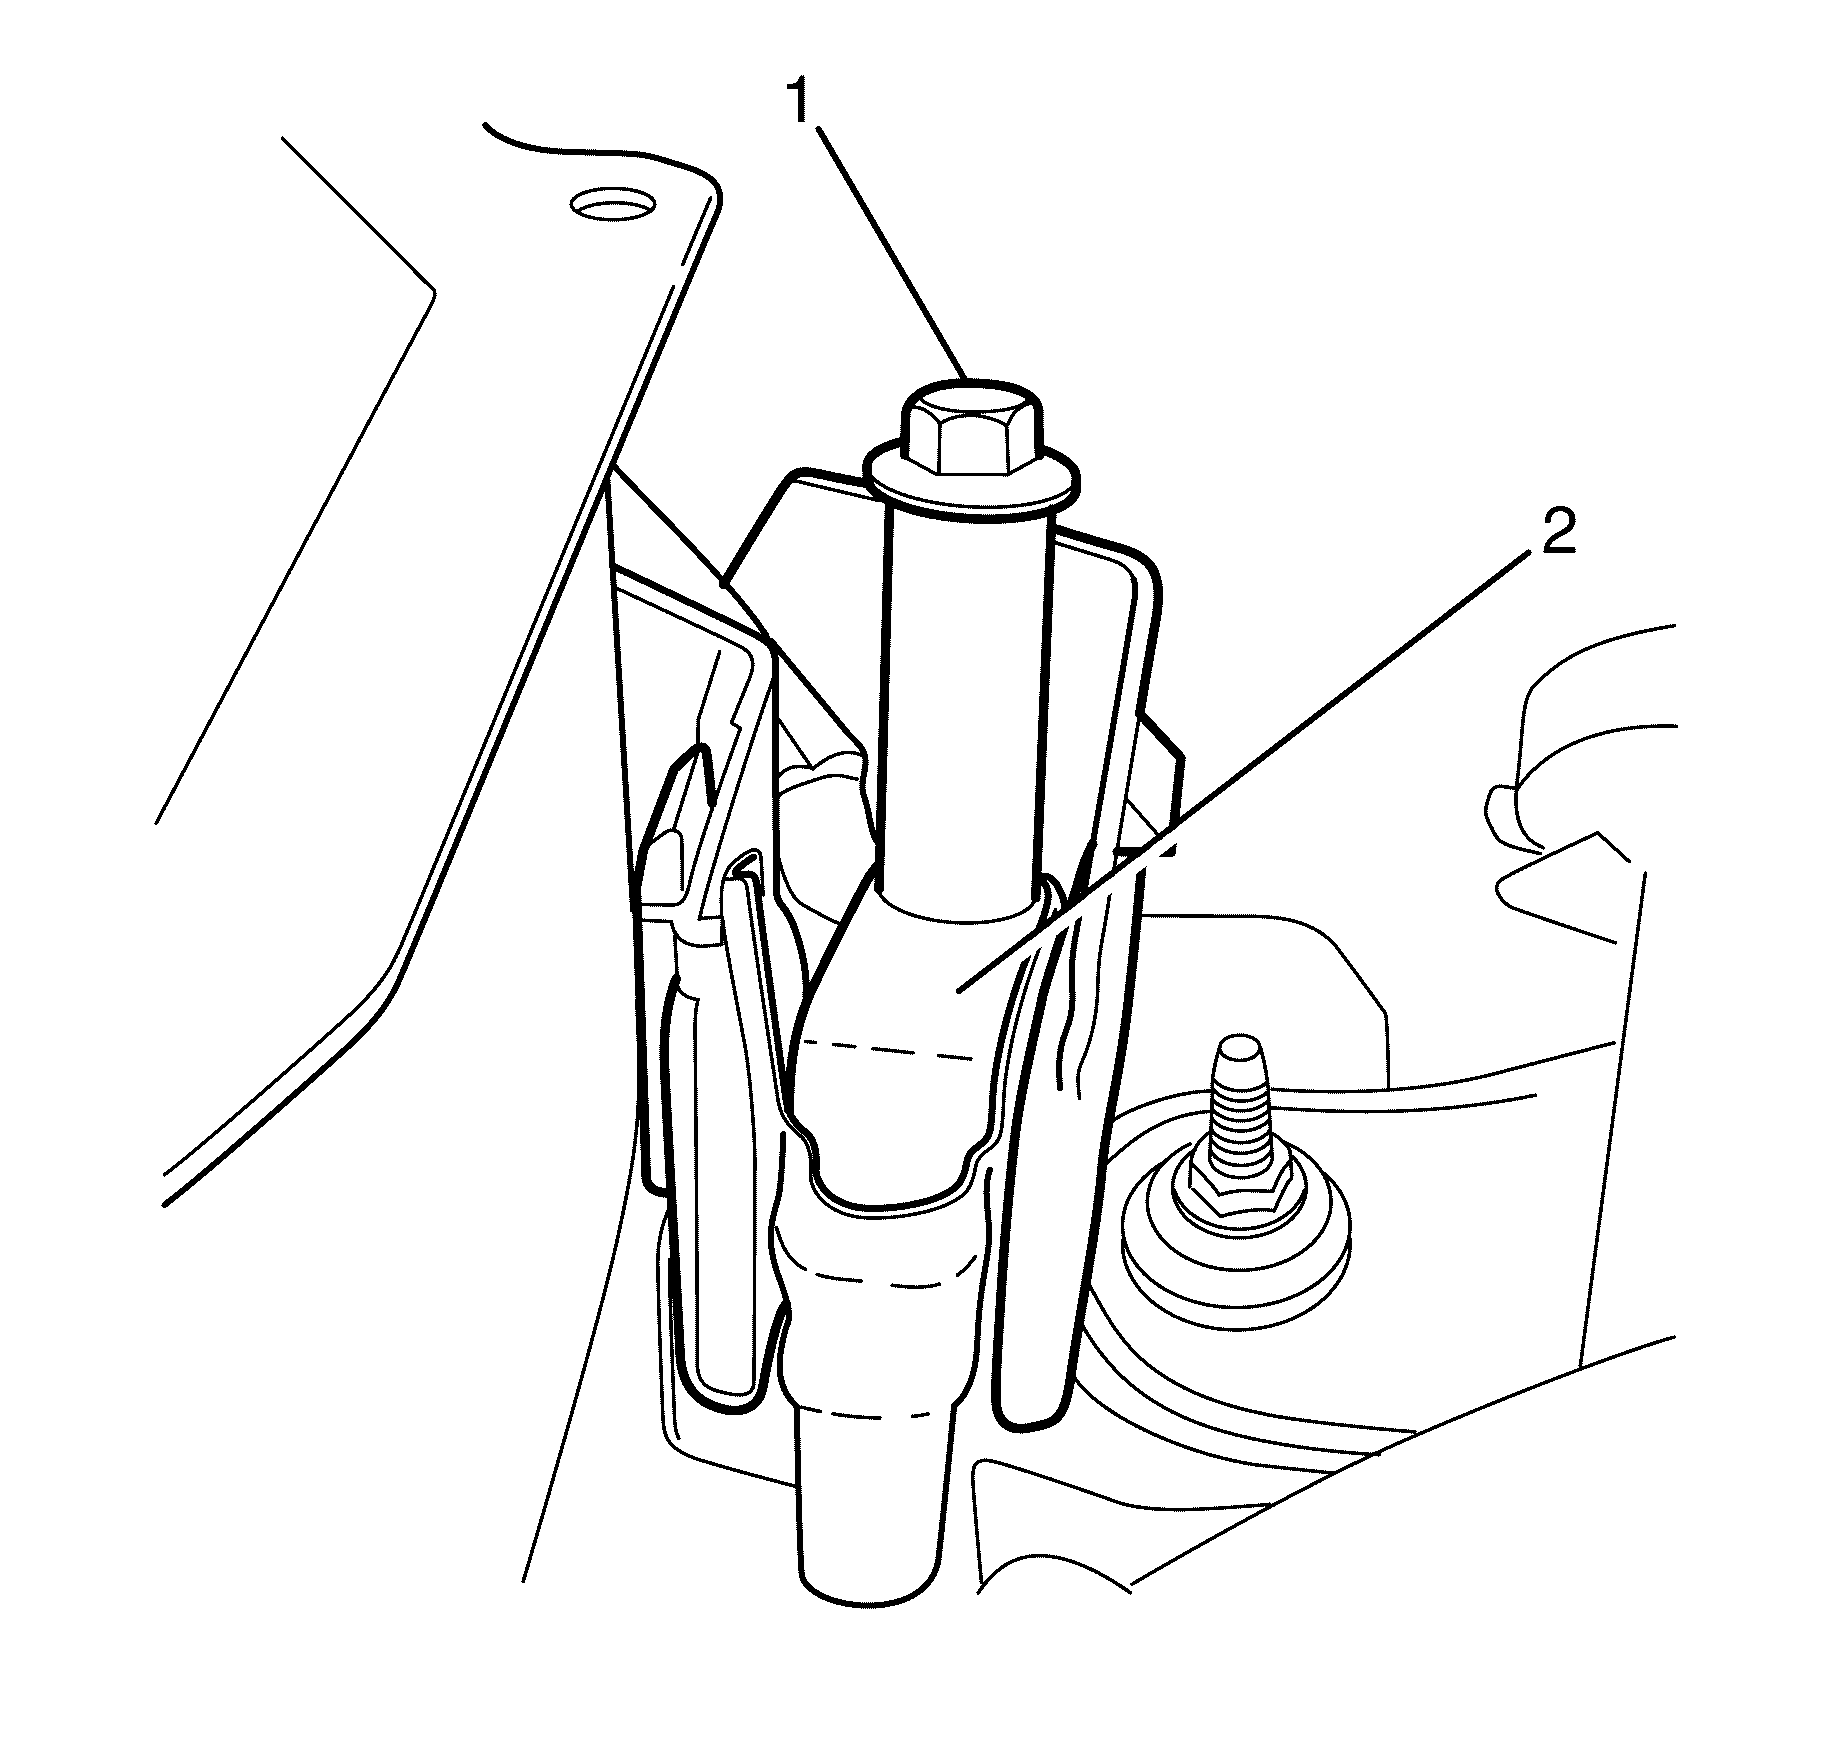
- Remove the remote battery positive post to battery positive cable retaining bolt (1).
- Remove the battery positive cable (2).
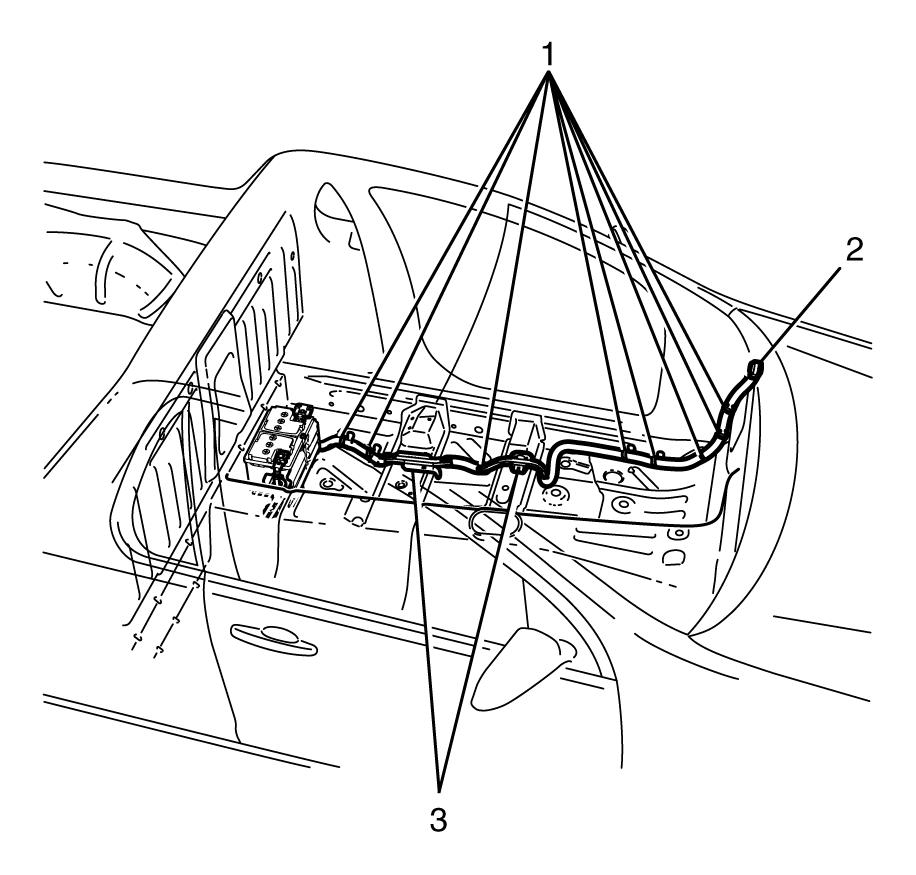
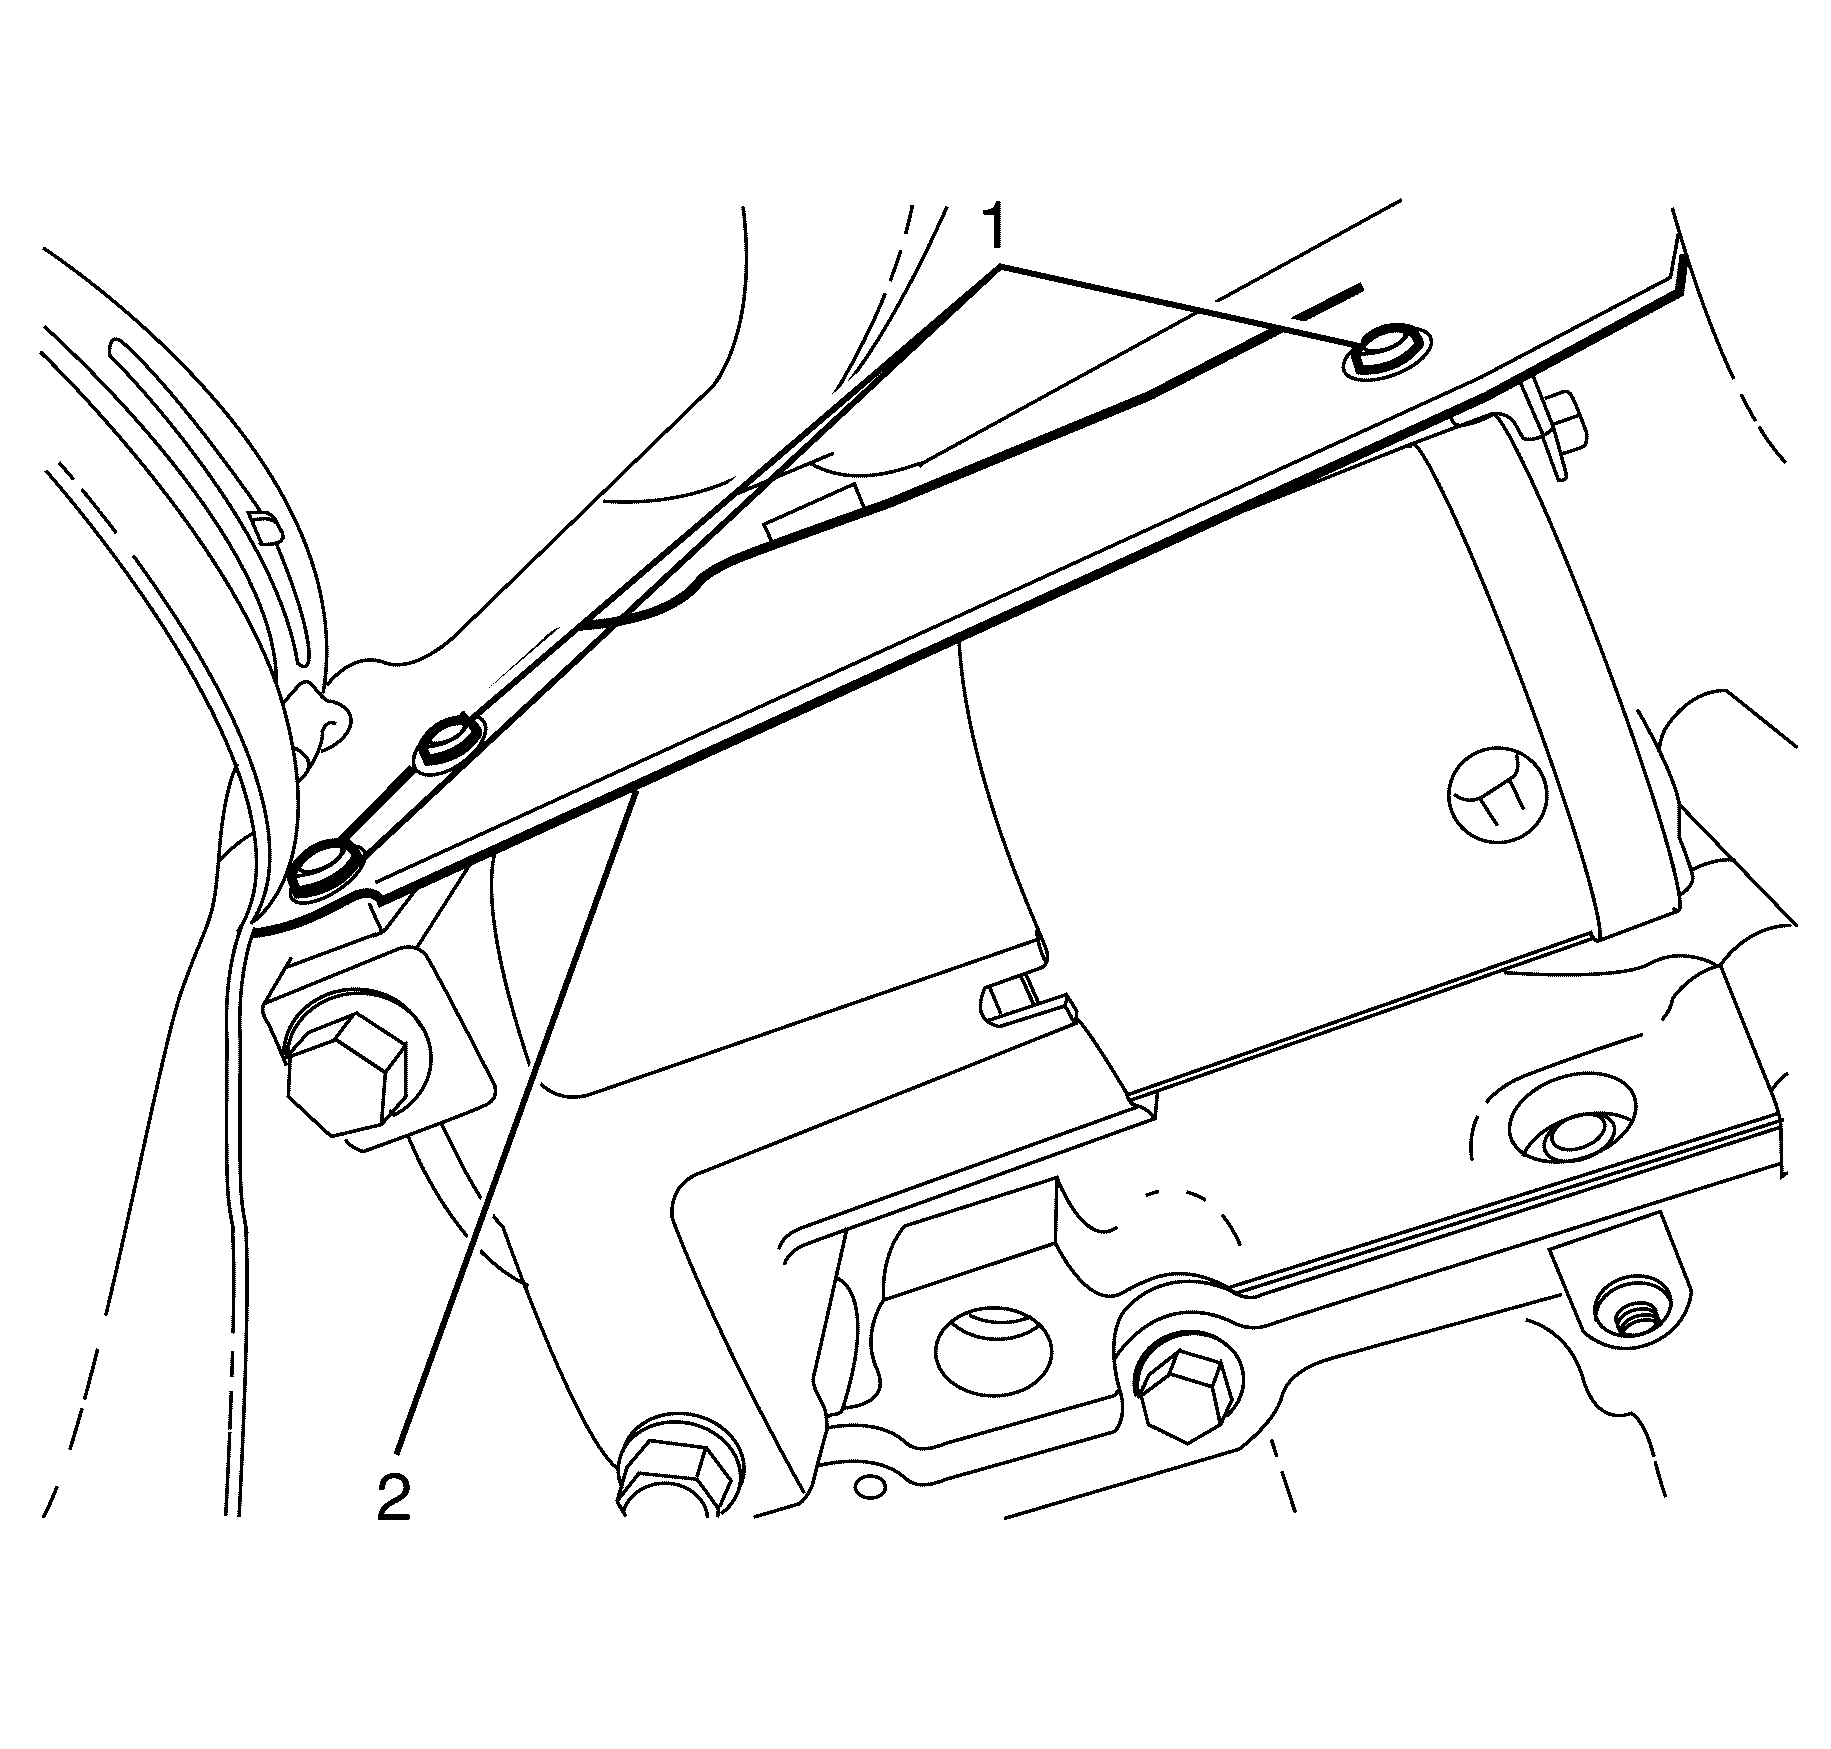
- Remove the battery positive cable to chassis retaining brackets (3).
- Remove the battery positive cable to chassis retaining clips (1).
- Remove the battery positive cable (2) from the vehicle.
Important:
• Always use replacement cables that are of the same type, diameter and
length of the cables that you are replacing. • Always route the replacement cable the same as the original cable.
Important: Clean any existing corrosion from the battery positive terminal (2) and the battery positive cable (3).
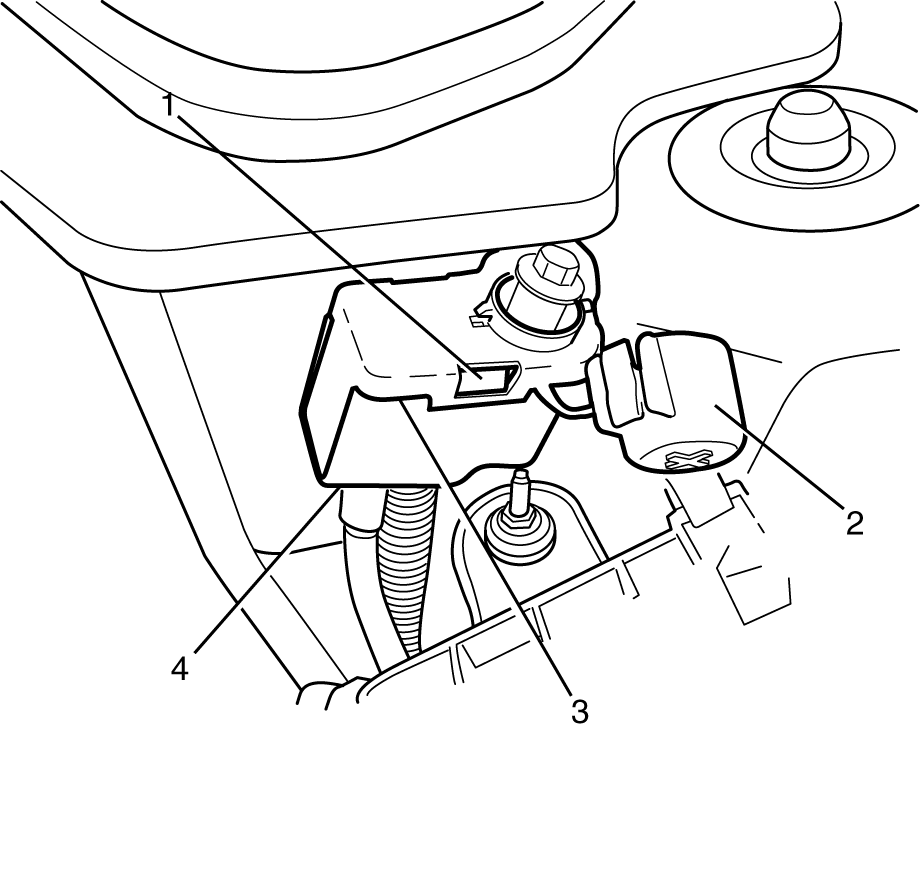
Important: Remove the remote battery positive cable upper protective cover (3) by pressing the retaining clip (1) and lifting the remote battery positive cable upper protective cover (3) upwards.
Installation Procedure - Rear
- Install the battery positive cable (2) to the vehicle.
- Install the battery positive cable to chassis retaining clips (1).
- Install the battery positive cable to chassis retaining brackets (3).
- Install the battery positive cable (2) to the remote battery post.
- Install the remote battery positive post to battery positive cable retaining bolt (1)
- Install the remote battery positive cable upper protective cover (3) to the remote battery positive cable lower protective cover (4).
- Attach the battery post cover (2) to the remote battery positive cable upper protective cover (3).
- Connect the rear fuse block electrical connector (4).
- Install the battery positive cable (3) to the battery positive terminal (2).
- Install the battery positive cable to battery positive terminal retaining nut (1).
- Install the front floor panel carpet. Refer to Front Floor Panel Carpet Replacement.
Notice: Refer to Fastener Notice in the Preface section.
Tighten
Tighten the bolt to 15 N·m (11 lb ft).
Important: Listen for an audible click from the retaining clip (1) to confirm correct fitting of the remote battery positive cable upper protective cover (3) to the remote battery positive cable lower protective cover (4).
Caution: Refer to Battery Disconnect Caution in the Preface section.
Removal Procedure - Front (3.6L Engine)
- Disconnect the battery negative cable. Refer to Battery Negative Cable Disconnection and Connection.
- Remove the front air deflector. Refer to Front Air Deflector Replacement.
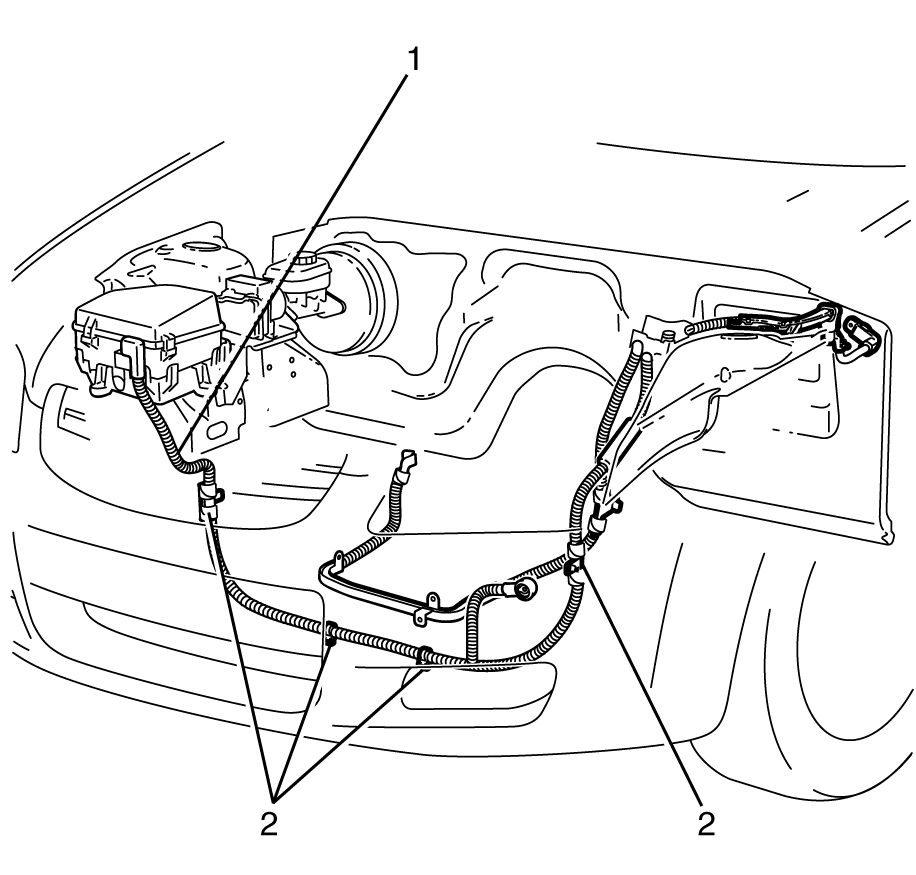
- Detach the remote battery positive post cover (2) from the remote battery positive cable upper protective cover (3).
- Remove the remote battery positive cable upper protective cover (3) from the remote battery positive cable lower protective cover (4).
- Remove the remote battery positive post to battery positive cable retaining bolt (2).
- Disconnect the front battery positive cable (3) from the battery post.
- Disconnect the rear battery positive cable (1) from the battery post.
- Remove the underhood body electrical centre (UBEC) cover (1).
- Remove the front battery positive cable protective cover (3).
- Remove the front battery positive cable to UBEC plate retaining nut (5).
- Disconnect the front battery positive cable (2) from the UBEC plate (4).
- Remove the front battery positive cable to alternator retaining nut (1).
- Disconnect the front battery positive cable (3) from the alternator (2).
- Remove the front battery positive cable to chassis retaining clips (2).
- Remove the front battery positive cable (1) from the engine compartment.
Caution: Refer to Battery Disconnect Caution in the Preface section.
Important: Remove the remote battery positive cable upper protective cover (3) by pressing the retaining clip (1) and lifting the remote battery positive cable upper protective cover (3) upwards.


Important: Reposition the protective boot on the front battery positive cable (3) to gain access to the front battery positive cable to alternator retaining nut (1).
Installation Procedure - Front (3.6L Engines)
- Install the front battery positive cable (1) to the engine compartment.
- Install the front battery positive cable to chassis retaining clips (2).
- Connect the front battery positive cable (2) to the alternator (3).
- Install the front battery positive cable to alternator retaining nut (1).
- Connect the front battery positive cable (2) to the UBEC plate (4).
- Install the front battery positive cable to the UBEC plate retaining nut (5).
- Install the front battery positive cable protective cover (3) to the positive cable.
- Install the UBEC cover (1).
- Connect the rear battery positive cable (1) to the battery post.
- Connect the front battery positive cable (3) to the battery post.
- Install the remote battery positive post to the battery positive cable retaining bolt (2).
- Install the remote battery positive cable upper protective cover (3) to the remote battery positive cable lower protective cover (4).
- Attach the remote battery positive post cover (2) to the remote battery positive cable upper protective cover (3).
- Connect the battery negative cable. Refer to Battery Negative Cable Disconnection and Connection.
- Install the front air deflector. Refer to Front Air Deflector Replacement.
Notice: Refer to Fastener Notice in the Preface section.
Tighten
Tighten the nut to 13 N·m (115 lb in).
Tighten
Tighten the nut to 10 N·m(89 lb in).
Tighten
Tighten the bolt to 15 N·m (11 lb ft).
Important: Listen for an audible click from the retaining clip (1) to confirm correct fitting of the remote battery positive cable upper protective cover (3) to the remote battery positive cable lower protective cover (4).
Removal Procedure - Front (6.0L Engines)
- Disconnect the battery negative cable. Refer to Battery Negative Cable Disconnection and Connection.
- Remove the front air deflector. Refer to Front Air Deflector Replacement.
- Detach the remote battery positive post cover (2) from the remote battery positive cable upper protective cover (3).
- Remove the remote battery positive cable upper protective cover (3) from the remote battery positive cable lower protective cover (4).
- Remove the remote battery positive post to battery positive cable retaining bolt (2).
- Disconnect the front battery positive cable (3) from the remote battery positive post.
- Disconnect the rear battery positive cable (1) from the remote battery positive post.
- Remove the underhood body electrical centre (UBEC) cover (1).
- Remove the front battery positive cable protective cover (3).
- Remove the front battery positive cable to UBEC plate retaining bolt (5).
- Disconnect the front battery positive cable (2) from the UBEC plate (4).
- Remove the front battery positive cable to alternator retaining nut (1).
- Remove the front battery positive cable (2) from the alternator (3).
- Remove the front battery positive cable to chassis retaining clips (2).
- Remove the front battery positive cable (1) from the engine compartment.
Caution: Refer to Battery Disconnect Caution in the Preface section.
Important: Remove the remote battery positive cable upper protective cover (3) by pressing the retaining clip (1) and lifting the remote battery positive cable upper protective cover (3) upwards.
Important: Reposition the protective boot on the front battery positive cable (2) to gain access to the front battery positive cable to alternator retaining nut (1).
Installation Procedure - Front 6.0L Engines)
- Install the front battery positive cable (1) to the engine compartment.
- Install the front battery positive cable to chassis retaining clips (2).
- Connect the front battery positive cable (2) to the alternator (3).
- Install the front battery positive cable to alternator retaining nut (1).
- Connect the front battery positive cable (2) to the UBEC plate (4).
- Install the front battery positive cable to UBEC plate retaining bolt (5).
- Install the front battery positive cable protective cover (3) to the positive cable.
- Install the UBEC cover (1).
- Connect the rear battery positive cable (1) to the remote battery positive post.
- Connect the front battery positive cable (3) to the remote battery positive post.
- Install the remote battery positive post to battery positive cable retaining bolt (2).
- Install the remote battery positive cable upper protective cover (3) to the remote battery positive cable lower protective cover (4).
- Attach the remote battery positive post cover (2) to the remote battery positive cable upper protective cover (3).
- Connect the battery negative cable. Refer to Battery Negative Cable Disconnection and Connection.
- Install the front air deflector. Refer to Front Air Deflector Replacement.
Notice: Refer to Fastener Notice in the Preface section.
Tighten
Tighten the nut to 13 N·m (115 lb in).
Tighten
Tighten the bolt to 10 N·m(89 lb in).
Tighten
Tighten the bolt to 15 N·m (11 lb ft).
Important: Listen for an audible click from the retaining clip (1) to confirm correct fitting of the remote battery positive cable upper protective cover (3) to the remote battery positive cable lower protective cover (4).
Removal Procedure - Starter (3.6L Engine)
- Disconnect the battery negative cable. Refer to Battery Negative Cable Disconnection and Connection.
- Remove the front air deflector. Refer to Front Air Deflector Replacement.
- Detach the remote battery positive post cover (2) from the remote battery positive cable upper protective cover (3).
- Remove the remote battery positive cable upper protective cover (3) from the remote battery positive cable lower protective cover (4).
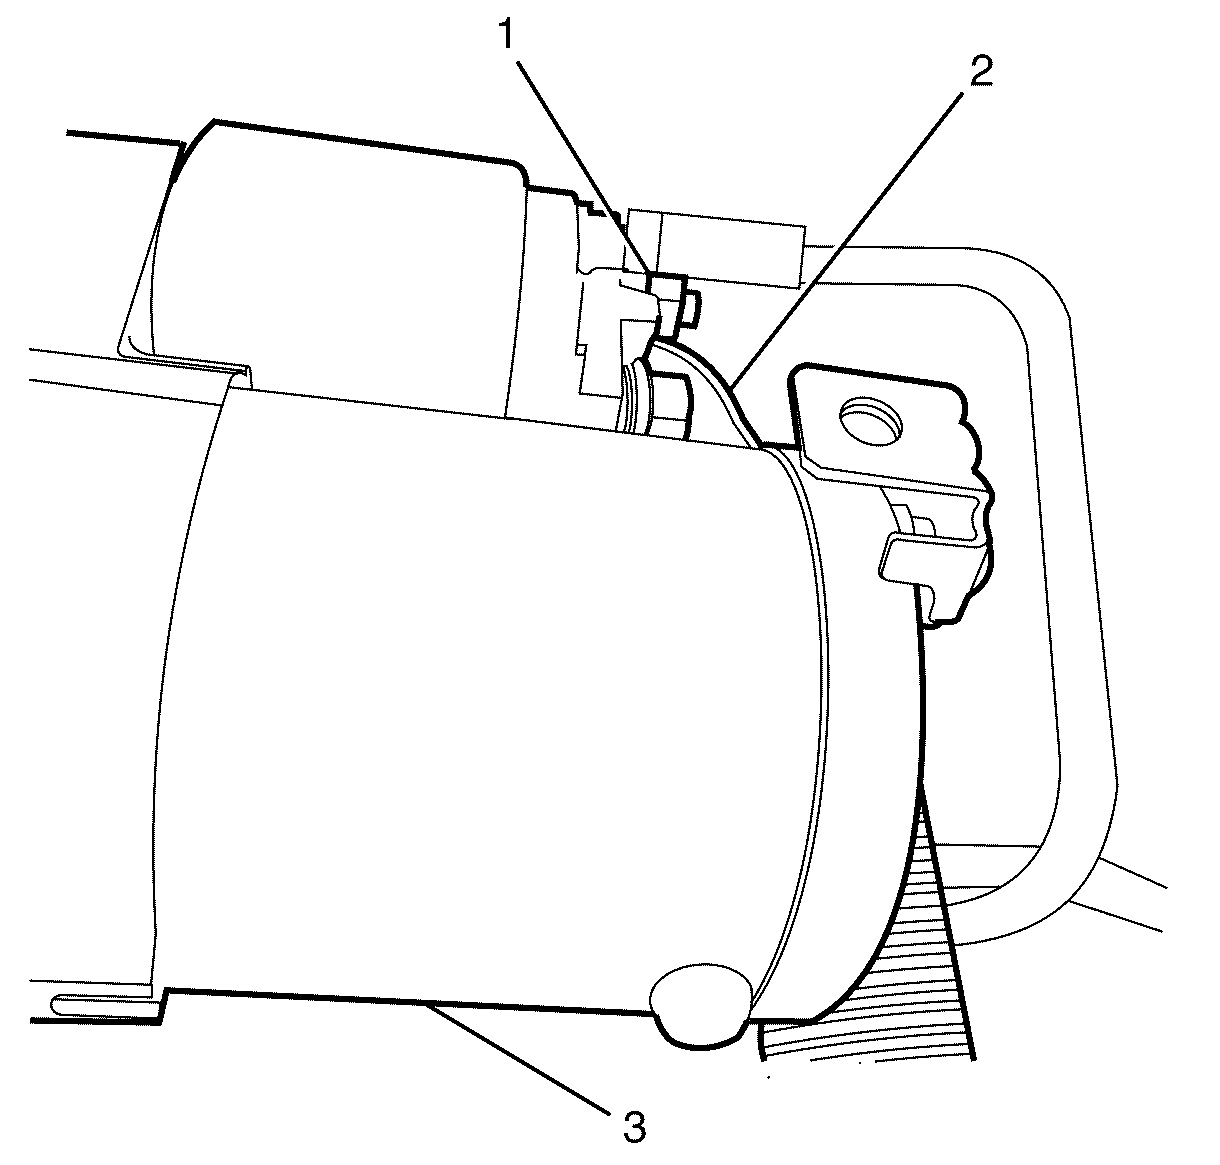
- Remove the remote positive battery post to battery positive cable retaining bolt (1).
- Disconnect the starter battery positive cable (2) from the remote positive battery post.
- Raise and support the vehicle. Refer to Lifting and Jacking the Vehicle.
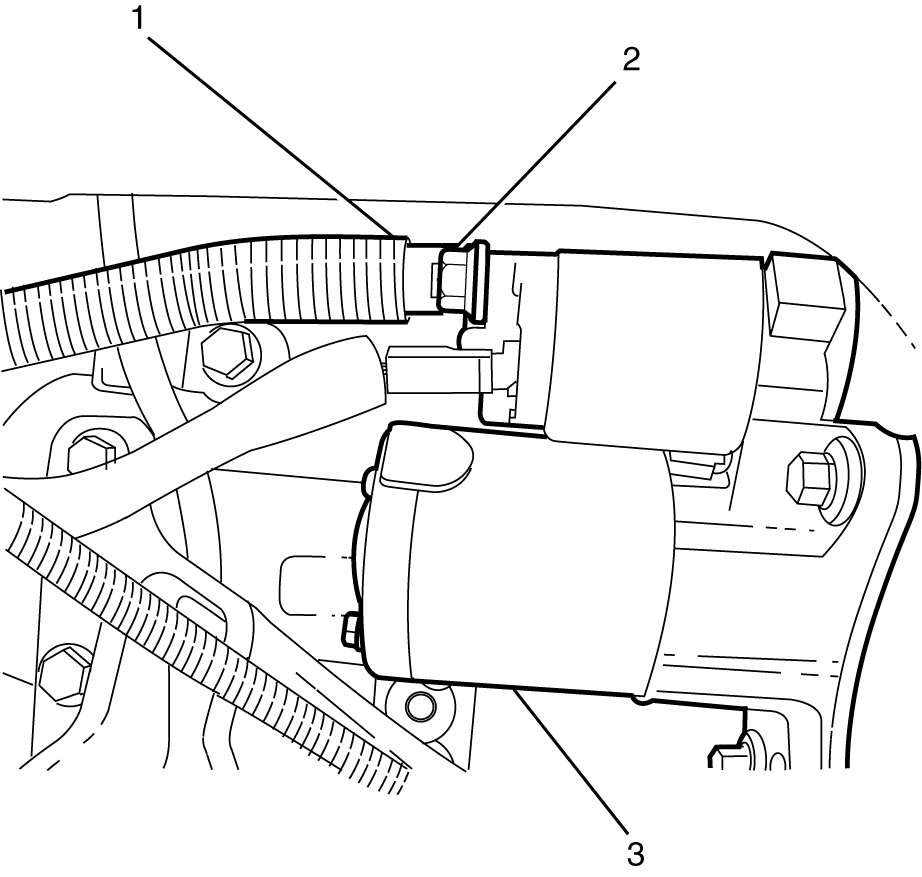
- Remove the starter battery positive cable to starter motor retaining nut (2).
- Disconnect the starter battery positive cable (1) from the starter motor (3).
- Lower the vehicle.
- Detach the starter battery positive cable (1) from the starter battery positive cable retaining clip (2).
- Remove the starter battery positive cable (1) from the engine compartment.
Caution: Refer to Battery Disconnect Caution in the Preface section.
Important: Remove the remote battery positive cable upper protective cover (3) by pressing the retaining clip (1) and lifting the remote battery positive cable upper protective cover (3) upwards.
Caution: Refer to Safety Glasses Caution in the Preface section.
Caution: Refer to Vehicle Lifting Caution in the Preface section.
Installation Procedure - Starter (3.6L Engine)
- Install the starter battery positive cable (1) to the engine compartment.
- Attach the starter battery positive cable (1) to the starter battery positive cable retaining clip (2).
- Raise the vehicle.
- Connect the starter battery positive cable (1) to the starter motor (3).
- Install the starter battery positive cable to starter motor retaining nut (2).
- Lower the vehicle.
- Connect the starter battery positive cable (2) to the remote battery positive post.
- Install the remote battery positive post to battery positive cable retaining bolt (2).
- Install the remote battery positive cable upper protective cover (3) to the remote battery positive cable lower protective cover (4).
- Attach the remote battery positive post cover (2) to the remote battery positive cable upper protective cover (3).
- Install the front air deflector. Refer to Front Air Deflector Replacement.
- Connect the battery negative cable. Refer to Battery Negative Cable Disconnection and Connection.
Notice: Refer to Fastener Notice in the Preface section.
Tighten
Tighten the nut to 20 N·m (15 lb ft).
Tighten
Tighten the bolt to 15 N·m (11 lb ft).
Important: Listen for an audible click from the retaining clip (1) to confirm correct fitting of the remote battery positive cable upper protective cover (3) to the remote battery positive cable lower protective cover (4).
Removal Procedure - Starter (6.0L Engine)
- Disconnect the battery negative cable. Refer to Battery Negative Cable Disconnection and Connection.
- Remove the front air deflector. Refer to Front Air Deflector Replacement.
- Detach the remote battery positive post cover (2) from the remote battery positive cable upper protective cover (3).
- Remove the remote battery positive cable upper protective cover (3) from the remote battery positive cable lower protective cover (4).
- Remove the remote battery positive post to battery positive cable retaining bolt (1).
- Disconnect the starter battery positive cable (2) to the remote battery positive post.
- Raise and support the vehicle. Refer to Lifting and Jacking the Vehicle.
- Remove the right catalytic converter. Refer to Catalytic Converter Replacement - Right Side.
- Remove the starter motor heat shield to starter motor retaining bolts (1).
- Remove the starter motor heat shield (2) from the starter motor.
- Remove the starter battery positive cable to starter motor retaining nut (1).
- Disconnect the starter battery positive cable (2) from the starter motor (3).
- Lower the vehicle.
- Detach the starter battery positive cable from the chassis retaining clips (2).
- Remove the starter battery positive cable (1) from the engine compartment.
Caution: Refer to Battery Disconnect Caution in the Preface section.
Important: Remove the remote battery positive cable upper protective cover (3) by pressing the retaining clip (1) and lifting the remote battery positive cable upper protective cover (3) upwards.
Caution: Refer to Safety Glasses Caution in the Preface section.
Caution: Refer to Vehicle Lifting Caution in the Preface section.
Installation Procedure - Starter (6.0L Engine)
- Install the starter battery positive cable (1) to the engine compartment.
- Attach the starter battery positive cable to the chassis retaining clips (2).
- Raise the vehicle.
- Connect the starter battery positive cable (2) to the starter motor (3).
- Install the starter battery positive cable to starter motor retaining nut (1).
- Install the starter motor heat shield to the starter motor (2).
- Install the starter motor heat shield to starter motor retaining bolts (1).
- Lower the vehicle.
- Connect the starter battery positive cable (2) to the remote battery positive post.
- Install the remote battery positive post to battery positive cable retaining bolt (2).
- Install the remote battery positive cable upper protective cover (3) to the remote battery positive cable lower protective cover (4).
- Attach the remote battery positive post cover (2) to the remote battery positive cable upper protective cover (3).
- Install the front air deflector. Refer to Front Air Deflector Replacement.
- Connect the battery negative cable. Refer to Battery Negative Cable Disconnection and Connection.
Notice: Refer to Fastener Notice in the Preface section.
Tighten
Tighten the nut to 10 N·m (89 lb in).
Tighten
Tighten the bolts to (5) N·m (44 lb in).
Tighten
Tighten the bolt to 15 N·m (11 lb ft).
Important: Listen for an audible click from the retaining clip (1) to confirm correct fitting of the remote battery positive cable upper protective cover (3) to the remote battery positive cable lower protective cover (4).
