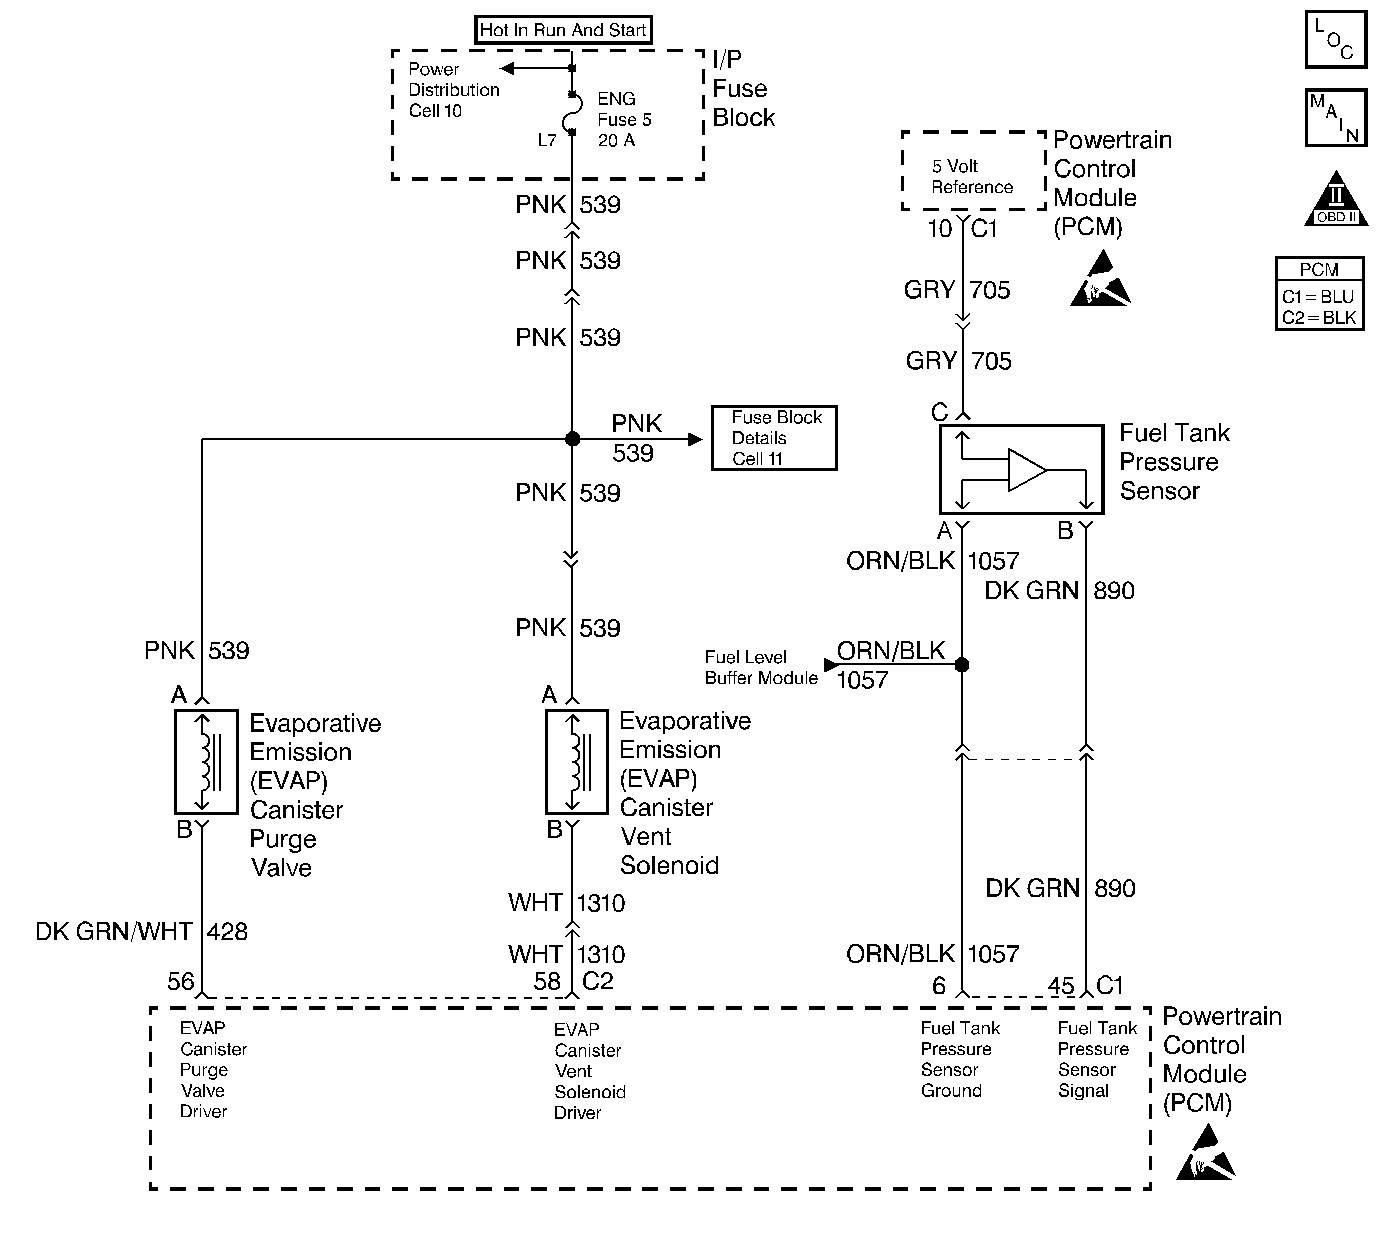
Evaporative Emission Control System Diagnosis Visual Check Of EVAP Canister
If cracked or damaged, replace canister. Refer to EVAP Canister Replacement .
Evaporative Emission Control System Diagnosis EVAP System Check

Circuit Description
Applying a vacuum to the EVAP system and monitoring for a vacuum decay checks the evaporative emission system. The Control Module monitors the vacuum level through the fuel tank vacuum sensor signal. At an appropriate time, the EVAP canister purge valve and the EVAP vent solenoid turn ON, allowing the engine to draw a small vacuum on the entire evaporative emission system. After the desired vacuum level has been achieved, the EVAP canister purge valve turns OFF, sealing the system. A leak is detected by monitoring for a decrease in the vacuum level over a given time period, when all other variables remain constant. A leak, a blockage, or a malfunctioning component in the system causes a DTC to set.
Diagnostic Aids
Check for the following conditions:
| • | Poor connection at the Control Module. Inspect the harness connectors for the following conditions: |
| - | Backed out terminals |
| - | Improper mating |
| - | Broken locks |
| - | Improperly formed or damaged terminals |
| - | Poor terminal to wire connections. |
| • | A damaged harness. Inspect the wiring harness for damage. If the harness appears to be OK, observe the Fuel Tank Vacuum display on the scan tool while moving connectors and wiring harnesses related to the sensor. A change in the display will indicate the location of the fault. |
| • | An incorrect purge or vacuum source line routing. Verify that the source vacuum and purge lines to the EVAP canister purge valve are not switched. |
Refer to Carbon Particle Removal from EVAP System before starting repairs.
Step | Action | Value(s) | Yes | No |
|---|---|---|---|---|
1 | Was the Powertrain On-Board Diagnostic (OBD) System Check performed? | -- | Go to | |
2 | Are any DTCs set? | -- | Go to DTC Diagnostic Tables first | |
3 |
Is Fuel Tank Pressure at the specified value? | 0 in H2O (1 in H2O) | Go to | |
4 |
Important:: Before continuing with diagnosis, zero the EVAP Pressure and Vacuum gages on EVAP pressure/purge cart J 41413 (refer to tool operating instructions).
Is Fuel Tank Pressure at the second specified value? | 5 in H2O 5 in H2O (± 2 in H2O) | Go to | |
5 | Observe EVAP System Pressure on the EVAP pressure/purge cart J 41413 while commanding the vent solenoid OFF (Open). Does EVAP System Pressure decrease to the specified value within 5 seconds? | 0 in. H2O | Go to DTC P0446 Evaporative Emission (EVAP) Vent System Performance | |
6 |
Is Fuel Tank Pressure decreasing? | 1500 RPM | Go to DTC P1441 Evaporative Emission (EVAP) System Flow During Non-Purge | |
7 |
Is Fuel Tank Pressure decreasing? | 1500 RPM | System OK. If a driveability symptom exists, refer to Symptoms | Go to |
Evaporative Emission Control System Diagnosis Fuel Tank Pressure Sensor

Circuit Description
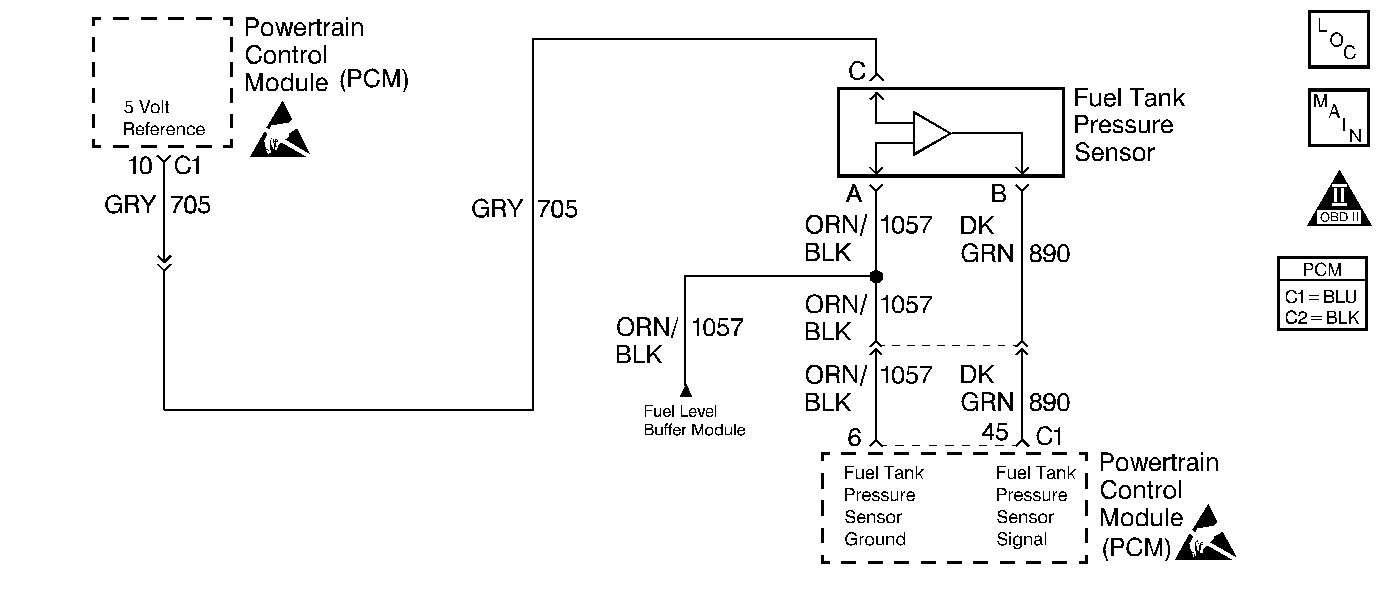
The fuel tank vapor pressure sensor is used in order to detect a vacuum decay or an excessive vacuum during the EVAP diagnostic routine. The sensor responds to the changes in the fuel tank pressure or vacuum. The signal voltage to the Control Module varies from a minimum of about 0.2 volts with pressure in the fuel tank to above 4 volts with a high vacuum in the fuel tank.
The Fuel Tank Vacuum display on the scan tool has an auto zero feature which occurs at each ignition cycle and is corrected according to the barometric pressure. Because of this, the Fuel Tank Vacuum may not accurately reflect the actual output of the sensor or the conditions within the fuel tank.
The Fuel Tank Vapor Pressure Sensor Diagnosis Table is intended to isolate and diagnose the electrical problems in the sensor wiring or the sensor.
Diagnostic Aids
Check for the following conditions:
| • | Inspect the Control Module harness connectors for the following conditions: |
| - | Improper mating |
| - | Broken locks |
| - | Improperly formed |
| - | Damaged terminals |
| • | Inspect the wiring harness for damage. If the harness appears to be OK, observe the Fuel Tank Vacuum display on the scan tool while moving the connectors and the wiring harnesses related to the sensor. A change in the display will indicate the location of the fault. |
Refer to Carbon Particle Removal from EVAP System before starting repairs.
Test Description
-
The Powertrain OBD System Check prompts the technician to use the Capture Info selection on the scan tool. This creates an electronic copy of the freeze frame data taken when the malfunction occurred. The information is then stored in the scan tool for later reference.
-
Refer to the Fuel Tank Replacement portion of the service manual for the fuel tank removal procedure.
-
A normal fuel tank pressure sensor voltage output with no pressure or vacuum on the fuel system should be between 1.3 V and 1.7 V.
-
The replacement PCMs must be reprogrammed and the crankshaft position system variation procedure must be preformed. Refer to the latest Isuzu Technical Communication System (ITCS) information for programming procedures and also refer to the Powertrain Control Module (PCM) for the Crankshaft variation learn procedure .
Step | Action | Value(s) | Yes | No |
|---|---|---|---|---|
Was the Powertrain On-Board Diagnostic (OBD) System Check performed? | -- | |||
Is the voltage near the specified value? | 5.0V | |||
3 | Connect the DVM to ground and probe the 5.0 volt reference circuit for the specified voltage. Is the voltage near the specified value? | 5.0V | ||
4 | Check the 5.0 volt reference circuit for a poor electrical terminal connection at the PCM. Was a problem found? | -- | ||
5 | Check for an open or a grounded 5.0 volt reference circuit to the fuel tank pressure sensor harness electrical connector. Was a problem found? | -- | ||
Is the voltage between the specified values? | 1.3-1.7V | |||
7 | Check the fuel tank pressure sensor signal circuit for a poor electrical terminal connection at the PCM and repair as necessary. Was a repair necessary? | -- | ||
8 | Check the fuel tank pressure signal circuit between the fuel tank pressure sensor electrical connector and the PCM for an open, short to ground, or short to voltage and repair as necessary. Was a repair necessary? | -- | ||
9 | Check the fuel tank pressure sensor ground circuit for a poor electrical terminal connection at the PCM and repair as necessary. Was a repair necessary? | -- | ||
10 | Check for an open in the fuel tank pressure sensor ground circuit. Was a problem found? | -- | ||
11 | Check for a poor electrical terminal connection at the fuel tank pressure sensor electrical connector and repair as necessary. Was a repair necessary? | -- | ||
12 | Replace the malfunctioning harness connector electrical terminals as necessary. Is the action complete? | -- | -- | |
13 | Locate and repair an open or short to ground in the wiring harness as necessary. Is the action complete? | -- | -- | |
14 | Replace the fuel tank pressure sensor. Is the action complete? | -- | -- | |
Replace the PCM. Is the action complete? | -- | -- |
