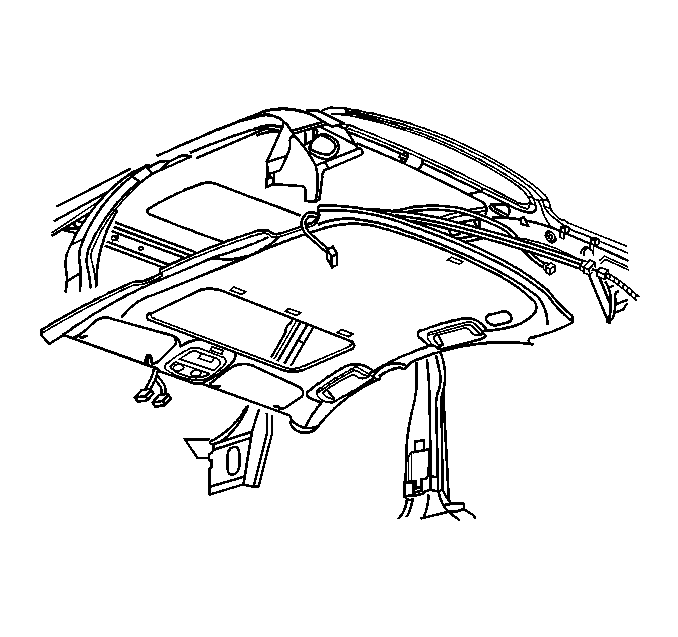
Headlining Trim Panel Replacement with Sunroof
Removal Procedure
- Remove the front passenger bucket seat. Refer to Bucket Seat Replacement in Seats.
- Remove the windshield pillar trim panels. Refer to Windshield Pillar Garnish Molding Replacement .
- Remove the center pillar trim panels. Refer to Center Pillar Garnish Molding Replacement .
- Remove the rear quarter upper trim panels. Refer to Quarter Upper Trim Panel Replacement .
- Remove the sunshades. Refer to Sunshade Replacement .
- Remove the overhead console. Refer to Roof Console Replacement .
- Pull the door opening moldings down to clear headliner. Refer to Rear Door Opening Weatherstrip Replacement in Doors.
- Remove the assist handles. Refer to Assist Handle Replacement .
- Remove the high mounted stop lamp. Refer to High Mount Stop Lamp Replacement in Lighting Systems.
- Disconnect the headliner wiring harness connectors.
- Pull the headliner down in order to release the headliner.
- With the add of an assistant, remove the headliner through the rear passenger door opening.

Notice: Use care when removing and installing the headliner. If reusing the headliner lay the headliner down flat on a clean surface. Excessive bending will damage the headliner.
Installation Procedure
- With the add of an assistant, load the headliner into the vehicle through the rear passenger door opening.
- Raise the headliner into position.
- Install the assist handles. Refer to Assist Handle Replacement .
- Install the high mounted stop lamp. Refer to High Mount Stop Lamp Replacement in Lighting Systems.
- Install the sunshades. Refer to Sunshade Replacement .
- Install the windshield pillar garnish moldings. Refer to Windshield Pillar Garnish Molding Replacement .
- Install the center pillar garnish moldings. Refer to Center Pillar Garnish Molding Replacement .
- Connect the headliner wiring harness connectors.
- Install the rear quarter upper trim panels. Refer to Quarter Upper Trim Panel Replacement .
- Install the door opening weatherstrips in the door openings. Refer to Rear Door Opening Weatherstrip Replacement in Doors.
- Install the overhead console. Refer to Roof Console Replacement .
- Install the front passenger bucket seat. Refer to Bucket Seat Replacement in Seats.

Notice: Use care when removing and installing the headliner. If reusing the headliner lay the headliner down flat on a clean surface. Excessive bending will damage the headliner.
Important: Ensure that the inside lip of the door opening weather-strip is properly seated to close out the headliner, sail panel and pillar garnish moldings.
Headlining Trim Panel Replacement without Sunroof
Removal Procedure
- Remove the front passenger bucket seat. Refer to Bucket Seat Replacement in Seats.
- Remove the windshield pillar garnish moldings. Refer to Windshield Pillar Garnish Molding Replacement .
- Remove the center pillar garnish moldings. Refer to Center Pillar Garnish Molding Replacement .
- Remove the rear quarter upper garnish moldings. Refer to Quarter Upper Trim Panel Replacement .
- Remove the sunshades. Refer to Sunshade Replacement .
- Remove the overhead console. Refer to Roof Console Replacement .
- Pull the door opening moldings down in order to clear headliner. Refer to Rear Door Opening Weatherstrip Replacement in Doors.
- Remove the assist handles. Refer to Assist Handle Replacement .
- Remove the High Mounted Stop Lamp. Refer to High Mount Stop Lamp Replacement in Lighting Systems.
- Disconnect the headliner wiring harness connectors.
- Carefully pull the headliner down in order to gain access to the cardboard roof insulator.
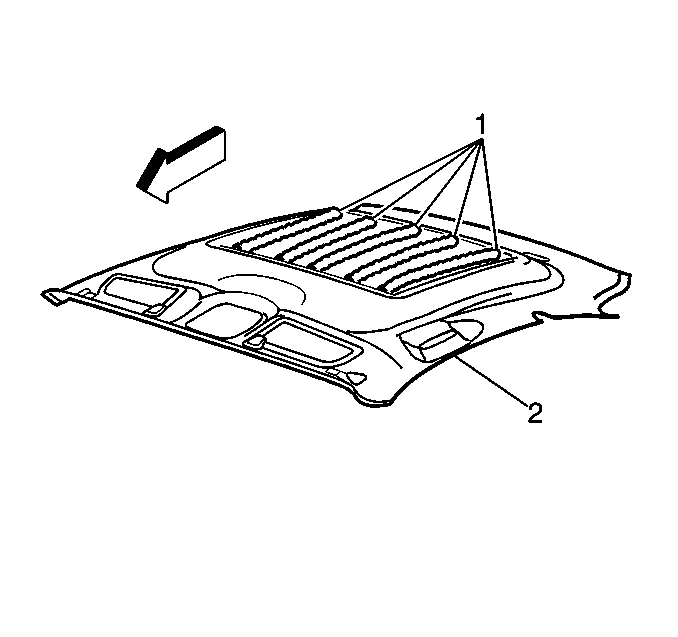
- Starting in 1 corner of the cardboard insulator, pulling downward, cut the adhesive beads (1) using a sharp putty knife or equivalent.
- Separate the cardboard roof insulator from the roof.
- Cut off all of the excessive adhesive beads.
- With the add of an assistant, remove the headliner through the rear passenger door opening.
- Carefully separate the cardboard roof insulator from the headliner.


Notice: Use care when removing the cardboard roof insulator. Excessive pressure can cause dents in the roof panel.
Important: It is not necessary to remove all of the old adhesive from the roof panel.
Notice: Use care when removing and installing the headliner. If reusing the headliner lay the headliner down flat on a clean surface. Excessive bending will damage the headliner.
Installation Procedure
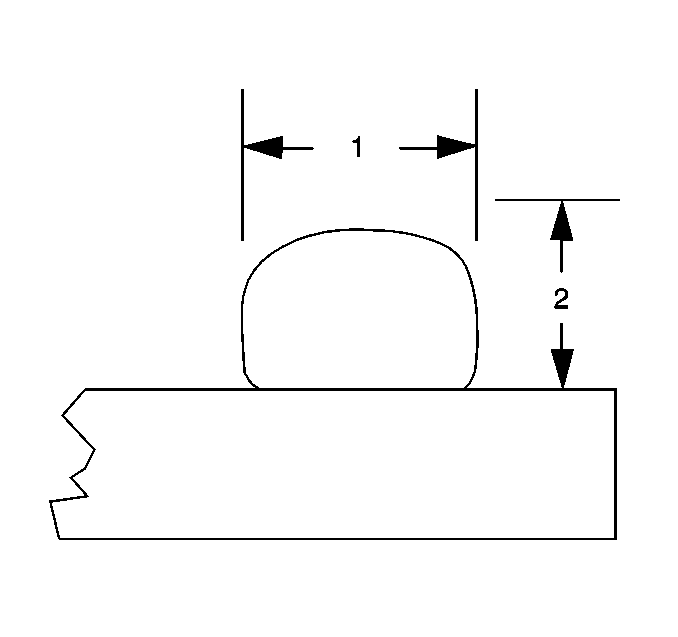
- Apply 6-9 mm (1/4-3/8 in) (2) beads of adhesive 15 mm (5/8 in) wide (1).
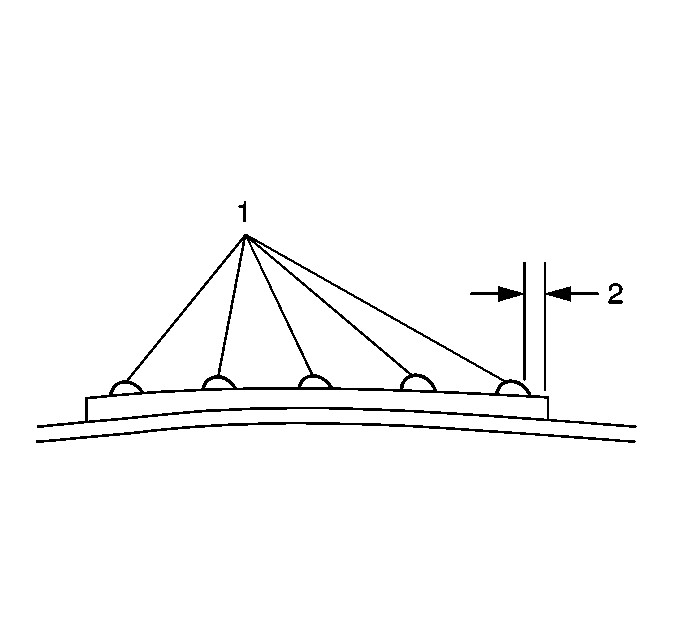
- Apply the adhesive in the locations marked on the cardboard insulator (1).
- Install the cardboard roof insulator to the roof panel.
- With the add of an assistant, load the headliner into the vehicle through the rear passenger door opening.
- Raise the headliner into position.
- Install the assist handles. Refer to Assist Handle Replacement .
- Install the high mounted stoplamp. Refer to High Mount Stop Lamp Replacement in Lighting Systems.
- Install the sunshades. Refer to Sunshade Replacement .
- Install the windshield pillar garnish moldings. Refer to Windshield Pillar Garnish Molding Replacement .
- Install the center pillar garnish moldings. Refer to Center Pillar Garnish Molding Replacement .
- Connect the headliner wiring harness connectors.
- Install the rear quarter upper garnish moldings. Refer to Quarter Upper Trim Panel Replacement .
- Install the door opening weather-strip in the door openings. Refer to Rear Door Opening Weatherstrip Replacement in Doors.
- Install the overhead console. Refer to Roof Console Replacement .
- Install the front passenger bucket seat. Refer to Bucket Seat Replacement in Seats.
Important: Installation of a new cardboard roof insulator is necessary to ensure the acoustical integrity of the roof system. Use GM P/N 12378192 Headliner adhesive available through General Motors Service Parts Operations.


Important: Cardboard roof insulator must be installed within 5 minutes of adhesive application.
Notice: Use care when removing and installing the headliner. If reusing the headliner lay the headliner down flat on a clean surface. Excessive bending will damage the headliner.
Important: Gluing the headliner to the cardboard roof insulator during installation is not required.
Important: Ensure that the inside lip of the door opening weather-strip is properly seated to close out the headliner, sail panel and pillar garnish moldings.
